
What you’ll learn
Every field and tab on the item screen in the Admin Portal — what each setting controls, and which fields only appear for durable or serialized items.
Note: This page lists what each field is. For guidance on what to put in each field, see Best practices for configuring item fields. To create your first item, see How to create an item manually.
Where to find items
Go to Data management > Items. The list shows every item in the system. Select a row and click View detail to open the item.
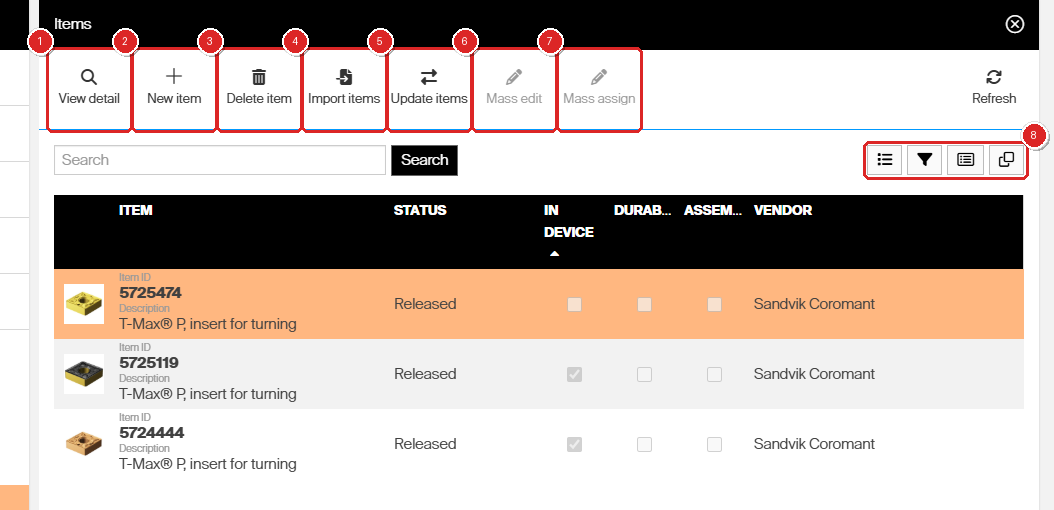
The Items list. Buttons 1–7 act on items; button 8 marks the four controls that change how the list itself behaves.
| Button | What it does | |
|---|---|---|
| 1 | View detail | Opens the selected item. |
| 2 | New item | Creates an item from scratch. |
| 3 | Delete item | Deletes the selected item. Blocked while the item is assigned to any stock location. |
| 4 | Import items | Opens the import window to pull item data from a catalog or an external system. See How to import items from a catalog. |
| 5 | Update items | Refreshes the selected items from an external catalog. See How to update items from an external catalog. |
| 6 | Mass edit | Changes the same field on several items at once. |
| 7 | Mass assign | Assigns several items to a device in one operation. |
| 8 | Selection mode, Advanced filter, Columns, Saved views | Switch between single and multi-select, filter the list on several criteria, choose which columns to show, and save a list layout for later. Column choices are stored per user. |
Tip: Mass edit and Mass assign stay greyed out until you switch Selection mode to multi-select and tick more than one row.
The item screen at a glance
An open item has twelve tabs. Only General information and Supplier are available on a brand-new item — the rest unlock once you save.
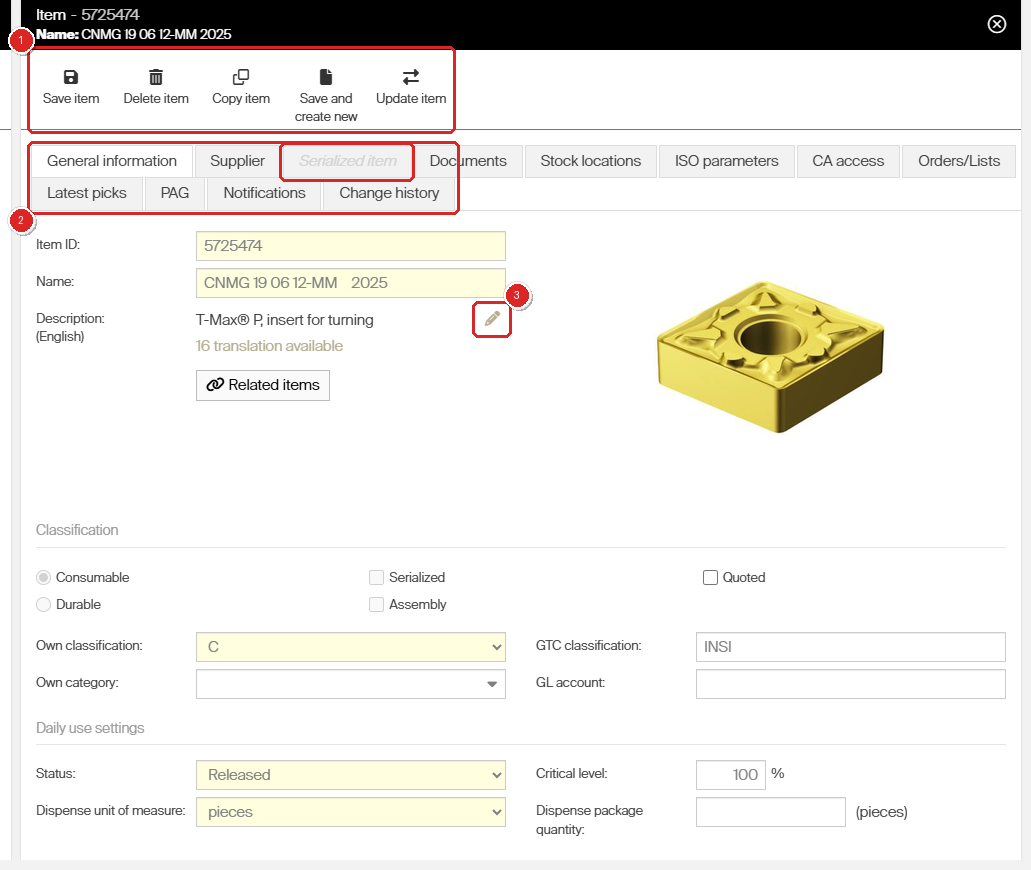
An open item. 1 — the item toolbar. 2 — the twelve tabs; Serialized item is greyed out because this item is not serialized. 3 — the pencil icon that opens the description translations.
| Tab | What it holds | Read more |
|---|---|---|
| General information | Identification, classification, daily-use settings, special handling and loan time. | Documented below |
| Supplier | Vendor, order code, prices, barcode, purchase unit, lead time and manufacturer. | Item supplier settings reference |
| Serialized item | Every physical piece with its serial number, location and condition. Greyed out unless Serialized is ticked. | Understanding the serialized item overview |
| Documents | Drawings, images, 3D models and links attached to the item. | Documented below |
| Stock locations | Device and location assignments with their order quantities. | Understanding stock structure |
| ISO parameters | Technical attributes that came from a tool catalog, as name, value and type. | Documented below |
| CA access | Which cost allocation units may pick this item. | Understanding cost allocation |
| Orders/Lists | Open purchase orders, service orders, service lists and transfer lists containing the item. | Documented below |
| Latest picks | Recent picks of this item across all devices. | How to pick an item |
| PAG | Whether the item sits on any product access group include, exclude or restriction list. | How to restrict item access with Product Access Groups |
| Notifications | Per-event e-mail and on-screen alerts for this item. | How to configure item notifications |
| Change history | Timestamped log of every change to the item. | Documented below |
Item toolbar
| Button | What it does |
|---|---|
| Save item | Saves your changes. |
| Delete item | Deletes the item. Blocked while the item is assigned to any stock location. |
| Copy item | Creates a new item pre-filled from the open one. |
| Save and create new | Saves the open item and opens an empty form. Use this when entering several items in a row. |
| Update item | Refreshes the item from its external catalog. |
General information tab
Identification
| Field | Required | What it controls |
|---|---|---|
| Item ID | Yes | The unique identifier for the item. It is the business key in every API integration, so decide your convention before loading items in bulk. |
| Name | Yes | The name used to identify the item. |
| Description | No | Shown next to the item ID or name, depending on your system settings. Click the pencil icon to add translations. Users see the description in their own language; if there is no translation, they see the default. See How to manage language translations. |
| Related items | No | Opens the relations for this item — alternatives, spare parts, matching items and assembly components. See Item relations. |
Classification
| Field | Required | What it controls |
|---|---|---|
| Consumable / Durable | Yes | Whether the item can come back into the system after use. Consumable items are used up; durable items are returned. Several settings are unavailable for consumables. |
| Serialized | No | Each physical piece carries a unique serial number, which operators enter for every operation on the Shop Floor Interface. New serial numbers can be added during restock and assign. Durable items only. |
| Quoted | No | The item needs a quote before purchase. Scheduled scripts will not add it to purchase orders automatically, but you still can by hand. When restocking a quoted item from a purchase order, you may receive more pieces than were ordered; that raises the ordered total and creates extra purchase transactions. |
| Assembly | No | The item is built from other consumable or durable items in fixed quantities. Durable items only. An assembly behaves like a durable item except that it cannot be added to a purchase order — when the component quantities are available on a device, a new assembly piece can be built from them. |
| Own classification | Yes | The item’s A, B or C class, used to prioritise ordering. See Understanding ABC classification. |
| Own category | No | Available once a category tree is defined in system settings. Lists in the Admin Portal and on the Shop Floor Interface can be filtered by category. |
| GTC classification | No | The item’s GTC class. Filled automatically for items imported from a GTC package. |
| GL account | No | General ledger account. Stored on every transaction for the item and available in reports. |
Important: Serialized and Assembly are disabled while Consumable is selected. And once the item status reaches Released, you can no longer switch between consumable and durable.
Daily use settings
| Field | Required | What it controls |
|---|---|---|
| Status | Yes | Where the item sits in its life cycle, which decides whether it can be assigned, picked, purchased or only returned. See the status table below. |
| Dispense unit of measure | Yes | The unit used for every operation on the Shop Floor Interface and on every transaction. Purchasing can use a different unit, set on the Supplier tab. See How to configure units of measure. |
| Critical level | No | The percentage of the order point at which the quantity in a device counts as critical. Default is 100%. Example: with an order point of 20 and a critical level of 10%, the item is critical below 2 pieces. The resulting quantity is shown in the item overview. |
| Dispense package quantity | No | The package size for dispensing. Used when a device is set to allow package picks only; coil devices always force package picks. Scheduled scripts add the item to a transfer list only in multiples of this quantity. If the item is already assigned in a package-only machine (such as an ASK200), you cannot change the quantity while any physical quantity sits in that location — empty the location first, or remove the assignment. |
| Usage cost structure | Yes (durable) | How the cost of a pick is calculated. Durable items only — for consumables, usage cost is always 100% of standard cost. See the options table below. |
Item statuses
| Status | What the item can do |
|---|---|
| Defined | Can be assigned from the Admin Portal, but not restocked, picked or purchased. |
| Defined (imported) | Same as Defined. Set by the system for items created by import from a catalog, ERP, GTC package or Tool Library. |
| Phase in | Can be assigned to locations and purchased, but is not offered for picking. |
| Released | Can be picked and purchased. |
| Phase out | Can be picked, but cannot be added to a purchase order. Can still be added to a transfer list to request quantity from central stock. |
| Obsolete | Can only be returned. Cannot be added to a purchase order or a transfer list. |
For the full life cycle and how to move between statuses, see Understanding item statuses.
Usage cost structure options
| Option | How the cost is calculated | Extra field it adds |
|---|---|---|
| Percentage of standard cost | A share of the item’s standard cost per dispense unit. | Value (%) |
| Fixed per pick | A fixed amount per dispense unit, whatever the item cost. | Cost (currency) |
| Per time in cost allocation | The time the item spent in production, measured between the pick and the return. | Time specification (hours, days, weeks or months) and Cost (currency) |
| Per item state | Depends on the condition of the picked piece: new costs the purchase price per dispense unit, refurbished costs the service price, used costs nothing. | None — the prices come from the Supplier tab |
See Understanding item costs for how standard cost and usage cost work together.
Special handling
| Setting | What happens when you tick it |
|---|---|
| Special handling for restock and return | The operator picks the target location by hand during restock and return instead of letting the system choose. The operator may also exceed the physical maximum quantity of a location if the goods fit. Items with special handling can only be restocked and returned to open storage devices. |
| Prompt user to return picked item during picking | Before dispensing, picking checks whether the item is already out in production — picked by anyone. If it is, the operator is offered the choice to return, scrap or recycle that piece first. Durable items only. |
| Track lot numbers | Every transaction stores the lot or batch number, and operators must enter one whenever units are added to stock by restock or assign. See Lot and batch tracking. |
Loan time
This section only appears for serialized items.
| Field | What it controls |
|---|---|
| Specify loan time | Turns on a maximum loan period for the item and reveals the two fields below. |
| Max allowed time | How long a user may keep the item picked, in hours, days, weeks or months. After the pick, the operator sees the date and time by which the item must be back. Overrun triggers a warning at the next Shop Floor Interface login, and can also send a notification. |
| Automatic scrap period | How long after the allowed time runs out before the piece counts as lost. When the period is reached the piece is marked as scrapped, it can no longer be returned, and a replacement purchase can be triggered. |
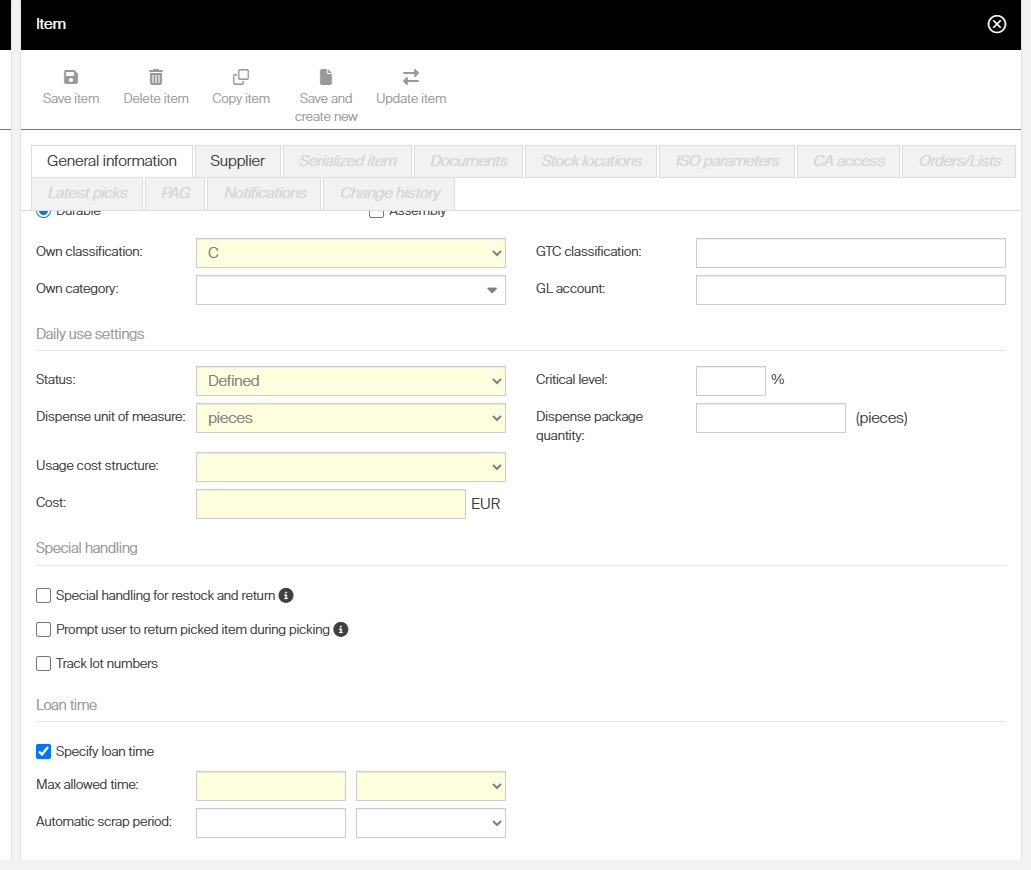
A durable, serialized item shows the most fields: Usage cost structure and Cost under Daily use settings, all three Special handling checkboxes, and the Loan time section. Yellow shading marks mandatory fields.
Which fields appear for which item type
The item type decides how much of the General information tab you actually see.
| Field | Consumable | Durable | Durable + serialized |
|---|---|---|---|
| Serialized, Assembly | Disabled | Available | Available |
| Quoted, Track lot numbers, Special handling for restock and return | Available | Available | Available |
| Usage cost structure, Cost | Hidden | Shown | Shown |
| Prompt user to return picked item during picking | Hidden | Shown | Shown |
| Loan time section | Hidden | Hidden | Shown |
| Serialized item tab | Greyed out | Greyed out | Available |
Documents tab
Attach as many documents to an item as you need. Each row lists the document ID, name, document type, reference type and path.
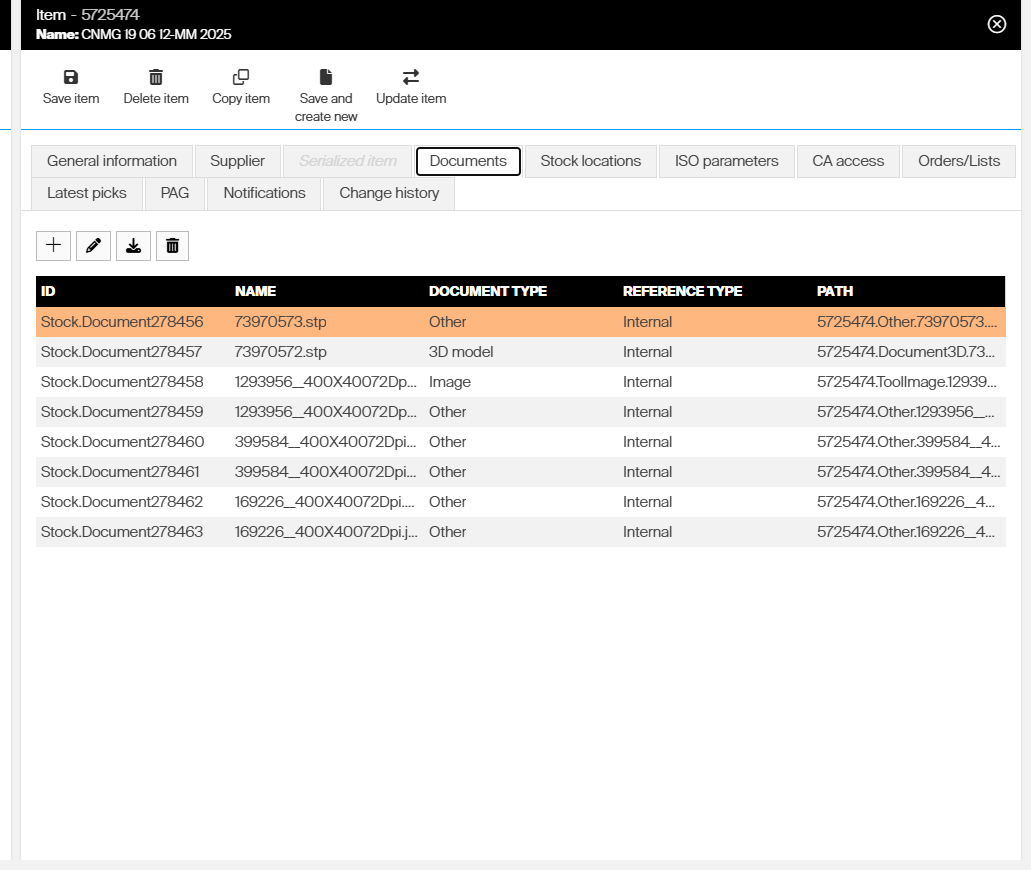
The Documents tab. This item arrived from a catalog with images and a 3D model already attached.
| Column | What it means |
|---|---|
| Reference type | Internal means the file is uploaded into CRIBWISE. External means the record is only a URL pointing at the document elsewhere. |
| Document type | What the file contains: image, drawing, 3D model or other. |
| Path | Where the file sits in the system. |
Use Add document, Update document, Download and Delete document to manage the list.
How documents reach the shop floor
- Uploading an image makes it the item thumbnail, in the Admin Portal and on the Shop Floor Interface.
- Any internal document can be set to show on the Shop Floor Interface. External documents cannot.
- Documents marked for the Shop Floor Interface are listed on the item detail during picking and returning, and can be opened there if the file type is supported — common image formats, PDF and DXF.
- An image or drawing marked for the Shop Floor Interface is shown directly on the item detail during pick and return, next to the item text. What the operator sees first is controlled by the device settings.
- For items downloaded from an external catalog, every image and drawing is marked for the Shop Floor Interface automatically.
Stock locations tab
This tab shows every assignment of the item across all stocks, in two tables.
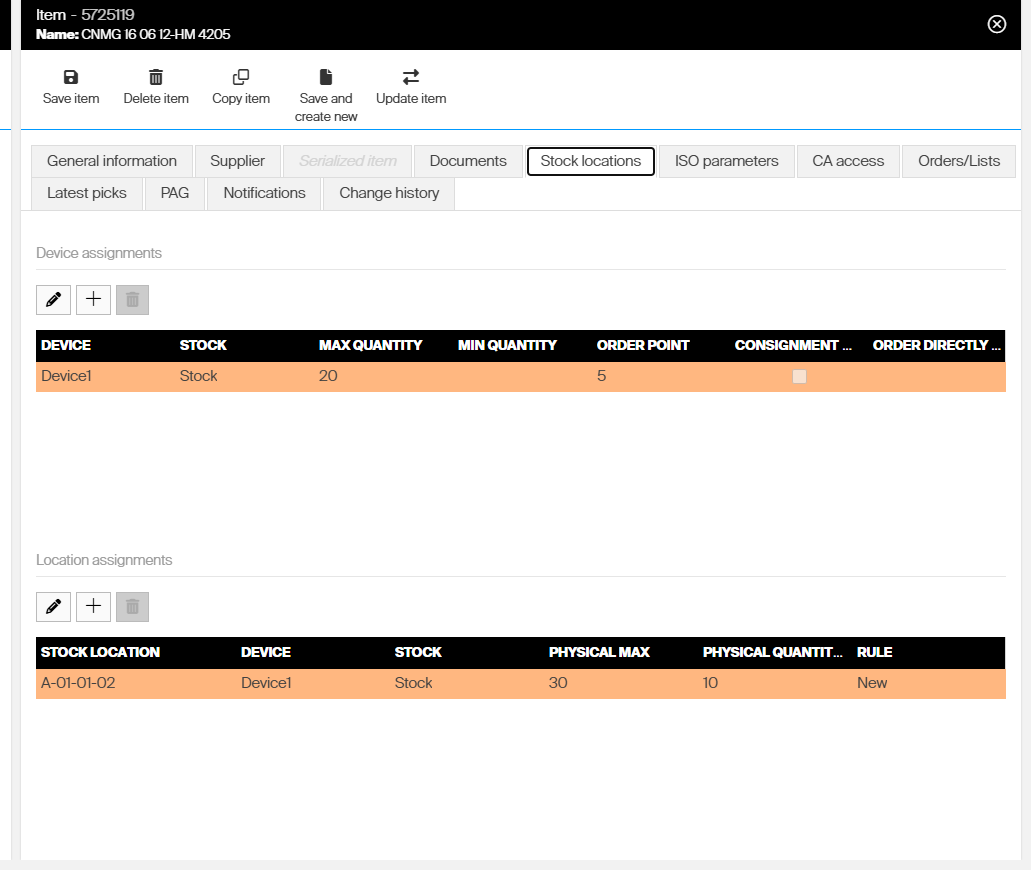
The Stock locations tab. Device assignments carry the ordering quantities; location assignments carry the physical quantities.
Device assignments
| Column | What it means |
|---|---|
| Device, Stock | Where the item is assigned. |
| Max quantity, Min quantity, Order point | The ordering levels that scheduled scripts use to generate purchase orders. |
| Consignment | The stock in this device is vendor-owned until it is picked. See Consignment management. |
| Order directly to satellite | For a device in a satellite stock, purchases are sourced straight to that device instead of being replenished through its central stock. Not available for assemblies, which cannot be purchased. |
Location assignments
| Column | What it means |
|---|---|
| Stock location, Device, Stock | The exact location holding the item. |
| Physical max | How much of the item fits in the location. |
| Physical quantity | How much is in the location right now. |
| Rule | Which item conditions the location accepts — for example New only. See Understanding item stock states. |
Use the pencil icon in either table to open the device or the stock location, and the plus and bin icons to add or remove an assignment.
ISO parameters tab
Technical attributes that arrived with the item from a tool catalog, listed as Name, Value and Type — cutting diameter, grade, coating, corner radius and so on. The tab is read-only and stays empty for items you create by hand.
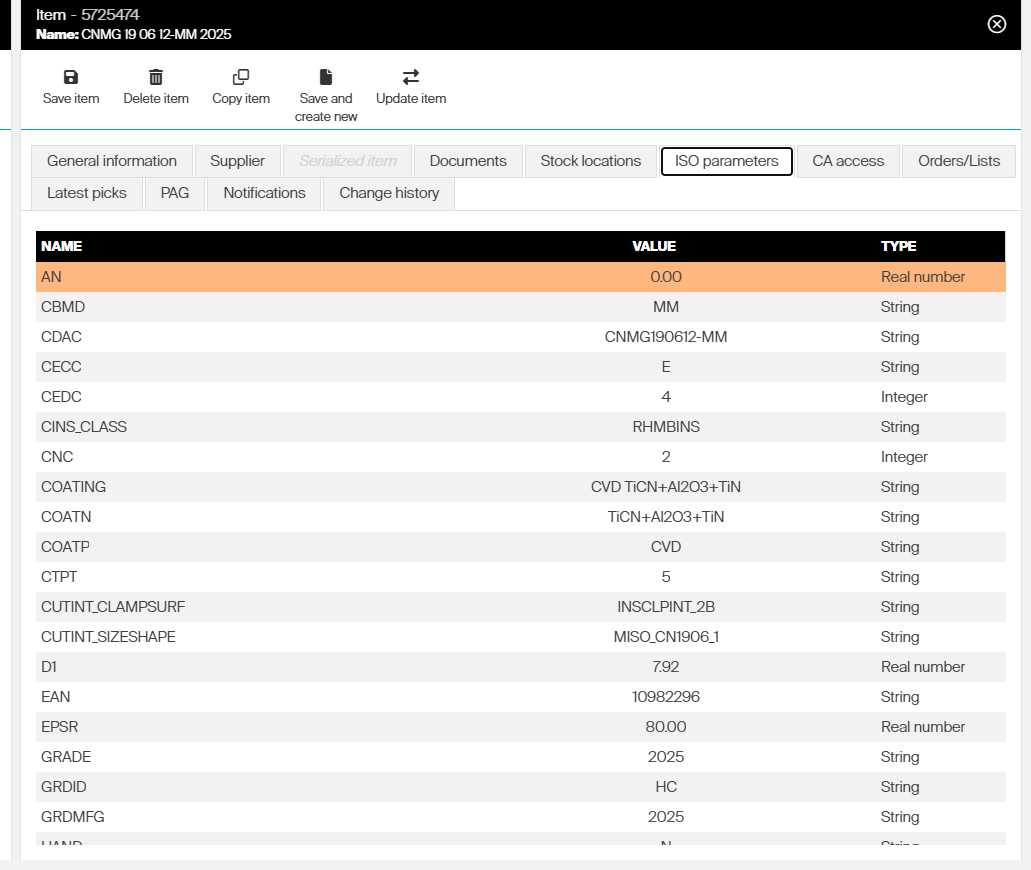
The ISO parameters of a catalog insert. Values keep their data type, so numbers stay numbers.
CA access tab
Cost allocation access controls which parts of your organisation may pick the item. Choose a set in Select CA set to load its hierarchy — the tab is empty until you do.
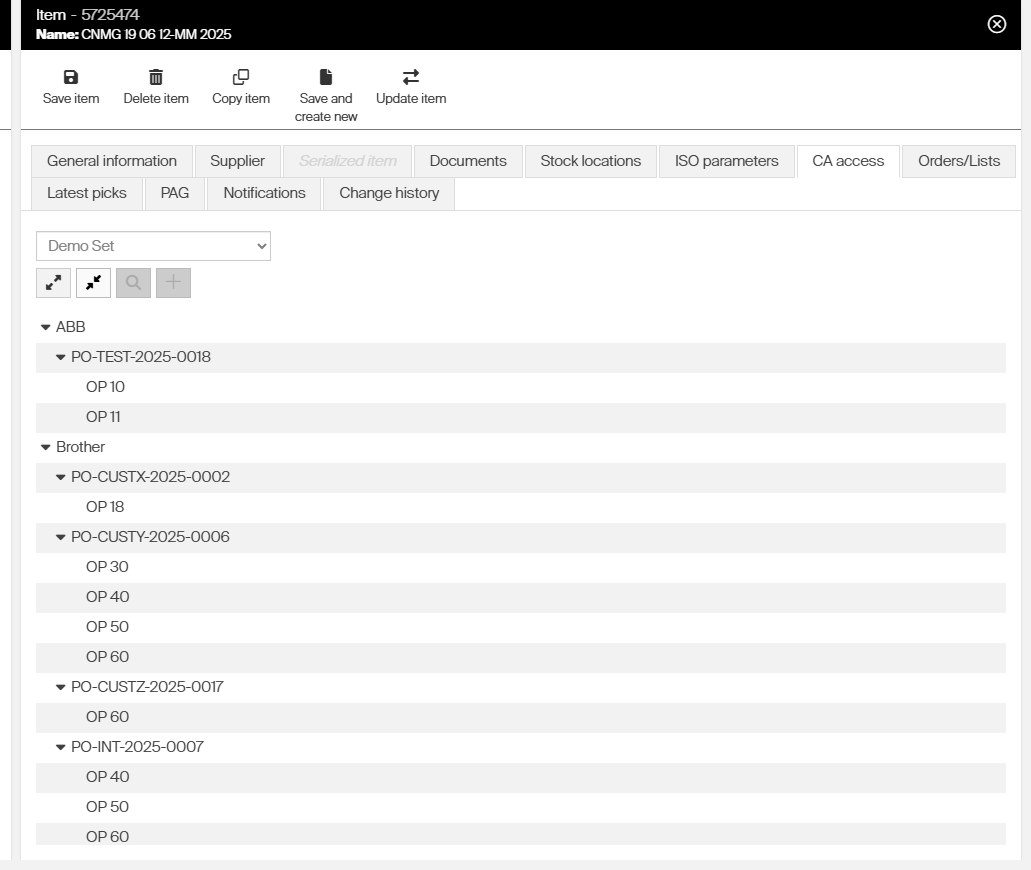
The CA access tab with a cost allocation set loaded and fully expanded. Plain text means the unit has no item restrictions, so any item can be picked there.
| How the unit looks | What it means |
|---|---|
| Normal text, no icon | The unit has no item restrictions. Any item can be picked in it. |
| Bold, with a tick | This item is assigned to the unit. Once a unit has any items assigned, only those items can be picked there. |
| Grey, with a cross | The unit has items assigned and this item is not one of them. Assign the item to the unit, or remove the other assignments, to allow it. |
| Grey, with a dash | The unit itself has no restrictions, but a parent unit blocks this item. Assign the item to the parent units where it has no access. |
Select a unit and use Assign CA access to allow the item there, Remove to take it away, and View CA detail to open the unit. Expand all and Collapse all control the tree.
Note: Only complete hierarchies appear here, and changes to cost allocation restrictions can take several minutes to show up on this tab. See How to create and manage cost allocation sets.
Orders/Lists, Latest picks and PAG tabs
| Tab | What it shows |
|---|---|
| Orders/Lists | Every purchase order, service order, service list and transfer list referring to the item. Purchase and service orders drop off the list once they are closed or cancelled. |
| Latest picks | Picks of this item from every device in the system, with the date, the user, the quantity and the cost allocation. |
| PAG | Every product access group in the system, and whether this item is on its include list, its exclude list or its restriction list. |
Notifications tab
Choose which events for this item send an e-mail, an on-screen message to the user, or both. Events cover Pick, Return, Purchase, Goods received, Scrap, Pick for service, Restock from service, Inventory, Loan time exceeded, Below critical quantity and Comment on pick/return/restock. Tick All to switch on every event at once, and enter the destination in Recipients address.
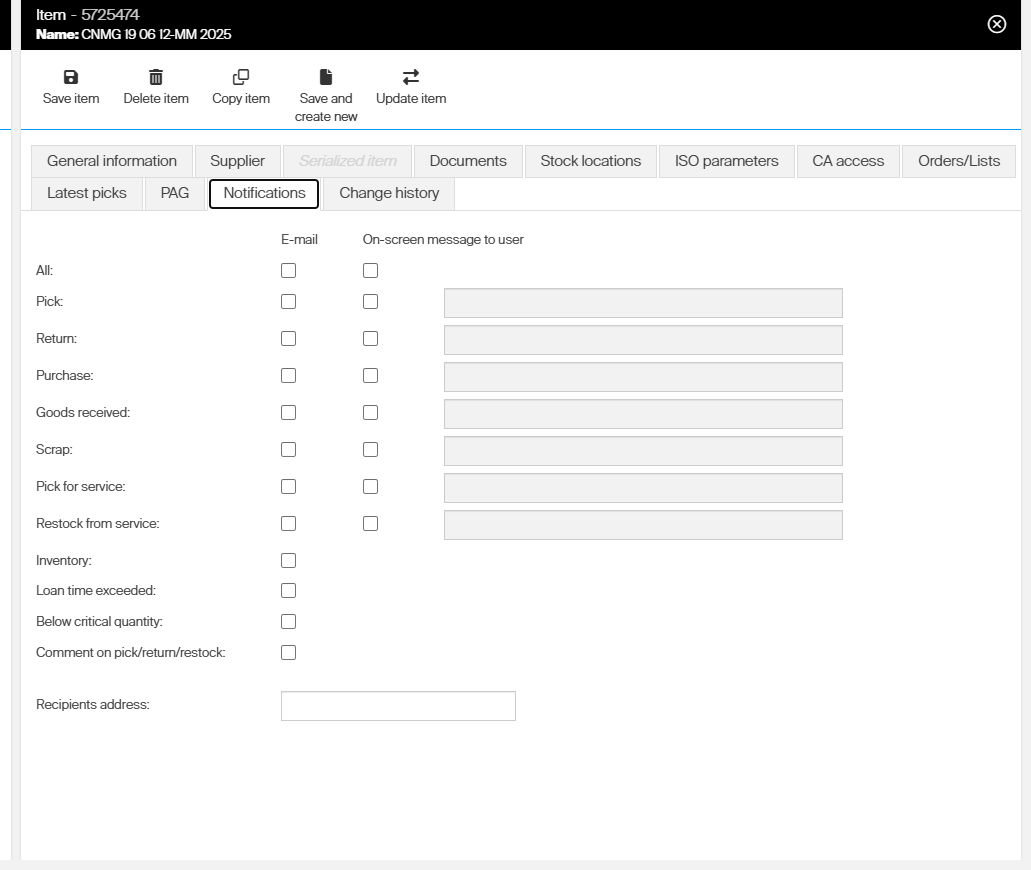
The Notifications tab. The last four events send e-mail only; the first seven can also show a message to the user.
For the full setup, see How to configure item notifications.
Change history tab
A read-only audit trail: one row per change, with the timestamp, the event, what changed and who did it. System actions such as catalog imports are logged as system.
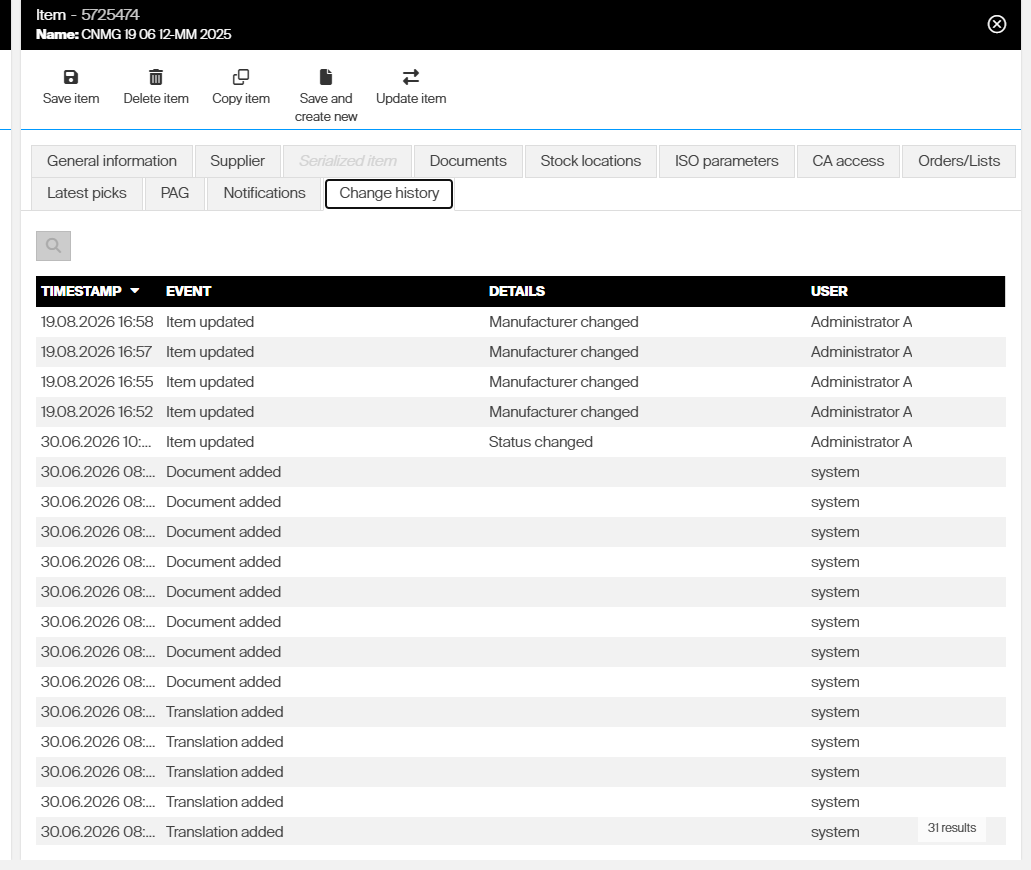
The Change history tab. Use it to answer “who changed this and when” without leaving the item.
Common confusion
| People often think… | But actually… |
|---|---|
| A field is missing from the item screen. | Most likely the item is a consumable. Usage cost structure, Cost and Prompt user to return picked item during picking only exist for durable items, and Loan time only for serialized ones. |
| Tabs are broken on a new item. | Only General information and Supplier are open before the first save. The rest unlock as soon as the item exists. |
| The Serialized item tab is greyed out by mistake. | That tab is only active when Serialized is ticked on the General information tab. |
| An item can be deleted at any time. | Deletion is blocked while the item is assigned to a stock location. Remove the assignments first, or set the status to Obsolete instead. |
| Critical level is a quantity. | It is a percentage of the order point set on the device assignment. The resulting quantity appears in the item overview. |
| The CA access tab is empty, so the item has no restrictions. | The tab stays empty until you pick a set in Select CA set. Only complete hierarchies are listed. |
Take action
Ready to set up an item? Start with How to create an item manually, or load items in bulk with How to import items from a catalog.
Related articles
- Best practices for configuring item fields — what to put in each field, and how to add custom fields of your own.
- Item supplier settings reference — every field on the Supplier tab: vendor, prices, barcode and lead time.
- Understanding item statuses — the full item life cycle and how to move an item through it.
- Understanding item costs: standard cost and usage cost — how the usage cost structure feeds your cost reporting.
- Item relations: alternatives, substitutes, and assemblies — how the Related items button works.
- Item overview dashboard reference — where to see stock, critical quantities and consumption for an item.
- How to create an item manually — the step-by-step version of this reference.