
A GTC package is an offline catalog from a vendor or supplier. Cribwise supports GTC version 2. This is a common way to add a catalog or items with all information into the system ready to be used.
Import items into CRIBWISE from a GTC package — a ZIP file from a tool supplier that carries item data, images, drawings and technical parameters. One import creates the items complete with their documents, so you do not type any of it in by hand.
If the package describes an assembly, the import also builds the assembly and attaches its component items.
Before you start
- A GTC version 2.0 package in ZIP format. Other versions and unzipped folders are not accepted.
- Administrator access to the Admin Portal.
- The vendor and the manufacturer must already exist in CRIBWISE. You pick both from a list during the import and cannot create them here — see How to manage manufacturers.
- For an assembly, every component item must be present in the same package.
Note: A GTC package is a file you already have. To pull items from a live supplier catalog instead, use How to import items from a catalog.
Quick start
Experienced users — import a package in 6 steps:
- Go to Data management > Items.
- Select Import items in the toolbar.
- Choose GTC package as the source.
- Pick the Vendor and Manufacturer.
- Select Select package and choose your ZIP file.
- Select Import package, then check the Results list.
Need more detail? Follow the full steps below.
Steps
Step 1 — Open the item import panel
- In the left menu, select Data management.
- Select Items.
- In the toolbar, select Import items. The Item import panel opens on the right.
- Select GTC package.
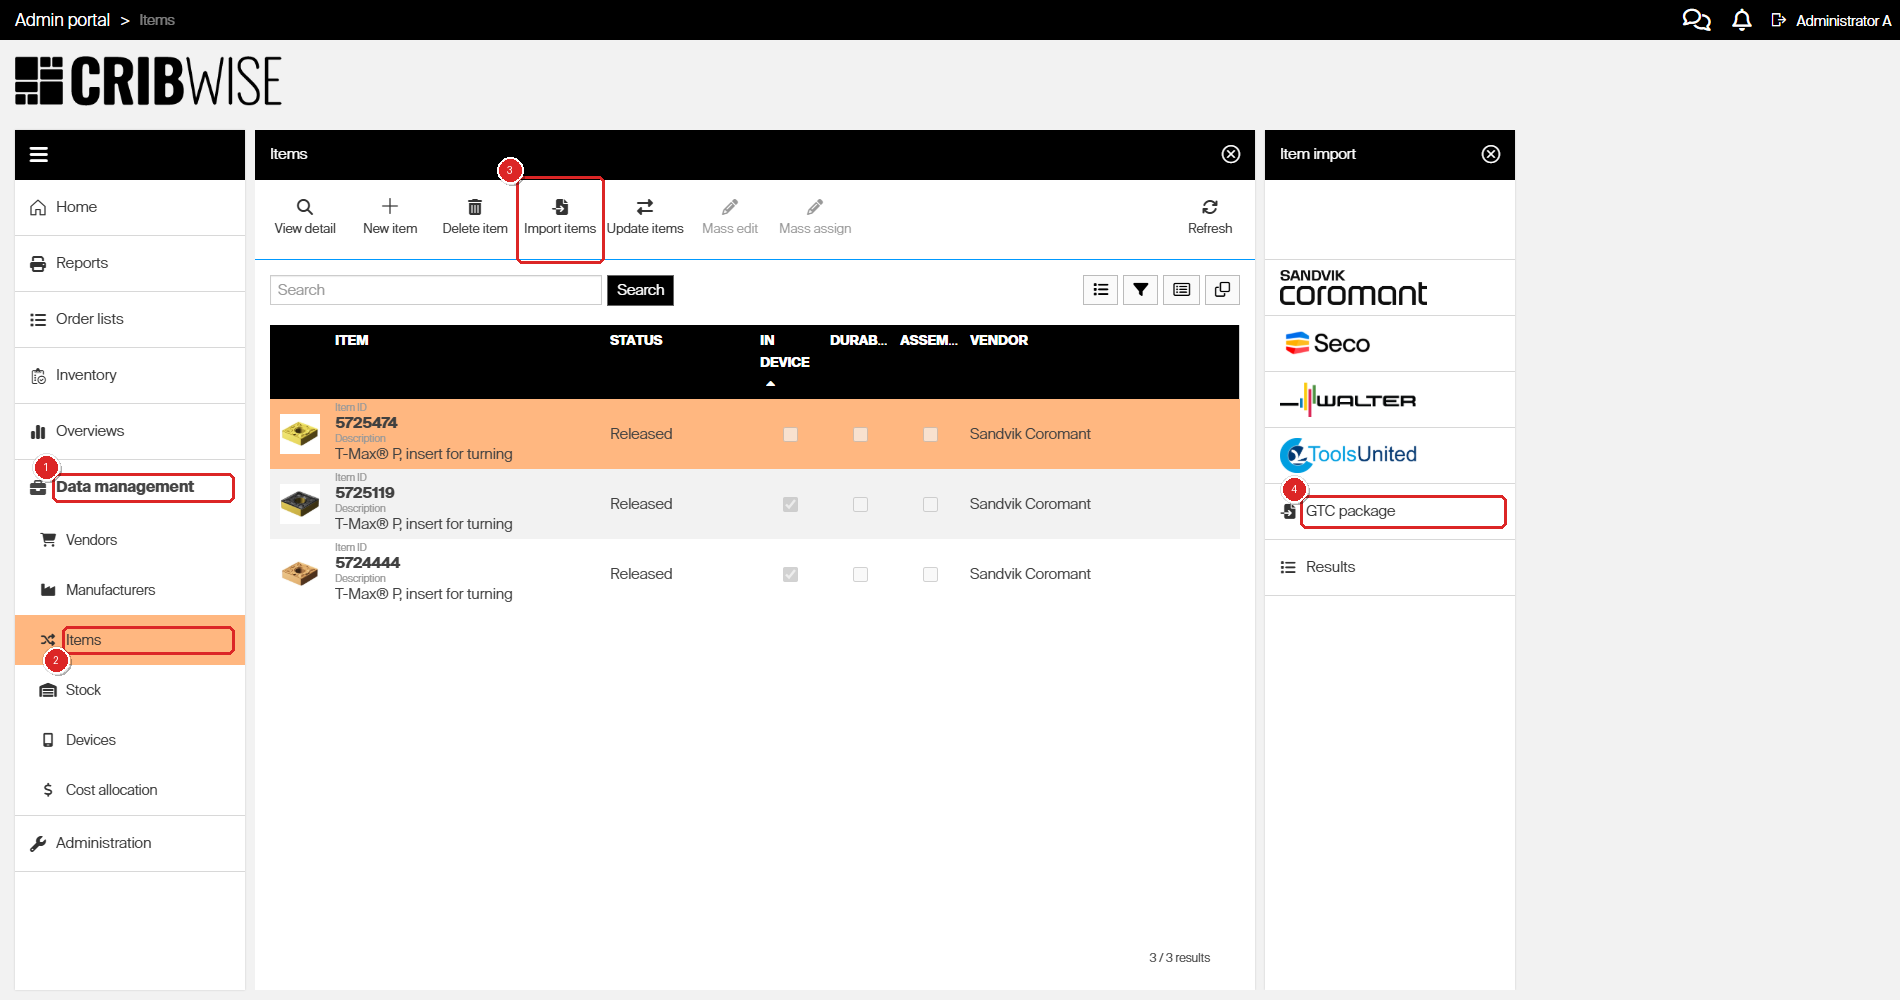
The Item import panel lists every available source. The supplier catalogs appear at the top; GTC package (4) is below them, with Results underneath.
Note: Which catalogs appear above GTC package depends on your subscriptions, so your list may be shorter or longer than the one shown here. GTC package needs no subscription.
Step 2 — Set the vendor and manufacturer
The Import item from GTC package panel opens. Both fields are mandatory and read-only — you choose from a list rather than typing.
- Select the search icon next to Vendor.
- Select the search icon next to Manufacturer.
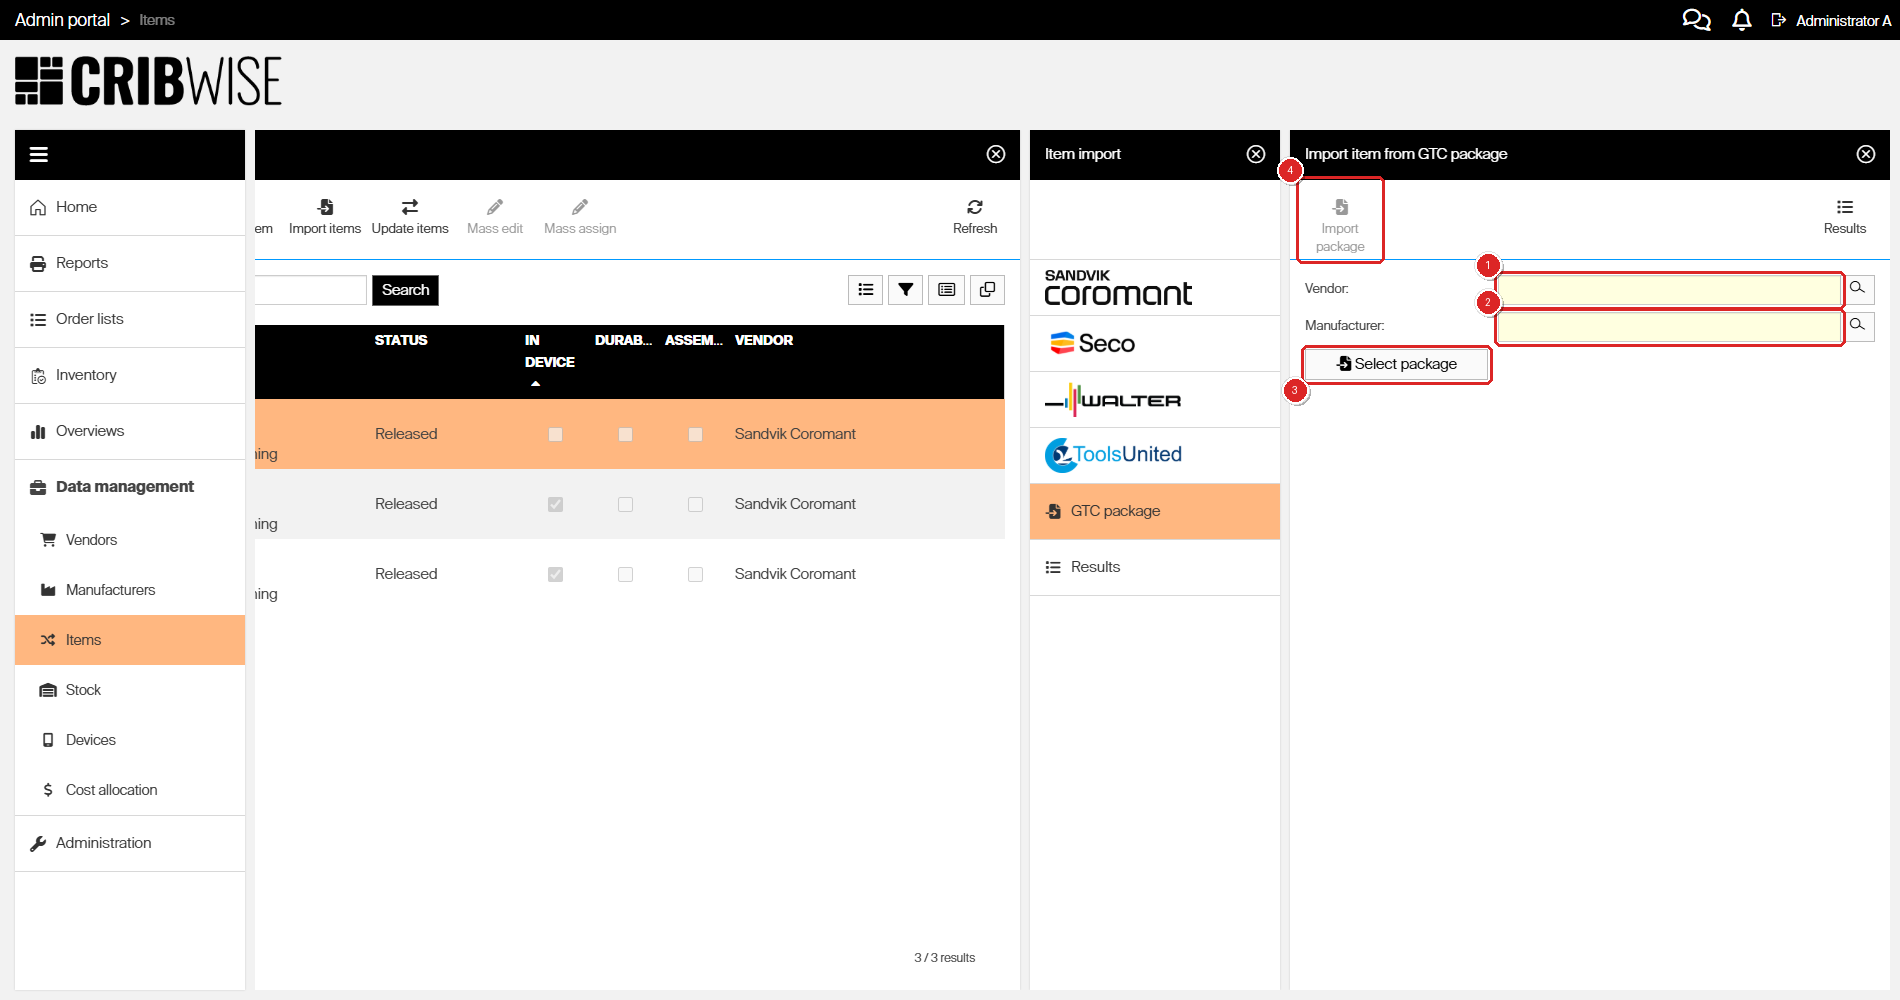
Vendor (1) and Manufacturer (2) are shaded to show they are mandatory. Select package (3) attaches the ZIP file. Import package (4) stays greyed out until a package is attached.
In the picker, select the row you want and confirm with OK. Use the Name field to filter a long list, or Cancel to back out without choosing.

The Vendors picker. Select a row (1), then confirm with OK (2). The Manufacturer field opens an equivalent list.
Tip: The vendor is who you buy from and the manufacturer is who makes the tool. They are often different companies, so check both rather than setting them to the same name out of habit.
Step 3 — Attach the package
Select Select package and choose your GTC v2.0 ZIP file.
The items contained in the package are then listed, so you can see what will be created before anything is written.
Step 4 — Set your own item IDs
Each listed item can be given a different Own item ID, so the item is created in CRIBWISE under your internal number rather than the supplier’s.
Each Own item ID must be unique. Leave a value unchanged to keep the ID from the package.
Step 5 — Run the import
Select Import package. A result screen shows progress and the status of each individual item as it is created.
Success: When the import finishes, the items exist in CRIBWISE with all the information and documents the package carried — images, drawings and technical parameters included.
Step 6 — Release the imported items
Imported items are created with the status Defined (imported). That status deliberately leaves the item type editable, so you can still change it.
While an item stays at Defined (imported) it will not synchronize to the Shop Floor Interface and cannot be assigned to a stock location. Change the status to Released once the item is correct.
Important: An import that reports success has not finished the job. Until you release the items, nothing reaches the shop floor. See Understanding item statuses.
What gets imported
A GTC package is read through the P21 Component, which maps the package contents onto CRIBWISE item fields. In outline:
- Identity — item ID, name and description.
- Codes — barcode, vendor order code and manufacturer order code.
- Documents — product pictures become Image, 2D drawings become Drawing, anything else becomes Other.
- Technical parameters — carried across as catalog characteristics.
- Assemblies — created as a new item with its component items assigned to it.
For the field-by-field mapping, see Understanding GTC package import mapping.
Troubleshooting
| Problem | Likely cause | Fix |
|---|---|---|
| Import package stays greyed out | No package has been attached yet | Select Select package and choose a ZIP file. The button only becomes active once a package is attached. |
| The package will not load | Wrong GTC version or not a ZIP | Only GTC version 2.0 in ZIP format can be imported. Ask your supplier for a v2.0 package. |
| The vendor or manufacturer you need is not in the picker | It does not exist in CRIBWISE yet | Cancel the import, create the record under Data management, then start again. You cannot create either from this panel. |
| An item fails with a duplicate ID | The Own item ID is already used by another item | Set a unique Own item ID for that row and import again. |
| Imported items do not appear on the Shop Floor Interface | They are still at Defined (imported) | Change the status to Released, which allows synchronization and location assignment. |
| An assembly imported without its parts | The component items were not in the same package | Ask your supplier for a package that contains the assembly and all of its component items together. |
Related articles
- Understanding GTC package import mapping — the full field-by-field mapping between a GTC package and a CRIBWISE item.
- How to import items from a catalog — the other import route, straight from a supplier catalog.
- Understanding item statuses — what Defined (imported) and Released control.
- How to create an item manually — for one-off items with no package or catalog entry.
- How to update items from an external catalog — refresh items you have already imported.
- How to manage manufacturers — create the manufacturer records the import needs.
- Item fields and settings reference — what each imported field is used for.