
What you can do
Define an assembly in CRIBWISE from the items it is built from, then let operators compose, stock, and pick that assembly on the Shop Floor Interface. An assembly is a durable item with a bill of materials, so a tool holder and its insert leave the crib as one tool.
Note: Working with assemblies takes two articles. This one covers the Admin Portal — defining the assembly and its components. For what operators do with it afterwards, see How to create, stock, and pick an assembly on the Shop Floor Interface.
Before you start
- Administrator or Manager access to the Admin Portal, and picking rights on the Shop Floor Interface for the composing step.
- The component items already in CRIBWISE. You build the bill of materials by picking existing items, so every component must exist first. See How to create an item manually.
- A decision on which components are durable. Durable components must be available in the device before an operator can compose the assembly. Consumable components can be missing — the assembly is still created.
- A unique serial number ready if you also make the assembly serialized.
Important: The Assembly checkbox is only available while the item type is Durable and the item is still in Defined status. Once the item has been released, the checkbox is locked and you cannot turn an ordinary item into an assembly.
Quick start
Experienced users — define an assembly in 5 steps:
- Create a new item and set the item type to Durable.
- Tick Assembly and save the item.
- Open Related items > Assembly items.
- Add each component with a requested quantity and a position.
- Set the status to Released so operators can use it.
Need more detail? Follow the full steps below.
Steps
Step 1 — Open the items list
- Go to Data management > Items (1).
- Click New item (2).
The item form opens on the right with an empty General information tab.

The items list has its own Assembly column, so you can see at a glance which items are assemblies.
Step 2 — Create the assembly item
- Enter an Item ID and a Name (1).
- Under Classification, select Durable (2). This enables the Serialized and Assembly checkboxes.
- Tick Assembly (3).
- Select a Usage cost structure and enter a Cost. Both are required.
- Click Save item (4).
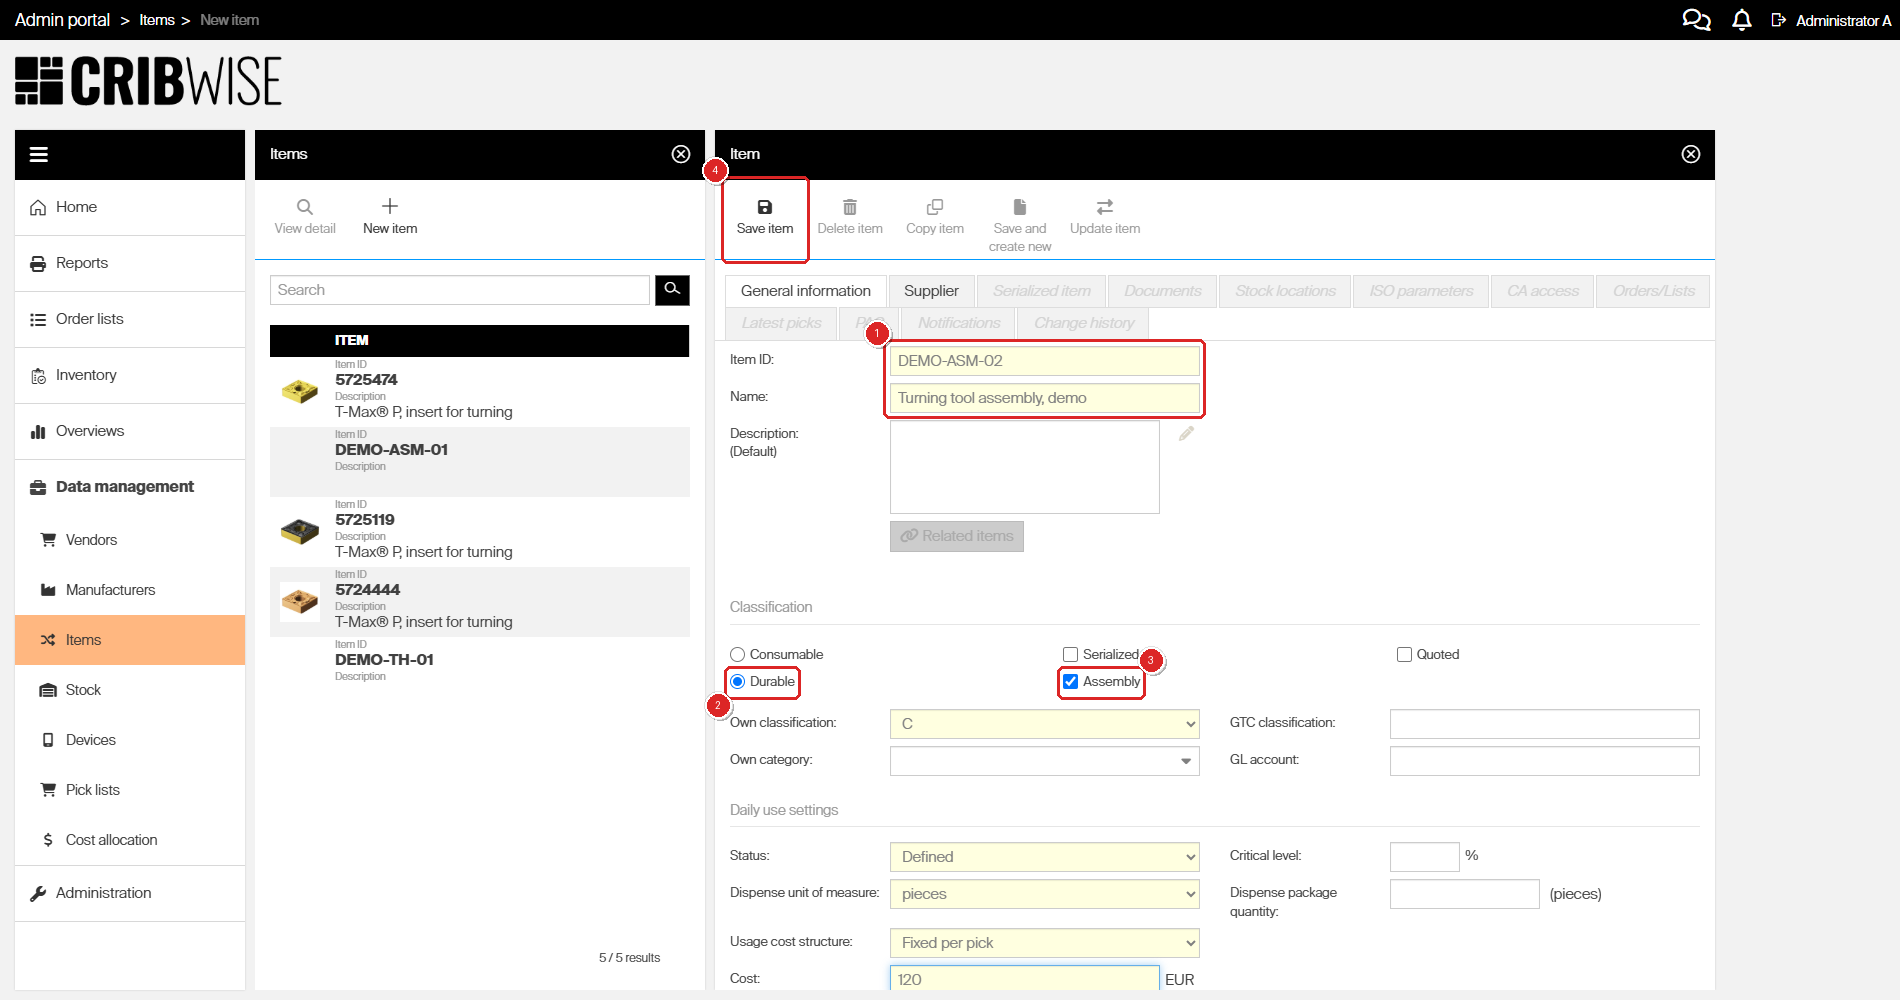
Durable first, then Assembly — the checkbox stays greyed out for consumables.
Note: If nothing happens when you click Save item, a required field is empty. Usage cost structure and Cost are outlined in red when they block the save.
Step 3 — Open the assembly items tab
After the first save, the Related items button below the description becomes available (1). Click it.

Related items is disabled until the item has been saved once.
The Related items panel opens with four tabs. Select Assembly items (1), then click Add assembly item (2).
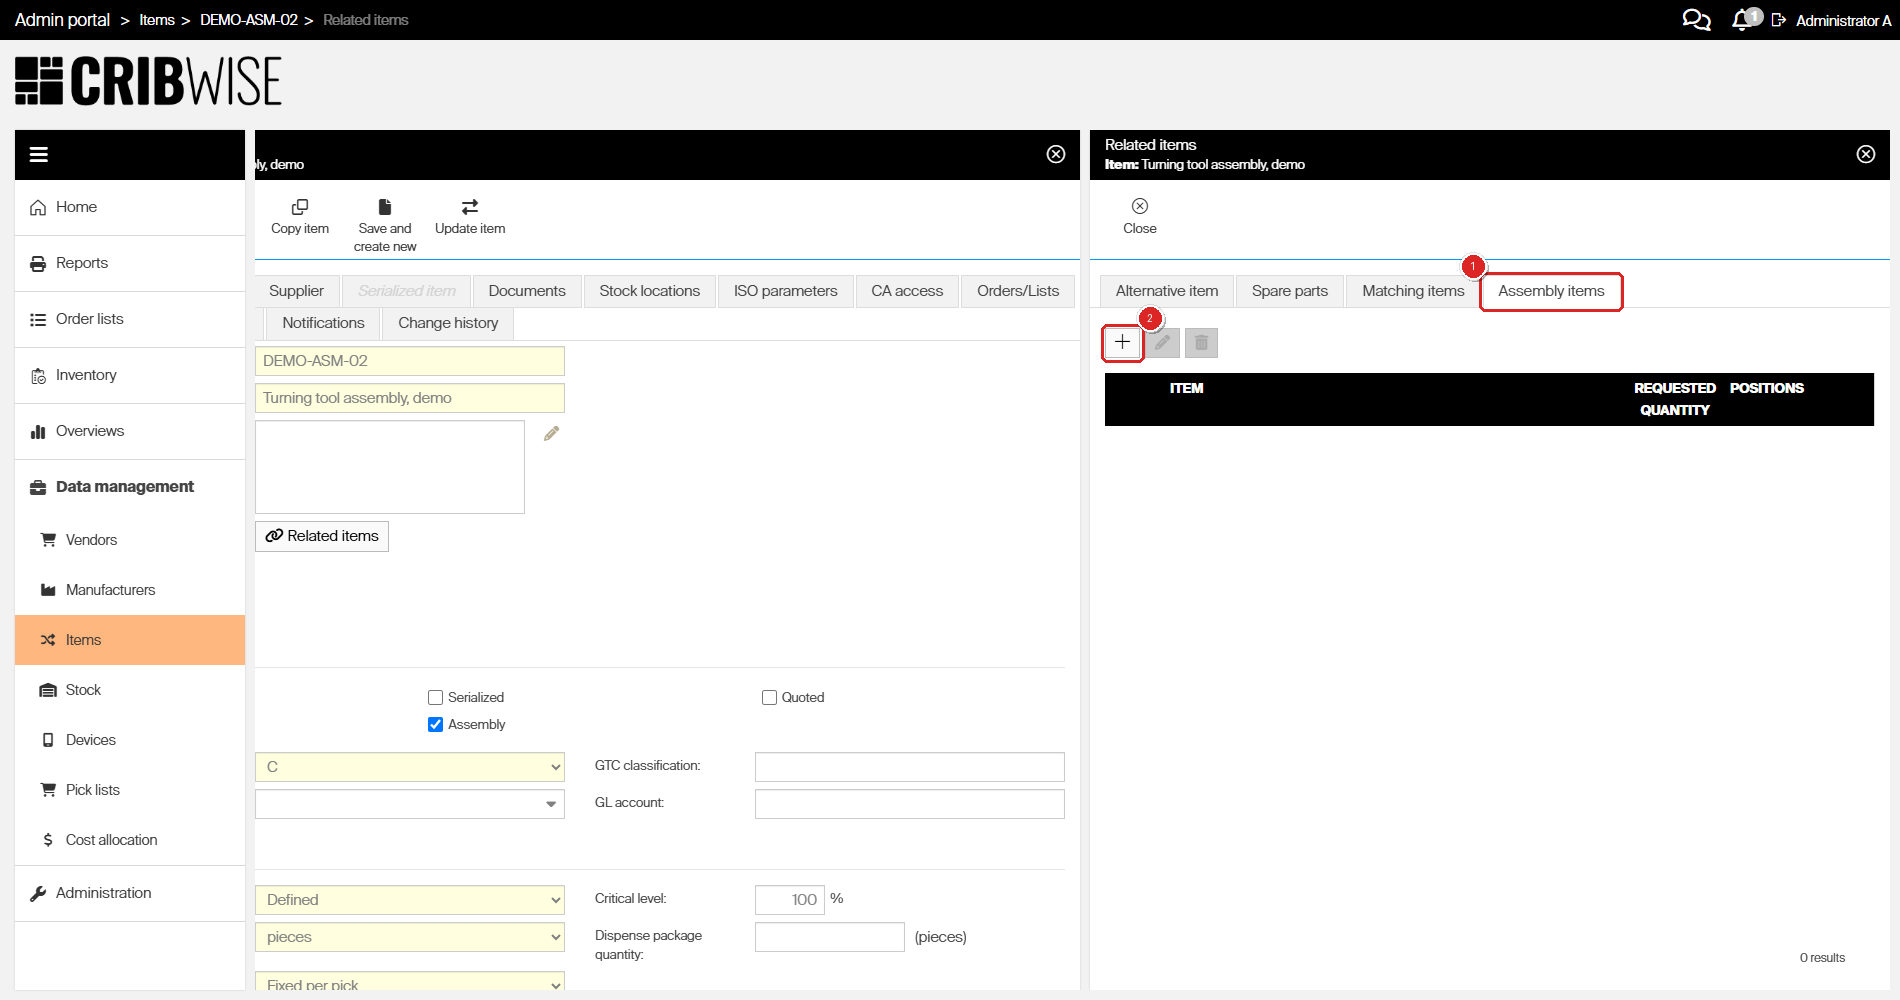
The Assembly items tab holds the bill of materials. Alternative item, Spare parts, and Matching items are separate relations.
Step 4 — Add a component
- In the Select assembly item panel, search for the component (1).
- Click the item to select it (2).
- Click OK (3).

Any existing item can be a component — durable or consumable.
Step 5 — Set the quantity and position
- Enter the Requested quantity (1) — how many of this component one assembly needs.
- Enter the Positions (2) — the position field is the information shown at pick. Can be any text and will not affect the order of picking.
- Click Save assembly item (3).

Repeat steps 4 and 5 for every component. Each saved component appears in the grid with its requested quantity and position (1).

The finished bill of materials. Use the pencil and bin buttons to edit or remove a component.
Step 6 — Release the assembly
A new item is created with the status Defined, which means operators cannot use it yet. On the General information tab, set Status to Released and save the item again.
Warning: Releasing the item also locks the Assembly checkbox. Finish the bill of materials before you release.
Success: The assembly appears in the items list with both Durable and Assembly ticked (1, 2). It has no vendor, because an assembly is built in-house rather than bought.

The Durable and Assembly columns confirm the item is set up as an assembly. This capture was taken before step 6, so the status still reads Defined.
On the Shop Floor Interface
Defining the assembly does not create a physical one. An operator builds it from the components during picking, puts it into a stock location, and picks it as a single tool.
Those three flows are covered step by step in How to create, stock, and pick an assembly on the Shop Floor Interface.
Warning: Building an assembly clears the operator’s current pick list, and the durable components it consumes are removed from the system — they cannot be returned separately.
Next steps
- Make the assembly serialized — tick Serialized alongside Assembly so each composed assembly gets its own serial number and history. See How to create and assign a serialized item.
- Stock the components — durable components must be in the device before anyone can compose the assembly. See How to restock items on the Shop Floor Interface.
- Check the access rules — a component restricted by a Product Access Group blocks the whole assembly. See How to restrict item access with Product Access Groups (PAG).
Troubleshooting
| Problem | Likely cause | Fix |
| The Assembly checkbox is greyed out. | The item type is Consumable, or the item has already been released. | Select Durable. If the item is past Defined status, create a new item instead — the flag cannot be added later. |
| The Related items button does nothing. | The item has not been saved yet. | Click Save item first. The button is enabled only for a saved item. |
| Save item appears to do nothing. | A required field is empty — usually Usage cost structure or Cost. | Scroll through the form and fill every field outlined in red, then save again. |
| Operators cannot find the assembly on the Shop Floor Interface. | The item is still in Defined status. | Set Status to Released on the General information tab. |
Related articles
- How to create, stock, and pick an assembly on the Shop Floor Interface — what operators do with the assembly once it is defined.
- Understanding assemblies: bill of materials, cost, and stock — how an assembly differs from an ordinary durable item.
- Understanding item relations — how assembly items sit alongside alternatives, spare parts, and matching items.
- How to create an item manually — the full item form, field by field.
- How to create and assign a serialized item — for assemblies that need individual serial numbers.
- Understanding item statuses — why a Defined item is invisible to operators.