
How to fill in each item field so integrations, purchase orders, catalog updates, and shop floor search all keep working. Includes custom fields — adding your own fields to items, serial instances, and stocks.
Note: This article is about what to put in each field and why. For a complete list of every field on an item, see the Item fields and settings reference.
The fields that matter most
Five fields carry more weight than the rest, because something outside CRIBWISE depends on each one.
| Field | What depends on it | Get it wrong and… |
|---|---|---|
| Item ID | Every API integration — it is the business key | Integrations break or address the wrong item |
| Order code | Purchase orders | The vendor receives a code they cannot fulfil |
| Manufacturer item ID | Catalog updates | Catalog updates skip the item |
| Barcode | Scanning on the Shop Floor Interface | Operators are prompted to add it mid-task |
| Description | What operators recognise, and search | Operators cannot find the item |
Core identification fields

The General information tab. Yellow shading marks mandatory fields; the pencil icon next to Description opens the translations.
Item ID
Use your own item ID — the one your organisation already uses. It must be unique in the system.
Prefer numbers and plain characters. Spaces and special characters are allowed, but avoid them: the Item ID is the business key in every API integration, and awkward characters cause trouble downstream.
Important: Decide your Item ID convention before you load items in bulk. Changing IDs later means reworking every integration that references them.
Name
A short designation — the reader-friendly label for the item. This is what operators scan down a list looking for.
Description
A fuller description, up to 400 characters. Descriptions can be stored in several languages, and CRIBWISE shows the one matching the user’s language setting. Where no description exists in that language, the default description is shown instead.
In the screenshot above, the description is English and 15 further translations exist.
Supplier and manufacturer fields
Vendor and Order code

The Supplier tab holds the purchasing information used when CRIBWISE raises an order.
Vendor sets who the item is sourced from. Order code is the field mapped onto every purchase order CRIBWISE generates — so it must be the code that vendor recognises, not your internal one.
Barcode

Enter the barcode operators will scan on the Shop Floor Interface. If an item has no barcode, the SFI prompts the operator to add one during item assignment — so filling this in up front keeps operators out of a data-entry task.
Manufacturer item ID

This is the manufacturer’s own key for the item, and it is the key CRIBWISE matches on when updating items from a catalog. An item with no Manufacturer item ID will not pick up catalog updates.
See How to import items from a catalog and How to update items from an external catalog.
Custom fields
When the built-in fields do not cover something you need to track, add a custom field. Custom fields can be attached to items, serialized item instances, and stocks, and their values can surface in the Admin Portal, the Shop Floor Interface, reports, and purchase orders.
Important: The maximum is 30 custom fields. Plan what you need before you start creating them.
Create a custom field
- Go to Administration > System settings.
- Open the Stock administration tab.
- In the Custom fields section, select the entity you want to extend — Item, Serialized item instance, or Stock.
- Click the edit button to open the custom fields panel.
- Click New field.
- Enter a unique Name, set Mandatory if the field must be filled in, and choose a Type.
- Click Save.
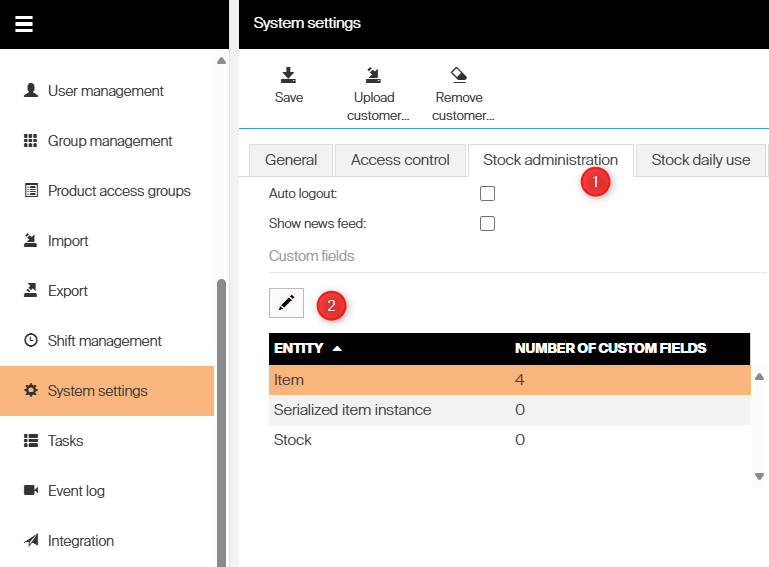
Custom fields live on the Stock administration tab (1). The edit button (2) opens the panel. The grid shows how many fields each entity already has — the row you select is the one you edit.
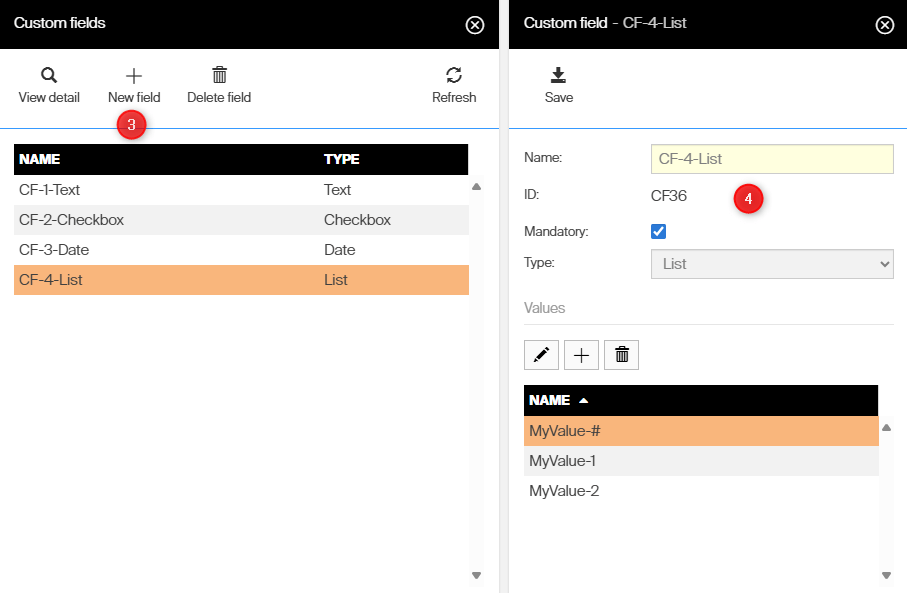
New field (3) adds a field. In the detail pane (4) you set the name, whether it is mandatory, and the type. A List field also needs its predefined values, added underneath.
Choose the right type
The type fixes what the field can hold, and two of the four come with limits worth knowing before you commit.
| Type | Holds | Can be mandatory? | Watch out for |
|---|---|---|---|
| Text | Any characters | Yes | The most flexible choice, and the only free-text option |
| List | One of a set of predefined values | Yes | You must define the values first. Imports must match them exactly |
| Date | A date from a date picker | Yes | Does not appear in Shop Floor Interface search results |
| Checkbox | Yes or no | No | Cannot be mandatory, is not searchable on the SFI, and cannot be used in purchase order templates |
Tip: Use List rather than Text wherever the answer comes from a fixed set. It keeps values consistent, which matters as soon as you start filtering reports on the field.
Where custom field values appear
| Location | Behaviour |
|---|---|
| Admin Portal item detail | In the Custom information section at the bottom of the General information tab. Mandatory fields are highlighted in yellow. |
| Shop Floor Interface | Text and List fields appear in search results. Date and Checkbox do not. All values appear in the extended view. |
| Item search | Custom item fields are searchable — see How search works below. |
| Export and import | Among the last columns of the export file, named Name [ID] (TYPE). Mandatory fields appear in bold. Every custom field must exist before an import that uses it. |
| Reports | Available in reports such as Raw Transaction, matched on the field name rather than its ID. Works with the inline filter, but not the advanced filter. |
| Purchase order templates | Use the tag <ITEM_CF_custom field name>. Checkbox fields cannot be used, and stock and serial-instance fields are not available as tags. |
| Purchase scripts | Custom purchase scripts can use custom fields to decide what to order. Classic purchase and service scripts cannot. |
For the full walkthrough of each of these, including serial instances and stocks, see Custom fields.
Choose which fields appear in the AP and SFI

Item identification on SFI. Up to three fields can be shown; tick Show label to print the field name alongside the value.
Go to Administration > System settings > Stock daily use to control which item fields operators and administrators see:
- Item identification on SFI — up to three fields, one minimum. Custom fields can be selected here too.
- Item identification on AP — the first row of item information is selectable; the second row is fixed to the item description.
Tip: Set these to whatever operators actually recognise the item by. If your team knows tools by manufacturer code, show that rather than your internal Item ID.
How search works across item fields
Search behaves the same way in every Admin Portal list and in the SFI item lists. You can search several fields at once by separating terms with a space — the terms do not need to be in the same field, or in order.

Searching key 04 matches “Key” from the description and “04” from the item name.

Terms can also match sections of the same field out of order — 075 C10 finds C10-391.05-60 075.
Searchable item fields:
- Item ID
- Item name
- Item description
- Vendor / supplier order code
- Manufacturer item ID
- Service code
- Barcode
- Any custom item field
Common confusion
| People often think… | But actually… |
|---|---|
| Order code and Item ID can hold the same value. | They can, but they serve different systems. Item ID is your key for integrations; Order code is what goes to the vendor. If the vendor uses a different code, they must differ. |
| A custom field will show up everywhere once created. | Coverage depends on the type. Checkbox fields are absent from SFI search and purchase order templates; Date fields are absent from SFI search. |
| Custom fields can be created during an import. | Every custom field must exist before the import runs. Imports fill values in; they do not create fields. |
| Reports can filter custom fields like any other column. | Custom fields work with the inline filter only. They are not available in the advanced filter. |
| Item descriptions need translating in each language a user picks. | Only where you want them translated. If no description exists in the user’s language, CRIBWISE falls back to the default description. |
Related articles
- Custom fields — the full walkthrough: types, serial instances, stocks, exports, reports, and purchase order tags.
- Item fields and settings reference — every field on an item, described one by one.
- How to import items from a catalog — bring items in from a supplier catalog and map their fields.
- How to update items from an external catalog — keep item data current using the Manufacturer item ID.
- All system settings quick reference — the Stock administration and Stock daily use settings referenced above.
- Managing serialized items and serial numbers — where per-instance custom fields apply.