
What you can do
Add your own fields to items, serialized item instances, and stocks, then read the values in the Admin Portal, on the Shop Floor Interface, and in reports. Custom fields also flow into exports, imports, purchase order templates, and custom purchase scripts.
Before you start
- You need Admin Portal access to Administration > System settings.
- Decide which entity the field belongs to: Item, Serialized item instance, or Stock. Each entity keeps its own separate set of fields.
- Decide the field type before you create it: Text, Checkbox, Date, or List.
- For a List field, have the predefined values ready. A list value that is not predefined cannot be entered or imported.
Important: The maximum number of custom fields is 30.
Quick start
Experienced administrators add a custom field in 5 steps:
- Go to Administration > System settings > Stock administration.
- Select the entity you want to add the field to.
- Click Edit custom fields.
- Click New field, then enter a name and choose a type.
- Click Save.
Need more detail? Follow the full steps below.
Steps
Step 1 – Open the custom fields editor
- In the Admin Portal, go to Administration > System settings.
- Select the Stock administration tab (1).
- Under Custom fields, select the entity you want to edit.
- Click Edit custom fields (2).
The custom fields side panel opens for the selected entity.
Note: The entity selected in the list is the one you edit. All three entities start with no custom fields, and the Number of custom fields column shows how many each one has.
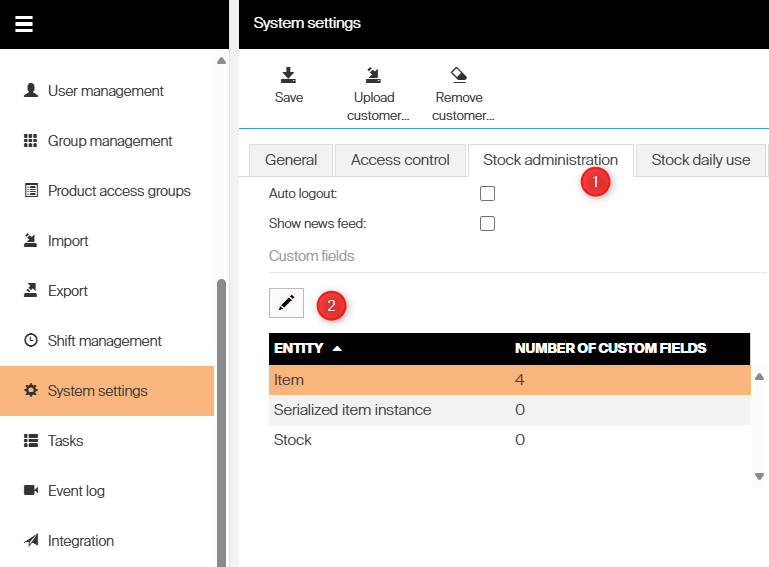
Callouts 1 and 2: the Stock administration tab and the Edit custom fields button. The grid below shows one row per entity.
Step 2 – Pick the field type
The type defines what kind of data the field holds. It also decides where the field can be used later, so choose it before you create the field.
| Type | What it holds | Can be mandatory | Worth knowing |
|---|---|---|---|
| Text | Any characters | Yes | The most flexible type. Shown in Shop Floor Interface search results. |
| Checkbox | A true/false value | No | Cannot be used as a purchase order tag, and is not shown in Shop Floor Interface search results. |
| Date | A date chosen from a date picker | Yes | Not shown in Shop Floor Interface search results. |
| List | One value from a predefined list | Yes | You must define the values before the field can be used. Shown in Shop Floor Interface search results. |
Note: A mandatory field cannot be left empty when the record is saved, but it may stay empty while you are still editing the page.
Step 3 – Create the field
- In the side panel, click New field (3).
- Enter a Name. The name must be unique.
- Select Mandatory if the field must be filled in.
- Choose the Type (4).
- For a List field, add each predefined value under Values.
- Click Save.
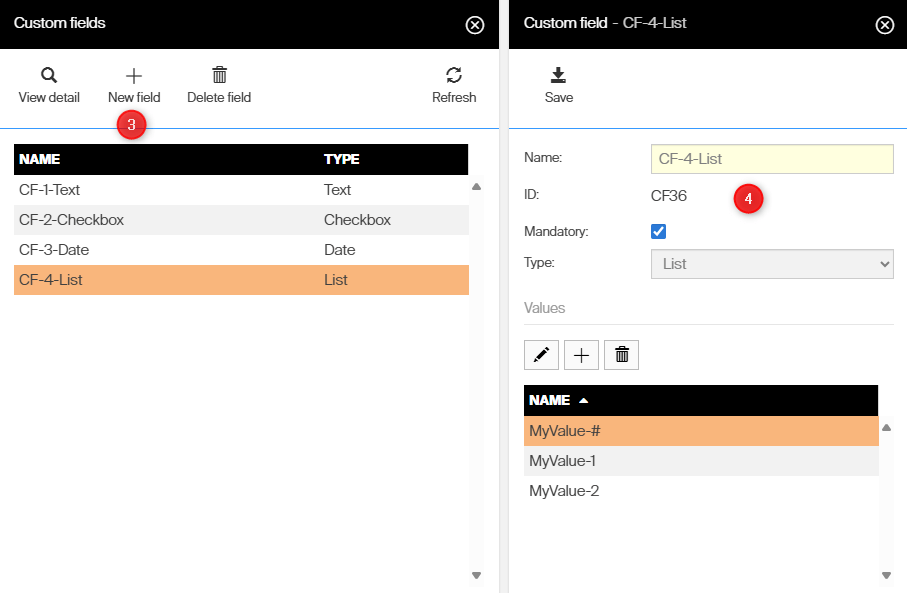
Callouts 3 and 4: New field, and the detail form where you set the name, the mandatory flag, and the type. A List field adds a Values grid for its predefined values.
Success: The new field appears in the Custom fields list with its type, and the entity row under Stock administration shows an increased field count.
Where custom field values appear
| Entity | Where you fill in the value | Where the value is shown |
|---|---|---|
| Item | Data management > Items > General information > Custom information | Admin Portal, Shop Floor Interface, exports, reports, purchase orders |
| Serialized item instance | Data management > Items > Serialized item > the serial number’s side panel | Admin Portal, Shop Floor Interface (pick, return, and inventory) |
| Stock | Data management > Stock > Custom information | Admin Portal |
Items in the Admin Portal
Navigate to an item via Data management > Items. The custom fields sit at the bottom of the General information tab, in the Custom information section (5). Mandatory fields are highlighted in yellow.
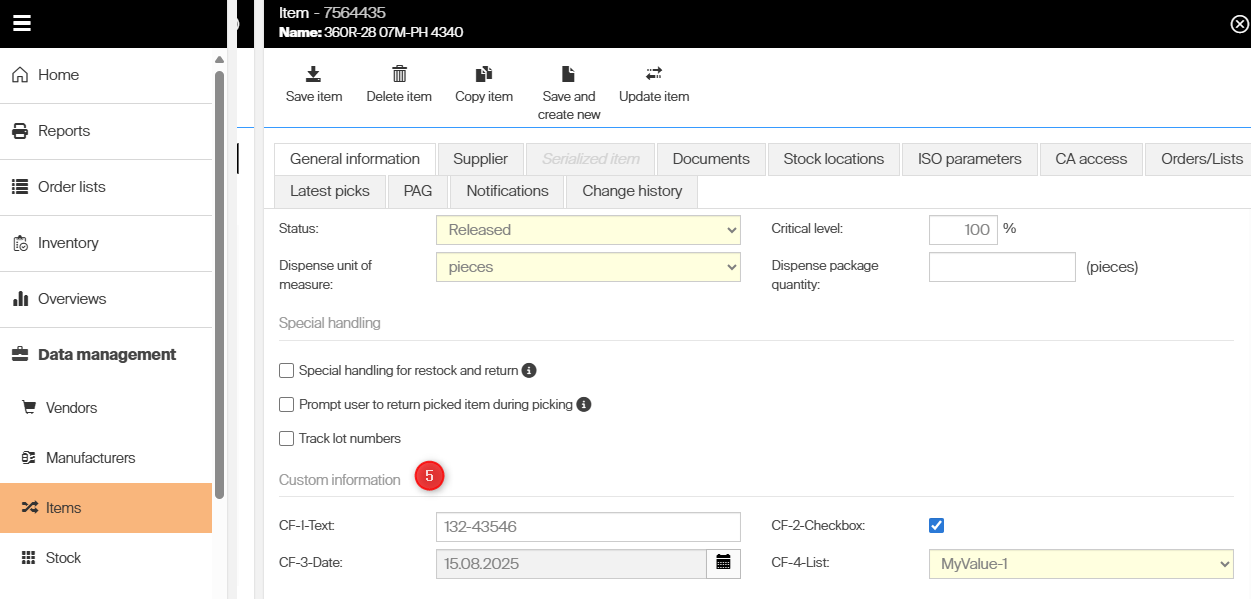
Callout 5: the Custom information section, here with one field of each type. The yellow fields are mandatory.
Items on the Shop Floor Interface
When you search for an item (6), custom fields of type Text and List appear in the search results. Date and Checkbox fields do not. All types are shown in the extended view (7).
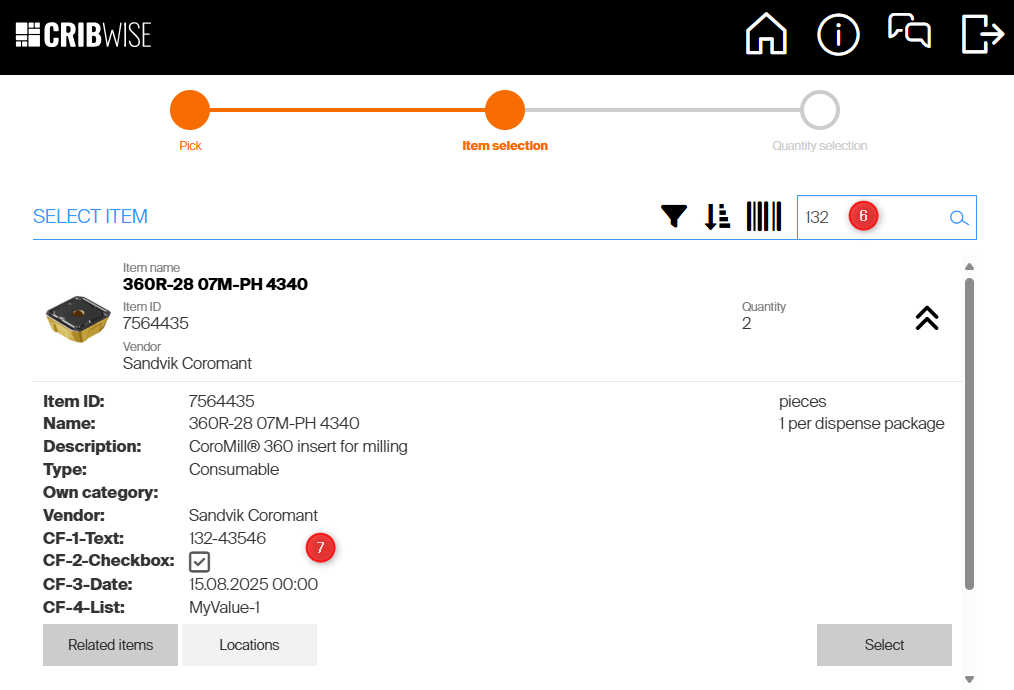
Callouts 6 and 7: the search box, and the extended view where every custom field is listed.
Serialized item instances
Custom fields for serialized item instances are filled in per instance. Item-level custom fields stay available and are not affected.
On the Shop Floor Interface, the values are shown during pick, return, and inventory, on the view where you choose the serial number. Click the information button i (8) to see them.
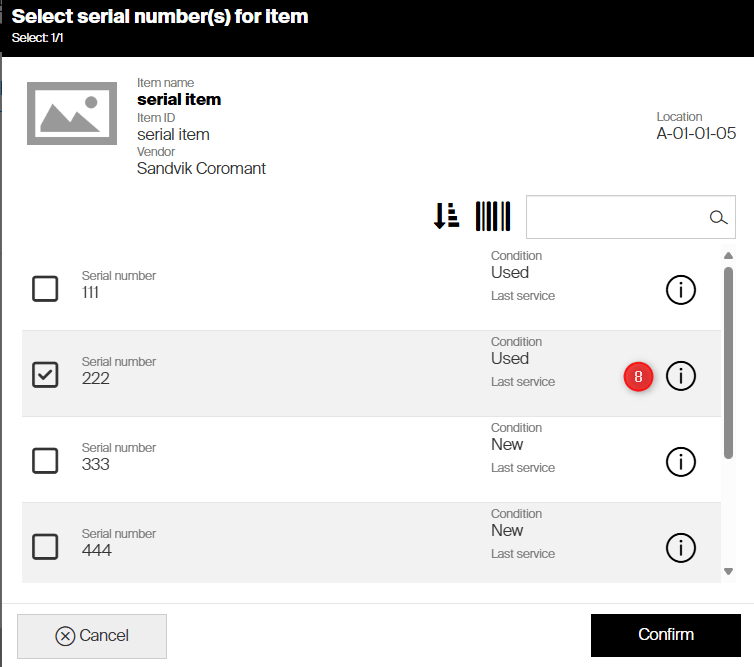
Callout 8: the information button next to a serial number. It opens the custom field values saved for that instance.
To see the same values in the Admin Portal:
- Go to Data management > Items and open the item.
- Select the Serialized item tab (9).
- Click a serial number (10) to open its side panel.
The values in the Custom information section (11) apply only to that serial number.
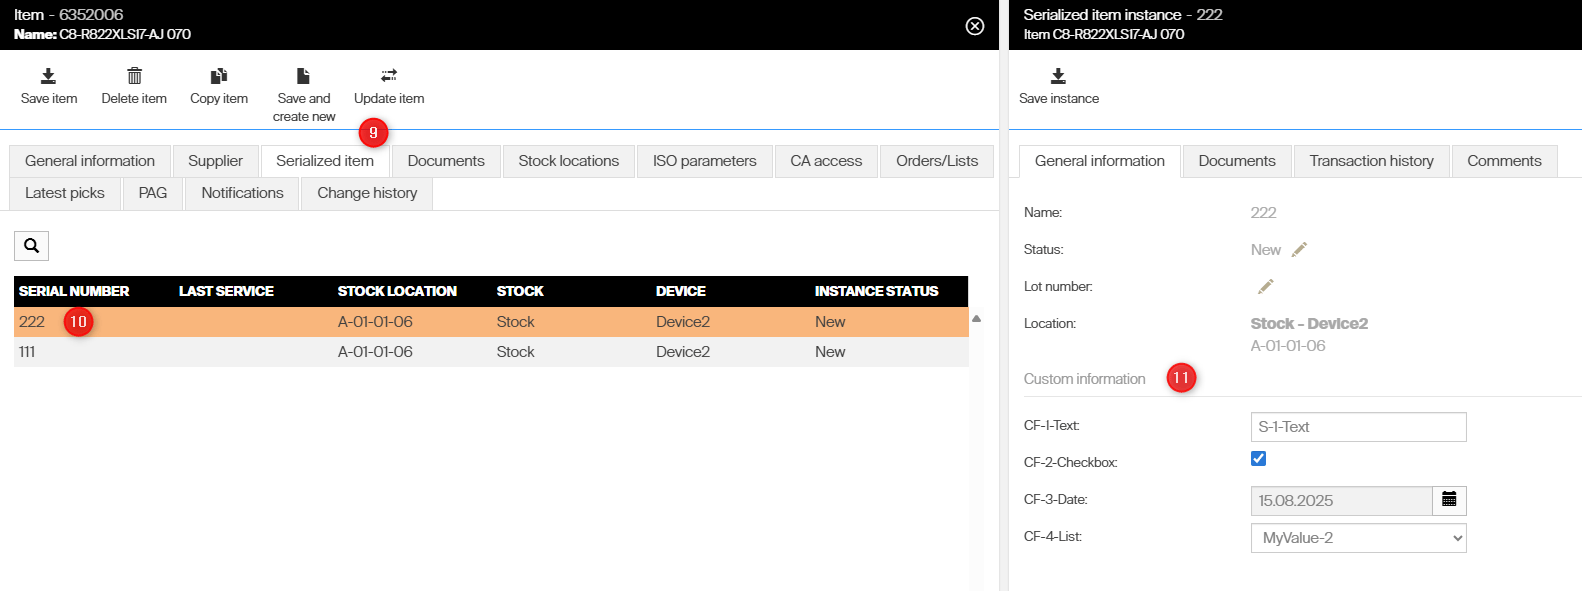
Callouts 9, 10, and 11: the Serialized item tab, a serial number in the grid, and the custom fields saved for that instance.
Stocks
Custom fields for stocks work the same way as for items and serialized item instances.
- Go to Data management > Stock.
- Click the stock.
- Scroll to the Custom information section (11).
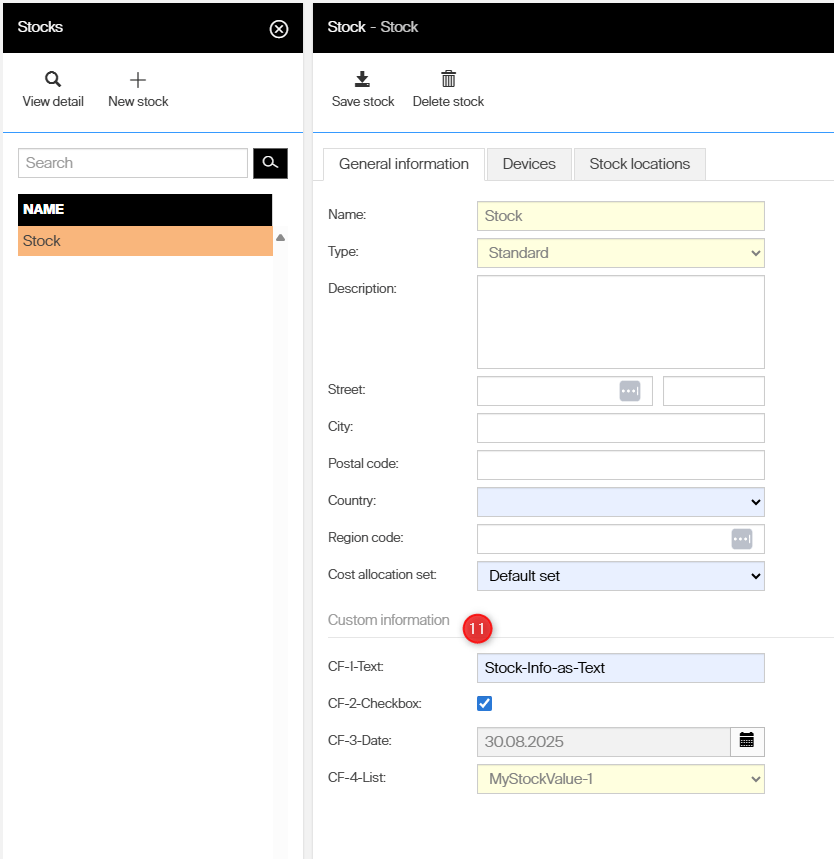
Callout 11: the Custom information section on a stock, below the address and cost allocation set.
Using custom fields elsewhere
Exports and imports
To export the values:
- Go to Administration > Export.
- Select Item and check Select all.
- Click Proceed at the top and download the file.
The Excel file holds all the item information that can also be used for import. The custom fields are among the last columns, named in the format Name [ID] (TYPE). Mandatory fields are shown in bold in the column header. For a List field, the value must match one of the predefined values.
![The last four column headers of an item export in Excel, reading CF-1-Text [CF37] (TEXT), CF-2-Checkbox [CF38] (TRUE/FALSE), CF-3-Date [CF39] (DATE AND TIME), and CF-4-List [CF40] (PREDEFINED VALUE)](https://cribwise.com/wp-content/uploads/2025/08/2025-08-18_08h54_02-1.png)
The custom field columns in an item export. Each header carries the field name, its ID, and its type.
The ID in the column header (12) is shown on the field’s detail view in the custom fields editor.
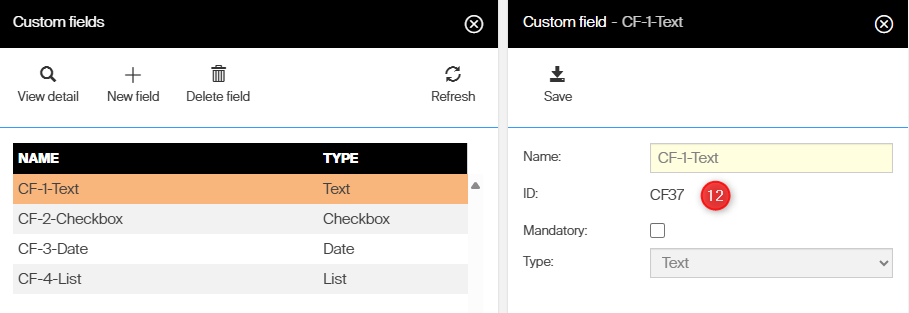
Callout 12: the field ID, here CF37 for the field CF-1-Text. It matches the ID in the export column header.
Important: Imports use the same file, and every custom field must exist in the Admin Portal before the import can complete.
Reports
- Go to Reports > Report viewer.
- Open a report that offers custom fields as available fields, for example Raw transaction.
- Move the custom field you need into Columns (13).
Custom fields can be filtered with the inline filter, but they are not available in the advanced filter.
Note: In reports, custom fields are linked to the field name, not to the ID. Renaming a field affects reports that use it.
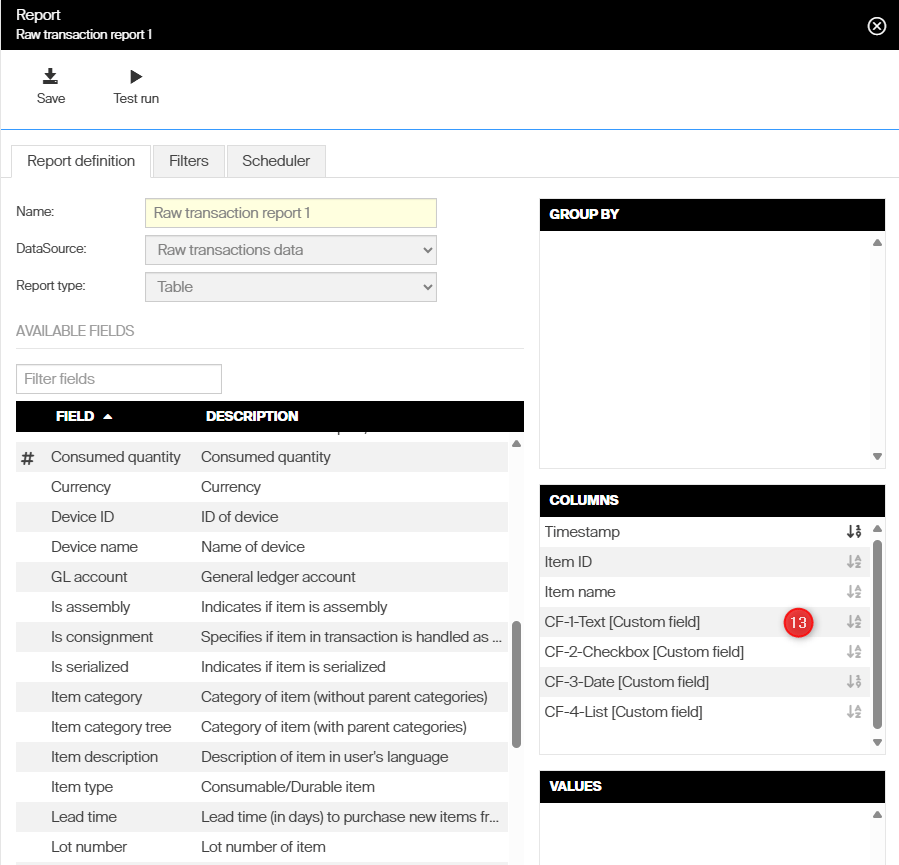
Callout 13: the custom fields added to the report Columns, each labelled [Custom field].
Purchase order templates
Use an item custom field in a purchase order template with the tag <ITEM_CF_custom field name>, replacing custom field name with the actual field name. For example, <ITEM_CF_CF-1-Text> resolves to the first custom field in the list above.
Note: Custom fields of type Checkbox cannot be used as tags. Stock and serialized item instance custom fields are not available as purchase order tags either.
Scheduled scripts
Custom purchase scripts can use custom fields to decide what to include in a purchase order. Classic purchase scripts and service scripts cannot.
Next steps
- Fill in the values — open an item, a serial number, or a stock and complete its Custom information section.
- Bulk-fill existing items — export the items, complete the custom field columns, and import the file back. See How to import item data into the system.
- Put the data to work — add the fields to a report, a purchase order template, or a custom purchase script.
Troubleshooting
| Problem | Likely cause | Fix |
|---|---|---|
| Mandatory cannot be selected for a field | The field type is Checkbox, which cannot be mandatory | Use a mandatory List field with two predefined values instead |
| A custom field is missing from the Shop Floor Interface search results | Only Text and List fields appear there | Open the item’s extended view (7), where all types are shown |
| No further custom fields can be added | The maximum of 30 custom fields is reached | Delete a field you no longer use before adding a new one |
| The new field does not appear on the entity you expected | A different entity was selected when the field was created | Select the right entity under Stock administration and create the field again (Step 1) |
| An import fails on a custom field column | The field does not exist yet, or a List value is not one of the predefined values | Create every custom field first, then check each list value against the predefined values |
| The values entered on an item are not on its serial numbers | Serialized item instance fields are filled in per instance | Open the serial number under the Serialized item tab and fill it in there |
| A custom field is missing from a report’s advanced filter | Custom fields are only available in the inline filter | Filter the column with the inline filter instead |
| An <ITEM_CF_…> tag stays empty in a purchase order | The tag names a Checkbox field, a stock or serialized field, or the name does not match | Use an item Text, Date, or List field and match the field name exactly |
Related articles
- Best practices for configuring item fields — decide which fields matter before you add custom ones.
- Item fields and settings reference — the full list of built-in item fields.
- All system settings quick reference — the other settings on the Stock administration tab.
- Managing serialized items and serial numbers — how serialized item instances work.
- How to export data from the system — the export that contains the custom field columns.
- How to import item data into the system — fill in custom field values in bulk.
- Custom scheduled scripts: flexible rules for automated ordering — use custom fields to drive automated ordering.