
Export data to an Excel file — as a backup, as a report, or as a template you edit and import back in. Export several objects at once and each one becomes its own sheet in a single workbook.
Before you start
- You need access to Export in the Administration menu.
- Decide which objects you want to export. Each selected object becomes a separate sheet in the exported file.
- Decide whether you will import the file back later. That choice changes what you must select in Step 3.
Important: If you export a single object, CRIBWISE only pre-selects a few mandatory attributes — not the full set. A file exported that way cannot be imported back without losing the columns you left out. To keep the file import-ready, click Select all under Select attributes, or select two or more objects, which exports every attribute automatically.
Quick start
Experienced administrators export data in 5 steps:
- Go to Administration > Export.
- Tick the objects to export, or click Select all.
- Click Select all under Select attributes if you selected exactly one object.
- Click Proceed and wait for the confirmation message.
- Open Results and click Download.
Need more detail? Follow the full steps below.
Steps
Step 1 – Open the export screen
- In the left menu, click Administration.
- Click Export.
The Select objects to export screen opens with a checkbox for every object CRIBWISE can export.
Step 2 – Select the objects to export
Tick every object you want in the file. To export the complete data set, click Select all above the list.
You can export as many objects as you like in one run. They all land in one Excel file, with each object on its own sheet — you do not need to run a separate export per object.
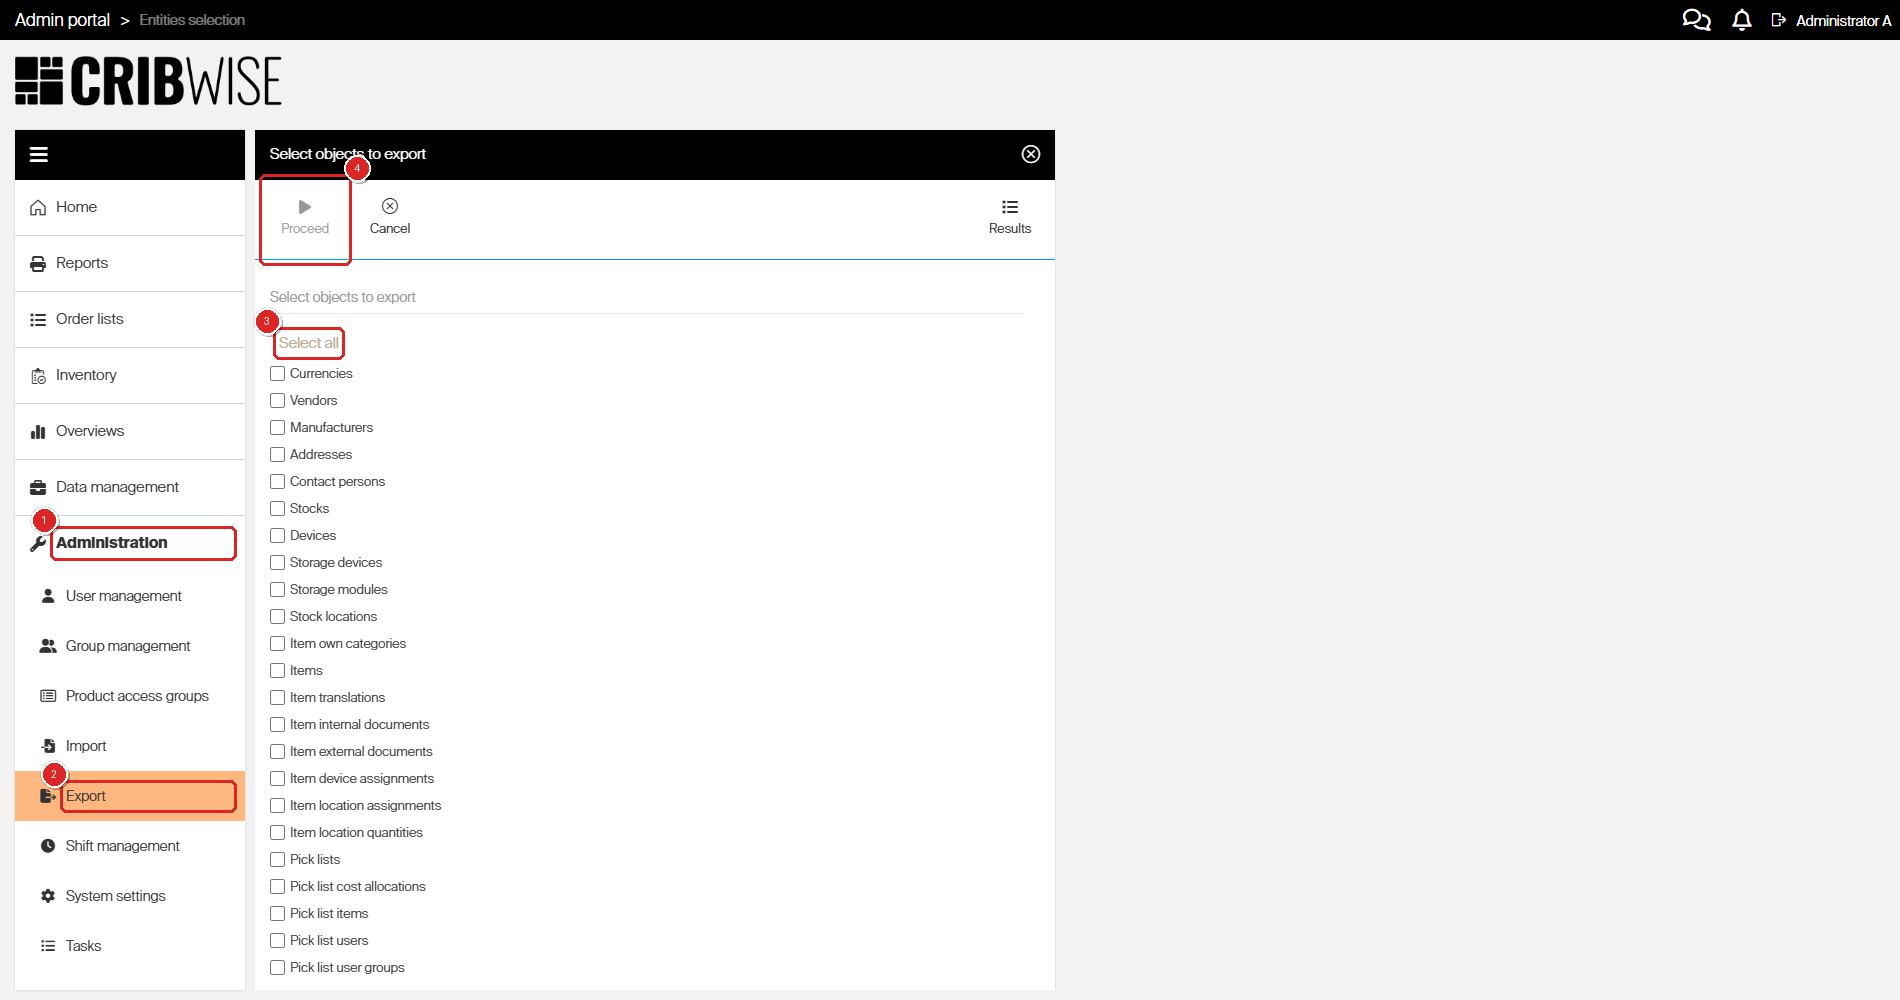
Tip: Selecting two or more objects is the safest option when you plan to import the file back. CRIBWISE then exports every attribute automatically and skips the attribute selection in Step 3.
Step 3 – Select the attributes (single object only)
When you select exactly one object, a Select attributes list appears next to the object list. This is where you choose which columns end up in the file.
Only a few mandatory attributes are ticked by default — the record ID and the object’s own name and ID fields. Everything else starts cleared.
- To import the file back later: click Select all above the attribute list. Every column is then exported and the file keeps the structure the import expects.
- To produce a short report: tick only the attributes you want to read. Do not use this file for a later import.
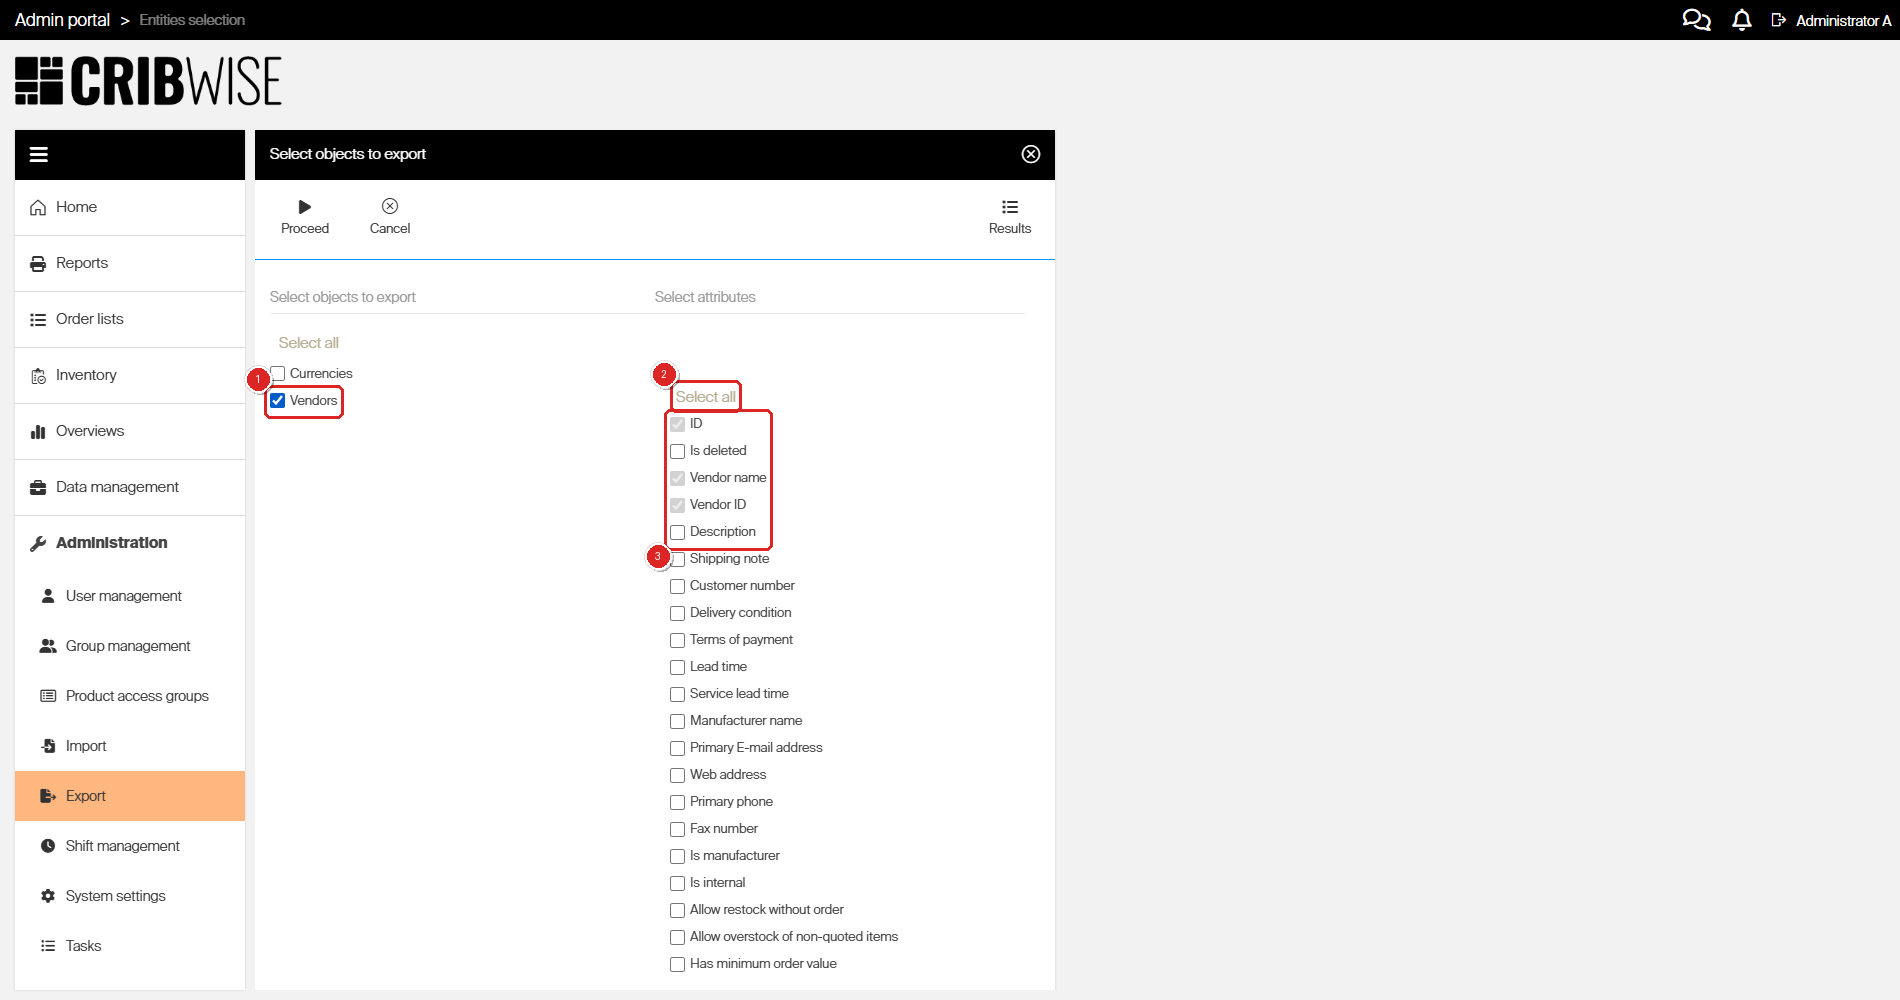
Note: The Select attributes list only appears while exactly one object is selected. Tick a second object and the list disappears, because all attributes are then included automatically.
Step 4 – Start the export
Click Proceed.
CRIBWISE starts building the file. Depending on server workload and how much data you selected, this can take a few minutes. A confirmation message appears when the file is ready.
Step 5 – Download the file
- Open the Results view. You can reach it from the export screen, or from Administration > Export at any time.
- Select the export in the list. The newest run is at the top, with its status.
- Click Download.
Click View detail on any finished export to see which objects that run contained.
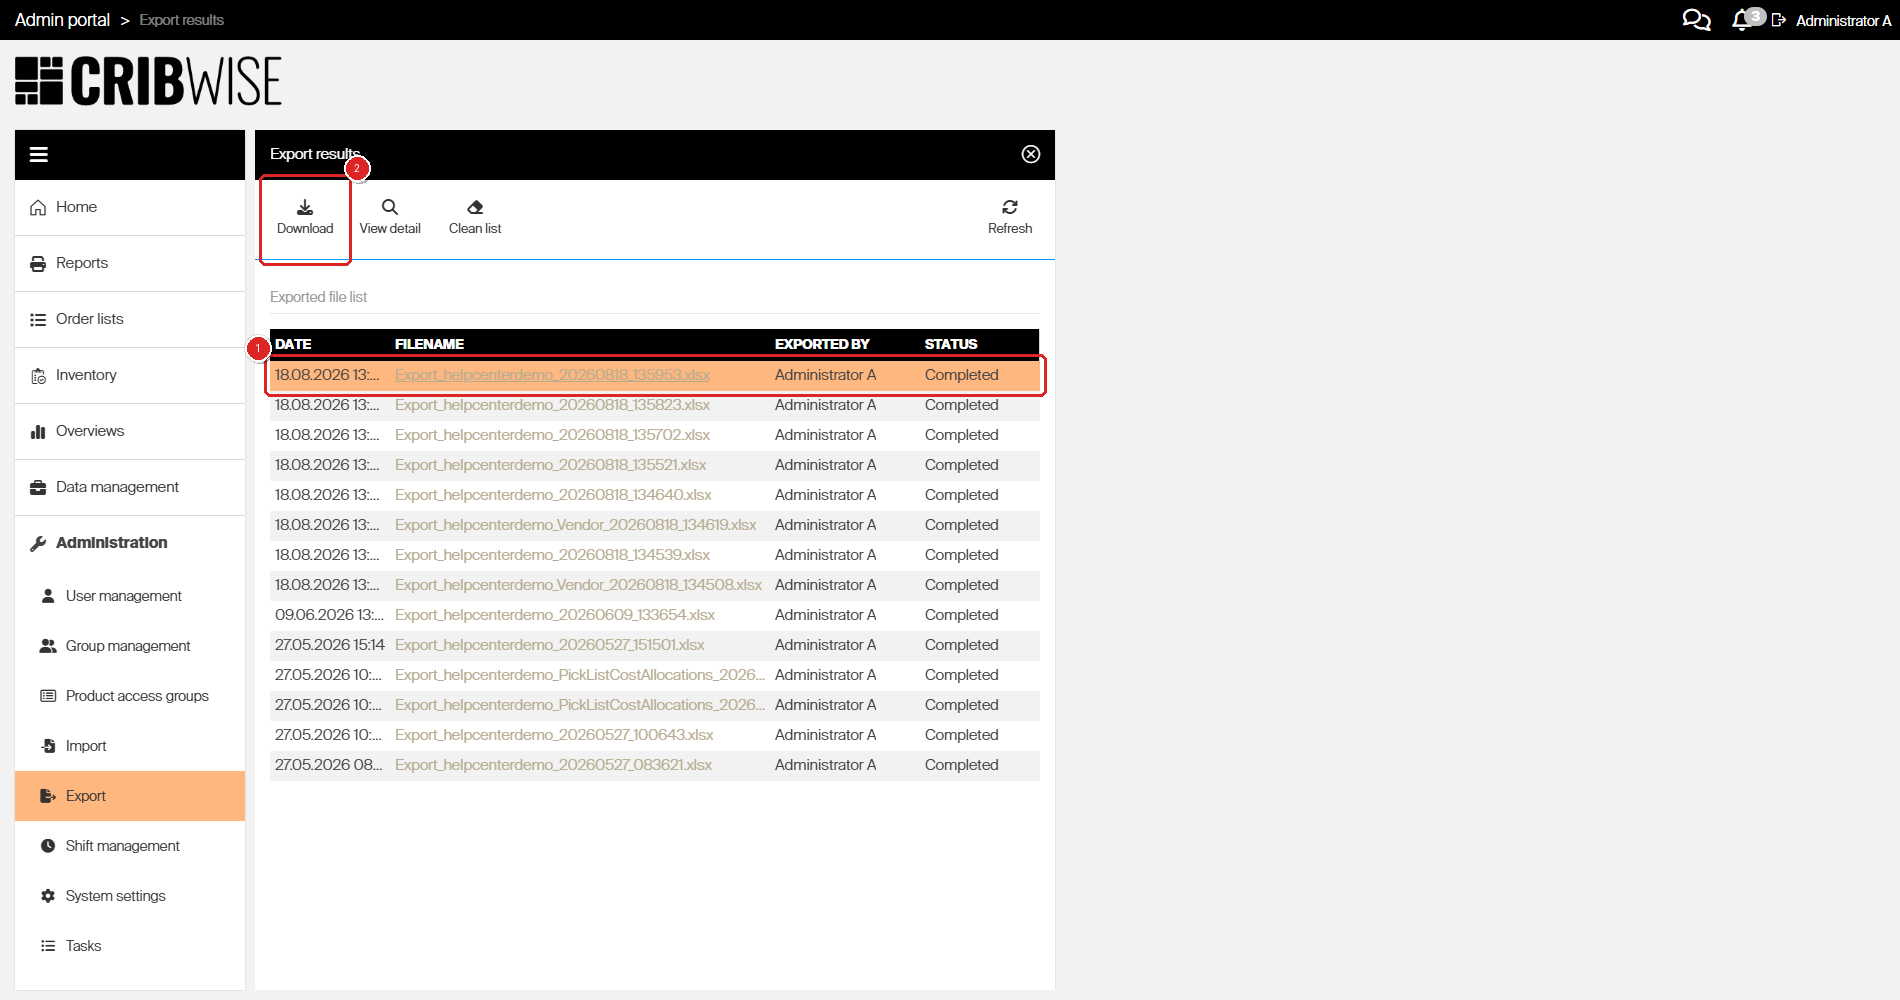
Success: The Excel file downloads and the finished export stays in the Results list.
Note: The export results list clears records older than six months automatically.
What the exported file contains
The export is a single Excel workbook. Each object you selected becomes one sheet, plus a Metadata sheet describing the export itself.
Sheet names use the system’s internal object names, which are usually the singular form of the label in the picker. Objects that depend on other data can add extra sheets so the file stays importable.
For example, exporting Currencies, Vendors, and Stocks in one run produces:
| Sheet | Contents |
|---|---|
| Metadata | Details of the export run itself |
| Currency | The Currencies you selected |
| Vendor | The Vendors you selected |
| Stock | The Stocks you selected |
| OrderTemplate | Related data added automatically alongside Stocks |
If you export an object that contains pictures (cost allocation steps, cost allocation definitions) or item documents, CRIBWISE also offers a ZIP archive with those files. The Excel file references them by file name, so keep the ZIP with the workbook.
Next steps
- Edit the values, not the structure — if the file is going back in, change only cell values. Leave the sheets, columns, and headers exactly as exported.
- Import the file back — see How to import item data into the system.
Troubleshooting
| Problem | Likely cause | Fix |
|---|---|---|
| A later import using the exported file fails | The file was exported with only the default attributes, so required columns are missing | Export again. Select two or more objects, or click Select all under Select attributes. |
| The Select attributes list is not shown | More than one object is selected | This is expected — all attributes are exported automatically. Clear all but one object if you want to choose columns. |
| Columns are missing from the exported sheet | Those attributes were left cleared in Select attributes | Run the export again and click Select all above the attribute list. |
| The export takes several minutes to prepare | High server workload or a large amount of data | Wait for the confirmation message, then download the file from the Results list. |
| An older export is no longer in the results list | Export results older than six months are cleared automatically | Run the export again to generate a fresh file. |
| Pictures or documents are missing from the workbook | Images and documents ship in a separate ZIP archive, referenced by file name | Download the ZIP offered alongside the Excel file and keep the two together. |
Related articles
- How to import item data into the system — load data back in using the exported file as a template
- How to set up custom data export (FTP, Azure, email) — schedule exports to an external destination instead of downloading them
- How to use the event log for auditing — review system events, including exports
- All system settings quick reference — configure system-wide behavior and defaults