
What you can do
Connect an Auth0 tenant to CRIBWISE Admin Portal as a SAML 2.0 identity provider, so your users sign in to Admin Portal with their Auth0 credentials.
Auth0 has no SAML application template. You create a plain application and then add SAML support to it as an addon, configured through a JSON editor. Three Auth0 quirks will break the login if you get them wrong, and each one is called out where it applies.
Before you start
- You need Admin Portal access with permission to open Administration > System settings.
- You need administrator access to the Auth0 Dashboard, with permission to create applications.
- Every user who should sign in through Auth0 must already exist in Admin Portal, with an e-mail address that exactly matches their Auth0 account’s e-mail. See How to create and manage users.
- Those users must belong to a user group with the AP users role. Without it, authentication succeeds but Admin Portal refuses the login.
- All Admin Portal e-mail addresses must be unique. If two users share one, activation is blocked.
- Each user must also exist as an end user in one of the Auth0 tenant’s connections. Your own Auth0 Dashboard login does not count — see step 6.
Warning: Once SSO is active, username and password login to Admin Portal is disabled. Keep Access for account administrators set to Allowed on the same Access control tab, so you retain a way in from the Customer Management Portal if the Auth0 configuration turns out to be wrong.
SSO covers Admin Portal only. Shop Floor Interface users keep signing in with their Admin Portal credentials, an RFID card, a barcode, or a Coges key.
Quick start
Experienced users — connect Auth0 in 6 steps:
- In Admin Portal, open System settings > Access control > Set up SSO and copy the Entity ID and both consumer URLs.
- In Auth0, create a Regular Web Application and enable the SAML2 Web App addon on it.
- In the addon’s Settings JSON, set
audience,logout.callback, and the e-mailnameIdentifierproperties. - Add both the plain and the
:443variant of the login consumer URL to the application’s Allowed Callback URLs. - From the addon’s Usage tab, take the login URL and the SHA-1 fingerprint, and read the logout URL out of the metadata.
- Back in Admin Portal, fill in Login URL, Certificate thumbprint (colons removed), and Logout URL, click Save settings, then Set active.
Need more detail? Follow the full steps below.
Which value goes where
Seven values move between the two systems. Putting one of them in the wrong field is the most common cause of a failed setup, so keep this table open while you work.
| Value | Produced by | Goes into |
|---|---|---|
| Entity ID | Admin Portal | Auth0 — the addon’s audience property |
| Login consumer URL (ACS URL) | Admin Portal | Auth0 — the addon’s Application Callback URL, and the application’s Allowed Callback URLs list |
| Logout consumer URL | Admin Portal | Auth0 — the addon’s logout.callback property |
| SAML signing certificate (optional) | Admin Portal (download) | Auth0 — the addon’s signingCert property, for the optional hardening in step 7 |
| Identity Provider Login URL | Auth0 | Admin Portal — Login URL |
| Identity Provider Logout URL | Auth0 | Admin Portal — Logout URL |
| IdP signing certificate SHA-1 fingerprint | Auth0 | Admin Portal — Certificate thumbprint |
Two different certificates are in play, in opposite directions. Auth0’s certificate fingerprint goes to Admin Portal, so Admin Portal can verify the assertion. CRIBWISE’s certificate goes to Auth0 only if you enable the optional signed-request check in step 7. Swapping the two causes a redirect loop.
Steps
Step 1 — Collect the Admin Portal values
In the Admin Portal, go to Administration, select System settings, then open the Access control tab.
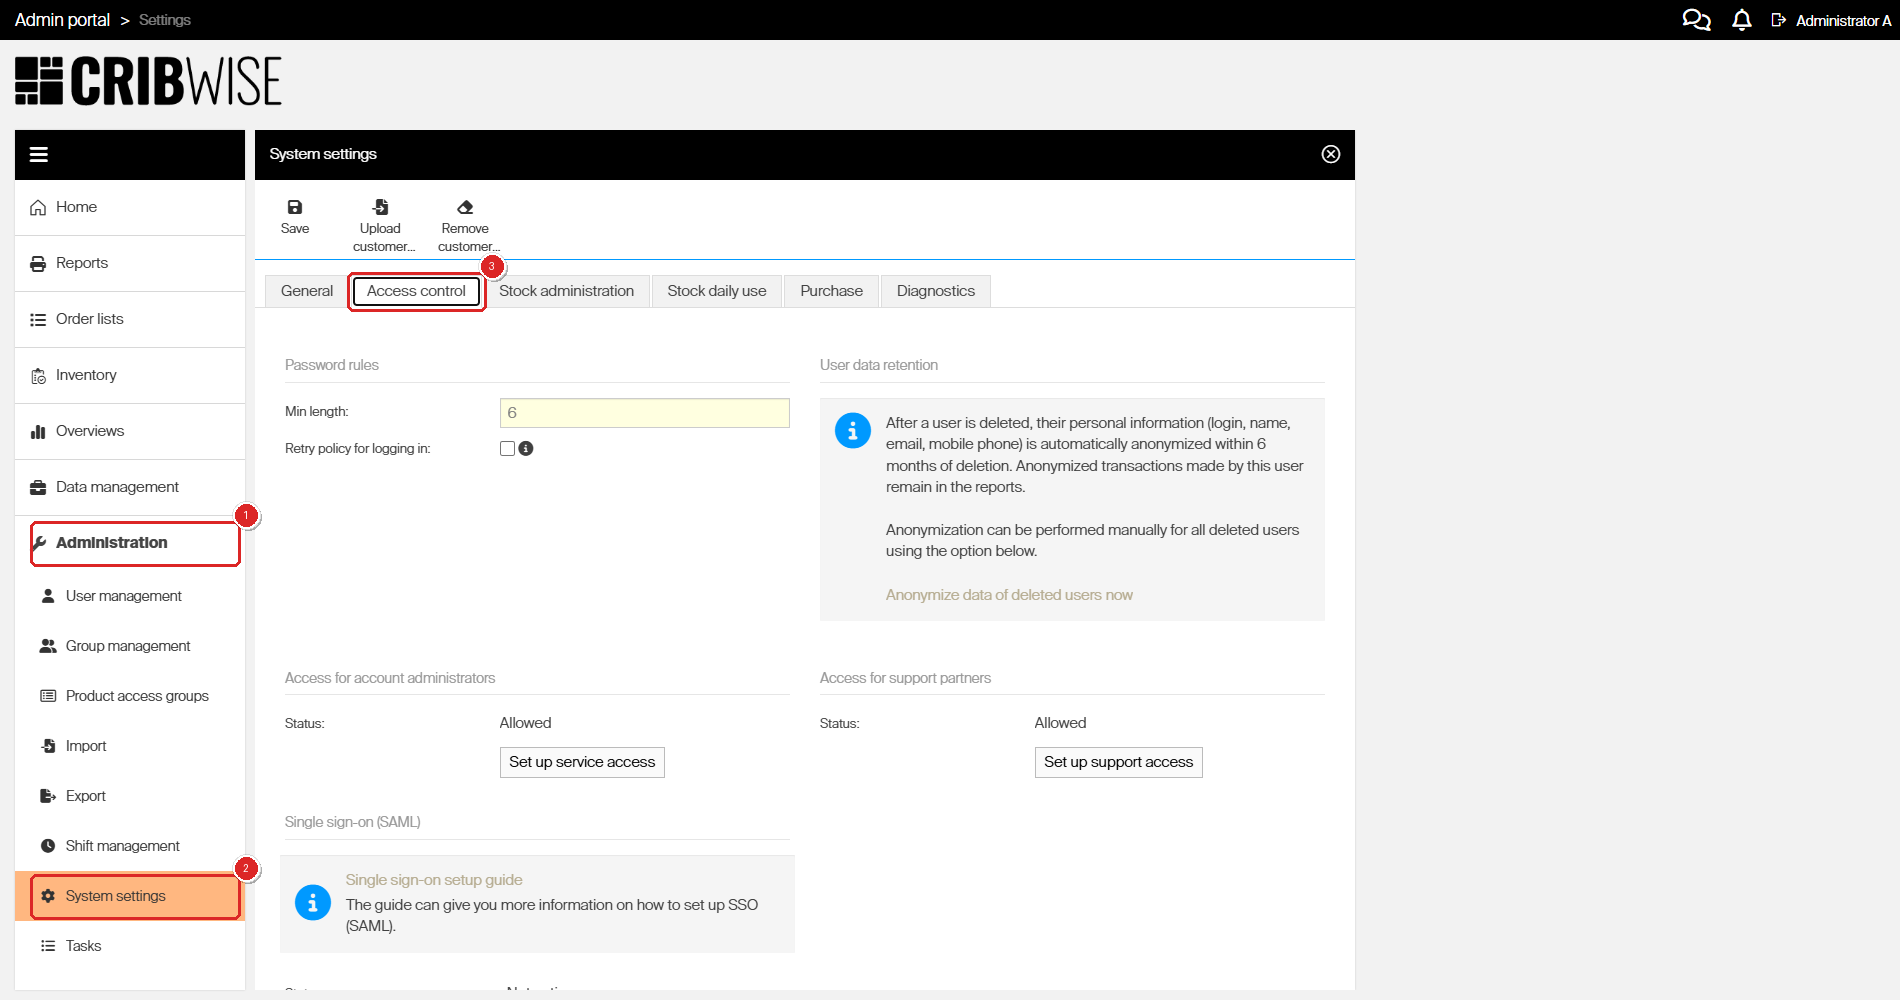
SSO lives on the Access control tab of System settings, not in its own menu entry.
Scroll to the bottom of the tab. The Single sign-on (SAML) section shows the current status — Not active until you finish this guide. Click Set up SSO.
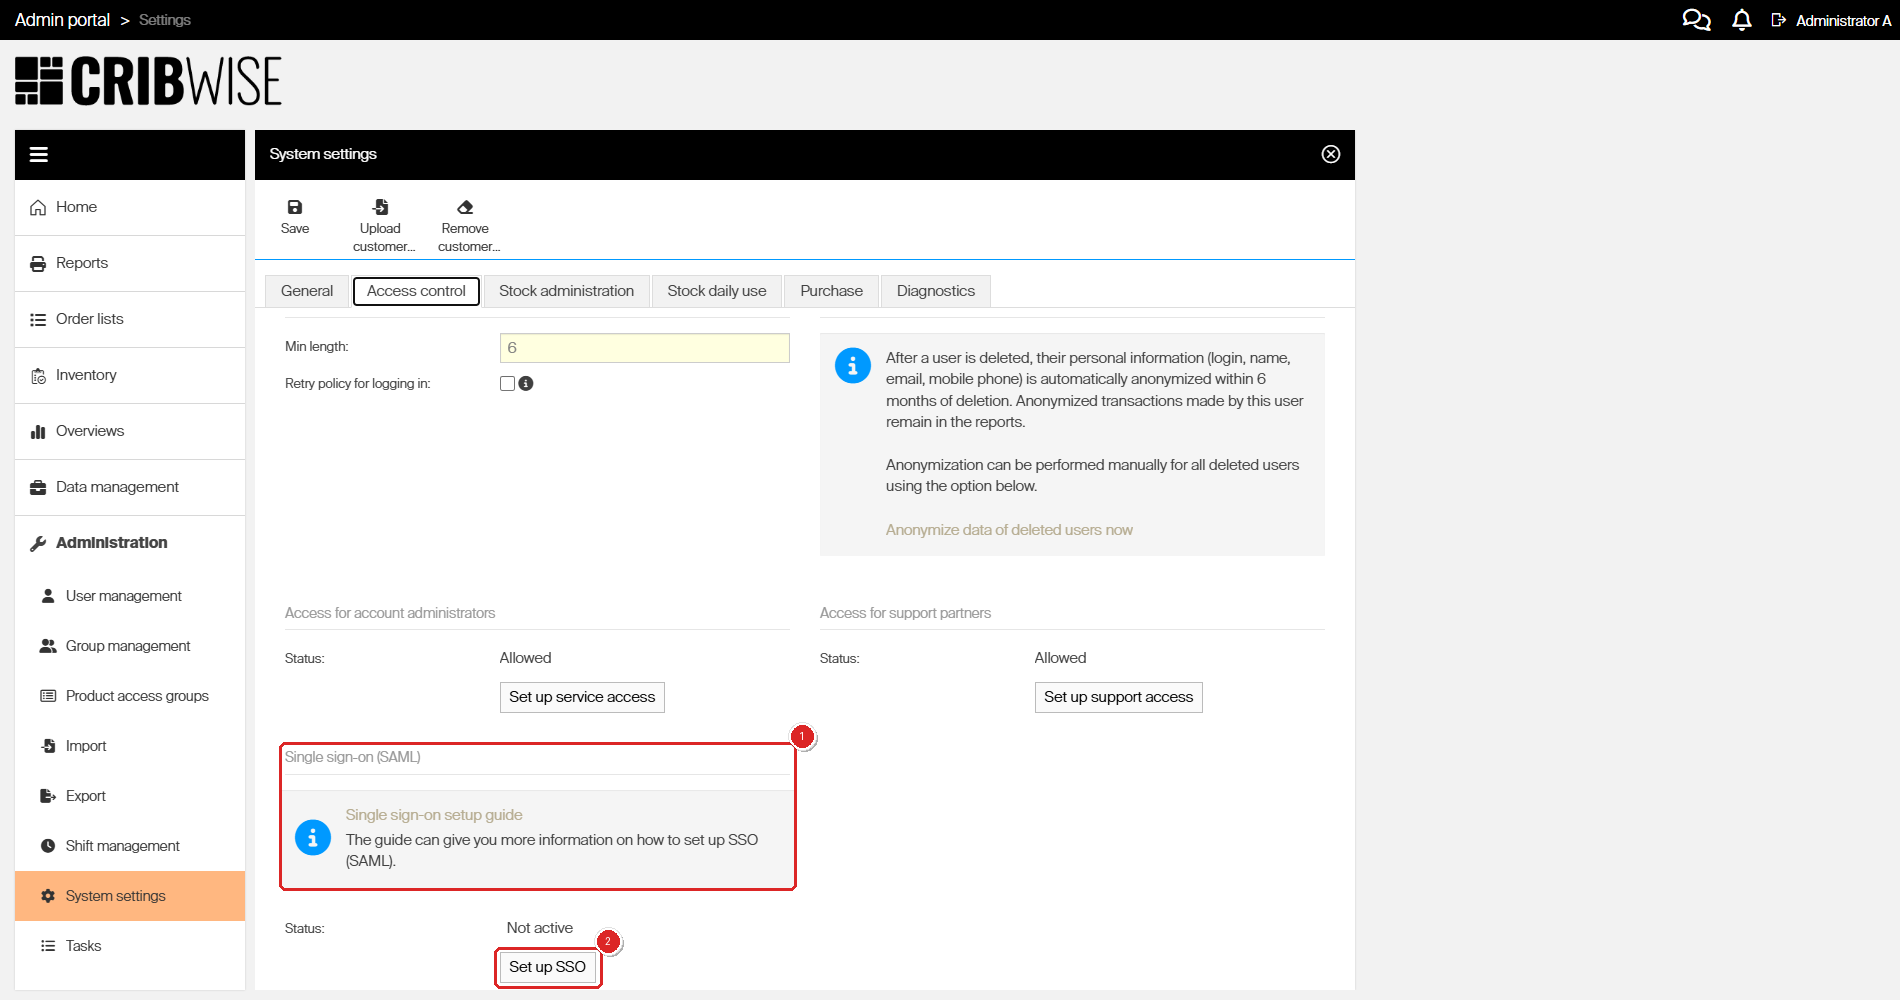
(1) the Single sign-on (SAML) section and its status, and (2) the Set up SSO button that opens the panel.
The Single sign-on panel opens on the right. Its three lower rows are read-only and belong to your tenant — these are the values Auth0 needs.
- Copy the Entity ID, the Login consumer URL, and the Logout consumer URL. Use the copy button at the end of each row.
- If you plan to do the optional hardening in step 7, click Download signature certificate and save the
.crtfile. You can skip this otherwise. - Leave this panel open. You come back to it in step 5.
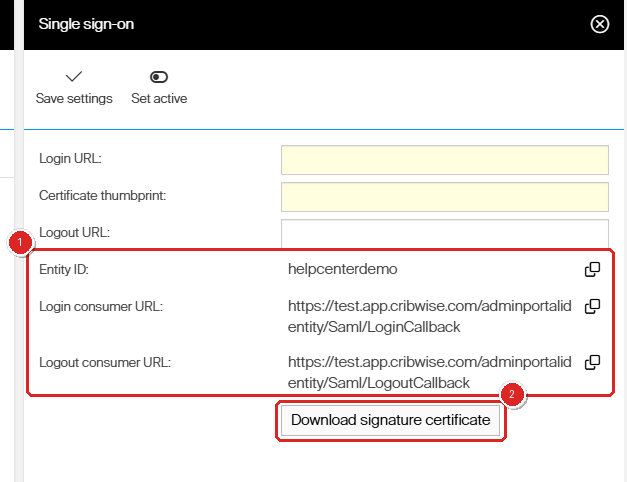
(1) the three read-only values to copy into Auth0, and (2) the certificate download, needed only for the optional hardening in step 7.
| Field | Read-only | What it is |
|---|---|---|
| Login URL | No — required | You fill this in step 5, with Auth0’s Identity Provider Login URL. |
| Certificate thumbprint | No — required | You fill this in step 5, with Auth0’s SHA-1 fingerprint, colons removed. |
| Logout URL | No — optional | You fill this in step 5, with Auth0’s logout URL. Leave it empty and Single Logout does not work. |
| Entity ID | Yes | The service provider identifier for your tenant. It is your tenant’s short name, for example helpcenterdemo. |
| Login consumer URL | Yes | Where Auth0 posts the SAML response: https://<host>/adminportalidentity/Saml/LoginCallback. |
| Logout consumer URL | Yes | Where Auth0 posts the logout request: https://<host>/adminportalidentity/Saml/LogoutCallback. |
Step 2 — Create the application in Auth0
- In the Auth0 Dashboard, go to Applications > Applications.
- Click Create Application. Create a new one rather than reusing an existing application.
- Enter a recognizable name such as
CRIBWISE SSO. - Select Regular Web Application, then click Create.
- Open the new application and go to its Addons tab.
- Click the SAML2 Web App card. The addon dialog opens.
Step 3 — Configure the SAML2 addon
- On the addon dialog’s Settings tab, paste the Admin Portal Login consumer URL into Application Callback URL. Use the plain path, with no port.
- In the Settings JSON editor below it, replace the commented-out template with this:
{
  "audience": "<your Entity ID>",
  "logout": {
    "callback": "https://<host>/adminportalidentity/Saml/LogoutCallback"
  },
  "nameIdentifierFormat": "urn:oasis:names:tc:SAML:1.1:nameid-format:emailAddress",
  "nameIdentifierProbes": [
    "http://schemas.xmlsoap.org/ws/2005/05/identity/claims/emailaddress"
  ]
}
| Property | What to set it to | Why it matters |
|---|---|---|
audience |
The Admin Portal Entity ID. | Identifies CRIBWISE as the service provider. |
logout.callback |
The Admin Portal Logout consumer URL. | Where Auth0 sends the user after a Single Logout. |
nameIdentifierFormatnameIdentifierProbes |
Exactly the values shown above. | Forces the SAML Subject/NameID to be the user’s e-mail address. Without them, Auth0 sends its internal user_id (such as auth0|abc123), which never matches an Admin Portal user. |
recipientdestination |
Leave both unset. | Auth0 then mirrors whatever AssertionConsumerServiceURL Admin Portal actually sent. Setting them to the plain URL causes a recipient mismatch. |
- Click Enable. On later edits the same button reads Save.
Step 4 — Allow both callback URLs
The application keeps a second, separate allow-list of callback URLs, on its Settings tab rather than the Addons tab. Both lists must be filled in.
- Go to the application’s Settings tab.
- Scroll to Application URIs > Allowed Callback URLs.
- Add the plain login consumer URL:
https://<host>/adminportalidentity/Saml/LoginCallback - Add the port-qualified variant as well:
https://<host>:443/adminportalidentity/Saml/LoginCallback - Click Save.
Important: The port-qualified variant is not optional. The Single sign-on panel displays the plain path, but at runtime Admin Portal puts an explicit
:443port and areturnUrlquery string into theAssertionConsumerServiceURLof its signed request. If only the plain URL is allowed, Auth0 rejects the login with “Callback URL mismatch. The provided redirect_uri is not in the list of allowed callback URLs.”
Step 5 — Collect the Auth0 values and finish in Admin Portal
Reopen the SAML2 Web App addon and switch to its Usage tab. Three of the values you need are there:
| On the Usage tab | Looks like | Use it as |
|---|---|---|
| Identity Provider Login URL | https://<auth0-domain>/samlp/<client-id> |
Admin Portal Login URL |
| Identity Provider SHA1 fingerprint | 40 hex characters separated by colons | Admin Portal Certificate thumbprint, colons removed |
| Identity Provider Metadata | https://<auth0-domain>/samlp/metadata/<client-id> |
Where you read the logout URL, below |
The logout URL is not shown on the Usage tab. Open the metadata URL in a browser and find the Location attribute of the <md:SingleLogoutService> element. It follows this pattern:
https://<auth0-domain>/samlp/<client-id>/logout
Important: Admin Portal expects the thumbprint as 40 uppercase hexadecimal characters with no separators. Auth0 displays the fingerprint with colons for readability, so strip them before pasting. A value with colons still lets you sign in to Auth0, but the return trip fails and the Admin Portal event log records “Thumbprint validation failed for user”.
On a single Auth0 tenant the same SHA-1 fingerprint can appear on several applications, because Auth0 may issue one tenant-level signing certificate for all SAML2 addons. Azure AD and Okta usually issue one certificate per application, so a repeated value here is expected rather than a mistake.
Now return to the Single sign-on panel you left open in step 1 and fill in the three editable fields:
- In Login URL, enter the Auth0 Identity Provider Login URL.
- In Certificate thumbprint, enter the SHA-1 fingerprint with the colons removed.
- In Logout URL, enter the Auth0 logout URL from the metadata.
- Click Save settings.
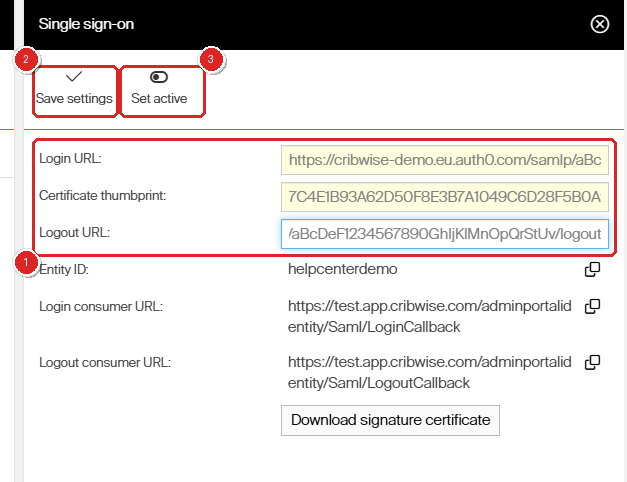
(1) the three Auth0 values you enter, (2) Save settings, and (3) Set active. The values shown here are examples.
Click Set active. Admin Portal re-checks that every user e-mail address is unique, then shows this warning.
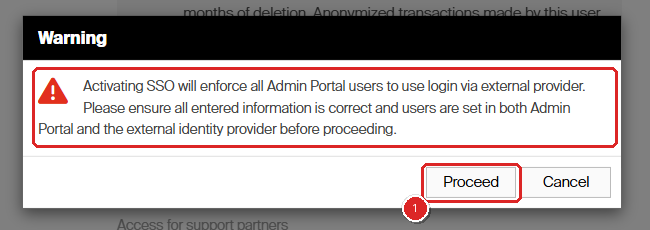
Read the warning before you continue. Cancel is safe — Proceed switches every Admin Portal user over to Auth0.
Confirm that your users exist on both sides, then click Proceed.
Success: The status in the Single sign-on (SAML) section changes from Not active to Active. Admin Portal now redirects new sign-in attempts to Auth0.
Step 6 — Create a test user and test before you log out
Warning: Do not close your current Admin Portal session yet. It is your fastest way back if the configuration is wrong.
Your Auth0 Dashboard login is a separate identity from the tenant’s end users. It does not automatically exist in any connection, so it usually cannot be used to test the SSO login. Check User Management > Users in Auth0 for a user whose e-mail matches an Admin Portal user, and create one if there is none:
- Go to User Management > Users and click Create User.
- Select the Username-Password-Authentication connection.
- Enter an e-mail address that matches an existing Admin Portal user, and set a password.
- Click Create.
Then test the round trip:
- Keep your existing, authenticated Admin Portal window open.
- Open a new private or incognito window and browse to your Admin Portal address.
- Sign in with the test user. Confirm that you are redirected to Auth0, that you can authenticate, and that you land back in Admin Portal.
- Sign out of Admin Portal and confirm that you are returned to the Auth0 login page. That confirms Single Logout works.
- If anything fails, switch back to your original window and deactivate SSO from the same Set up SSO panel, then re-check your values.
A user signing in for the first time is asked to accept the Acceptable Use Policy, exactly as with any other login method.
Step 7 (optional) — Require signed AuthnRequests
Admin Portal always signs its outgoing AuthnRequest, but Auth0 does not check that signature unless you tell it to. Enabling the check rejects unsigned and forged login attempts. It is extra hardening, not a requirement — SSO works without it.
- If you have not already, download CRIBWISE’s SAML signing certificate from the Single sign-on panel, as described in step 1.
- Open the SAML2 Web App addon’s Settings JSON.
- Add a
signingCertproperty holding the full PEM certificate, using\nfor the line breaks inside the JSON string:
{
  "audience": "<your Entity ID>",
  "logout": { "callback": "https://<host>/adminportalidentity/Saml/LogoutCallback" },
  "nameIdentifierFormat": "urn:oasis:names:tc:SAML:1.1:nameid-format:emailAddress",
  "nameIdentifierProbes": ["http://schemas.xmlsoap.org/ws/2005/05/identity/claims/emailaddress"],
  "signingCert": "-----BEGIN CERTIFICATE-----\nMIIDCj...\n-----END CERTIFICATE-----\n"
}
- Click Save and wait about 30 seconds for the change to propagate.
- Retest the login in a private window.
- To confirm the check is really being enforced, temporarily replace
signingCertwith an unrelated certificate. The login should now fail. Restore the correct certificate afterwards.
Next steps
- Review who can reach Admin Portal — check group membership and roles in the Admin Portal permissions reference.
- Decide on account administrator access — turning it off closes the last non-SSO route into the portal. See the All system settings quick reference.
- Onboard new users in three places — the Admin Portal user, the Auth0 connection, and the application’s enabled connections. A user missing from any of them cannot sign in.
Troubleshooting
| Problem | Likely cause | Fix |
|---|---|---|
| Auth0 shows “Callback URL mismatch” | The port-qualified ACS URL is missing from Allowed Callback URLs. | Add https://<host>:443/adminportalidentity/Saml/LoginCallback alongside the plain URL. See step 4. |
| The Admin Portal event log records “Thumbprint validation failed for user” | The Certificate thumbprint still contains colons, or does not match Auth0’s signing certificate. | Re-copy the fingerprint from the addon’s Usage tab and remove every colon before saving. |
| Auth0 says “Invalid username or password” during your test | You are signing in with your Auth0 Dashboard account, which is not an end user of the tenant’s connections. | Create a test user under User Management > Users with an e-mail matching an Admin Portal user. See step 6. |
| Auth0 authentication succeeds but Admin Portal denies access | The assertion carries Auth0’s internal user_id instead of an e-mail address, or no matching Admin Portal user exists. |
Confirm nameIdentifierFormat and nameIdentifierProbes are set as shown in step 3, and that the Admin Portal user has the same e-mail and the AP users role. |
| Redirect loop, or an immediate error after signing in to Auth0 | The Certificate thumbprint belongs to the CRIBWISE certificate instead of Auth0’s. | Use the fingerprint from Auth0’s Usage tab. The CRIBWISE certificate is only for the optional check in step 7. |
| A connection you expected is unavailable at login, such as Google | Connections must be enabled per application in Auth0, even when they already exist at tenant level. | Enable the connection on the application’s Connections tab. |
| Set active is refused | Two or more Admin Portal users share the same e-mail address. | Make every e-mail address unique, then activate again. |
| Signing out of Admin Portal leaves the Auth0 session open | Logout URL is empty in Admin Portal, or logout.callback is missing from the addon JSON. |
Fill in both, then retest the logout round trip. |
| Nobody can sign in to Admin Portal after activation | SSO is active and access for account administrators is disabled. | Sign in through the Customer Management Portal if that access is still Allowed. Otherwise contact CRIBWISE support to deactivate SSO. |
Related articles
- How to configure Single Sign-On (SSO) — the general SSO guide, with an Azure AD walkthrough.
- How to configure Single Sign-On (SSO) with Okta — the same setup against Okta, which does have a SAML app template.
- How to create and manage users — create the Admin Portal users that Auth0 identities map onto.
- How to create and configure a user group — grant the AP users role that SSO logins require.
- Admin Portal permissions reference — what each role and permission controls.
- All system settings quick reference — the rest of the Access control tab, including access for account administrators.
- How to log in to Shop Floor Interface — why Shop Floor Interface sign-in is unaffected by SSO.