How to create and configure a user group
Read time: ~7 minutes
Applies to: Admin Portal
What you can do
Create a user group that defines which applications, features, and data its members can access — then assign users to it.
Before you start
- You need Administrator privileges in Admin Portal.
- Decide what role this group represents (e.g., Operators, Purchasers, Stock Administrators, or custom).
- Know which applications members need access to (Admin Portal, SFI, or both).
- For a full explanation of how the permission model works, see Understanding user groups and permissions.
Quick start
Experienced users — create a group in 5 steps:
- Go to Administration > Group management.
- Click New group.
- Enter name and description, enable access types.
- Configure AP Privileges and SFI Privileges tabs.
- Click Save group.
Need more detail? Follow the full steps below.
Steps
Step 1 — Open group management
- In the left sidebar, click Administration.
- Click Group management.
The group list shows all existing user groups with their names and number of assigned users.
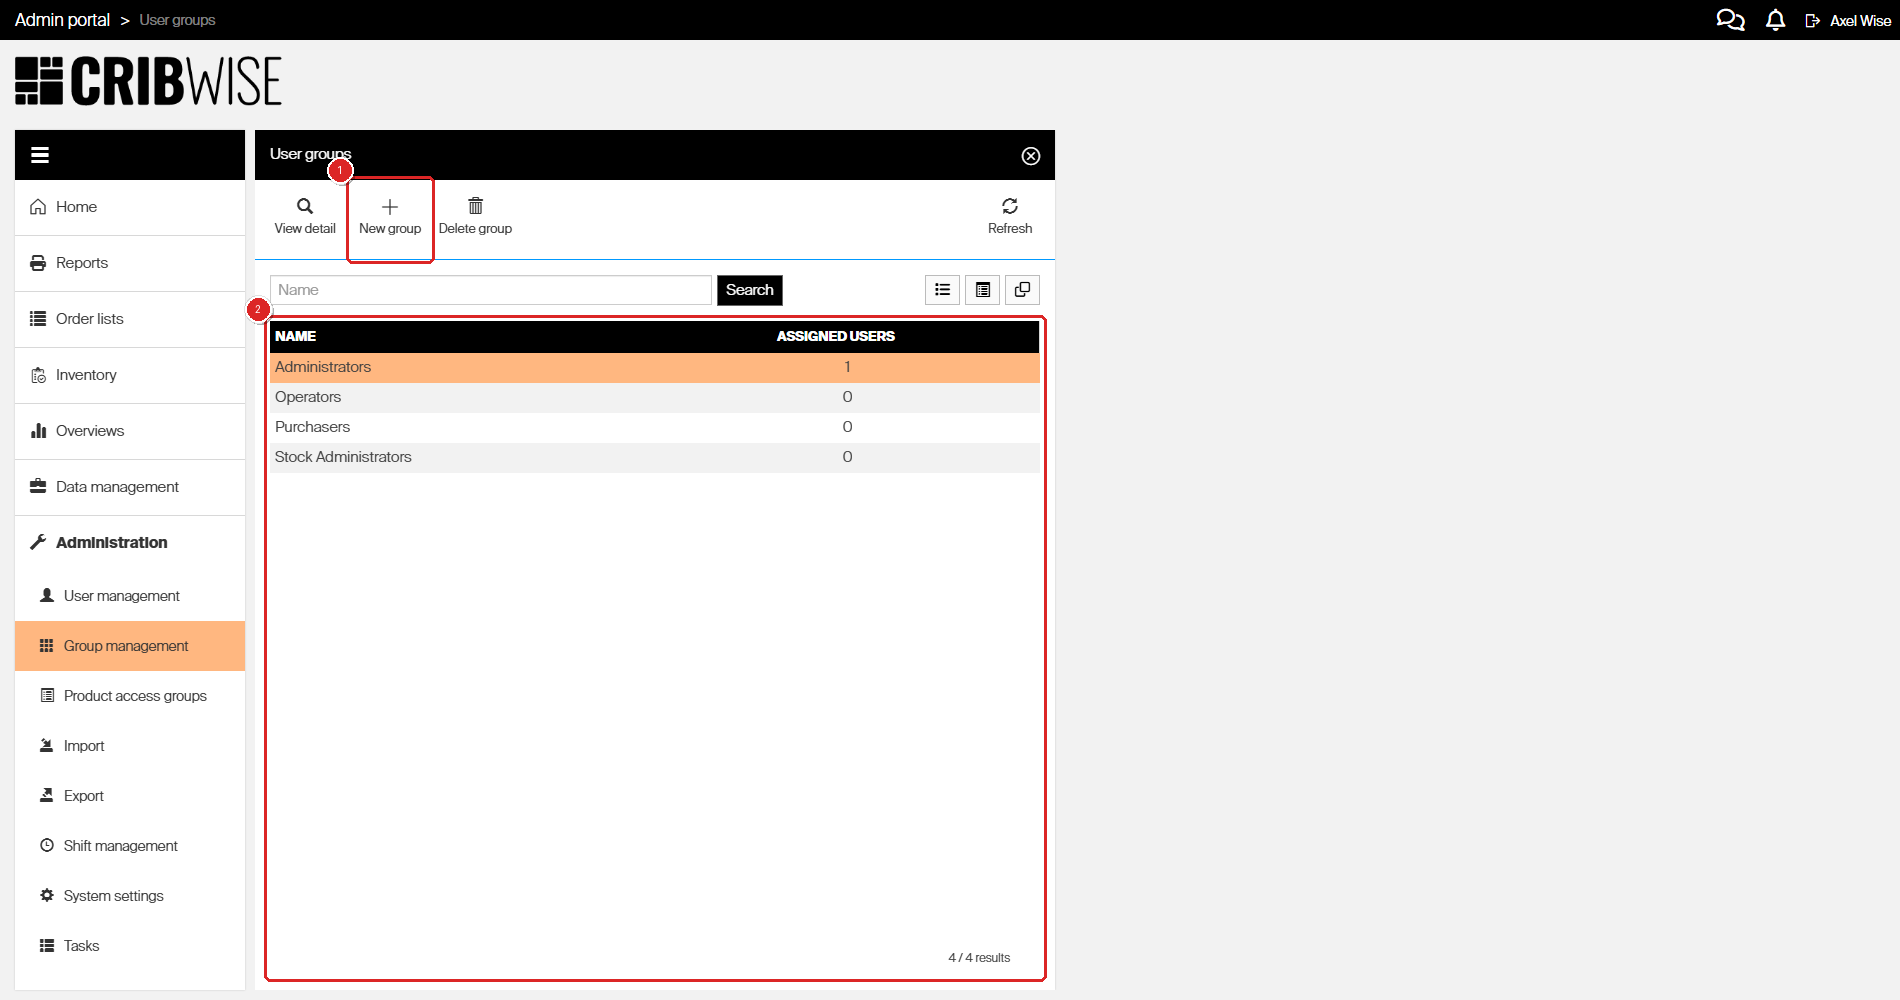
The group management list — click New group to create a new user group.
Step 2 — Create the group
- Click New group in the toolbar.
- In the Name field, enter a descriptive name (e.g., “Operators” or “Purchasers”).
- In the Description field, describe the group’s purpose.
Step 3 — Set access types
On the General information tab, enable the access types for this group:
| Checkbox | Enable when |
|---|---|
| Admin portal users | Members need to use Admin Portal |
| Shop floor interface users | Members need to use SFI on storage devices |
| API users (Deprecated) | Members need API access for ERP integration |
| BI users (Deprecated) | Members need remote access to reporting data |
| Administrators | Members are granted the highest privileges. This overrides all settings on the AP Privileges and SFI Privileges tabs. Data access, PAG, and cost allocation restrictions still apply. |
Important: The Administrators checkbox grants full access to all AP and SFI features. Only enable it for users who truly need unrestricted access. Data access restrictions, PAG, and cost allocation rules still apply even for administrators.
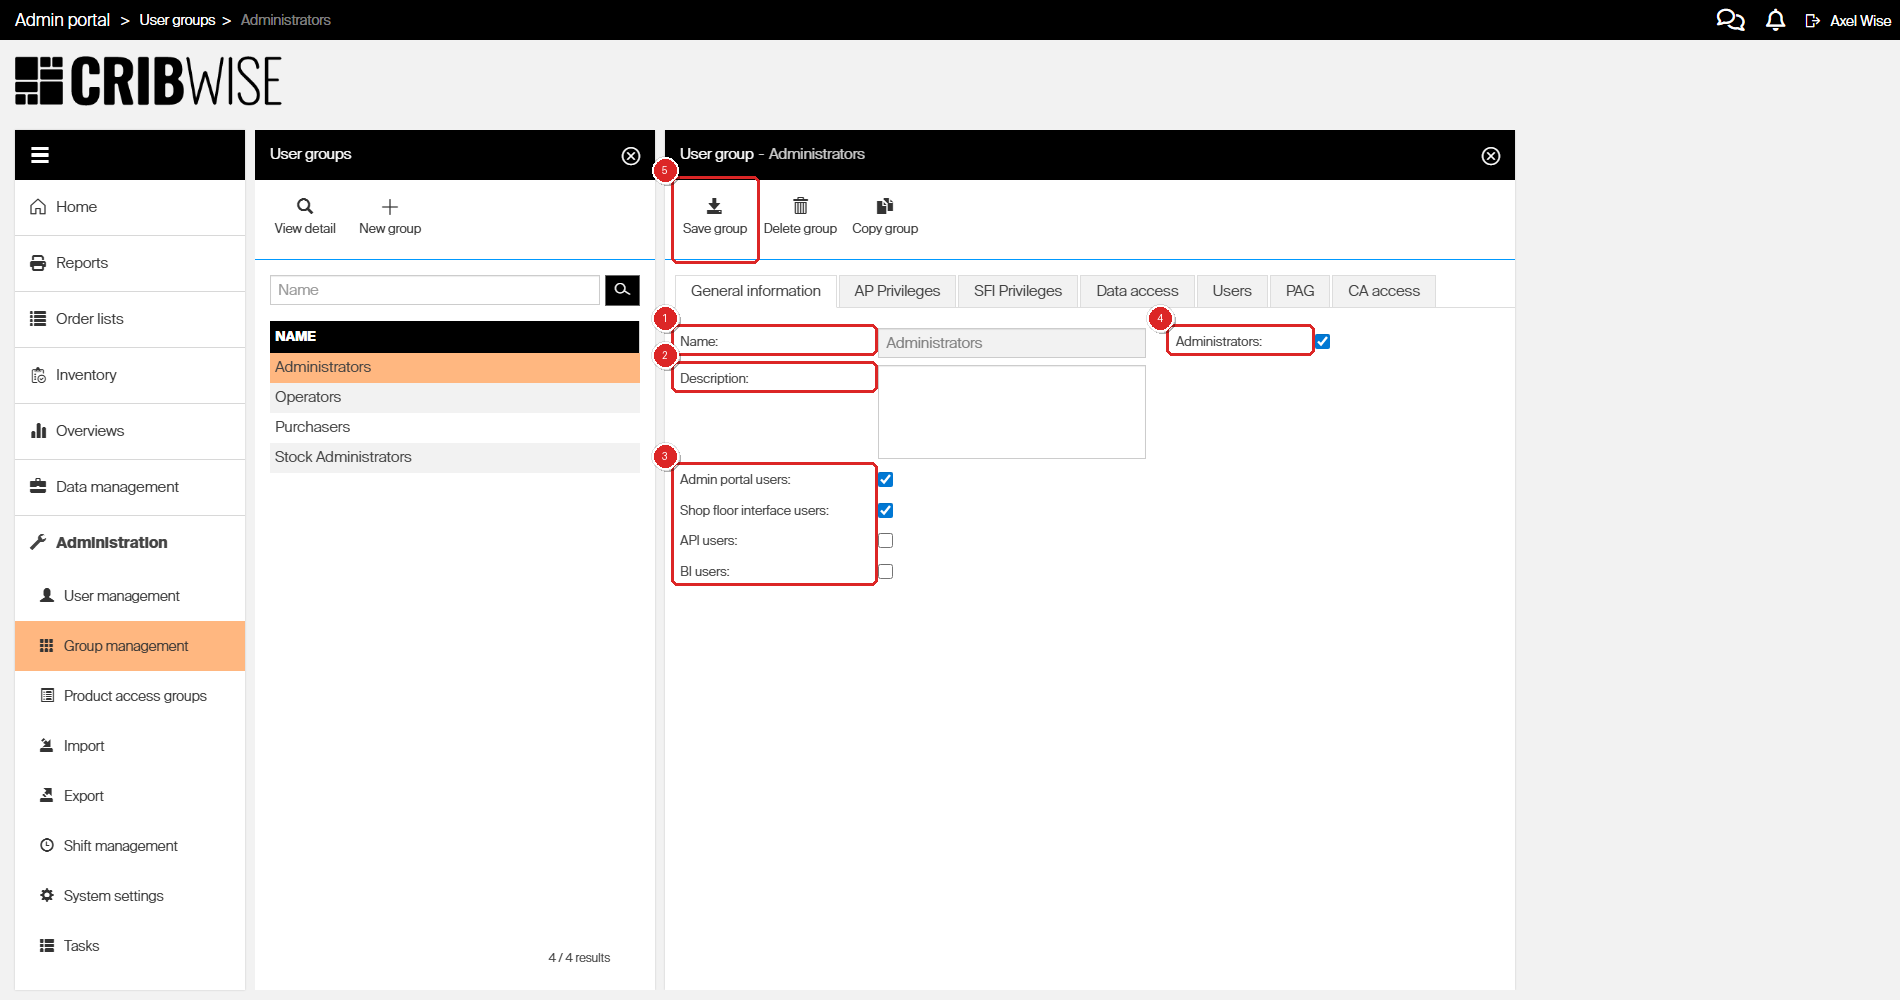
The General information tab — set the group name, description, and access types.
Step 4 — Configure Admin Portal permissions
- Click the AP Privileges tab.
- Enable or disable each permission based on what this group should be able to do in Admin Portal.
Permissions are organized into three sections:
AP General Privileges
| Setting | Description |
|---|---|
| Perform inventory from Admin portal | Start inventory of an open storage device from Admin Portal |
| Enable privileges override | Override user group settings at the individual user level |
| Export | Export data to Excel |
| Import | Import data via Excel |
| Manage consignment invoice requests | Manage consignment invoice requests. When disabled, automatic invoicing cannot be set up on vendors, invoice requests cannot be accessed, and invoice templates cannot be managed |
| Manage integrations | Set up ERP interfaces, generate and read API keys, and manage ready-to-use integrations to third-party systems |
| Run tasks | Start periodic system tasks manually on demand (e.g., recalculation of access rights or generation of reporting data) |
| Access Event log | Access the Event log |
| View item overviews | Access Item overview |
| Access dashboard | View the dashboard on the AP home screen and pin reports to it |
| ABC classification | Access and perform ABC classification of items based on historical consumption |
| Stock optimization | Access and perform stock optimization based on historical consumption and purchasing schedule |
AP System Settings Privileges
| Setting | Description |
|---|---|
| General settings | General settings tab in system settings |
| Stock administration | Stock administration tab in system settings |
| Purchase | Purchase tab in system settings |
| Access control | Access control tab in system settings |
| Stock daily use | Stock daily use tab in system settings |
| Diagnostics | Diagnostics tab in system settings |
AP Entity Privileges
Entity privileges control create, read, update, and delete permissions for specific objects like items, vendors, orders, and other entities.
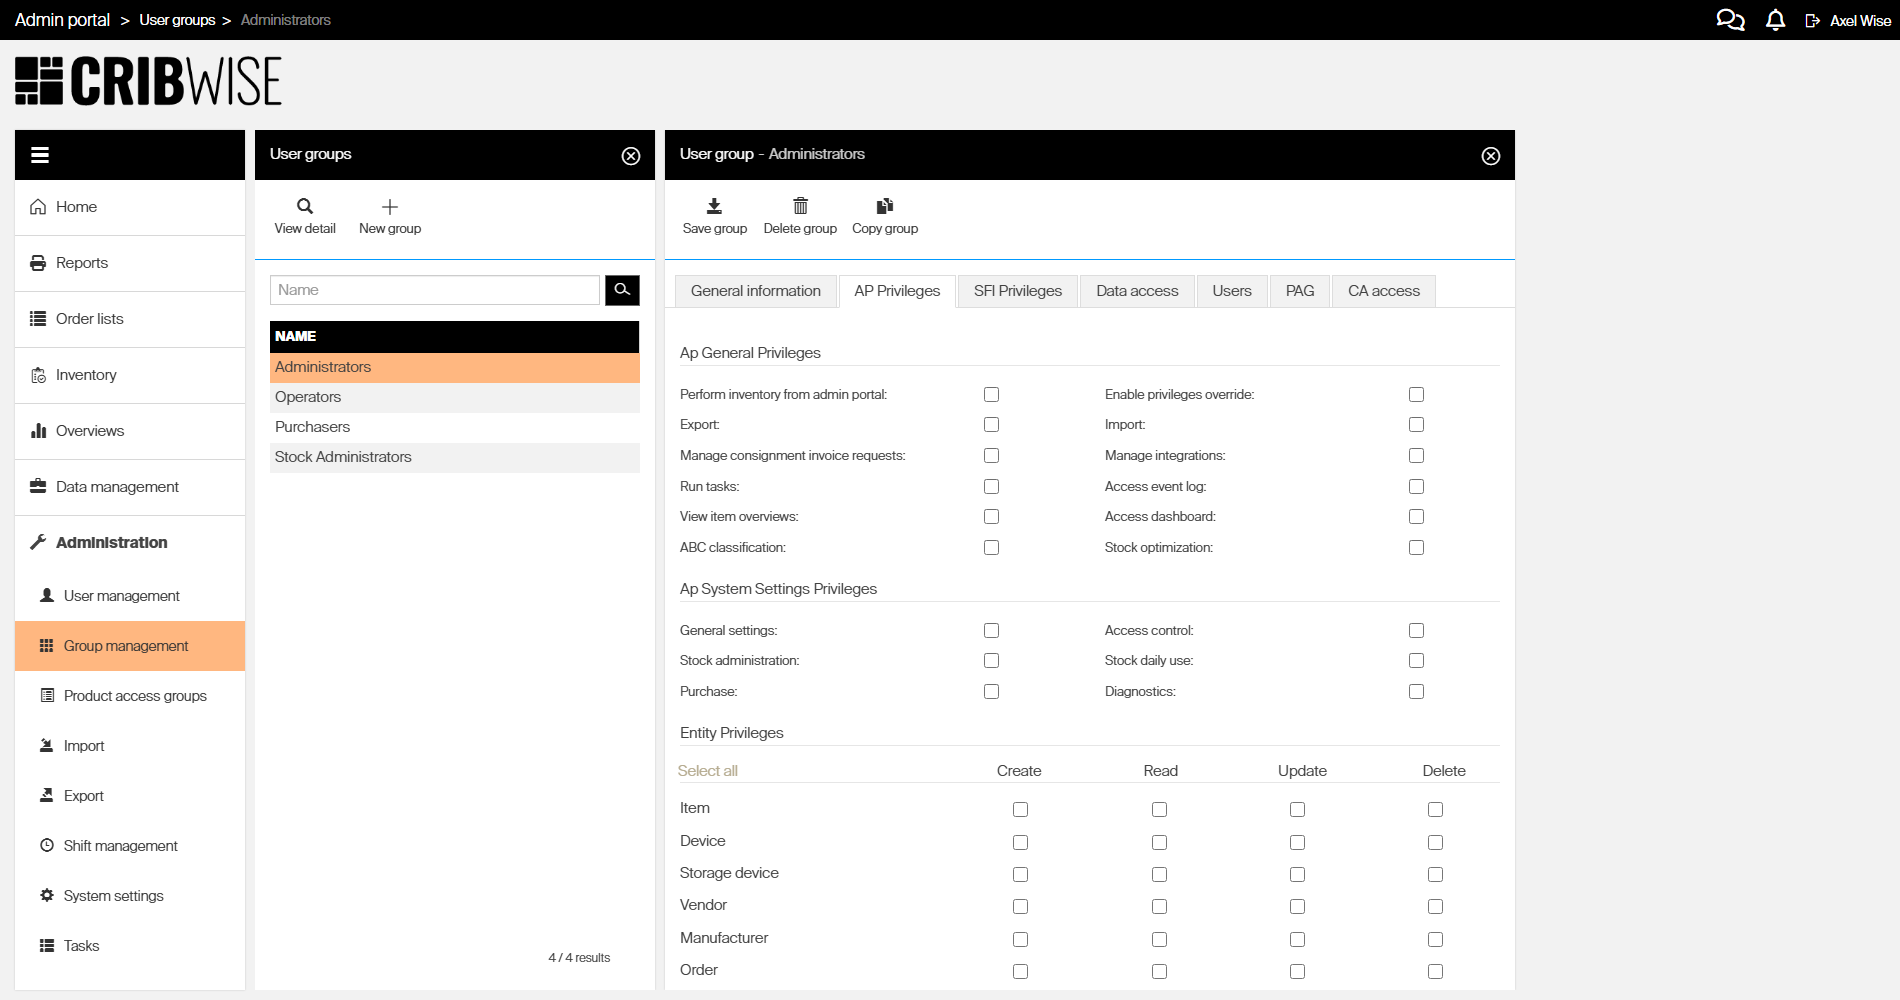
The AP Privileges tab — enable the permissions this group needs in Admin Portal.
Step 5 — Configure SFI permissions
- Click the SFI Privileges tab.
- Enable or disable each permission based on what this group should be able to do in SFI.
Permissions are organized into three sections:
SFI General Privileges
| Setting | Description |
|---|---|
| Assign items | Assign or edit assignment of items to stock locations |
| View price | Show the price of an item during picking |
| Perform inventory | Perform inventory on SFI |
| Restock without order | Restock items without selecting an order (must also be enabled on the vendor) |
| Exit application | Exit the SFI application and access the operating system (relevant for on-premise installations) |
| Restock | Perform restock (with or without an order) |
| Perform inventory during restock | Confirm or change the quantity in a location during the restock process. Requires the Restock permission. Independent of the Perform inventory permission |
| Update SFI application | Start an update of the SFI application |
| Setup locations | Manage storage device structure — create locations in open storage devices, Lista LDC drawers, Sielaff ASK200, or AutoCrib TX750 |
SFI Picking Privileges
| Setting | Description |
|---|---|
| Pick items | Pick items without a predefined pick list |
| Pick predefined pick lists | Pick items according to a predefined pick list |
| Pick items with Phase in status | Pick items in Phase in status. The Pick items permission is still required. Items in Phase in status can still be picked during phasing in of alternative items even without this permission |
| Override pick rules | Select the condition of a picked item (new, used, or refurbished) |
| Override cost allocation rules | Override all restrictions from the cost allocation setup |
| Change quantity during pick | Change the picked quantity from a location after it is accessed, without limitation of dispense package size or PAG restrictions. Available during regular pick, pick for transfer, and pick for service. Only works on open storage devices |
| Cancel picking | Interrupt the picking flow at any stage. If disabled, the cancel button is hidden and the operator must always finish the picking flow |
SFI Returning Privileges
| Setting | Description |
|---|---|
| Return as used | Return durable items as used |
| Return as not used | Return all items as not used (cancel pick) |
| Return for service | Return durable items to a service location |
| Return as scrap | Discard a picked item |
| Return for recycle | Return all items to a location set for recycling |
Important: Revoking all SFI privileges removes every action available to the user on SFI.
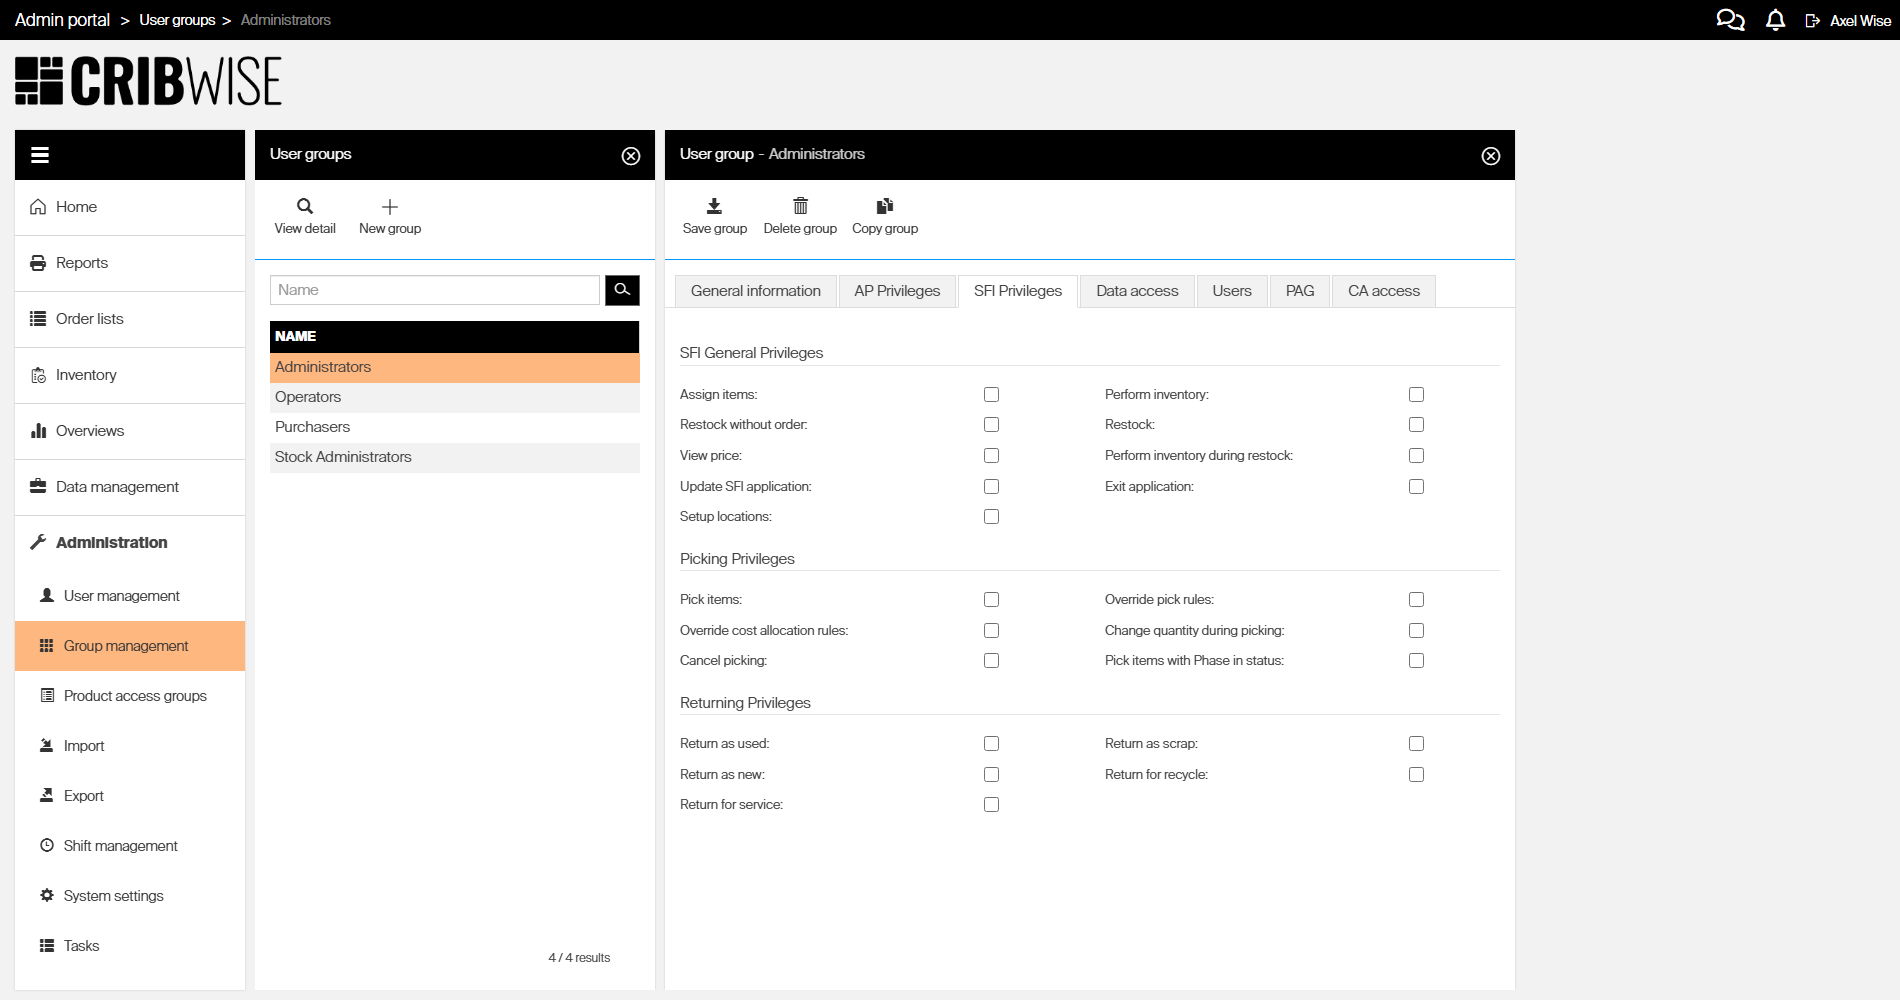
The SFI Privileges tab — enable the permissions this group needs on Shop Floor Interface.
Step 6 — Configure data access (optional)
- Click the Data access tab.
- To restrict which objects the group can see, enable a restriction and select the allowed objects.
- Click Save group to apply the changes.
If you leave all restrictions unchecked, the group can see all data. The following restrictions are available:
| Restriction | Description |
|---|---|
| Stock access | Restricts access to selected stocks. Devices from unselected stocks are hidden in Admin Portal, and users cannot log in to SFI on those devices |
| Device access | Restricts access to selected devices. Unselected devices are hidden in Admin Portal, and users cannot log in to SFI on those devices |
| Report access | Restricts access to selected reports. Unselected reports are hidden in Admin Portal |
| Vendor access | Restricts access to selected vendors. Items assigned to unselected vendors and all related orders and lists are hidden in both AP and SFI |
| User group access | Restricts access to selected user groups. Unselected groups are hidden in Admin Portal |
To remove a restriction and restore full access, uncheck the restriction checkbox and save the group.
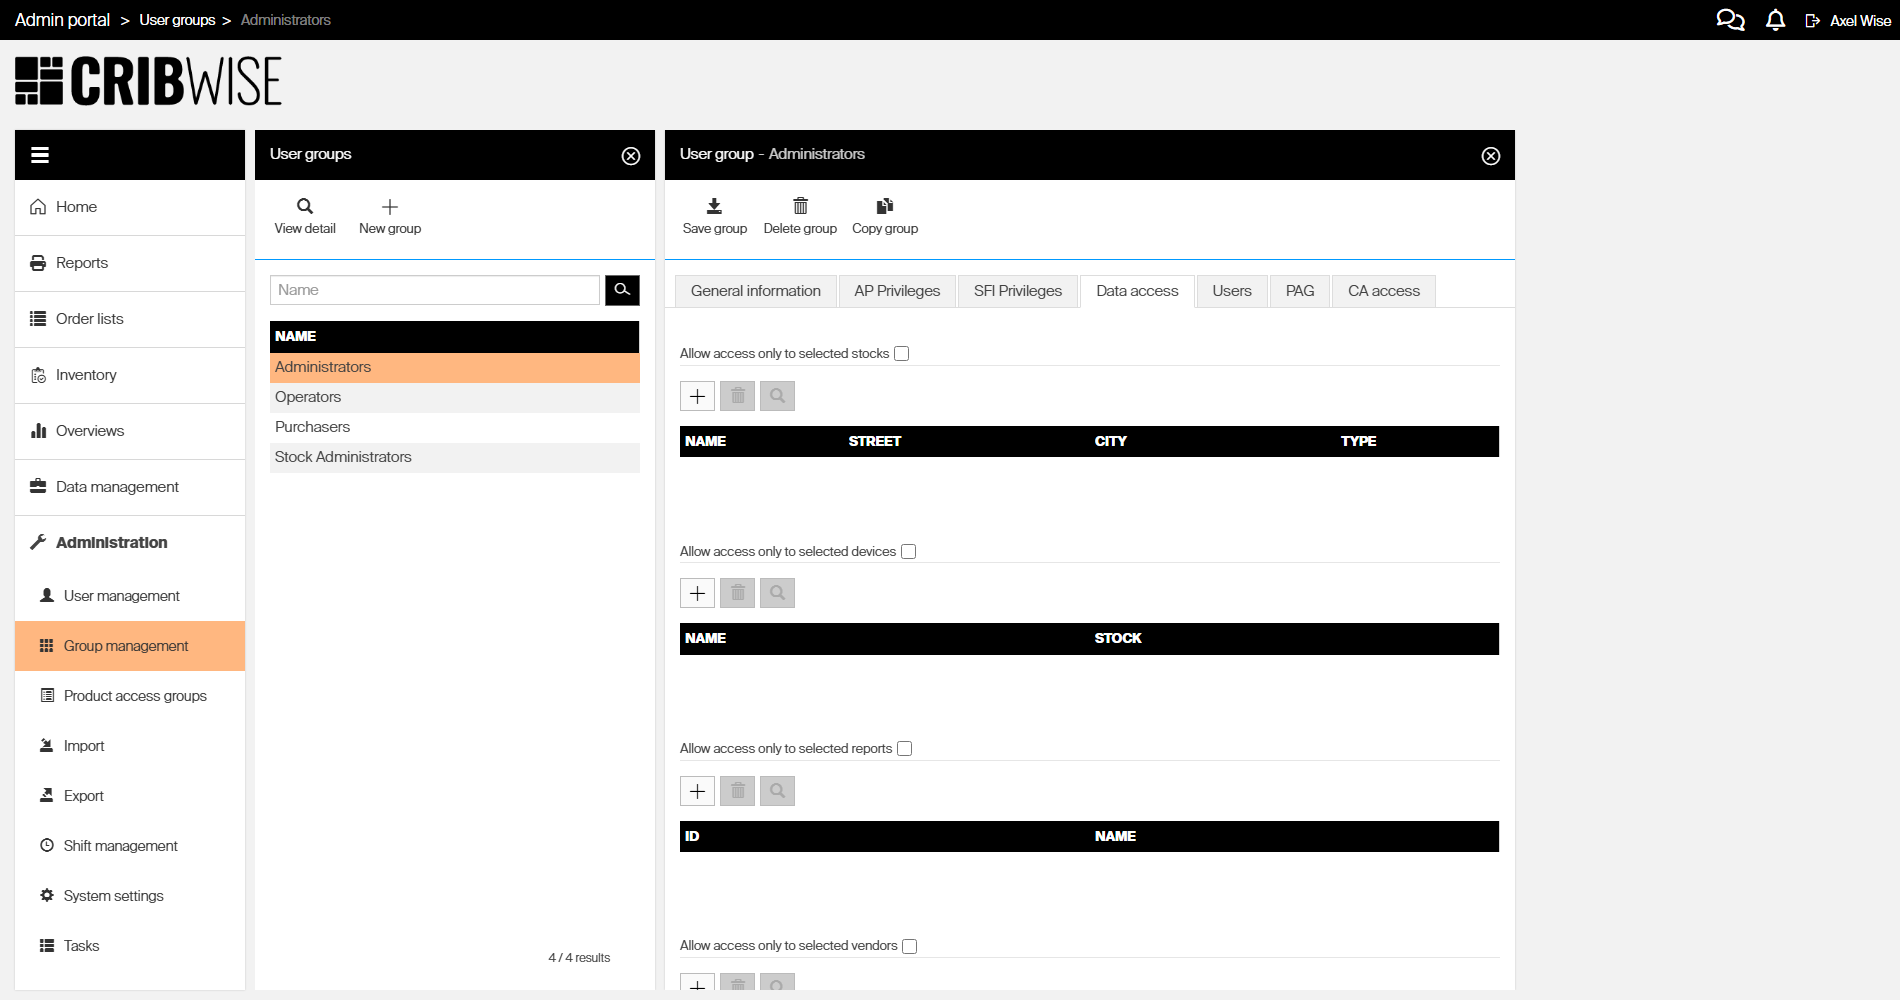
The Data access tab — enable restrictions and select which objects should be visible.
Step 7 — Save the group
- Click Save group in the toolbar.
Success: The group appears in the group list with 0 assigned users. You can now assign users to this group from the User management screen.
Tip: Use Copy group in the toolbar to duplicate an existing group with all its settings — this saves time when creating similar roles.
Next steps
After creating a user group:
- Create users and assign them to this group.
- Configure cost allocation access on the CA access tab if you need to restrict which cost allocations the group can select during picking.
- Set up product access groups to restrict which items and categories the group can see — see Product access groups.
Troubleshooting
| Problem | Likely cause | Fix |
|---|---|---|
| AP Privileges tab is grayed out | Admin portal users is not enabled on the General information tab | Enable the Admin portal users checkbox and save |
| SFI Privileges tab is grayed out | Shop floor interface users is not enabled on the General information tab | Enable the Shop floor interface users checkbox and save |
| User can still access restricted data | Data access restriction changes can take several minutes to apply | Wait a few minutes, then ask the user to log out and log back in |
| Cannot delete a user group | The group still has users assigned to it | Move all users to a different group first, then delete |