
What you can do
Connect the CRIBWISE Admin Portal to your own identity provider with SAML single sign-on (SSO), so users log in with their existing company credentials and your own login policies apply.
The steps below use Azure Active Directory. Setting up Azure AD itself is out of scope – see the Microsoft documentation for that.
How SSO works in CRIBWISE
Once SSO is active, opening the Admin Portal address redirects the user to the login screen of the external identity provider. The user completes that authentication flow, including multi-factor authentication if it is required, and is then redirected back to the Admin Portal for authorization.
To pass authorization, the user must exist in the Admin Portal with an email address matching the authenticated user, and must have the privilege to access the Admin Portal – that is, belong to a user group with the role AP users. All restrictions set in Admin Portal user and user group management still apply.
Important: While SSO is active, it is not possible to log in to the Admin Portal with a username and password defined in Admin Portal user management.
SSO covers the Admin Portal only. For the Shop Floor Interface, users defined in the Admin Portal with the role SFI users log in with a login name and password, or with an external accessory – an RFID card, a barcode or a Coges key.
Account administrators can still reach the Admin Portal from the Customer Management Portal while SSO is active. To prevent that, change the access control settings.
Before you start
- Every user in the Admin Portal must have a unique email address. If two users share one, SSO cannot be activated.
- Every user who should log in must already exist in the Admin Portal, with an email address matching their principal name in Azure AD.
- You need rights to create an enterprise application in Azure AD.
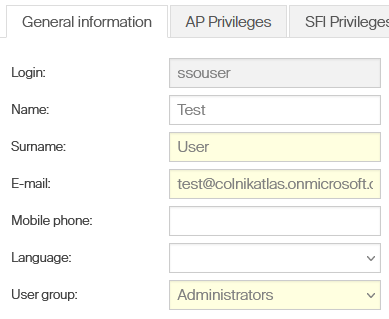
The Admin Portal user…
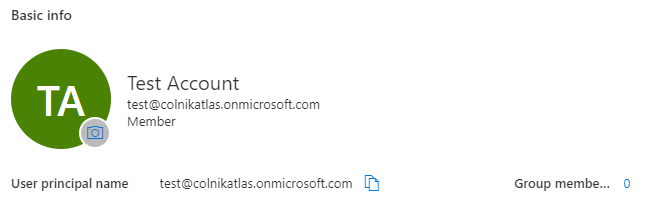
…and the matching Azure AD user.
Important: A user from Azure AD cannot reach the Admin Portal if no matching user exists in the portal.
Quick start
Experienced users – set up SSO in 5 steps:
- Open System settings → Access control → Setup SSO and note the three CRIBWISE URLs.
- Create an enterprise application for CRIBWISE in Azure AD.
- Fill in the basic SAML configuration with those values.
- Copy the login URL, logout URL and certificate thumbprint back into the Admin Portal.
- Save and press Set active, then test in a private browser window.
Steps
Step 1 — Collect the CRIBWISE values
- In the Admin Portal, go to System settings → Access control.
- Select Setup SSO.
- Note the Entity ID, Login consumer URL and Logout consumer URL.
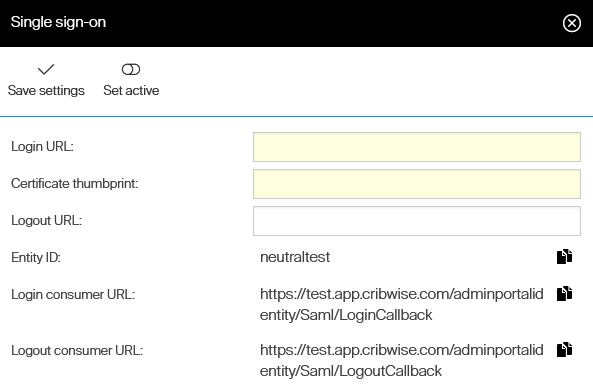
The three values that Azure AD needs.
Step 2 — Create the enterprise application in Azure AD
- In Azure AD, set up a new enterprise application for CRIBWISE.
- On the application detail, select to manage Single sign-on.
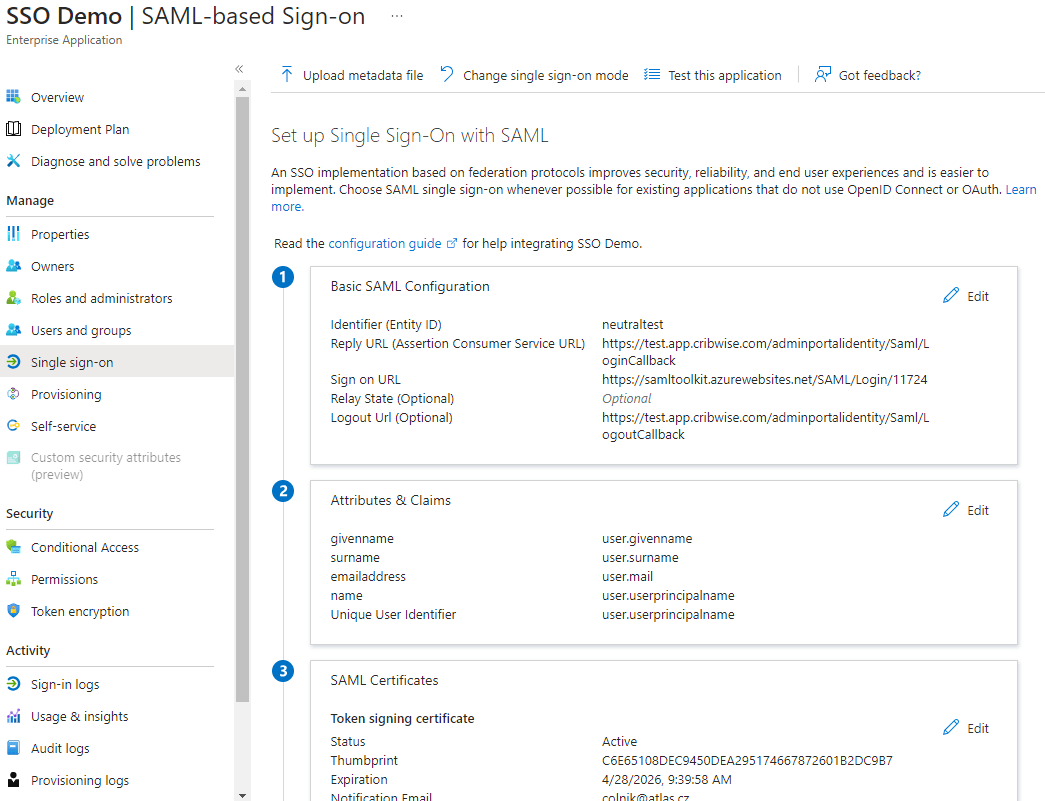
Managing single sign-on for the new application.
Step 3 — Fill in the basic SAML configuration
- Edit Basic SAML Configuration.
- Set Identifier (Entity ID) to the Entity ID from the Admin Portal.
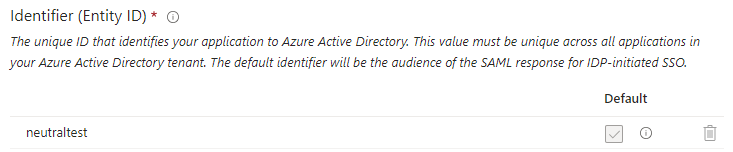
Identifier (Entity ID).
- Set Reply URL (Assertion Consumer Service URL) to the Login consumer URL.
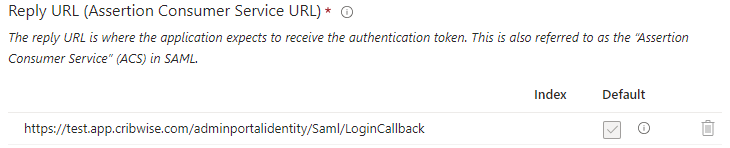
Reply URL.
- Set Logout URL to the Logout consumer URL.
- Save the configuration.

Logout URL.
Step 4 — Collect the Azure AD values
- In the SAML Certificates section, note the certificate Thumbprint.

The certificate thumbprint.
- In the application setup section, note the Login URL and Logout URL.
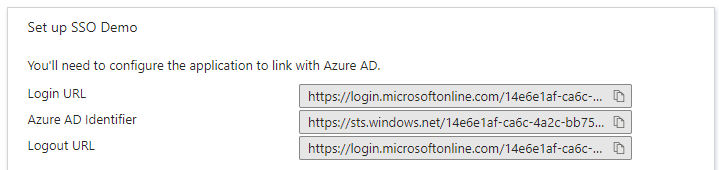
Login and logout URLs from Azure AD.
Step 5 — Finish and activate in the Admin Portal
- Go back to the SSO setup page in the Admin Portal.
- Set Login URL to the login URL from Azure AD.
- Set Certificate thumbprint to the thumbprint from Azure AD.
- Set Logout URL to the logout URL from Azure AD.
- Save the settings and press Set active.
The portal checks that every user has a unique email address. If not, SSO is not activated.
Success: Opening the portal address redirects to the Azure AD login page.
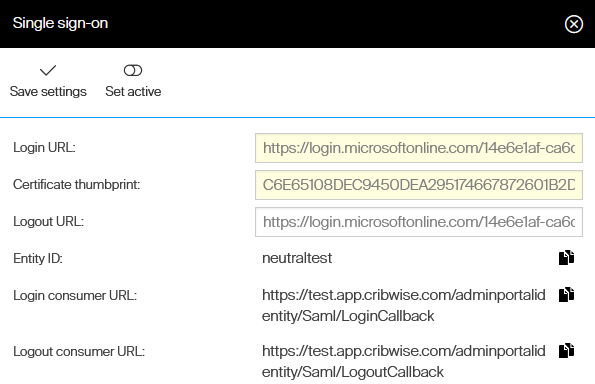
The completed configuration, ready to be set active.
Step 6 — Test before you log out
Keep the current Admin Portal window open, and open a new browser window in private mode to reach the portal. Perform a test login there. If anything goes wrong, deactivate SSO in the original window.
Warning: Activating SSO while access for account administrators is disabled can leave you unable to log in to the Admin Portal at all.
Troubleshooting
| Problem | Likely cause | Fix |
| Set active refuses to activate SSO. | Two or more Admin Portal users share an email address. | Give every user a unique email address, then activate again. |
| A user authenticates in Azure AD but is rejected by the portal. | No matching Admin Portal user, or the user has no AP users role. | Create the user with the matching email address and put them in a user group with the AP users role. |
| Nobody can log in after activation. | SSO was activated while access for account administrators was disabled. | Test in a private window before closing the original session, and deactivate SSO there if login fails. |
| Operators cannot log in to the SFI with their company credentials. | SSO covers the Admin Portal only. | Use the Admin Portal user with the SFI users role, a password, or an RFID card, barcode or Coges key. |
Related articles
- System settings – access control settings, including access for account administrators.
- How to create and manage users – the users that SSO logins are matched against.
- How to create and configure a user group – where the AP users and SFI users roles are granted.
- Admin Portal permissions reference – what each permission allows once a user is authenticated.