
What you can do
Set up a custom data export from CRIBWISE to an FTP server, an Azure storage account or an email address, on a schedule you choose, all configured from the Admin Portal.
Use it when the built-in integration capabilities do not cover your data needs: the export is tailored to your file format and data schema.
Supported destinations
- FTP or sFTP server
- Azure Storage Account – account key authentication
- Azure Storage Account – Microsoft Entra (formerly Azure AD) access token
More destination types are added as usage of the add-on grows.
Before you start
- The export logic is built to your requirements, so ordering is a two-step process – see the steps below.
- Have the destination details ready: host and credentials, storage account and container, or recipient addresses.
- An FTP host must be publicly reachable from the CRIBWISE cloud.
Quick start
Experienced users – get an export running in 4 steps:
- Order the CRIBWISE Integration Development add-on in the CMP.
- Agree the data structure with the integration team.
- Add the Custom Data Export add-on to your subscription.
- Configure destination and schedule under Administration → Integration.
Steps
Step 1 — Order the integration development
Because the export logic is tailored to your requirements, the process starts with a quote request. Order the CRIBWISE Integration Development add-on in the CMP. Someone from the integration team then contacts you to collect the requirements, and you agree the final structure of the export together.
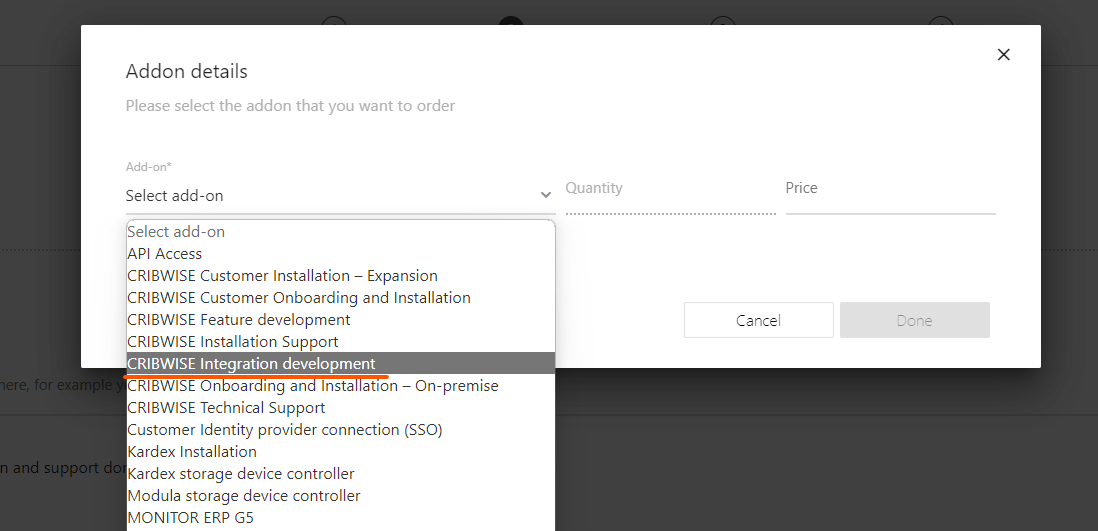
Ordering the integration development add-on starts the requirements analysis.
Step 2 — Add the Custom Data Export add-on
When the development work is complete, update your CRIBWISE subscription and add the Custom Data Export add-on. This enables the integration configuration page in the Admin Portal.
Step 3 — Configure the export
- In the Admin Portal, choose Administration and then Integration in the left menu.
- Select Customer Data Export.
- Fill in the destination details, the schedule, and optionally a date before which transactions are excluded.
Success: The export runs on the schedule you set and delivers to the configured destination.
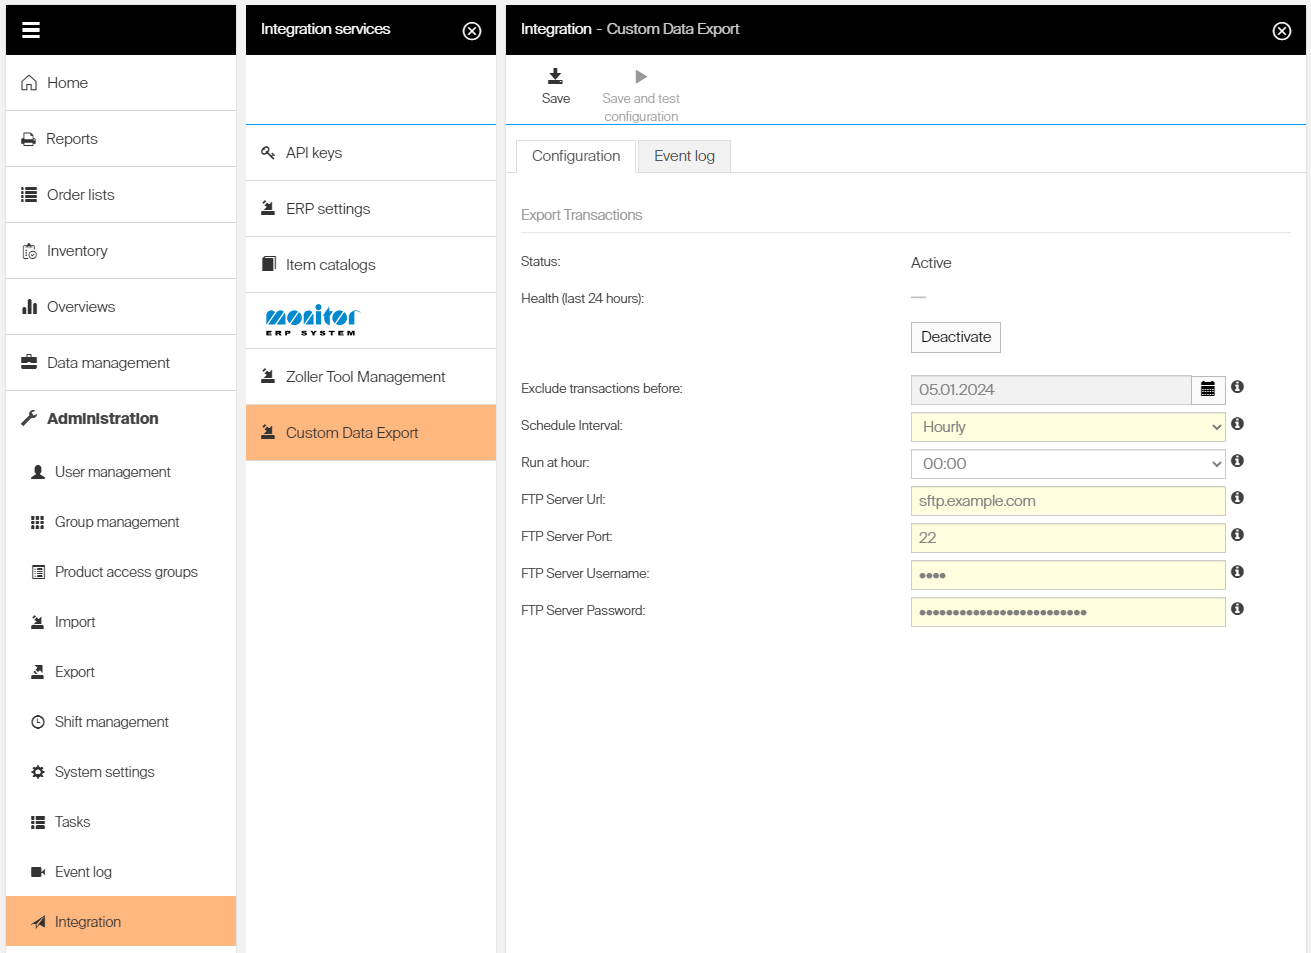
An example configuration with an sFTP destination.
Note: The configuration page shows different options depending on the destination you selected.
Schedule settings
| Setting | What it does |
| Exclude transactions before | Exports are usually based on transactions inside CRIBWISE. This excludes transactions that occurred before the given date. |
| Schedule interval | Daily runs once a day, every day. Hourly runs at the top of every hour. Weekly runs once a week on the day you select. |
| Run at hour | The hour the export runs, for the daily and weekly intervals. |
| Run on day | The day of the week, for the weekly interval. It has no effect on daily and hourly. |
Destination settings
FTP or secure FTP server
| Server host | Fully qualified domain name or IP address of the server. It must be publicly reachable from the CRIBWISE cloud. |
| Server port | Port used when connecting to the host. |
| Username | Username used when connecting to the host. |
| Password | Password used when connecting to the host. |
| Recipient(s) email | Recipients of the email. Use a semicolon-separated list for several addresses. |
Azure Storage Account BLOB (account key)
| Storage account name | Name of the Azure storage account resource. For the FQDN fabrikam.blob.core.windows.net, enter fabrikam. |
| Container name | Container the file is uploaded to. |
| Account key | Your storage account access key. |
Azure Storage Account BLOB (Entra access token)
| Storage account name | Name of the Azure storage account resource, as above. |
| Container name | Container the file is uploaded to. |
| Client id | Client id of the application identity used for authentication. |
| Client secret | Client secret of that application identity. |
| Tenant id | Id of the tenant the application identity belongs to. |
Troubleshooting
| Problem | Likely cause | Fix |
| Customer Data Export is missing from the integration menu. | The Custom Data Export add-on is not active yet. | Add the add-on to your subscription once the development work is complete. |
| The export never reaches the FTP server. | The host is not publicly reachable from the CRIBWISE cloud, or the port is closed. | Open the host to the CRIBWISE cloud and verify host, port and credentials. |
| The file arrives with more history than expected. | No cut-off date is set. | Set Exclude transactions before to the date you want to start from. |
| A weekly export runs on the wrong day. | Run on day is set for a daily or hourly interval, where it has no effect. | Set the interval to weekly, then choose the day and hour. |
Related articles
- CRIBWISE REST API – endpoint overview – the built-in integration capabilities to check before ordering a custom export.
- BI interface: connect a BI tool to CRIBWISE reporting data – read reporting data directly instead of exporting files.
- Getting started with the CRIBWISE API – API access as an alternative to scheduled exports.
- How to manage users in the Customer Management Portal (CMP) – who can order add-ons.