
What you’ll learn
The CRIBWISE REST API lets an external system create, read, and update purchase orders, items, vendors, cost allocations, and pick lists in CRIBWISE. This overview lists every endpoint, explains how a call is authenticated, and shows why a successful response does not always mean the data is in.
The endpoints on this page are the ERP REST interfaces. They run on your own Admin Portal address and are always available.
Important: These are not the same endpoints as the newer cloud API on
api.cribwise.com. That one is a paid add-on with its ownintegration/v1/endpoints – see Getting started with the CRIBWISE API. If you are unsure which one you are integrating against, check the host name in the URL you were given.
The ERP REST API at a glance
| Detail | |
|---|---|
| Base address | [AP_base_uri] – the host your Admin Portal runs on, without the portal path. If you open the portal at https://solutionaddress.com/adminportal/yourcompany, the base address is https://solutionaddress.com. |
| Authentication | An API key from the Admin Portal, exchanged for a bearer token. Every call carries an Authorization: Bearer header. |
| Payload format | JSON in the request body. Read endpoints return JSON in the response. |
| Availability | Always active. There is no setting to switch the interfaces on or off. |
| Write behaviour | Asynchronous. A create or update call is queued and returns a request GUID, not the finished object. |
| Read behaviour | Synchronous. A read call returns the requested data directly in the response. |
Authentication and access
Every call needs a bearer token, and a token is issued only against a valid API key. Keys live in the Admin Portal under Administration > Integration > API keys, where New key creates one.
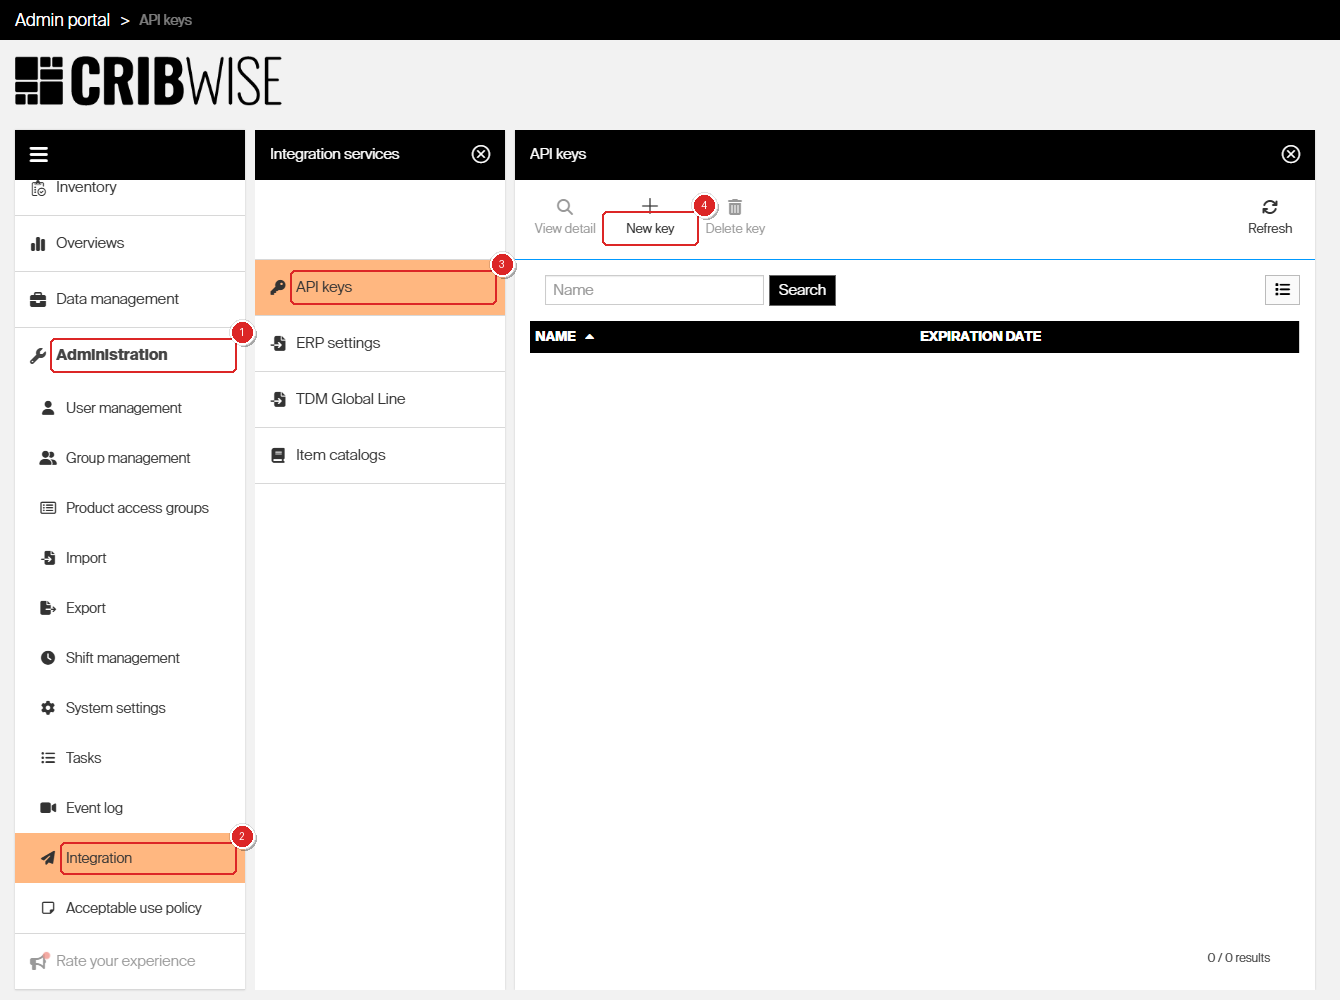
API keys sit under Administration > Integration in the Admin Portal.
A key has a Name and an optional Expiration date. A key with no expiration date stays valid indefinitely; an expired key stops issuing tokens until you set a new date on it.
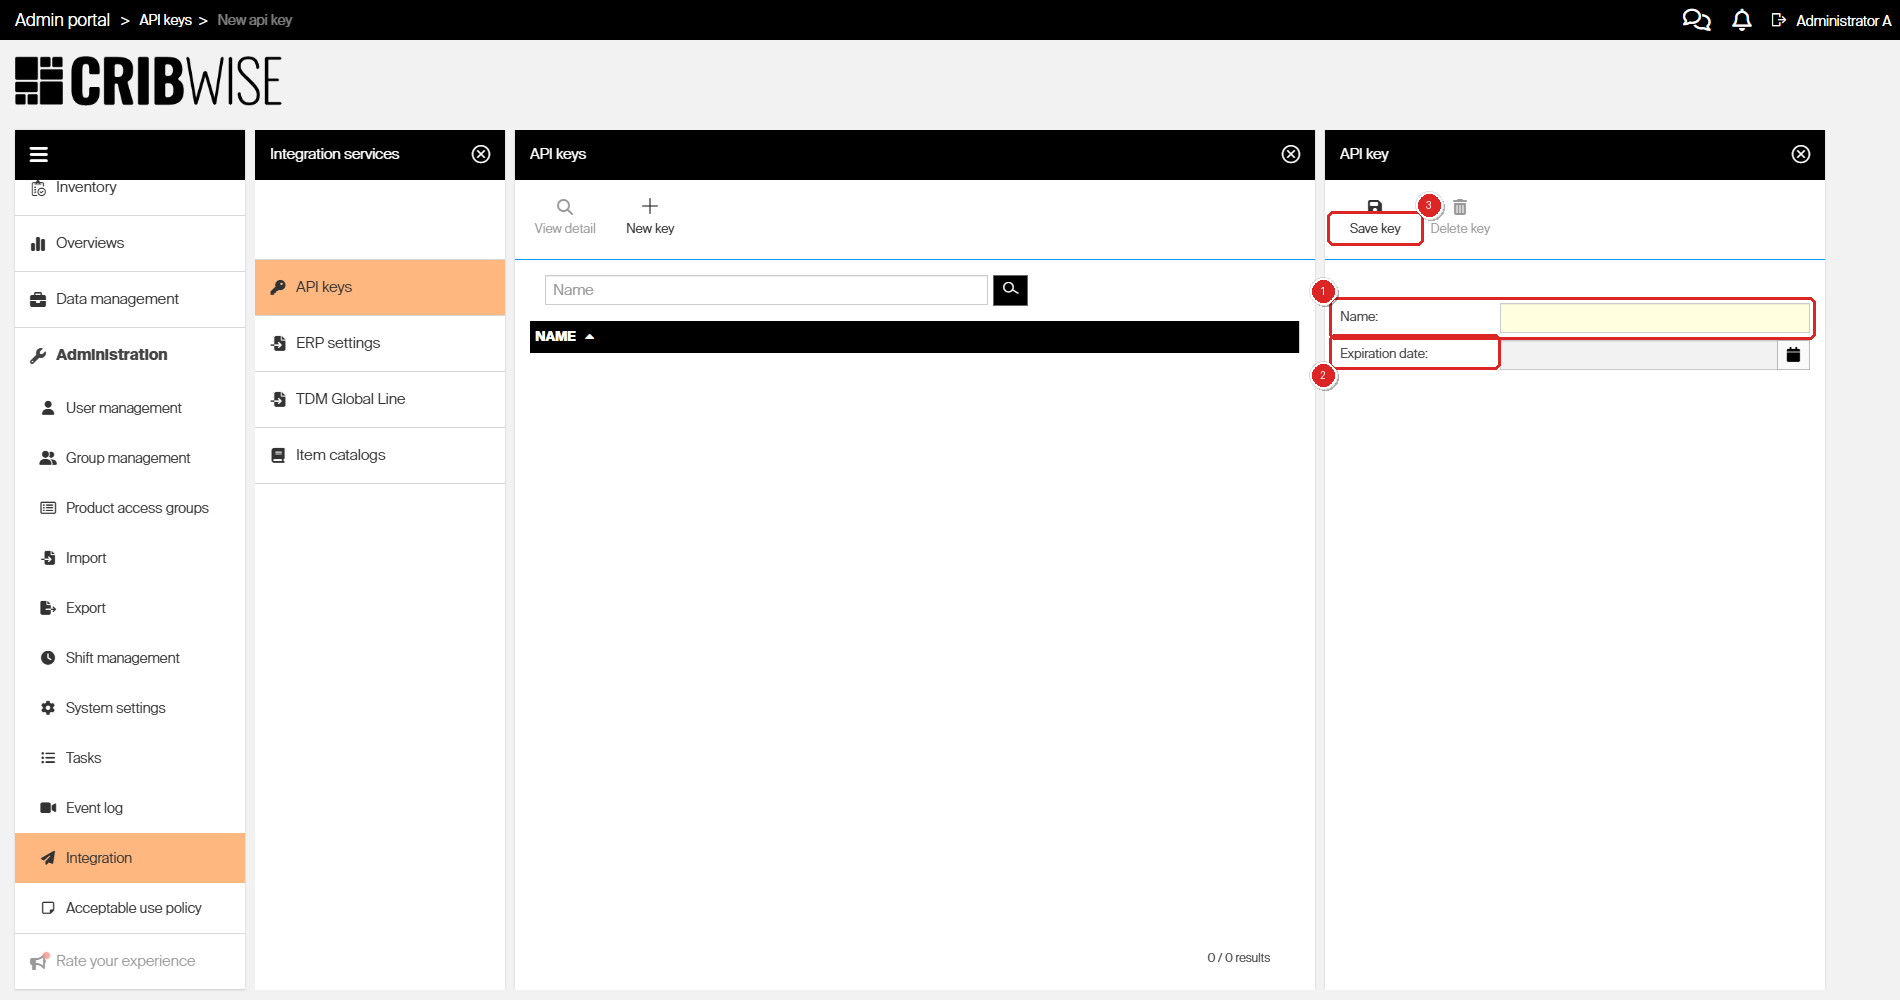
A new key needs a name; the expiration date is optional.
Two things are worth knowing before you hand a key to an integration partner:
- A key grants access to the REST API and the BI interfaces only. It cannot be used to sign in to the Admin Portal or the Shop Floor Interface.
- You can create as many keys as you need, so each integration can have its own key that you can expire on its own.
Note: Creating or reading a key needs the Manage integrations permission. Without it, Integration does not appear in the Administration menu – see Admin Portal permissions reference.
Warning: Authenticating with a user account that has the API users role is obsolete and no longer supported. Any integration still passing a user name and password should move to an API key.
How a call works
A call to a write endpoint travels through three stages. Only the first two are visible in the response you get back.
- Get an access token. Post your API key to the token endpoint and read the bearer token out of the response. Add it to every following call as an
Authorization: Bearerheader. Tokens are short-lived, so an integration that runs for any length of time has to renew them – see How to authenticate with the REST API. - Send the request. Read endpoints answer with the data. Create and update endpoints answer
200with a request GUID and put the work in a queue, so the response says the request was accepted – nothing more. - Collect the result. Pass the GUID to the matching
GetRequestResultendpoint to find out whether the queued work succeeded and to read the IDs of any objects it created. This stage applies to create and update endpoints only.
Important: Treat a
200from a create or update endpoint as “queued”, not as “done”. An integration that stops at stage 2 will silently miss every validation error, because those are reported in the request result and nowhere else.
Request and object statuses
GetRequestResult reports two levels of status: one for the request as a whole, and one for each object the request touched.
| Request status | What it means |
|---|---|
| Created | The request arrived but is not in the task queue yet. |
| Ready | The request is in the task queue, waiting to run. |
| Scheduled | The request is queued to run at a later time. |
| Running | The changes are being applied. |
| Completed | Every change in the request has finished. Check the object statuses to see what each one did. |
| Failed | The request could not be performed. |
Each object in the result carries its own status – Created, Updated, Deleted, or None. None means the object was skipped, either because it failed validation or because the request asked for no change to it. Validation errors are listed per object, next to the parameter that caused them.
Tip: A request can come back Completed while individual objects sit at None. Always read the object statuses, not just the request status.
Endpoints by resource
All 28 endpoints are grouped by the data they work on. Paths are relative to [AP_base_uri]. Each group links to its own article, which carries the full JSON schema, field lengths, and validation rules.
Purchase orders
Full reference: How to manage purchase orders with the REST API.
| Method | Endpoint | What it does |
|---|---|---|
| POST | /ERP/PurchaseOrder/Create |
Creates a purchase order with its ordered items. Leave the status empty to create the order as New. |
| POST | /ERP/PurchaseOrder/UpdateQuantity |
Updates ordered, received, and cancelled quantities on an existing order. Which quantity you can change depends on the order status. |
| POST | /ERP/PurchaseOrder/UpdateOrder |
Sends an order to the vendor by setting it active, cancels an active order, or updates shipping information, reference, and notes. |
| GET | /ERP/PurchaseOrder/GetRequestResult |
Returns the result of a create or update request. Takes the request GUID as the requestGuid parameter. |
Service orders
Full reference: How to manage service orders with the REST API.
| Method | Endpoint | What it does |
|---|---|---|
| POST | /ERP/ServiceOrder/Create |
Creates an order of type Service. |
| POST | /ERP/ServiceOrder/UpdateQuantity |
Updates ordered and received quantities on an existing service order. |
| POST | /ERP/ServiceOrder/UpdateOrder |
Sends a service order to the vendor, cancels an active one, or updates shipping information, reference, and notes. |
| GET | /ERP/ServiceOrder/GetRequestResult |
Returns the result of a service order create or update request. |
Items
Full reference: How to manage items with the REST API.
| Method | Endpoint | What it does |
|---|---|---|
| POST | /ERP/ReceiveItems/Create |
Creates new items in the system. |
| POST | /ERP/ReceiveItems/Update |
Updates information on existing items. |
| GET | /ERP/ReceiveItems/GetRequestResult |
Returns the result of an item create or update request. |
Item status
Full reference: How to read item status with the REST API.
| Method | Endpoint | What it does |
|---|---|---|
| GET | /ERP/ItemsStatus/GenerateReport |
Returns quantities of every item currently held in your stocks. An item is included only if its status is Released, Phase out, or Outgoing and it is assigned to a device. |
| GET | /ERP/ItemsStatus/GenerateSerializedItemsReport |
Returns every serialized item with its instances, and each instance’s location, status, service, and purchase information. |
Cost allocation
Full reference: How to manage cost allocation with the REST API.
| Method | Endpoint | What it does |
|---|---|---|
| POST | /ERP/CostAllocation/Create |
Creates cost allocation definitions for one cost allocation type. Valid for list and hierarchy steps. |
| POST | /ERP/CostAllocation/UpdateHierarchy |
Creates relations between the definitions of hierarchy steps. |
| POST | /ERP/CostAllocation/DeleteHierarchy |
Removes existing relations between the definitions of hierarchy steps. |
| POST | /ERP/CostAllocation/UpdateItemRestrictions |
Updates which items are allowed at a specific place in the hierarchy. |
| GET | /ERP/CostAllocation/GetHierarchy |
Returns the whole current hierarchy, including item, user, and user group restrictions. |
| GET | /ERP/CostAllocation/GetRequestResult |
Returns the result of a cost allocation create or update request. |
Vendors
Full reference: How to create vendors with the REST API.
| Method | Endpoint | What it does |
|---|---|---|
| POST | /ERP/Vendor/Create |
Creates new vendors. |
| GET | /ERP/Vendor/GetRequestResult |
Returns the result of a vendor create request. |
Manufacturers
Full reference: How to create manufacturers with the REST API.
| Method | Endpoint | What it does |
|---|---|---|
| POST | /ERP/Manufacturer/Create |
Creates new manufacturers. |
| GET | /ERP/Manufacturer/GetRequestResult |
Returns the result of a manufacturer create request. |
Pick lists
Full reference: How to manage pick lists with the REST API.
| Method | Endpoint | What it does |
|---|---|---|
| GET | /ERP/PickList/Get |
Returns every pick list in the system. |
| POST | /ERP/PickList/Create |
Creates new pick lists. |
| POST | /ERP/PickList/Update |
Updates existing pick lists. |
| POST | /ERP/PickList/Delete |
Deletes existing pick lists. |
| GET | /ERP/PickList/GetRequestResult |
Returns the result of a pick list create, update, or delete request. |
Common confusion
| People often think… | But actually… |
|---|---|
A 200 response means the order or item was created. |
For create and update endpoints it means the request was queued. The objects exist only once GetRequestResult reports them as Created or Updated. |
These are the same endpoints as the CRIBWISE API on api.cribwise.com. |
They are two separate APIs. The ERP REST interfaces run on your own Admin Portal address under /ERP/. The cloud API is a paid add-on with integration/v1/ endpoints and its own developer portal. |
| You need a user account with the API users role. | That authentication method is obsolete. Create an API key instead – it needs no user account and grants nothing beyond the API and the BI interfaces. |
| Every endpoint returns a request GUID. | Only create and update endpoints do. Read endpoints such as ItemsStatus/GenerateReport, CostAllocation/GetHierarchy, and PickList/Get return the data itself. |
| The interfaces have to be enabled first. | They are always active. What you do need is a valid API key, and IDs that already exist in CRIBWISE – vendor, stock, device, and item IDs are validated against the database on every call. |
Take action
Ready to make your first call? Start with How to authenticate with the REST API to create a key and exchange it for an access token, then open the article for the resource you want to work with.
Related articles
- How to authenticate with the REST API – how to create an API key and exchange it for a bearer token.
- Getting started with the CRIBWISE API – the separate cloud API on
api.cribwise.comand the add-ons that unlock it. - Admin Portal permissions reference – the Manage integrations permission that controls access to API keys.
- BI interface – the reporting interfaces that the same API key unlocks.
- How to manage items with the REST API – the largest schema of the set, and a good model for how the others are documented.
- How to manage cost allocation with the REST API – the endpoints that build and restrict the cost allocation hierarchy.