
What you can do
Enable the API Access add-on for CRIBWISE, create an API key, swap it for a bearer token, and call the endpoints that let your own applications create, read, update and delete CRIBWISE data.
Full endpoint documentation lives at api.developer.cribwise.com/apis.
Before you start
- You need a customer account manager account to buy add-ons at app.cribwise.com.
- You need administrator access in your CRIBWISE instance to create an API key.
- Decide which add-on you need: API All Access, or one of the add-ons covering a subset of endpoints.
Quick start
Experienced users – get a working call in 4 steps:
- Buy the API add-on in the CMP under Add-ons.
- Create an API key in Administration → Integration → API Keys.
- POST to the authentication endpoint to get an access token.
- Send the token as a bearer token on every API call.
Steps
Step 1 — Add the API Access add-on
- Go to app.cribwise.com and sign in with a customer account manager account.
- Open the Add-ons tab and click Buy new add-on.
- Click Add new add-on in the middle of the page.
- In the pop-up, select type Software and then the API add-on you need.
- Repeat for any further add-ons, then complete the order.
The pop-up shows a description of what the add-on enables, and its price.
Success: Your account is updated and API access is enabled, usually within a few minutes.
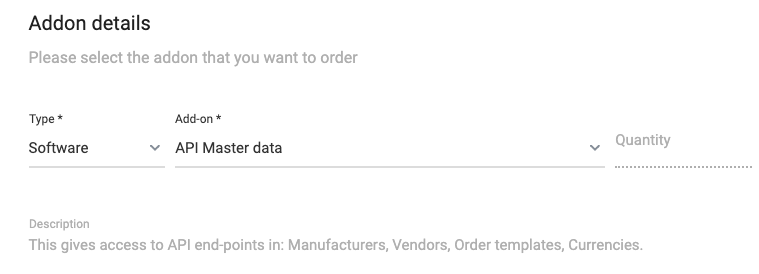
Choosing the API add-on for your subscription.
Step 2 — Create an API key
- Log in to the Admin Portal and select Administration in the left menu.
- Select Integration, then API Keys.
- Click the New key icon in the top menu of the API keys pane.
- Give the key a name and an expiration date, then click Save key.
- Copy the generated API key.
You can come back and find the key again later.
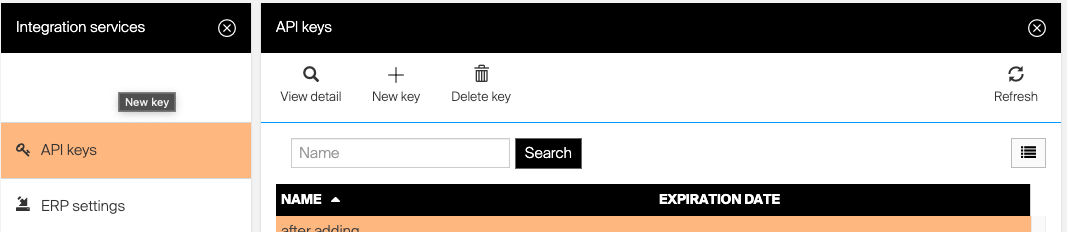
Creating an API key in the Admin Portal.
Step 3 — Request an access token
POST to https://api.cribwise.com/authentication/v1/connect/token with a body of content type x-www-form-urlencoded.
POST /authentication/v1/connect/token HTTP/1.1
Accept: */*
Host: api.cribwise.com
Content-Type: application/x-www-form-urlencoded
Content-Length: 123 client_id=erp_client&client_secret=[your_api_key]&grant_type=client_credentials&scope=erp_api
| Key | Value |
| client_id | Always erp_client |
| client_secret | The API key you created in the Admin Portal |
| grant_type | Always client_credentials |
| scope | Always erp_api |
A successful request returns JSON like this:
{
"access_token":"eyJhbGciOiJSUzI1NiIsIm...",
"expires_in":3600,
"token_type":"Bearer",
"scope":"erp_api"
}
Step 4 — Call an endpoint
Send the access_token as a bearer token on every call to a CRIBWISE API endpoint:
GET /integration/v1/integrationapi/Items HTTP/1.1
Authorization: Bearer eyJhbGciOiJSUzI1NiIsIm...
Accept: */*
Host: api.cribwise.com
Success: The endpoint answers with your instance data instead of a 401.
Note: Tokens expire – expires_in is 3600 seconds in the example above – so a working integration requests a new one as it goes.
The API Access offering
Pick individual add-ons, or API All Access for everything current and future.
API All Access
Unrestricted access to every CRIBWISE API endpoint, plus full access to the API Developer Portal. Best where the integration needs to cover all current and future functionality.
API Cost Allocation
Endpoints for managing cost allocations: hierarchy instances, instance-item, instance-user-group and instance-user relations, sets, steps, step types and values.
- integration/v1/integrationapi/CostAllocationHierarchyInstances/*
- integration/v1/integrationapi/CostAllocationInstanceItemRelations/*
- integration/v1/integrationapi/CostAllocationInstanceUserGroupRelations/*
- integration/v1/integrationapi/CostAllocationInstanceUserRelations/*
- integration/v1/integrationapi/CostAllocationSets/*
- integration/v1/integrationapi/CostAllocationStepTypes/*
- integration/v1/integrationapi/CostAllocationSteps/*
- integration/v1/integrationapi/CostAllocationValues/*
API Master Data
Fundamental data across the inventory system: manufacturers, vendors, order templates and currencies.
- integration/v1/integrationapi/Manufacturers/*
- integration/v1/integrationapi/Vendors/*
- integration/v1/integrationapi/Currencies/*
- integration/v1/integrationapi/OrderTemplates/*
API Items
Item-related data: categories, items, description translations, serialized item instances and their documents.
- integration/v1/integrationapi/ItemCategories/*
- integration/v1/integrationapi/Items/*
- integration/v1/integrationapi/ItemTranslations/*
- integration/v1/integrationapi/SerializedItemInstanceDocuments/*
- integration/v1/integrationapi/SerializedItemInstances/*
API Purchase
The whole purchase process: purchase orders and their items, service orders and their items, and consignment invoice requests and their items.
- integration/v1/integrationapi/PurchaseOrders/*
- integration/v1/integrationapi/PurchaseOrderItems/*
- integration/v1/integrationapi/ServiceOrders/*
- integration/v1/integrationapi/ServiceOrderItems/*
- integration/v1/integrationapi/ConsignmentInvoices/*
- integration/v1/integrationapi/ConsignmentInvoiceItems/*
API Stock
Devices and stock levels, for keeping real-time inventory records in external systems.
- integration/v1/integrationapi/Devices/*
- integration/v1/integrationapi/Stocks/*
API Access Control
User permissions and security: users, user groups and user keys.
- integration/v1/integrationapi/Users/*
- integration/v1/integrationapi/UserGroups/*
- integration/v1/integrationapi/UserKeys/*
API Reporting
Generating and accessing reports, supporting both Reporting v1 and v2.
- reporting/v2/DeviceAssignments
- reporting/v2/OrderedItems
- reporting/v2/RawTransactions
- reporting/v2/StockLocations/*
API System Settings
Access and modify system settings and configuration.
- integration/v1/integrationapi/Settings/*
Troubleshooting
| Problem | Likely cause | Fix |
| The token request is rejected. | A wrong value in the body, or an expired API key. | Use erp_client, client_credentials and erp_api, and check the key’s expiration date in the Admin Portal. |
| An endpoint answers 401 or 403. | The token expired, or the add-on covering that endpoint is not enabled. | Request a new token, and check which add-on covers the endpoint in the list above. |
| API Keys is missing in the Admin Portal. | Your user is not an administrator in the instance. | Ask an administrator to create the key. |
| The add-on is bought but nothing works yet. | The account update takes a few minutes. | Wait and try again, then contact support if it persists. |
Related articles
- CRIBWISE REST API – endpoint overview – the separate ERP REST interfaces on your own Admin Portal address.
- BI interface: connect a BI tool to CRIBWISE reporting data – reporting data without writing code.
- How to set up custom data export (FTP, Azure, email) – scheduled file exports as an alternative to API calls.
- How to manage users in the Customer Management Portal (CMP) – who can buy the add-on.