
What you can do
Send CRIBWISE pick and return transactions to SAP and let SAP handle every stock update. Choose between scheduled files from the ERP sending interface or on-demand pulls from the Reporting API.
How the integration works
A common way to integrate CRIBWISE with SAP is to send raw transaction data to SAP and let SAP handle all stock updates. In this setup, CRIBWISE does not create orders or manage stock levels. It only reports the transactions.
The typical data sent to SAP is Pick and Return transactions:
- Pick — an item is taken from the vending machine. SAP reduces the item’s quantity by –1.
- Return — an item is put back. SAP increases the quantity by +1.
SAP remains the master system. It handles purchasing, orders, and stock management, while the vending device simply reports what happened.
Note: For consumable items, most SAP setups do not allow returns. In those cases you only need Pick transactions, and SAP adjusts the stock based on those picks alone.
Before you start
- You need Admin Portal access with permission to open Administration > Integration.
- Decide which transactions SAP needs — picks only, or picks and returns.
- For the sending interface: have your destination ready (an FTP server, an e-mail address, or a web service endpoint).
- For the API: the API access add-on must be enabled on your account, and you need somewhere to run the API calls from.
Important: Plan how you will transform the CRIBWISE data into the format SAP expects. CRIBWISE delivers the transactions; the mapping into SAP is done on your side.
Choose your method
| Method | Best for | How data arrives | Trade-off |
|---|---|---|---|
| ERP sending interface | Getting started quickly without building an integration | CRIBWISE pushes a file at a set interval, via FTP, e-mail, or web service | If a file is lost, the data is not sent again — each run only contains transactions since the previous run. |
| Reporting API | Full control over what is pulled, and when | You call the API and receive raw JSON | Requires the API add-on and development work on your side. |
Quick start
Experienced users — set up the integration in 5 steps:
- Decide which transactions SAP needs — picks only, or picks and returns.
- Pick a method — the ERP sending interface for scheduled files, or the Reporting API for on-demand pulls.
- Enable it — tick Send picks under Administration > Integration > ERP settings, or create a key under Administration > Integration > API keys.
- Transform the transactions in-house into the format SAP expects.
- Track each transaction by its unique Id so nothing is imported into SAP twice.
Need more detail? Follow the full steps for your method below.
Method 1 — ERP sending interface
The ERP sending interface is the quickest option. It is easy to set up and can deliver the data through FTP, E-mail, or Web service.
Step 1 — Open the ERP settings screen
In the Admin Portal, go to Administration > Integration > ERP settings.
Step 2 — Enable the transactions SAP needs
Under Active interfaces, tick Send picks. Also tick Send return information if SAP should receive returns.
Step 3 — Choose the delivery channel and interval
- Under Delivery format, choose where the data should be delivered and fill in the connection details.
- Under Sending interval, choose how often it should be sent.
- Click Save.
Each transmission includes all transactions that occurred since the previous run.
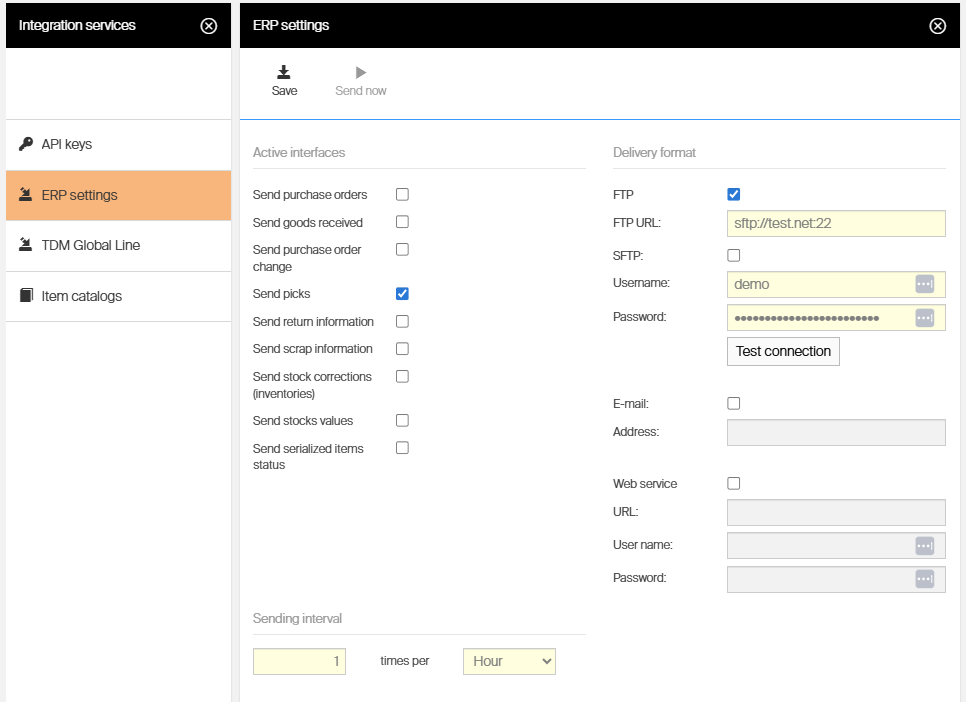
The ERP settings screen: tick the transactions to send, choose the delivery channel, and set the interval.
Warning: If a file is lost in transit, the data will not be sent again — the system only sends new transactions after each run. If SAP must never miss a transaction, use the Reporting API instead.
Success: At the next interval, a file containing the picks recorded since the previous run arrives at the destination you configured.
Method 2 — Reporting API
Use the Reporting API to retrieve all transactions and organize them by transaction type. The API documentation is available in the CRIBWISE API Management developer portal.
Step 1 — Create an API key
In the Admin Portal, go to Administration > Integration > API keys and select Create new key. Copy the generated key.
Step 2 — Request an access token
Use the key to make your initial request to:
https://app.cribwise.com/adminportalidentity/connect/token
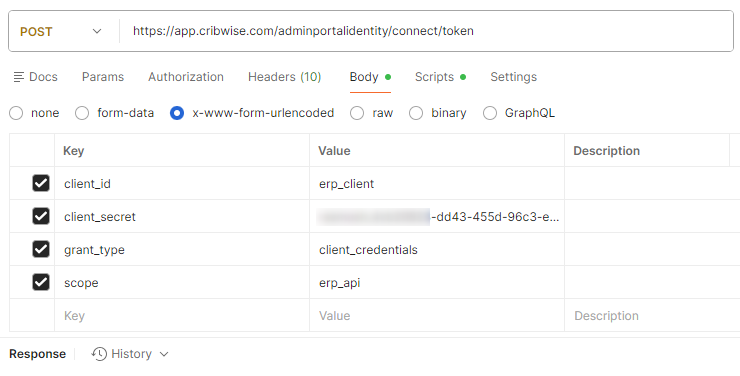
The token request: the API key is sent as the client credentials in the request body.
The response contains a Bearer token in the field access_token. This is the authorization token for all following API calls.
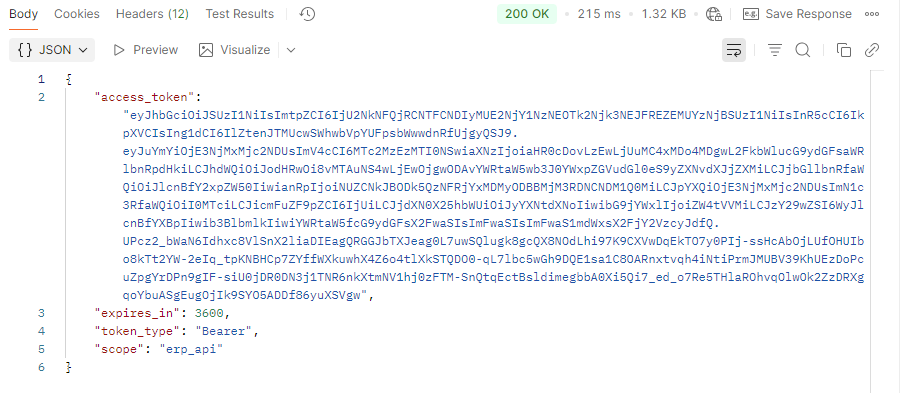
The token response. Copy the value of access_token.
Note: Use the access_token as the bearer token for all API calls for the next hour. When it expires, request a new one.
Step 3 — Call the Raw Transactions API
Call the Raw Transactions API to retrieve the transaction records. Because the data volume can be large, apply filters:
| Filter | Set it to | Why |
|---|---|---|
| TransactionTypeId | Pick |
Returns only the transactions SAP needs. |
| CreatedOn | The timestamp of your last successful API call | CreatedOn is the time the server processed the transaction. Devices that were offline upload their data later, so their own timestamps may not match the processing time. Filtering on the device timestamp risks missing those transactions. |
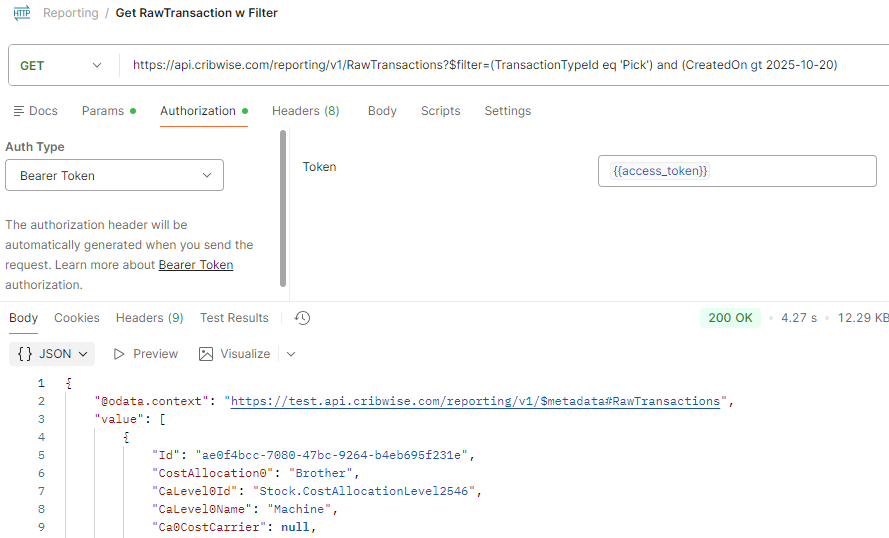
A filtered Raw Transactions call: picks created after a given date, authorized with the bearer token.
Important: TransactionTypeId is translated according to the system language set in the Admin Portal. The displayed name “Pick” appears in the system language, so check the language before you hard-code the filter value.
Step 4 — Transform the data before importing it into SAP
It is highly beneficial to receive the transactions as raw JSON and perform the transformation in-house before sending the data into SAP. This gives the receiving system full control over how the data is interpreted, validated, and inserted into SAP.
Each transaction includes a unique Id. Store it so you can track which entries have already been processed into SAP.
Success: A filtered Raw Transactions call returns the picks recorded since your last run, and every transaction you have already imported can be identified by its Id.
Next steps
- Schedule the pull or the export — run the API call on the same cadence SAP expects, or set the sending interval to match.
- Verify the first transactions in SAP — make a test pick in CRIBWISE and confirm SAP reduces the quantity by –1.
- Decide how returns are handled — if SAP does not accept returns for consumables, keep sending picks only.
Troubleshooting
| Problem | Likely cause | Fix |
|---|---|---|
| SAP stock never changes after a pick | No transactions are reaching SAP — the interface is not active, or the API filter excludes them. | Tick Send picks under Administration > Integration > ERP settings, or check the filter values in your API call. |
| A file never arrived and the transactions are gone | Each sending-interface run only contains transactions created since the previous run. A lost file is not resent. | Pull the missing period from the Reporting API using a CreatedOn filter, or switch to the API for critical data. |
| Transactions are missing from the API response | The filter uses the device’s own timestamp. Devices that were offline upload later, so their timestamps do not match the processing time. | Filter on CreatedOn instead, and use the timestamp of your last successful call. |
| The transaction type filter returns nothing | TransactionTypeId is translated to the Admin Portal system language, so the literal value “Pick” may not match. | Check the system language in the Admin Portal and filter on the translated value. |
| The same transaction is imported into SAP twice | Overlapping time windows between runs, with no de-duplication on the receiving side. | Store the unique Id of every processed transaction and skip Ids you have already imported. |
| API calls start returning an authorization error | The access token is valid for one hour. | Request a new token from the token endpoint and use the new access_token. |
Related articles
- How to export data with ERP sending interfaces — the full setup for every interface, delivery channel, and XML field.
- Getting started with the CRIBWISE API — what the API add-on covers and how to get access.
- How to authenticate with the REST API — token requests explained in more detail.
- How to use the raw transaction report — check the same transactions in the Admin Portal before you integrate.
- BI interface: connect a BI tool to CRIBWISE reporting data — read the same reporting data as an OData feed.
- How to set up custom data export (FTP, Azure, email) — scheduled exports with more destination options.