
What you can do
Create manufacturers in CRIBWISE straight from your ERP with one POST to /ERP/Manufacturer/Create. A single call can carry your whole manufacturer list.
The interface only creates. There is no endpoint that updates, deletes, or reads a manufacturer, so an existing record is changed in the Admin Portal under Data management > Manufacturers — see How to manage manufacturers.
Endpoints
| Method | Endpoint | What it does |
|---|---|---|
| POST | [AP_base_uri]/ERP/Manufacturer/Create |
Queues one or more manufacturers for creation and returns a request GUID. |
| GET | [AP_base_uri]/ERP/Manufacturer/GetRequestResult |
Returns the outcome of a create request, identified by its GUID. |
[AP_base_uri] is the host your Admin Portal runs on, without the portal path. If you open the portal at https://solutionaddress.com/adminportal/yourcompany, the base address is https://solutionaddress.com. See the CRIBWISE REST API endpoint overview for the full endpoint list.
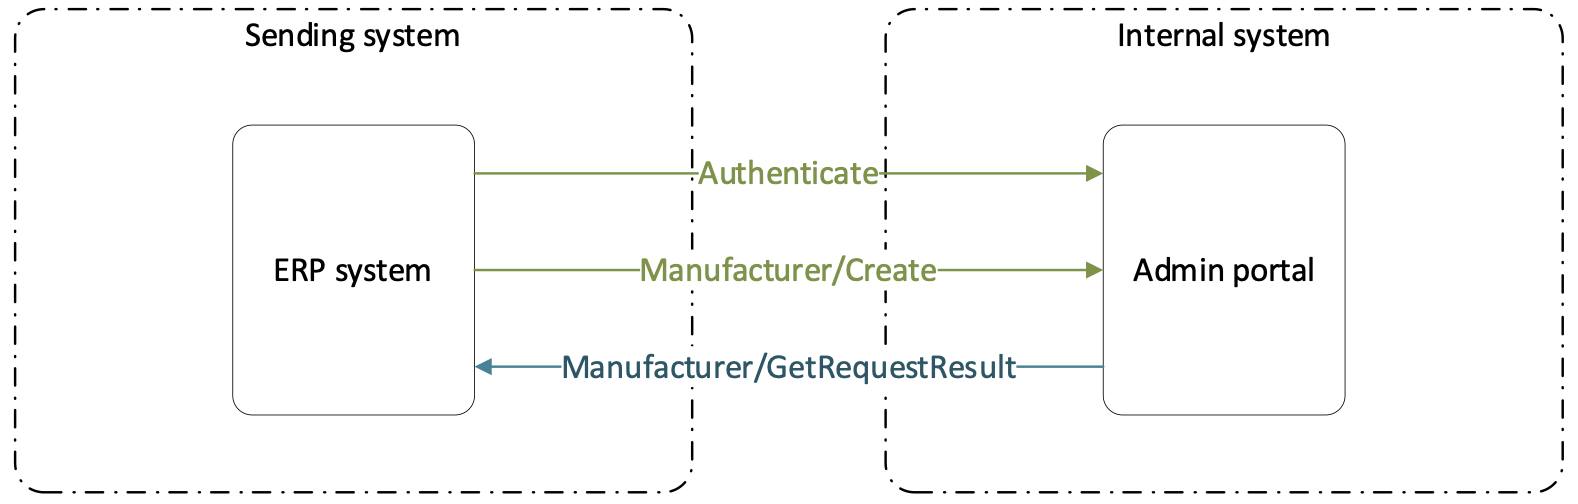
The full exchange: authenticate, create, then collect the result of the create.
Before you start
- An API key, exchanged for a bearer token that every call carries in its
Authorizationheader — see How to authenticate with the REST API. - The Manage integrations permission, which is what makes Administration > Integration available so you can create the key — see the Admin Portal permissions reference.
- A manufacturer ID convention agreed with whoever maintains the ERP. The ID is what your imports and integrations refer to later, so it should be short and stable.
Important:
ManufacturerIdandNamemust each be unique across all manufacturers, and neither can be corrected through this interface. Fix a wrong value in the Admin Portal, or delete the record there and send it again.
Quick start
Experienced users — create a manufacturer in 4 steps:
- Exchange your API key for a bearer token.
- POST a JSON array of manufacturer objects to
[AP_base_uri]/ERP/Manufacturer/Create. - Read the request GUID from the
200response. - GET
/ERP/Manufacturer/GetRequestResult?requestGuid={GUID}untilStatusisCompleted.
Need more detail? Follow the full steps below.
Steps
Step 1 — Check what already exists
Both values you send have to be unique, and a duplicate is rejected rather than merged. Your system may already hold pre-loaded manufacturers, so check the list before you send yours.
- In the left menu, select Data management.
- Select Manufacturers.
- Search for the names your ERP is about to send.

The two fields you send are the two columns of this list: ManufacturerId is ID (1) and Name is NAME (2).
Tip: Using the same string for both fields is normal. Most pre-loaded manufacturers do exactly that.
Step 2 — Build the request body
The body is a JSON array of manufacturer objects, even when you send a single manufacturer. Both fields are mandatory.
| Field | Max length | What it sets |
|---|---|---|
Name |
100 | The manufacturer name shown in the list and in the manufacturer picker on an item. Must be unique. |
ManufacturerId |
100 | Your identifier for the manufacturer, and the value imports and integrations refer to. Must be unique. |
There are no other fields. A manufacturer record holds nothing else — everything that ties a manufacturer to a tool, such as the Manufacturer item ID, lives on the item.
A complete request body for two manufacturers:
[
  {
    "Name": "Fraisa",
    "ManufacturerId": "Fraisa"
  },
  {
    "Name": "Walter",
    "ManufacturerId": "WAL"
  }
]
Tip: Send your whole manufacturer list in one array rather than one call per manufacturer. Each object is validated on its own, so one bad entry does not stop the rest — the failures come back in
Errorsand the successes inCreatedManufacturers.
Step 3 — Send the request
- Set
Content-Typetoapplication/json. - Set
AuthorizationtoBearer {access_token}. - POST the body to
[AP_base_uri]/ERP/Manufacturer/Create. - Read the request GUID from the response.
The response is the GUID on its own, for example "3f2b9c14-5d7e-4a91-8c66-0b1d2e3f4a5b". Keep it — it is the only way to find out what happened to the manufacturers you sent.
Important:
200means the request was accepted, not that the manufacturers exist. The work is queued and runs in the background, so an integration that stops at the response never sees its own validation errors. Always follow up withGetRequestResult.
Step 4 — Check the result
- GET
[AP_base_uri]/ERP/Manufacturer/GetRequestResultwith the query parameterrequestGuidset to the GUID from step 3. - Read
Status, and repeat the call until it reachesCompletedorFailed. - Read
Resultfor the per-manufacturer outcome.
| Request status | What it means |
|---|---|
Created |
The request has been received but is not in the task queue yet. |
Ready |
The request is in the task queue, waiting to run. |
Scheduled |
The request is queued to run at a later time. |
Running |
The manufacturers are being created right now. |
Completed |
Everything the request asked for has finished. |
Failed |
The request could not be performed. |
The response:
{
  "Message": "string",
  "Status": "Completed",
  "Result": {
    "CreatedManufacturers": [ "string" ],
    "Errors": [ "string" ]
  }
}
| Field | What it holds |
|---|---|
Message |
A message about the request as a whole. |
Status |
One of the six request statuses above. |
Result.CreatedManufacturers |
The manufacturers that were created. |
Result.Errors |
One entry per object that failed validation, naming the parameter that was invalid. |
Success: Status is Completed, Errors is empty, and every manufacturer you sent is listed in CreatedManufacturers. The records now appear under Data management > Manufacturers, and they can be selected in the Manufacturer field on the Supplier tab of any item.
What this interface cannot do
| You cannot… | Do this instead |
|---|---|
| Rename a manufacturer, or change its ID | Open the record under Data management > Manufacturers and edit both fields there. Changing an ID that an import file already uses breaks the match on the next run. |
| Delete a manufacturer | Delete it in the Admin Portal. A manufacturer that is assigned to any item cannot be deleted at all — reassign those items first. |
| Read the manufacturer list | There is no read endpoint. Use the list in the Admin Portal, or keep the ERP as the master of the list. |
| Assign a manufacturer to an item | Set Manufacturer and Manufacturer item ID on the item — see How to manage items with the REST API for the item interface. |
Test a call without writing code
Every CRIBWISE installation publishes the ERP interfaces on a built-in Swagger page at [AP_base_uri]/ERP/swagger. Open it in a browser to see the endpoint list of your own installation and the exact models the server is running.

The Manufacturer group on the Swagger page: the create endpoint (1) and the request-result endpoint (2).
Selecting an endpoint opens its parameters, its model schema, and a Try it out! button that sends a real call.

The create endpoint expanded: the request body (1), the model schema with both fields (2), and Try it out! (3).
Warning: Try it out! writes to the installation you are connected to. Use a test installation, and remember that a manufacturer created this way can only be removed again from the Admin Portal.
Next steps
- Assign the manufacturers to your items — set Manufacturer and Manufacturer item ID on each item’s Supplier tab. See Best practices for configuring item fields.
- Keep item data current — with the manufacturer item ID filled in, CRIBWISE can refresh item data from the manufacturer’s catalog. See How to update items from an external catalog.
- Send the companies you buy from — vendors are separate records with their own endpoint. See How to create vendors with the REST API.
Troubleshooting
| Problem | Likely cause | Fix |
|---|---|---|
The call answered 200, but no manufacturer appears in the Admin Portal. |
The request was queued and then rejected during validation, or it has not run yet. | Call GetRequestResult with the GUID. Read Errors once Status is Completed. |
A manufacturer comes back in Errors every time you send it. |
The ID or the name already exists. Both must be unique, and a repeat send is not an update. | Search the manufacturer list for the existing record. Reuse it, or send a different ID or name. |
| Some manufacturers in the array were created and others were not. | Each object is validated on its own, so a failure does not stop the rest of the array. | Compare CreatedManufacturers with what you sent, and resend only the ones listed in Errors. |
| The call is refused with an authorization error. | The bearer token has expired, or the API key behind it has passed its expiration date. | Request a new token. If that fails too, set a new expiration date on the key — see How to authenticate with the REST API. |
| The ERP renamed a manufacturer and the change never reached CRIBWISE. | There is no update endpoint, so a rename cannot travel over this interface. | Rename the record in the Admin Portal. If renames are frequent, keep the ManufacturerId stable and change only the name. |
Related articles
- CRIBWISE REST API – endpoint overview — every ERP REST endpoint, grouped by resource, and how a call is authenticated.
- How to authenticate with the REST API — how to create an API key and exchange it for a bearer token.
- How to manage manufacturers — the same records maintained by hand, including renaming and deleting.
- How to create vendors with the REST API — the companion interface for the companies you buy from.
- How to manage items with the REST API — the item interface, where a manufacturer is referenced by its ID.
- How to update items from an external catalog — what the manufacturer and the manufacturer item ID are used for afterwards.