Read time: ~5 minutes
Applies to: Admin Portal
What you can do
Set up email and on-screen notifications for specific item actions in CRIBWISE. When a notification is enabled, the system alerts designated recipients whenever someone picks, returns, purchases, or performs other actions on that item.
Before you start
- You must be logged in to the Admin Portal with an account that has permission to edit items.
- Know which item you want to configure notifications for.
- For email notifications, have the recipient email addresses ready.
Note: Your CRIBWISE system must have email sending configured for email notifications to work. Contact your system administrator if emails are not arriving. Emails are sent from noreply@cribwise.com and might be considered as spam or blocked by IT.
Quick start
Experienced users — configure item notifications in 4 steps:
- Open Data management → Items.
- Select an item and click View detail.
- Click the Notifications tab.
- Check the actions you want to be notified about, enter recipient addresses, and Save.
Need more detail? Follow the full steps below.
Steps
Step 1 — Open the item list
- Click Data management in the left navigation menu.
- Click Items.
The item list opens, showing all items in the system.
Step 2 — Open the item detail
- Find the item you want to configure in the list. Use the search field to filter by item ID or description.
- Click the item to select it.
- Click View detail in the toolbar, or double-click the item row.
The item detail panel opens on the right side, showing the General information tab.
Step 3 — Open the notifications tab
- Click the Notifications tab in the tab row.
The notifications settings appear, showing a list of actions with checkboxes for E-mail and On-screen message to user.
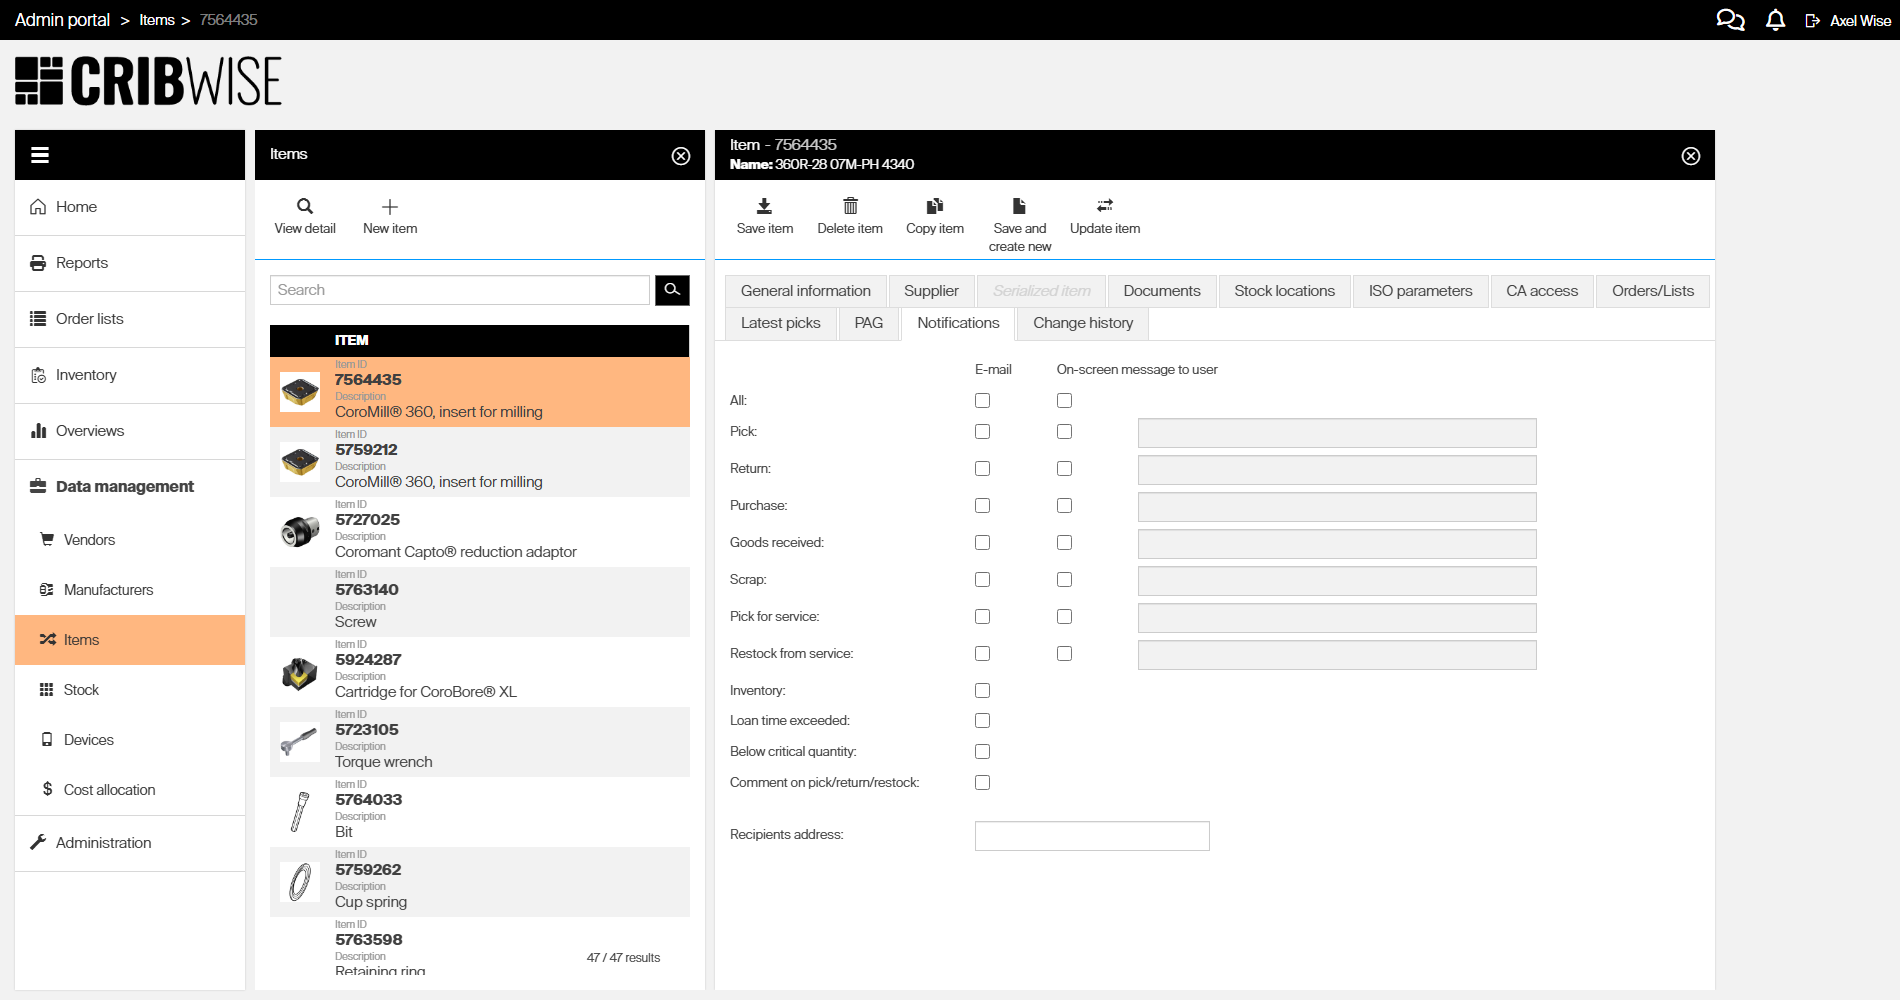
Step 4 — Enable notifications for actions
For each action, you can enable two types of notifications:
- E-mail — sends an email to the addresses in the Recipients address field when the action is performed.
- On-screen message to user — displays a custom message on the Shop Floor Interface when a user performs the action. Enter the message text in the field next to the checkbox.
Check the boxes for the actions you want to be notified about:
| Action | Trigger |
|---|---|
| All | Enables notifications for all actions below |
| Pick | Pick of this item is confirmed |
| Return | Return of this item is confirmed |
| Purchase | An order containing this item changes to Active |
| Goods received | Goods received is confirmed on SFI, or received quantity is increased by a restock operation |
| Scrap | Scrap of this item is confirmed |
| Pick for service | Pick of this item against a service list is confirmed |
| Restock from service | Restock of this item from a service list is confirmed |
| Inventory | Inventory of this item is finished (on AP or SFI) |
| Loan time exceeded | The loan time for a serialized pick of this item has been exceeded |
| Below critical quantity | This item’s quantity in at least one device is below the critical quantity |
| Comment on pick/return/restock | A comment is made after a pick, return, or restock operation involving this item |
Step 5 — Enter recipient email addresses
- Scroll down to the Recipients address field at the bottom of the tab.
- Enter one email address. When an email address is entered, a new email field appears underneath. Only one email per field can be entered.
Tip: Use a shared mailbox address if multiple people need to receive notifications for this item.
Step 6 — Save the item
- Click Save item in the toolbar.
Success: The notification settings are saved. Email notifications are sent to the specified recipients, and on-screen messages appear on the SFI whenever the enabled actions are performed on this item.
Next steps
After configuring item notifications:
- Test the notification — Perform one of the enabled actions (such as picking the item on SFI) and verify that the email or on-screen message appears.
- Configure more items — Repeat the process for other items that need notifications.
- Review stock states — If you enabled “Below critical quantity,” make sure the item has minimum and critical quantities configured. See Understanding item stock states.
Troubleshooting
| Problem | Likely cause | Fix |
|---|---|---|
| Email notification not received | The system email service is not configured, the recipient address is incorrect, or noreply@cribwise.com is blocked by the company. | Verify the email address in the Recipients address field. Contact your administrator to confirm that email sending is set up in system settings. Contact you IT department to verify sending email address is not blacklisted. |
| On-screen message does not appear on SFI | The on-screen checkbox is not enabled for the action, or the message text field is empty. | Open the item’s Notifications tab and verify both the checkbox and the message text are filled in for the action. |
| “Below critical quantity” notification never triggers | The item have a critical quantity value set to low, or item is a durable where picked items are considered ‘alive’. | Open the item’s stock location settings and set the critical quantity. See Understanding item stock states. |
| “Loan time exceeded” notification never triggers | The item is not configured as a serialized item, or no loan time is set. | Open the item’s Serialized item tab and configure the loan time value. |
| Notifications saved but checkboxes reset after reload | Changes were not saved before navigating away. | Click Save item in the toolbar before switching to another item or tab. |
Related articles
- Understanding item stock states — Learn about minimum, reorder, and critical quantity thresholds that trigger notifications.
- Item fields and settings reference — Complete reference for all item detail fields and tabs.
- How to manage vendors — Configure vendor notification settings for purchasing.
- System settings reference — Configure system-wide email and notification settings.
- Consignment management — Set up consignment workflows that may include notification triggers.