
What you can do
Create a device in the Admin Portal so a Shop Floor Interface installation can pair with it. Then set how that device behaves for operators, lock it when you need to make structural changes, and delete it when the hardware goes away.
A device is the Admin Portal record that represents one Shop Floor Interface (SFI) installation. It belongs to a stock, it holds the storage devices your operators pick from, and its ID is what pairs the record with the physical hardware.
Before you start
- You need Device entity privileges in your user group, on the AP Privileges tab. Create, Read, Update, and Delete are separate checkboxes – see Admin Portal permissions reference.
- At least one stock must exist. Stock is mandatory on the device and cannot be left empty – see How to create and manage stocks.
- Decide whether the device is physical hardware or a cloud device before you save. The choice locks once the device pairs with an installation, and it limits which storage devices you can add.
- If your group has Allow access only to selected devices set on its Data access tab, you will only see the devices listed there.
Note: The cloud device option is not available on on-premise Admin Portal installations.
Quick start
Experienced users create a device in 6 steps:
- Open Data management > Devices.
- Select New device.
- Enter a unique Name and pick a Stock.
- Decide whether to tick Is cloud device.
- Set the login, language, and picking options under User setup.
- Select Save device and copy the generated ID.
Need more detail? Follow the full steps below.
Steps
Step 1 – Open the device list
- Navigate to Data management > Devices.
- Select New device.
The list shows every device you have access to, with the ID that pairs it to its hardware, its stock, its synchronization status, and whether it is a cloud device.
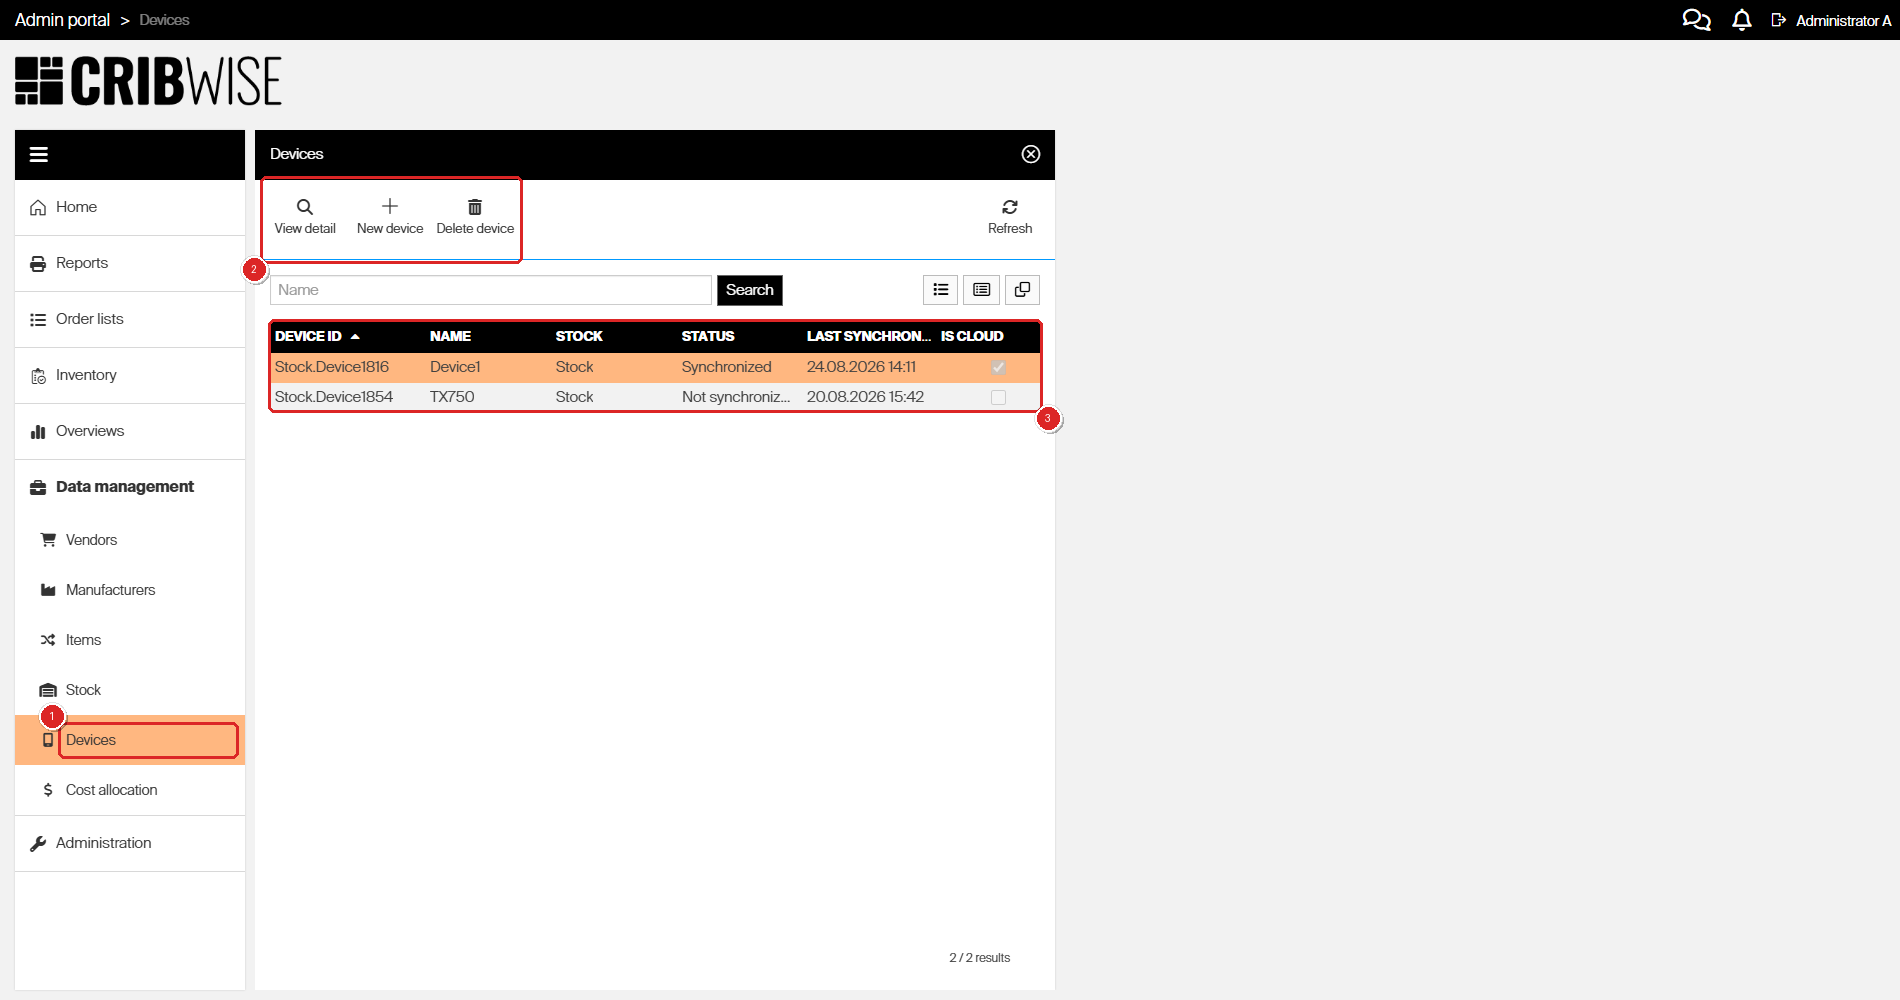
(1) Devices under Data management, (2) the View detail, New device and Delete device buttons, and (3) the grid. Here one cloud device is Synchronized and one physical cabinet is Not synchronized.
Double-click a row, or select it and choose View detail, to open an existing device. Refresh reloads the grid.
Step 2 – Fill in the general information
Only two fields are mandatory. Everything else has a working default.
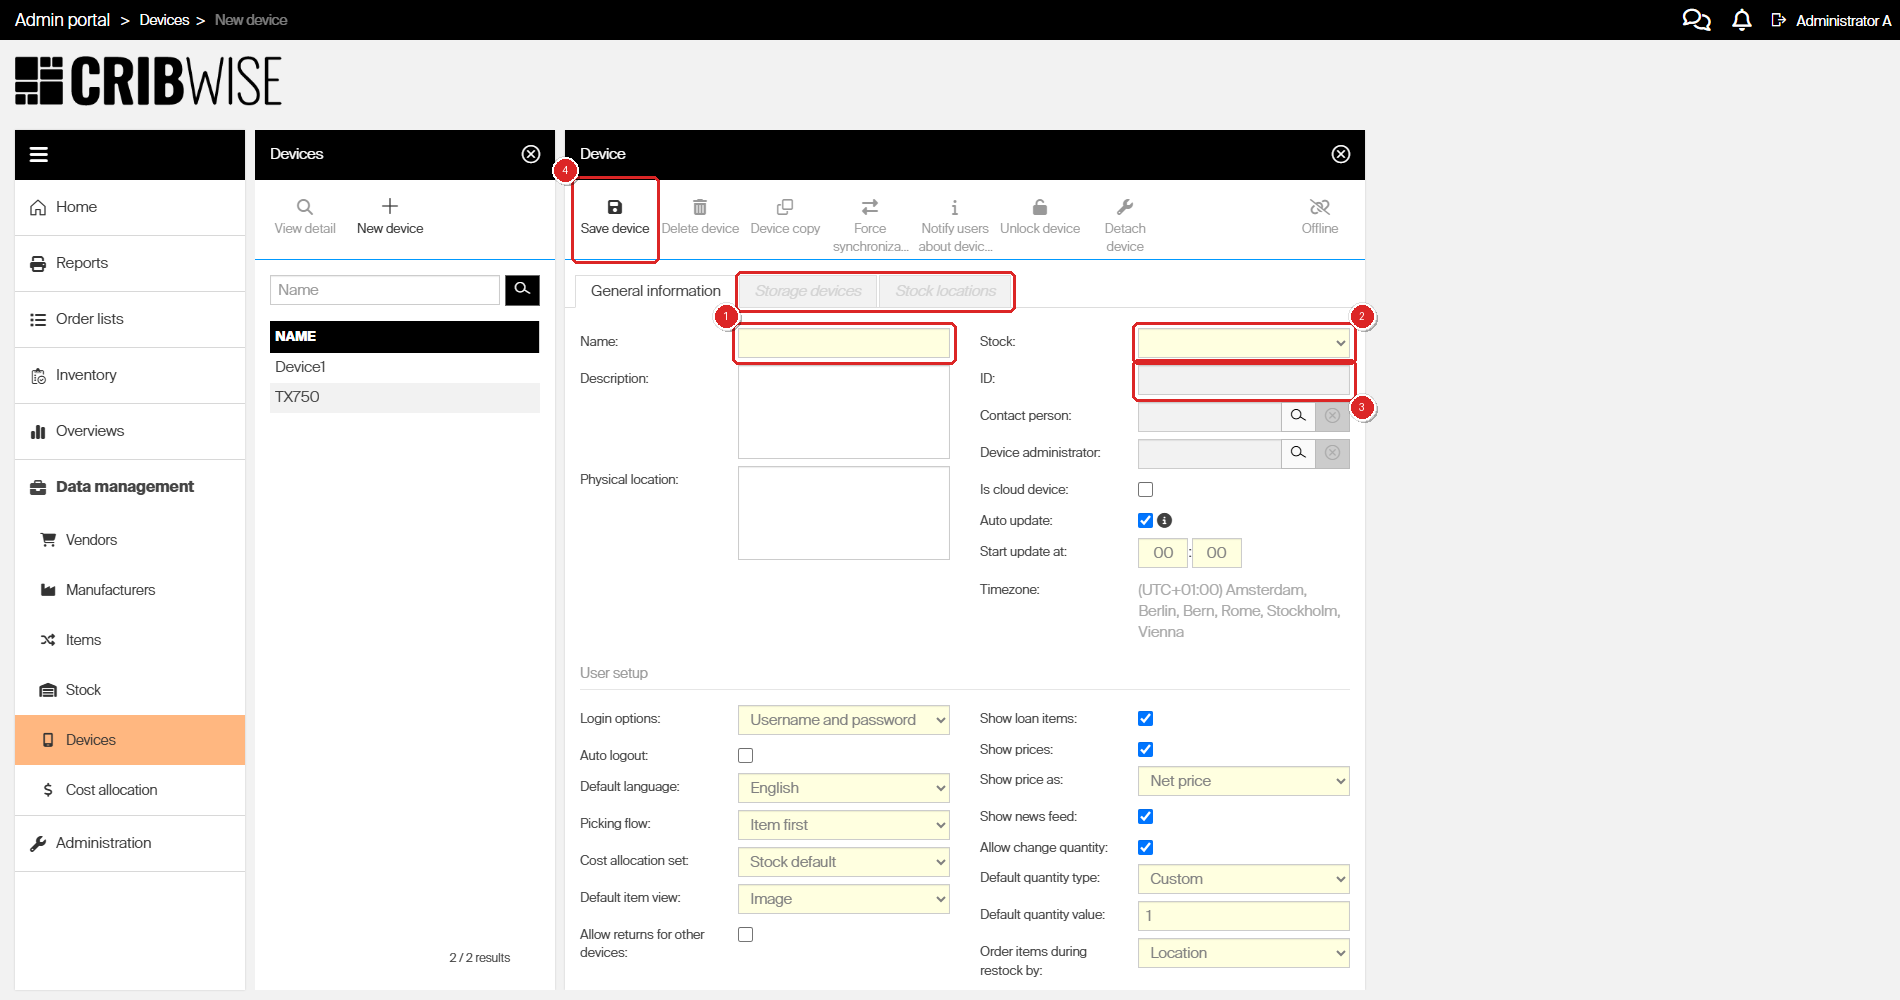
(1) Name and (2) Stock are the two mandatory fields, shaded yellow. (3) ID is read-only and stays empty until you save. (4) Save device. The Storage devices and Stock locations tabs in the red box are greyed out until the first save.
| Field | Required | What to enter |
|---|---|---|
| Name | Yes | A name for the device. Must be unique. |
| Description | No | Free text. |
| Physical location | No | Free text describing where the hardware stands, for example the building and room. |
| Stock | Yes | The stock this device belongs to, picked from the stocks defined in the system. |
| ID | Read-only | Generated when you save the device for the first time, in the form Stock.DeviceNNNN. Use it when you install the SFI application on the hardware. |
| Contact person | No | A defined user. Choose them with the search button next to the field, and clear the field with the button beside it. |
| Device administrator | No | A defined user, picked the same way as the contact person. |
| Is cloud device | No | Tick to run the SFI in a browser instead of installing it on hardware. See Step 3. |
Important: If you save with Name or Stock empty, nothing happens and no error dialog appears – the two fields simply turn red. Fill them in and save again.
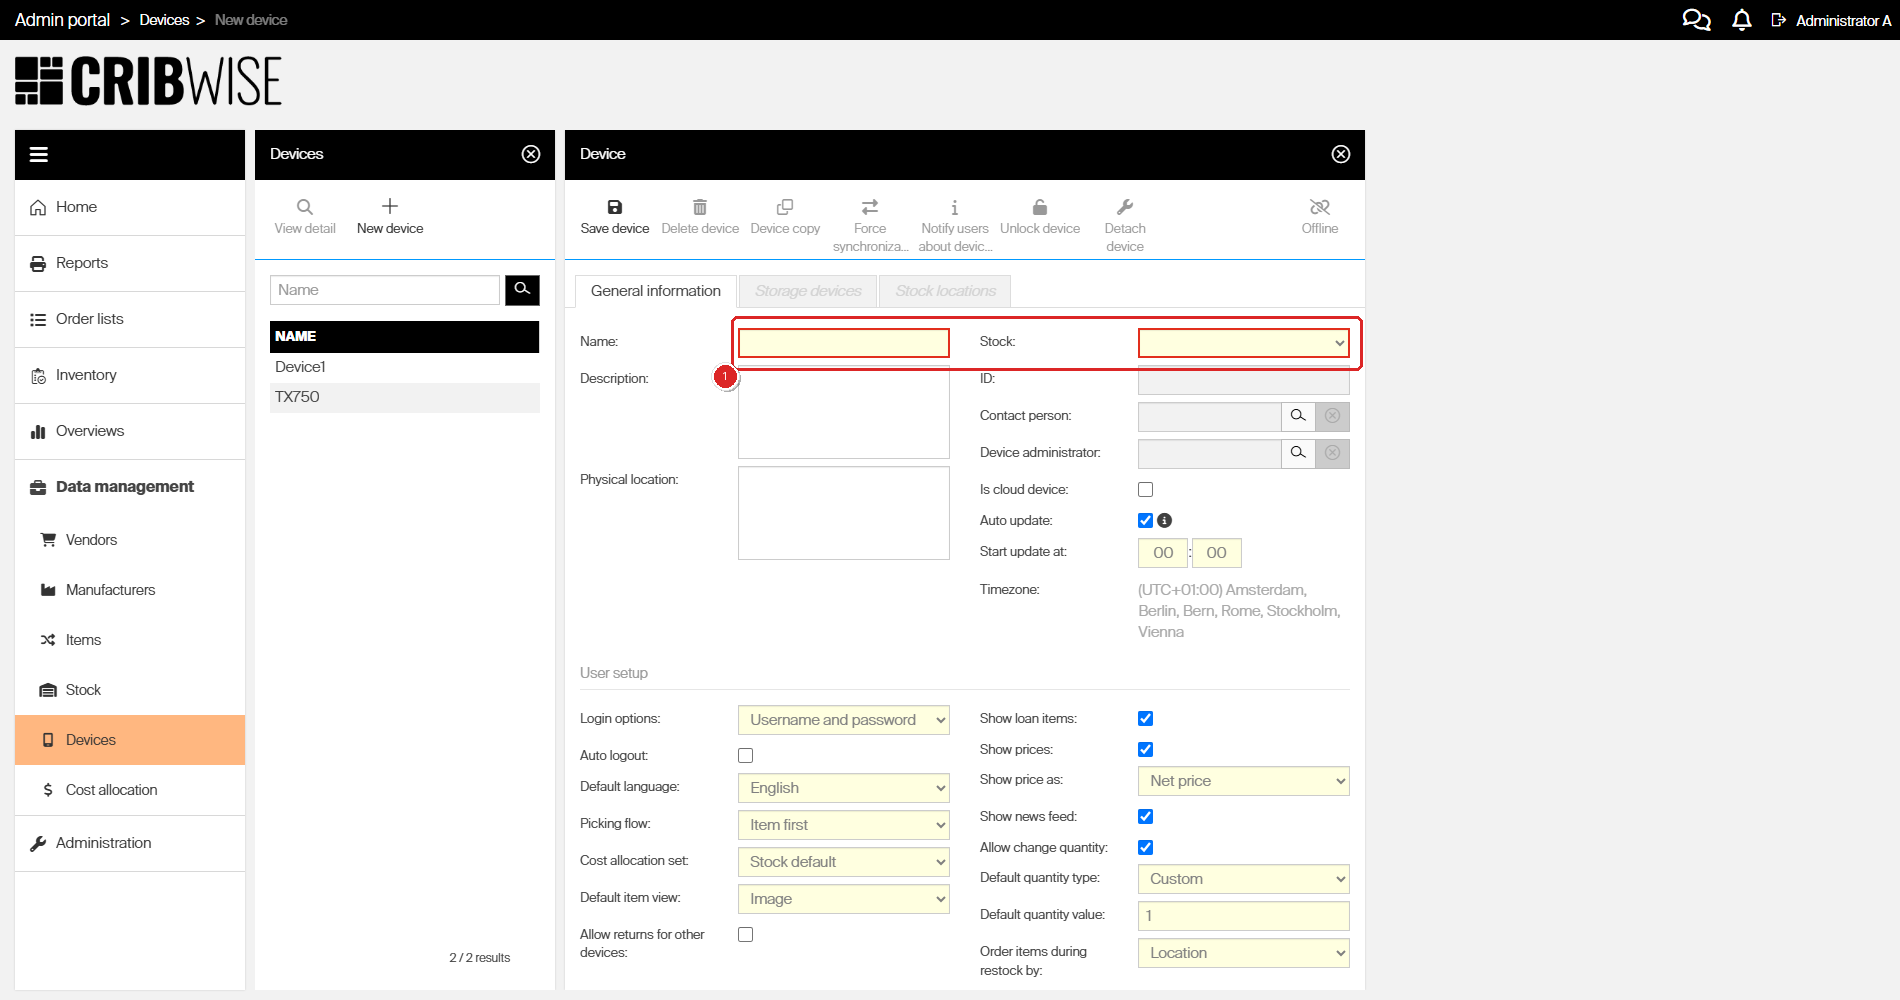
Saving an empty form. The Name and Stock fields are outlined in red by the product itself. There is no message and no dialog, so this is easy to miss.
Step 3 – Choose physical hardware or a cloud device
Leave Is cloud device clear for hardware that runs the SFI application locally – a cabinet, a drawer unit, or a PC on the shop floor. Tick it to run the SFI in a browser at your portal address followed by /shopfloorinterface, with no local installation.
The choice changes the form. A physical device gets seven extra settings that a cloud device does not have, because they only make sense for a locally installed application.
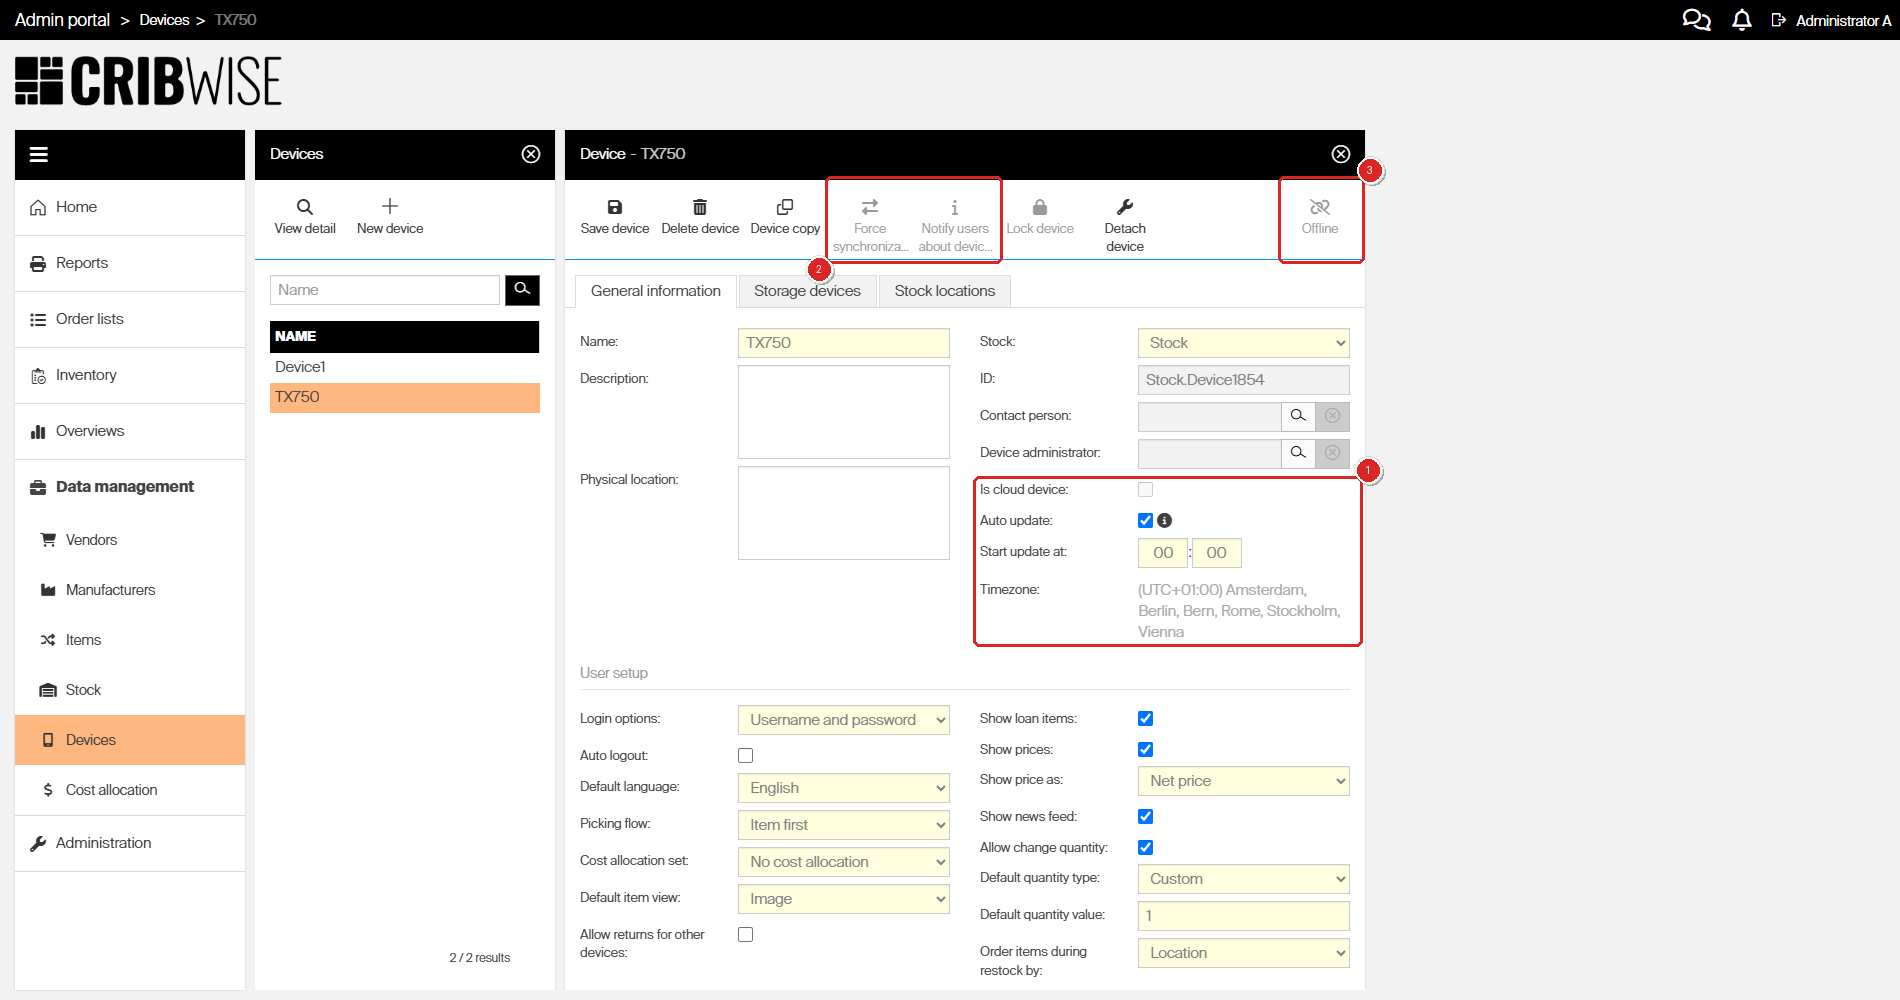
A physical device. (1) the fields only physical devices get – Auto update, Start update at and the read-only Timezone. (2) Force synchronization, Notify users about device lock and Lock device are greyed out, and (3) the indicator reads Offline – those three actions need a live connection.
| Field | What it does |
|---|---|
| Auto update | The SFI downloads a new version in the background as soon as one is available and installs it at the time you set. |
| Start update at | The hour and minute the automatic update starts. |
| Timezone | Read-only. Shows the timezone the update time is interpreted in. |
| Login options | The default login method on this device: Username and password or Card or Coges. Operators can switch method on the SFI. |
| Auto logout | Logs the operator out after a period of inactivity. Tick it to reveal Inactivity logout time in minutes. |
| Default language | The SFI language for operators who have no language preference of their own. The SFI login screen always uses this language. 20 languages are available – see How to manage language translations. |
| Show news feed | Shows the news feed on this device’s login screen. The feed must first be enabled in system settings. |
Warning: Only open storage devices can be created for a cloud device. Adding a location-controlled storage device to one fails with Cannot create location controlled storage device for cloud device. If the hardware needs controlled locations, do not tick Is cloud device.
A cloud device’s form is correspondingly shorter.
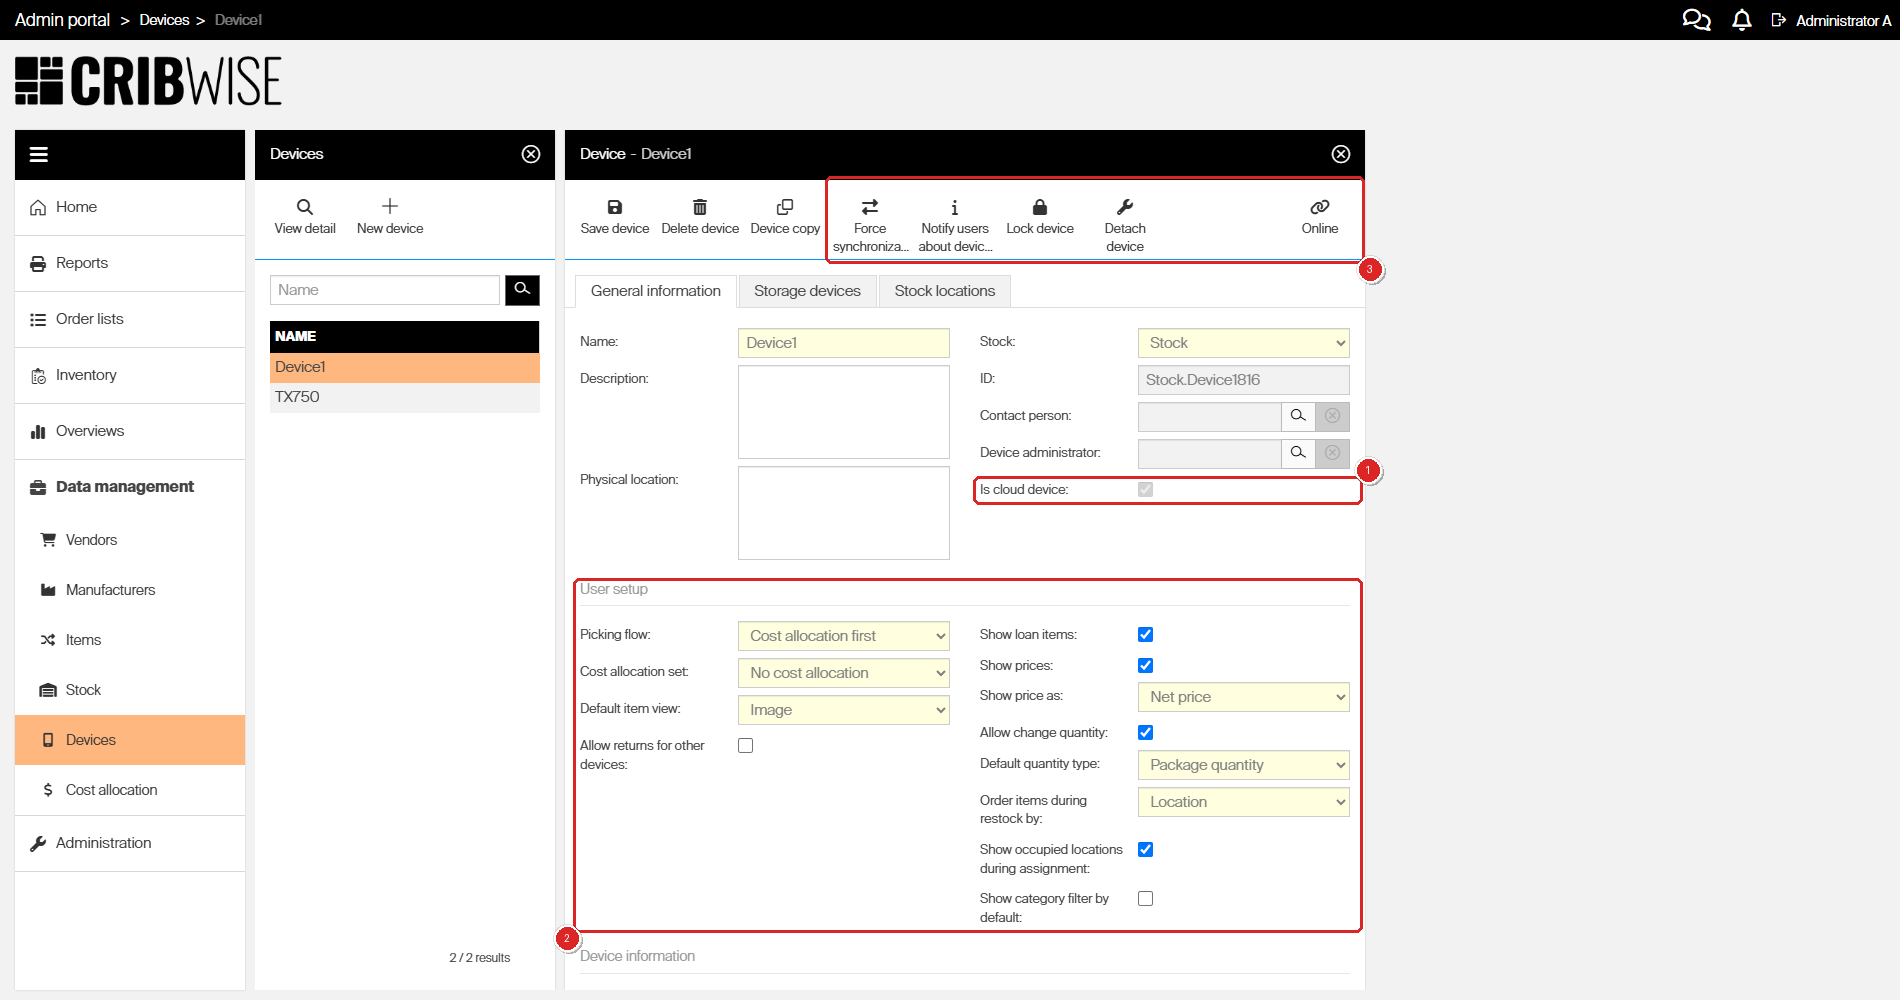
A cloud device. (1) Is cloud device is ticked and greyed out, because the device has already paired with an installation. (2) User setup is shorter – no login options, auto logout, default language, or news feed. (3) every toolbar action is available and the indicator reads Online.
Step 4 – Configure the user setup
The User setup section controls what operators see and do on this device. Every field here applies to both physical and cloud devices.
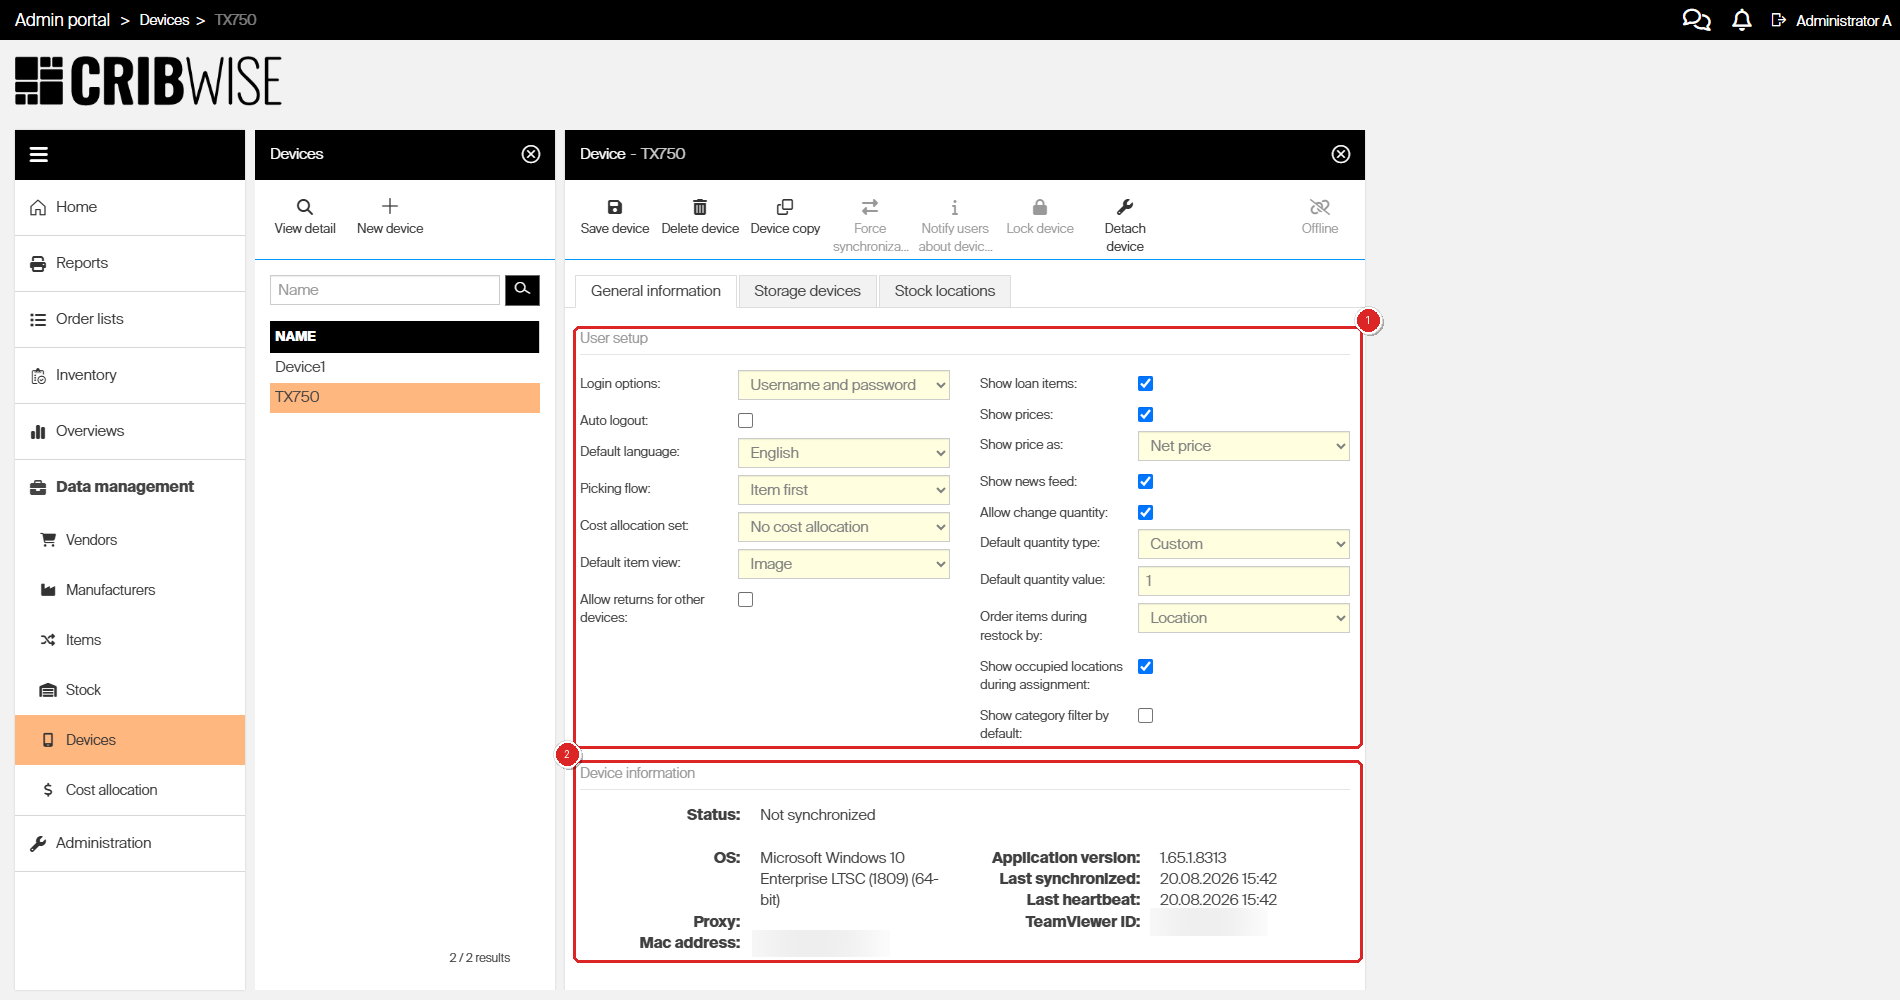
(1) the User setup fields, and (2) the read-only Device information the hardware reports back. The MAC address and TeamViewer ID are blurred here – a TeamViewer ID lets anyone who has it request remote access to the machine.
| Field | What it does |
|---|---|
| Picking flow | Item first starts the pick with item selection. Cost allocation first starts with the cost allocation questions. Only relevant when cost allocation is enabled. |
| Cost allocation set | Stock default uses the set on the parent stock, No cost allocation turns the questions off for this device, and any named set overrides the stock – see How to create and manage cost allocation sets. |
| Default item view | What the item detail shows first while picking or returning: Image, Drawing, or Item information. If the chosen one is missing for an item, the next available one is shown, and the operator can still switch manually. |
| Allow returns for other devices | When on, the return list also offers items picked from other devices. When off, only items picked from this device can be returned here. |
| Show loan items | Shows serialized items that have a defined loan time on this device. |
| Show prices | Shows the item purchase price while picking and returning, both in the expanded item row and while choosing a quantity. |
| Show price as | Available only when Show prices is on. Shows Net price or Gross price, per dispense unit. |
| Allow change quantity | Lets operators change the quantity offered for a pick. |
| Default quantity type | Package quantity offers the item’s package quantity. Custom reveals Default quantity value so you can set the number yourself. |
| Order items during restock by | Location walks the operator through the locations of each storage device and module in turn. Item finishes one item across all its locations before moving to the next. |
| Show occupied locations during assignment | When on, assignment lists every location by default rather than only free ones. Operators can show or hide occupied locations manually either way. |
| Show category filter by default | Opens the category filter automatically during the item selection step of the picking flow. |
Step 5 – Save and note the ID
- Select Save device.
- Copy the value now shown in ID.
Use that ID when you install the SFI application on the hardware. It is what starts synchronization between the installation and this record.
Success: the ID field holds a value such as Stock.Device1816, and the Storage devices and Stock locations tabs are no longer greyed out. If you need to find the ID again later, see How to find Device ID and Storage Device ID.
Device information reported by the hardware
After the first synchronization the device detail gains a read-only Device information section. You cannot edit any of it from the Admin Portal.
| Field | What it shows |
|---|---|
| Status | The synchronization state. See Device statuses. |
| OS | The operating system reported by the machine running the SFI. |
| Proxy | The proxy the device connects through, if any. |
| Mac address | The network adapter address of the machine. |
| Application version | The SFI version installed on the device. |
| Last synchronized | When the device last completed a synchronization. |
| Last heartbeat | When the device last reported in. |
| TeamViewer ID | Filled in automatically when TeamViewer is detected on the device, and re-checked at every synchronization. It cannot be edited in the Admin Portal, and reads NotAvailable when TeamViewer is not installed. |
Device statuses
| Status | What it means | Do you need to lock the device to make structural changes? |
|---|---|---|
| Not installed | No SFI installation has paired with this record yet. The ID is still free to use for a new installation. | No |
| Synchronized | The ID is paired with a physical installation and synchronization is current. The ID cannot be reused for another installation unless you detach this one. | Yes |
| Not synchronized | The ID is paired but the device has not synchronized recently. Usually means the SFI is closed, the connection is down, or synchronization is failing. | Yes |
| Locked | Operators cannot log in to the SFI. Structural changes are allowed in the Admin Portal. | Already locked |
| Waiting for lock | A lock has been requested. The status becomes Locked once the next synchronization completes. | Not yet |
| Waiting for unlock | An unlock has been requested. The status becomes Synchronized once the next synchronization completes. | Not yet |
Device actions
These seven actions sit in the toolbar of the device detail. To the right of them, a connection indicator reads Online, Offline, or Checking connection.
| Action | What it does | When it is available |
|---|---|---|
| Save device | Saves your changes, and generates the ID on the first save. | Always |
| Delete device | Deletes the device after a confirmation. Blocked while assigned items or released storage devices remain – see Deleting a device. | After the first save |
| Device copy | Creates a new device using the open device’s settings as the starting point. | After the first save |
| Force synchronization | Synchronizes the device immediately. Does not change its synchronization schedule. | Only while the device is online |
| Notify users about device lock | Warns everyone currently logged in to this device that it is about to be locked, so they can finish and log out. | Only while the device is online and not already locked |
| Lock device / Unlock device | Locks the device so nobody can log in to the SFI, or releases it again. Locking logs out anyone already signed in. | Only while the device is online |
| Detach device | Clears the pairing information so the record can synchronize with different hardware. Use it when the machine has been replaced. | After the first save |
Warning: Lock device, Unlock device, Detach device and Force synchronization run the moment you select them. There is no confirmation dialog. Locking a device logs out every operator on it, and detaching one clears its pairing information.
Locking a device
Lock a device before you make structural changes to it – adding or removing storage devices, modules, stock locations, or item assignments. Locking stops operators from changing the same things on the SFI at the same time, which is what causes synchronization conflicts.
The sequence is:
- Select Notify users about device lock so anyone signed in can finish their work.
- Select Lock device. The status becomes Waiting for lock and a synchronization is requested.
- When that synchronization finishes, the status becomes Locked and the SFI is closed to operators.
- Make your changes in the Admin Portal.
- Select Unlock device. The status becomes Waiting for unlock, then Synchronized once the next synchronization completes.
A device can only be locked while it is online, that is, while the Admin Portal can reach it.
What you cannot change while a device is in use
Because the SFI and the Admin Portal both write to the same data, some operations are blocked in the Admin Portal while operators can still reach the device. What is blocked depends on the device status and on whether the storage device is New or Released.
| Operation | Synchronized / Not synchronized | Not installed | Locked | |||
|---|---|---|---|---|---|---|
| Released | New | Released | New | Released | New | |
| Add assignment to device | Yes | Yes | Yes | Yes | Yes | Yes |
| Remove assignment to device | No | No | Yes | Yes | Yes | Yes |
| Add assignment to location | No | Yes | Yes | Yes | Yes | Yes |
| Remove assignment to location | No | Yes | Yes | Yes | Yes | Yes |
| Create storage device | Yes | Yes | Yes | Yes | Yes | Yes |
| Delete storage device | No | Yes | Yes | Yes | Yes | Yes |
| Create storage module | No | Yes | Yes | Yes | Yes | Yes |
| Delete storage module | No | Yes | Yes | Yes | Yes | Yes |
| Create stock location | No | Yes | Yes | Yes | Yes | Yes |
| Delete stock location | No | Yes | Yes | Yes | Yes | Yes |
| Disable stock location | No | Yes | Yes | Yes | Yes | Yes |
| Enable stock location | No | Yes | Yes | Yes | Yes | Yes |
| Perform inventory from AP | No | No | No | No | Yes | Yes |
| Change physical quantities by import | No | Yes | Yes | Yes | Yes | Yes |
The pattern is simple: everything is allowed once the device is Locked, and almost everything is blocked on a Released storage device while the device is live. To get all the options back, lock the device.
Deleting a device
Select Delete device from the list or from the device detail and confirm.
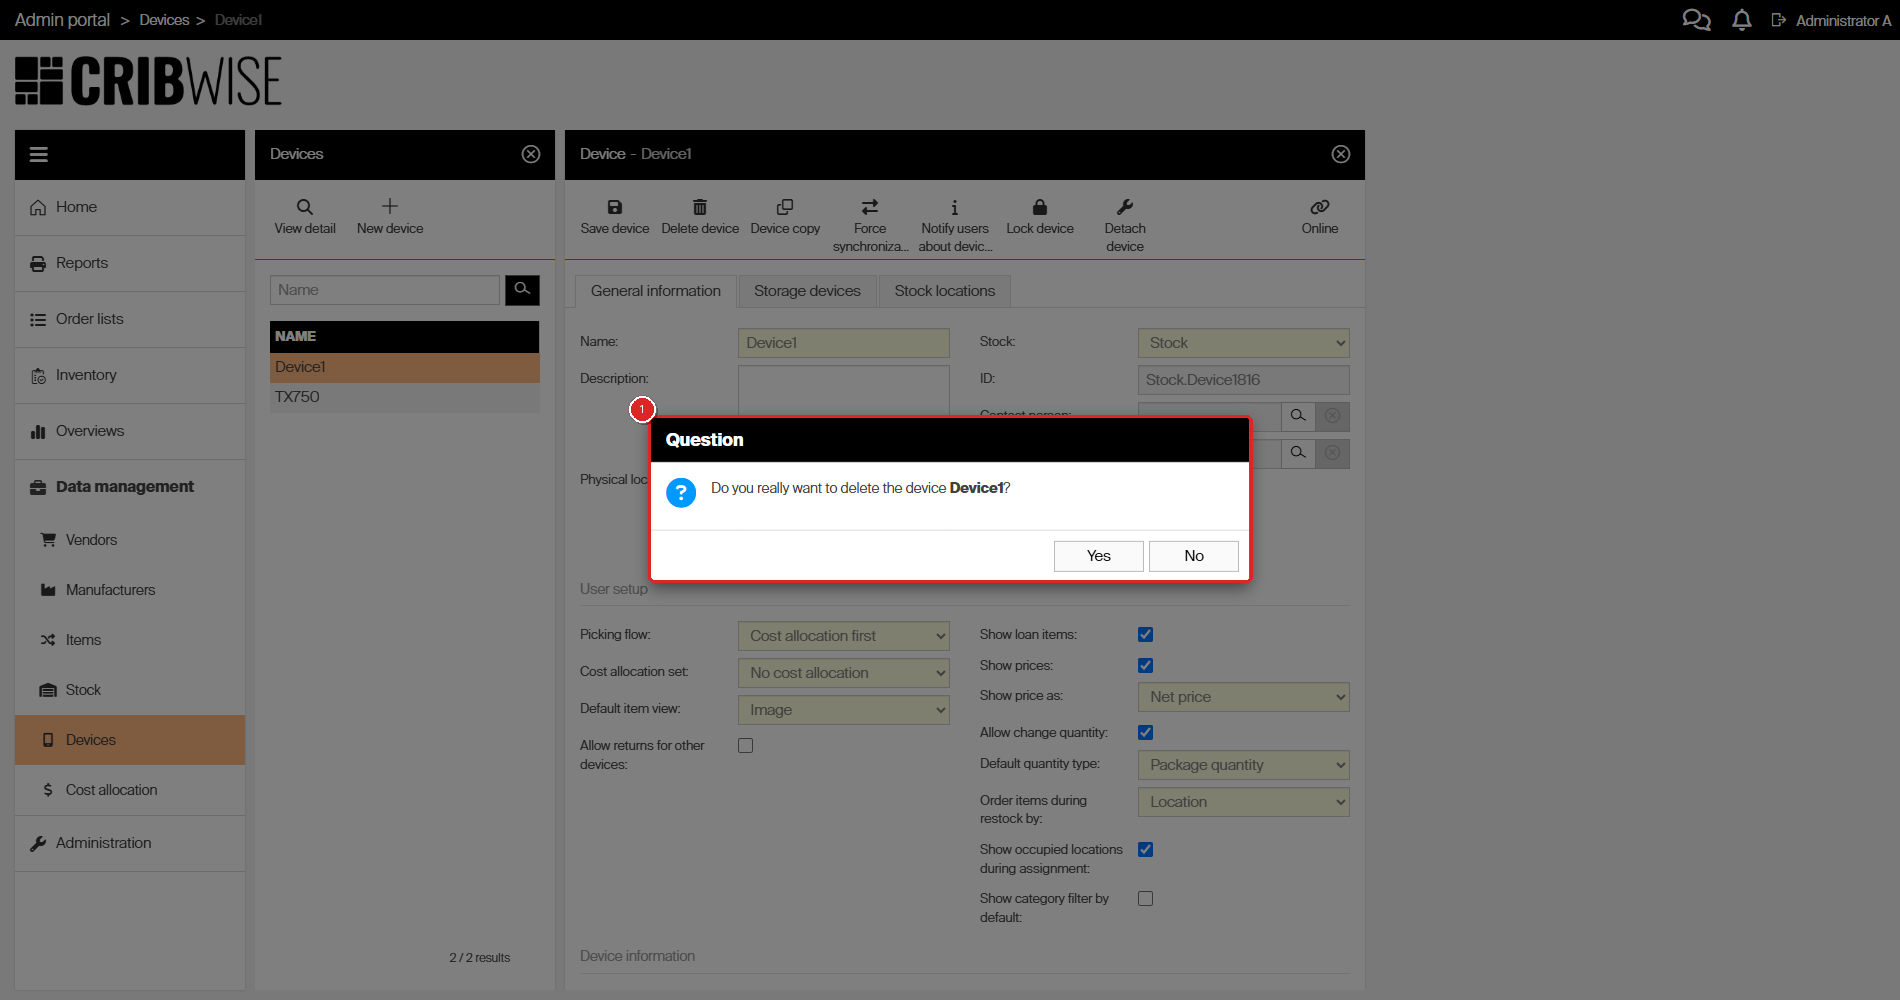
The confirmation dialog. It names the device, so check the name before selecting Yes.
A device cannot be deleted while it still has assigned items or a storage device with status Released. When that is the case, an error message appears instead; select the message to download the list of assigned items as an Excel file.
The clean way to remove a device is to inventory the assigned items out on the SFI, remove their assignments, and delete the released storage devices first. That needs a running SFI and a device that can be locked.
Force deletion
When the hardware has failed or been scrapped, the clean route is impossible. In that case you can override the rules:
- Select Delete device, from the device list or the device detail.
- Select the error message to open the dialog listing the assigned items.
- Select Delete anyway.
- Confirm.
Warning: A forced deletion cannot be undone, and the Admin Portal is unavailable while it runs. It removes every item assignment; records a withdraw event for any physical quantity still in a stock location; deletes every connected storage device with its modules and stock locations; cancels items not yet restocked in active purchase and service orders for this device; removes items in suggested or new stock-level orders; deletes device-level purchase and service orders; deletes the device’s service and transfer lists; and closes any open inventory on its storage devices.
Next steps
- Add the storage devices – a saved device unlocks its Storage devices tab. See How to configure storage devices.
- Install the SFI on the hardware using the generated ID to start synchronization.
- Assign items to the new locations once the storage devices are released.
Troubleshooting
| Problem | Likely cause | Fix |
|---|---|---|
| Save device appears to do nothing and two fields turn red. | Name and Stock are mandatory, and the product shows no error dialog. | Fill in both fields and save again. |
| Storage devices and Stock locations are greyed out. | The device has never been saved. | Select Save device once. The ID is generated at the same moment. |
| Lock device, Force synchronization and Notify users about device lock are greyed out. | The device is offline. All three need a live connection. | Wait until the connection indicator reads Online. If it stays Offline, check that the SFI is running and can reach the portal. |
| Is cloud device is ticked but cannot be changed. | The device has already paired with an SFI installation, which fixes its type. | Use Detach device to clear the pairing, or create a new device of the right type. |
| Adding a location-controlled storage device fails with Cannot create location controlled storage device for cloud device. | Cloud devices only support open storage. | Create a physical device for hardware that needs controlled locations. |
| Deleting a device reports assigned items or released storage devices. | The device still holds stock or released hardware. | Inventory the items out, remove their assignments, and delete the released storage devices – or use force deletion if the hardware is gone. |
| There is no Synchronization period field on the form. | The field was removed. From SFI 1.56 onwards, changes synchronize between the SFI and the Admin Portal as they happen. | Nothing to do. Use Force synchronization if you want to trigger a sync now. |
Related articles
- How to configure storage devices – the cabinets, modules, and stock locations you add to a saved device.
- How to create and manage stocks – the stock every device must belong to.
- How to find Device ID and Storage Device ID – where to read the IDs support asks for.
- Admin Portal permissions reference – the Device entity privileges and the Data access restrictions.
- How to create and manage cost allocation sets – the sets you can assign to a device.
- How to manage language translations – how the device default language relates to the user and system defaults.
- All system settings quick reference – the portal-wide settings behind the news feed and the device defaults.