
What you can do
Add a cabinet, shelf or vending machine to a CRIBWISE device, define its drawers and stock locations, and release it so the Shop Floor Interface can use it.
Find your machine first
Every storage device is added the same way. What changes from model to model is who builds the storage modules and stock locations afterwards: you type them in, they appear on the first save, they come from a configuration file, or they are laid out at the machine on the Shop Floor Interface. Find your model in the table before you start — it tells you which of the steps below you actually need.
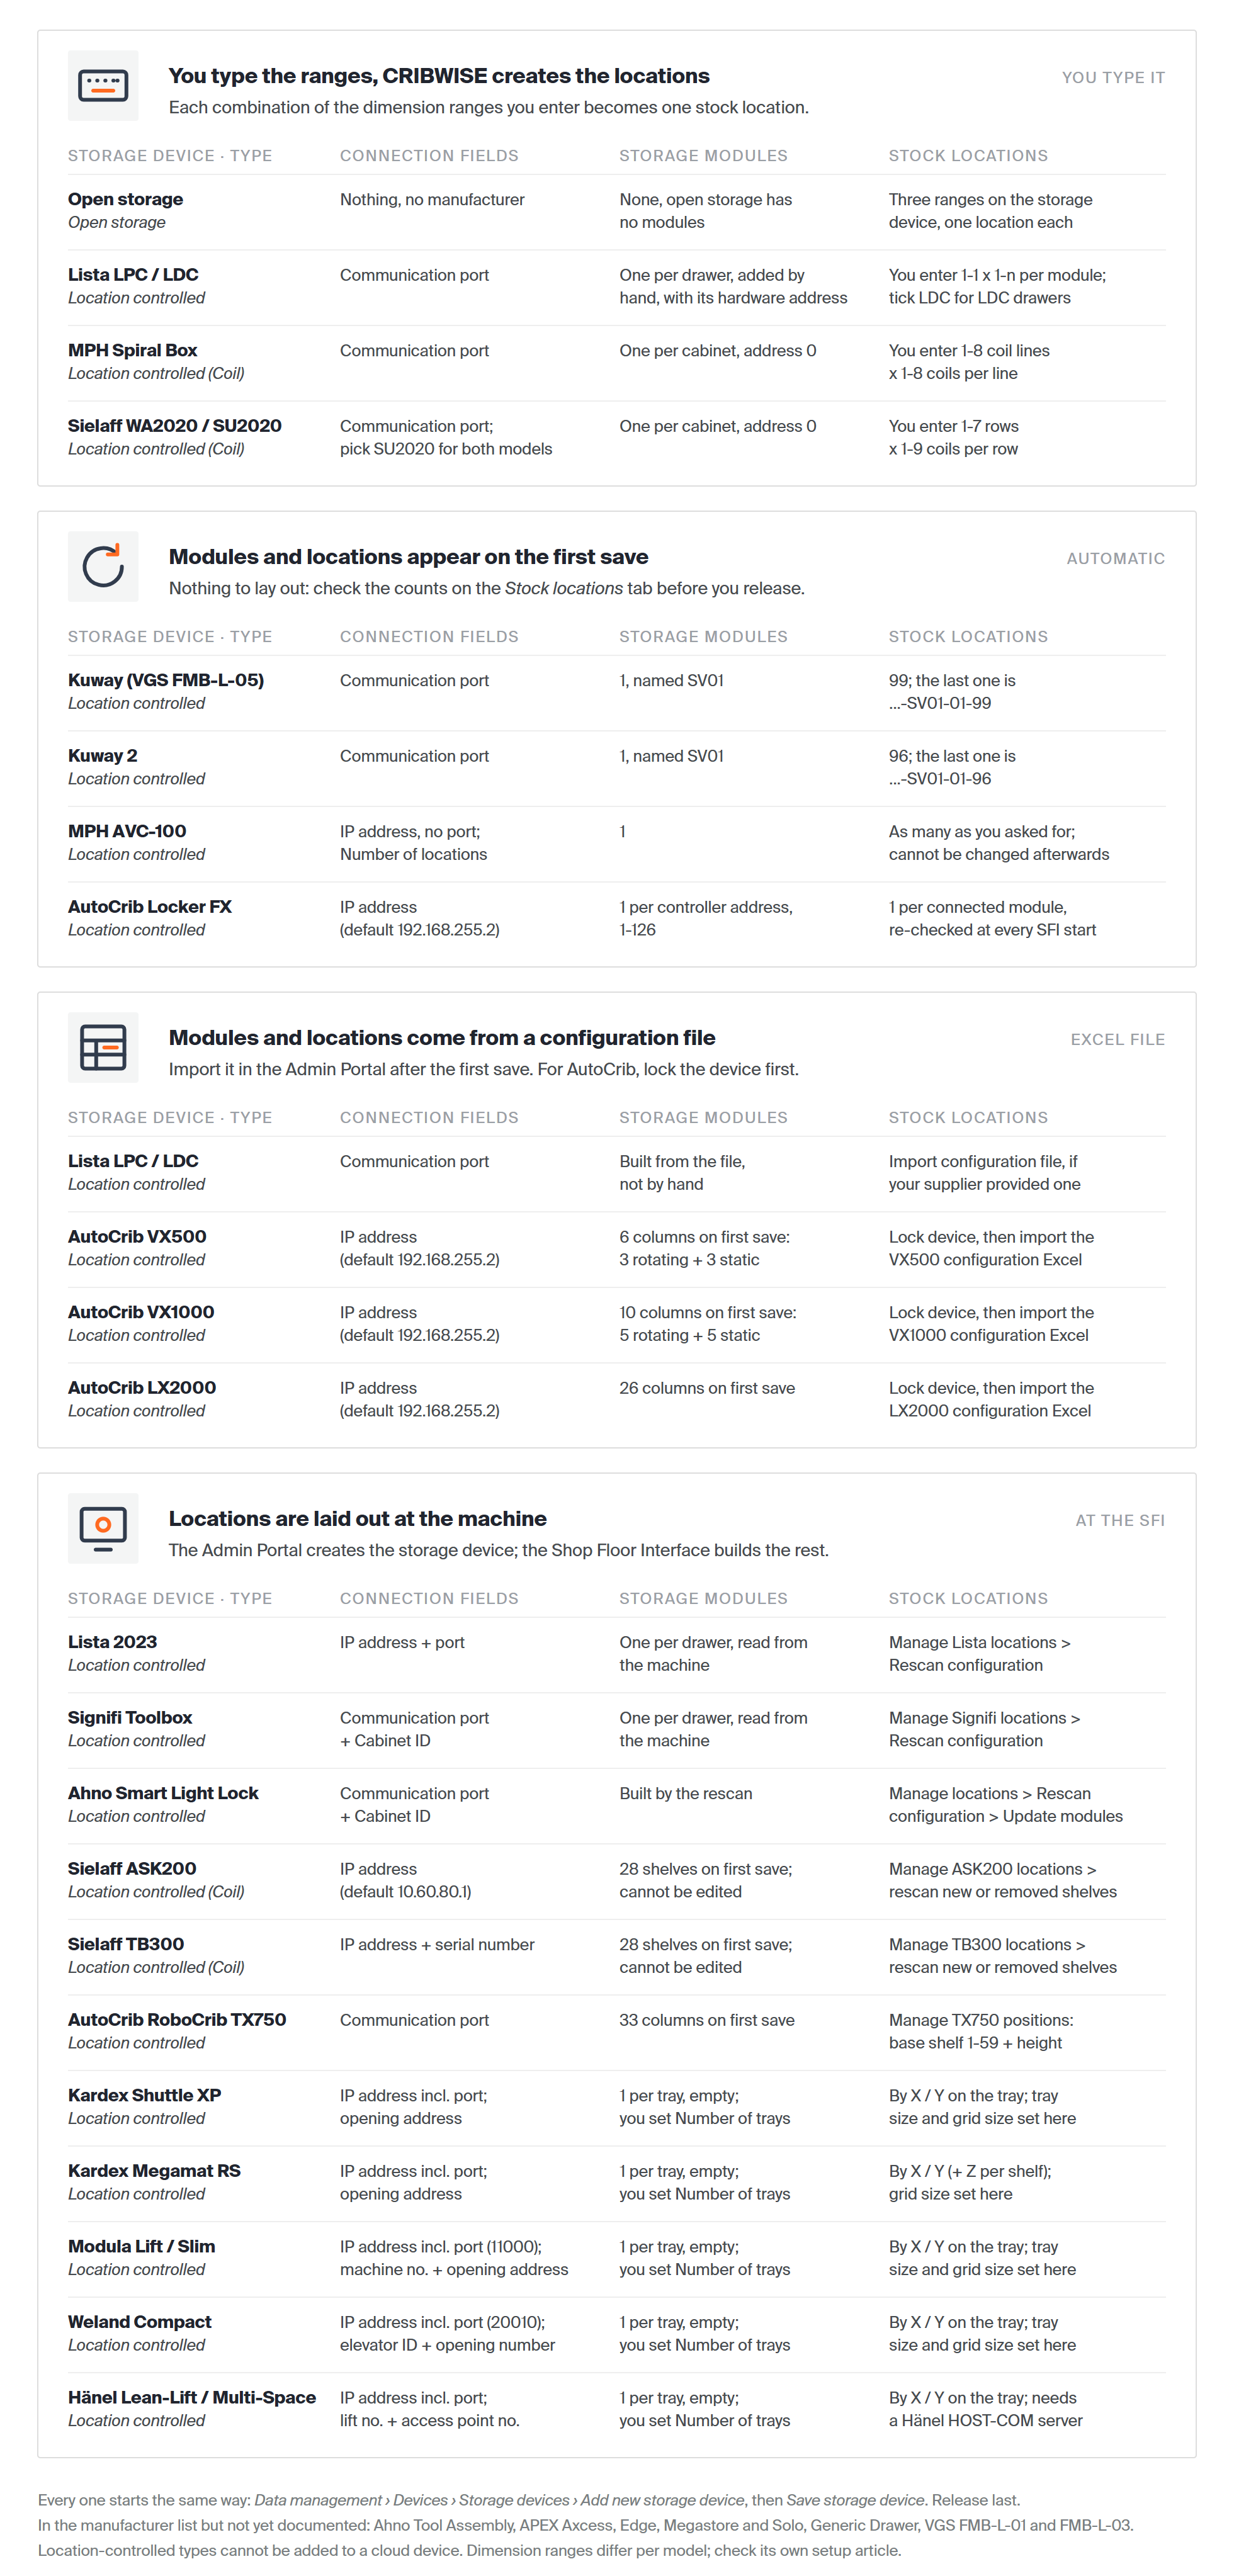
Every supported storage device, grouped by who builds its modules and stock locations. Click the table to open it full size.
Dimension ranges differ per drawer and cabinet model, so check your machine’s own setup article and the Supported storage devices – configuration reference for the exact values. A few manufacturers in the list — Ahno, APEX, Generic Drawer and VGS FMB-L-01 and FMB-L-03 — have no setup article yet.
How the pieces fit together
A device is one Shop Floor Interface installation. Each device holds one or more storage devices — the physical cabinets, shelves and machines standing next to it. A storage device is divided into storage modules (drawers, shelves or coil lines), and the modules generate the stock locations that items are assigned to.
| Level | What it is | Where you create it |
|---|---|---|
| Device | One Shop Floor Interface installation | Data management > Devices |
| Storage device | One cabinet, shelf or machine | Storage devices tab on the device |
| Storage module | A drawer, shelf or coil line inside the storage device | Storage modules tab on the storage device |
| Stock location | The compartment a single item sits in | Generated automatically from the dimension ranges you enter |
Open storage devices are the exception: they have no modules, and their stock locations are generated straight from the storage device’s own dimension ranges.
Choose the storage device type
The Type you pick decides which fields the form asks for and whether the storage device has modules.
| Type | Use it for | What you supply |
|---|---|---|
| Location controlled | Cabinets and machines that CRIBWISE opens and locks — Lista, Kardex, AutoCrib, Sielaff, Modula, Weland and the other supported models | A manufacturer, a communication port or IP address, and one storage module per drawer or shelf |
| Open storage | Shelves, racks and open bins with no lock and no electronics | Three dimension ranges. No modules, no manufacturer |
| Location controlled (Coil) | Coil- and spiral-fed machines, where a location is a coil rather than a compartment | A manufacturer, a communication port or IP address, and one module per coil line |
Note: On a cloud device only Open storage works. Saving a location-controlled type on a cloud device fails with Cannot create location controlled storage device for cloud device.
Before you start
- You need Admin Portal access with permission to manage devices.
- The device must already exist. See How to create and manage devices.
- For a location-controlled storage device, have the manufacturer and model and the communication port or IP address ready. The port is the one the cabinet is wired to on the computer that runs the Shop Floor Interface — read it from that computer’s device manager.
- Look up your model’s module type and dimension ranges in Supported storage devices – configuration reference before you start typing.
Important: Releasing a storage device cannot be undone. Build the whole structure and check it while the storage device is still in New.
Quick start
Experienced users — configure a storage device in 6 steps:
- Open the device under Data management > Devices with View detail.
- Go to the Storage devices tab and click Add new storage device.
- Enter a Name, choose the Type and fill in the fields it asks for.
- Click Save storage device.
- Add one storage module per drawer or shelf (location-controlled types only).
- Check the Stock locations tab, then click Release and confirm with Yes.
Need more detail? Follow the full steps below.
Steps
Step 1 — Open the device’s Storage devices tab
- Go to Data management > Devices.
- Select the device and click View detail.
- Open the Storage devices tab.
The tab lists every storage device attached to this device, with its Storage device ID, Name, Type and Status.
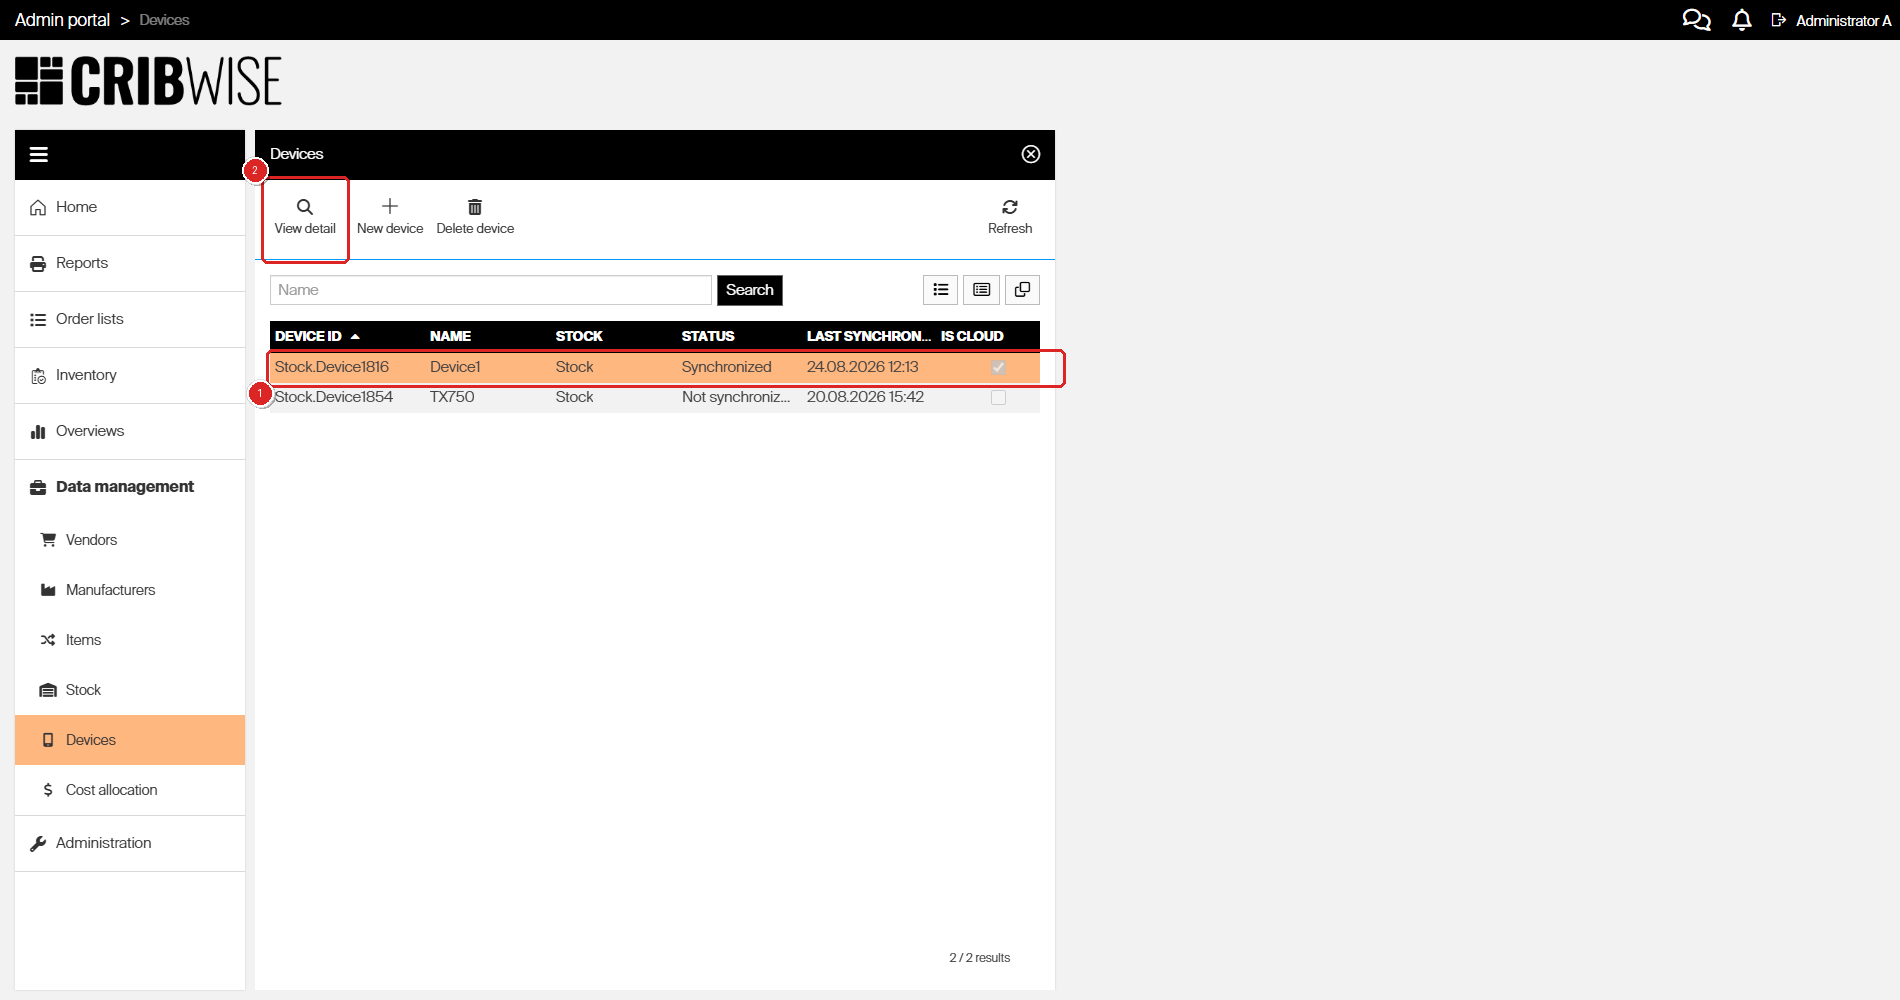
Select the device (1) and open it with View detail (2).
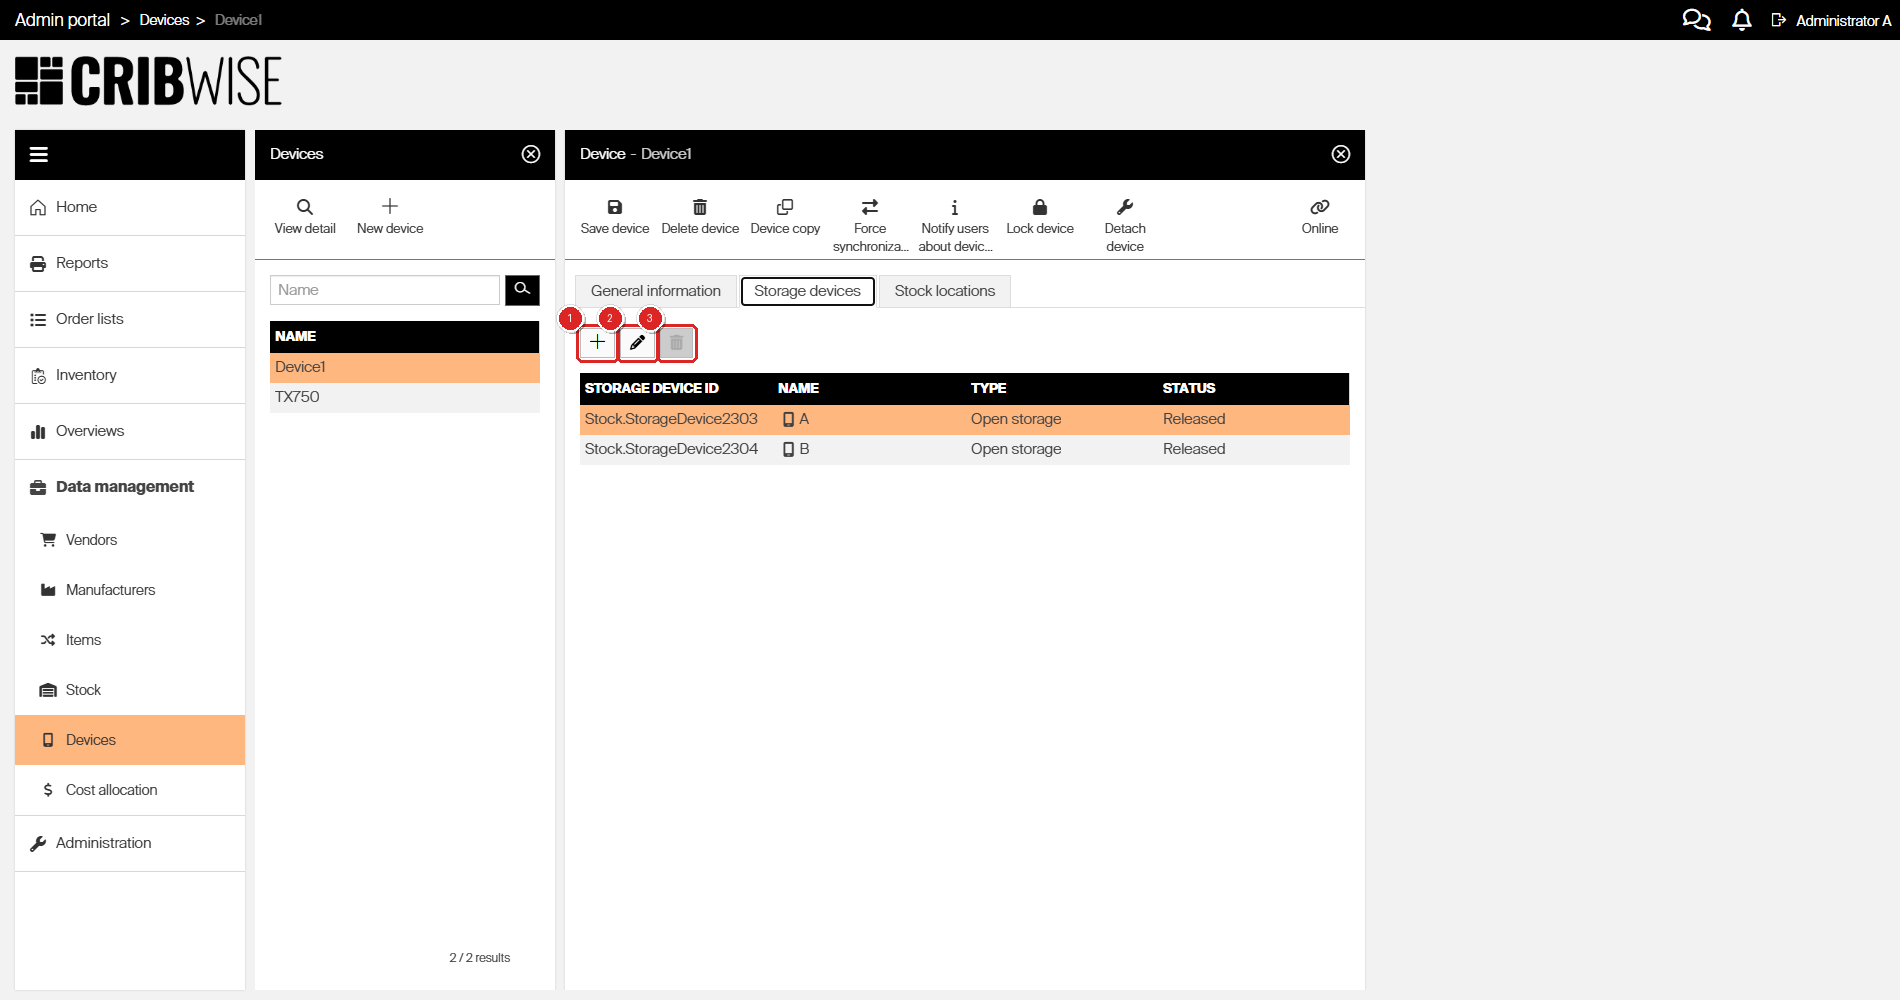
Add (1), edit (2) and remove (3) storage devices from this tab. Both storage devices on this device are Released, so the remove button is greyed out.
Step 2 — Create the storage device
- Click Add new storage device.
- Type a Name.
- Choose the Type.
- Fill in the fields the type asks for.
- Click Save storage device.
An open storage device asks for these fields:
| Field | Required | What to enter |
|---|---|---|
| Name | Yes | What the shelf or rack is called on the shop floor. It becomes the first part of every stock location name, so keep it short. |
| 1st, 2nd and 3rd dimension | Yes | A from-and-to range for each of the three levels — numbers or letters, up to 99 or Z per dimension. One stock location is generated for every combination, so all six boxes must be filled. |
| Default stock location dimension (mm) | No | Width, height and depth of one compartment. |
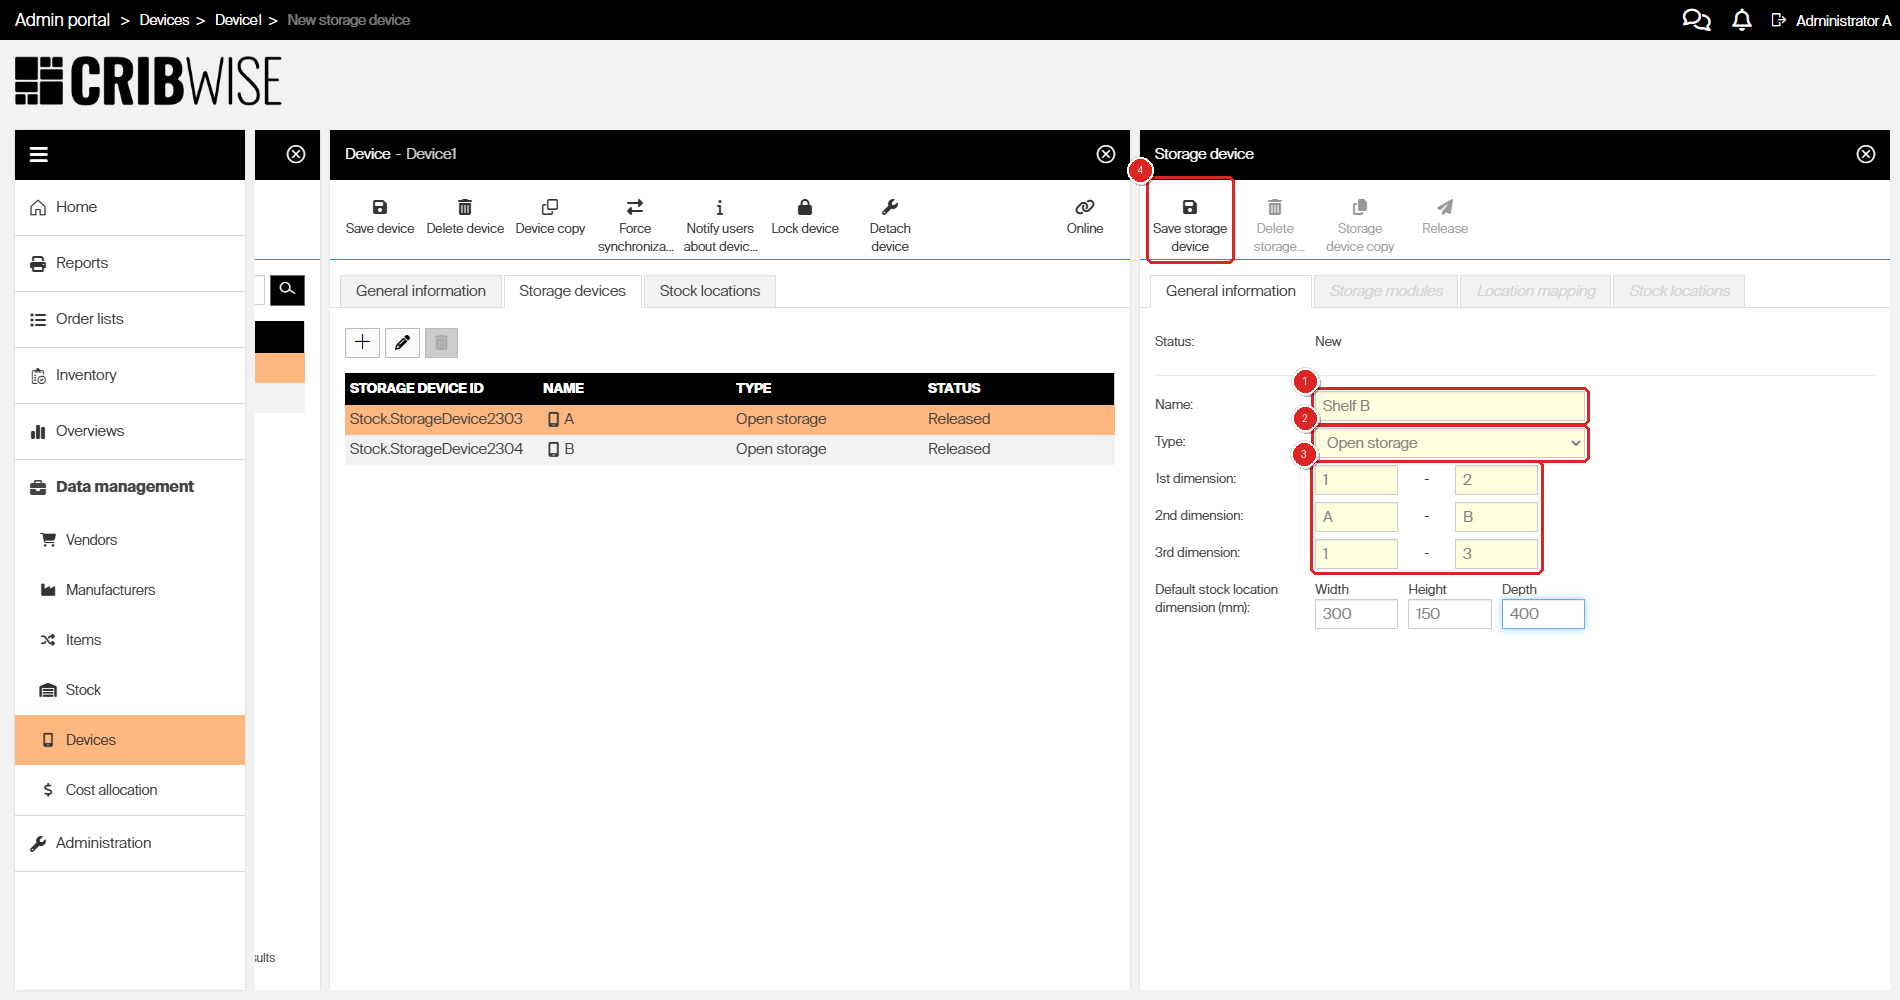
An open storage device: Name (1), Type (2), the three dimension ranges (3), then Save storage device (4).
A location-controlled device asks for different fields:
| Field | Required | What to enter |
|---|---|---|
| Name | Yes | What the cabinet is called on the shop floor. |
| Manufacturer | Yes | The make and model of the cabinet. Choose it before anything else — it decides which connection field appears next and which module settings the hardware expects. |
| Communication port or IP address | Yes | Where the cabinet is reachable. Which of the two the form asks for depends on the model. |
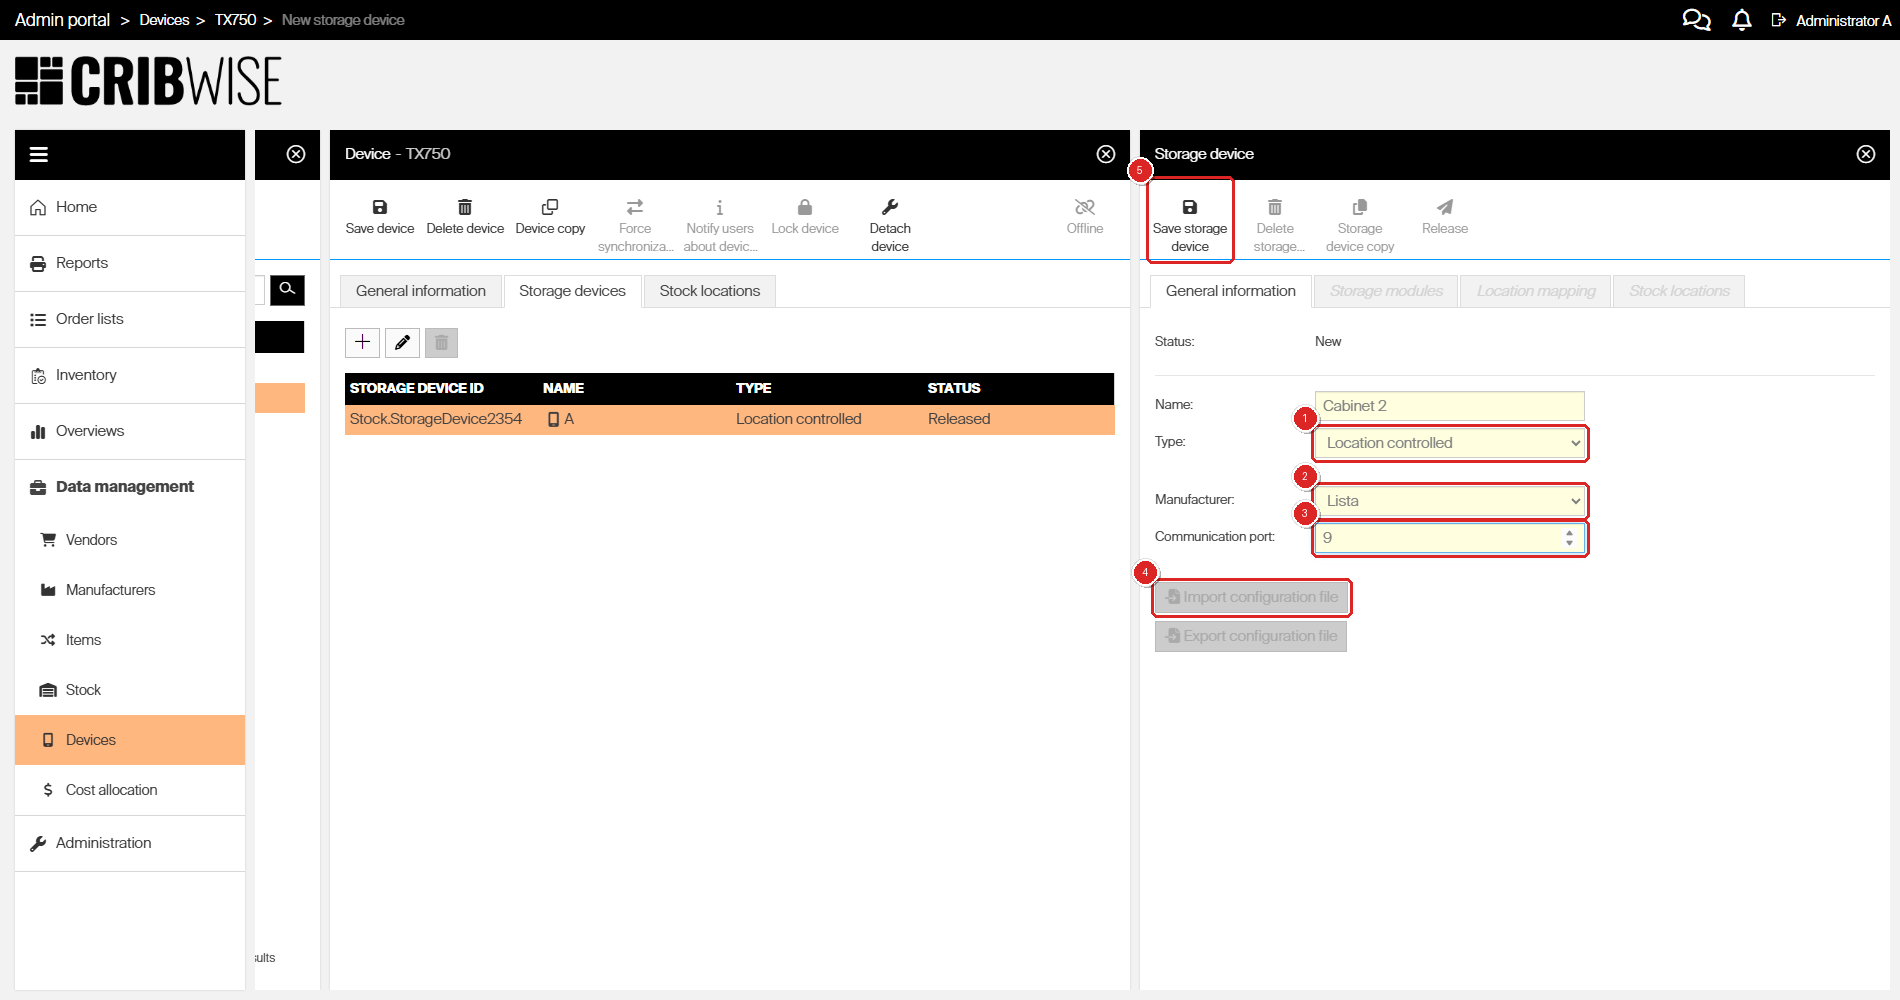
Picking a location-controlled Type (1) adds Manufacturer (2) and Communication port (3). Import configuration file (4) is greyed out here because the storage device has not been saved yet.
The Storage modules, Location mapping and Stock locations tabs stay greyed out until the storage device has been saved once.
The storage device is created with status New. A New storage device is not synchronized to the physical hardware, so you can keep changing it — even while the device is running in production on the shop floor.
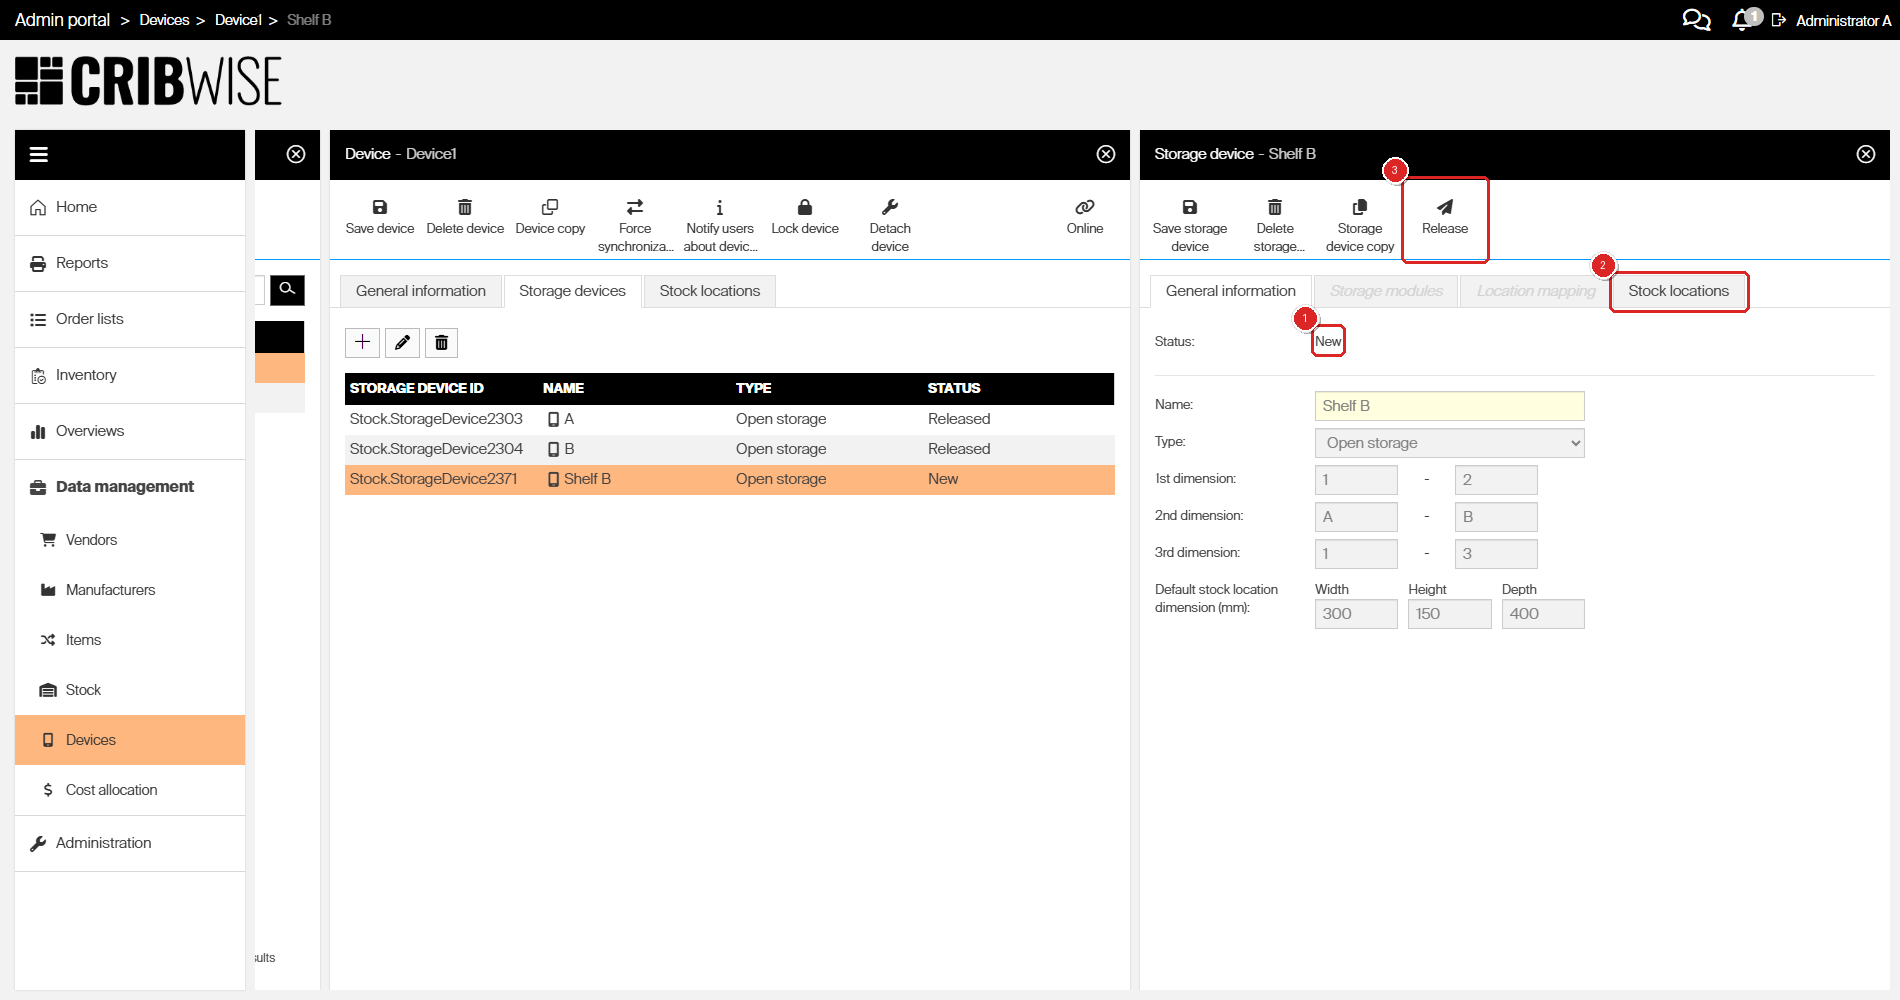
After saving: Status is New (1), the Stock locations tab opens (2) and Release becomes available (3). Storage modules stays greyed out — this is an open storage device, and those have no modules.
Step 3 — Add storage modules
Skip this step for open storage devices. A location-controlled storage device needs one storage module per drawer, shelf or coil line.
- Open the Storage modules tab.
- Click Add.
- Fill in the module fields.
- Click Save storage module.
- Repeat for every drawer or shelf.
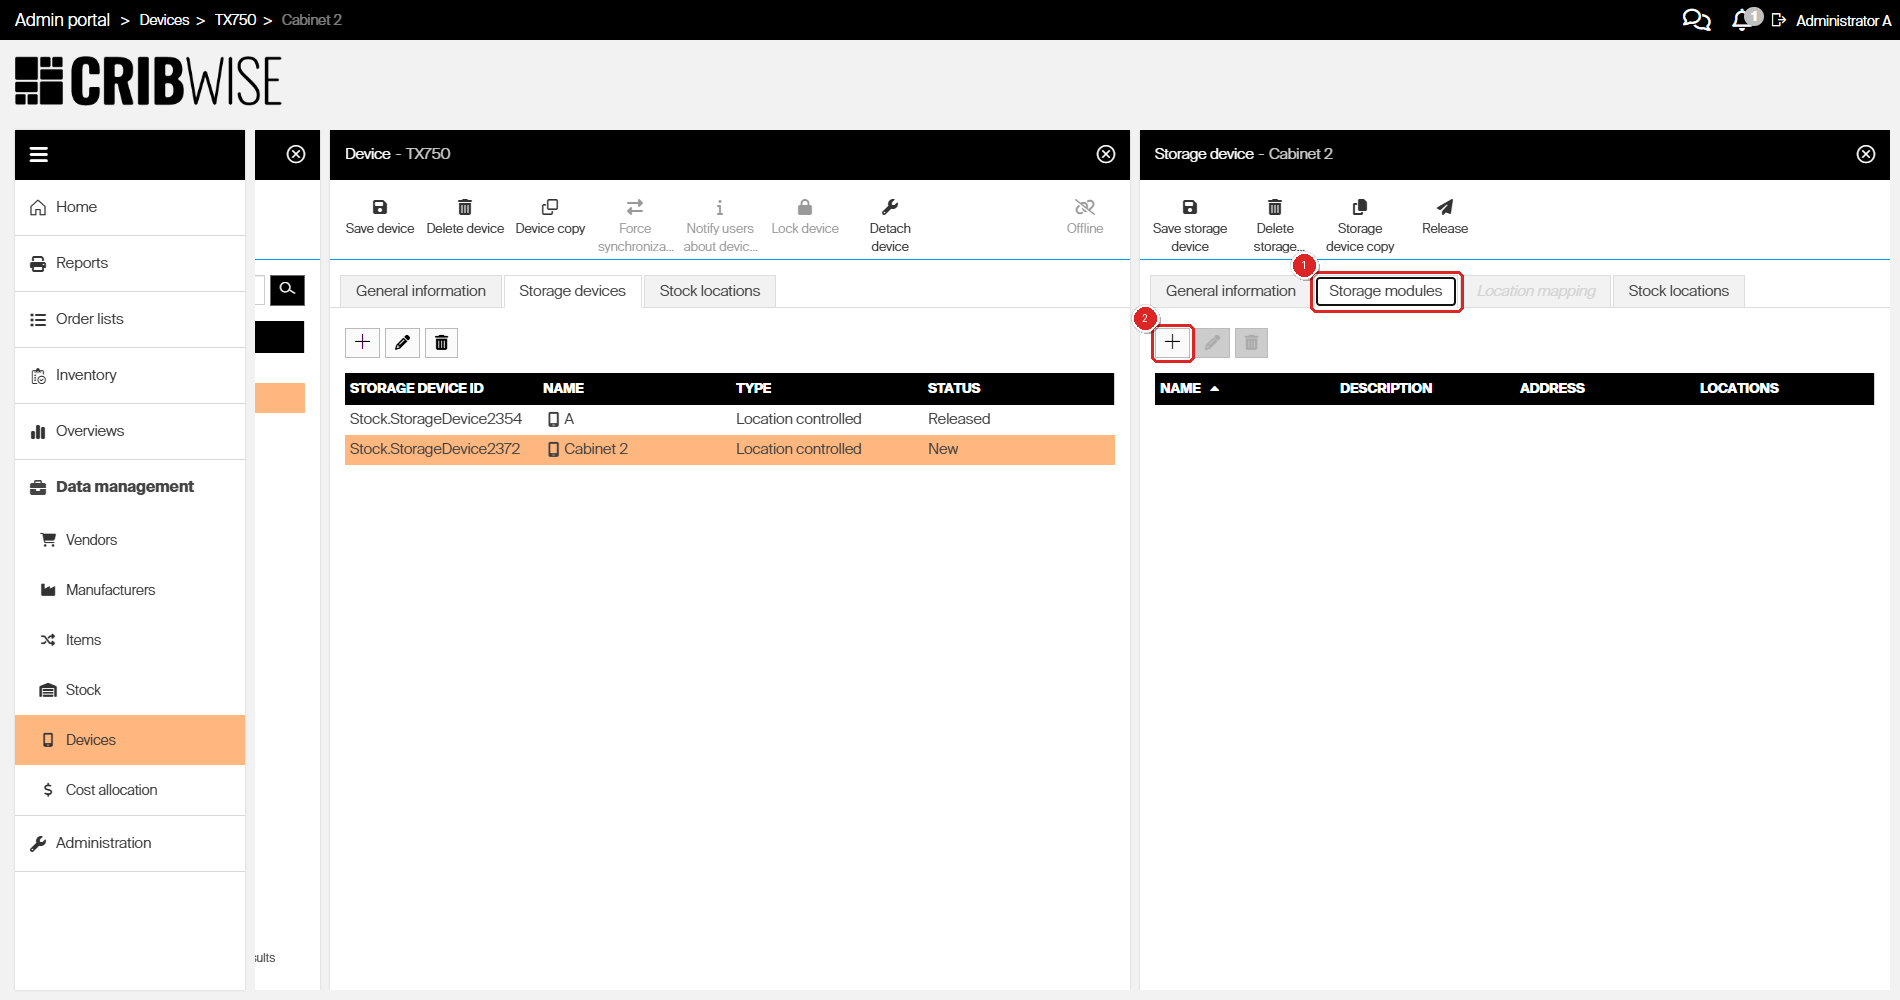
The Storage modules tab (1) is empty on a new storage device. Add (2) opens the module settings.
| Field | Required | What to enter |
|---|---|---|
| Name | Yes | How the drawer or shelf is identified. It becomes part of every stock location name in this module. |
| Description | No | Free text for your own notes. |
| Address | Yes | The address the hardware answers on. Your storage device supplier provides it — do not invent one. |
| Controlled-module tick box | No | Tick it when the hardware locks at module level rather than at location level. The label follows the manufacturer — on Lista cabinets it reads LDC. Check the Is controlled column for your model in the configuration reference. |
| 1st and 2nd dimension | Yes | A from-and-to range for each level inside the module — numbers or letters. One stock location is generated per combination. |
| Default stock location dimension (mm) | No | Width, height and depth of one compartment in this module. |
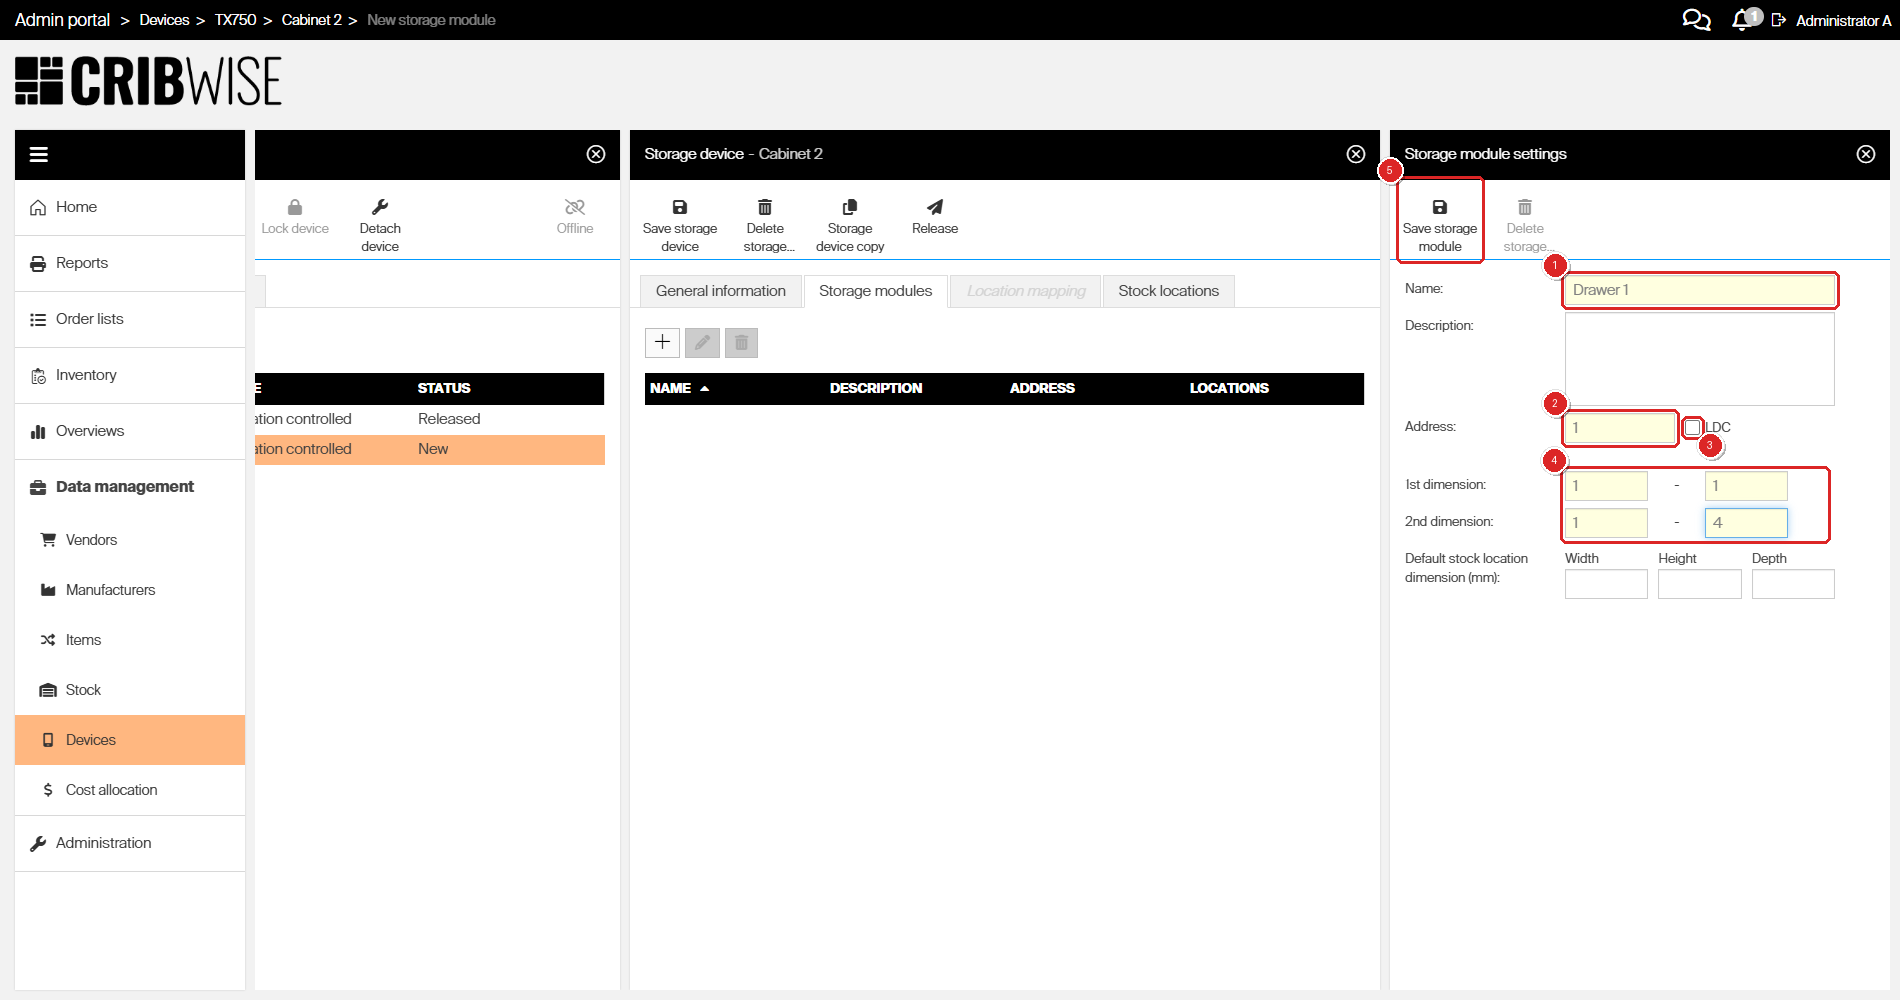
One module: Name (1), Address (2), the controlled-module tick box — here labelled LDC (3), the two dimension ranges (4), then Save storage module (5).
Tip: Lista cabinets can be built in one go. Save the storage device first, then click Import configuration file on its General information tab: CRIBWISE generates every module and stock location from the file your supplier provides.
Saving the module generates its stock locations straight away.
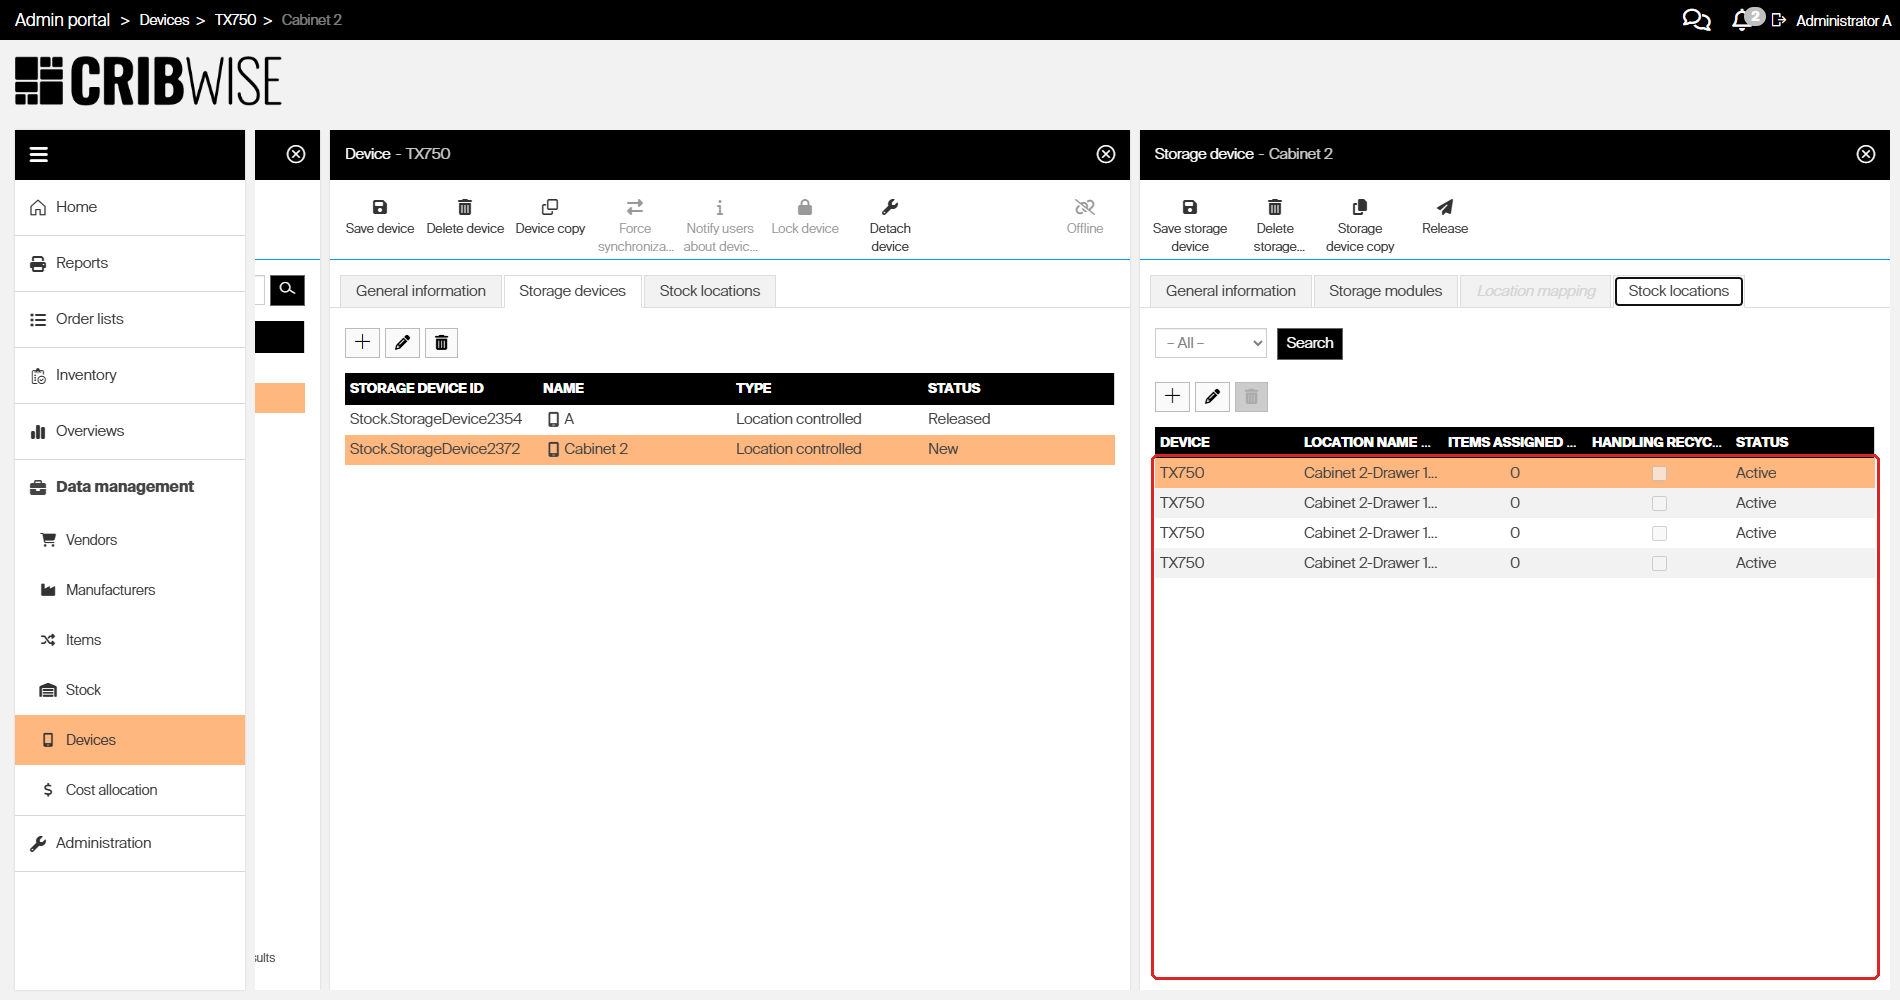
The module Drawer 1, with ranges 1–1 and 1–4, produced four locations: Cabinet 2-Drawer 1-01-01 through Cabinet 2-Drawer 1-01-04. Widen the Location name column to read the full names.
Step 4 — Check the generated stock locations
Open the Stock locations tab. Every combination of your dimension ranges is there, one row per location, with the number of Items Assigned and a Status.
Location names are built from the storage device name, the module name where there is one, and the dimension values. Numeric values are padded to two digits.
| Storage device | Ranges | Locations generated |
|---|---|---|
| Open storage called Shelf B | 1–2 · A–B · 1–3 | 12 locations, Shelf B-01-A-01 through Shelf B-02-B-03 |
| Location controlled called Cabinet 2, module Drawer 1 | 1–1 · 1–4 | 4 locations, Cabinet 2-Drawer 1-01-01 through Cabinet 2-Drawer 1-01-04 |
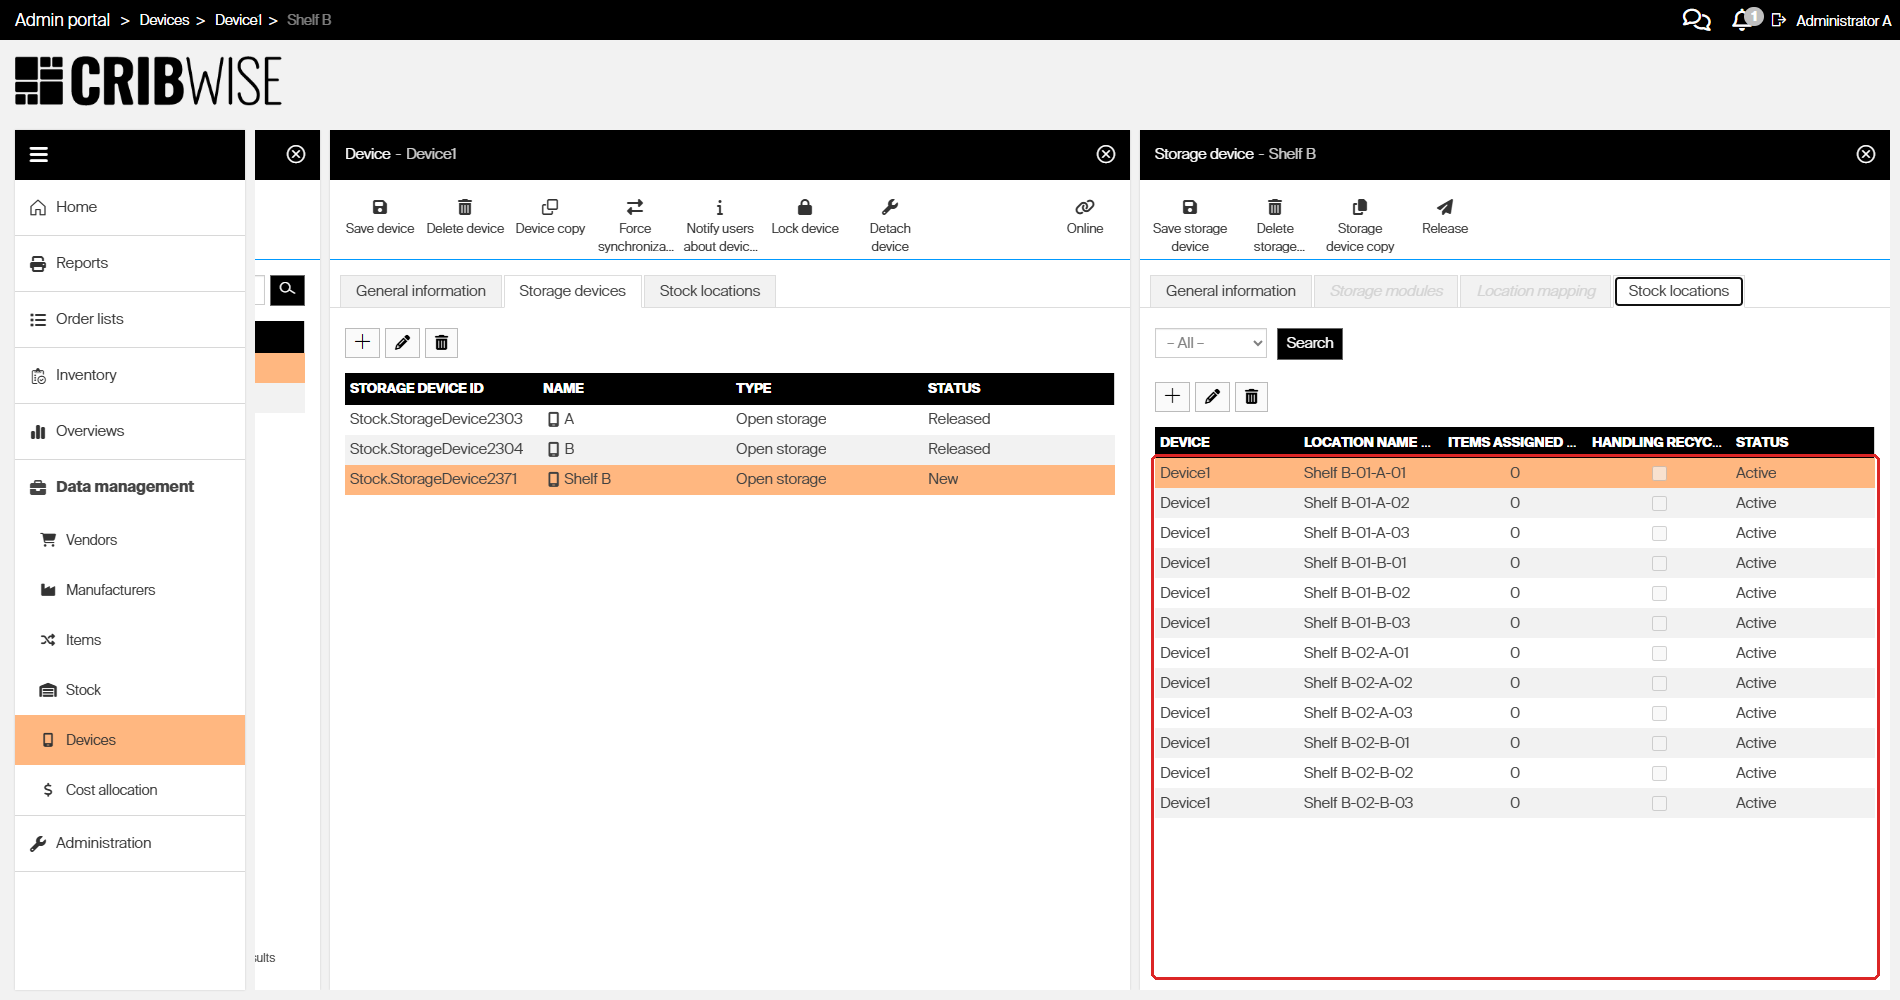
The twelve locations generated for Shelf B. Nothing is assigned to them yet, so Items Assigned is 0 on every row.
Tip: A location you do not need yet can be switched off instead of deleted. See How to disable and re-enable a stock location.
Step 5 — Release the storage device
- Open the General information tab.
- Click Release.
- Confirm with Yes.
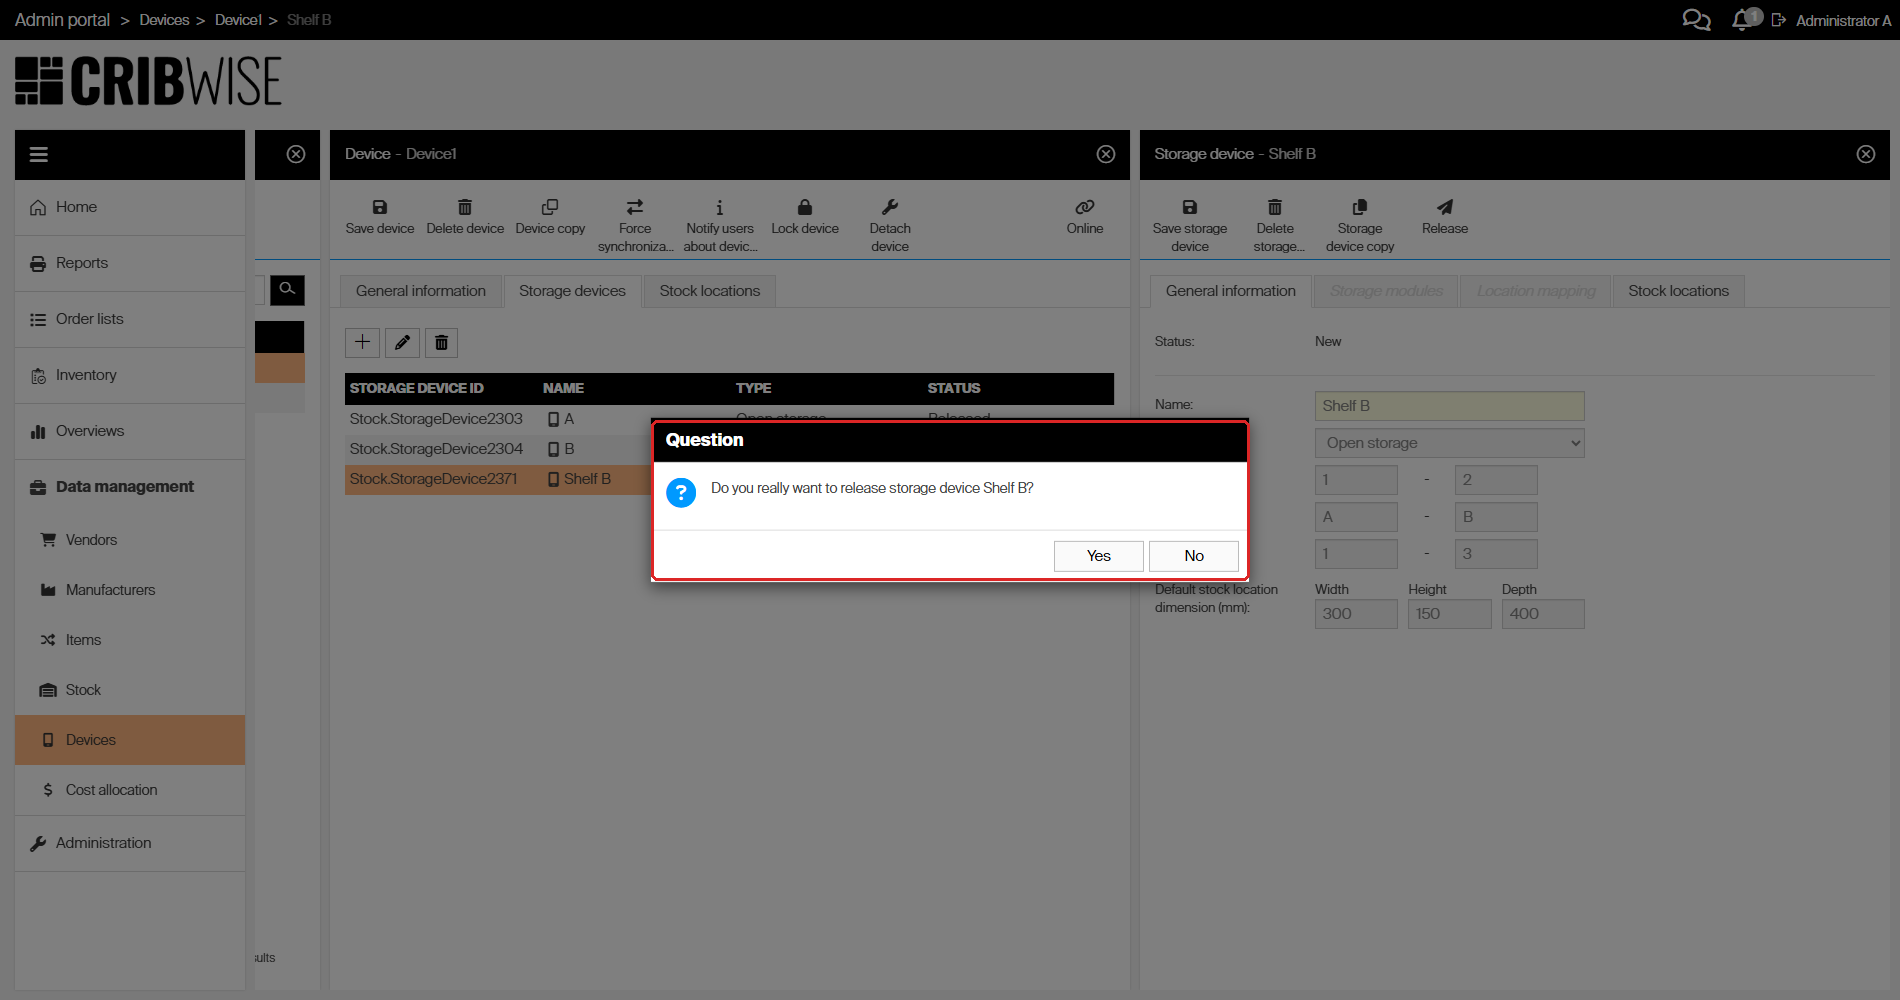
Release asks for confirmation. There is no way back after Yes.
Warning: Release cannot be undone. A released storage device can only be taken out of the system by deleting it, and deleting it is blocked while items are assigned to its locations.
Success: the Status changes to Released and the Release button greys out. The storage device and its locations reach the Shop Floor Interface at the controlling device’s next synchronization.
Change a storage device after it is released
Once a device is paired with a Shop Floor Interface installation, CRIBWISE blocks structural changes to its released storage devices — otherwise the shop floor and the Admin Portal could edit the same drawer at the same time. Lock the device on the device detail first, make the change, then unlock it.
| Action | Storage device is New | Storage device is Released |
|---|---|---|
| Rename it, change its dimensions | Allowed | Lock the device first |
| Add or remove storage modules | Allowed | Lock the device first |
| Add or remove stock locations | Allowed | Lock the device first |
| Copy the storage device | Allowed | Lock the device first |
| Delete the storage device | Allowed | Lock the device first, and only once no items are assigned |
| Release it | Allowed | Already done — the button is disabled |
Important: A device can only be locked while it is online. If the device is offline, Lock device is disabled too, and no structural change to its released storage devices is possible until it connects again.
Next steps
After the storage device is released:
- Assign items to the new locations — locations stay empty until items are assigned to them. See How to assign an item to a location (Shop Floor Interface).
- Fill the locations — restock the items physically at the device. See How to manage stock locations (Shop Floor Interface).
- Note the Storage device ID — support asks for it when a cabinet misbehaves. See How to find Device ID and Storage Device ID.
Troubleshooting
| Problem | Likely cause | Fix |
|---|---|---|
| The locations do not appear on the Shop Floor Interface | The storage device is still New, or the device has not synchronized yet | Release the storage device, then wait for the next synchronization or click Force synchronization on the device detail. |
| Saving fails with Cannot create location controlled storage device for cloud device | The device has Is cloud device set | Only open storage devices work on a cloud device. Choose Open storage, or attach the cabinet to a device installed on a physical computer. |
| Save storage device does nothing and fields turn red | A required field is empty | Fill in every outlined field. Open storage needs a name and all six dimension values; location controlled needs a name, a manufacturer and a communication port. |
| The Storage modules and Stock locations tabs are greyed out | The storage device has never been saved | Click Save storage device first. The tabs open as soon as the record exists. |
| Storage modules stays greyed out after saving | The type is Open storage | Open storage devices have no modules. Their locations come from the three dimension ranges on General information. |
| Add and Remove on the modules tab are disabled | The storage device is Released and the controlling device is not locked | Lock the device on the device detail, make the change, then unlock it. If Lock device is also disabled, the device is offline — bring it online first. |
| Delete storage device is disabled, or the delete is refused | Items are still assigned to its stock locations, or the storage device is released and the device is not locked | Remove the item assignments, then lock the device and delete. Deleting a storage device also erases all its modules and stock locations. |
| Location mapping is greyed out | The chosen manufacturer does not use location mapping | Nothing to do — the tab only opens for models that need it. Check your model in Supported storage devices – configuration reference. |
Related articles
- How to create and manage devices — create the device that holds the storage devices, and lock or unlock it.
- Supported storage devices – configuration reference — module type, dimension ranges and Is controlled setting for every supported model.
- How to set up an open storage device — the settings summary for shelves and open bins.
- How to disable and re-enable a stock location — take a location out of use without deleting it.
- How to find Device ID and Storage Device ID — the IDs support asks for.
- How to create and manage stocks — the stock a device and its locations belong to.
- Admin Portal permissions reference — the permissions that grant access to devices and storage devices.