
What you can do
Create and maintain vendors in CRIBWISE — the suppliers that decide where each item is bought, what it costs, and who services it. Every item needs a vendor, so a vendor is usually the first record you create in a new system.
Before you start
- Administrator access to the Admin Portal, under Data management > Vendors.
- At least one order template must exist. You cannot save a vendor without one — see All system settings quick reference.
- Decide whether the vendor is internal (your own workshop services the items) or external (items are sent away for service).
- For consignment invoicing, consignment must be switched on in system settings and your user needs the privilege to manage consignment.
Important: Internal is locked as soon as you save the vendor for the first time. If you choose wrong, the only fix is a new vendor record.
Quick start
Experienced users — create a vendor in 5 steps:
- Go to Data management > Vendors.
- Select New vendor.
- Fill in Vendor ID and Name.
- Choose an Order template and a Consignment order template.
- Select Save vendor.
Need more detail? Follow the full steps below.
Steps
Step 1 — Open the vendor list
- In the left menu, select Data management.
- Select Vendors.
The list shows every vendor with its ID, name, and whether it is internal.
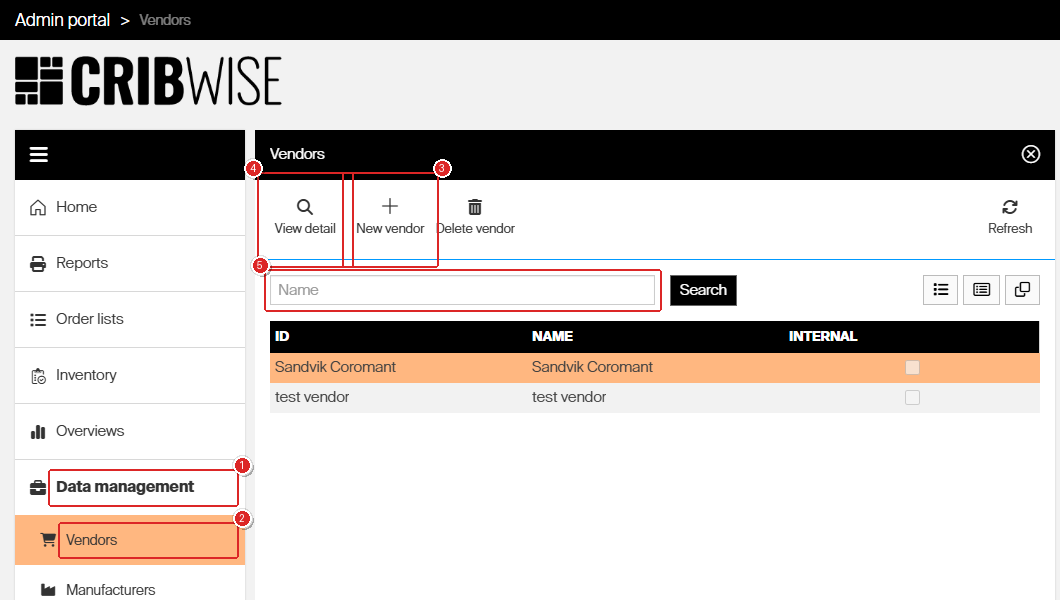
The vendor list. New vendor (3) starts a blank record and View detail (4) opens the row you selected — double-clicking a row does the same. Use the Name field (5) to filter a long list.
Step 2 — Create the vendor and save it
Only four fields are mandatory. Shaded fields are the ones CRIBWISE requires.
- Select New vendor.
- Enter a Vendor ID.
- Enter a Name.
- Choose an Order template.
- Choose a Consignment order template.
- Select Save vendor.

The blank vendor form. Vendor ID (1), Name (2), Order template (3) and Consignment order template (4) must all be filled in before Save vendor (5) works. The five remaining tabs (6) stay greyed out until the vendor exists.
Fill in the rest of the identification fields now or later. They all appear on purchase orders through the order template.
| Field | Required | What to enter |
|---|---|---|
| Vendor ID | Yes | A unique identifier used for purchasing and integration. Cannot repeat another vendor’s ID. |
| Name | Yes | The vendor’s name as you want to see it in lists and on orders. Must be unique. |
| Description | No | Free text for your own reference. |
| Shipping note | No | Text the order template can print on the purchase order. |
| Frame order number | No | A default order reference added to the Purchase order reference field of every order a script creates automatically. |
| Customer number | No | Your account number with this vendor. Used for order integration and can be printed by the order template. |
| Default order ID prefix | No | Up to 10 letters or numbers, added to generated order IDs as prefix-order ID. Can be overridden per order. |
| Default Ship to ID | No | The vendor’s identifier for your delivery address. Can be overridden per order. |
| Delivery condition | No | Printable by the order template. |
| Terms of payment | No | Printable by the order template. |
Step 3 — Set how the vendor behaves in purchasing
These settings drive automatic ordering, restocking on the Shop Floor Interface, and service routing. They are all on the same General information tab.
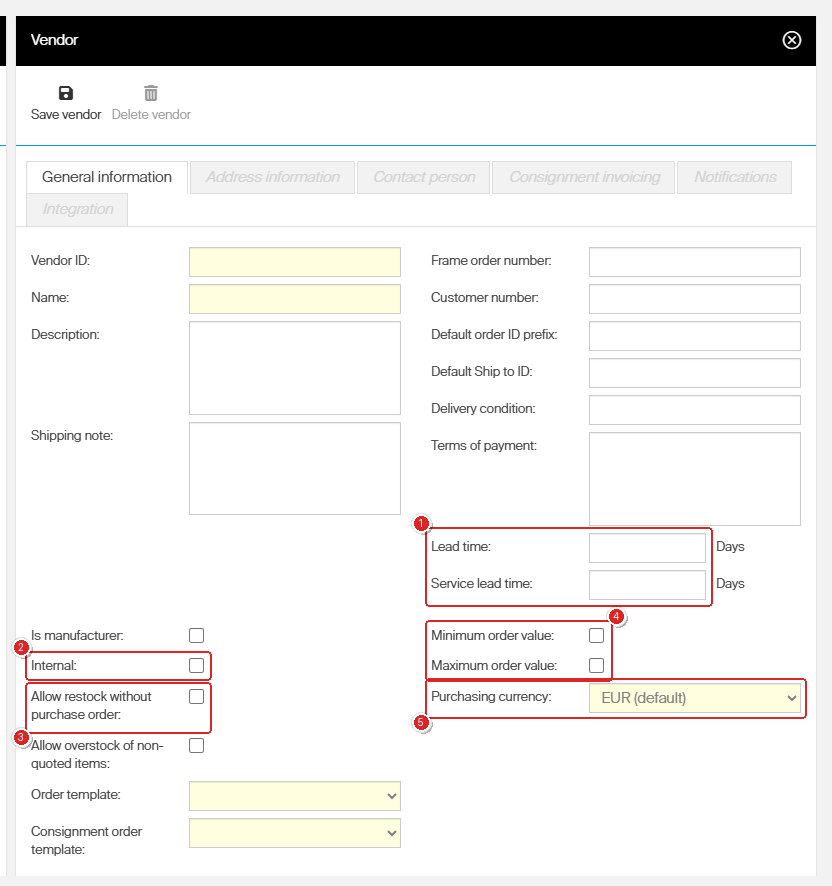
Purchasing and service settings: lead times (1), Internal (2), Allow restock without purchase order (3), the order value limits (4) and Purchasing currency (5).
| Setting | What it controls |
|---|---|
| Lead time | Expected delivery time in days for items bought from this vendor. |
| Service lead time | Expected turnaround in days for items this vendor services. |
| Is manufacturer | Creates a manufacturer with the same name the first time you save the vendor. Useful when the supplier also makes the tools — see How to manage manufacturers. |
| Internal | Decides where service and calibration happen. Items on an internal vendor can go on service lists and are handled in-house. Items on an external vendor go out on purchase service orders. Locked after the first save. |
| Allow restock without purchase order | Lets Shop Floor Interface users restock this vendor’s items with no purchase order behind them. |
| Allow overstock of non-quoted items | Lets you restock more pieces than were ordered even when the item is not marked as quoted. This raises the ordered quantity on the order and creates extra purchase transactions. Leave it off to allow overstocking only on quoted items. |
| Minimum order value | Tick it, then enter an amount. A scheduled script that builds an order below this value leaves the order in Suggested state with the alert Minimum order value not reached instead of sending it. |
| Maximum order value | Same idea in reverse. An order above the amount stays in Suggested state with the alert Maximum order value exceeded. |
| Order template | The default PDF or Excel layout for this vendor’s purchase orders. Order settings can override it — see How to customize purchase order email templates. |
| Consignment order template | The same, for consignment orders. |
| Purchasing currency | The currency used for purchase and service prices on this vendor’s items, and on its orders. See How to configure currencies for purchasing. |
Success: the breadcrumb and the panel header show the vendor name, the vendor appears in the list on the left, and the five other tabs become available. Internal is now greyed out.
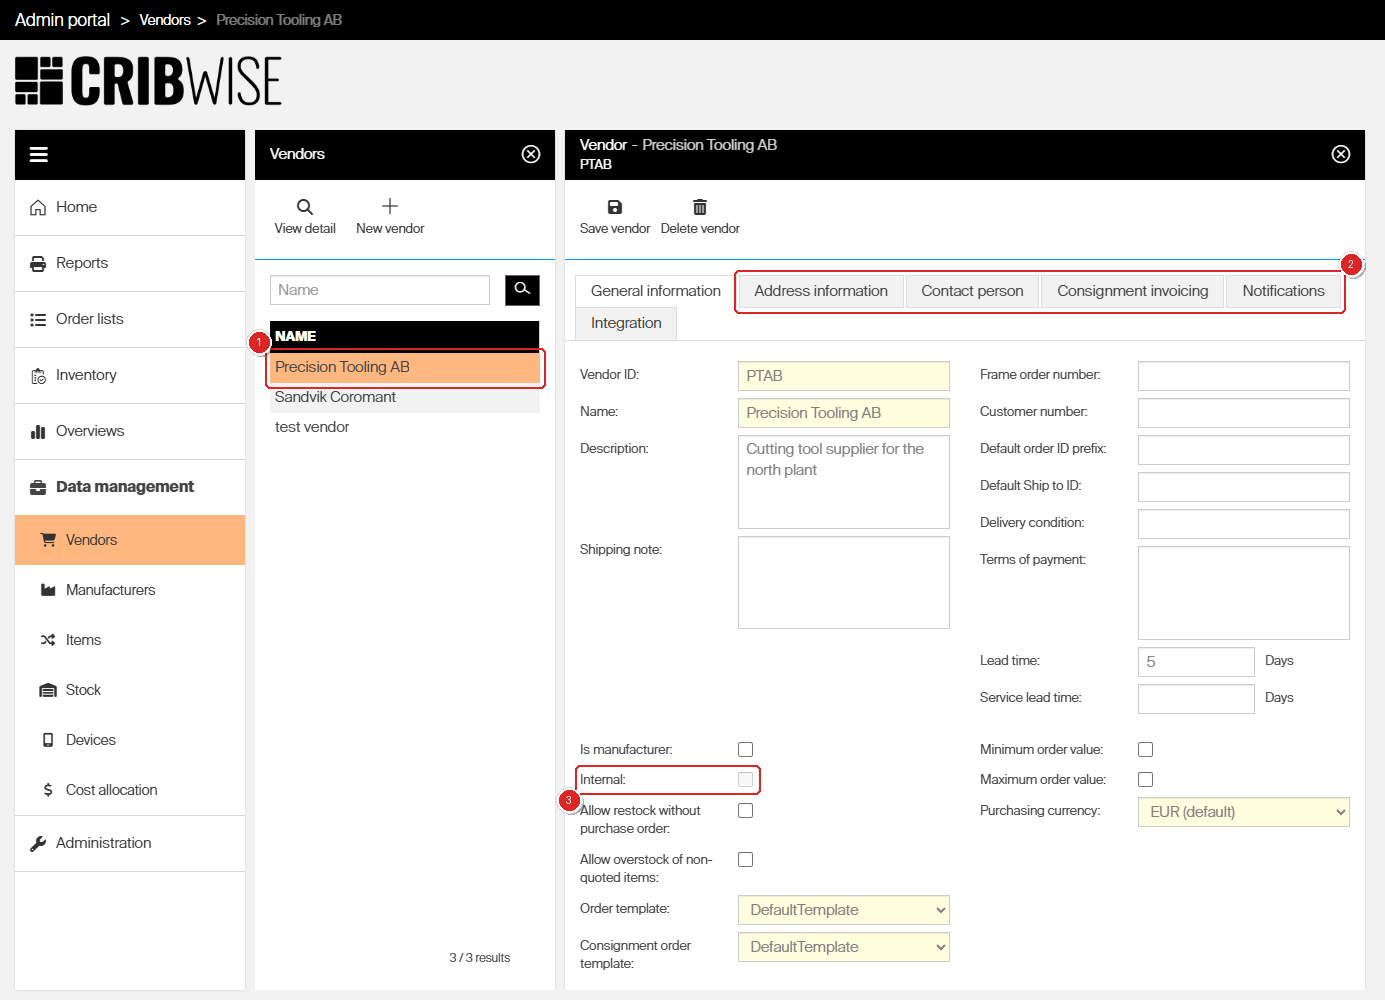
The saved vendor. The new row is in the list (1), the five tabs are now open (2), and Internal is locked (3).
Step 4 — Add contact details and addresses
Open the Address information tab. The top half holds one set of primary contact details. The bottom half holds as many addresses as you need.
- Fill in Primary E-mail address, Web address, Primary phone, and Fax number as needed.
- Under Address, select the add button (+).
- Enter the Street, then City, Postal code, Country, and a Comment if useful.
- Select Save in the Address panel.
- Select Save vendor to keep the primary contact details.
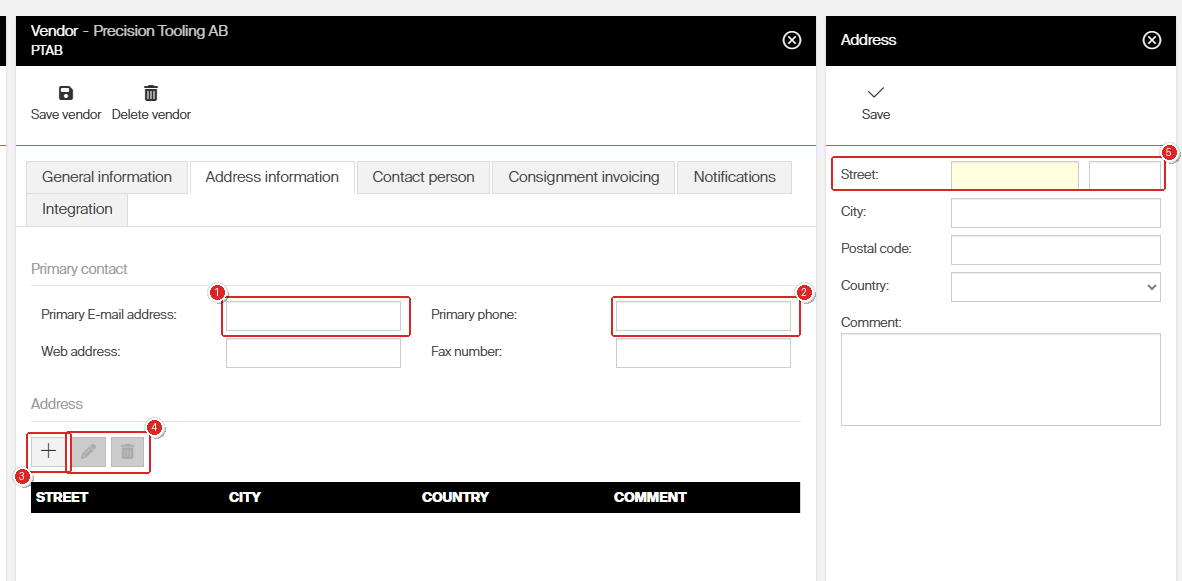
The Address information tab with the Address panel open. The add button (3) creates an address; the edit and remove buttons (4) stay greyed out until you select a row in the grid. Street (5) is the only mandatory address field.
Step 5 — Add contact persons
Open the Contact person tab to record the people you deal with at this vendor. There is no limit on how many you add.
- Select the add button (+).
- Enter the Surname. This is the only mandatory field.
- Fill in Name, E-mail, Phone, Mobile no., and Position as needed.
- Select Save in the Contact person panel.
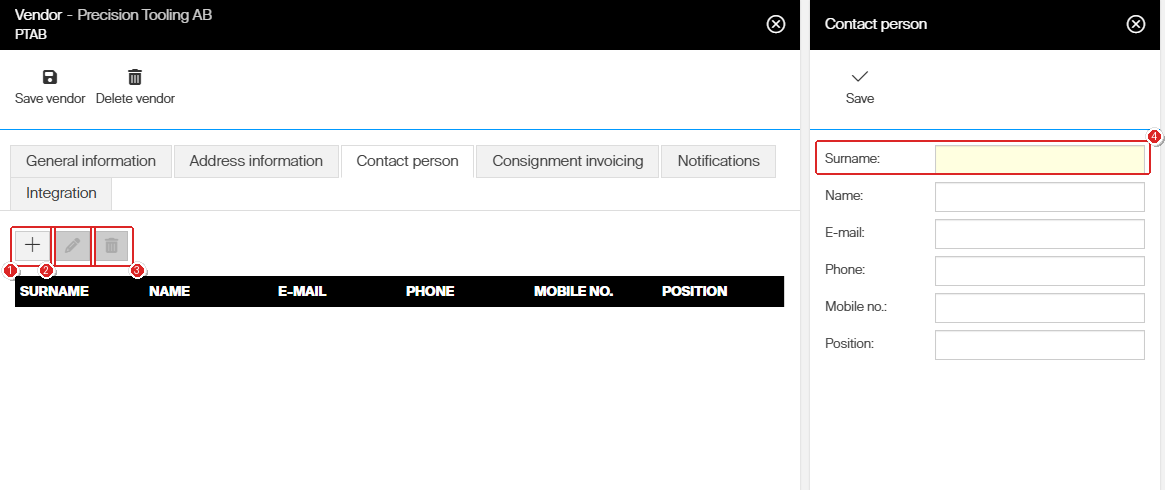
The Contact person tab. Add (1), edit (2), and remove (3) work the same way as on the address grid. Surname (4) is mandatory.
Step 6 — Set up consignment invoicing (optional)
On consignment stock you pay for items as they are consumed. This tab tells CRIBWISE to collect that consumption on a schedule and send the vendor an invoice request.
- Open the Consignment invoicing tab.
- Select Generate consignment invoice requests. The remaining options appear.
- Choose a Period and a Starting day.
- Select Send automatically if the request should go out as soon as it is created.
- Tick the distribution channels to use, and pick a template for each file format. The template lists show only the invoice request templates defined in system settings — see How to customize consignment invoice templates.
- Select Save vendor.
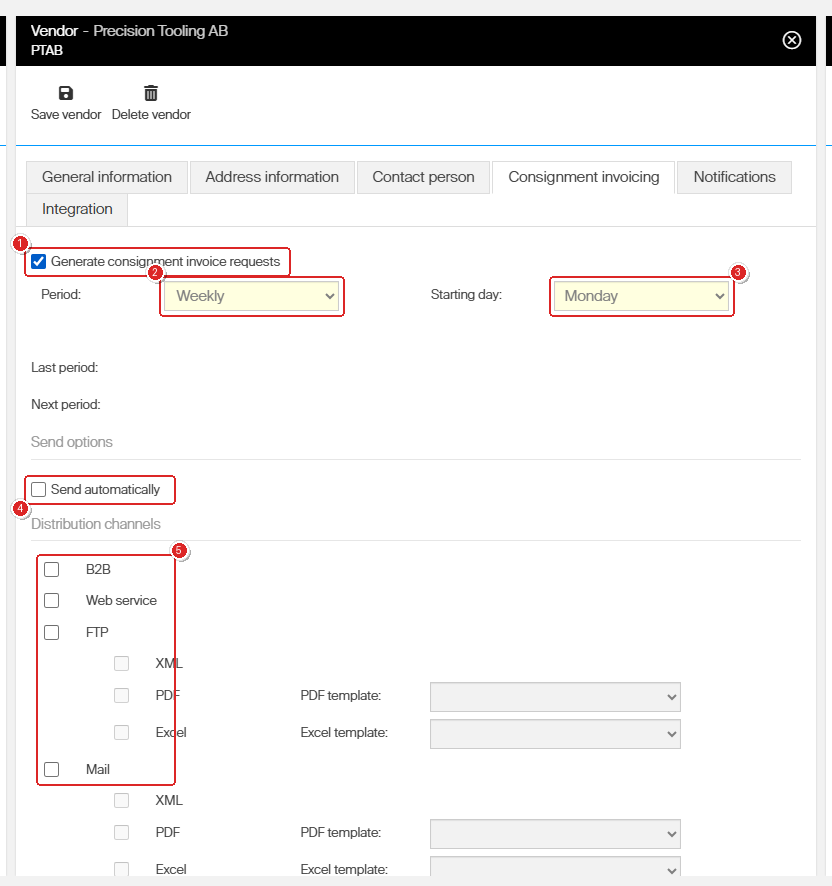
Consignment invoicing switched on. Period (2) and Starting day (3) set the schedule; Send automatically (4) and the distribution channels (5) control how the request leaves CRIBWISE.
| Option | What it does |
|---|---|
| Period | How often a request is generated: Weekly, Biweekly, or Monthly. |
| Starting day | The weekday the period starts on. |
| Last period | Read-only. The date range of the last request that was generated. |
| Next period | Read-only. The date range of the next request. The request is created the day after the period ends. This is calculated once you pick a period and save the vendor. |
| Send automatically | Sends the request to the selected channels as soon as it is created. Unavailable until at least one channel is set up. |
| B2B | Sends the request over the B2B interface. Unavailable until the B2B fields on the Integration tab are filled in. |
| Web service | Posts the request to a web service endpoint. Needs the web service fields on the Integration tab. |
| FTP | Uploads the request to your FTP server as XML, PDF, or Excel. PDF and Excel each need an invoice request template. Needs the FTP fields on the Integration tab. |
| Emails the request as XML, PDF, or Excel, with a template per format. Needs an integration email address on the Integration tab. |
Step 7 — Turn on vendor notifications (optional)
Vendor notifications email you about purchasing events for this one vendor. The same events can be set for every vendor at once under Administration → System settings → Purchase, and actions on a single item have their own notifications on the item detail. See All system settings quick reference and How to configure item notifications.
- Open the Notifications tab.
- Select Set custom vendor notifications.
- Tick the events you want: New suggested order, Order sent, Sending of order failed, Order canceled, Order is late, or Service item scrapped.
- Enter the recipients in E-mails.
- Select Save vendor.
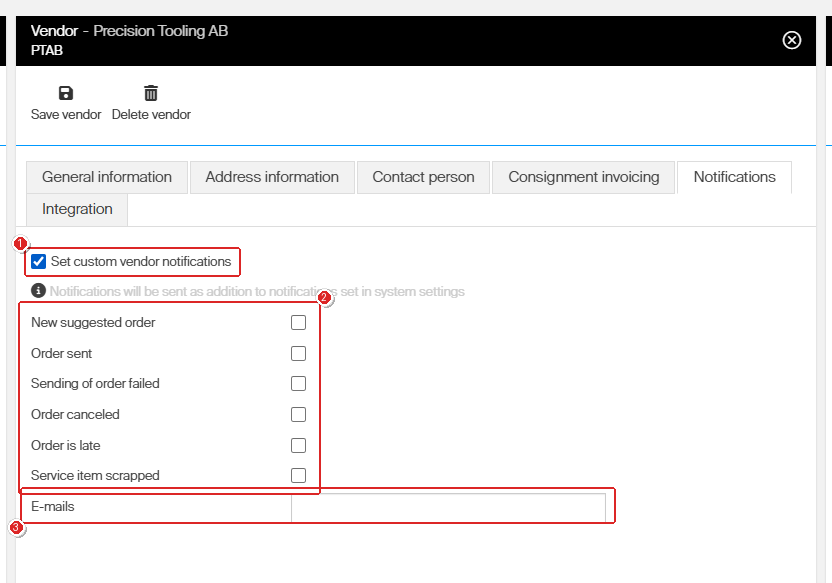
Vendor notifications. Tick the events (2) and add the recipients (3). The notice under the checkbox (1) confirms these are sent on top of the system-level notifications.
Note: When the same event is set at both system and vendor level, both sets of recipients get an email.
Three purchasing events cannot be set per vendor: No order generated by script, Transfer list created, and Items added to transfer list. They exist only at system level, because they are not tied to a single vendor.
Step 8 — Connect the vendor to an external system (optional)
The Integration tab defines the channels this vendor’s orders and invoices can use. Which channel a specific order actually uses is chosen on the order itself, under its send options.
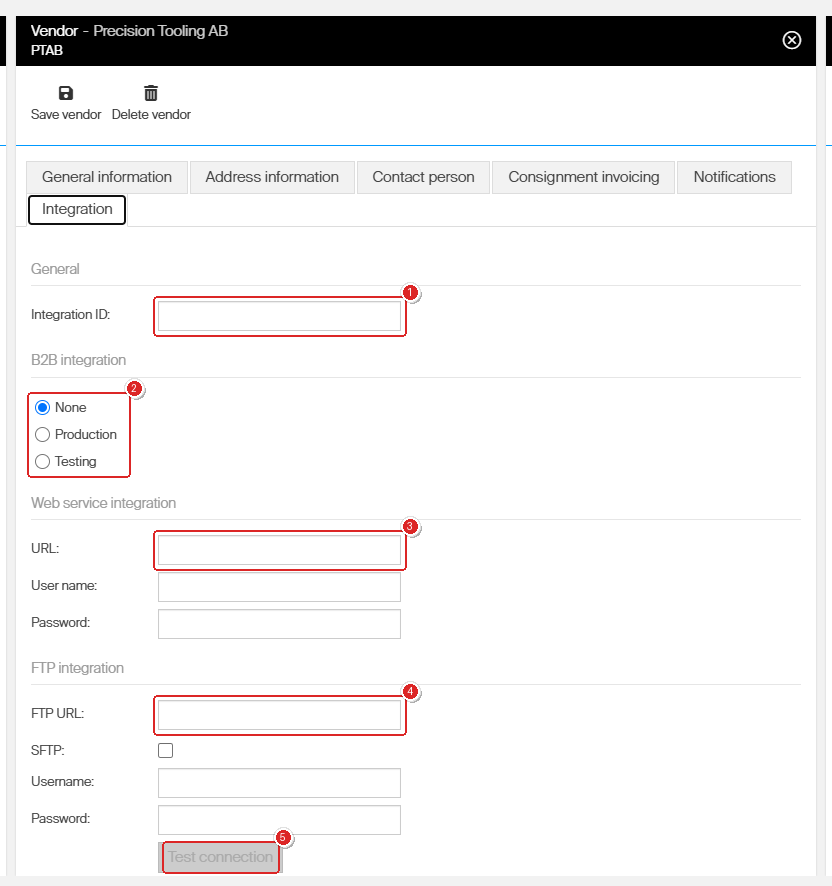
The four integration channels. Integration ID (1) identifies you to the vendor’s B2B system (2). The web service (3) and FTP (4) sections each take their own credentials; Test connection (5) becomes active once the FTP details are filled in.
| Channel | What to set up |
|---|---|
| B2B | Pick Production or Testing, then enter the Integration ID — it becomes mandatory and tells the vendor which system the order belongs to. Ask the vendor for the correct ID. Choose Testing to send orders to the vendor’s test system. See Consignment management for how B2B is used for invoice requests. |
| Web service | Enter the target URL, and a User name and Password if the endpoint uses basic authentication. Orders are sent as a POST request with the order as XML in the body, using the same schema as the B2B interface. |
| FTP | Enter the FTP URL, tick SFTP if the server requires it, and add the credentials. The URL must point at the user’s root folder — subfolders are not accepted, so set the subfolder as that user’s root instead. Use Test connection to check the details before saving. |
| Enter one or more addresses in E-mails. Tick Custom e-mail content to write your own subject and body for the orders and invoices sent to this vendor. |
Note: B2B is available for the Sandvik Group brands — Seco Tools, Walter, Sandvik Coromant, and Dormer Pramet. The Integration ID you get from the vendor determines which system receives the order.
Delete a vendor
- Go to Data management > Vendors.
- Select the vendor row.
- Select Delete vendor.
Warning: A vendor with items attached cannot be deleted. Move those items to another vendor first, or delete them. If you only want to stop ordering from a vendor, leave the record in place instead — deleting it breaks the history on its past orders.
Next steps
- Assign the vendor to your items — set the purchase and service vendor, prices, and pack sizes on each item. See Item supplier settings reference.
- Automate the ordering — let a scheduled script build and send this vendor’s orders. See Custom scheduled scripts.
- Set up consignment stock — if you agreed consignment terms, configure the stock side too. See Consignment management.
Troubleshooting
| Problem | Likely cause | Fix |
|---|---|---|
| Save vendor does nothing and two fields turn red | Order template and Consignment order template are empty | Both are mandatory. Choose a template in each list, then save again. If the lists are empty, create an order template first — see All system settings quick reference. |
| The other five tabs are greyed out | The vendor has not been saved yet | Fill in the mandatory fields and select Save vendor. Addresses, contacts, consignment, notifications, and integration all need an existing vendor. |
| The Internal checkbox is greyed out | It locks on the first save | Create a new vendor with the correct setting and move the items across. The setting cannot be changed on an existing vendor. |
| A vendor cannot be deleted | Items are still attached to it | Reassign those items to another vendor, or delete them, then delete the vendor. |
| Saving fails on the ID or the name | Another vendor already uses it | Vendor ID and Name must both be unique. Search the list for the value and pick a different one. |
| The Consignment invoicing tab is empty or missing | Consignment is off in system settings, or your user lacks the privilege to manage consignment | Switch consignment on in system settings and check that your user group has consignment management rights. |
| A distribution channel cannot be ticked | The matching fields on the Integration tab are empty | Fill in the B2B, web service, FTP, or email details first. Each channel unlocks only when its own integration is configured. |
| An automatic order stays in Suggested state | The order is below Minimum order value or above Maximum order value | Check the alert on the order. Send it manually, or adjust the limit on the vendor. |
Related articles
- Item supplier settings reference — how a vendor is attached to an item, with prices, pack sizes, and the service vendor.
- Understanding stock structure: stocks, devices, and locations — where vendors sit in the wider data model.
- Consignment management: setup, ordering, and invoicing — the full picture behind the Consignment invoicing tab.
- How to configure currencies for purchasing — set up the currencies you can pick as a purchasing currency.
- Custom scheduled scripts: flexible rules for automated ordering — automate the orders sent to this vendor.
- How to manage manufacturers — for vendors that also make the tools they sell.
- All system settings quick reference — order templates, system-level purchase notifications, and the consignment switch.