
What you can do
Design your own Excel template for consignment invoice requests, so the PDF or Excel file CRIBWISE sends to a vendor carries your layout, your branding, and exactly the consumption data you agreed to report.
Before you start
- You need Admin access to the CRIBWISE Admin Portal.
- Microsoft Excel, or a spreadsheet editor that writes
.xlsxfiles, must be installed on your computer. - Allow consignment invoice requests must be selected under Administration > System settings > Purchase. Without it, the system never generates an invoice request to apply the template to.
- Decide what the vendor needs on the document: consumed quantities only, or quantities and prices.
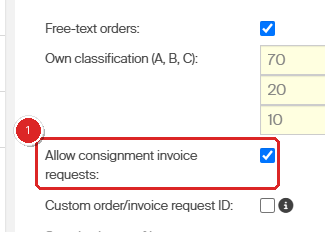
Consignment invoice requests must be allowed (1) before any invoice request — and therefore any template — is used.
Important: The
<PRODUCTS>and</PRODUCTS>tags must sit in the first column of the worksheet. Anywhere else, the system ignores them and no consumed items are printed.
Quick start
Experienced users — customize an invoice request template in 5 steps:
- Create an Excel file with the layout you want the vendor to receive.
- Insert the placeholder tags listed below in the cells where the data belongs.
- Wrap the item row between
<PRODUCTS>and</PRODUCTS>in column A. - In Excel, check the layout under View > Page Layout.
- Upload the file under Administration > System settings > Purchase with Type set to Invoice request.
Need more detail? Follow the full steps below.
Steps
Step 1 — Create the Excel file
- Open Excel and create a new workbook.
- Save it with a name you will recognize later, for example
Consignment_invoice_VendorName.xlsx. - Lay out the headings, logo, and any fixed text exactly as the vendor should receive them.
Everything you type stays as it is. Only the placeholder tags are replaced when an invoice request is generated.
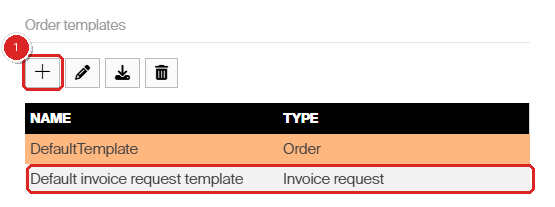
The Order templates grid holds both kinds of template. Add (1) creates a new one; the Type column tells them apart.
Tip: A tenant usually already holds a Default invoice request template. Select it in the grid and use Download to keep a copy of the working layout before you build your own.
Step 2 — Add your company details
Place these tags wherever your own company details belong on the document. The values come from the general system settings, so you never maintain them in the template itself.
| Tag | What it prints | Where the value comes from |
|---|---|---|
<NAME> |
Your company name | System settings |
<ADDRESS> |
Your company address | System settings |
<PHONE> |
Your company phone number | System settings |
<EMAIL> |
Your company e-mail address | System settings |
Step 3 — Add the invoice request details
These tags identify the invoice request and the period it covers.
| Tag | What it prints |
|---|---|
<INVOICE_REQUEST_ID> |
ID of the invoice request |
<DATE_FROM> |
First day of the consumption period |
<DATE_TO> |
Last day of the consumption period |
<CURRENCY> |
Currency defined for the vendor |
<INVOICE_REQUEST_TOTAL_PRICE> |
Total purchase price of all items in the invoice request |
Step 4 — Add the stock and vendor details
An invoice request always covers one vendor and one stock. These tags print both, together with the commercial details held on the vendor record.
| Tag | What it prints | Where the value comes from |
|---|---|---|
<STOCK_NAME> |
Name of the stock the consumption was made in | Stock record |
<VENDOR_NAME> |
Vendor name | Vendor detail |
<VENDOR_ID> |
Vendor ID | Vendor detail |
<CUSTOMER_NUMBER> |
Your customer number with that vendor | Vendor detail |
<TERMS_OF_PAYMENT> |
Agreed payment terms | Vendor detail |
Step 5 — Build the consumed-items section
The consumed items are printed as a repeating block. Build one row that describes a single item, then wrap it in the pair of section tags.
- Put
<PRODUCTS>in column A of the row above your item row. - Fill the item row with the item tags you need, one tag per cell.
- Put
</PRODUCTS>in column A of the row below your item row.
Everything between the two tags repeats once per item consumed during the period.
| Tag | What it prints |
|---|---|
<PRODUCTS> |
Opens the consumed-items section. Must be in the first column. |
<LINE_NUMBER> |
Line number of the item in the invoice request |
<ITEM_ID> |
ID of the item |
<ORDER_CODE> |
Order code of the item |
<ITEM_NAME> |
Item name |
<ITEM_DESCRIPTION> |
Item description |
<ITEM_BAR_CODE> |
Bar code of the item |
<CONSUMED_QTY> |
Quantity consumed during the period, in dispense units |
<UNIT_OF_MEASURE> |
Dispense unit of measure of the item |
<ITEM_MANUFACTURER> |
Name of the item’s manufacturer |
<ITEM_MANUFACTURER_ID> |
Manufacturer ID of the item |
<ITEM_PRICE> |
Purchase price per dispense unit |
<TOTAL_PRICE> |
Total purchase price for the line |
</PRODUCTS> |
Closes the consumed-items section. Must be in the first column. |
Note:
<CONSUMED_QTY>is always reported in the item’s dispense unit. An invoice request only lists consumable items that are marked as consignment and were consumed inside the period.
Step 6 — Format the template and check the page layout
- Format the cells as you want them printed. Font color, size and style, cell colors, and cell sizes are all kept.
- Insert your logo or any other image. The image becomes part of the template.
- Add one empty column to the right of your last data column.
- Go to View > Page Layout and confirm that every field sits inside the page boundary.
You can put more than one tag in a single cell, for example Period: <DATE_FROM> – <DATE_TO>.
Important: The PDF version of the invoice request uses this page layout. Anything outside the page area is cut off in the PDF, even when it looks correct in Excel.
Step 7 — Upload the template to CRIBWISE
- In the Admin Portal, open Administration.
- Select System settings.
- Open the Purchase tab.
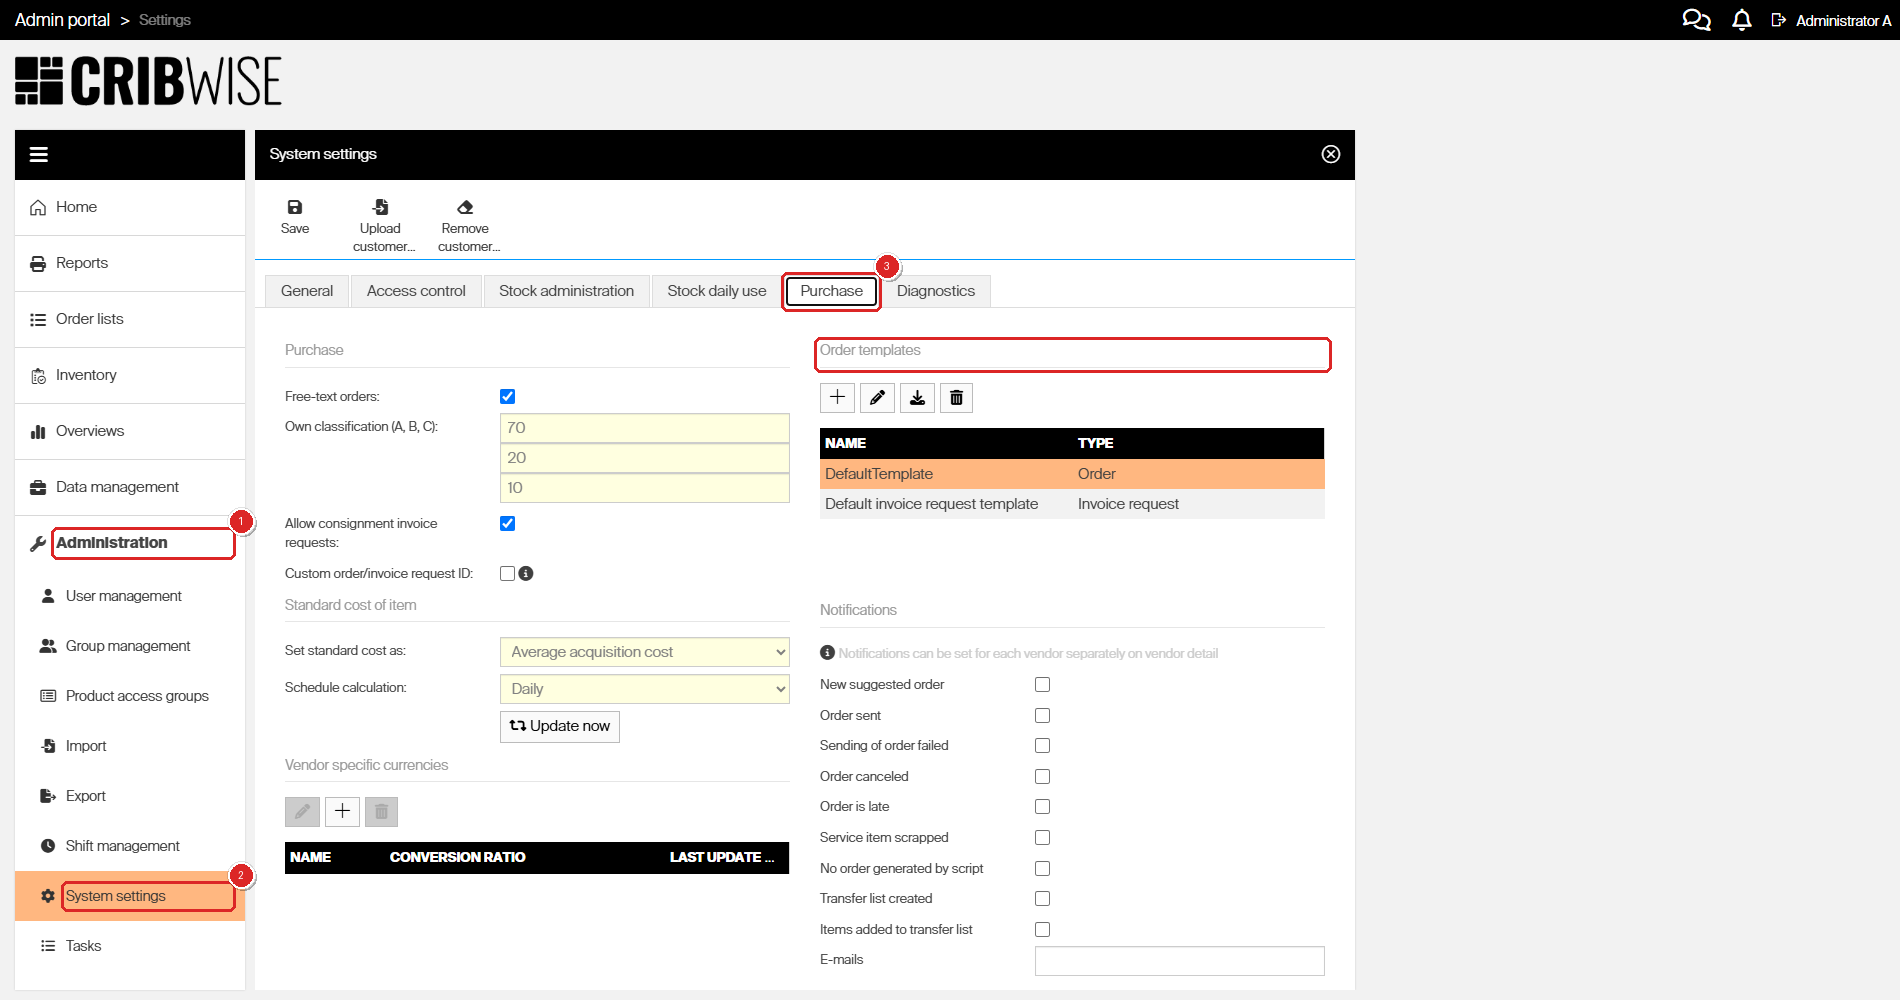
Administration (1) > System settings (2) > Purchase (3). The Order templates section is on the right.
The Order templates grid lists every template on the tenant with its Name and Type. Four buttons act on it:
| Button | What it does |
|---|---|
| Add | Opens an empty Order template detail panel for a new template |
| Edit | Opens the selected template so you can rename it, change its type, or replace the file |
| Download | Saves the selected template file |
| Remove | Deletes the selected template |
- Click Add. The Order template detail panel opens.
- Type a Template name.
- Set Type to Invoice request.
- Click Select template file and choose your Excel file.
- Click Save.
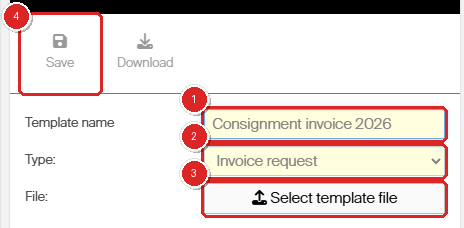
Name the template (1), set Type to Invoice request (2), attach the file (3), then Save (4).
Warning: A template saved with Type set to Order is offered for purchase orders, not for invoice requests. The type cannot be guessed from the file — set it before you save.
Success: Your template appears in the Order templates grid with the type Invoice request, next to the templates that were already there.
Step 8 — Select the template on an invoice request
Uploading the template makes it available; it does not make it the one that is used. The template is chosen per invoice request, in the send options.
- Open Order lists.
- Select Consignment invoice requests.
- Select an invoice request and click View detail.
- Open the Send options tab and pick your template for the PDF or Excel format.
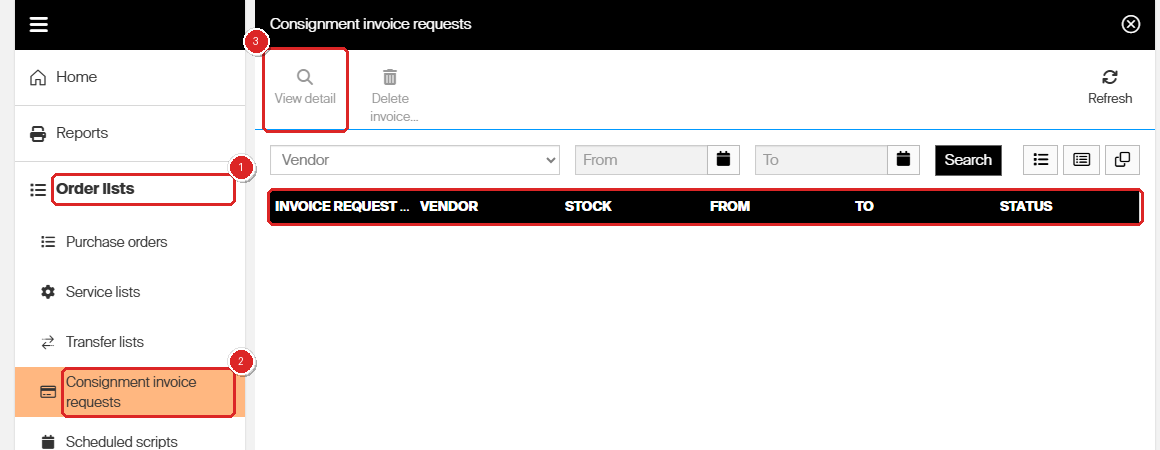
Order lists (1) > Consignment invoice requests (2), then View detail (3) to reach the send options.
The template list on that tab only offers templates of type Invoice request, which is why Step 7 matters. Defaults come from the distribution channels on the vendor detail. See Send options in the consignment article.
Template example
A minimal invoice request template looks like this in Excel, with the spreadsheet columns across the top:
| A | B | C | D | E | F |
|---|---|---|---|---|---|
| CUSTOMER | No.: <INVOICE_REQUEST_ID> |
||||
<NAME> |
Customer no.: <CUSTOMER_NUMBER> |
||||
<ADDRESS> |
|||||
<PHONE> |
Stock: <STOCK_NAME> |
||||
<EMAIL> |
|||||
| Period | |||||
| VENDOR | From: | <DATE_FROM> |
|||
<VENDOR_NAME> |
To: | <DATE_TO> |
|||
| Order code | Item | Consumed quantity | |||
| (pieces) | |||||
<PRODUCTS> |
|||||
<ORDER_CODE> |
<ITEM_NAME> |
<CONSUMED_QTY> |
|||
<ITEM_DESCRIPTION> |
|||||
</PRODUCTS> |
Next steps
- Set the vendor to generate invoice requests — select Generate consignment invoice requests on the vendor detail and set the period and distribution channels. See Consignment invoicing.
- Preview before you send — open an invoice request, use the preview action, and download the generated file from the notification bar to check the layout with real data. See Manage consignment invoice requests.
- Do the same for purchase orders — order templates follow the same mechanism with a different tag set. See How to customize purchase order email templates.
Troubleshooting
| Problem | Likely cause | Fix |
|---|---|---|
| The template does not appear in the send options of an invoice request | The template was saved with type Order | Open the template under System settings > Purchase, click Edit, set Type to Invoice request, and save |
| No consumed items are printed, only the headings | The <PRODUCTS> and </PRODUCTS> tags are not in the first column |
Move both tags to column A of the worksheet |
| A tag is printed as literal text instead of a value | The tag name is misspelled or is not one of the supported tags | Check the spelling against the tag tables above |
| Some columns are missing from the generated file | The rightmost column of the template holds data with nothing after it | Add one empty column to the right of your last data column |
| Fields are cut off in the PDF but not in the Excel file | The layout runs past the page boundary | In Excel, go to View > Page Layout and adjust column widths until everything fits inside the page |
| Vendor or customer tags print as blank | The vendor record or the system settings are incomplete | Fill in the missing fields on the vendor detail, or under System settings > General |
| No invoice requests are generated at all | Allow consignment invoice requests is off, or the vendor is not set to generate them | Turn the setting on under System settings > Purchase, then select Generate consignment invoice requests on the vendor detail |
Related articles
- Consignment management: setup, ordering, and invoicing — how consignment periods, invoice requests, and send options work end to end
- How to customize purchase order email templates — the same template mechanism for purchase and service orders, with its own tag reference
- How to manage vendors — where customer number, payment terms, and distribution channels are maintained
- All system settings quick reference — every setting in the Admin Portal, including the Purchase tab
- How to configure currencies for purchasing — what the
<CURRENCY>tag prints and how vendor currencies are set - Understanding purchasing and service workflows — how orders, service lists, and invoice requests fit together