
What you can do
Create the stocks that group your devices by site or area, choose whether a stock orders on its own or through a central stock, and check the devices and locations that belong to it.
A stock is the top of the physical structure in CRIBWISE. Everything a user touches on the shop floor — a device, a cabinet, a location, a picked item — sits inside one stock.
Before you start
- You need Admin Portal access with permission to use the Data management menu.
- Create your stocks before your devices. A device must belong to a stock, so the stock has to exist first.
- Decide the Type (Standard, Central or Satellite) before you create the stock, and know which cost allocation set it should use.
Note: A stock groups the physical world — devices, storage devices and locations. It does not split your item list, your users or your settings: those are shared across the whole portal. If you need those separated too, see One portal or several? below.
How stocks fit into the structure
One portal holds one or more stocks. Each stock holds the devices in that location, each device controls one or more storage devices, and each storage device is divided into stock locations that hold the items.
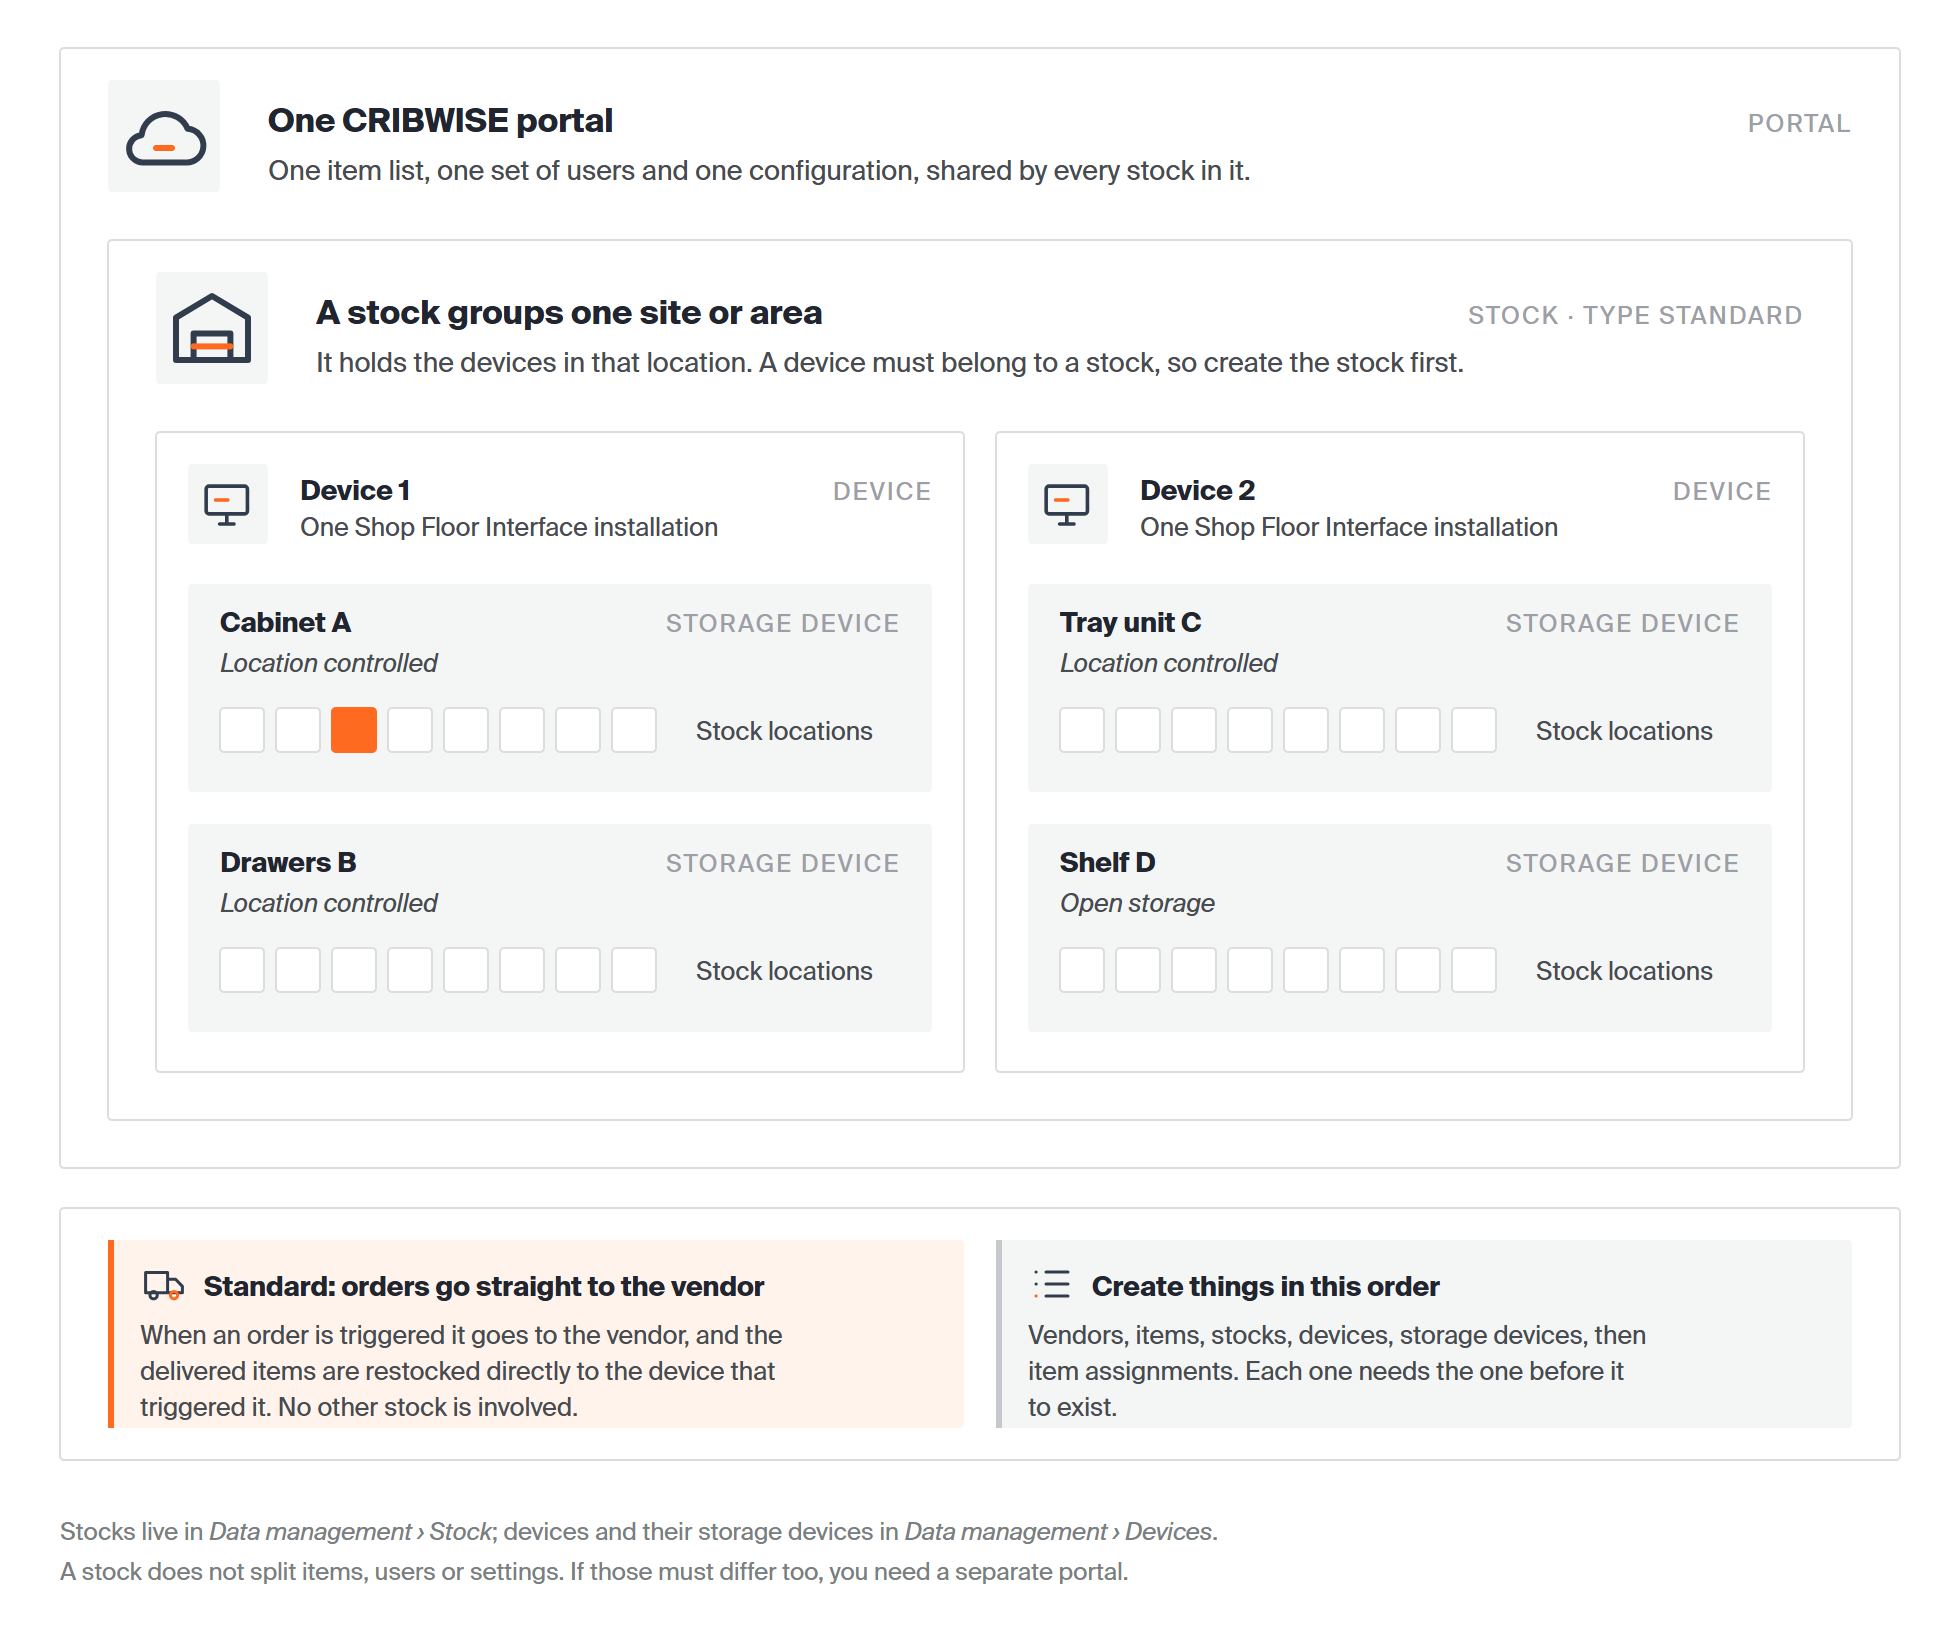
A standard setup. The portal shares items, users and settings; the stock groups the devices and their storage devices. Orders go straight to the vendor.
Because of those relations, objects have to be created in order: vendors, then items, then stocks, then devices, then storage devices, then item assignments. For the full picture, see Understanding stock structure: stocks, devices, and locations.
Stock types
The Type you choose decides how replenishment and ordering work for every device in the stock.
| Type | How ordering works | Use it when |
|---|---|---|
| Standard | When an order is triggered, it goes straight to the vendor. Delivered items are restocked directly to the device that triggered the order. | Most setups — a single site that buys for itself. |
| Central | Holds stock on behalf of its satellites. It raises the purchase order to the vendor, and only when it cannot cover a satellite’s request from its own quantity. | You run a main store that feeds smaller stores. |
| Satellite | Requests items from its central stock instead of ordering directly. Daily picking and returning happen here. | Workshops or lines that are supplied from the main store. |
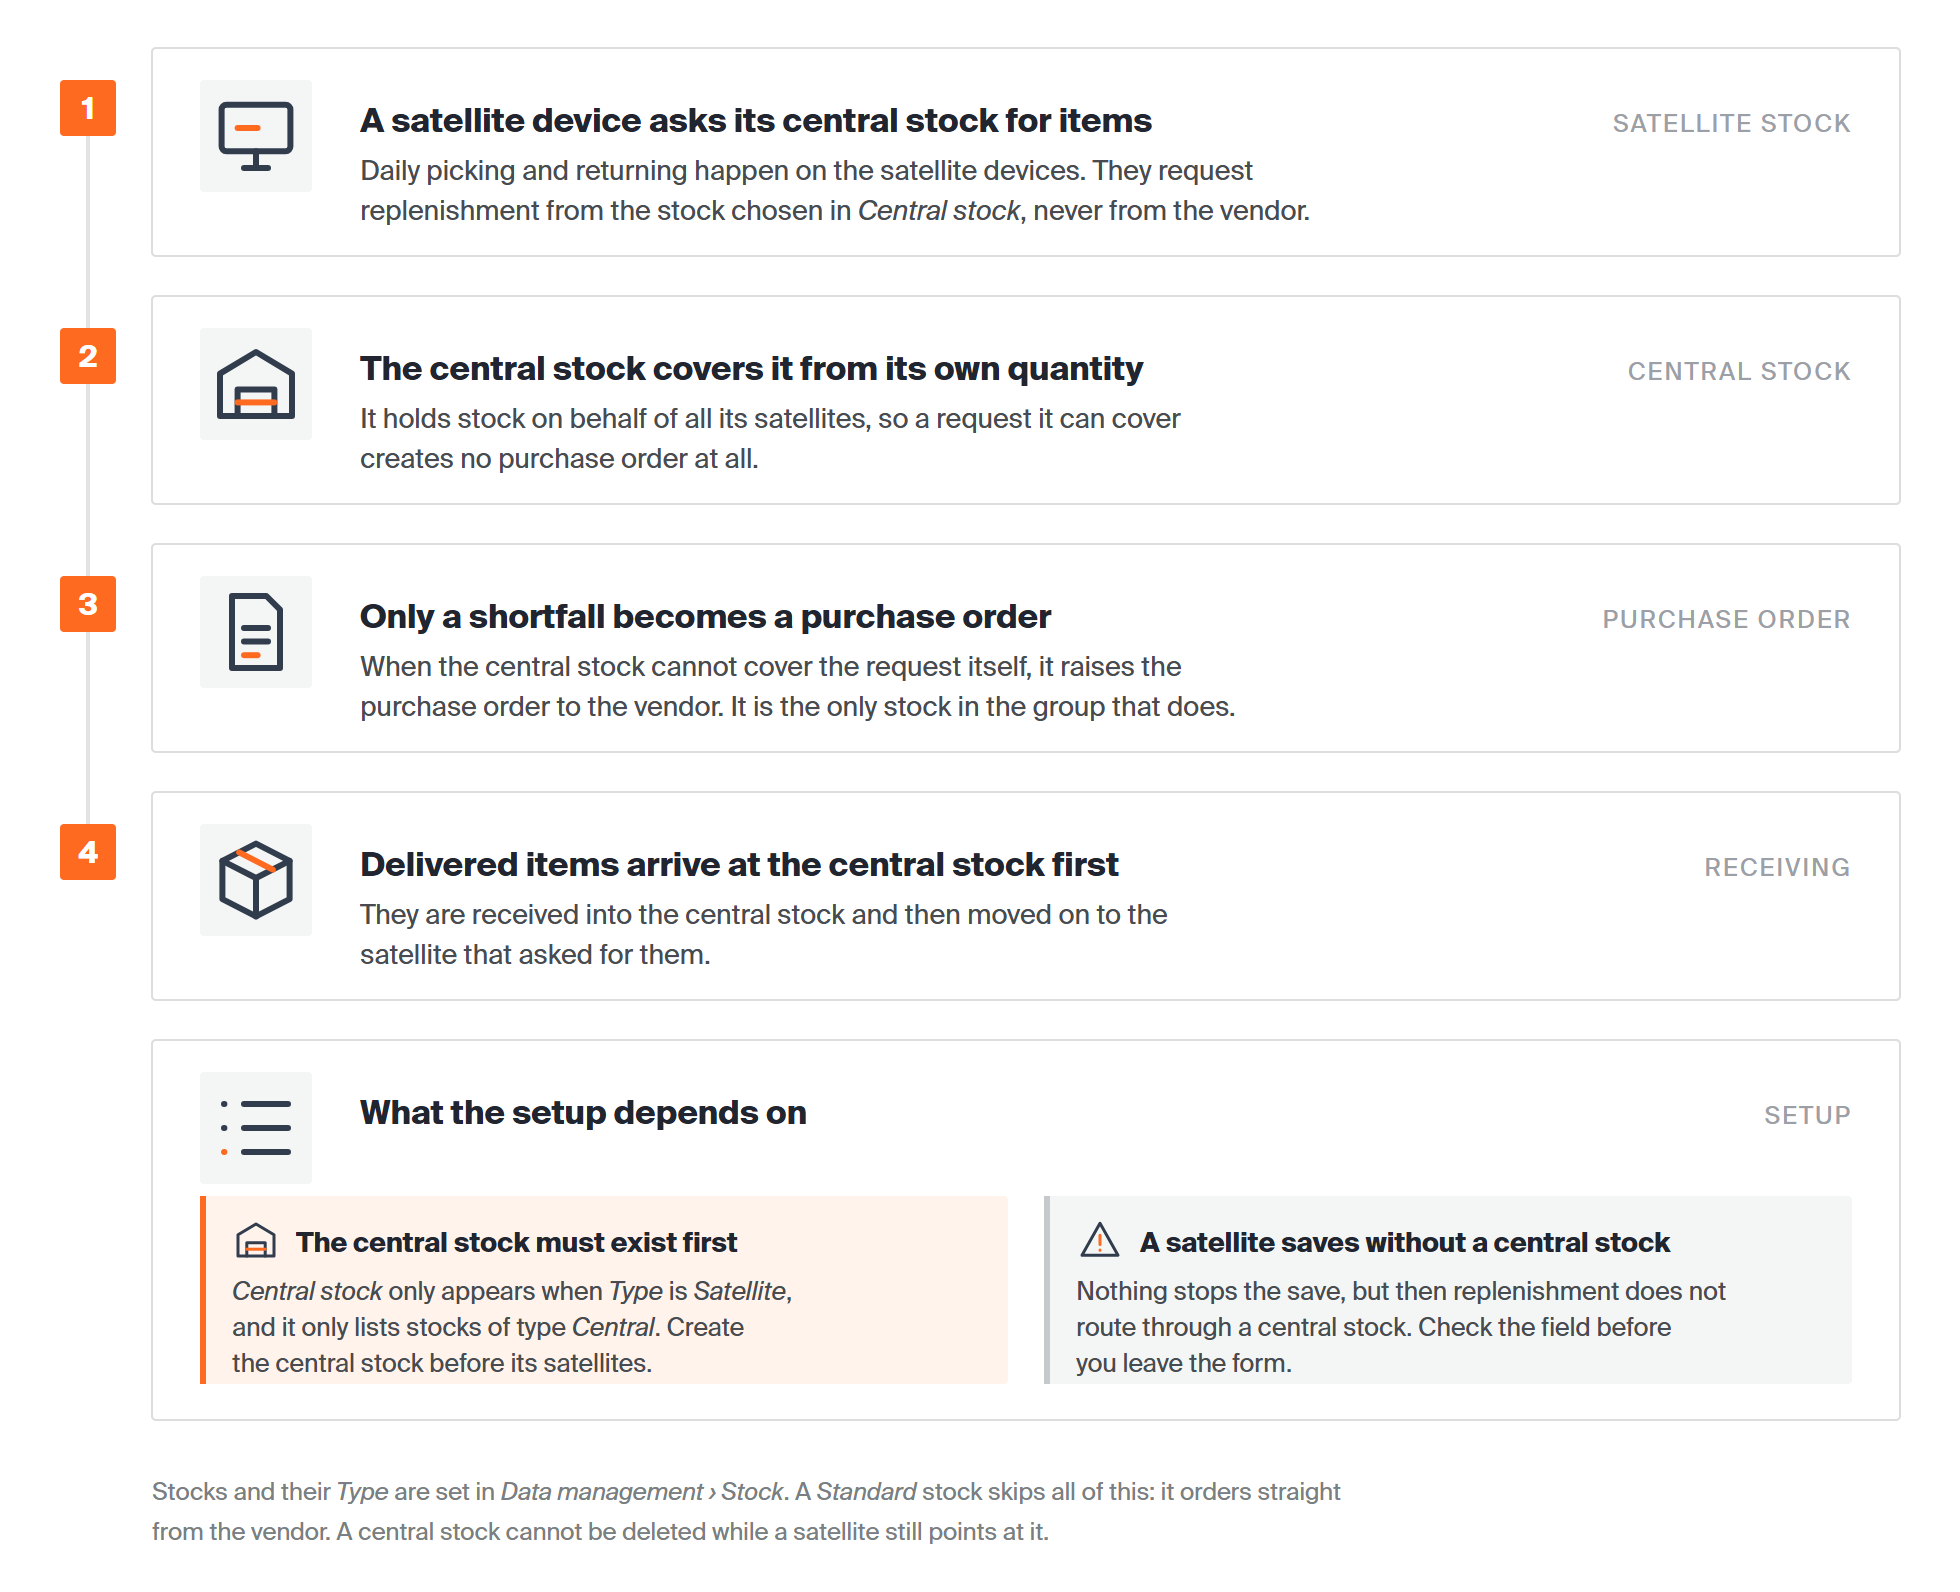
A central and satellite setup. Only the central stock orders from the vendor, and delivered items reach the central stock before moving on to the satellite that asked for them.
Important: A satellite stock only routes replenishment through a central stock if you actually select one in the Central stock field. The system lets you save a satellite without it, so check the field before you leave the form.
Quick start
Experienced users — add a stock in 5 steps:
- Go to Data management > Stock.
- Click New stock.
- Enter a Name and pick a Type.
- Pick a Cost allocation set.
- Click Save stock.
Need more detail? Follow the full steps below.
Steps
Step 1 — Open the stock list
- In the sidebar, open Data management.
- Select Stock.
The Stocks list opens with one row per stock, showing Name, Street, City, Country and Type. The result count sits at the bottom right.
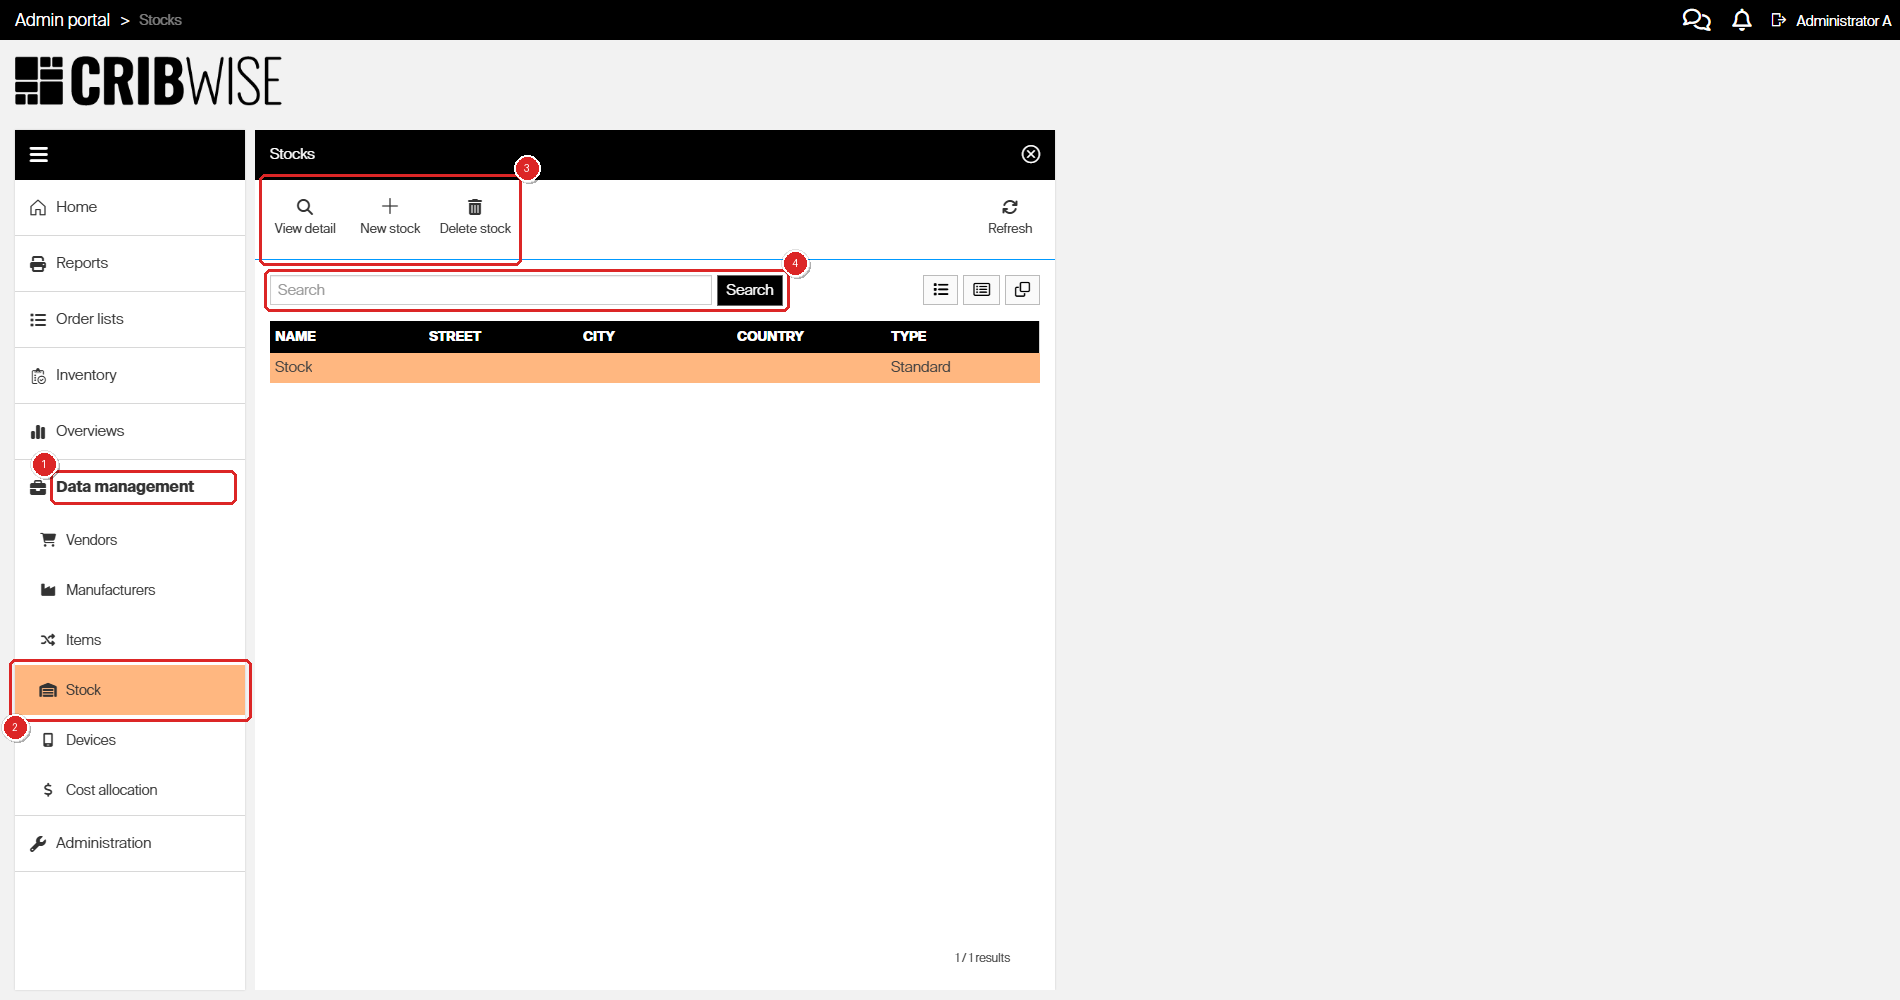
The stock list. The toolbar (3) holds every action: View detail, New stock and Delete stock. Use the search field (4) to filter by name.
Step 2 — Create the stock
- Click New stock.
- Enter the Name.
- Fill in the rest of the General information tab.
The three yellow fields — Name, Type and Cost allocation set — are mandatory. Everything else is optional.

The new stock form. Yellow shading marks the mandatory fields. The Devices and Stock locations tabs stay greyed out until the stock is saved.
| Field | Required | What to enter |
|---|---|---|
| Name | Yes | How the stock is identified everywhere else in the system — device records, reports, order lists. Must be unique. Use the site or area name your staff would recognize. |
| Type | Yes | Standard, Central or Satellite. See the table above. |
| Central stock | Only for satellites | Appears when Type is Satellite. Lists the stocks whose type is Central, so create the central stock first. |
| Description | No | Free text — useful for noting shift patterns, contacts or what the stock covers. |
| Street, City, Postal code, Country, Region code | No | The delivery address for orders raised from this stock. These fields can be pulled into order and invoice templates, and they fill the recipient address automatically for XML-based B2B orders. |
| Cost allocation set | Yes | The set used by every device in this stock. Choose No cost allocation to switch cost allocation off for the stock. A device can override the stock’s set in its own device settings. |
Step 3 — Choose the type
Select the Type. Choosing Satellite adds a Central stock field directly below it — pick the central stock that will supply this one.
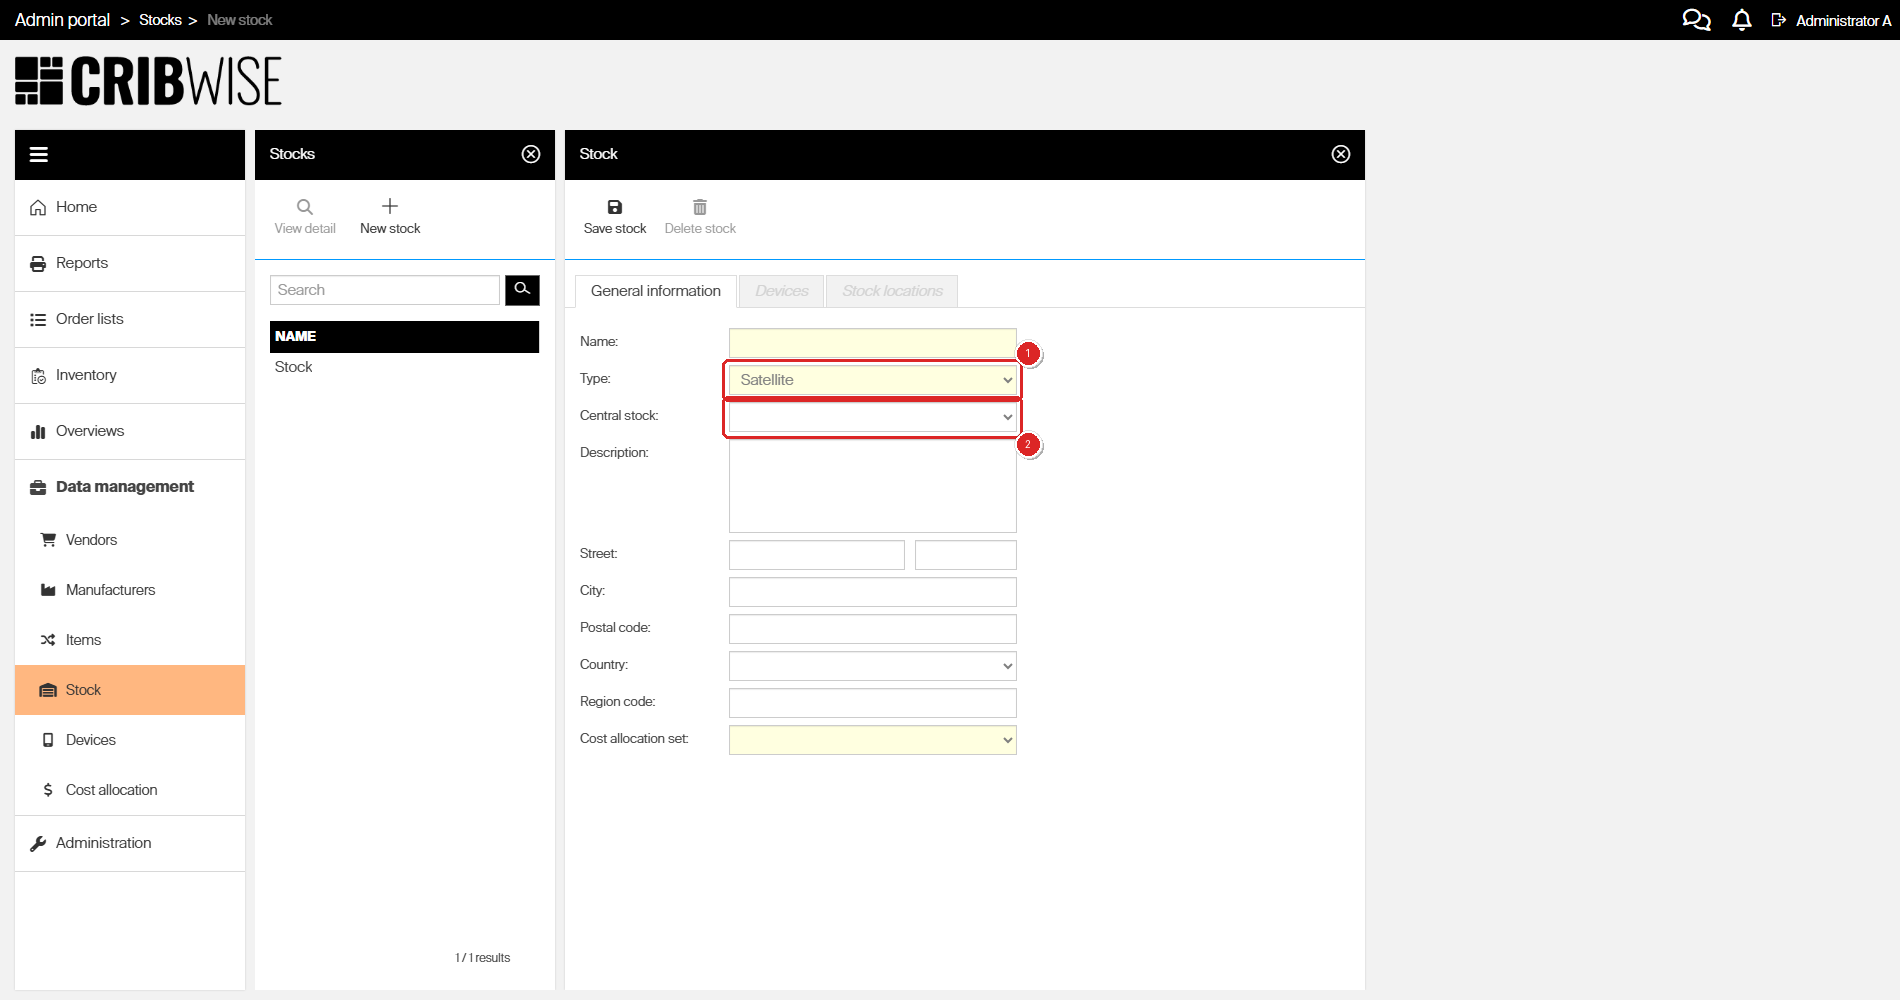
Type set to Satellite (1) reveals the Central stock field (2). The list is empty until at least one stock of type Central exists.
Step 4 — Save the stock
Click Save stock.
Success: a green message confirms The Stock <name> has been successfully saved, the record appears in the list on the left, and the Devices and Stock locations tabs become available.
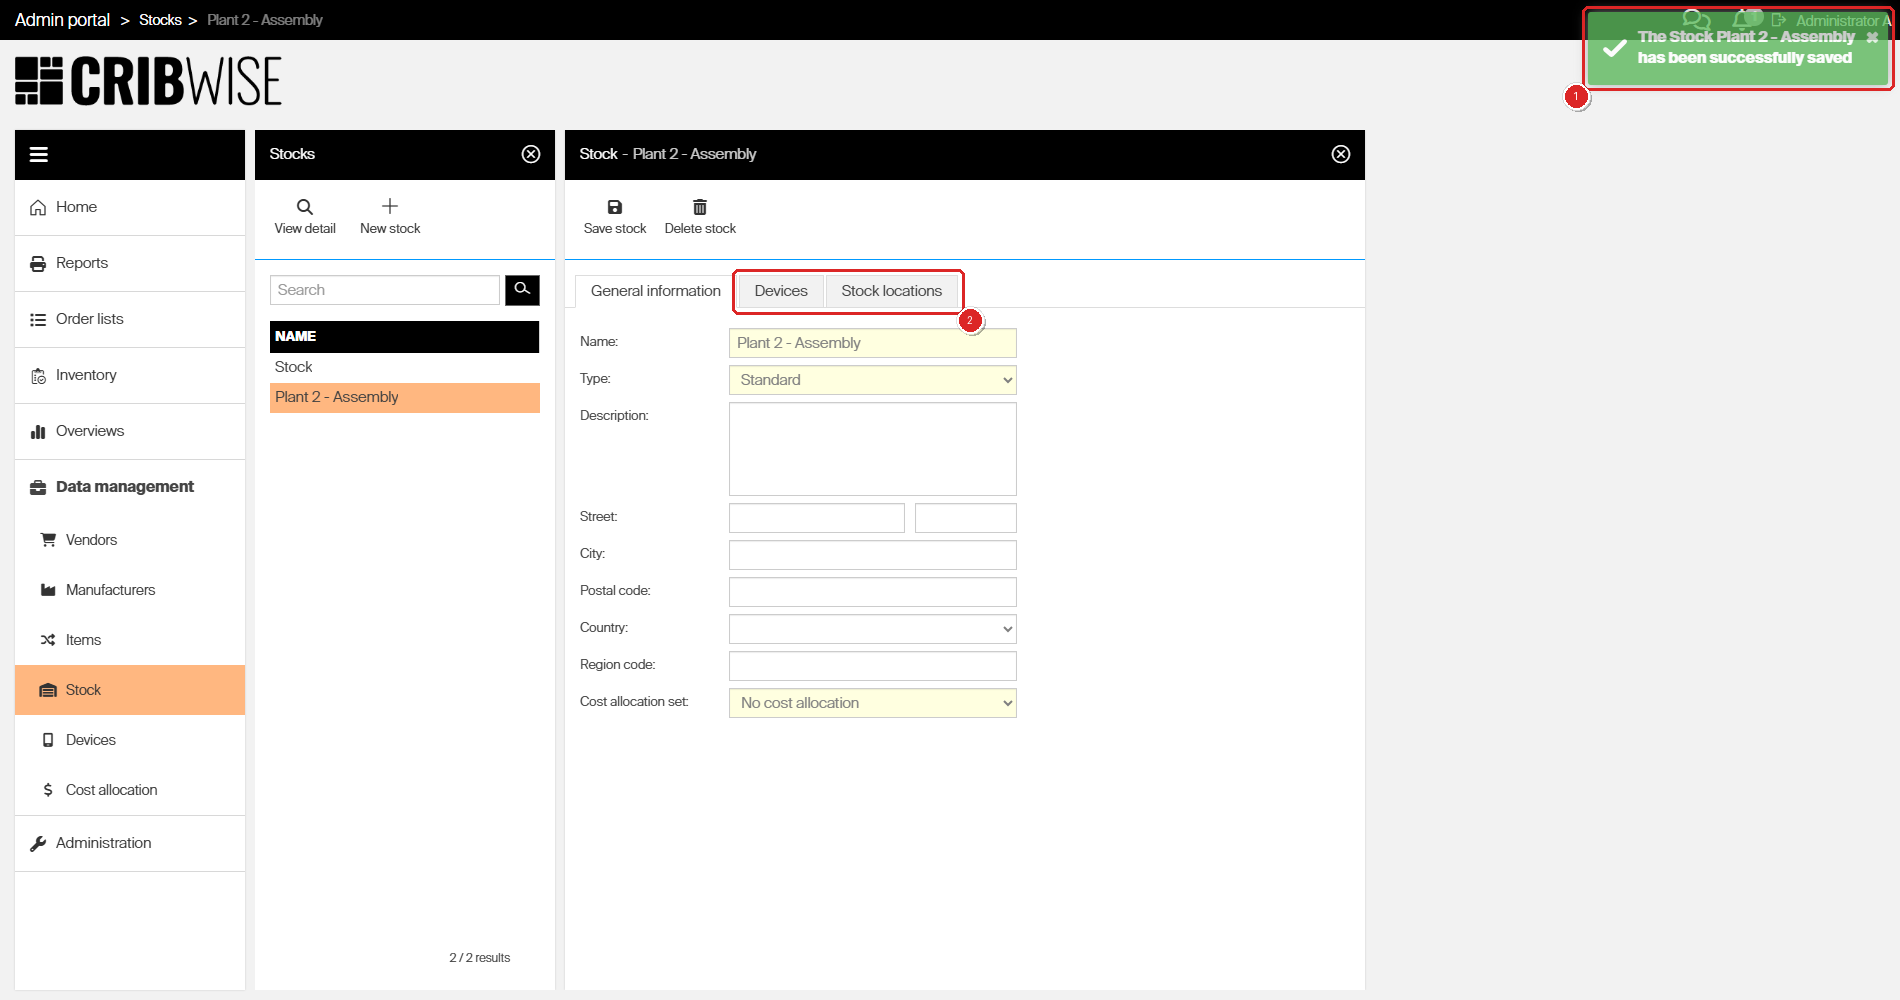
The saved stock: the confirmation message (1) and the two tabs that unlock once the record exists (2).
If a mandatory field is empty, nothing is saved and the offending fields switch from yellow to a red outline.
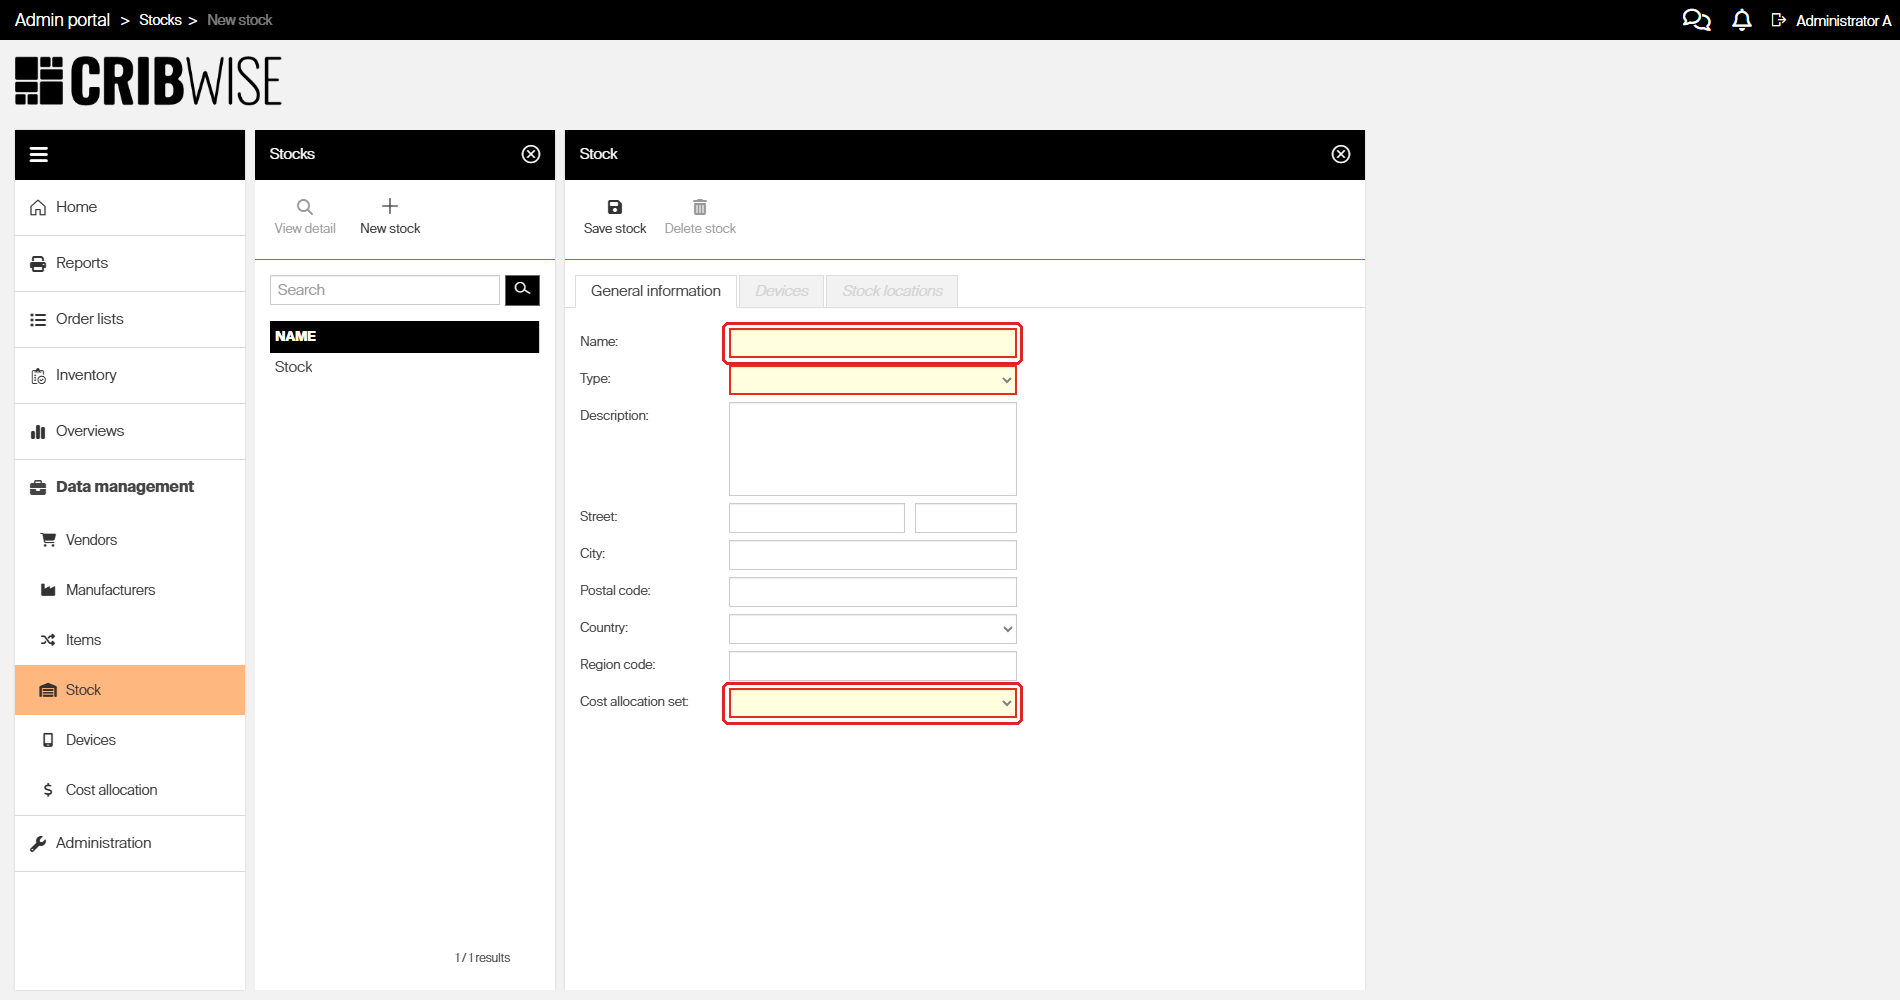
Name and Cost allocation set outlined in red after a save attempt with both left empty.
Tip: If you navigate away with unsaved changes, CRIBWISE asks There are unsaved changes at new stock, do you really want to discard them? Answer No to go back and save.
Step 5 — Check the devices and locations in the stock
Open a saved stock with View detail to see what it contains.
The Devices tab lists every device connected to the stock, with its Device ID, Name and whether a storage device is defined. Use Edit device to jump straight into a device.
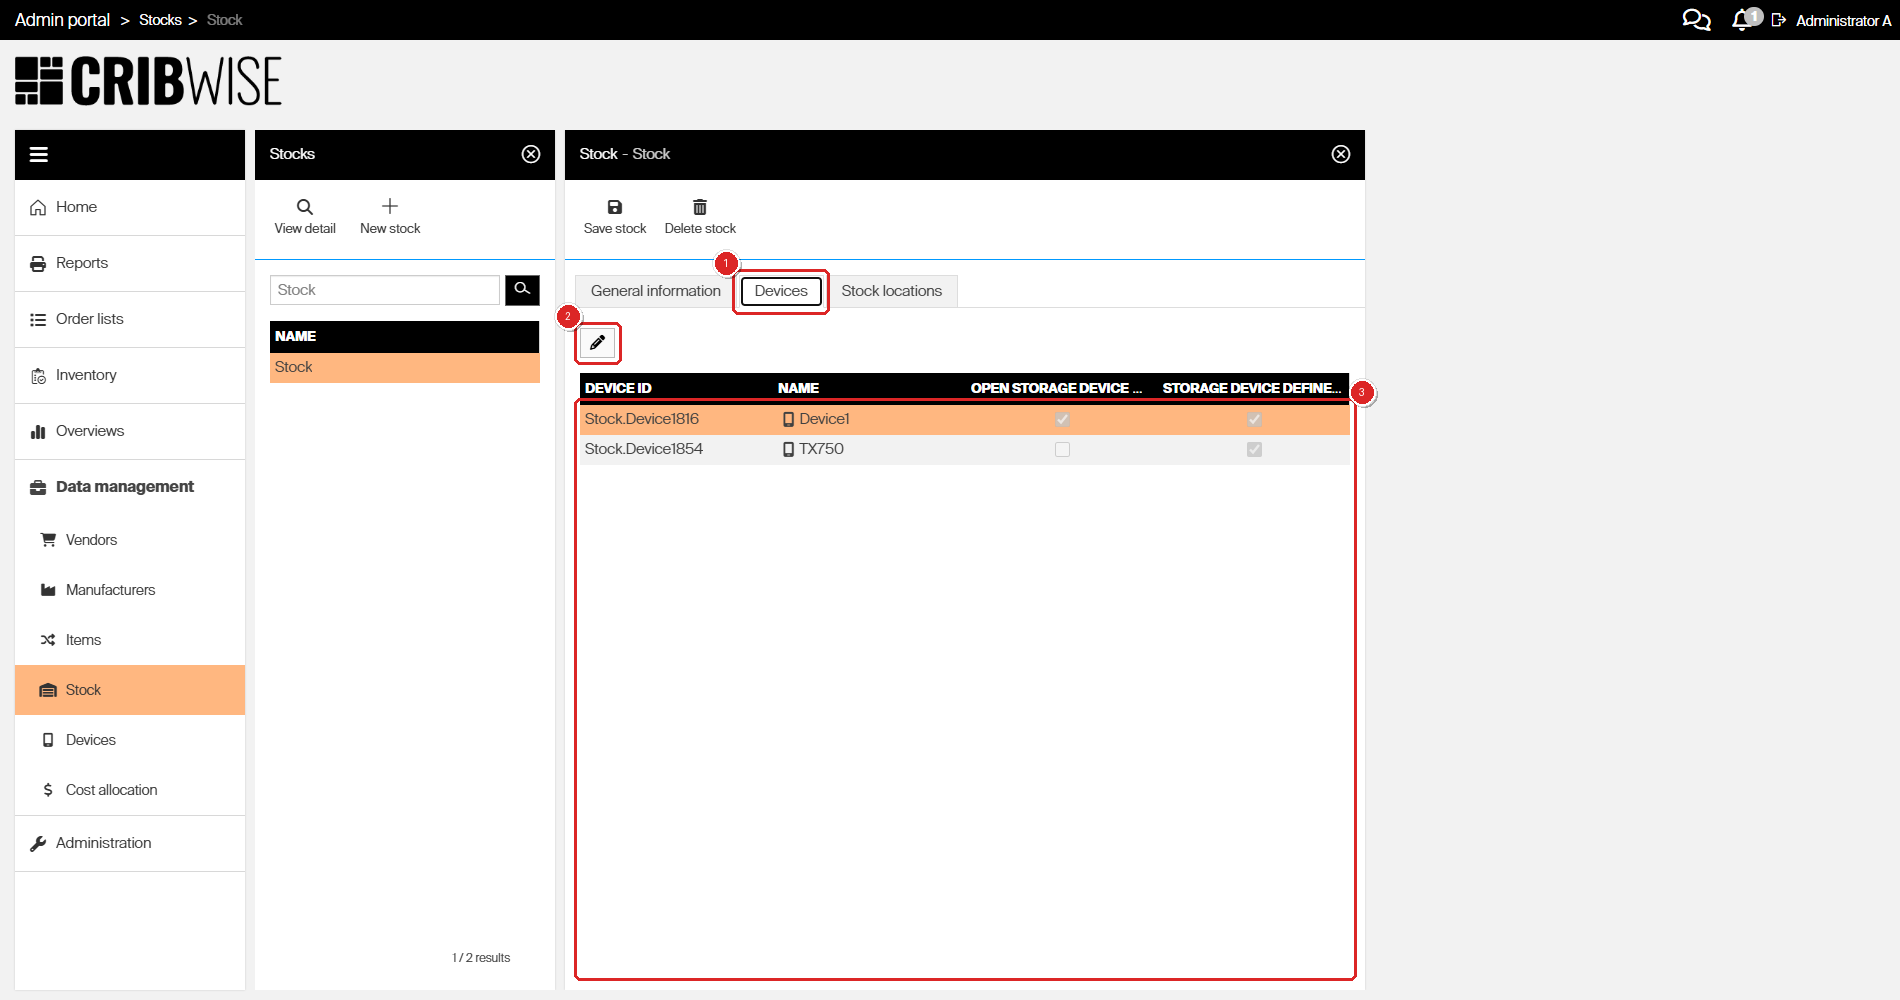
The Devices tab (1). Edit device (2) opens the selected device; the list (3) is read-only here — devices are created under Data management > Devices.
The Stock locations tab lists every location in the stock, with the device it belongs to, how many items are assigned and its status. Filter by device, by storage device, or to empty locations only.
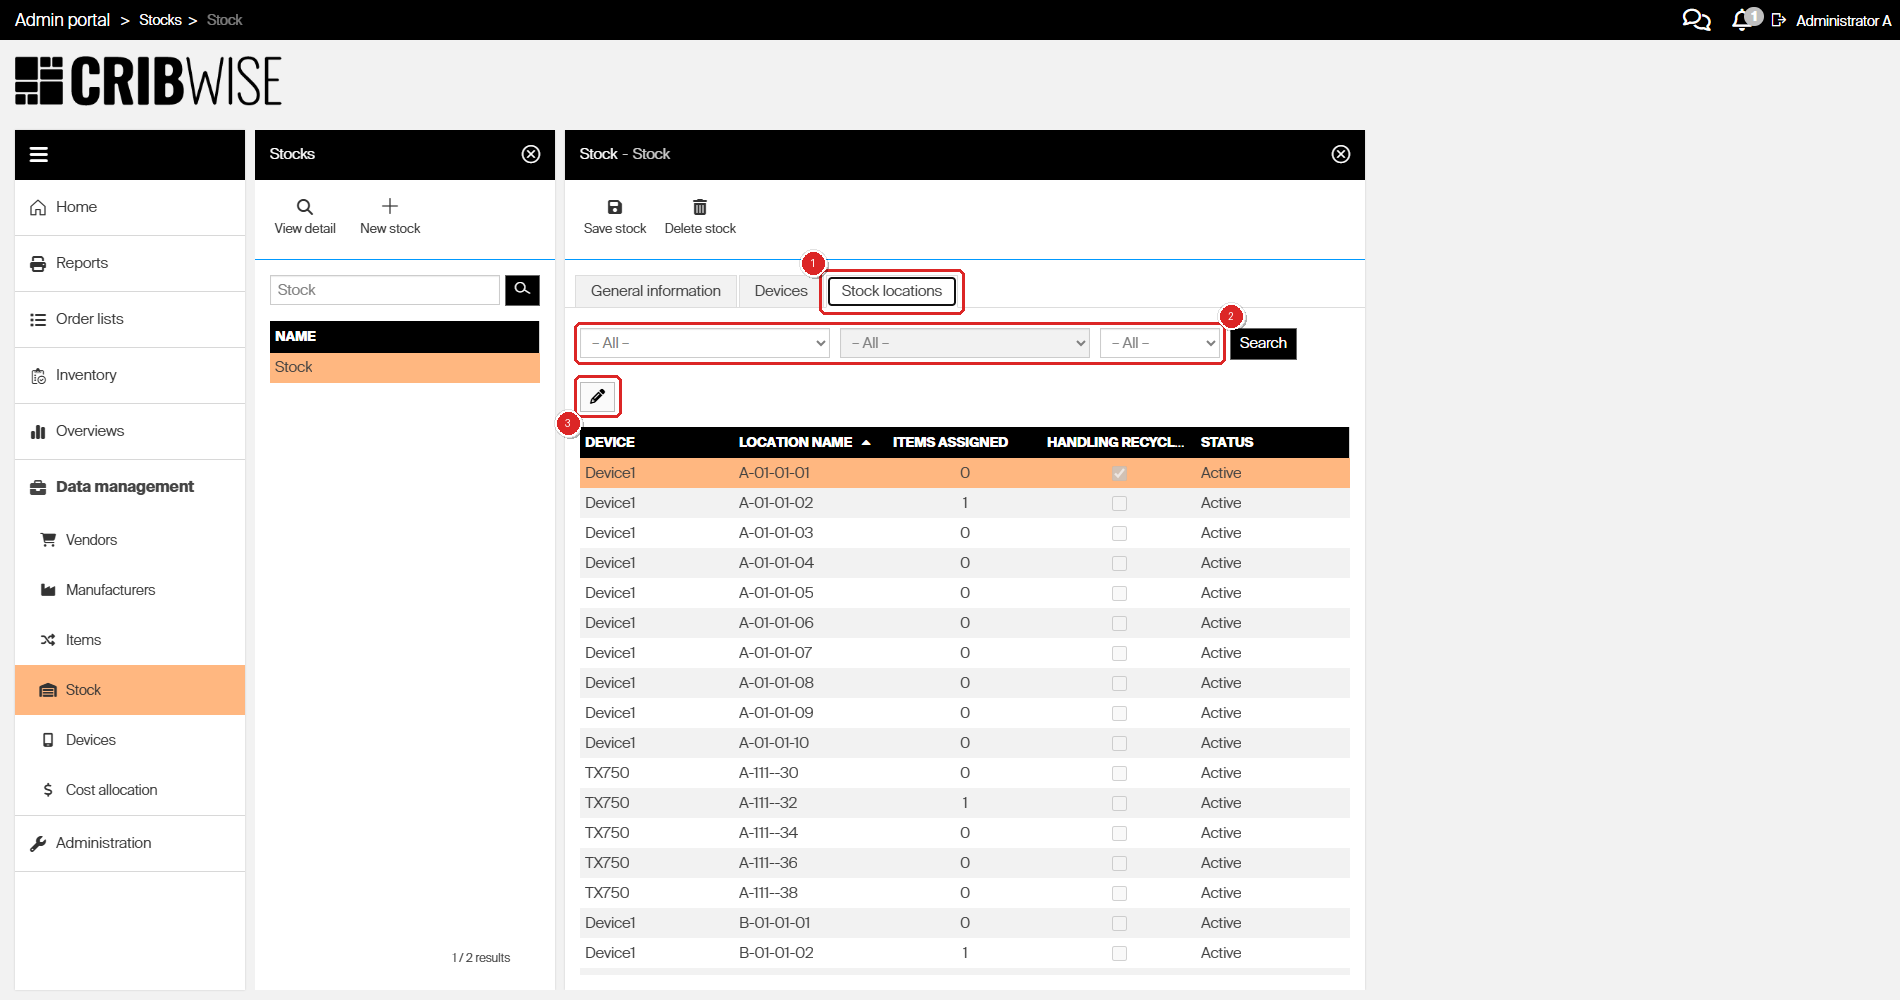
The Stock locations tab (1). Narrow a long list with the filters (2), then open a location with Edit stock location (3).
Step 6 — Delete a stock
- Select the stock in the list.
- Click Delete stock.
- Confirm with Yes.
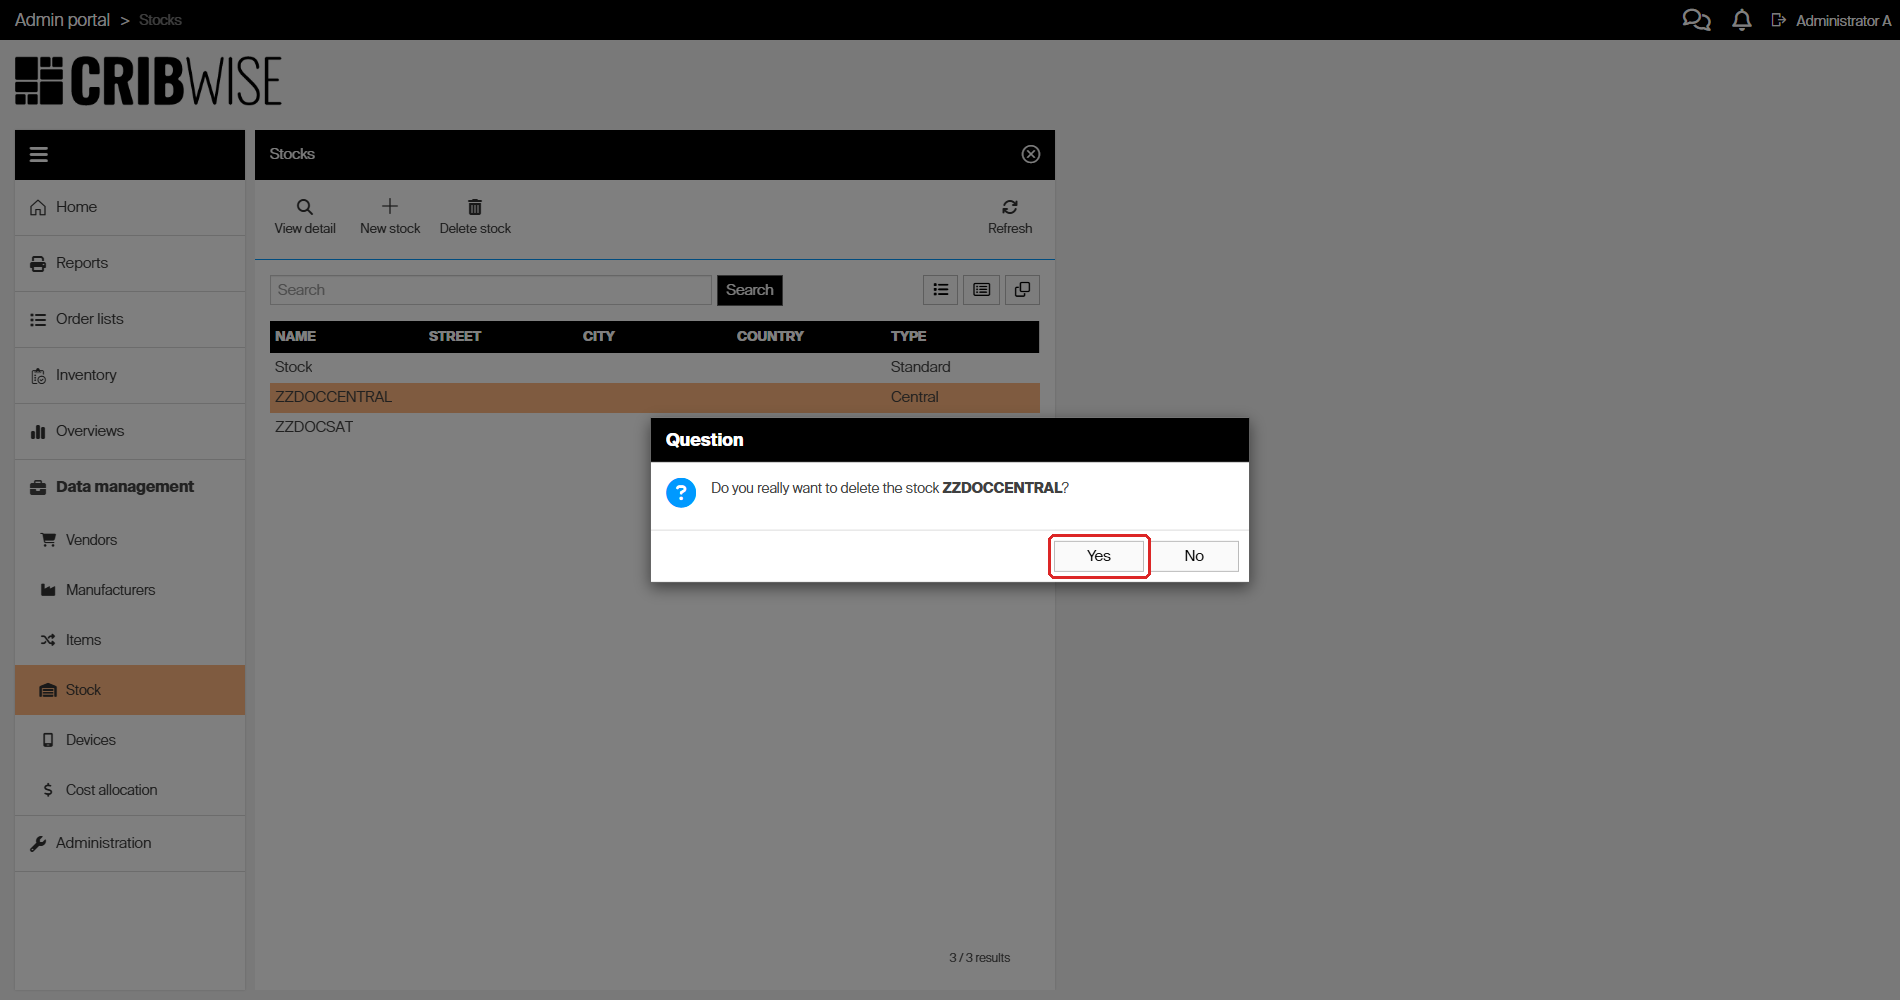
The confirmation names the stock it is about to delete — check it before confirming.
A stock can only be deleted once nothing references it. If anything is still assigned, the delete is refused and an Error panel opens listing what is in the way.
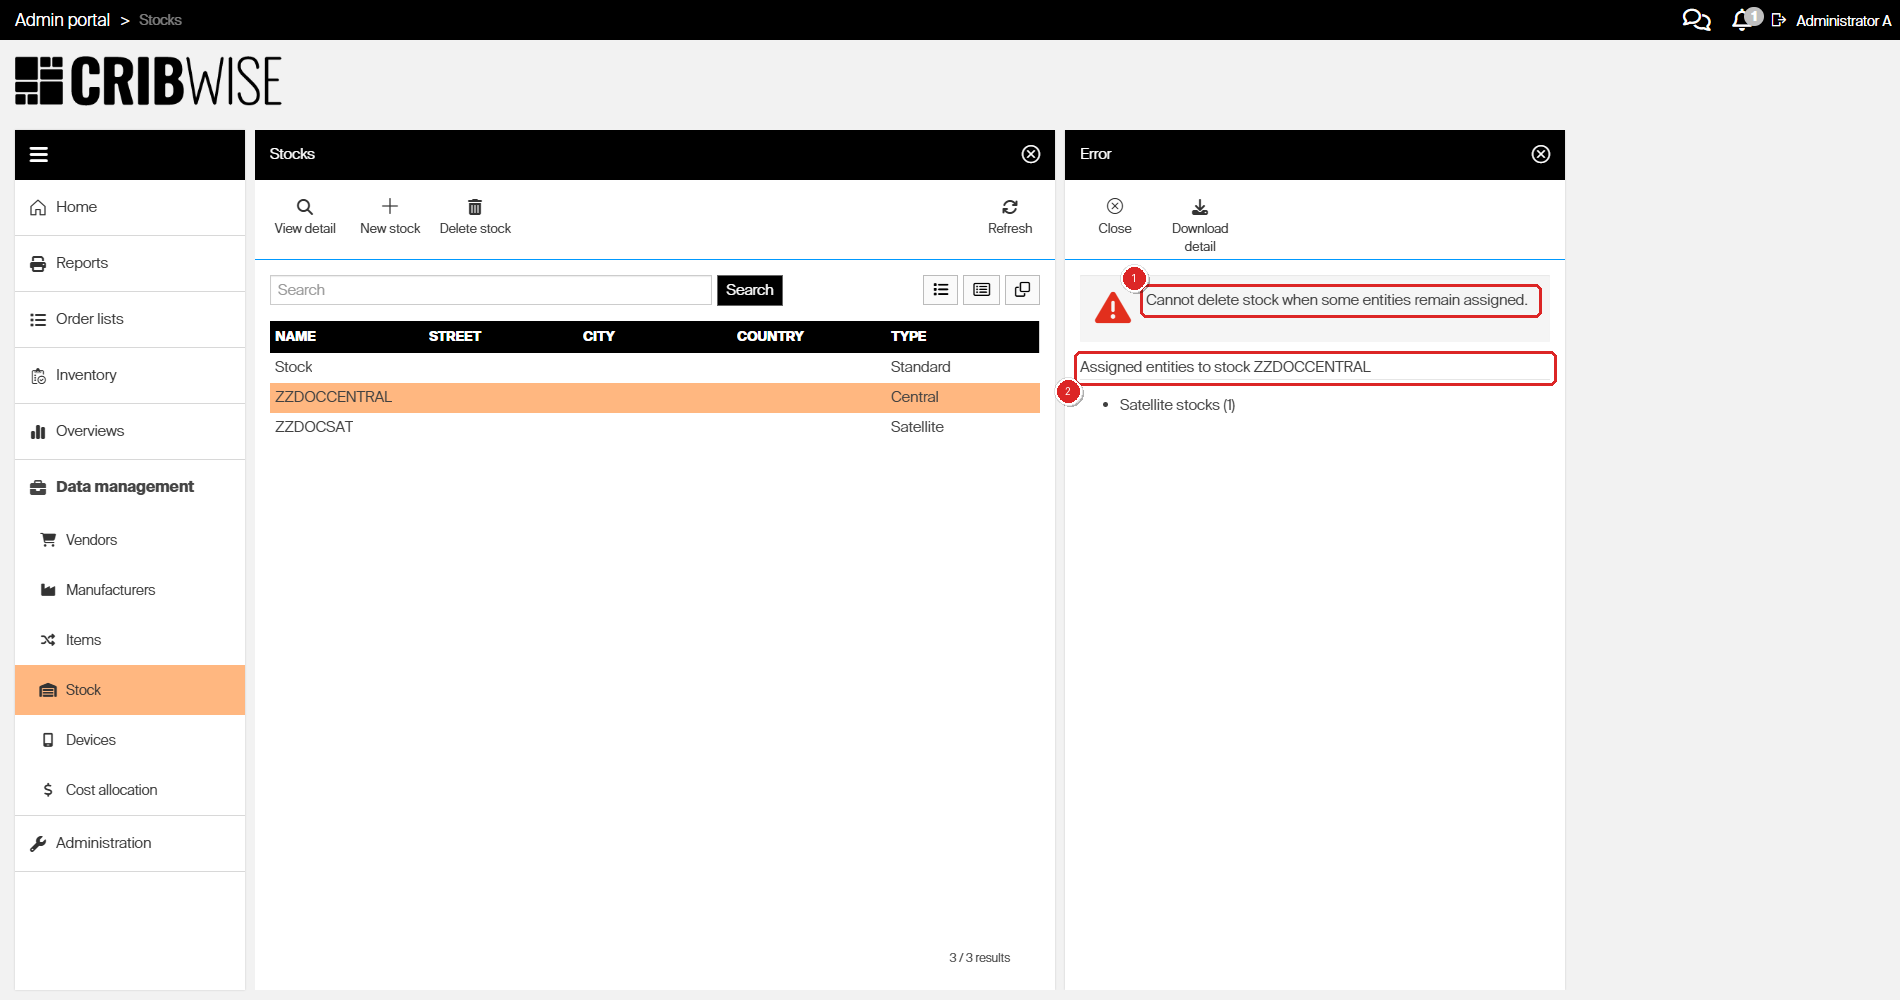
The message “Cannot delete stock when some entities remain assigned” (1), with the blocking entities listed underneath (2) — here one satellite stock still points at this central stock. Download detail saves the full list.
One portal or several?
Separate stocks are the right tool when the differences are physical: another site, another building, another line. They keep one shared item list, one set of users and one configuration.
A separate portal is the right tool when the differences go deeper than the physical layout. Consider a second portal when:
- Item setup differs significantly between the parts of the business, and separate stocks cannot express that difference.
- Languages and time zones differ — for example when the company operates in several countries. Sharing one portal across countries is not recommended.
- There would be too many administrators in one portal. The more admins, the harder it is to keep control of configuration changes. For large customers, one portal per department is often the better split.
- A single portal hits system limits — for example too many locations or too many items.
Note: Splitting into portals is a bigger decision than adding a stock: reporting, item data and users do not carry across portals, and items cannot be transferred between them the way they can between stocks. Weigh it up before you commit. See How to activate and log in to a new portal.
Next steps
After the stock exists:
- Create its devices — a device runs the Shop Floor Interface and controls the storage devices. See How to create and manage devices.
- Define storage devices and assign items — locations are generated from the storage device settings, then items are assigned to them. See Understanding stock structure.
- Move items between stocks when a second stock is up and running. See How to transfer items between stocks.
Troubleshooting
| Problem | Likely cause | Fix |
|---|---|---|
| Nothing saves and Name or Cost allocation set turns red | A mandatory field is empty | Fill in every yellow field — Name, Type and Cost allocation set — then save again. |
| Cannot delete stock when some entities remain assigned | Devices, locations, items or satellite stocks still reference this stock | Read the Assigned entities list in the error panel, remove or move those objects, then delete the stock. Use Download detail for the full list. |
| Central stock is empty when Type is Satellite | No stock of type Central exists yet | Create the central stock first, then come back and select it on the satellite. |
| A satellite orders directly from the vendor instead of asking the central stock | The Central stock field was left empty — the save is not blocked | Open the stock, select the central stock, and save. |
| The Devices and Stock locations tabs are greyed out | The stock has not been saved yet | Save the stock. Both tabs become available on the saved record. |
| There are unsaved changes at new stock, do you really want to discard them? | You navigated away from a form with unsaved edits | Answer No to return to the form and save, or Yes to throw the edits away. |
| No Stock entry under Data management | Your user group lacks the permission for stocks | Ask an administrator to grant it. See Admin Portal permissions reference. |
Related articles
- Understanding stock structure: stocks, devices, and locations — how stocks, devices, storage devices and locations relate, and the order to define them in.
- How to create and manage devices — create the devices that run inside a stock and override its cost allocation set.
- How to transfer items between stocks — move quantities from one stock to another.
- How to create and manage cost allocation sets — build the sets you assign to a stock.
- How to manage vendors — define the vendors that orders are sent to.
- How to activate and log in to a new portal — what happens when a separate portal is the better fit.
- How to import item data into the system — load stocks and other objects in bulk instead of one at a time.