
Read time: ~8 minutes
Applies to: Shop Floor Interface · Admin Portal
What you can do
Move stock from a central stock to a satellite stock: request the items on a transfer list, pick them on the central device, and restock them on the satellite device.
Before you start
- Your site needs a Central stock and at least one Satellite stock that points at it. See How to create and manage stocks.
- The device you pick on must belong to the central stock. Check the Stock column under Data management > Devices.
- The item must be assigned to a location on the central device, with quantity in that location.
- You need a Shop Floor Interface login with permission to pick items.
Important: Pick for transfer appears in the Stock management menu only on a device that belongs to a central stock. On every other device that menu has one tile fewer.
How a transfer moves stock
A transfer is not a single action. Stock leaves the central device in one step and arrives at the satellite device in another, and the quantity stays visible in between.
| Stage | Where you do it | What happens to the stock |
|---|---|---|
| 1. Request | Admin Portal – Order lists > Transfer lists | Nothing yet. The quantity is listed as Quantity for transfer. |
| 2. Pick for transfer | Shop Floor Interface on the central device | The quantity leaves the central location and becomes Quantity in transfer. |
| 3. Restock | Shop Floor Interface on the satellite device | The quantity arrives in a location on the satellite device and leaves the transfer list. |
Note: Transfer lists can also be filled automatically by satellite demand. This article covers the manual route. For how the demand is created and how it interacts with purchasing, see Understanding transfer lists.
Quick start
Experienced users – transfer items in five steps:
- Create a transfer list under Order lists > Transfer lists and add the items.
- Open Stock management > Pick for transfer on the central device.
- Select the transfer list, tick the items, and set the quantity to pick.
- Pick from the locations shown, then select Picking finished.
- Restock the items against the same transfer list on the satellite device.
Need more detail? Follow the full steps below.
Steps
Step 1 – Create the transfer list
In the Admin Portal, go to Order lists > Transfer lists and select New list.
- On the General information tab, choose the Central stock the items come from.
- Choose the Satellite stock they go to. The list only offers satellite stocks that point at the central stock you picked.
- Choose the Device on the satellite stock that will receive the items.
- Select Save list.
The Items to transfer tab becomes available once the list is saved.
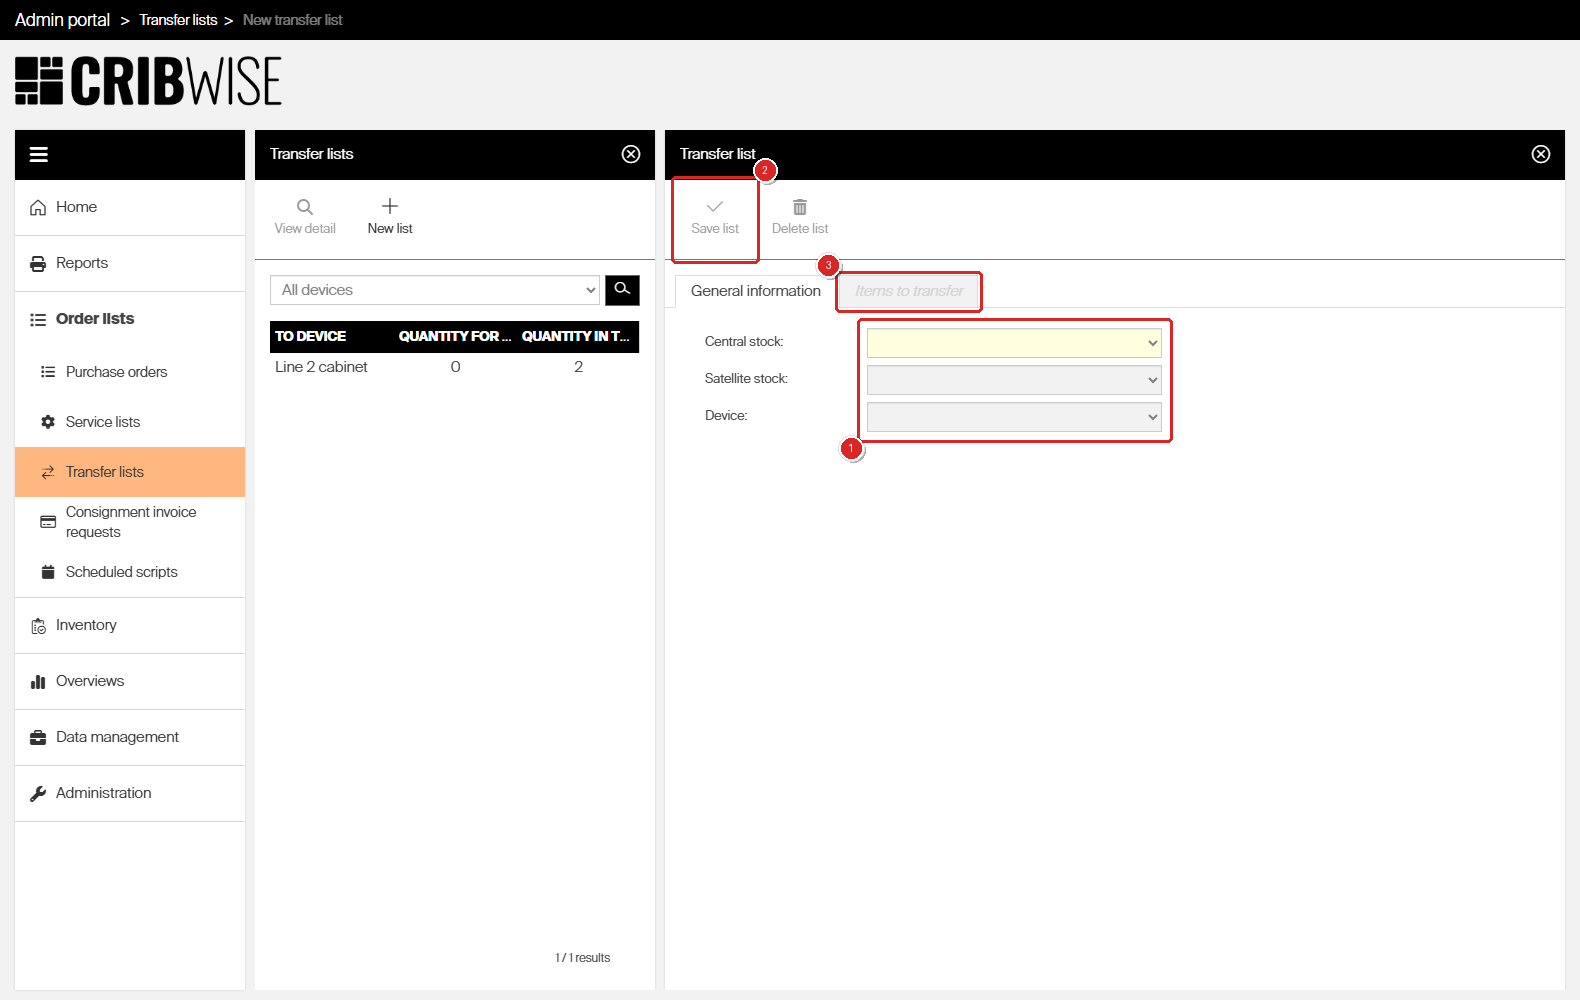
(1) the three dropdowns that define the route, (2) Save list, and (3) the Items to transfer tab, which stays greyed out until the list is saved.
Step 2 – Add the items and quantities
- Open the Items to transfer tab.
- Select Add new item (the + button).
- Select the item in the Items picker, then select OK.
- Enter the Quantity for transfer in pieces and select Save.
- Repeat for every item, then select Save list.
Use Edit selected item to change a quantity and Remove selected item to take a row off the list.
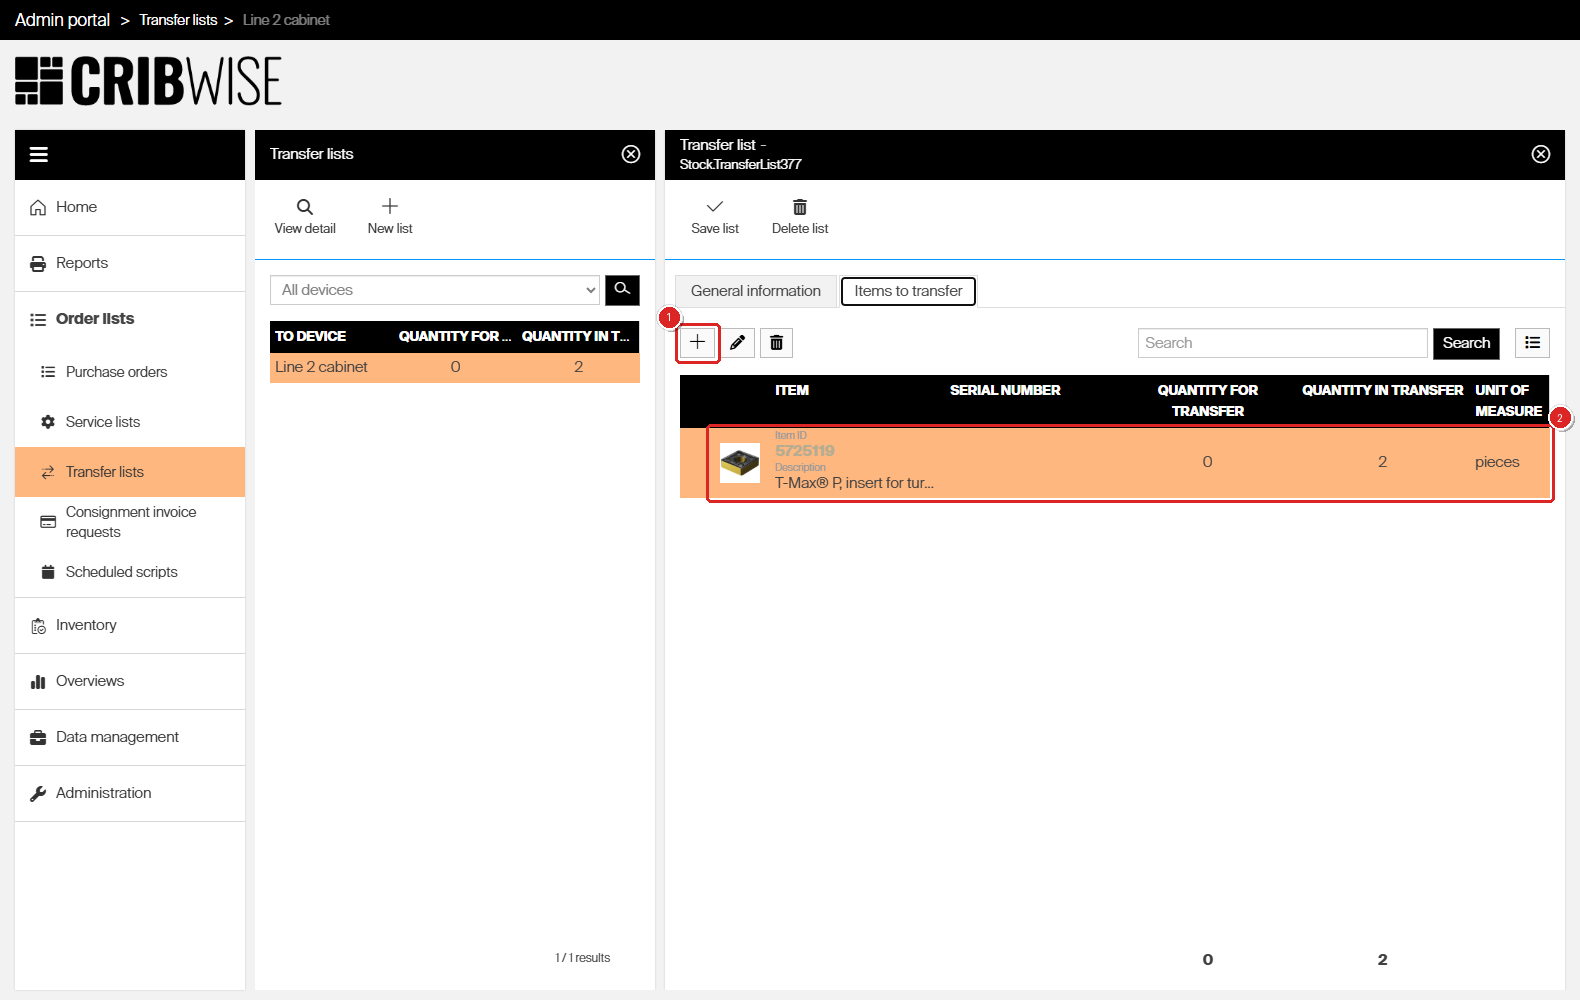
(1) Add new item, and (2) the item row. This list has already been picked on the central device, so its two pieces have moved from Quantity for transfer to Quantity in transfer. On a new list you see the opposite: the quantity you entered on the left, and 0 on the right.
Step 3 – Open Pick for transfer on the central device
On the Shop Floor Interface of a device that belongs to the central stock, tap Stock management, then tap Pick for transfer.
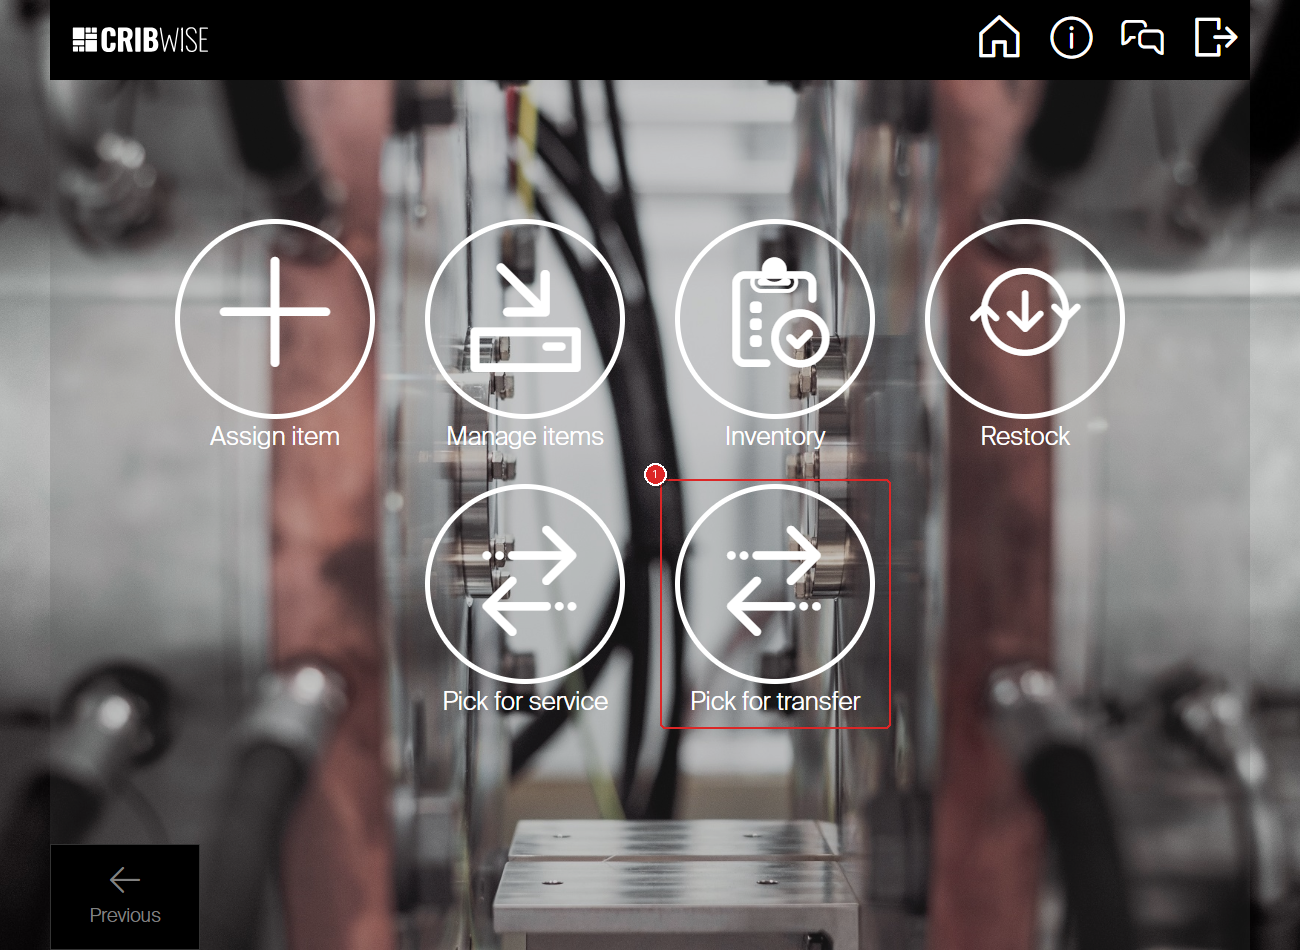
The Stock management menu on a central-stock device. Pick for transfer sits next to Pick for service – the two flows work the same way.
Step 4 – Select the transfer list
Select transfer list shows every open transfer list this central stock has to serve. Each row names the receiving device and its satellite stock, and shows how much has already moved.
- Qty for transfer – still waiting to be picked here.
- Quantity in transfer – already picked, waiting to be restocked on the satellite device.
Tap the list you want to work on.
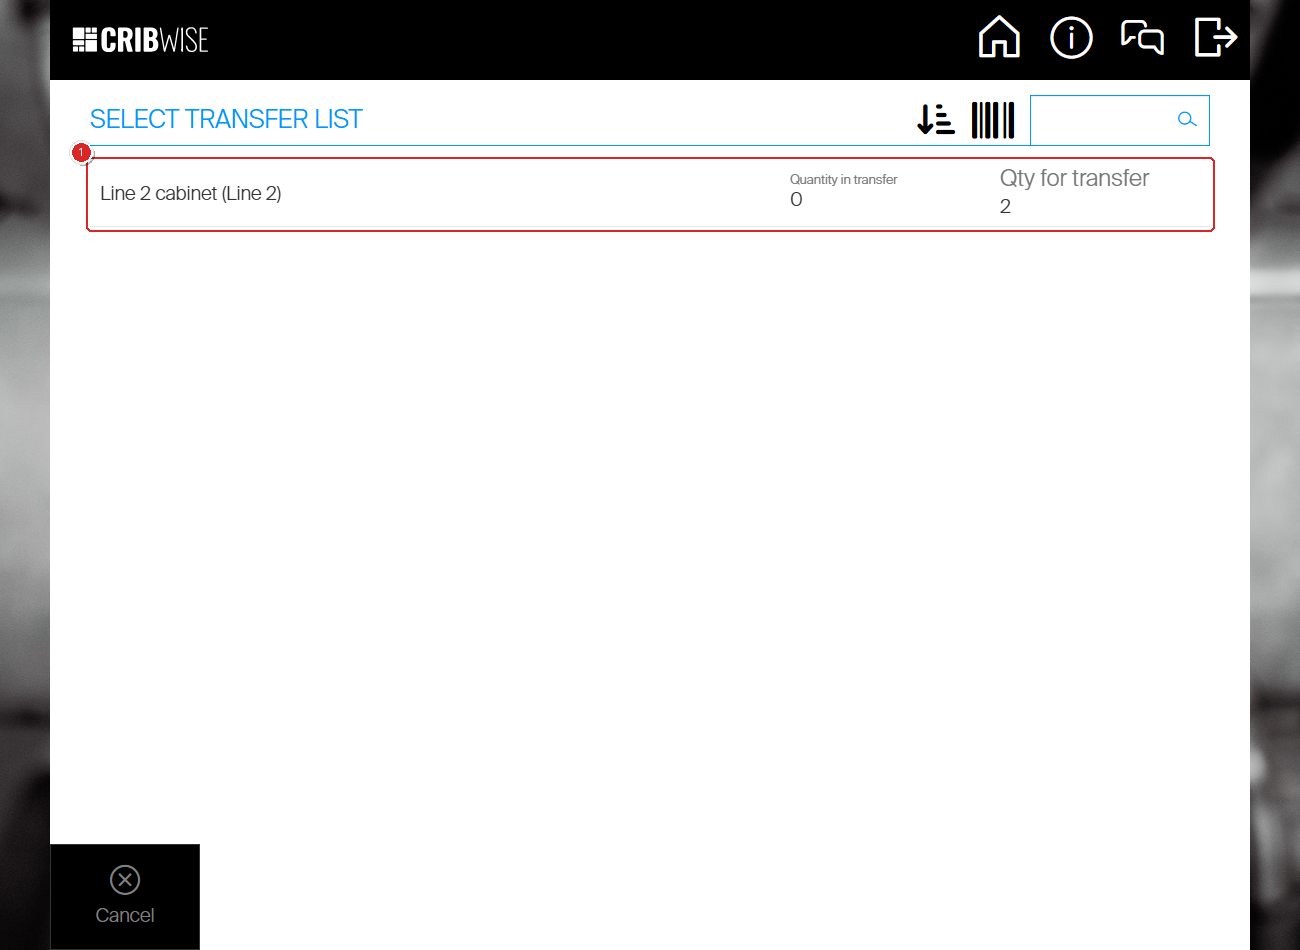
One open list, for the device Line 2 cabinet on the satellite stock Line 2: two pieces requested, none picked yet.
Step 5 – Select the items and the quantity to pick
The list opens with one row per item. Each row shows the requested Qty for transfer and the Available quantity on this device.
- Tick the checkbox on each item you are picking. Quantity to pick fills in with the requested quantity.
- Adjust the quantity with – and + if you are picking a different amount.
- Tap Confirm.
Tap Select all to tick every row at once.
Tip: If the device allows changing quantity during picking, you can pick more than the list asked for. The extra quantity travels with the transfer and can be restocked on the satellite device.
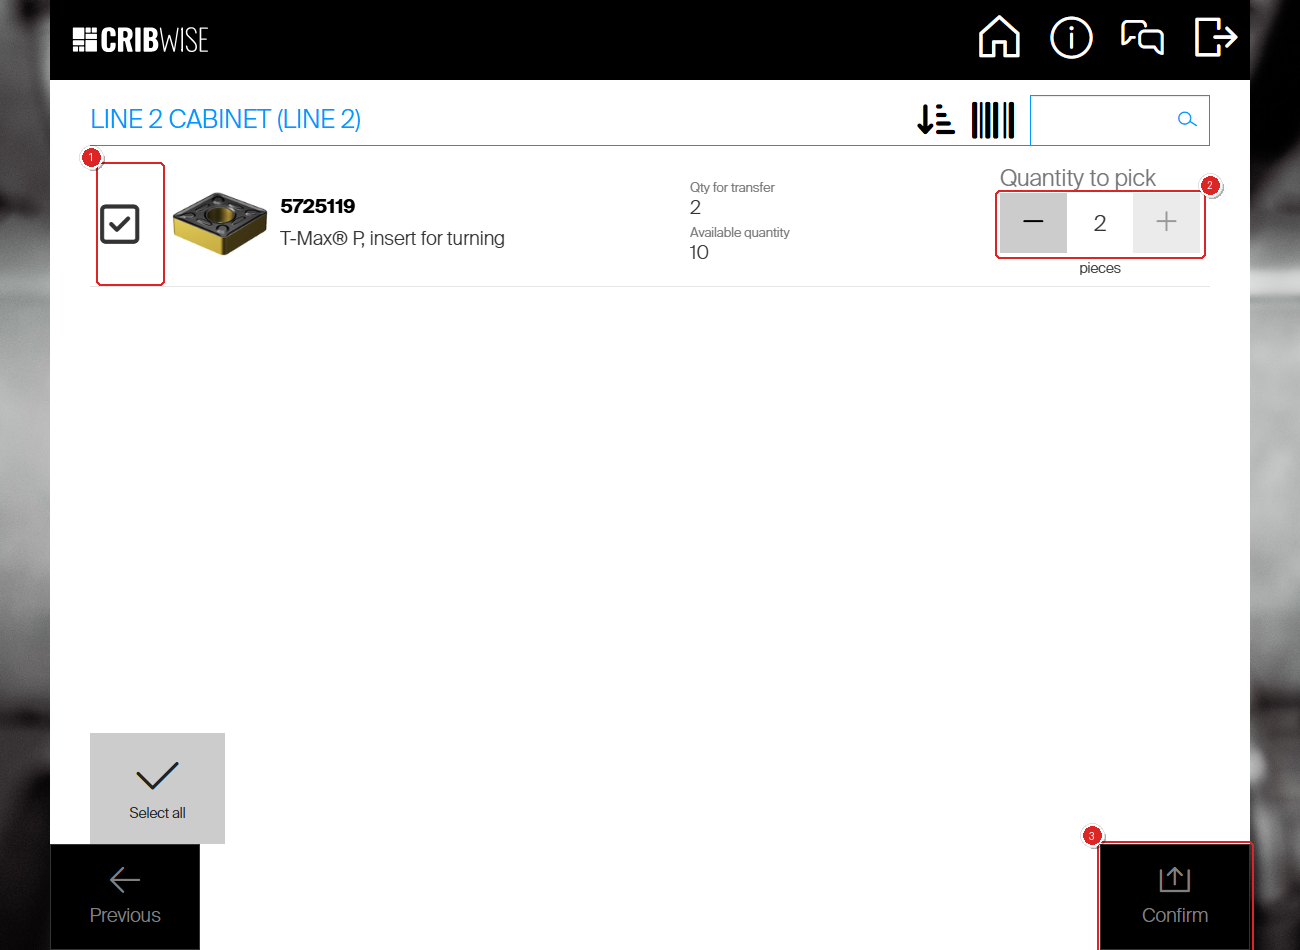
(1) the item checkbox, (2) Quantity to pick, filled in with the two requested pieces, and (3) Confirm, which stays inactive until at least one row is ticked. For a serialized item you choose serial numbers here instead of a quantity.
Step 6 – Pick from the locations shown
Items to pick tells you where the stock is. Take the quantity shown from each location, then tap Picking finished.
- Change picked quantity – correct the quantity if you took a different amount.
- Cancel – drop a quantity you cannot pick, for example when the location is empty. The cancelled quantity stays on the transfer list for later.
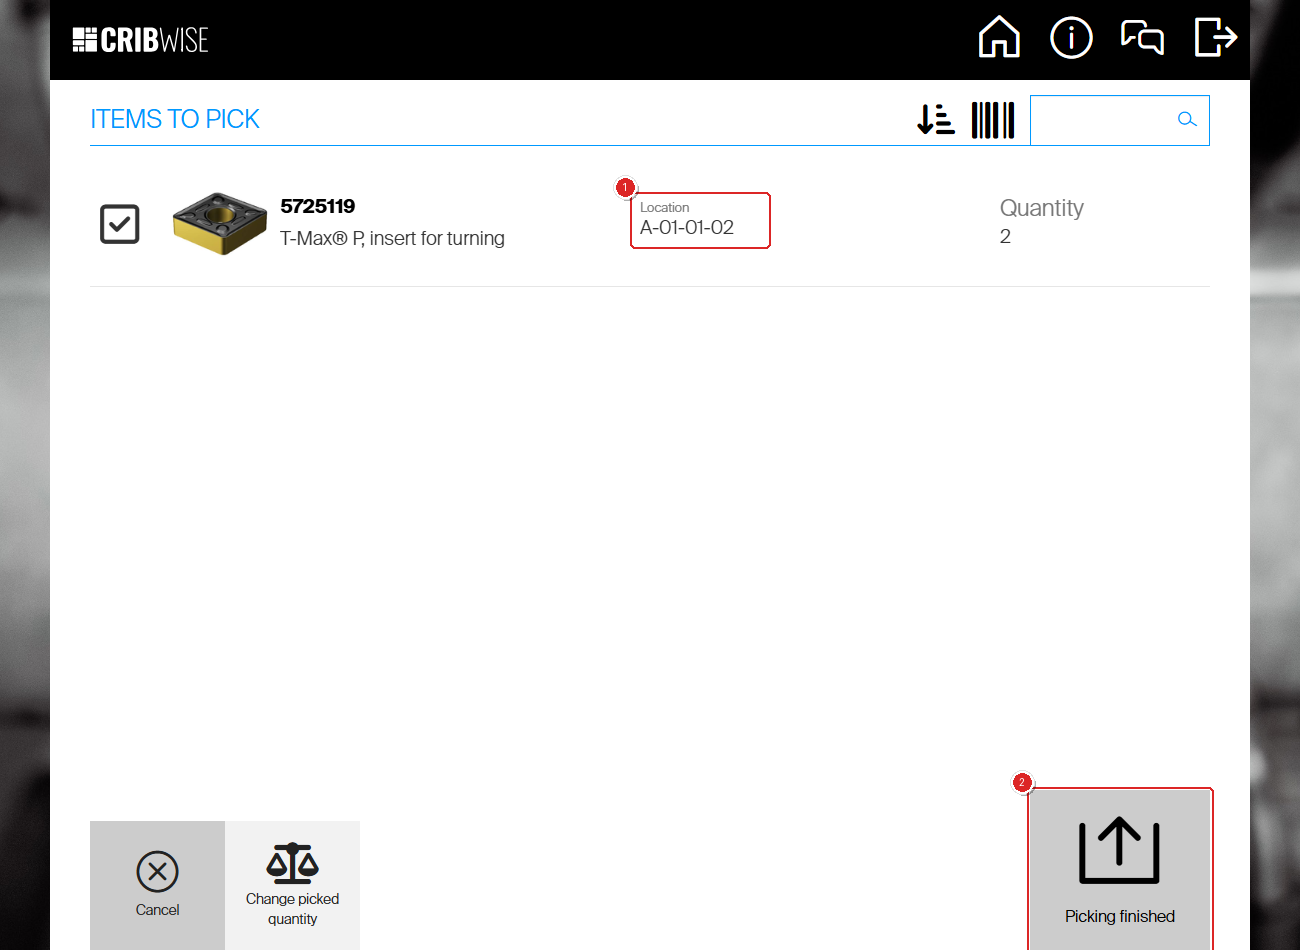
(1) the location to pick from, and (2) Picking finished. Storage devices that open drawers or lift trays do so as you work through the list.
Success: the Summary of list transfer screen appears, naming the transfer list and showing Quantity picked for each item and Remaining Qty of 0 when the list is fully served. Tap Close to return to the menu.
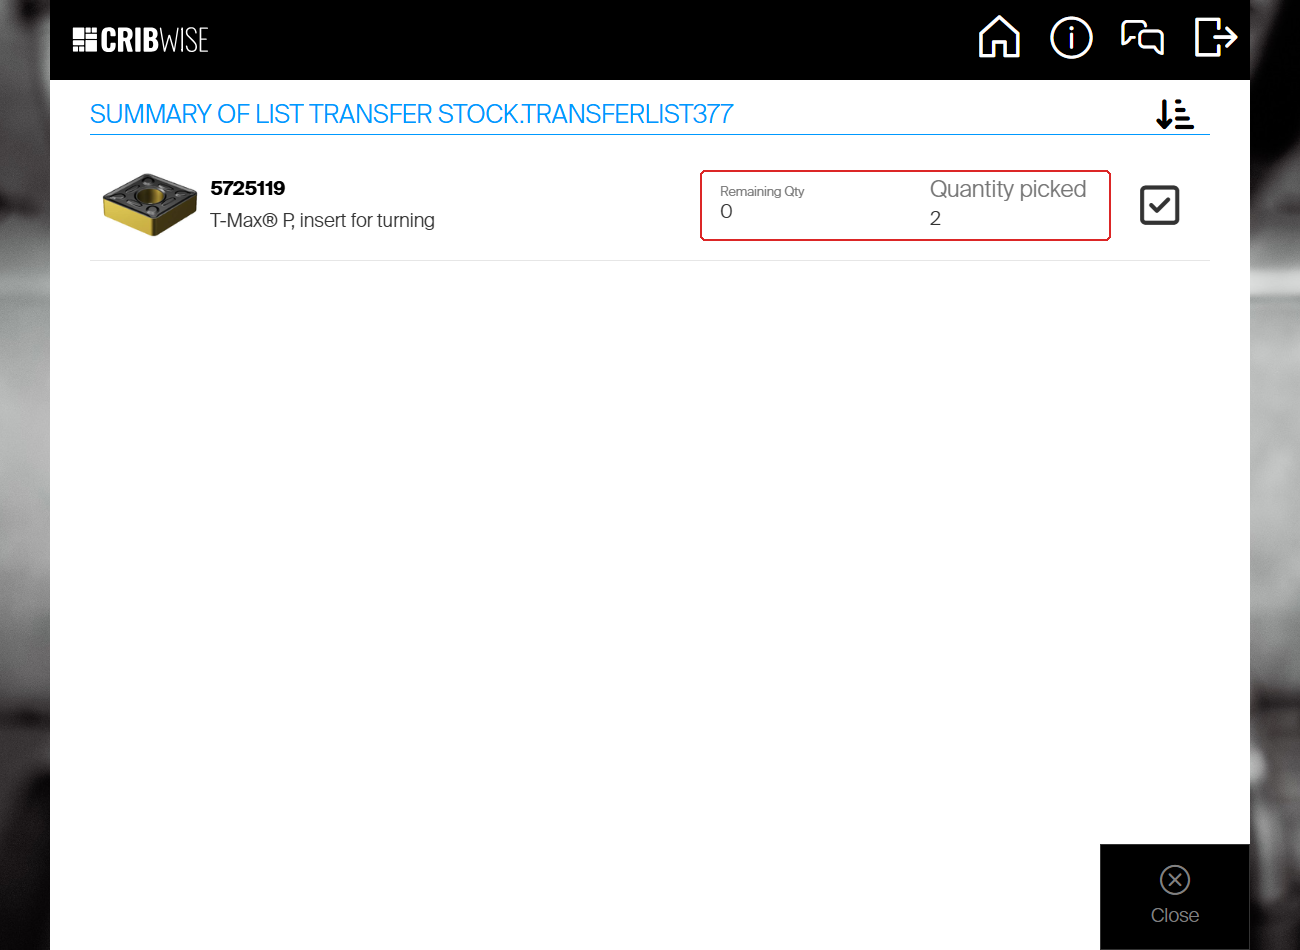
Two pieces picked, nothing remaining. The stock has now left the central device and counts as in transfer until it is restocked.
Step 7 – Restock the items on the satellite device
Carry the items to the satellite device. On its Shop Floor Interface, tap Stock management > Restock and restock them against the same transfer list. The full restock procedure is in How to restock items on the Shop Floor Interface.
Important: Items keep their condition across the transfer. Stock picked from a location with the rule Used on the central device is restocked into a location with the same rule on the satellite device.
Track a transfer from the Admin Portal
Order lists > Transfer lists shows every list and how far it has got. Use the device filter above the grid to narrow it down, and View detail to see the items.
| Column | What it tells you |
|---|---|
| Central stock | The stock the items are picked from. |
| Satellite stock | The stock the items are going to. |
| To device | The device on the satellite stock that receives them. |
| Quantity for transfer | Still to be picked on the central device. |
| Quantity in transfer | Picked, not yet restocked on the satellite device. |
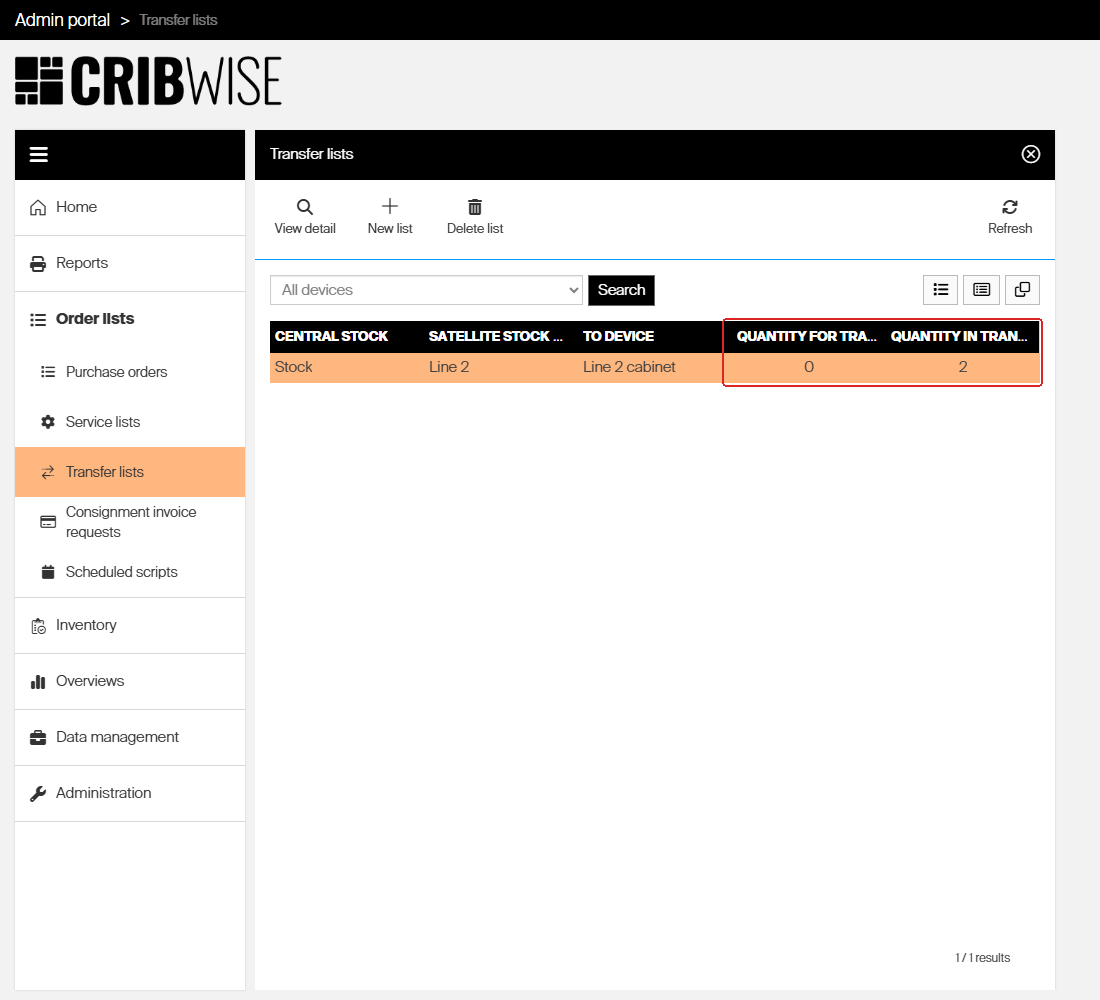
The same list after step 6: nothing left to pick, two pieces in transfer. Both columns read 0 once the satellite device has restocked the items, and the list closes.
Next steps
- Check the satellite stock levels – confirm the items arrived where you expect them, from Overviews > Item overview.
- Let demand fill the lists for you – see Understanding transfer lists for how satellite demand and purchase order scripts build transfer lists automatically.
Troubleshooting
| Problem | Likely cause | Fix |
|---|---|---|
| Pick for transfer is missing from the Stock management menu | The device does not belong to a central stock | In the Admin Portal, open Data management > Devices and check the Stock column. Only devices on a stock of type Central show the tile. |
| The transfer list is not on the Select transfer list screen | Nothing is left to pick on it, or it belongs to a different central stock | Open Order lists > Transfer lists and check Quantity for transfer and the Central stock column. |
| The satellite stock you need is not in the Satellite stock dropdown | That stock does not point at the central stock you selected | Open the stock under Data management > Stock, set Type to Satellite, and set Central stock. |
| Available quantity is lower than the requested quantity | The central device does not hold enough stock | Pick what is there and use Cancel for the rest, or restock the central device first and pick again. |
| The items were picked but the satellite device still shows nothing | The restock on the satellite device has not been done | Restock the items against the transfer list on the satellite device. Until then the quantity sits in Quantity in transfer. |
Related articles
- Understanding transfer lists – what a transfer list is, and how satellite demand fills one automatically.
- How to restock items on the Shop Floor Interface – step 7 of this article in full.
- How to create and manage stocks – creating the central and satellite stocks a transfer needs.
- How to create and manage devices – which stock a device belongs to, and the settings that control picking.
- How to pick items for a service order – the same picking flow, for items going to a service centre.
- Getting started with Shop Floor Interface: layout and menus – where Stock management sits in the interface.