
What you can do
Build an assembly on the Shop Floor Interface from the components it needs, put it into a stock location, and pick it as one tool. Everything an operator does with an assembly happens in the Pick and Stock management menus.
Note: This one covers the Shop Floor Interface. The assembly has to be defined first — see How to set up an assembly in the Admin Portal.
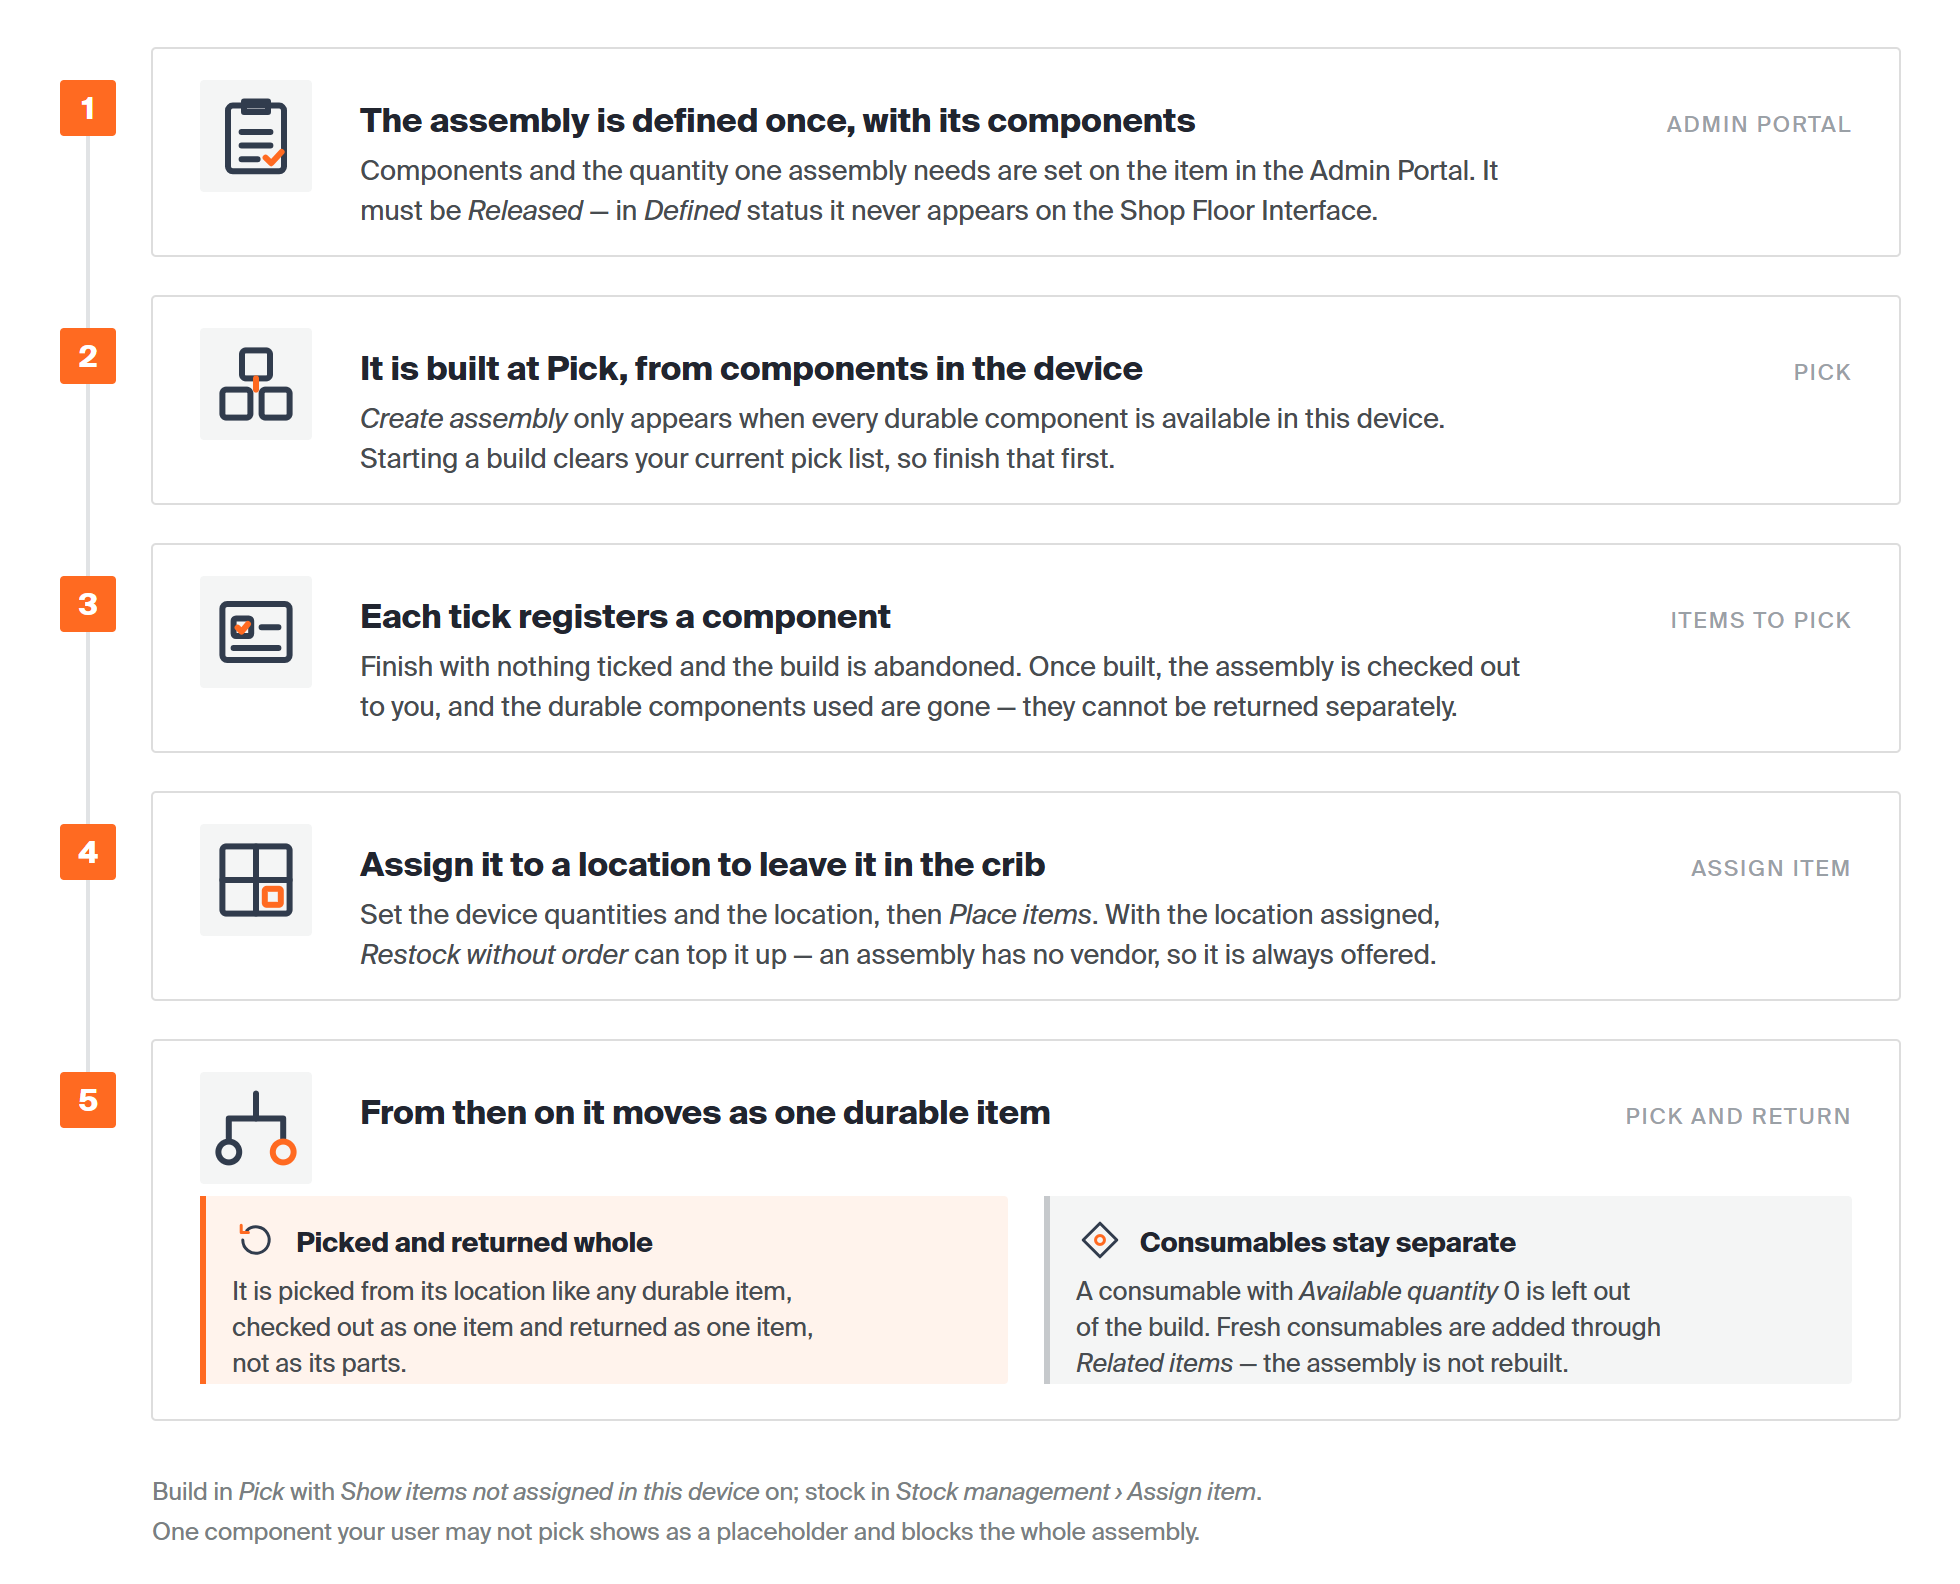
A built assembly is checked out to whoever built it. It only goes into stock once you assign it to a location, and from then on it is picked and returned as one item.
Before you start
- The assembly already defined in the Admin Portal, with its components and their quantities. See How to set up an assembly in the Admin Portal.
- Status Released. An assembly still in Defined status does not appear on the Shop Floor Interface at all.
- All durable components available in the device. Without them, the Create assembly button never appears.
- Permission to pick every component. One restricted component blocks the whole assembly.
Warning: Creating an assembly clears your current pick list. Finish the pick list before you start.
Quick start
Experienced users — build, stock, and pick an assembly in 5 steps:
- Open Pick and switch on Show items not assigned in this device.
- Tap the assembly, then Create assembly.
- Pick the components and finish.
- Assign the new assembly to a location under Stock management > Assign item.
- Pick it from that location like any other durable item.
Need more detail? Follow the full steps below.
Steps
Step 1 — Find the assembly
An assembly you have not built yet is out of stock, so it is hidden by default.
- From the main menu, tap Pick.
- Switch on Show items not assigned in this device at the bottom of the item list.
- Tap the assembly (1). Its quantity reads 0.
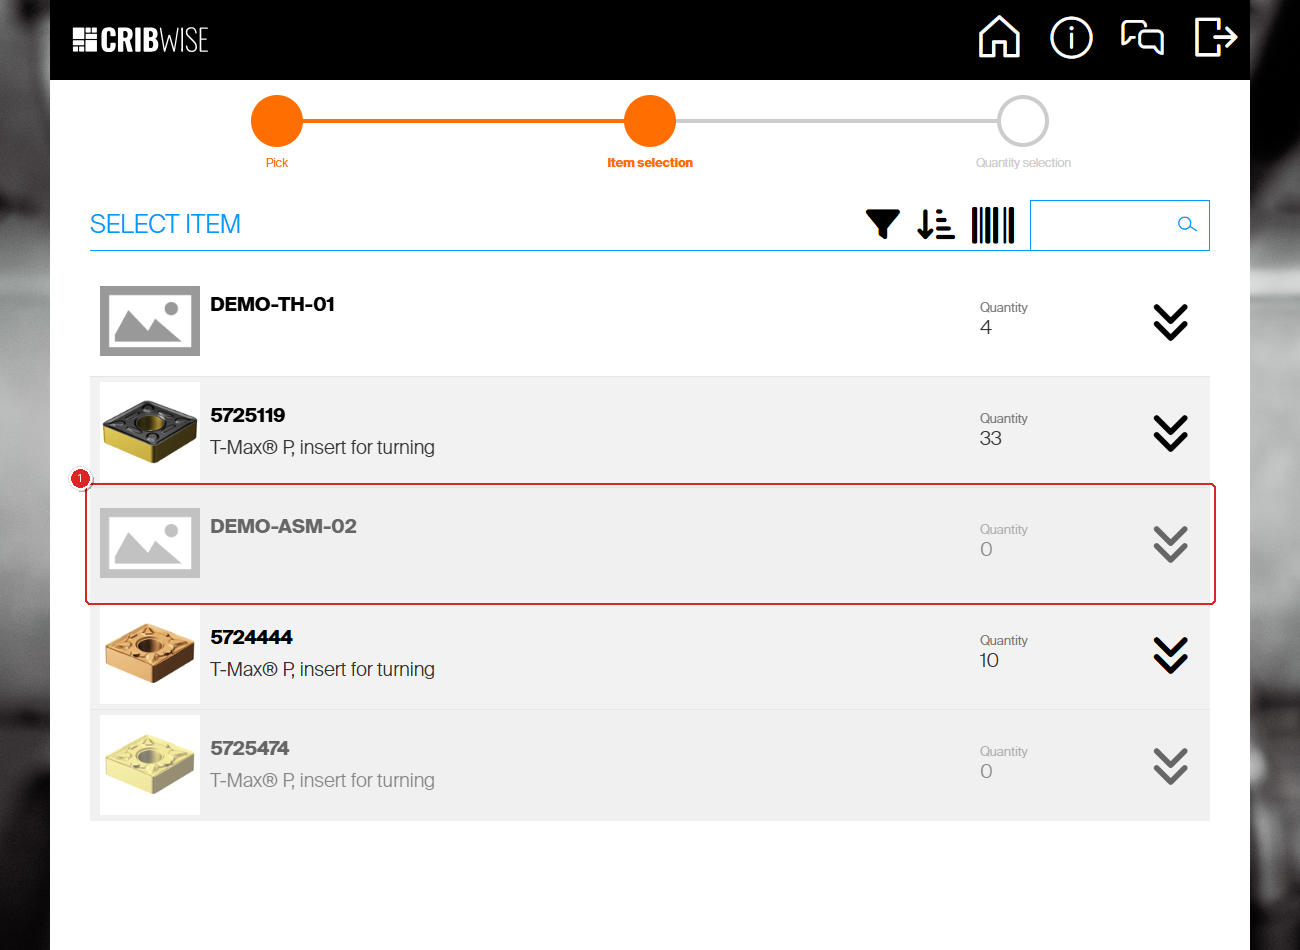
Until you build one, the assembly only shows up with unassigned items switched on.
Step 2 — Start the assembly
The All item locations dialog opens on the Assembly items tab. Each component shows its position, the quantity one assembly needs, and how many are available here.
Tap Create assembly (1).

The button only appears when every durable component is available in this device.
Note: A consumable component with Available quantity 0 does not block the assembly. It is left out of the build, and you pick it separately from another device afterwards.
Step 3 — Confirm the components
CRIBWISE lists everything the build will consume. Check it, then tap Pick items (1).

The summary before anything leaves the cabinet.
Note: If your site uses cost allocation, a cost allocation step appears before this one. What it asks for is configured per site, so yours may look different.
Step 4 — Pick the components
The Items to pick screen lists each component with the location to take it from.
- Take each component from its location.
- Tick the box on its row to confirm you took it.
- Tap Picking finished.
Important: Ticking the box is what registers the pick. If you tap Picking finished with nothing ticked, CRIBWISE asks “No item is selected as picked. Do you want to finish operation anyway?” — answering Yes abandons the assembly and treats anything already taken as an ordinary pick.
If the assembly is serialized, enter a unique serial number in the last step.
Success: The Create assembly summary confirms the new assembly and lists any consumables picked with it. The assembly now exists as a single piece, and the durable components used are gone from the system — they cannot be returned separately.

The assembly is built and checked out to you. The Picked consumables list is empty here because the consumable component was not available in this device.
Add the assembly to a stock location
A new assembly is checked out to whoever built it. To leave it in the crib for others, assign it to a location.
Step 5 — Choose the assembly
- From the main menu, tap Stock management, then Assign item.
- Search for the assembly (1).
- Tap it in the list (2).
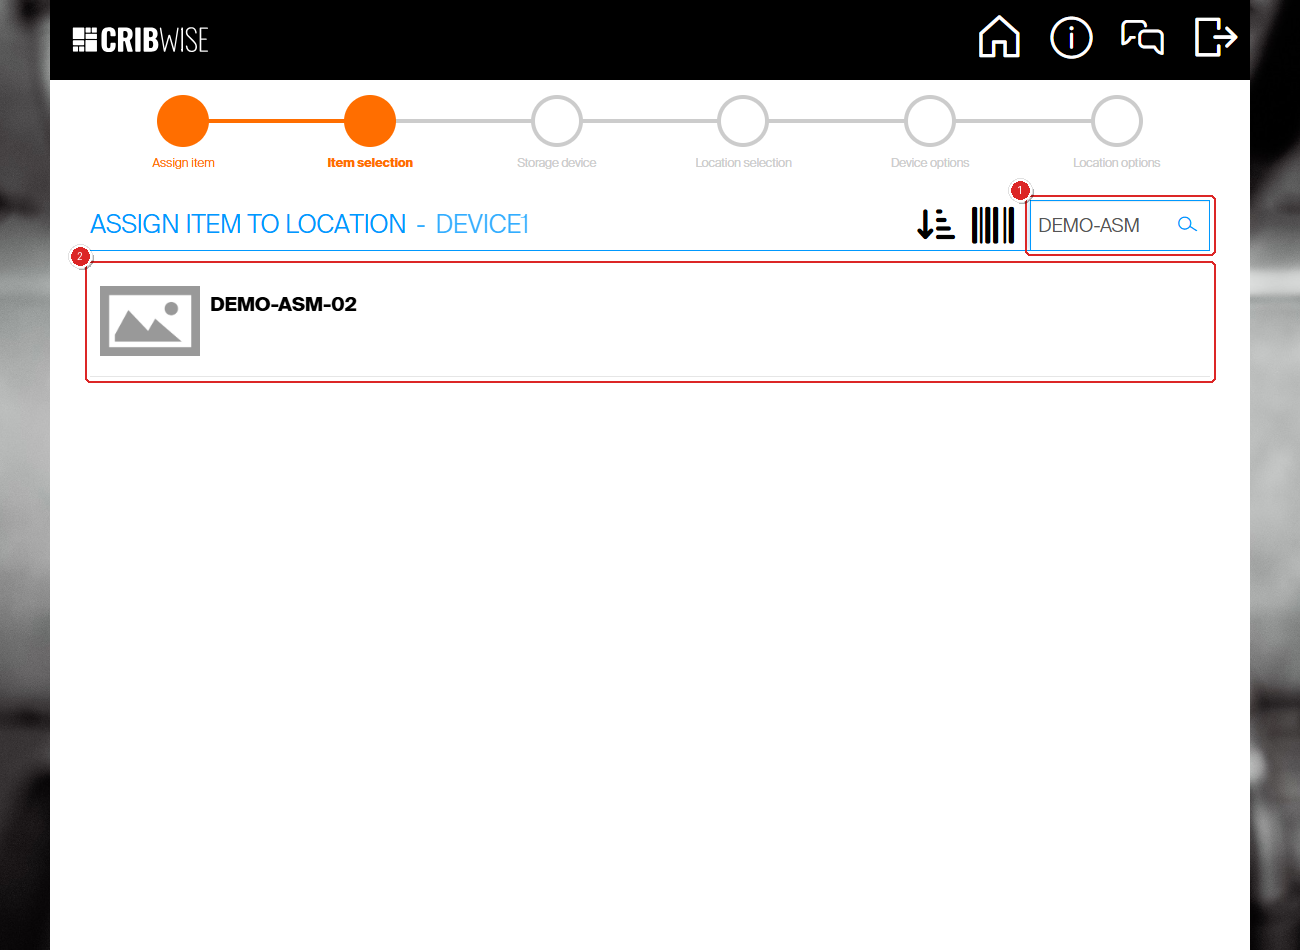
Assemblies appear in the assign flow like any other item.
Then choose the storage device and the stock location the assembly should live in.
Step 6 — Set the device quantities
- Set Max quantity (1) — how many of this assembly the device should hold.
- Set Order point (2).
- Set Min quantity (3).
- Tap Confirm (4).

Use the minus and plus buttons — these fields are steppers, not free text.
Step 7 — Set the location and place the assembly
- Set Physical max quantity (1) — how many fit in this location.
- Choose the Location rule (2). CRIBWISE only offers the conditions that apply to this item.
- Set Quantity (3) to the number of assemblies you are putting in right now.
- Tap Place items (4).

The button reads Save while Quantity is 0, and changes to Place items as soon as you are putting something in.
Put the assembly in the location, tick the box on its row (1), and tap Finish (2).

Same rule as picking: the tick is what registers the action.
CRIBWISE asks Assign item to another location? Answer No to end the wizard.
Success: The assembly appears in the assigned items list with its quantities and location count.
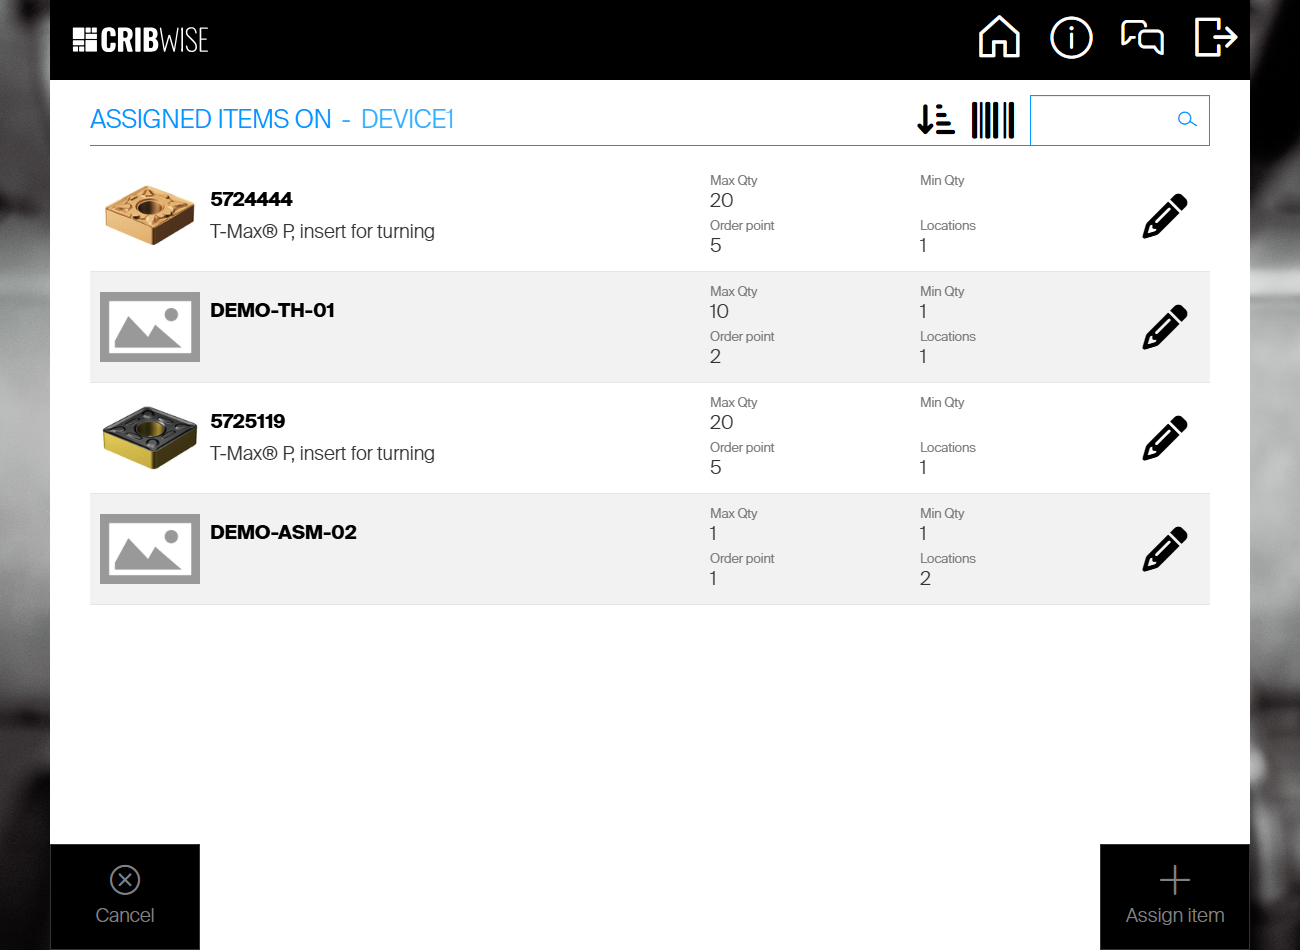
The assembly is now stocked and available to everyone using this device.
Tip: Restock without order is the other way to top up an assembly. An assembly has no vendor, so it is always available in that flow — but the location has to be assigned first.
Pick an assembly
Once it is in a location, an assembly is picked like any other durable item.
Step 8 — Select the assembly
Tap Pick on the main menu, then tap the assembly in the item list (1). No toggle is needed now — it is in stock.

A stocked assembly sits in the normal item list.
Step 9 — Choose the quantity and pick
- Set the quantity (1).
- Choose a Preferred condition (2) if more than one is stocked.
- Tap Pick (4).

Use Related items (3) to pick a fresh consumable for the assembly at the same time.
Take the assembly from its location, tick the box on its row, and tap Picking finished.
Success: The pick summary shows the assembly, the location it came from, its condition, and the date it is due back.

The assembly is checked out to you as one item, not as its parts.
Pick consumables for an assembly you already have
When an assembly in use needs a fresh consumable — a new insert for a holder, for example — you do not rebuild it. Open Related items for the assembly, either from the item list or from the quantity selection screen, and tap the consumable to add it to your pick.
Note: If the consumable is not in this device, CRIBWISE shows where it can be picked instead, or when it is due to be restocked.
Next steps
- Return the assembly when the job is done — it returns as one item. See How to return, scrap, and recycle items in SFI.
- Build a second one — repeat steps 1 to 4 whenever the assembly runs out.
- Check the definition if the wrong components come up. See How to set up an assembly in the Admin Portal.
Troubleshooting
| Problem | Likely cause | Fix |
| The assembly is not in the item list at all. | It is out of stock and unassigned items are hidden, or the item is still in Defined status. | Switch on Show items not assigned in this device. If it still does not appear, ask an administrator to set the status to Released. |
| No Create assembly button appears. | Not all durable components are available in this device. | Check the Available quantity column on the Assembly items tab. Restock the missing components, or build the assembly at a device that has them. |
| A placeholder appears instead of a component. | That component is restricted for your user. | Ask for the picking permission, or let a colleague who has it build the assembly. |
| CRIBWISE says no item is selected as picked. | The tick box on the item row was not ticked. | Answer No, tick the box on each row you took, then tap Picking finished again. |
| The assembly was not created after picking. | A durable component was not ticked during the flow. | Start again and tick every durable component. Anything already picked can be returned. |
| Place items is greyed out. | Physical max quantity or Quantity is still empty. | Use the plus button on each stepper. The button stays Save while Quantity is 0. |
| Your pick list was emptied. | Creating an assembly clears the current pick list. | Expected behaviour — finish the pick list before building an assembly. |
Related articles
- How to set up an assembly in the Admin Portal — define the assembly and its components in the Admin Portal.
- Understanding assemblies: bill of materials, cost, and stock — how an assembly differs from an ordinary durable item.
- How to assign an item to a location (Shop Floor Interface) — the full assign wizard, field by field.
- How to restock items on the Shop Floor Interface — restock without order, the other way to top up an assembly.
- How to pick an item — the standard pick flow an assembly follows.
- How to return, scrap, and recycle items in SFI — what happens when the assembly comes back.
- Understanding item relations — how assembly items sit alongside alternatives, spare parts, and matching items.