How to pick items from a pick list on the Shop Floor Interface
Read time: ~5 minutes
Applies to: Shop Floor Interface
What you can do
Pick a predefined set of items from a pick list on the Shop Floor Interface. A supervisor or planner creates the list in the Admin Portal with export/import (or through the REST API), and operators on the shop floor pick the items in one guided flow — with the required quantities, locations, and cost allocation already filled in.
Before you start
- Pick lists must be enabled in System settings > Stock daily use.
- Your user group needs the Pick from predefined pick lists permission.
- At least one pick list must exist and be active for the current device. Pick lists are created in the Admin Portal using the export/import function — see How to create pick lists with the export/import function.
Important: If the Pick list button is missing from the main menu, pick lists are either disabled in system settings or restricted by your user group permissions.
Quick start
Experienced users — pick from a pick list in 5 steps:
- Tap Pick list on the main menu.
- Select the pick list you want to fulfil.
- Confirm the cost allocations (machine, project, operation, and so on) if prompted.
- Review the summary, adjust quantities if allowed, then tap Pick.
- Collect the items from each location and tap Picking finished.
Need more detail? Follow the full steps below.
Steps
Step 1 — Open the Pick list flow
On the SFI main menu, tap Pick list.
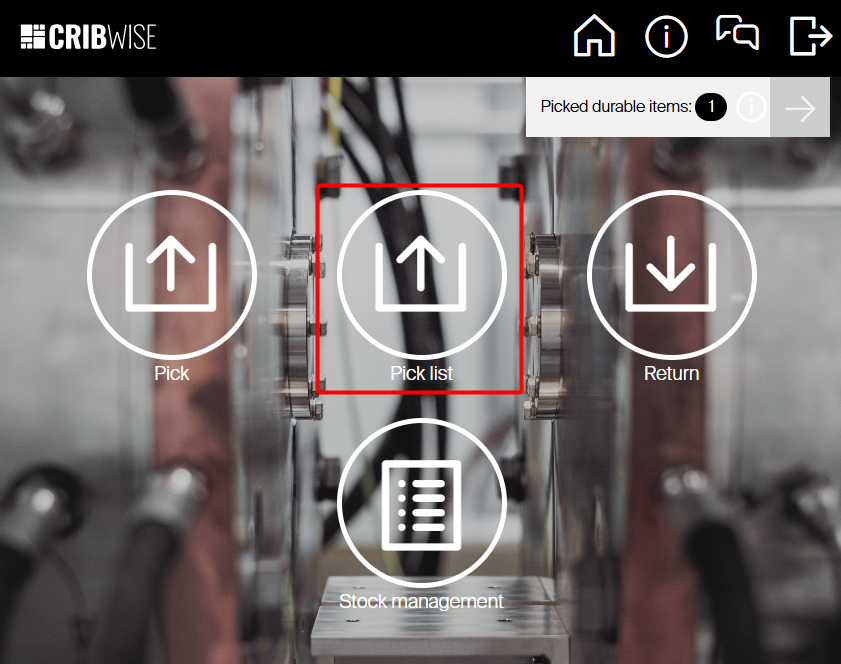
The Select pick list screen opens.
Step 2 — Select a pick list
- Browse the available pick lists. Each row shows the list Name and ID, the remaining Quantity for pick in total, and how many of those items are Available in device.
- Tap the list you want to fulfil.
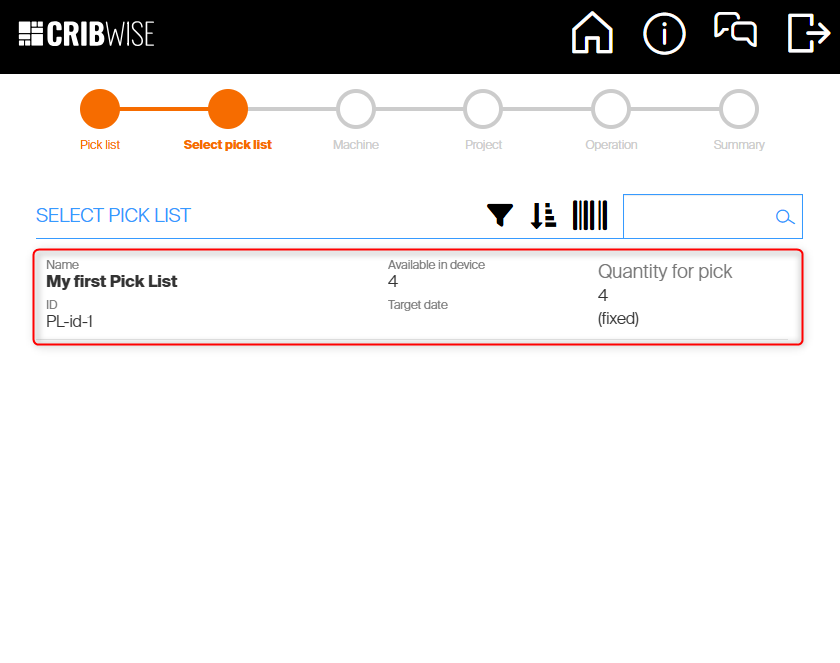
Tip: Use the search field at the top of the screen if there are many lists to choose from.
Step 3 — Confirm cost allocation
If the pick list has a preselected cost allocation, the matching steps are filled in automatically and skipped. Otherwise, the wizard walks you through each cost-allocation level (for example Machine, Project, Operation) before showing the summary.
Step 4 — Review the summary and start picking
The Pick list summary shows every item in the list with its required quantity and current availability on this device.
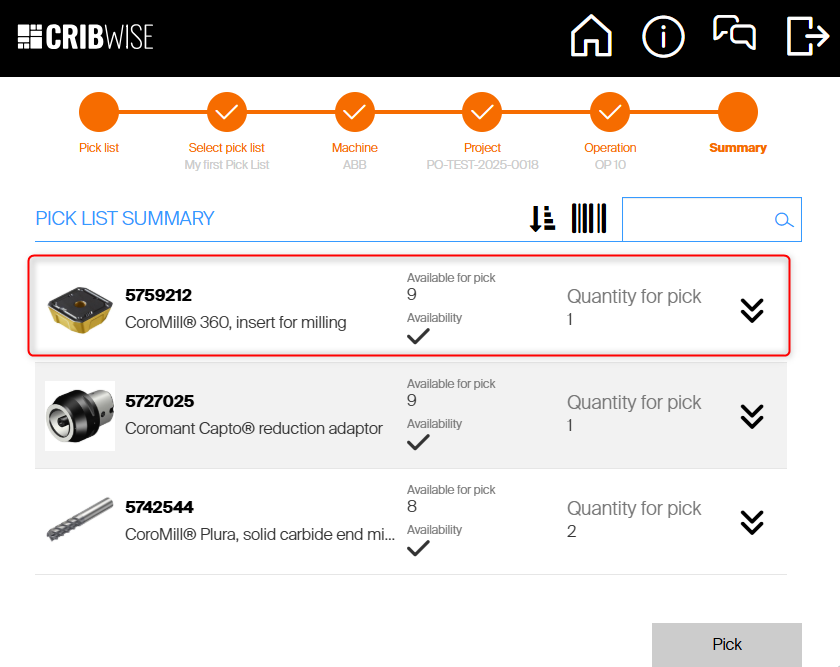
Each row shows the availability status:
- OK (checkmark) — the full required quantity is available on this device.
- Warning — only a partial quantity is available.
- Error — the item is not available on this device. Tap the row to see which other stocks or production cells hold the item.
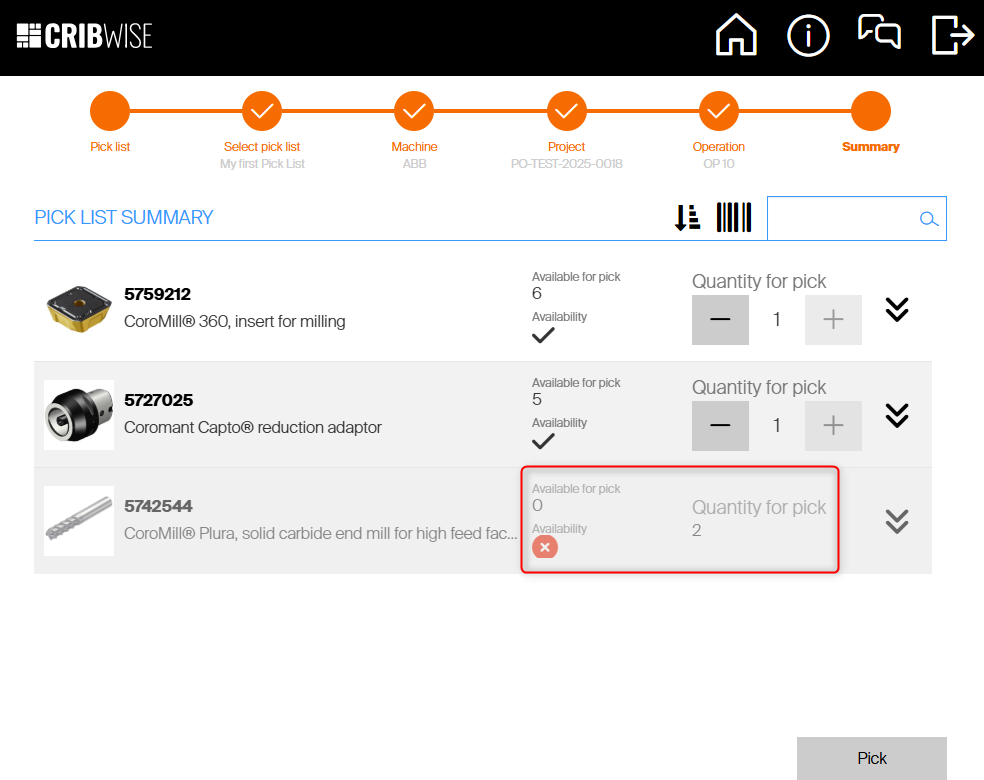
If the list allows quantity changes, use the + and − buttons to adjust the quantity for each item — within the limits set by the list (see When to use each pick-list type). Tap an item row to expand it and see related items or documents without losing your selection.
When the summary is correct, tap Pick.
Step 5 — Collect the items from their locations
The Items to pick screen shows each item with the exact Location and quantity to take.
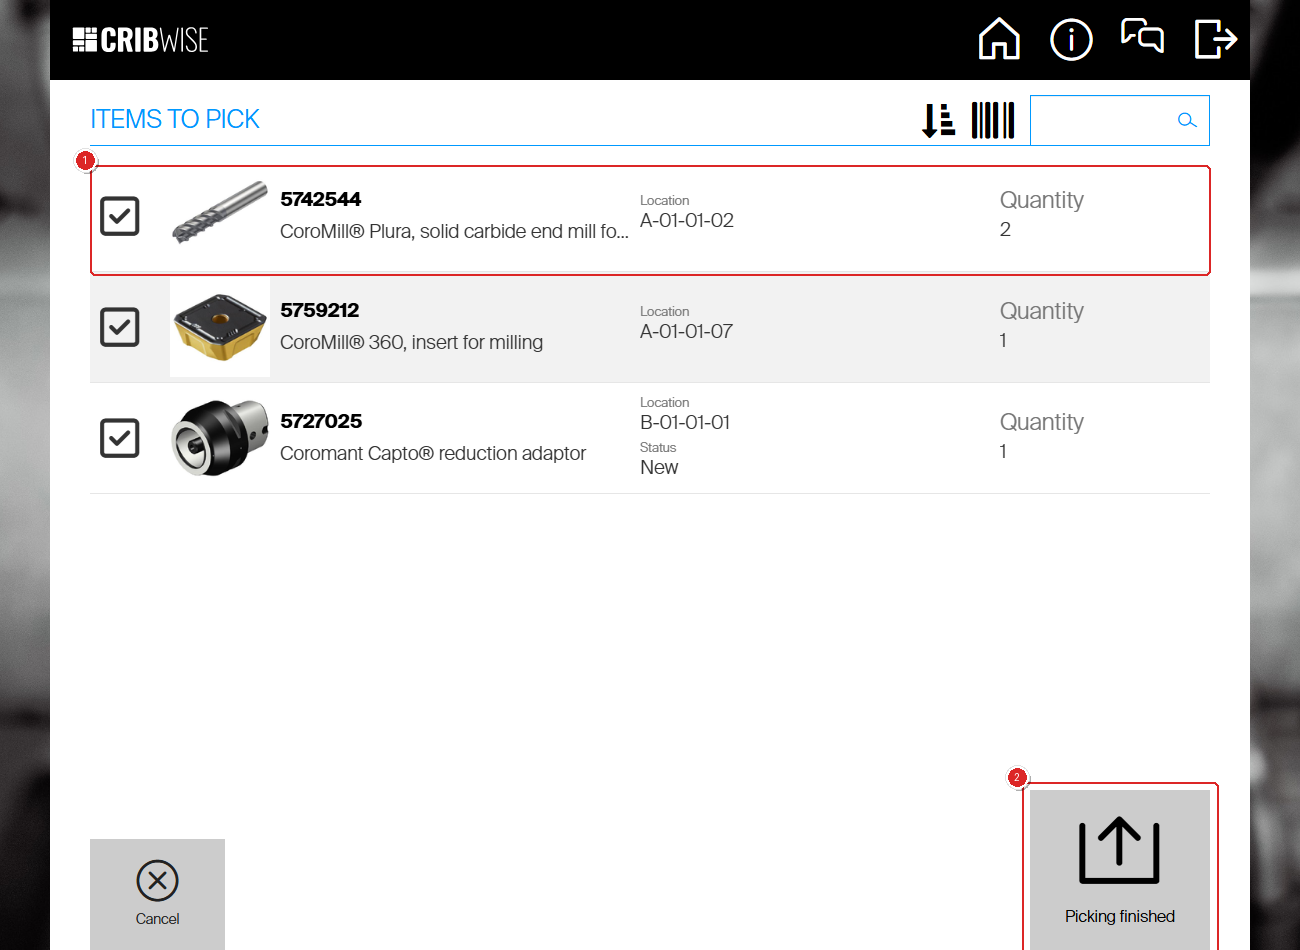
- Walk to each location shown in the list.
- Remove the required quantity of each item.
- For storage devices that open automatically (vending cabinets, vertical lift modules), the correct compartment opens when you reach the device.
- Tap the checkbox next to each item as you pick it.
Step 6 — Finish the pick
When all items are collected, tap Picking finished. The final summary confirms what you picked.
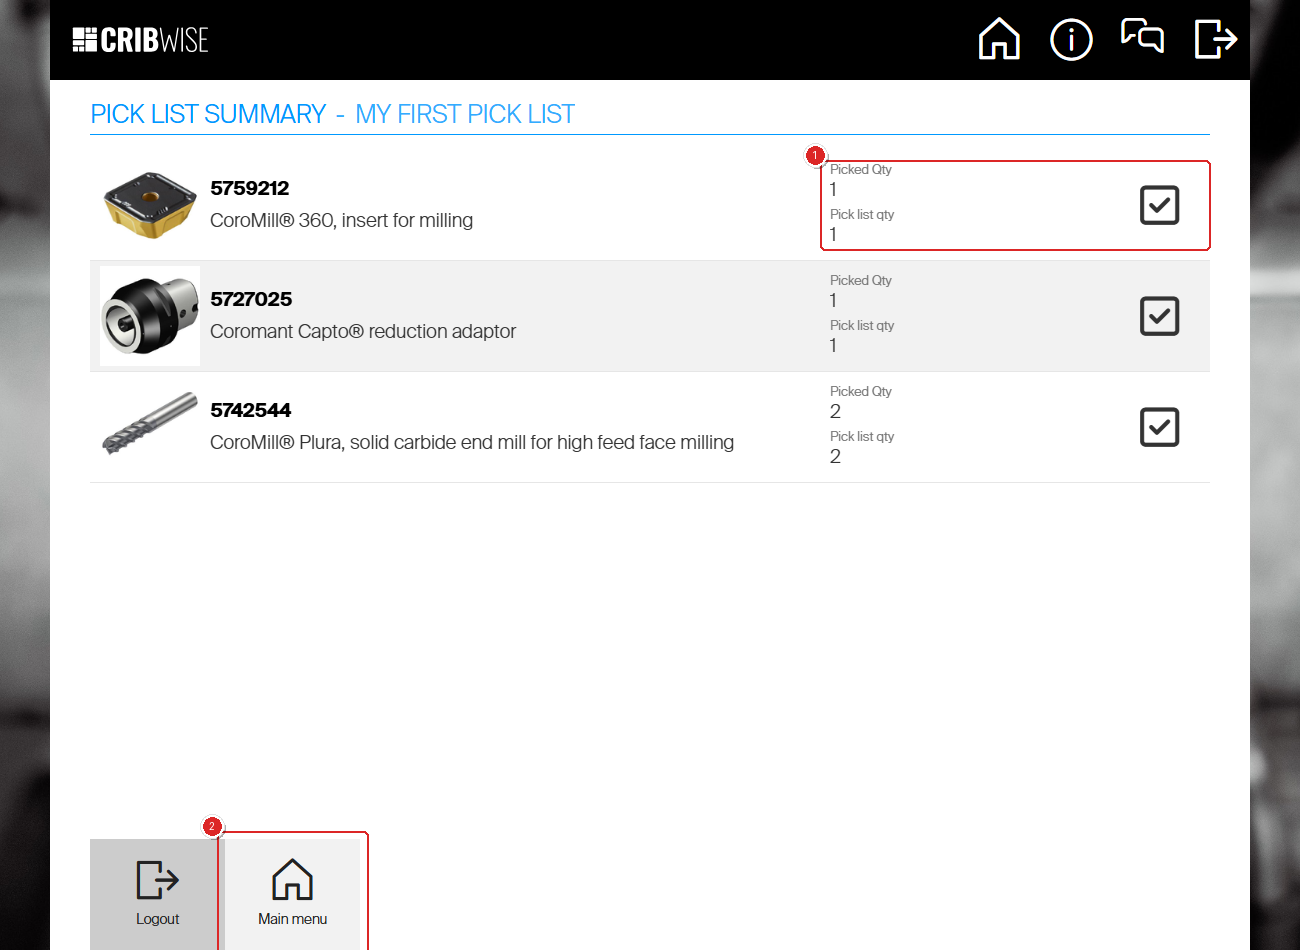
Success: Each item shows Picked Qty matching the Pick list qty, the stock movements are recorded in CRIBWISE, and any associated cost allocation is applied automatically.
Next steps
After completing a pick:
- Pick another list — tap Pick list again on the main menu to fulfil the next job.
- Return unused items — if you picked more than you needed, see How to return an item as new.
- Create or update a pick list — planners can adjust the list in the Admin Portal. See How to create pick lists with the export/import function.
When to use each pick-list type
The behaviour you see during picking depends on how the pick list was configured in the Admin Portal. Two settings — Allow change quantity and Fixed quantities — combine into four common scenarios.
| Scenario | Allow change qty | Fixed quantities | When to use it |
|---|---|---|---|
| 1. Reusable template list | ✅ | ✅ | A recurring job (for example, producing part Engine block 123). Operators see the same items and recommended quantities every time, but can override quantities for the day. The list stays available indefinitely. |
| 2. Work order with target quantity | ✅ | ❌ | A week of production planned upfront. Each pick deducts from the list’s remaining quantity. When everything has been picked, the list disappears from the SFI. |
| 3. Kit (fixed set) | ❌ | ✅ | A defined kit — the operator must pick the exact specified quantities and cannot change them. The list stays available for repeat use. |
| 4. Net demand from MES | ❌ | ❌ | An integration with MES or a tool-management system. The system has calculated exactly what is still needed; the operator picks that delta and the list closes. |
Tip: Pick lists can also be locked to a specific device (set DeviceId in the import template) so a list only appears at the cabinets near the relevant machine.
Troubleshooting
| Problem | Likely cause | Fix |
|---|---|---|
| Pick list tile is missing from the main menu | Pick lists are disabled in System settings > Stock daily use, or your user group does not have the Pick from pick list permission. | Ask an administrator to enable pick lists and grant the permission. |
| Pick list does not appear in the Select pick list screen | The list is locked to another device (DeviceId set), expired (ActiveTillDate in the past), or all items have already been picked from a non-fixed list. | Verify the list’s settings in the Admin Portal export, or create a new list. |
| An item shows a red error (not available) | The item is not assigned to a location on this device, or current stock is zero. | Tap the item to see other stocks or production cells that hold it, or restock the device. |
| + and − buttons are missing on the summary | The list has Allow change quantity set to FALSE (kit or net-demand list). | Pick the exact quantity defined by the list, or ask the planner to change the list type. |
| Cost allocation steps appear unexpectedly | The pick list does not have a preselected cost allocation. | Either complete the steps during picking, or add a default cost allocation in the Admin Portal so future picks skip these steps. |
Related articles
- How to create pick lists with the export/import function — Create and update pick lists in bulk from the Admin Portal.
- Pick lists — Reference for pick-list setup, fields, and management options.
- How to pick an item — Single-item picking when you do not have a pick list.
- Picking — complete reference — Advanced topics: related items, return or scrap during pick.
- How to pick a serialized item — Picking items that require a serial number.
- How to pick items for a service order — Picking items that are scheduled for maintenance or repair.