
What you can do
Add an AutoCrib TX750 to CRIBWISE: create the storage device in the Admin Portal, where its 33 columns appear on the first save. You then build the shelf positions at the machine itself, on the Shop Floor Interface.
Before you start
- You need Admin Portal access with permission to edit devices and storage devices.
- The device the TX750 is wired to must already exist in CRIBWISE. See How to create and manage devices.
- The machine must be powered on and connected to the computer that runs the Shop Floor Interface next to it.
- You need one value from whoever installed the machine: the communication port it is wired to.
- Decide on a name for the machine before you start. Operators see this name at the Shop Floor Interface.
Important: A TX750 is a location controlled storage device, so it cannot sit on a cloud device. Saving one there fails with Cannot create location controlled storage device for cloud device. Add it to the device installed on the physical computer beside the machine.
How a TX750 is built
The TX750 is a carousel. Its columns rotate to the door, and each column holds a stack of shelves that you position yourself. CRIBWISE mirrors that in three layers.
| Connection details | You type them in the Admin Portal — the Communication port only |
| Storage modules (columns) | All 33 are created automatically on the first save |
| Stock locations (shelf positions) | Created at the machine, on the Shop Floor Interface |
| Location mapping tab | Not used — stays greyed out for the TX750 |
You never add or remove columns yourself. The 33 columns match the physical carousel: six outer columns 10A to 10F, three front columns 101 to 103, and three inner stacks of eight, 111–118, 121–128 and 131–138.
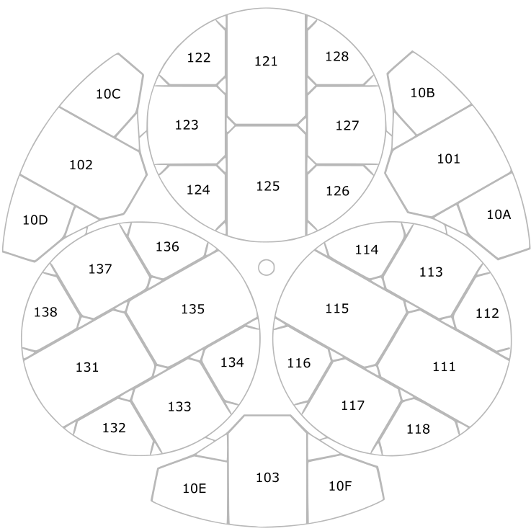
The carousel seen from above. Each numbered segment is one column, and each column becomes one storage module in CRIBWISE.
Inside a column, a stock location is a shelf. You choose where its base sits and how tall it is. Positions are numbered from 0 at the bottom to 59 at the top, and a location needs at least two positions of height.

One column seen from the side. Position 0 is at the bottom, position 59 at the top. x stands for the column address.
Quick start
Experienced users — add the machine in five steps:
- Open the device in Data management > Devices and go to the Storage devices tab.
- Add a storage device: name it, set Type to Location controlled and Manufacturer to AutoCrib TX750.
- Enter the Communication port, then Save storage device. The 33 columns appear.
- Release the storage device.
- At the machine, go to Stock management > Manage TX750 positions and create the shelf positions.
Need more detail? Follow the full steps below.
Steps
Step 1 — Open the device the machine is wired to
- Go to Data management > Devices.
- Select the device the TX750 is wired to.
- Click View detail.
Check the Is cloud column before you go on. A ticked box means the device is a cloud device and cannot hold a TX750.

The device list. Is cloud is unticked for this device, so it can hold a location controlled storage device.
Step 2 — Add the storage device
- Open the Storage devices tab.
- Click + (Add new storage device).

The Storage devices tab of the device. One machine already exists here; a second one is added with the same button.
- Enter a Name for the machine.
- Set Type to Location controlled.
- Set Manufacturer to AutoCrib TX750.
- Enter the Communication port.
The Communication port field only appears once you pick a manufacturer. The connection fields change with the manufacturer, and the TX750 needs nothing else.
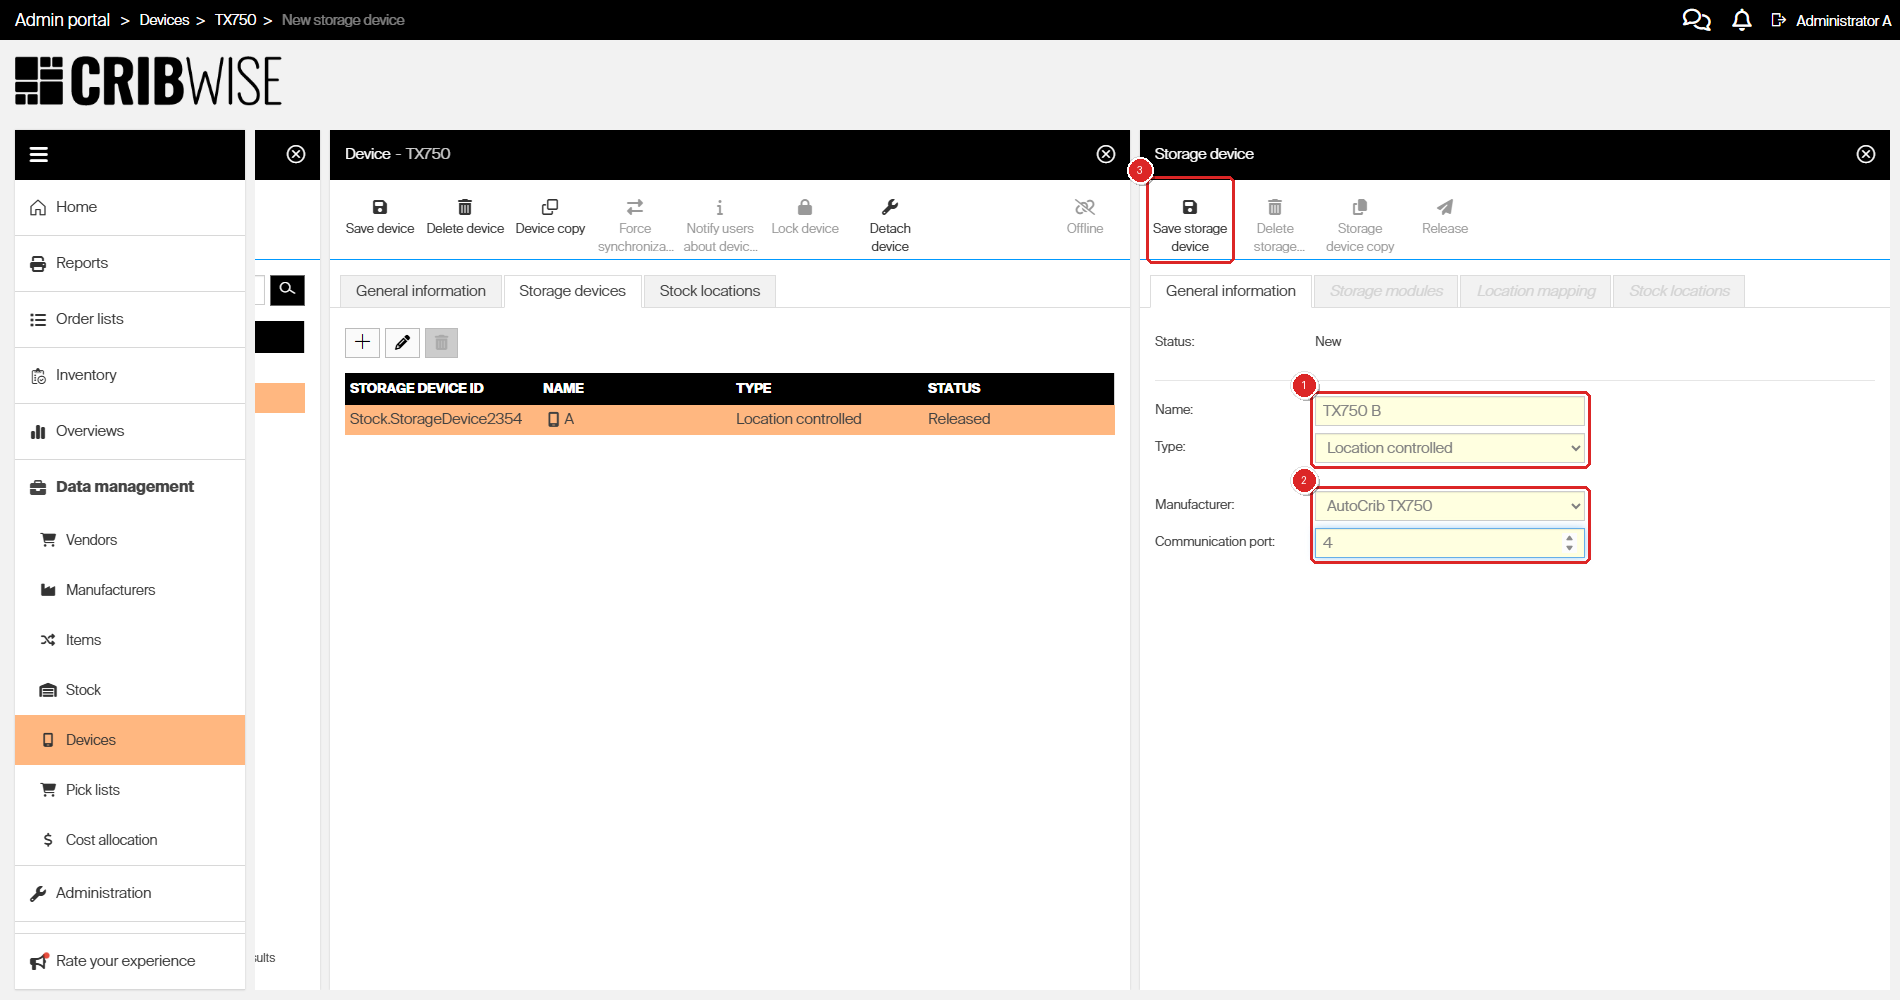
A new TX750 before the first save. The three right-hand tabs, Release and Delete storage device all stay disabled until you save.
| Field | Required | What to enter |
|---|---|---|
| Name | Yes | The name operators see at the Shop Floor Interface, for example TX750 B. It also becomes the first part of every location name. |
| Type | Yes | Location controlled. The TX750 controls individual shelf positions, so Open storage is wrong here. |
| Manufacturer | Yes | AutoCrib TX750. The AutoCrib list also holds VX500, VX1000, LX2000 and AutoLocker FX — those are different machines with different setup articles. |
| Communication port | Yes | The number of the port the machine is wired to, without any prefix — enter 4 for port 4. |
Step 3 — Save and check the 33 columns
- Click Save storage device.
The status stays New, but Storage modules and Stock locations open up, and Release, Delete storage device and Storage device copy become available. Location mapping stays greyed out — the TX750 does not use it.

The same machine after the first save. Compare with Step 2: the tabs have opened, and Type and Manufacturer are now greyed out.
Note: Type and Manufacturer lock on the first save, not on release. Name and Communication port stay editable. If you picked the wrong manufacturer, delete the storage device and create it again.
- Open the Storage modules tab and check the list.
All 33 columns are there, each with a name and an address that match the carousel diagram above, and each with 0 locations for now.

The 33 columns, created for you. Add is greyed out — the column list comes from the machine, not from you.
Checkpoint: The storage device has 33 storage modules and no stock locations. That is expected. The Stock locations tab is empty until the shelves are laid out at the machine.
Step 4 — Release the storage device
- Open the General information tab.
- Click Release.
- Confirm Do you really want to release storage device <name>? with Yes.
The status changes from New to Released and Release greys out because it is done. The storage device reaches the Shop Floor Interface at the device’s next synchronization, or immediately if you click Force synchronization on the device detail.
Warning: Release cannot be undone. Once the storage device is released, structural changes need the device to be locked first, and Lock device only works while the device is online. See How to configure storage devices for the full rules.
Step 5 — Create the shelf positions at the machine
Do the rest in front of the TX750, on the Shop Floor Interface that runs beside it. You place a physical shelf and tell CRIBWISE where it is, one location at a time.
- Go to Stock management > Manage TX750 positions.
- Select the column you want to fill.
- Tap Setup locations. The machine rotates that column to the door and unlocks it.
- Pick the base position for the shelf and set the height.
- Tap Create new location, place the shelf where the machine lights up, and confirm.
The full procedure — including creating several identical locations at once, joining two opposite columns into one, and removing a location again — is in How to use AutoCrib TX750.
Every location you create appears on the Stock locations tab of the storage device in the Admin Portal.
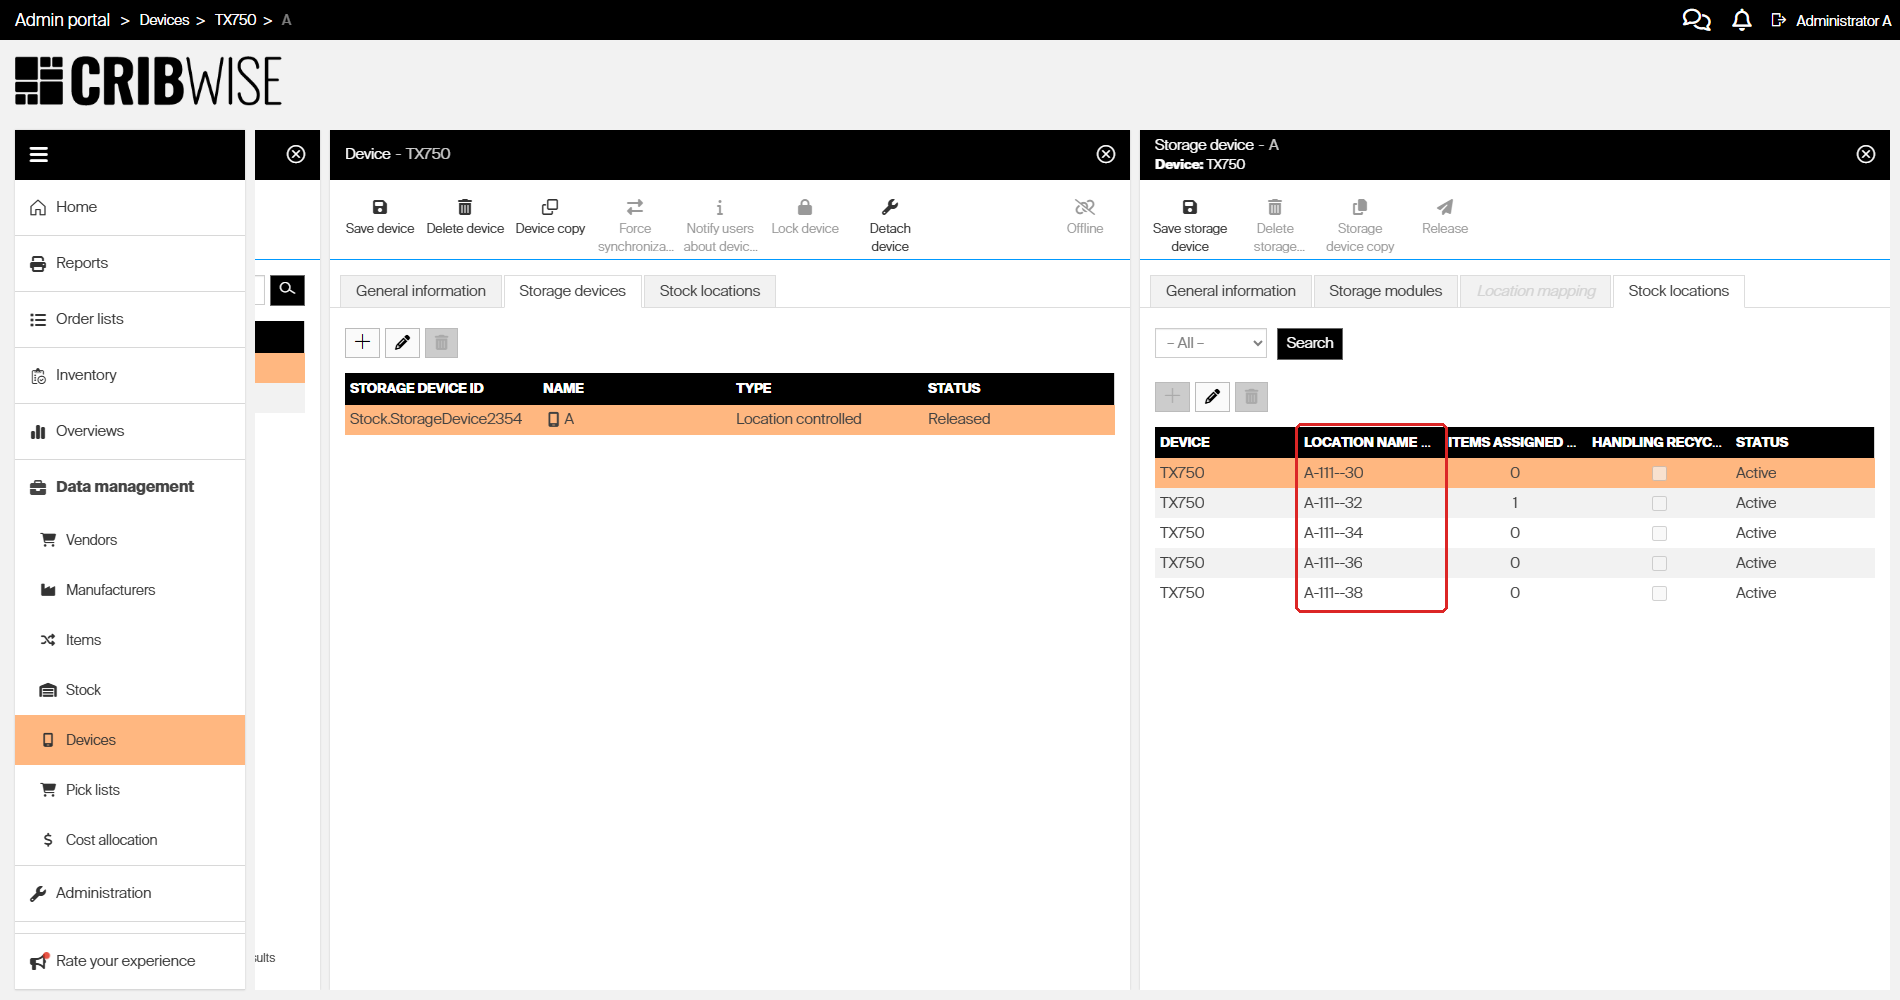
Five locations built in column 111 of the machine named A. Their bases sit two positions apart, which is the minimum height a location can have.
Location names follow one pattern:
| Part | Example | What it is |
|---|---|---|
| Storage device | A | The name you gave the machine in Step 2 |
| Column | 111 | The storage module — one of the 33 addresses |
| Empty segment | (nothing) | The TX750 numbers its positions in one dimension only, so the second segment stays empty and you get two hyphens in a row |
| Base position | 30 | Where the bottom of the shelf sits, between 0 and 59 |
Put together, a shelf whose base sits at position 30 of column 111 in machine A is called A-111–30.
Success: The storage device is Released, its 33 columns are listed under Storage modules, and every shelf you built at the machine appears under Stock locations with the status Active. The machine is ready for items.
Next steps
- Assign items to the new locations — How to assign an item to a location (Shop Floor Interface). You can also assign an item straight from the TX750 positions screen.
- Fill the machine and count it — How to do an inventory on the Shop Floor Interface.
- Take a location out of service if a shelf is damaged — How to disable and re-enable a stock location.
Tip: To add a second TX750 on the same device, use Storage device copy and then change the name and the communication port, instead of filling in the form again.
Troubleshooting
| Problem | Likely cause | Fix |
|---|---|---|
| Saving fails with Cannot create location controlled storage device for cloud device | The device you added the machine to is a cloud device | Add the storage device to the device installed on the computer beside the machine. Is cloud must be unticked in the device list |
| Storage modules and Stock locations are greyed out | The storage device has not been saved yet | Click Save storage device. The tabs open as soon as the first save succeeds |
| Location mapping is greyed out | The TX750 does not use location mapping | Nothing to fix — this is expected |
| The Storage modules tab is empty after saving | The save did not complete, or the wrong manufacturer was picked | Check that Manufacturer reads AutoCrib TX750. Any other AutoCrib model builds a different structure |
| You picked the wrong Type or Manufacturer | Both fields lock on the first save | Delete the storage device and create it again. Deleting is blocked once items are assigned to its locations |
| The machine does not appear at the Shop Floor Interface | The storage device is still New, or the device has not synchronized yet | Release the storage device, then wait for the next synchronization or click Force synchronization on the device detail |
| Manage TX750 positions is missing from Stock management | The signed-in user has no permission to set up the device | Give the user a role that allows device setup, or sign in as someone who has it |
| A new location wiped out an existing one | The new location overlapped one that was already there | Overlapping locations are replaced, and their item assignments are removed with them. Check the column diagram before you place a shelf, and reassign the items afterwards |
Related articles
- How to use AutoCrib TX750 — creating, joining and removing shelf positions at the machine
- How to configure storage devices — the general storage device workflow and what every field does
- Supported storage devices — configuration reference — every supported machine and its module and location ranges
- How to create and manage devices — adding the device the machine belongs to
- How to manage stock locations (Shop Floor Interface) — what else the Stock management menu can do
- How to clean the AutoCrib TX750 touchscreen — keeping the machine’s screen usable
- How to find Device ID and Storage Device ID — the IDs support will ask you for