
What you can do
Create, copy and remove locations on an AutoCrib RoboCrib TX750 from the machine itself, connect two columns into one location, and assign or unassign items straight from the location management screen.
The TX750 lets you prepare locations in the sizes you need, working in front of the machine.
Before you start
- Your user needs permission to set up the device. Without it, the option to manage the cabinet is not shown.
- Assigning or removing items from the management screen needs the permission to assign items.
- Removing a centre barrier needs tools and access to the machine control panel.
Tip: The TX750 can open several locations in one column at once when they sit directly above each other. Assigning the same item to locations stacked above each other therefore makes restock and inventory much faster.
Important: The machine performs no rotation while a door is open. Close the door to continue.
Create a location
- Go to Stock management and select Manage TX750 positions.
- The screen shows a top-view diagram of every column in the storage device. Select a column. The column diagram (1) shows existing locations and free positions. Show column (2) rotates the machine to that column and opens both tambours fully.
- Press Setup locations (3). The machine rotates to the column, opens both tambours and unlocks the door.
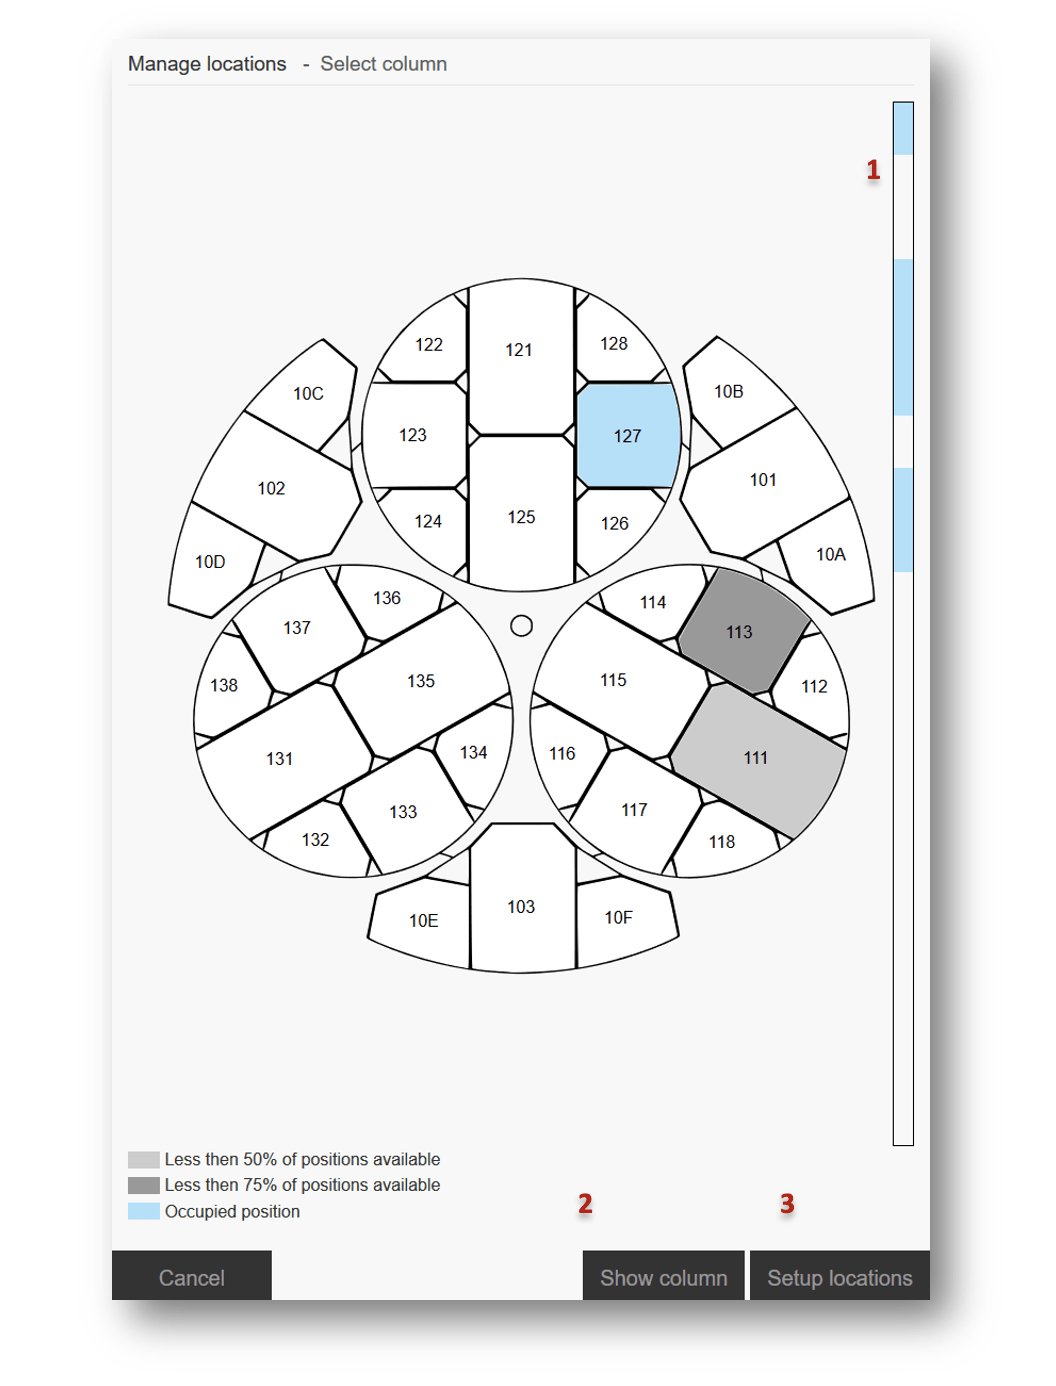
Selecting the column to work on.
- Click an empty position in the grid to set the base of the location, the place of the bottom shelf (1). Use the navigation buttons (2) to move the base or change the height – the minimum is two positions. The LEDs on the machine follow your selection.
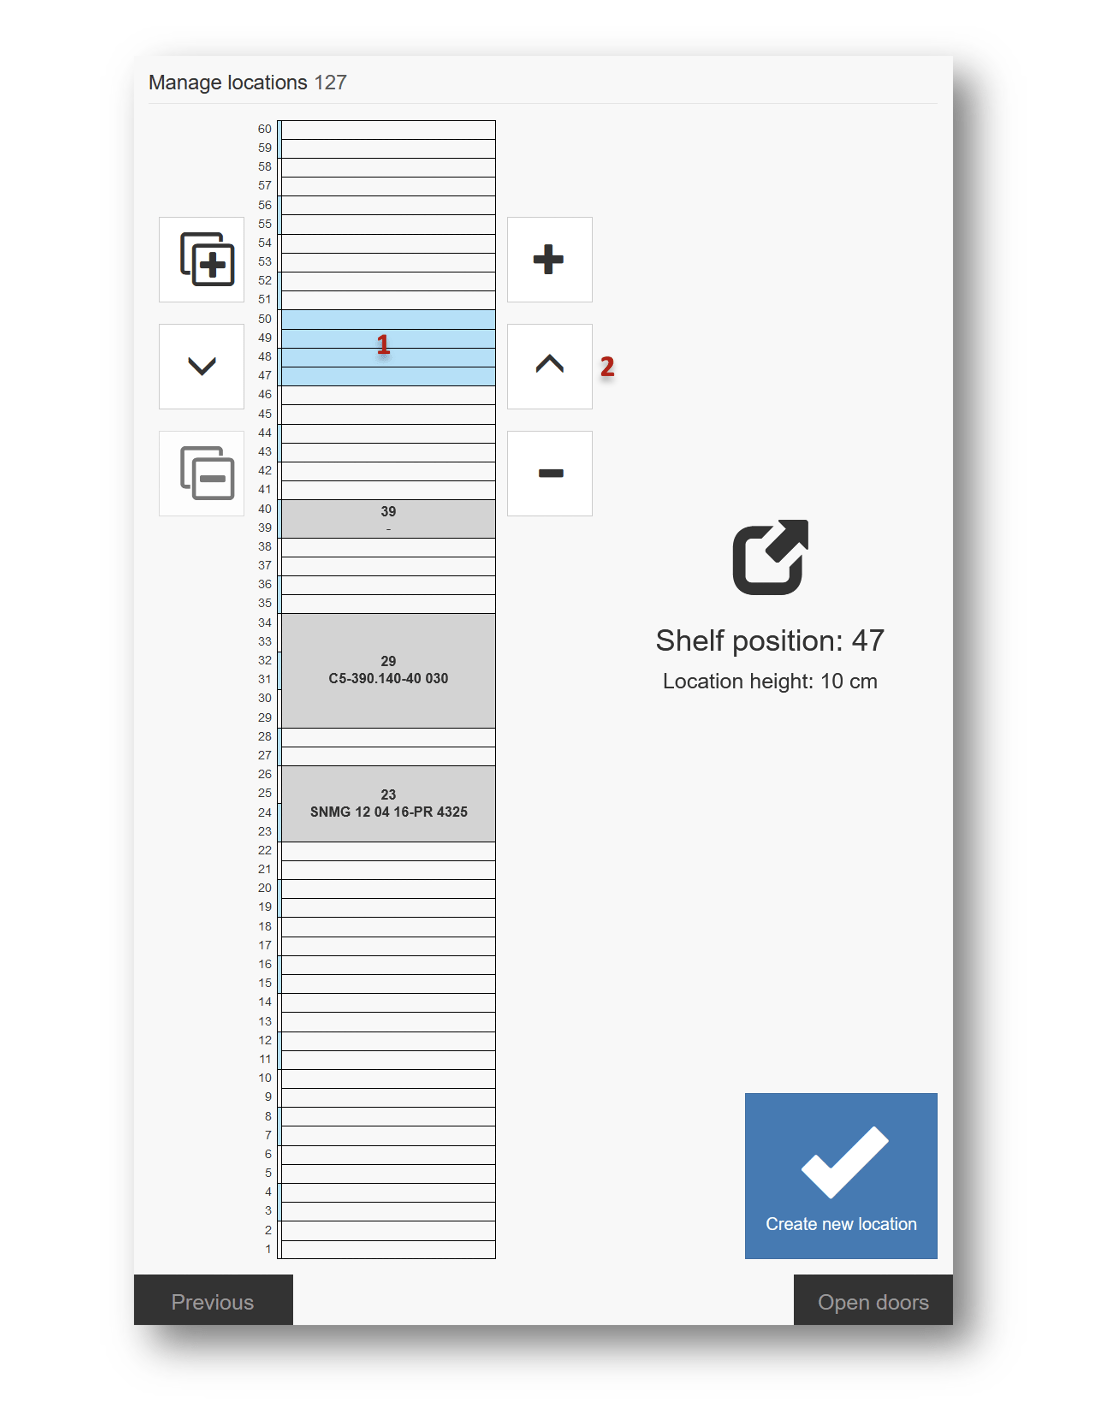
Defining base position and height.
- Press Create new location. The system lights up the position where the shelf should go.
- Place the shelf on the base position and confirm.
Success: The location exists and appears in the column diagram.
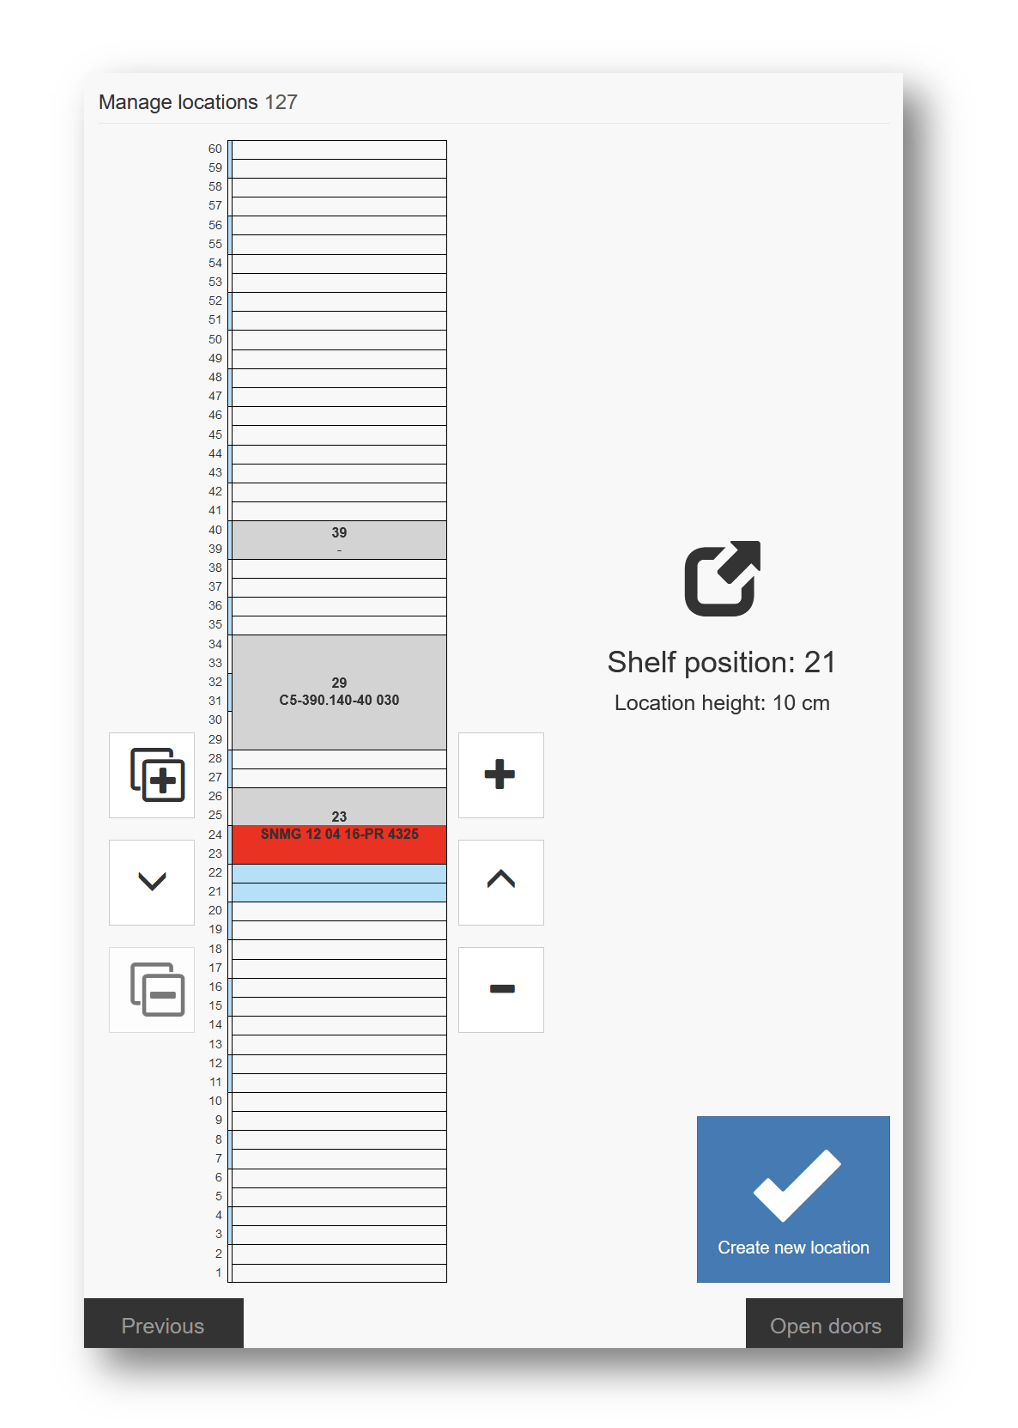
The created location.
Warning: If a new location overlaps an existing one, the existing location is deleted and its assignments are removed.
Note: Columns can be rotated by hand for 60 seconds after the door opens, in case a column is not centred correctly. To allow manual rotation after that, press Open doors.
Create several locations at once
Where a column needs several locations of the same width holding the same item:
- Select the base position. All locations are created above it.
- Select the height.
- Press the copy button (1) to duplicate the location directly above the base one.
- Remove a copy again with the remove-copied-location button (2). Base position and height can still be adjusted, and a height change affects all of them.
- Press Create new location (3) when the definition is finished.
- Place the shelves where the LEDs indicate, and confirm.
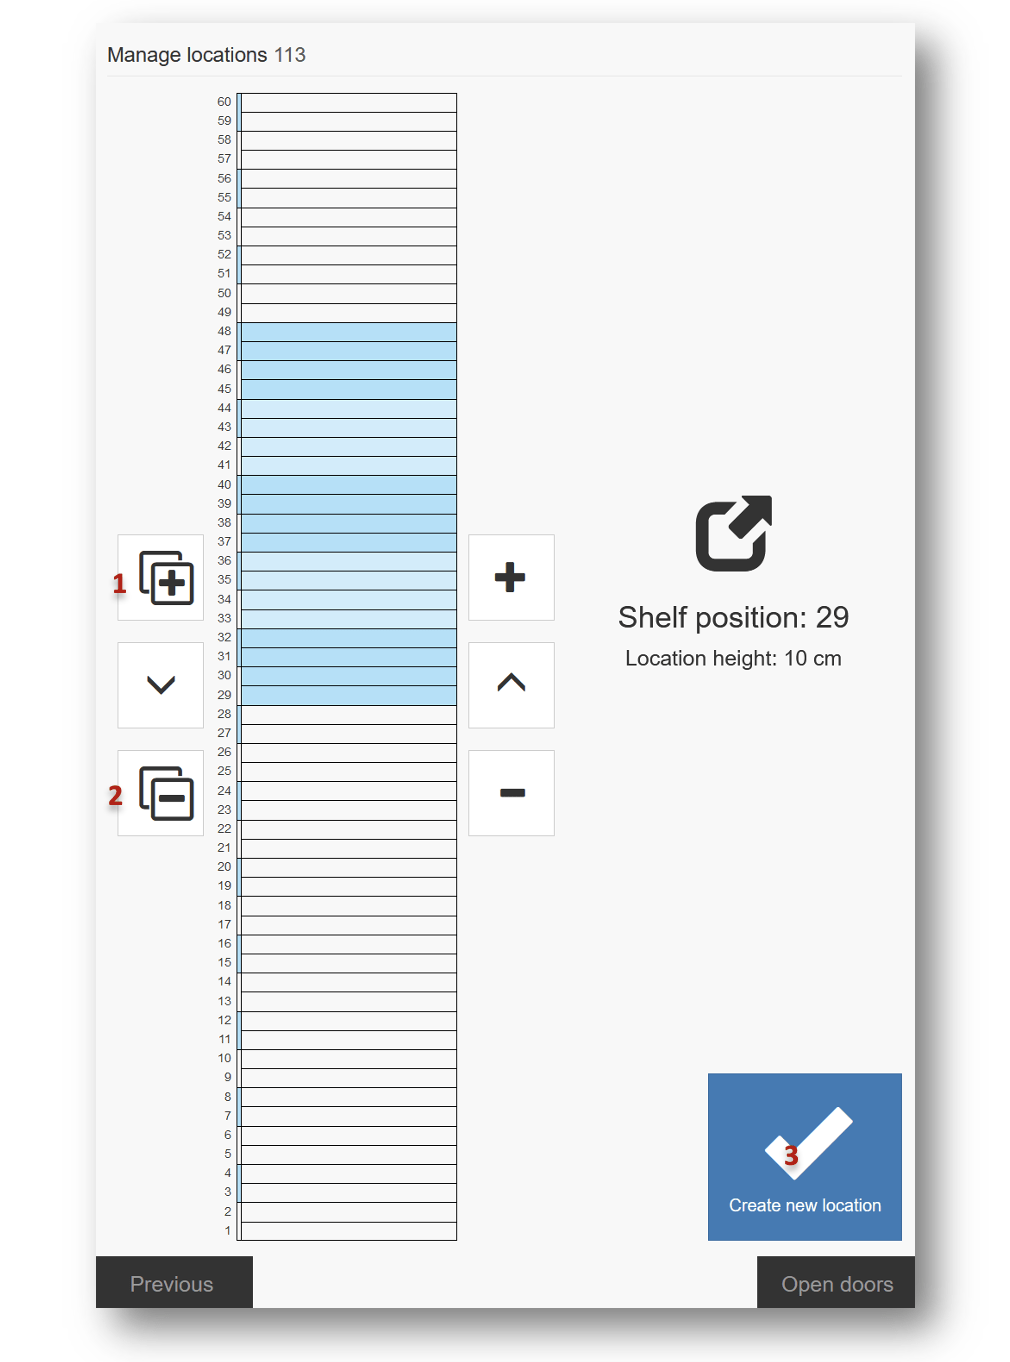
Copying a location within the column.
Success: The locations are created and the system asks you to assign an item to all of them. Select the item and follow the assignment wizard.
Create a location connected with the opposite column
Some columns allow the centre barrier to be removed, making one location across two columns. This works for the column pairs 111 and 115, 121 and 125, and 131 and 135.
- Open the main machine door to reach the control panel. The SFI can keep running.
- Rotate the columns with the DOOR OVERRIDE and TABLE/STACK buttons to find the column whose barrier is to be removed.
- With DOOR OVERRIDE and STACK, rotate to reach both sides of the barrier – 90 degrees left and right.
- Unscrew the two screws on each side to loosen the barrier.
- Rotate the columns back and remove the barrier.
- Place shelves from both sides of the stack on the base position of the connected location, rotating the stack to reach both sides.
- In the SFI, go to Stock management → Manage TX750 positions.
- Select the column with the connected location and press Setup locations.
- Select the base position and the width.
- Press Create location through (1) and confirm that the shelves are placed correctly. If they are not, use the control panel to rotate the stacks and place the shelf from the opposite side.
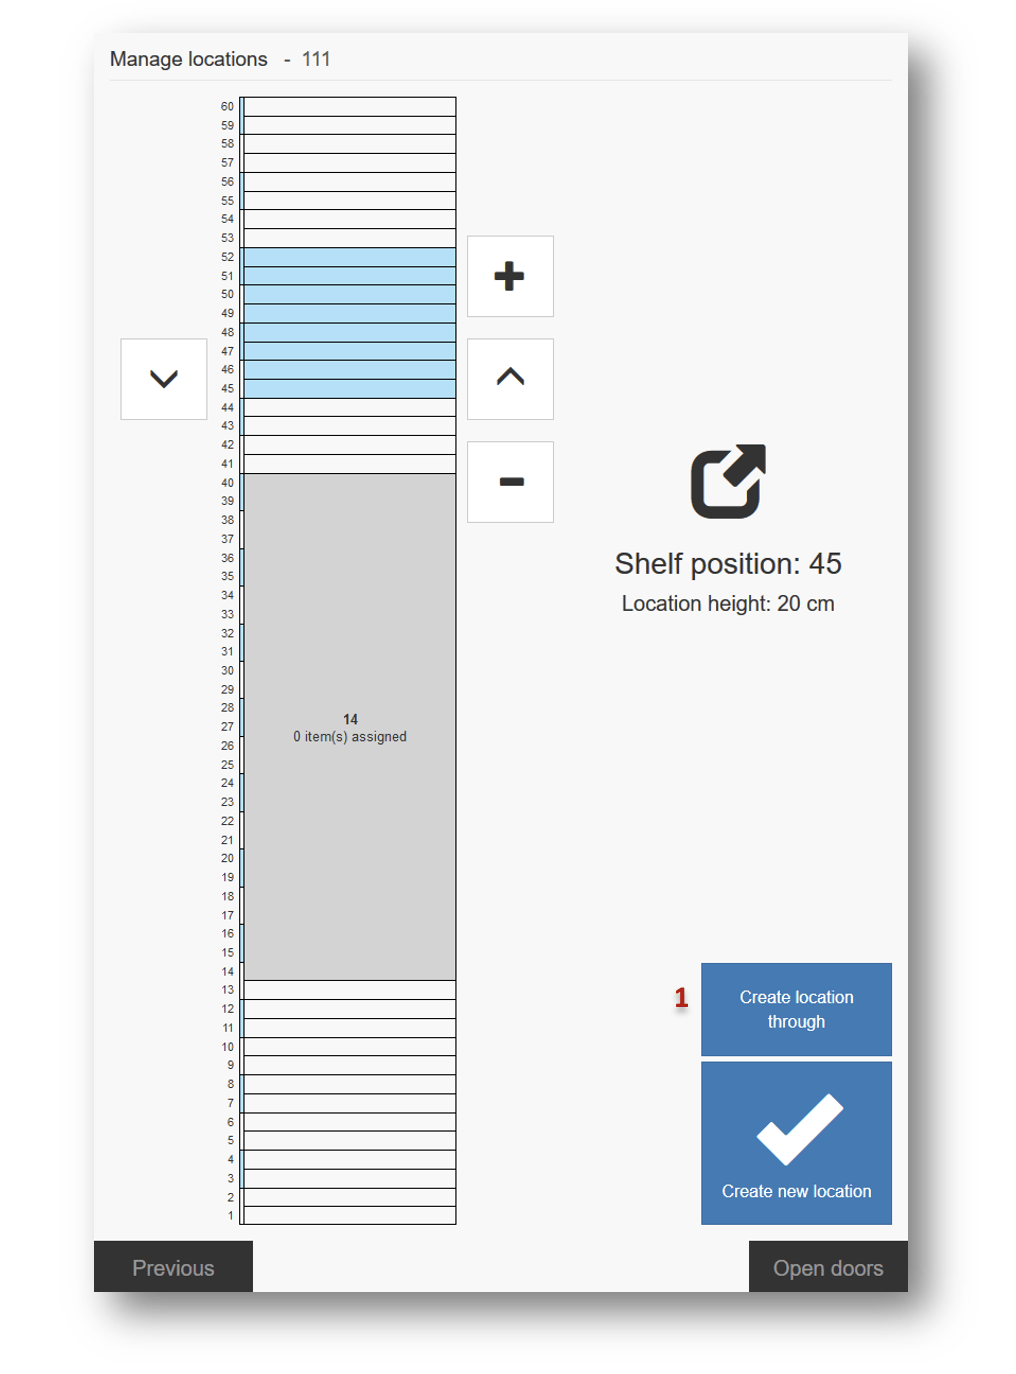
Creating a location across two columns.
Warning: Any location that exists on the opposite column is removed, together with all its assigned items.
Remove a location
An existing location cannot be changed. To change its size, remove it and create a new one.
- Go to Stock management → Manage TX750 positions.
- Select the column.
- Select the location in the position grid (1). The machine shows it with LEDs.
- Press Remove location (2). The location is removed and all assigned items are unassigned.
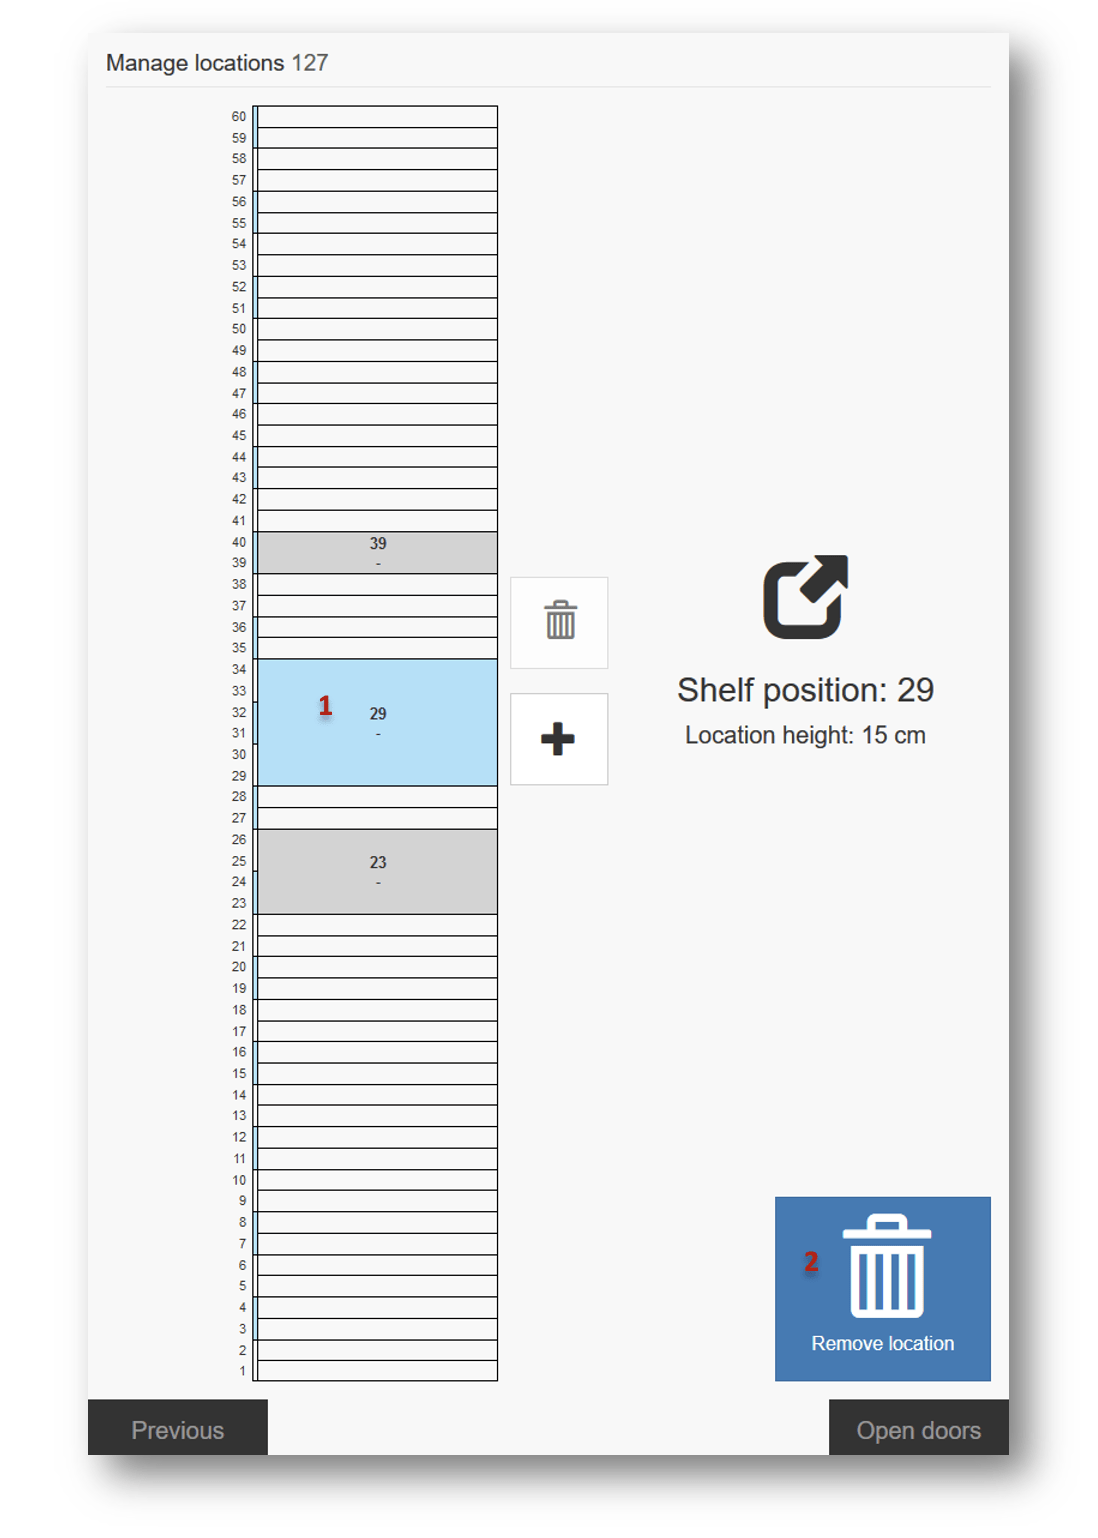
Removing a location.
Note: Use the tool delivered with the machine to remove the shelf from the stack.
Assign an item to a new location
- Select an existing location in a column.
- Click the assign-item button for that location.
- Select the item in the assignment wizard and enter the assignment information – see How to assign an item to a location (Shop Floor Interface).
- Confirm the placement of the item by clicking the checkbox. If the doors are closed, open them with Open doors.
- Finish the assignment.
Success: The assigned item is shown for the location.
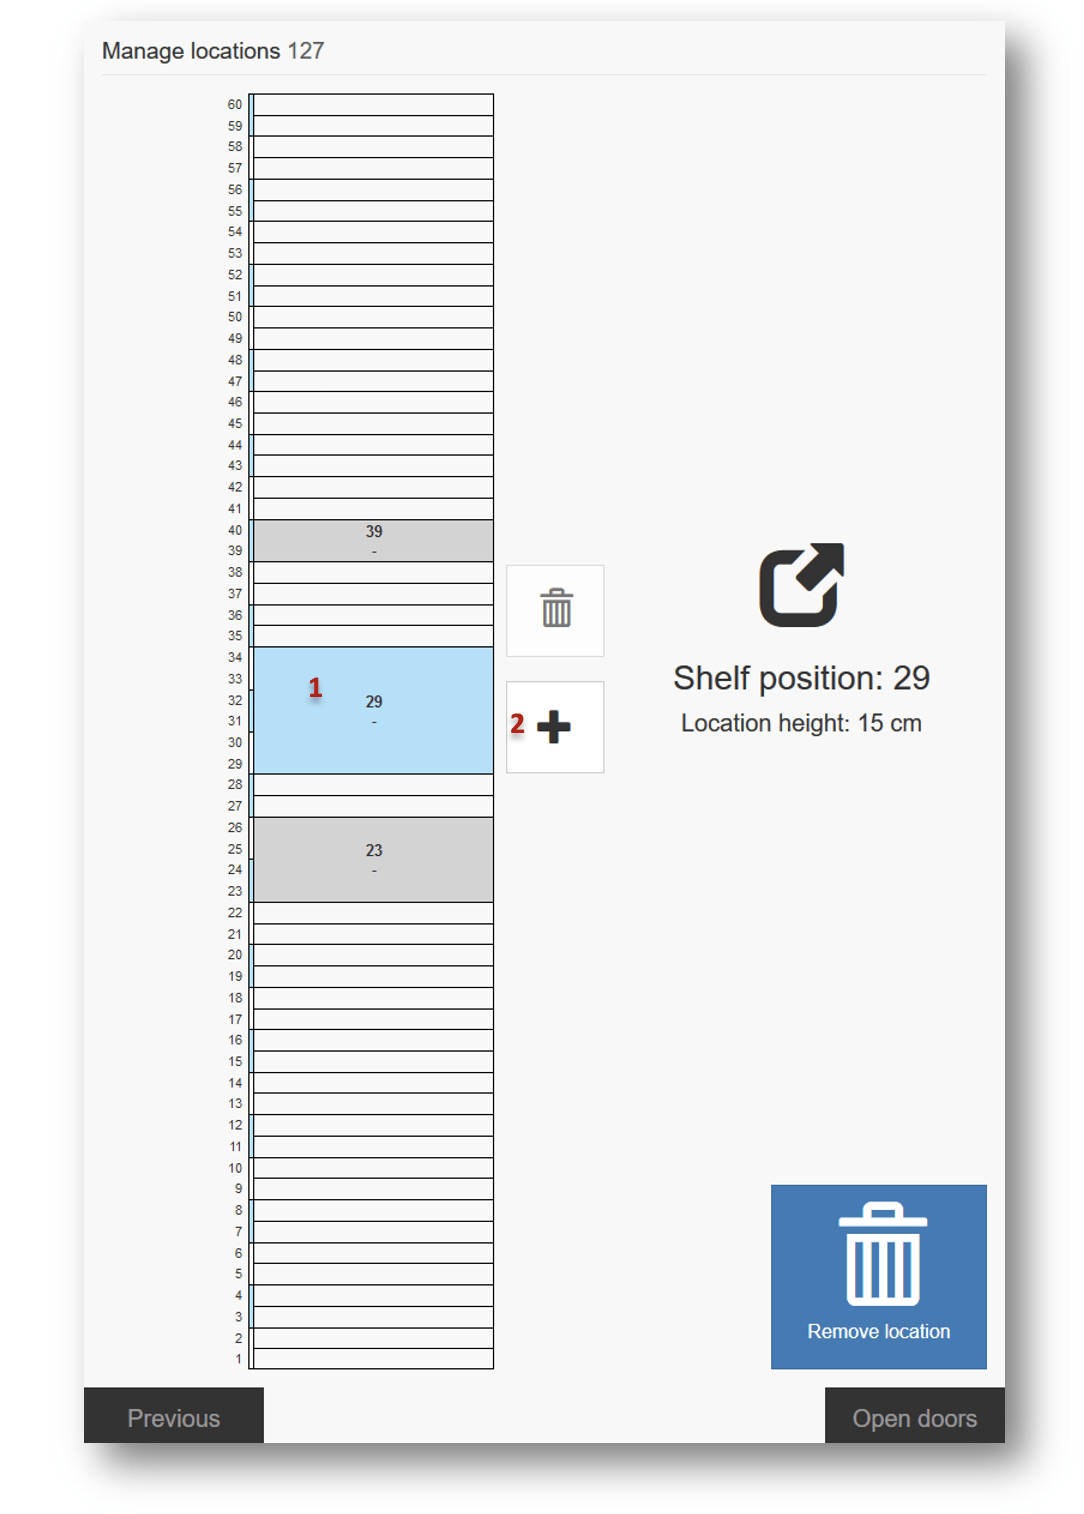
Starting the assignment from the management screen.
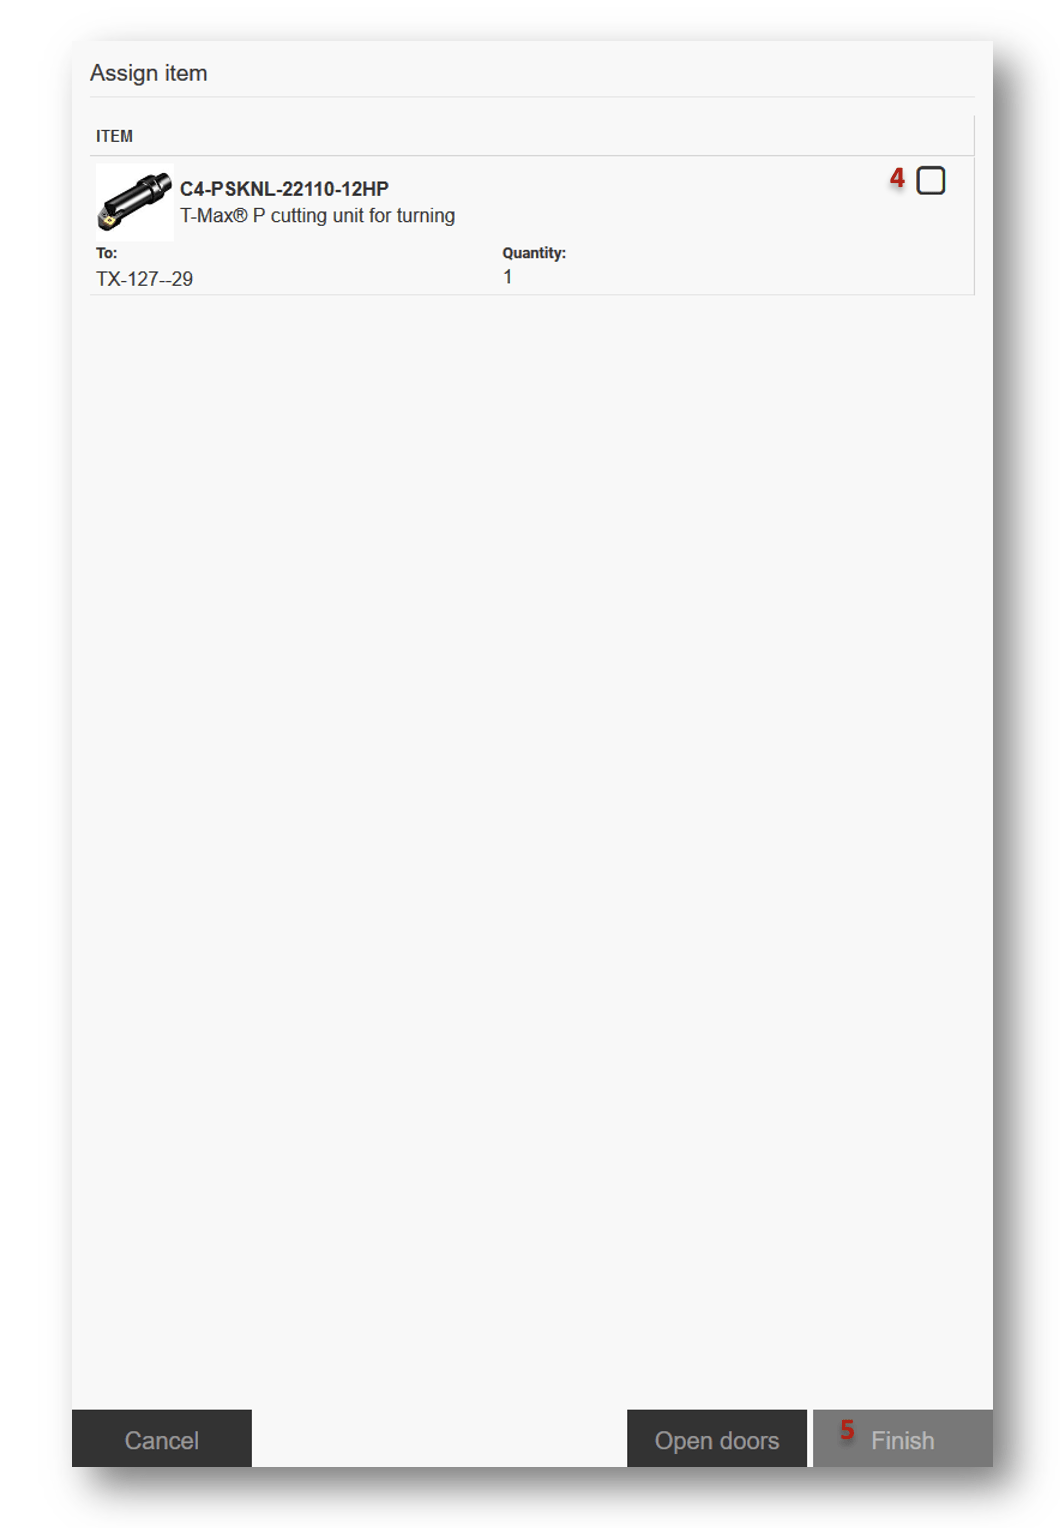
The assignment wizard.
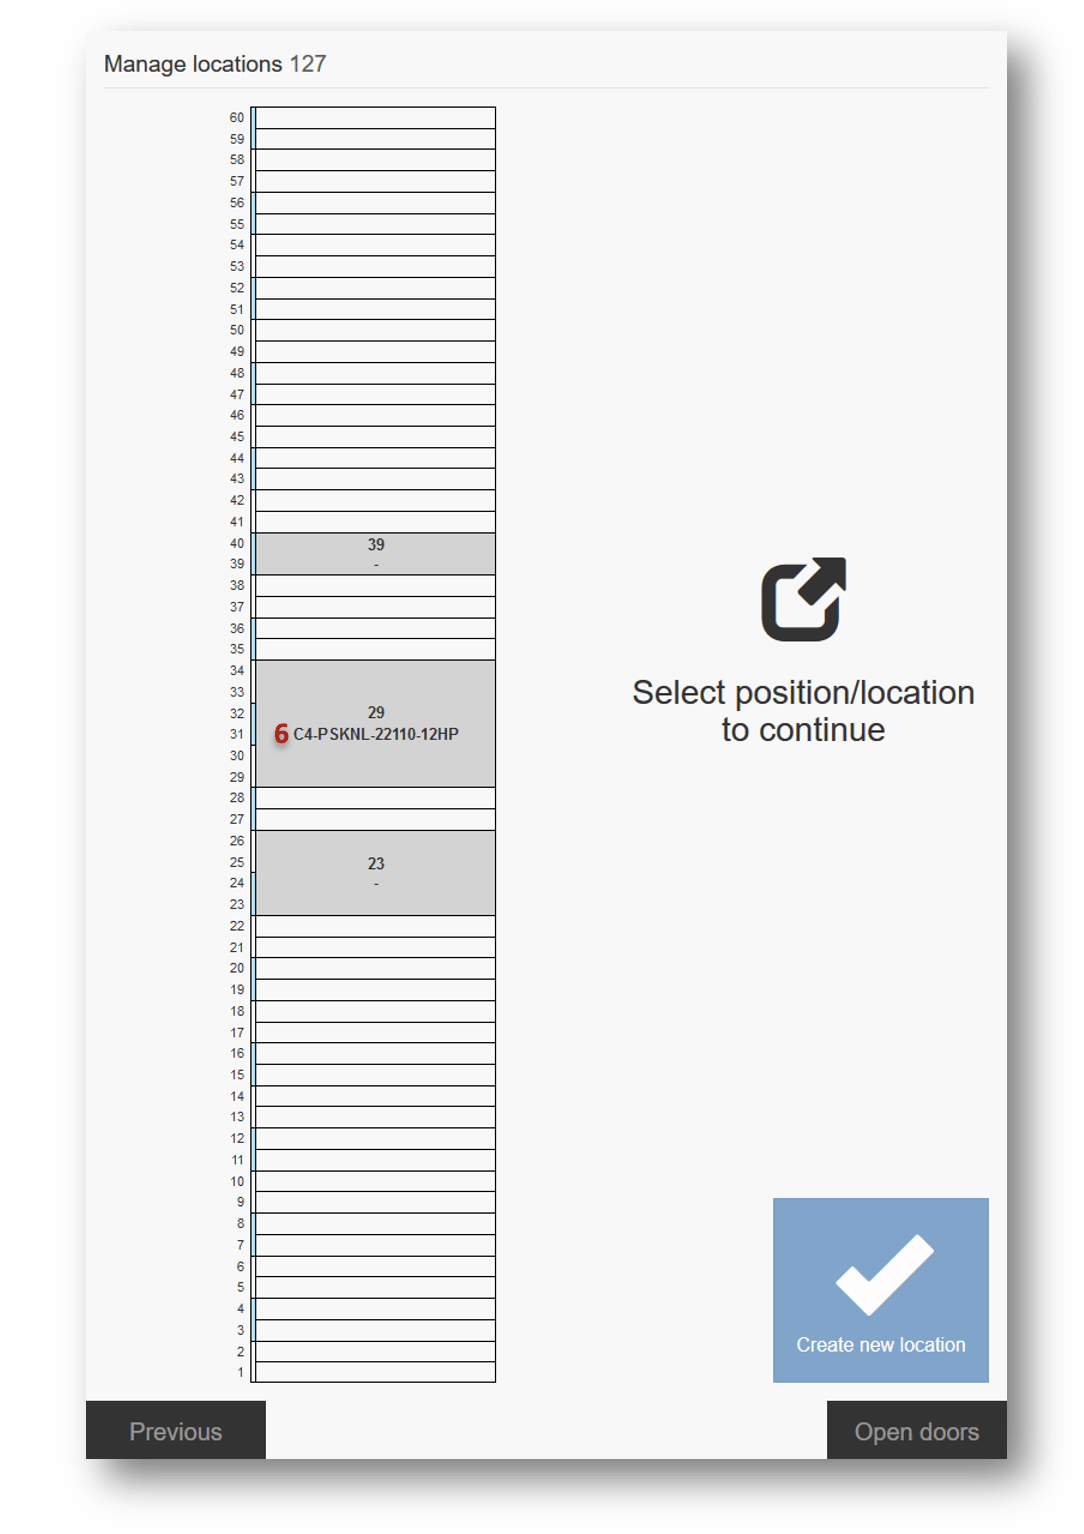
The finished assignment.
Remove an assignment
- Select the location with the assignment.
- Press the remove icon.
- If physical quantity remains, the system asks you to take those items out of the location.
- Confirm that the items have been removed. Open the doors with Open doors if needed.
- Finish the operation.
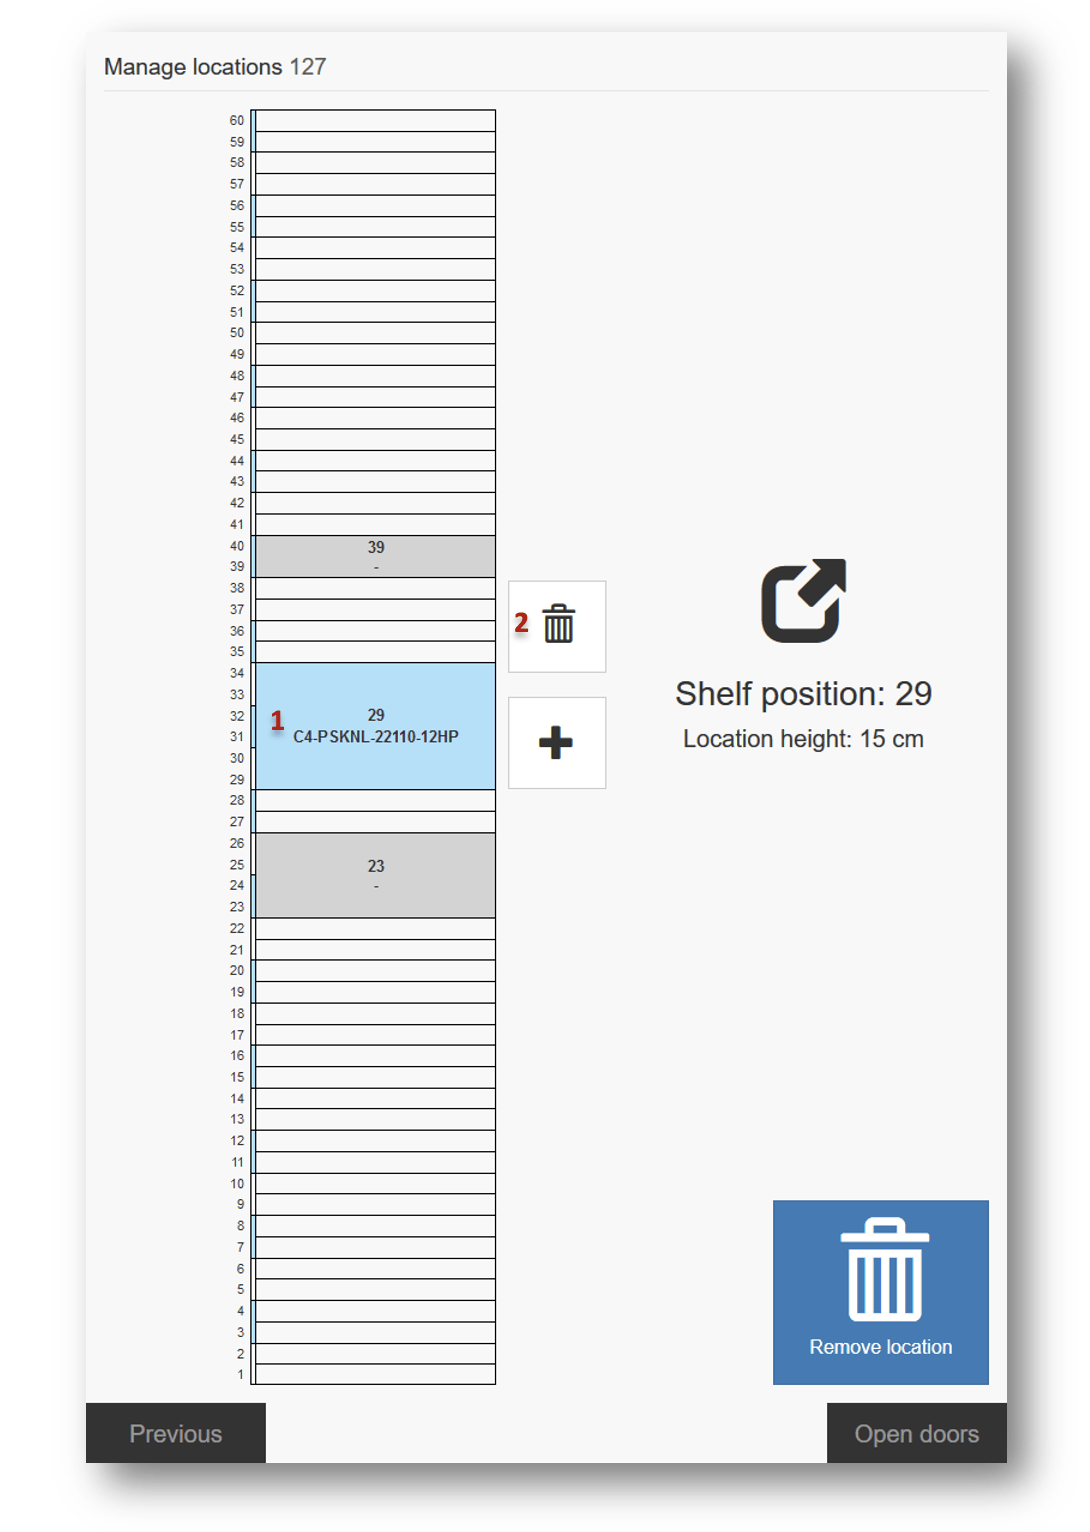
Removing an assignment.
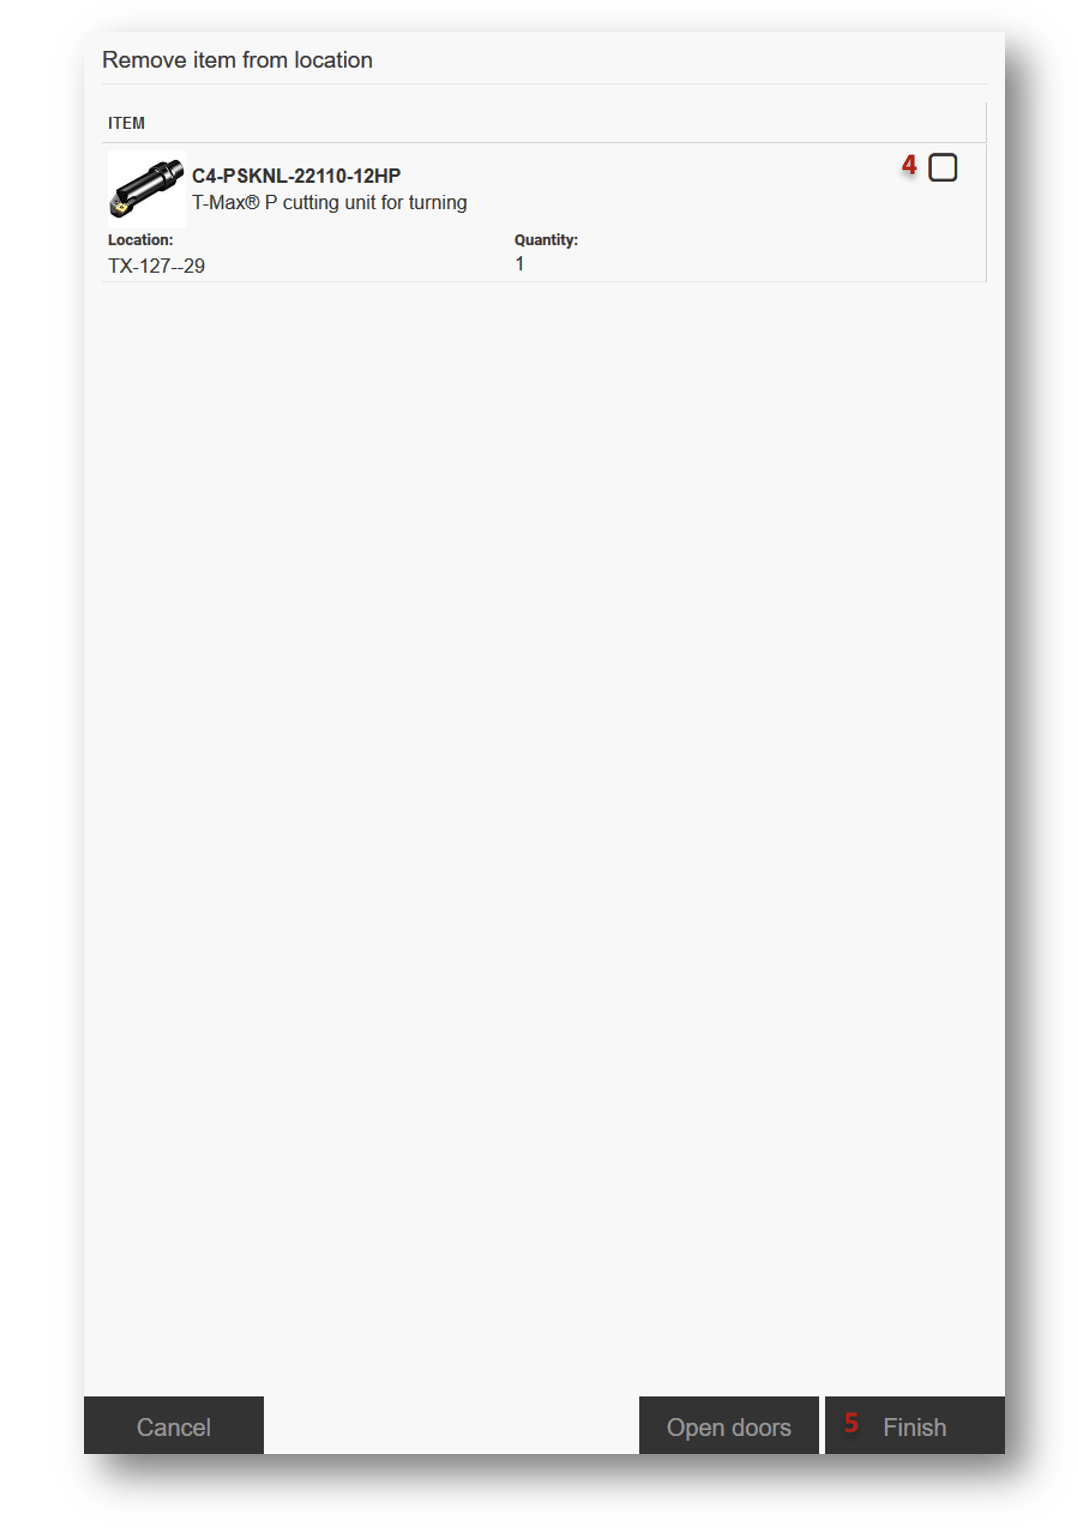
Confirming the physical removal.
Troubleshooting
| Problem | Likely cause | Fix |
| The option to manage the cabinet is missing. | The user has no permission to set up the device. | Grant the permission, or use a user that has it. |
| The assign or remove option is missing on a location. | The user is not allowed to assign items. | Grant the assignment permission. |
| The machine will not rotate. | A door is open. | Close the door. Manual rotation is possible for 60 seconds after opening, or after pressing Open doors. |
| A location disappeared when a new one was created. | The new location overlapped it. | Expected behaviour – the overlapped location and its assignments are removed. |
| A location cannot be resized. | Existing locations cannot be changed. | Remove it and create a new one of the size you need. |
Related articles
- AutoCrib TX750 – storage device setup – the storage device settings for this machine.
- How to clean the AutoCrib TX750 touchscreen – keeping the screen usable.
- How to assign an item to a location (Shop Floor Interface) – the assignment wizard in detail.
- How to configure storage devices – creating the storage device in the Admin Portal.