
What you can do
Add an Ahno Smart Light Lock / Tool Assembly cabinet to CRIBWISE: create the storage device in the Admin Portal, then scan the cabinet at the Shop Floor Interface so its drawers and stock locations are created for you.
Before you start
- You need Admin Portal access with permission to edit devices and storage devices.
- The Shop Floor Interface must already be installed and running on the device the cabinet is wired to. Adding a device is covered in Manage devices.
- The cabinet must be powered on and connected to that computer.
- You need two values from whoever installed the cabinet: the communication port it is wired to, and its Cabinet ID.
- All drawers and locations on the cabinet must be closed before you scan it.
Important: An Ahno cabinet is a location controlled storage device, so it cannot be created on a cloud device — saving fails with Cannot create location controlled storage device for cloud device. Create it on the device that physically runs the Shop Floor Interface next to the cabinet.
How Ahno differs from other cabinets
You do not type in drawers or stock locations for an Ahno cabinet, and you do not import a configuration file. The cabinet reports its own layout: you scan it once from the Shop Floor Interface and CRIBWISE creates the storage modules and stock locations from what it finds.
| Connection details | You type them in the Admin Portal — Communication port and Cabinet ID |
| Storage modules | Created by the rescan at the Shop Floor Interface |
| Stock locations | Created by the rescan at the Shop Floor Interface |
| Location mapping tab | Not used — stays greyed out for Ahno |
Quick start
Experienced users — add the cabinet in six steps:
- Open the device in Data management > Devices and go to the Storage devices tab.
- Add a storage device: name it, set Type to Location controlled, set Manufacturer to Ahno Smart Light Lock.
- Enter the Communication port and Cabinet ID, then Save storage device.
- Release the storage device.
- At the Shop Floor Interface, go to Stock management > Manage locations and pick the cabinet.
- Rescan configuration, then Update modules to accept the layout it found.
Need more detail? Follow the full steps below.
Steps
Step 1 — Create the storage device in the Admin Portal
- Go to Data management > Devices.
- Select the device the cabinet is wired to, then open the Storage devices tab.
- Click + (Add new storage device).
- Enter a Name for the cabinet — this is the name operators see at the Shop Floor Interface.
- Set Type to Location controlled.
- Set Manufacturer to Ahno Smart Light Lock.
- Enter the Communication port and the Cabinet ID.
The form only shows Communication port and Cabinet ID once you pick an Ahno manufacturer — the connection fields change with the manufacturer.
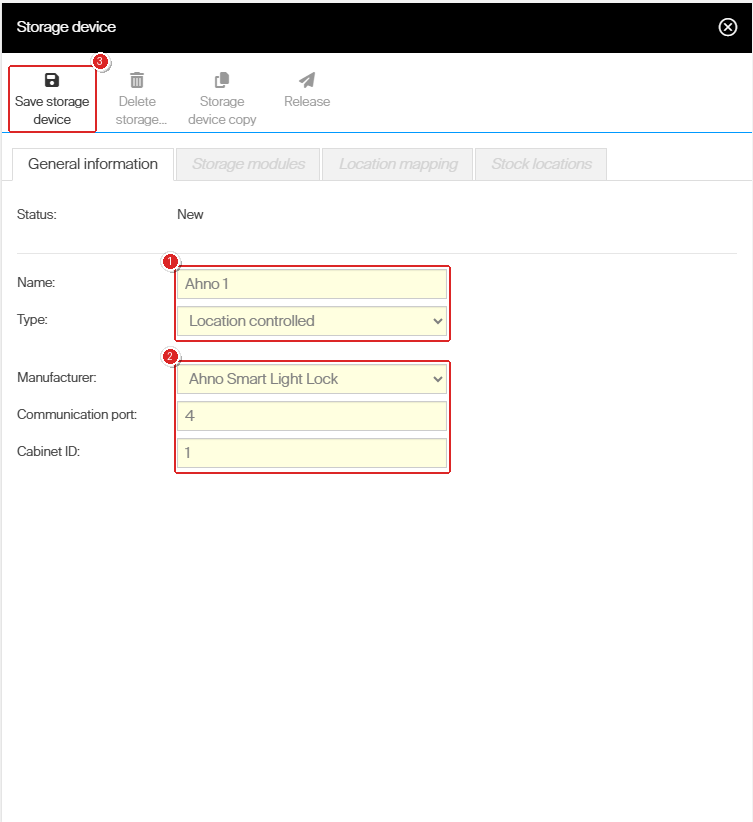
A new Ahno storage device before the first save. The three right-hand tabs and Release stay disabled until you save.
| Field | Required | What to enter |
|---|---|---|
| Name | Yes | The name operators see at the Shop Floor Interface, for example Ahno 1. |
| Type | Yes | Location controlled. An Ahno cabinet controls individual locations, so Open storage is wrong here. |
| Manufacturer | Yes | Ahno Smart Light Lock. Ahno Tool Assembly is a different product — do not pick it by mistake. |
| Communication port | Yes | The number of the port the cabinet is wired to, without any prefix — enter 4 for port 4. |
| Cabinet ID | Yes | The cabinet’s own ID, starting at 1. Give each cabinet on the same port a different ID. |
Note: Type and Manufacturer cannot be changed once the storage device is released. If you pick the wrong one, delete the storage device and create it again while it is still new.
Step 2 — Save and release
- Click Save storage device.
- Click Release, then confirm Do you really want to release storage device <name>? with Yes.
The status changes from New to Released, the Storage modules and Stock locations tabs become available, and Release greys out because it is done. Location mapping stays greyed out — Ahno does not use it.

A released Ahno storage device. Compare with Step 1: Release is now greyed out and the tabs have opened up, apart from Location mapping.
The cabinet also appears in the device’s Storage devices list, where you can add a second Ahno cabinet the same way.

Two Ahno cabinets on the same device. Each one needs its own Cabinet ID.
Tip: For a second identical cabinet, use Storage device copy and then change the name and Cabinet ID, instead of filling in the form again.
Checkpoint: The storage device is Released and has no storage modules and no stock locations yet. That is expected — the cabinet supplies them in the next step.
Step 3 — Open Manage locations at the Shop Floor Interface
Do the rest at the Shop Floor Interface on the computer the cabinet is wired to.
- On the home menu, tap Stock management.

The Shop Floor Interface home menu. Tap Stock management.
- Tap Manage locations.

The Stock management menu. Manage locations is bottom right.
- Tap the cabinet you created.
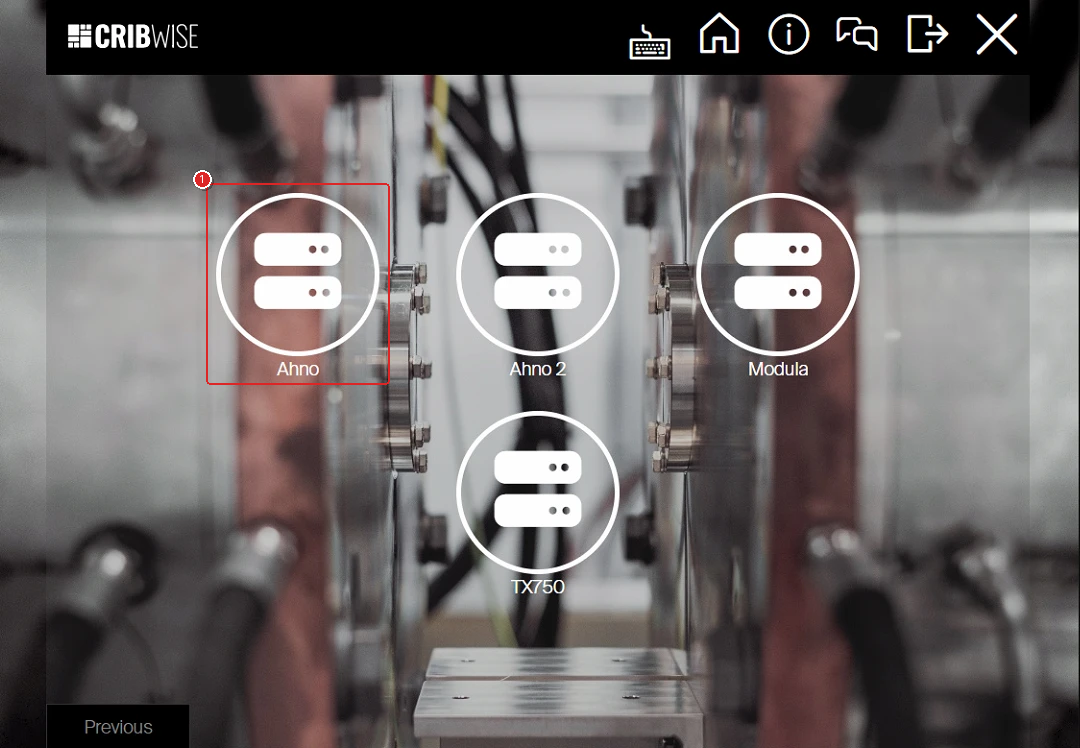
Only released, location controlled storage devices on this device appear here.
Only released, location controlled storage devices on this device appear here. If your cabinet is missing, see Troubleshooting.
Step 4 — Rescan the cabinet
A cabinet with no modules yet opens straight onto the rescan prompt.
- Tap Rescan configuration.

An Ahno cabinet before its first scan. There is nothing else to do here until you scan it.
- Check that every drawer and location on the cabinet is closed, then confirm the reminder with Confirm.

An open drawer can be missed by the scan, so the cabinet would come back with fewer locations than it really has.
An open drawer can be missed by the scan, so the cabinet would come back with fewer locations than it really has.
CRIBWISE polls the cabinet and reports what it finds. Cancel stops the scan and changes nothing.

Scanning in progress. Cancel stops the scan and changes nothing.
Step 5 — Accept the configuration it found
The New configuration screen lists the storage modules the cabinet reported and how many stock locations each one holds.
- Check the list against the physical cabinet — one row per drawer, with the right number of locations.
- Tap Update modules.
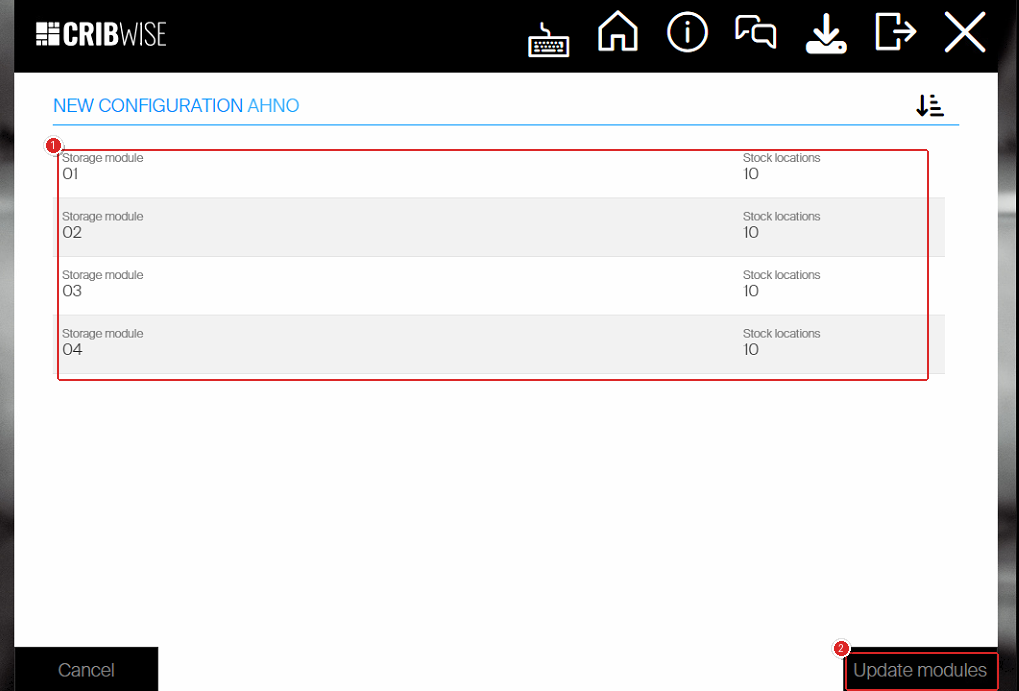
This cabinet reported four drawers of ten locations each — 40 stock locations in total.
Module numbers are zero-padded, so a four-drawer cabinet reads 01 to 04. Four drawers of ten locations each gives 40 stock locations in total.
- Confirm the warning with Yes.

On a first-time setup there is nothing to lose. On a cabinet already in use, read this carefully.
Warning: Update modules replaces the layout. Any module or location the scan did not find is deleted, and the item assignments on it go with it. Before you rescan a cabinet that is already in use, make sure the whole cabinet is powered on, connected and closed — a partial scan will wipe assignments you still need.
Success: The cabinet’s storage modules and stock locations exist. The Shop Floor Interface now shows the modules instead of the rescan prompt, and the Stock locations tab of the storage device in the Admin Portal lists the same locations. The cabinet is ready for items.
Next steps
- Assign items to the new locations — How to assign an item to a location (Shop Floor Interface).
- Fill the cabinet and count it — How to do an inventory on the Shop Floor Interface.
- Take a location out of service if a drawer is broken — Disable or enable a stock location.
Troubleshooting
| Problem | Likely cause | Fix |
|---|---|---|
| Saving the storage device fails with Cannot create location controlled storage device for cloud device | The device you added it to is a cloud device | Create the storage device on the device that runs the Shop Floor Interface next to the cabinet |
| Storage modules and Stock locations tabs are greyed out | The storage device has not been saved yet | Click Save storage device, then Release |
| Location mapping tab is greyed out | Ahno does not use location mapping | Nothing to fix — this is expected |
| The cabinet is missing from the Manage locations picker | It was never released, or it was created on a different device | Check the status is Released in the Admin Portal and that it sits under the device this Shop Floor Interface runs on |
| The rescan finds nothing, or the rescan prompt keeps coming back | Wrong Communication port or Cabinet ID, or the cabinet is off or unplugged | Confirm the port number and Cabinet ID with whoever installed the cabinet, then check power and cabling |
| The scan reports fewer modules or locations than the cabinet has | A drawer or location was open during the scan | Close everything, then rescan — do not accept a partial configuration |
| Item assignments disappeared after Update modules | The scan did not find those modules, so they were deleted with their assignments | Fix the connection, rescan the full cabinet, then reassign the items |
Related articles
- How to configure storage devices — the general storage device workflow and what every field does
- Supported storage devices — configuration reference — every supported machine and its connection details
- Manage devices — adding the device the cabinet belongs to
- How to manage stock locations (Shop Floor Interface) — what else the Manage locations menu can do
- How to find Device ID and Storage Device ID — the IDs support will ask you for
- Understanding stock structure: stocks, devices and locations — how cabinets fit into the wider stock model