
What you can do
Add an MPH Spiral Box vending machine to CRIBWISE: create the coil storage device, enter the coil grid once, and let CRIBWISE create one stock location per coil.
Before you start
- You need Admin Portal access with permission to edit devices and storage devices.
- The device the machine is wired to must already exist. See How to create and manage devices.
- You need the communication port number the machine is connected to.
- You need the cabinet layout: how many coil lines it has, and how many coils sit in each line. Both are 1–8.
Important: A Spiral Box is a location-controlled machine, so it cannot be added to a cloud device. Saving it there fails with Cannot create location controlled storage device for cloud device. Add it to the device that runs the Shop Floor Interface next to the machine.
How the coil grid becomes stock locations
One cabinet is one storage module, and you describe its coils with two dimension ranges. The 1st dimension is the coil line, the 2nd dimension is the coil within that line. Two coil lines share one shelf level, facing each other, so a cabinet with four levels has eight coil lines.
CRIBWISE then creates one stock location per coil and names it after the storage device, the module and the two numbers.
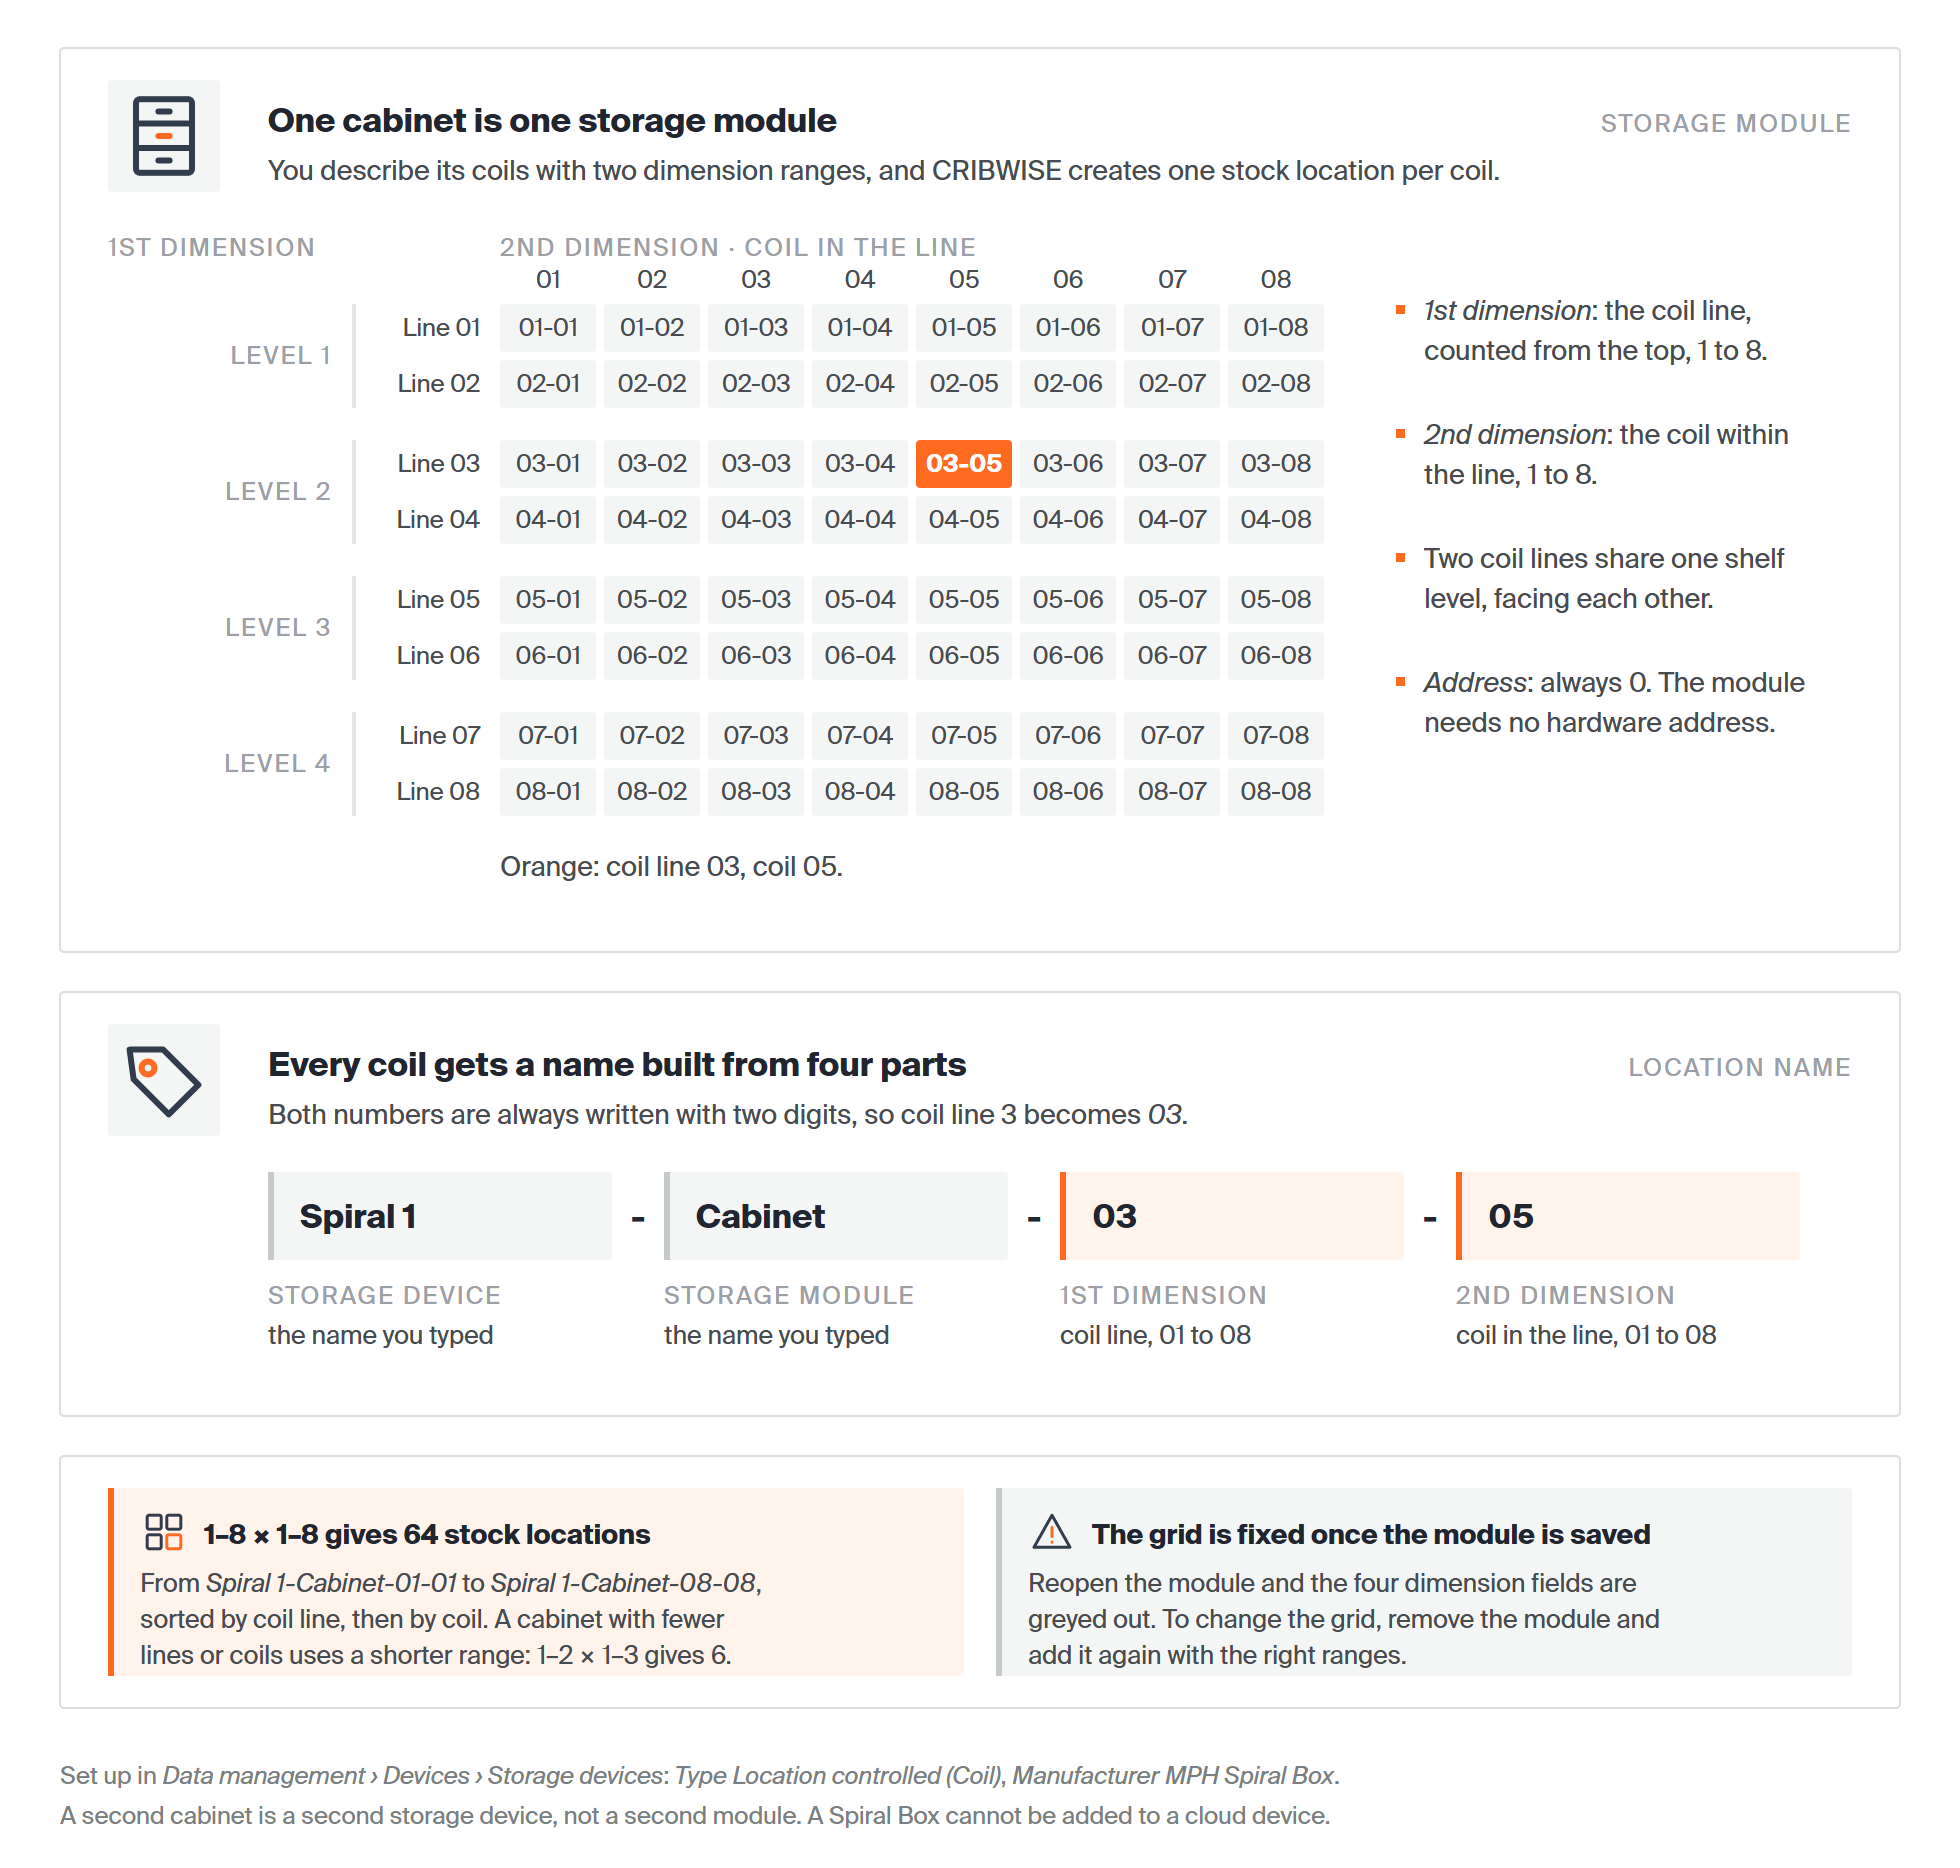
The coil grid, the name each coil gets, and why the ranges must be right before you save the module. Click the image to open it full size.
Both numbers are always written with two digits, so coil line 3, coil 5 on the storage device Spiral 1 with the module Cabinet becomes Spiral 1-Cabinet-03-05.
Quick start
Experienced users — add the machine in six steps:
- Open the device in Data management > Devices and go to the Storage devices tab.
- Add a storage device: name it, set Type to Location controlled (Coil) and Manufacturer to MPH Spiral Box.
- Enter the Communication port, then Save storage device.
- Add one storage module for the cabinet, with Address 0 and both dimension ranges.
- Check the generated locations on the Stock locations tab.
- Release the storage device.
Need more detail? Follow the full steps below.
Steps
Step 1 — Open the device’s Storage devices tab
- Go to Data management > Devices.
- Select the device the machine is wired to, then click View detail.
- Open the Storage devices tab.
- Click + (Add new storage device).
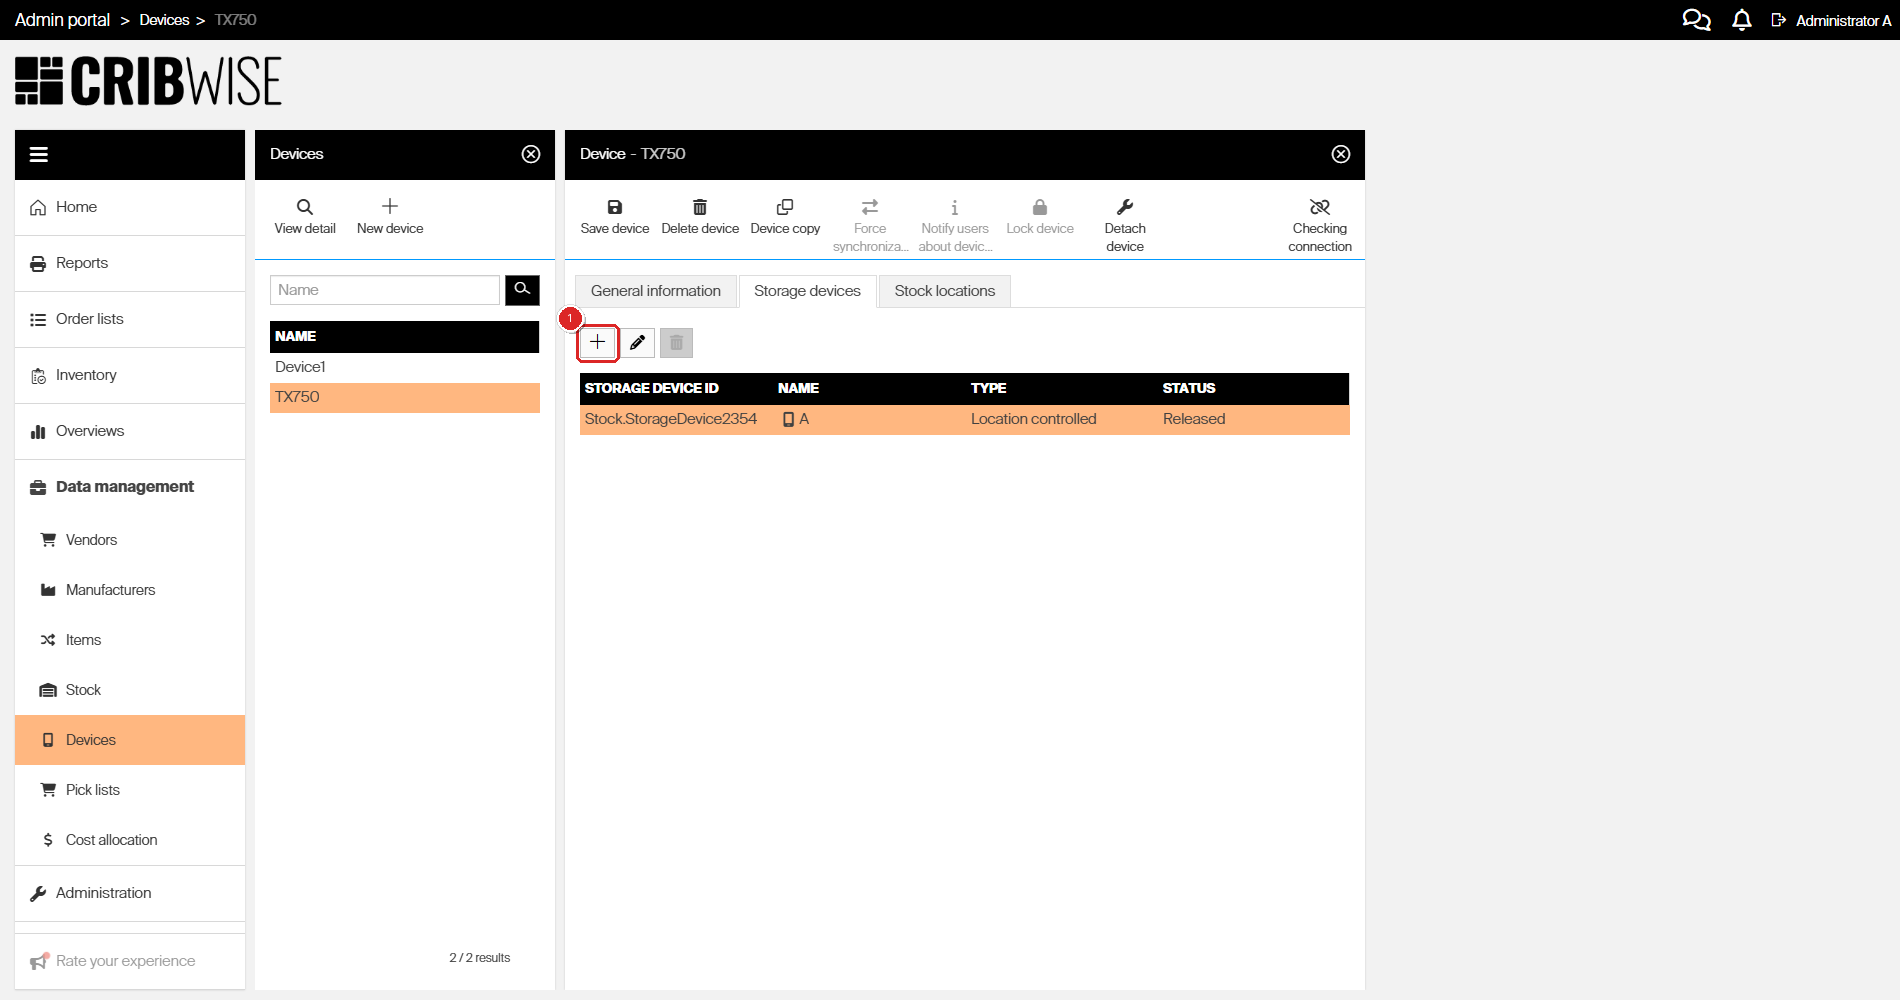
The Storage devices tab lists everything already attached to this device. + (1) starts a new one.
Step 2 — Fill in the general information
- Enter a Name for the machine.
- Set Type to Location controlled (Coil).
- Set Manufacturer to MPH Spiral Box.
- Enter the Communication port.
Communication port only appears once you have chosen a manufacturer — the connection fields change with the machine.
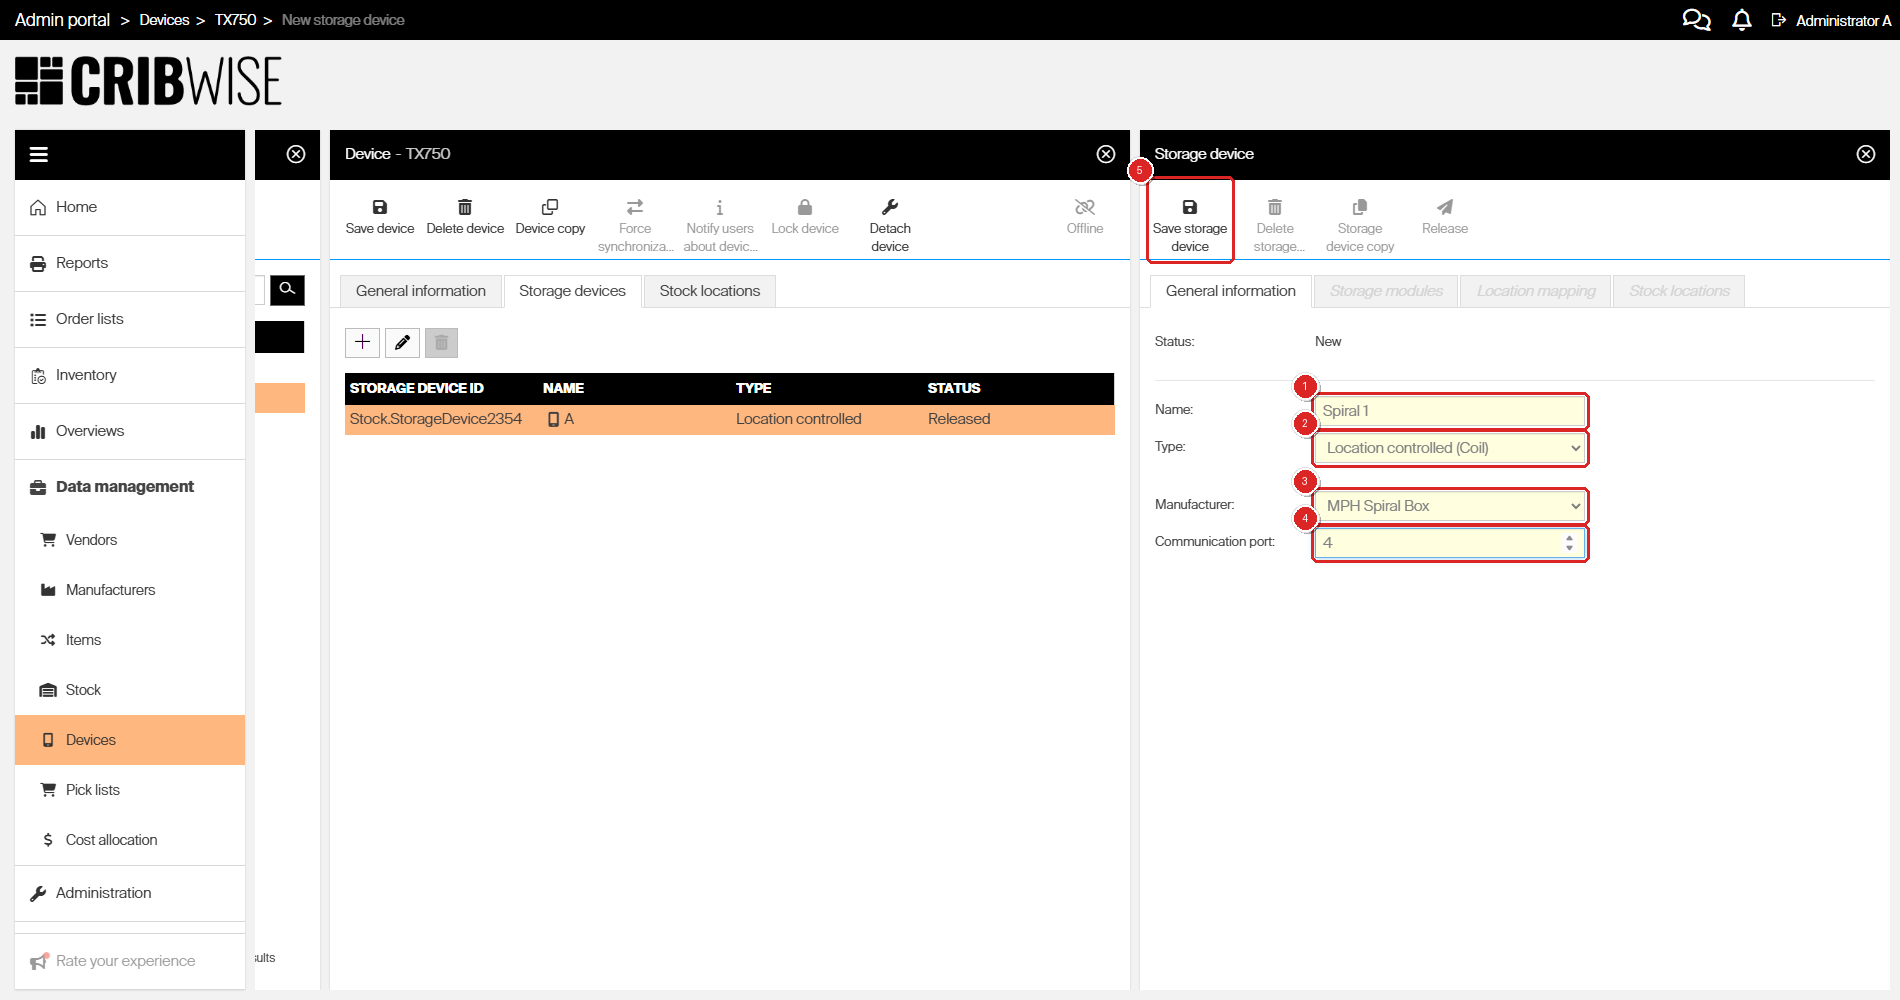
A new Spiral Box before the first save: Name (1), Type (2), Manufacturer (3), Communication port (4), then Save storage device (5). The three right-hand tabs and Release stay greyed out until you save.
| Field | Required | What to enter |
|---|---|---|
| Name | Yes | The name operators see at the Shop Floor Interface, for example Spiral 1. It becomes the first part of every stock location name. |
| Type | Yes | Location controlled (Coil). Plain Location controlled is for drawer cabinets and lifts, not for coil machines. |
| Manufacturer | Yes | MPH Spiral Box. MPH AVC-100 is a different machine with a different setup. |
| Communication port | Yes | The number of the port the machine is physically connected to, without any COM prefix — enter 4 for COM4. |
Note: The Manufacturer list is the same for both location-controlled types, so nothing warns you if the Type is wrong. Check both fields before you save.
Step 3 — Save the storage device
- Click Save storage device.
The Storage modules and Stock locations tabs open, and Release becomes available. Location mapping stays greyed out — a Spiral Box does not use it. Type and Manufacturer are now read-only; Name and Communication port can still be edited.
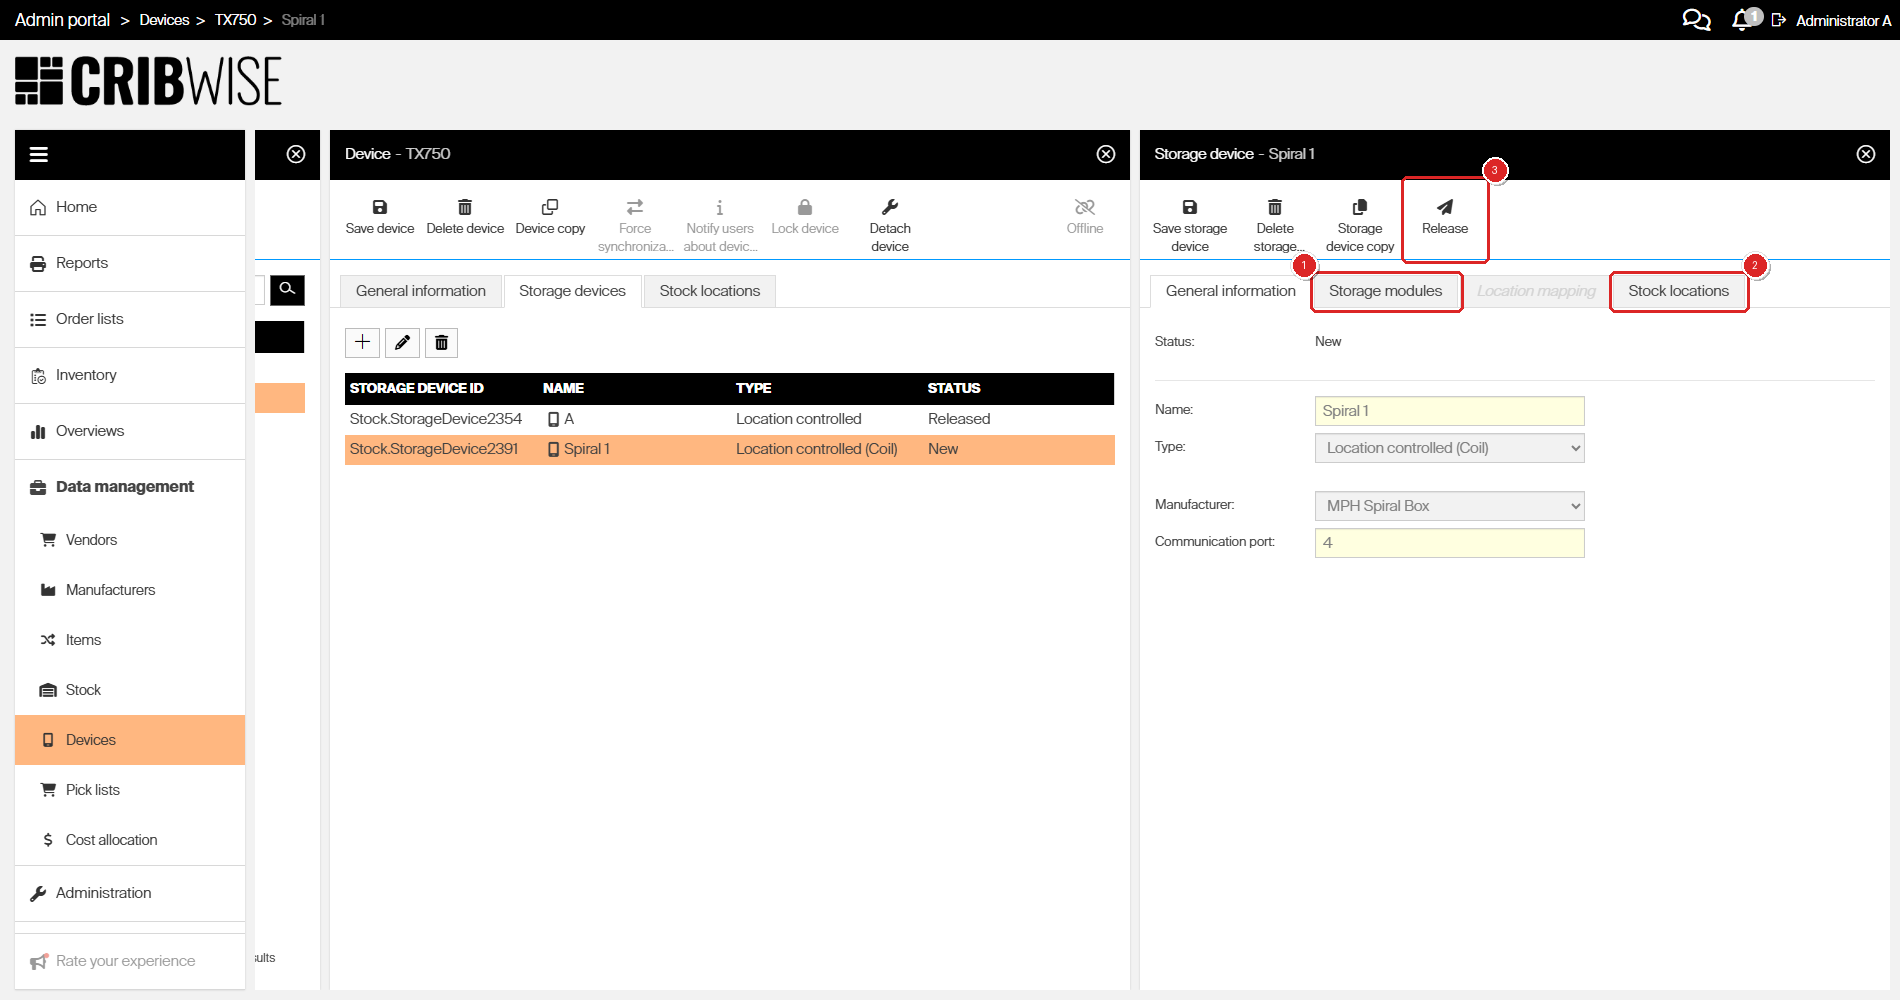
After saving: Storage modules (1) and Stock locations (2) open up, and Release (3) becomes available. Status stays New until you release it.
Warning: To change Type or Manufacturer after this save, you have to delete the storage device and create it again.
Step 4 — Add the cabinet as a storage module
- Open the Storage modules tab.
- Click Add.
- Enter a Name for the cabinet.
- Enter
0in Address. - Enter the 1st dimension range — the number of coil lines, from 1 to 8.
- Enter the 2nd dimension range — the number of coils in a line, from 1 to 8.
- Click Save storage module.
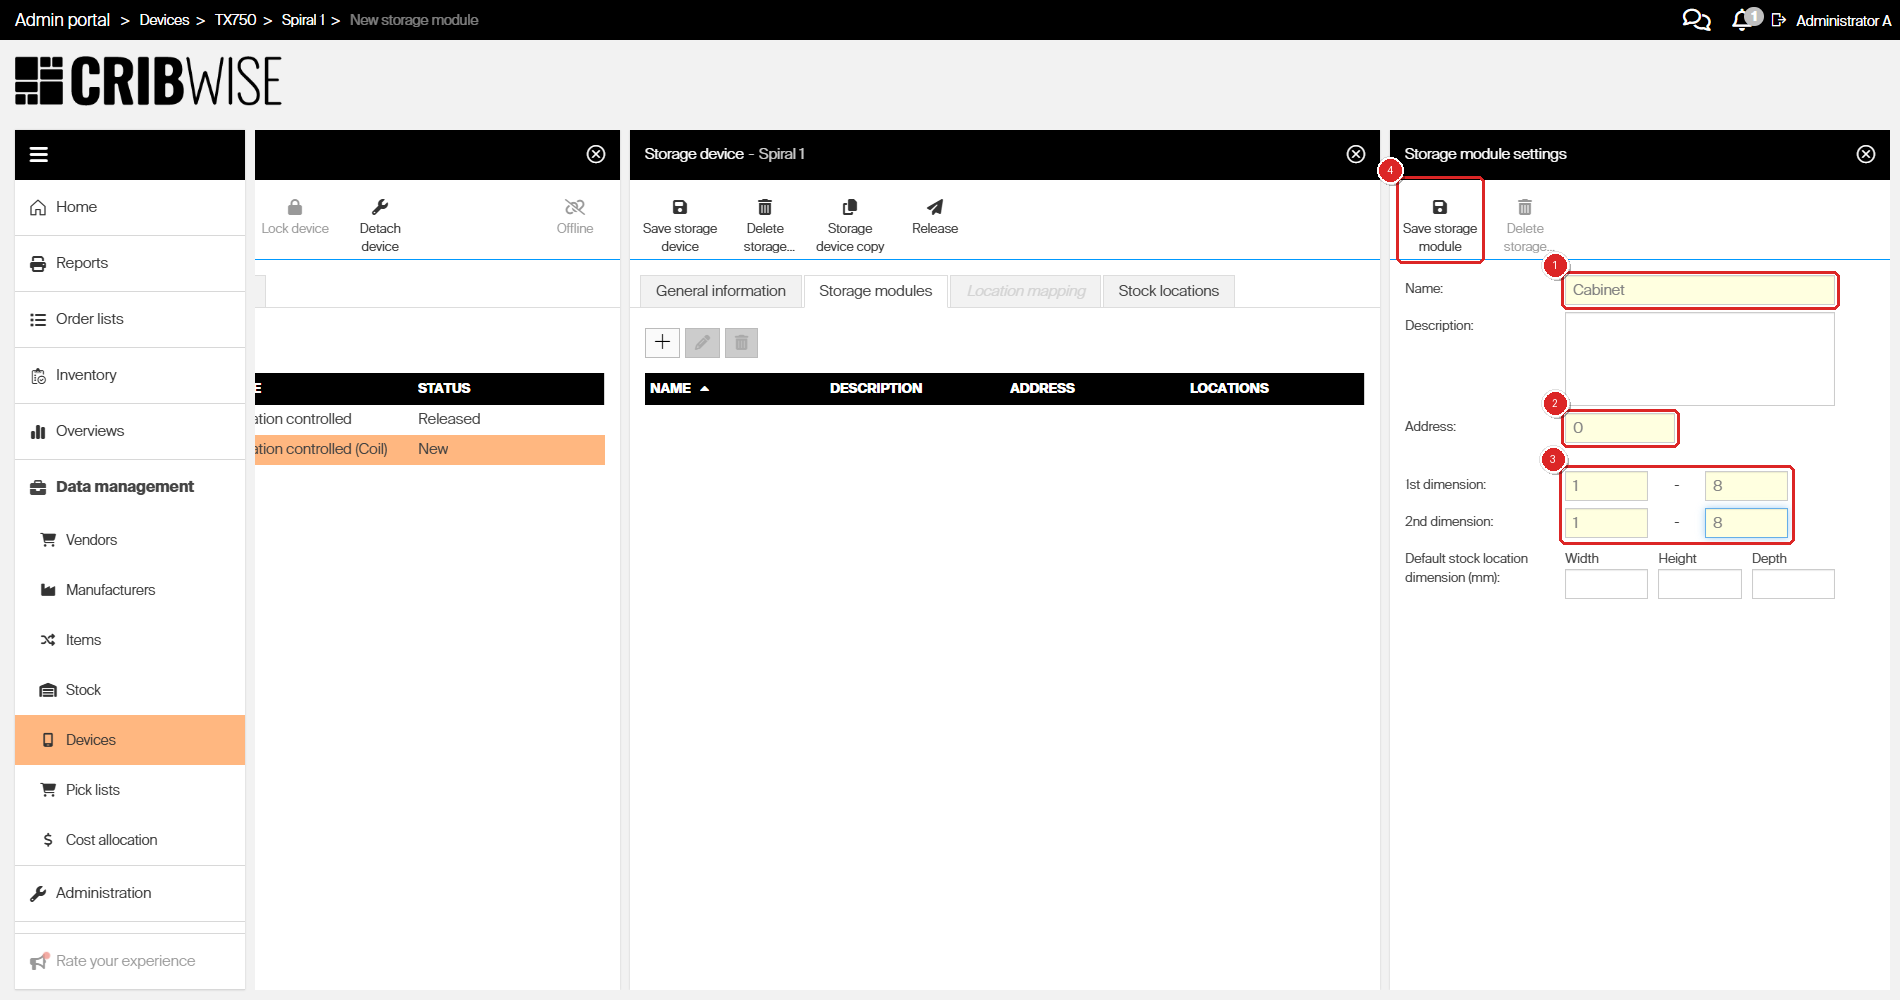
One module per cabinet: Name (1), Address 0 (2), the two dimension ranges (3), then Save storage module (4).
| Field | Required | What to enter |
|---|---|---|
| Name | Yes | A name for the cabinet, for example Cabinet. It becomes the second part of every stock location name. |
| Address | Yes | 0. A Spiral Box module needs no hardware address. |
| 1st dimension | Yes | The coil lines, counted from the top: 1 to the number of lines, at most 8. Two lines share one shelf level. |
| 2nd dimension | Yes | The coils in one line: 1 to the number of coils, at most 8. |
| Description | No | Free text, for example where the cabinet stands. |
| Default stock location dimension (mm) | No | Width, height and depth given to every location this module creates. |
Add one module per cabinet. A second Spiral Box cabinet is a second storage device, not a second module.
Important: The dimension ranges are fixed once the module is saved — the four fields are greyed out when you reopen it. Only Name, Description and Address stay editable. To change the grid, remove the module and add it again.
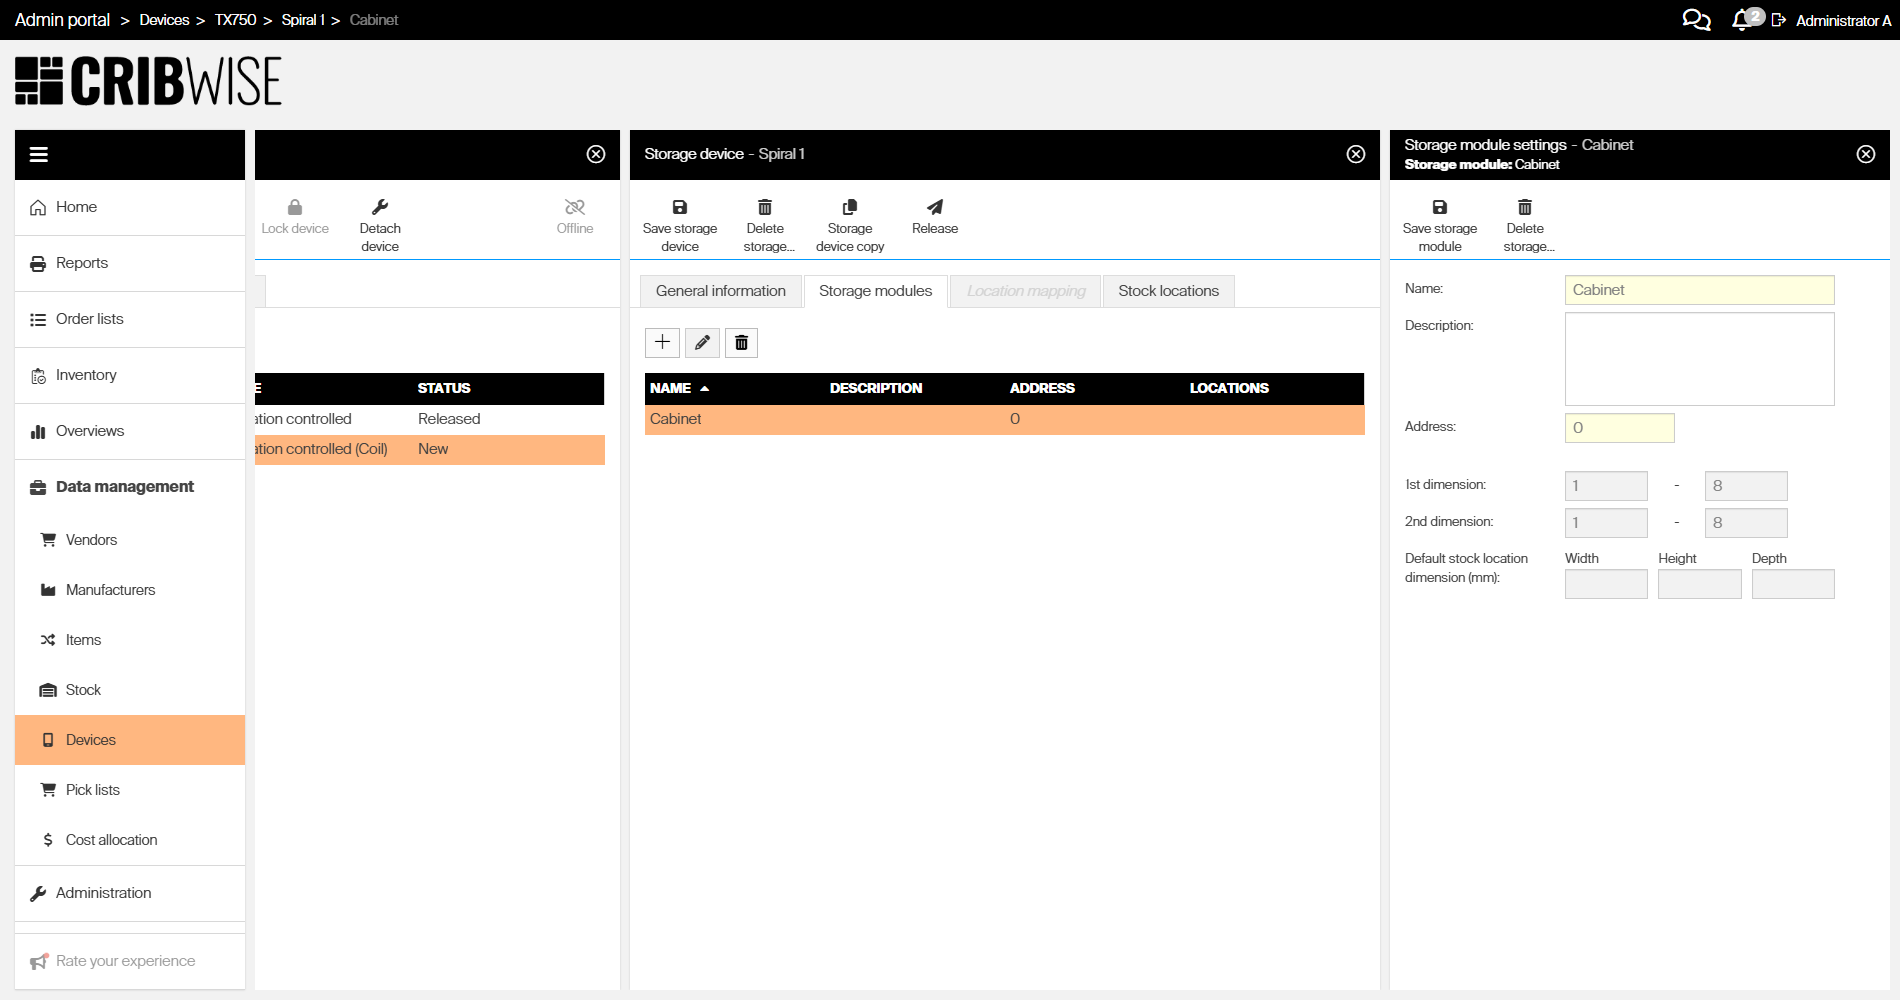
The same module reopened after saving. The dimension ranges are greyed out.
Step 5 — Check the generated stock locations
- Open the Stock locations tab.
One location per coil is already there, sorted by coil line and then by coil. Widen the Location name column if the names are cut off.
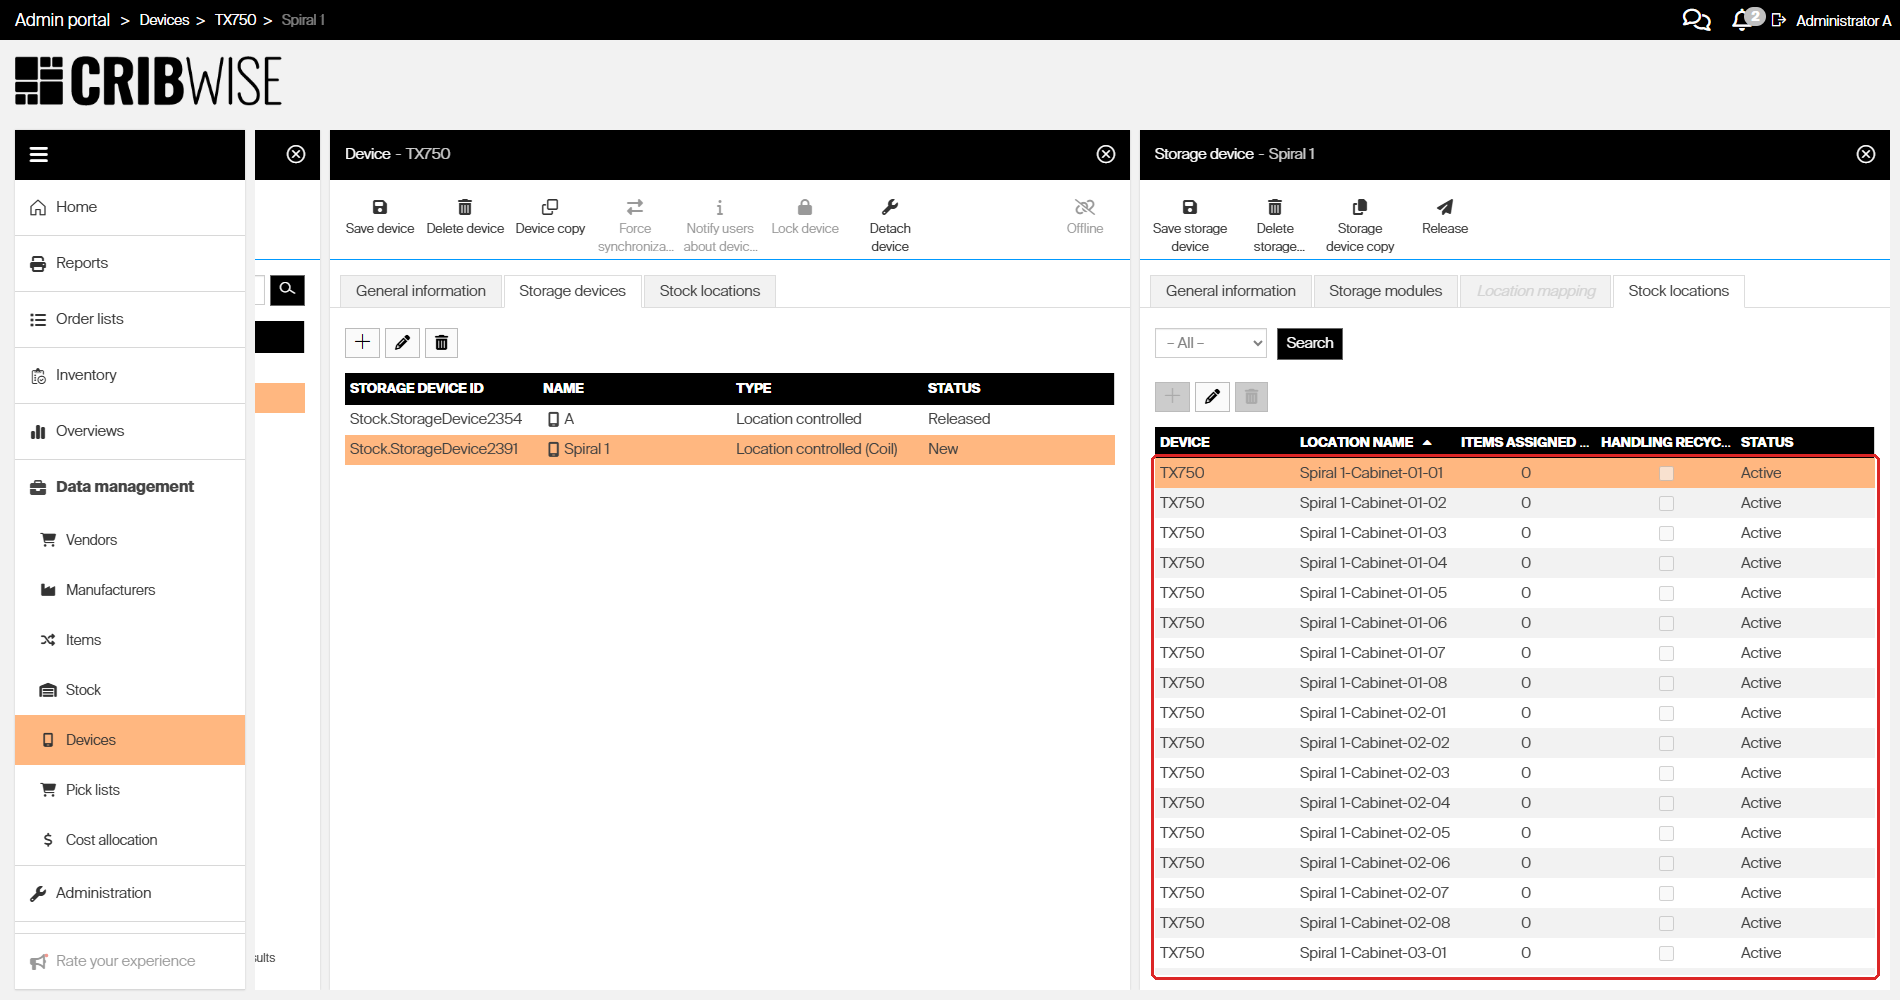
Ranges 1–8 and 1–8 produced 64 locations, from Spiral 1-Cabinet-01-01 to Spiral 1-Cabinet-08-08. Items Assigned is 0 on every row until you assign items.
| You entered | You get | Named |
|---|---|---|
| 1st dimension 1–8, 2nd dimension 1–8 | 64 locations | Spiral 1-Cabinet-01-01 … Spiral 1-Cabinet-08-08 |
| 1st dimension 1–2, 2nd dimension 1–3 | 6 locations | Spiral 1-Cabinet-01-01 … Spiral 1-Cabinet-02-03 |
Step 6 — Release the storage device
- Go back to the General information tab.
- Click Release.
- Confirm Do you really want to release storage device (name)? with Yes.
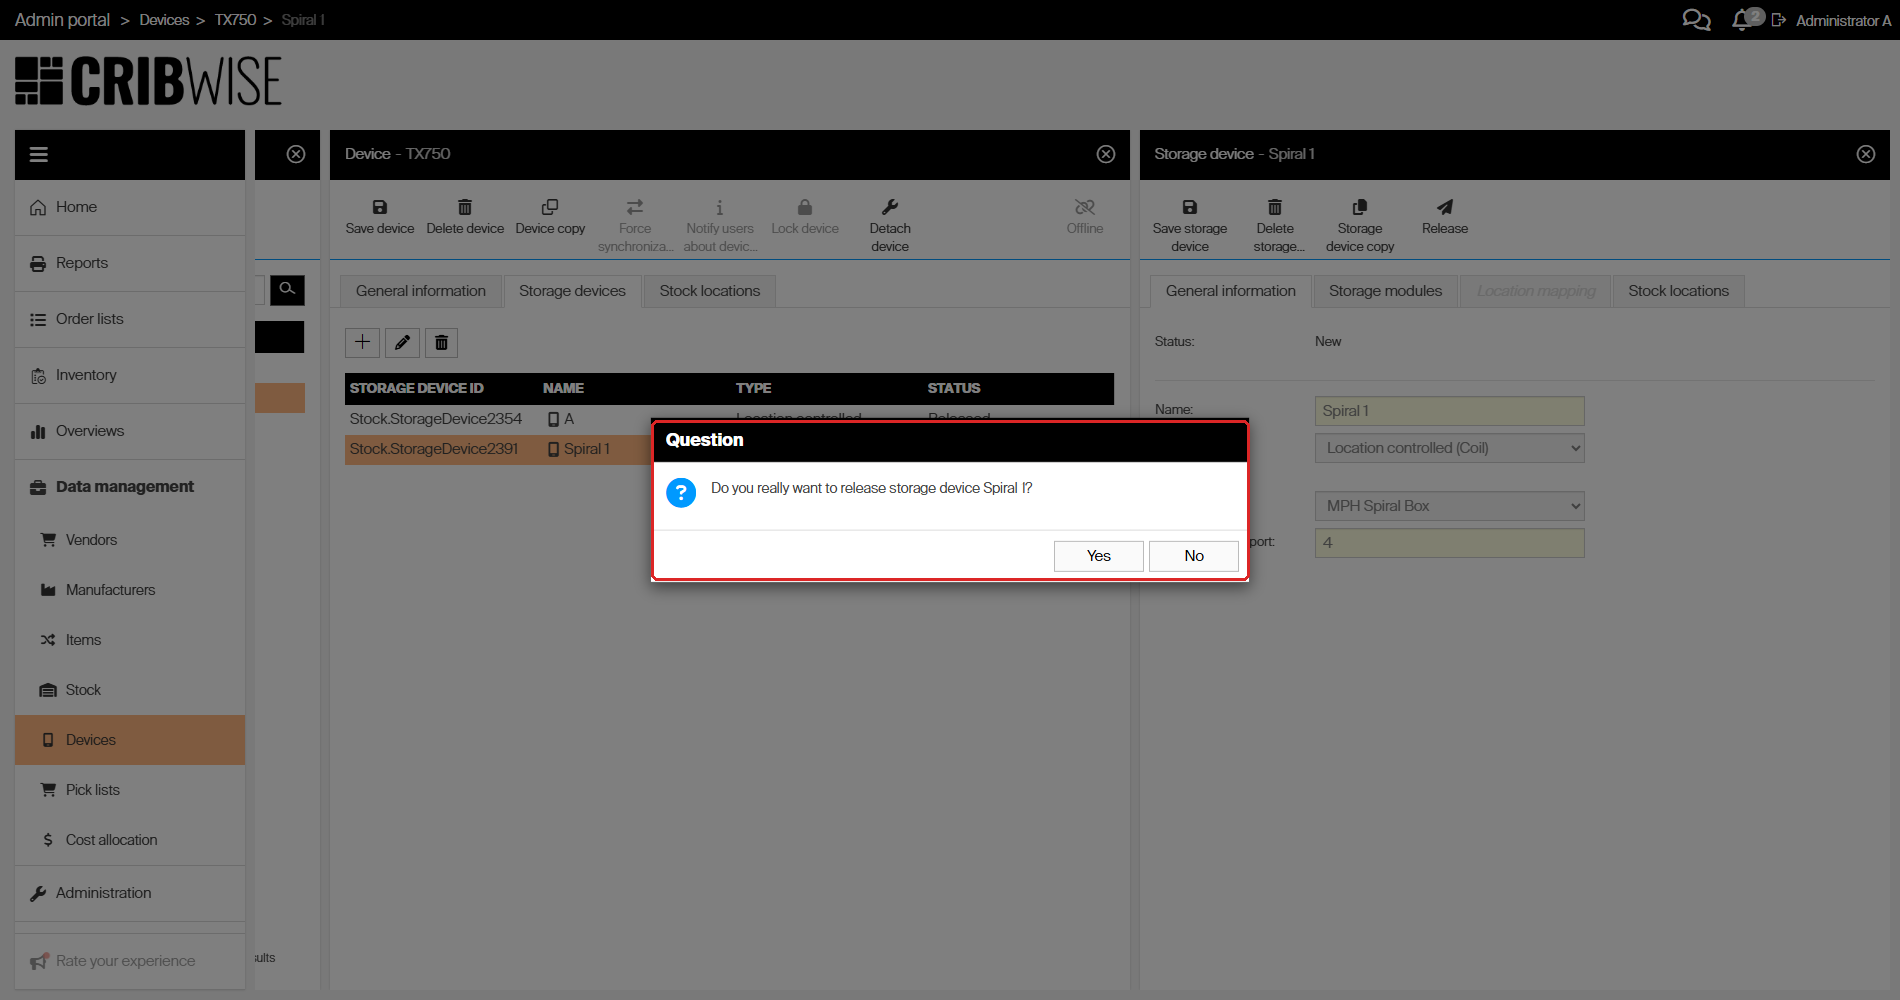
Release asks for confirmation. There is no way back after Yes, so check the coil grid first.
Success: The status changes from New to Released, Release greys out, and the machine and its coil locations are available at the Shop Floor Interface.
Settings summary
| Setting | Value |
|---|---|
| Type | Location controlled (Coil) |
| Manufacturer | MPH Spiral Box |
| Communication port | The port the machine is physically connected to |
| Storage modules | One per cabinet, Address 0 |
| 1st dimension | 1–8, the coil lines — two lines per shelf level |
| 2nd dimension | 1–8, the coils in one line |
| Location mapping | Not used |
Next steps
- Assign items to the coil locations — see How to manage stock locations (Shop Floor Interface).
- Add the next cabinet — repeat the steps above, or use Storage device copy and change the name and port.
Troubleshooting
| Problem | Likely cause | Fix |
|---|---|---|
| Saving fails with Cannot create location controlled storage device for cloud device | The device you picked is a cloud device | Add the machine to the device that runs the Shop Floor Interface next to it. Only open storage works on a cloud device. |
| The Storage modules and Stock locations tabs are greyed out | The storage device has not been saved yet | Click Save storage device first. Both tabs open on the first save. |
| Location mapping is greyed out | A Spiral Box does not use location mapping | Nothing to do — the tab only opens for models that need it. |
| The dimension fields are greyed out when you reopen the module | Dimension ranges are fixed at the first save of the module | Remove the module and add it again with the correct ranges. |
| Too many or too few stock locations were created | The dimension ranges do not match the cabinet | Count the coil lines (1st dimension) and the coils in one line (2nd dimension), then rebuild the module. |
| Type and Manufacturer cannot be changed | Both are locked from the first save onwards | Delete the storage device and create it again. Deleting also removes its modules and stock locations. |
| Release is greyed out | The storage device is already released | Nothing to do. Check Status on the General information tab. |
Related articles
- How to configure storage devices — the full storage device workflow, for every supported machine.
- Supported storage devices – configuration reference — type, dimension ranges and module type for every supported model.
- How to create and manage devices — create the device the Spiral Box is wired to.
- Sielaff WA2020, SU2020 – storage device setup — the other coil machines, set up the same way with different ranges.
- MPH AVC-100 – storage device setup — the other MPH machine, which builds its locations differently.
- Understanding stock structure: stocks, devices, and locations — how stocks, devices, storage devices and locations fit together.
- How to find Device ID and Storage Device ID — the IDs support asks for.