
What you can do
Connect CRIBWISE to Tool Library so that every assembly you create or update in Tool Library arrives in CRIBWISE as items, ready to be stocked and picked.
The transfer runs one way, from Tool Library into CRIBWISE, and carries item data in GTC v2.0 package format. When the items arrive, you give them a vendor and release them.
Note: The connection is made by the Tool Library Logistic Connector, a program that runs on the machine where Tool Library is installed. Tool Library itself has no settings page in the Admin Portal.
How the connection works
The connector sits next to Tool Library and does four things:
- Registers with the Tool Library API.
- Receives notice of new or updated assemblies.
- Requests the assembly data and receives it as a GTC package.
- Sends the GTC package to CRIBWISE for import.
CRIBWISE then creates every item in the assembly that it does not already have. The fields are filled in exactly as they are for a package you import by hand, so the same mapping applies here — see Understanding GTC package import mapping.
| What happens | Where |
|---|---|
| An assembly is created or updated | Tool Library |
| The assembly is turned into a GTC package | Tool Library Logistic Connector, on the Tool Library machine |
| The items are created | CRIBWISE, automatically |
| The items get a vendor and are released | Admin Portal, by you |
Important: An item CRIBWISE already holds is never overwritten. Items are matched on item ID, so an assembly that carries a changed version of an item you already have leaves your item untouched. Edit it in CRIBWISE if the change matters.
Before you start
- Tool Library installed and running, and access to the machine it runs on.
- The Tool Library Logistic Connector installer and the connection details for your CRIBWISE tenant. Ask your CRIBWISE contact for both — the connector is not downloaded from the Admin Portal.
- Administrator access to the CRIBWISE Admin Portal.
- A vendor for the new items to point at. Vendors are managed under Data management > Vendors, and you cannot create one while editing an item.
Quick start
Experienced users — five steps:
- Install the Tool Library Logistic Connector on the machine that runs Tool Library.
- Create or update an assembly in Tool Library.
- In the Admin Portal, go to Data management > Items.
- Filter the list on the status Defined (imported) to find the new items.
- Give each item a vendor and set its status to Released.
Need more detail? Follow the full steps below.
Steps
Step 1 — Install the Tool Library Logistic Connector
Install the connector on the machine where the Tool Library application runs. It reads assembly data locally and forwards finished GTC packages to CRIBWISE, so it has to run where Tool Library runs.
Your CRIBWISE contact supplies the installer and the details it needs to reach your tenant. Nothing has to be switched on in the Admin Portal first.
Step 2 — Create or update an assembly in Tool Library
Work in Tool Library as you normally would. The connector picks up new and updated assemblies and asks Tool Library for their data.
Every item in the assembly that CRIBWISE does not already know is created. The flow starts in Tool Library — there is no import to run in CRIBWISE.
Step 3 — Find the new items
Items created by an integration arrive with the status Defined (imported), which the system sets for you. Filter on that status to see exactly what came over.
- Go to Data management > Items.
- Select the Advanced filter icon (1).
- Open the Status list (2).
- Tick Defined (imported) (3).
- Select Apply (4).
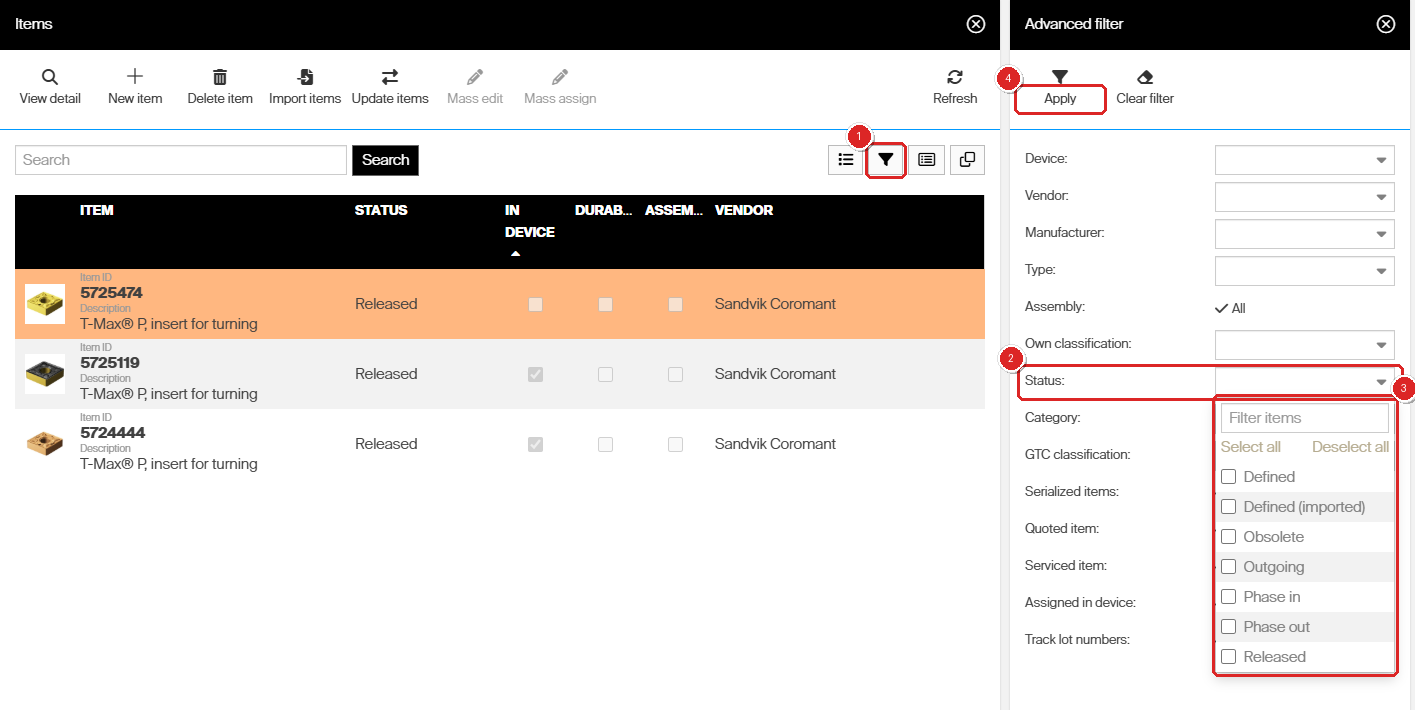
The Status list holds every item status. Tick Defined (imported) to list only the items an import or an integration created.
Step 4 — Set the vendor
An imported item has no vendor. Give it one before you try to order the item.
- Select the item in the list, then select View detail.
- Open the Supplier tab (1).
- Select the search icon in Vendor and choose the vendor (2).
- Select Save item (3).
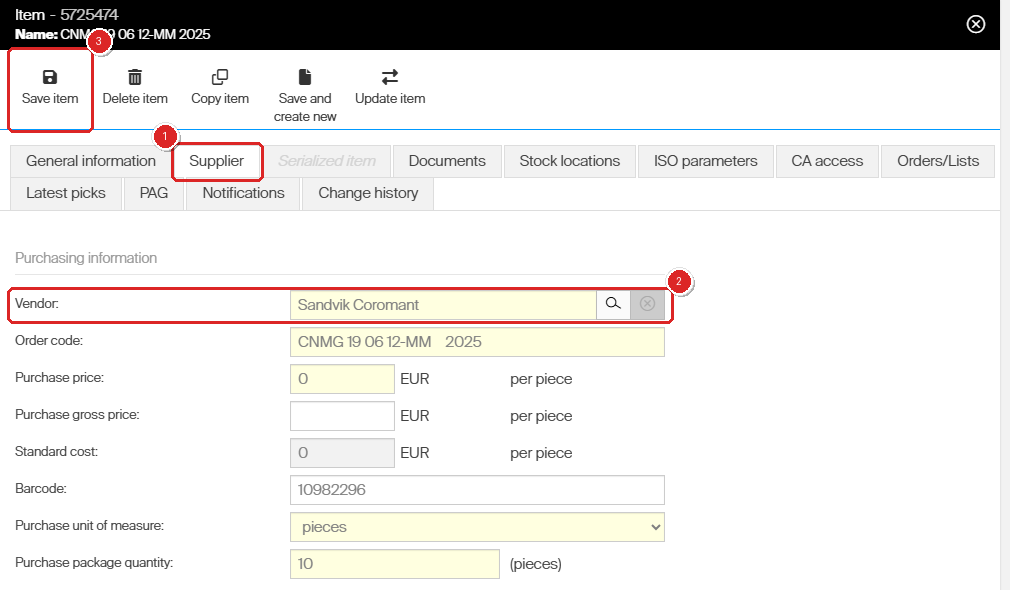
The vendor sits on the Supplier tab under Purchasing information, next to the order code and the purchase price.
Step 5 — Release the item
- Open the General information tab.
- Under Daily use settings, set Status to Released (1).
- Select Save item (2).
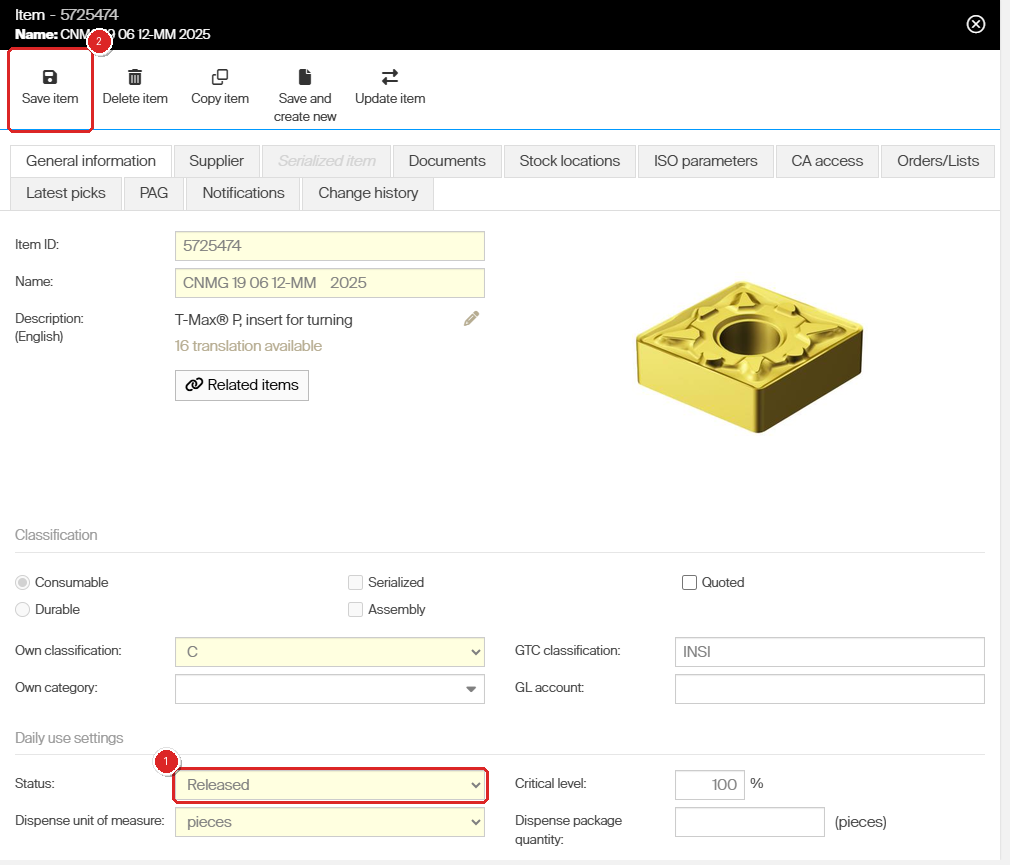
Once an item is released, Defined (imported) is no longer offered in the list — the system sets that status, you cannot choose it.
Important: While an item stays at Defined (imported) it does not synchronize to the Shop Floor Interface and cannot be assigned to a stock location. See Understanding item statuses.
Success: the item shows your vendor and the status Released, and reaches the shop floor at the next synchronization.
Step 6 — Release a whole batch at once
One assembly can bring over many items. Mass edit sets the same vendor and status on all of them in one operation.
- In the Items list, select the Selection mode icon (1).
- Select each item you want to change (2).
- Select Mass edit (3).
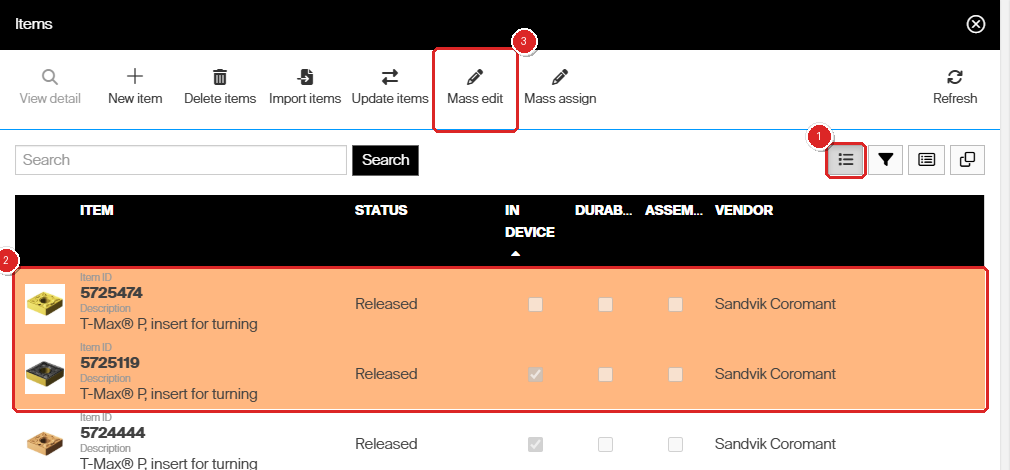
Mass edit stays greyed out until the list is in Selection mode and at least one item is selected.
In the Mass edit panel:
- Tick the checkbox next to Status and choose Released (1).
- Tick the checkbox next to Vendor and choose the vendor (2).
- Select Mass edit (3).
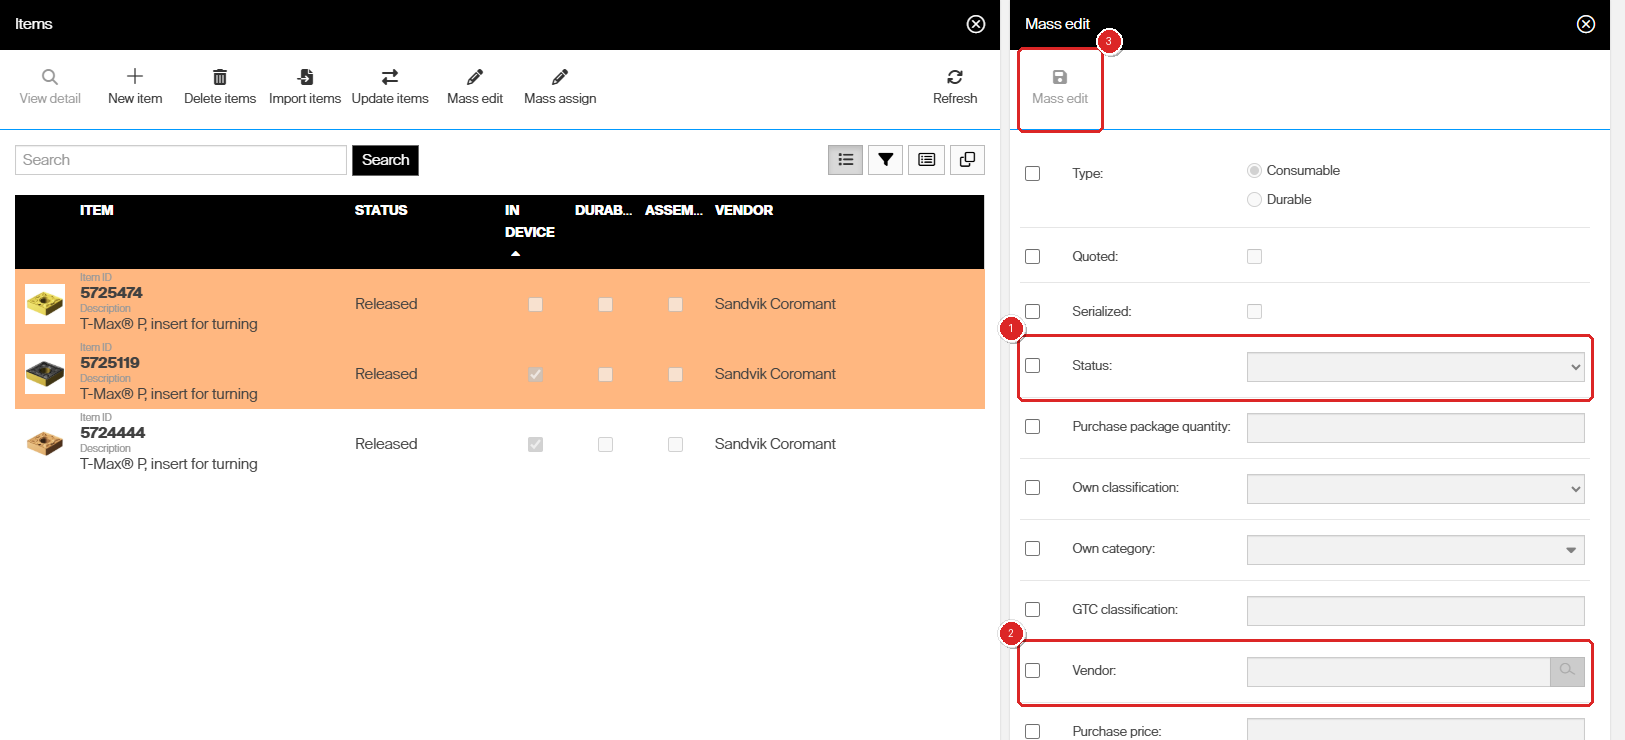
Every field in the panel has its own checkbox. Only the fields you tick are written to the selected items.
Warning: Mass edit writes the same value to every selected item. Check the selection before you apply it.
Check what the connector changed
Every item keeps its own log. Open the item and select Change history (1). Changes made automatically show system in the USER column (2); changes made by a person show that person’s name.
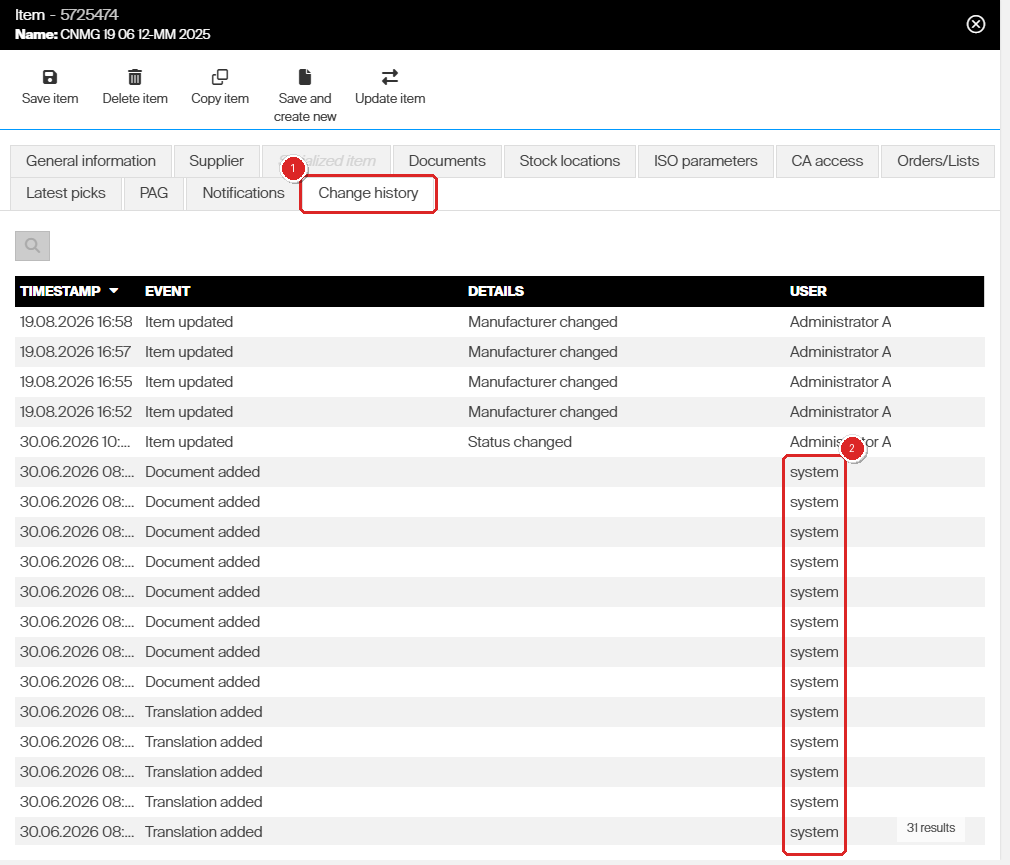
Change history for an imported item: the documents and translations that came with the import are logged against system, the later edits against a named user.
For a view across the whole system, go to Administration > Event log and set the type to Entity created or Assembly created. The CATEGORY column tells you which kind of record each row refers to.
Next steps
- Complete the item data the package could not supply — see Best practices for configuring item fields.
- Assign the released items to stock locations so the shop floor can pick them — see How to manage stock locations (Shop Floor Interface).
Troubleshooting
| Problem | Likely cause | Fix |
|---|---|---|
| No new items in CRIBWISE after you create an assembly in Tool Library | The connector is not running, or has not registered with Tool Library | Check the connector on the Tool Library machine. The Admin Portal cannot tell you whether the connector is alive. |
| You cannot find a Tool Library page in the Admin Portal | There is none | The connection is configured in the connector. Administration > Integration covers API keys, ERP settings, TDM Global Line and item catalogs only. |
| The items arrived, but the shop floor cannot see them | They are still at Defined (imported) | Set a vendor and change the status to Released. |
| An item did not pick up a change made in Tool Library | Existing items are never overwritten — items are matched on item ID | Make the change on the item in CRIBWISE. |
| Mass edit is greyed out | The list is not in Selection mode, or no item is selected | Select Selection mode, then select the items you want to change. |
| A field you set in Mass edit did not change | Its checkbox was not ticked | Tick the checkbox next to each field you want written, then select Mass edit again. |
| The vendor you need is not in the picker | The vendor record does not exist yet | Create it under Data management > Vendors, then set it on the item. |
Related articles
- Understanding GTC package import mapping — the field-by-field mapping between a GTC package and a CRIBWISE item.
- How to import items from a GTC package — import a package by hand, without the connector.
- Understanding item statuses — what Defined (imported) and Released control.
- Item fields and settings reference — every field on the item screen, tab by tab.
- How to integrate Zoller TMS with CRIBWISE — the Zoller route, which uses an API key instead of a connector.
- How to integrate WinTool TMS with CRIBWISE — two-way tool data and stock levels with WinTool.
- How to integrate TDM Systems with CRIBWISE — the TDM Systems Global Line integration.