
What you’ll learn
How CRIBWISE handles currencies for purchasing: the system default currency used for every transaction, and vendor-specific currencies used for vendors who invoice you in something else.
Understanding the difference tells you which price you are looking at on an item, an order or a report – and when CRIBWISE converts one currency into the other.
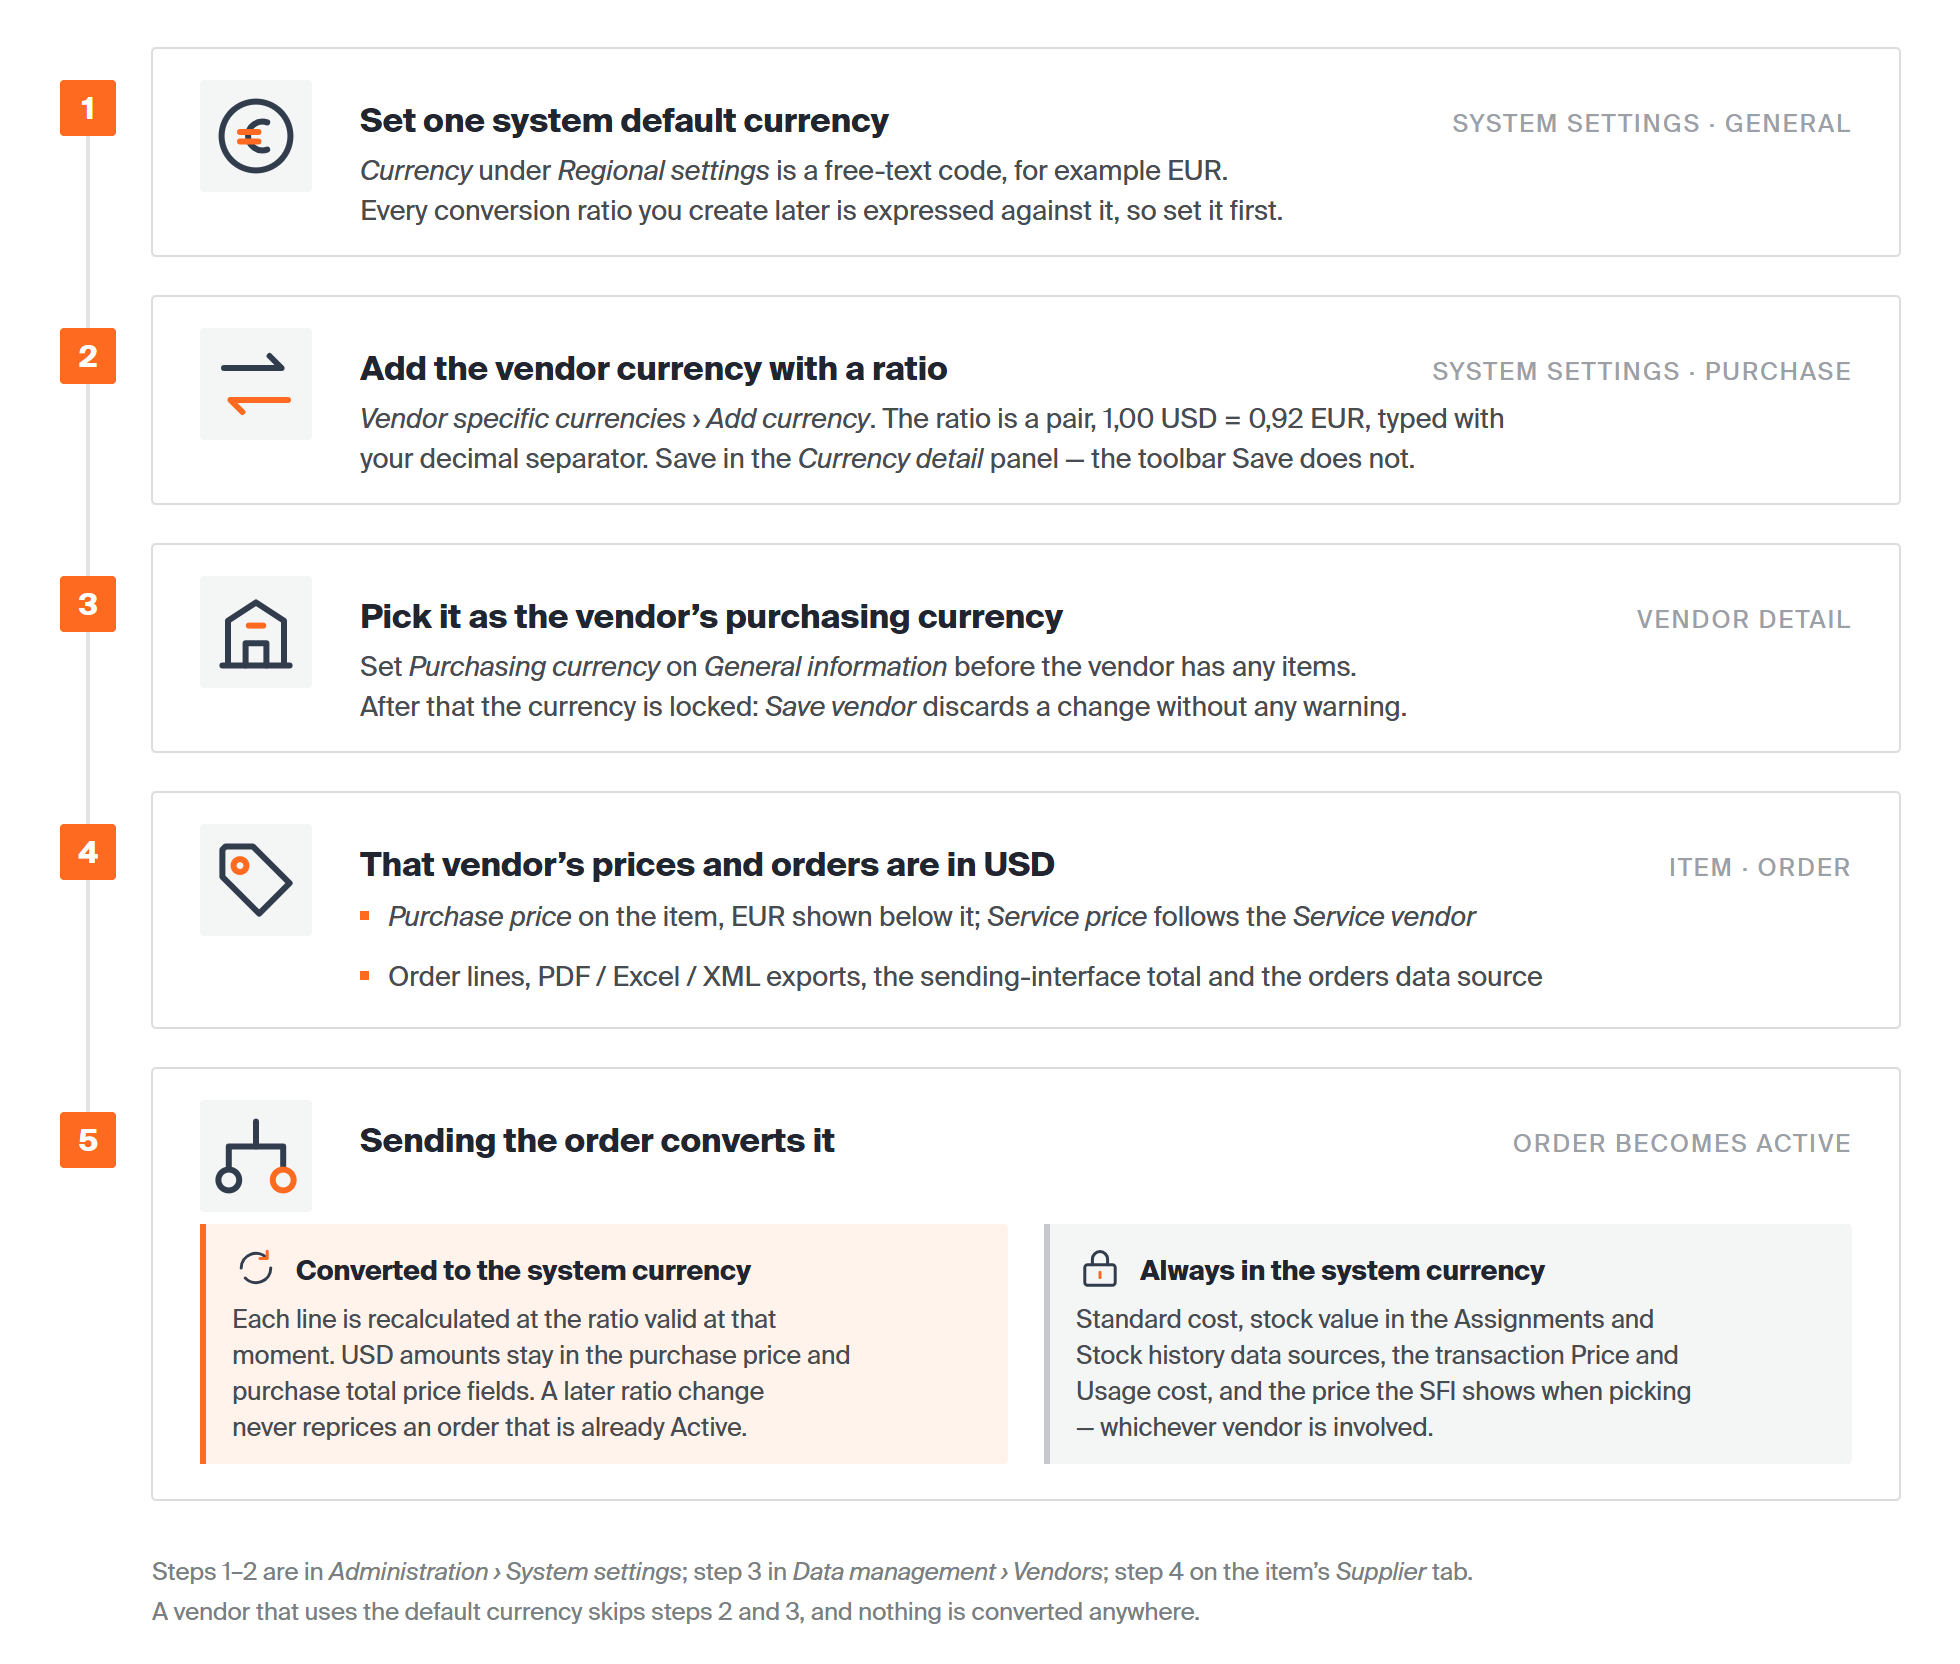
Set the system currency first, add the vendor currency with its ratio, and assign it before the vendor has items. Conversion happens once, when the order becomes Active.
Currencies at a glance
| System default currency | Vendor-specific currency | |
| Where you set it | System settings → General → Regional settings → Currency | Created in System settings → Purchase → Vendor specific currencies, then picked in Purchasing currency on the vendor detail |
| How many | One, for the whole system | One per vendor, as many as you need |
| Needs a conversion ratio | No | Yes – always from the system default currency |
| Used for | All transaction values, stock value, standard cost | Purchase and service prices for that vendor, and its orders |
| Applies to | Every vendor that has no currency of its own | Only the vendor it is set on |
| Can be changed later | Yes | Only while the vendor has no items |
Quick start
Experienced users – put a vendor on its own currency in 4 steps:
- Check the system default currency in Administration → System settings → General → Regional settings.
- Add the vendor currency on the Purchase tab, under Vendor specific currencies, with its conversion ratio, then Save in the Currency detail panel.
- Set Purchasing currency on the vendor, in Data management → Vendors → General information, before the vendor has any items.
- Enter the item prices on the Supplier tab – they are now in the vendor currency, converted below.
Need more detail? Follow the four moves below.
How the setup hangs together
The four places below are always visited in this order. Each one depends on the one before it, which is why a vendor currency set up out of order is hard to correct afterwards.
1. Set the system default currency
System settings → General tab → Regional settings. Currency is a free-text code, so type the code your organisation uses, for example EUR. Currency position decides whether the code is printed before or after the amount.
Do this first: every conversion ratio you create later is expressed against this currency.
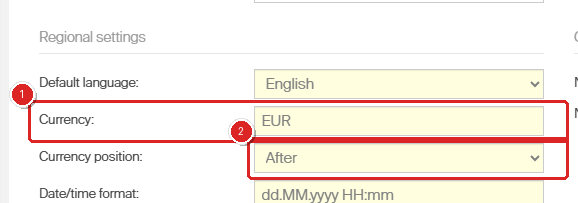
(1) The system default currency. (2) Where the code is printed relative to the amount.
2. Create the vendor currency and its ratio
System settings → Purchase tab → Vendor specific currencies → Add currency. The grid keeps one row per currency and shows the ratio and the moment it was last updated.
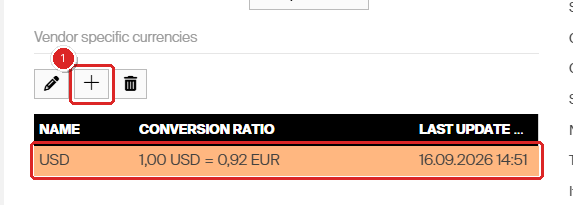
(1) Add currency. The saved row carries the ratio and the date and time it was last updated.
The Currency detail panel opens on the right. The conversion ratio is a pair of numbers, read as “this much of the vendor currency equals this much of the system currency”.
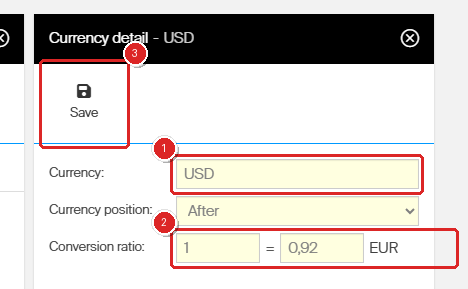
(1) The currency code. (2) The ratio pair. (3) Save – the panel has its own Save, separate from the System settings toolbar above.
3. Assign the currency to a vendor
Data management → Vendors → the vendor → General information → Purchasing currency. The list contains the system default currency, marked (default), plus every currency from the Purchase tab.
Do this while the vendor is still new. Once items exist for the vendor, the currency is locked – see Vendor-specific currency explained below.
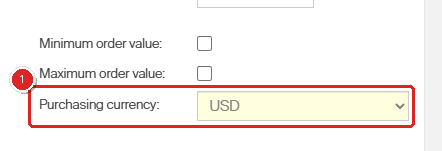
(1) Purchasing currency on the vendor detail.
4. Enter prices on the item
Item → Supplier tab → Purchasing information. Purchase price and Purchase gross price are now entered in the vendor currency, and CRIBWISE shows the converted amount on the line directly below. Standard cost stays in the system currency.
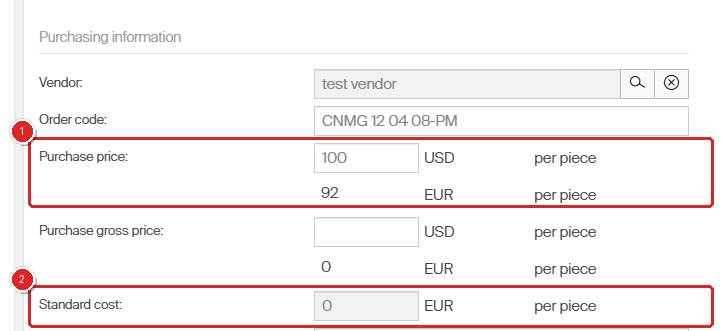
(1) 100 USD per piece, converted to 92 EUR on the line below. (2) Standard cost is always in the system currency.
System default currency explained
The system default currency is the base currency of your CRIBWISE installation. You set it in System settings, on the General tab, under Regional settings.
CRIBWISE uses it for the value of all transactions (both total value and value per piece), for stock value in the assignments and stock history reporting data sources, and for the standard cost of items.
Unless you set something else, every vendor uses the system default currency for the purchase price and service price of its items.
Note: The price per unit that the Shop Floor Interface can show during picking – switched on with Show prices in System settings → Stock administration – is always in the system default currency, converted from the vendor currency using the current conversion ratio.
Vendor-specific currency explained
If the system default currency does not suit a vendor, create the currency you need in System settings on the Purchase tab, then select it on the vendor detail.
Every specific currency must have a conversion ratio from the system default currency, written as a pair – 1,00 USD = 0,92 EUR. CRIBWISE stores the date and time the ratio was last updated and shows it next to each currency in system settings. A currency also carries its own currency position, so a vendor currency can print before the amount while the system currency prints after it.
Important: You cannot change a vendor’s currency once items already exist for that vendor. The field itself stays editable, which makes the block easy to miss: you can pick a new currency and press Save vendor, but the change is rejected and nothing is written. Reopen the vendor and the old currency is still there. To change it, remove the vendor’s items first.
Once a vendor has its own currency, that currency is used instead of the system default in these places:
- Purchase price per unit on the item detail, with the conversion to the system currency shown below the price.
- Service price per unit on the item detail, with the conversion shown below the price. This one follows the Service vendor field, which can be a different vendor from the purchasing one.
- Price per unit and total price of an item in an order, including orders exported to PDF, Excel or XML.
- Price per unit and total price of an item in an order in the orders reporting data source.
- Total price of ordered items passed on by the sending interface.
What happens when an order becomes Active
When an order changes to Active – that is, when it is sent to the vendor – CRIBWISE recalculates the purchase price of every item in the order to the system default currency, using the conversion ratio valid at that moment.
All transactions related to ordering (purchase, restock, goods received, cancelled ordered quantity, scrapped service quantity) then show their main price in the system default currency. The vendor-currency amounts are kept as well, in the separate purchase price and purchase total price fields.
Warning: Changing the conversion ratio between the system currency and a vendor-specific currency does not affect orders that are already Active. Those orders keep the ratio that applied when they were activated. New and draft work uses the new ratio.
Which currency is this number?
When a price looks wrong, the first question is usually which currency it is in. This table answers that for every place a price appears.
| Where you are looking | Shown in | Notes |
| Item → Supplier → Purchase price, Purchase gross price | Vendor currency | System-currency amount on the line below |
| Item → Supplier → Service price | Currency of the service vendor | A separate field from the purchasing vendor |
| Item → Supplier → Standard cost | System default | Always |
| Order line: price per unit and total price, including the PDF, Excel and XML exports | Vendor currency | Until the order becomes Active |
| Order total passed on by the sending interface | Vendor currency | |
| Orders data source: price per unit, total price | Vendor currency | |
| Transactions data source: order price per unit, total order price, order currency, purchase currency | Vendor currency | Purchase-related transactions only |
| Transactions data source: price, usage cost, currency | System default | |
| Assignments and stock history data sources: stock value, standard cost, price per piece | System default | Always |
| Price shown in the Shop Floor Interface during picking | System default | Converted at the current ratio |
Common confusion
| People often think… | But actually… |
| A vendor currency can be corrected at any time. | Once the vendor has items, the currency is locked. The field still looks editable and Save gives no warning – the change is simply not written. Correcting it means removing the items first. |
| Updating a conversion ratio reprices existing orders. | Active orders keep the ratio from the moment they were activated. Only new and draft work uses the new ratio. |
| Reports show prices in the vendor currency. | Only the order-related fields do, in the orders and transactions data sources. Stock value and stock history are always in the system default currency. |
| The service price follows the vendor on the item. | It follows the Service vendor field, which is set separately on the same Supplier tab. |
| Operators see the vendor price when picking. | The Shop Floor Interface always shows the converted system-currency price. |
If a currency will not save
| What you see | Why | What to do |
| The conversion ratio box turns red and the currency will not save, with no message. | The number was typed with the wrong decimal separator. | Use the separator configured for your system in System settings → General → Regional settings, for example 0,92 rather than 0.92. |
| “There are unsaved changes at new currency, do you really want to discard them?” | The Currency detail panel was closed instead of saved. | Answer No and use Save inside the Currency detail panel. The System settings toolbar Save above it does not save the currency. |
| A vendor keeps reverting to its old currency after Save. | Items already exist for that vendor, so the currency is locked. | Remove the vendor’s items first, or create a new vendor with the right currency from the start. |
Take action
Ready to set this up? Set the system default currency in System settings, add vendor currencies on the Purchase tab, and assign one to a vendor in How to manage vendors.
Related articles
- All system settings quick reference – where the default currency and the list of vendor currencies live.
- How to manage vendors – assign a currency to a vendor and maintain vendor details.
- Item supplier settings reference – every field on the Supplier tab, including purchase price, service price and service vendor.
- Understanding item costs: standard cost and usage cost – how CRIBWISE values items in the system default currency.
- Report data sources reference – which currency each reporting field uses.