
What you can do
Set up consignment in CRIBWISE so a vendor owns the stock in your device until an operator picks it. You flag the item’s device assignment as consigned, order those items on their own purchase order, and let CRIBWISE build invoice requests from what was actually consumed.
Before you start
- Administrator or Manager access to the Admin Portal, covering the Data management and Administration menus.
- The item already exists and is assigned to a device. Consignment is set on that assignment, so there is nothing to flag until the assignment exists. See Understanding stock structure: stocks, devices, and locations.
- The vendor record exists and is the vendor that supplies the item. See How to manage vendors.
- A decision about which items in which devices are consigned. Read Consignment management: setup, ordering, and invoicing first if you are still choosing.
Important: Consignment is set for each combination of item and device, on the item’s device assignment. The same item can be consigned in one device and bought normally in another, and consigned and normally purchased items can sit side by side in the same stock.
Quick start
Experienced users — set up consignment in 5 steps:
- Confirm Allow consignment invoice requests under Administration > System settings > Purchase.
- Set the Consignment order template on the vendor’s General information tab.
- Tick Consignment on the item’s device assignment (Data management > Items > item > Stock locations > Edit device assignment).
- Tick Generate consignment invoice requests on the vendor’s Consignment invoicing tab and set the period.
- Order the items on a purchase order with Consignment ticked.
Need more detail? Follow the full steps below.
Steps
Step 1 — Confirm that consignment invoicing is allowed
- Go to Administration > System settings.
- Open the Purchase tab.
- Check that Allow consignment invoice requests is ticked.
- If you changed it, click Save.
This is the only consignment setting in System settings. It controls invoicing, not the flag itself — you can mark an assignment as consigned without it, but no invoice request will ever be generated.
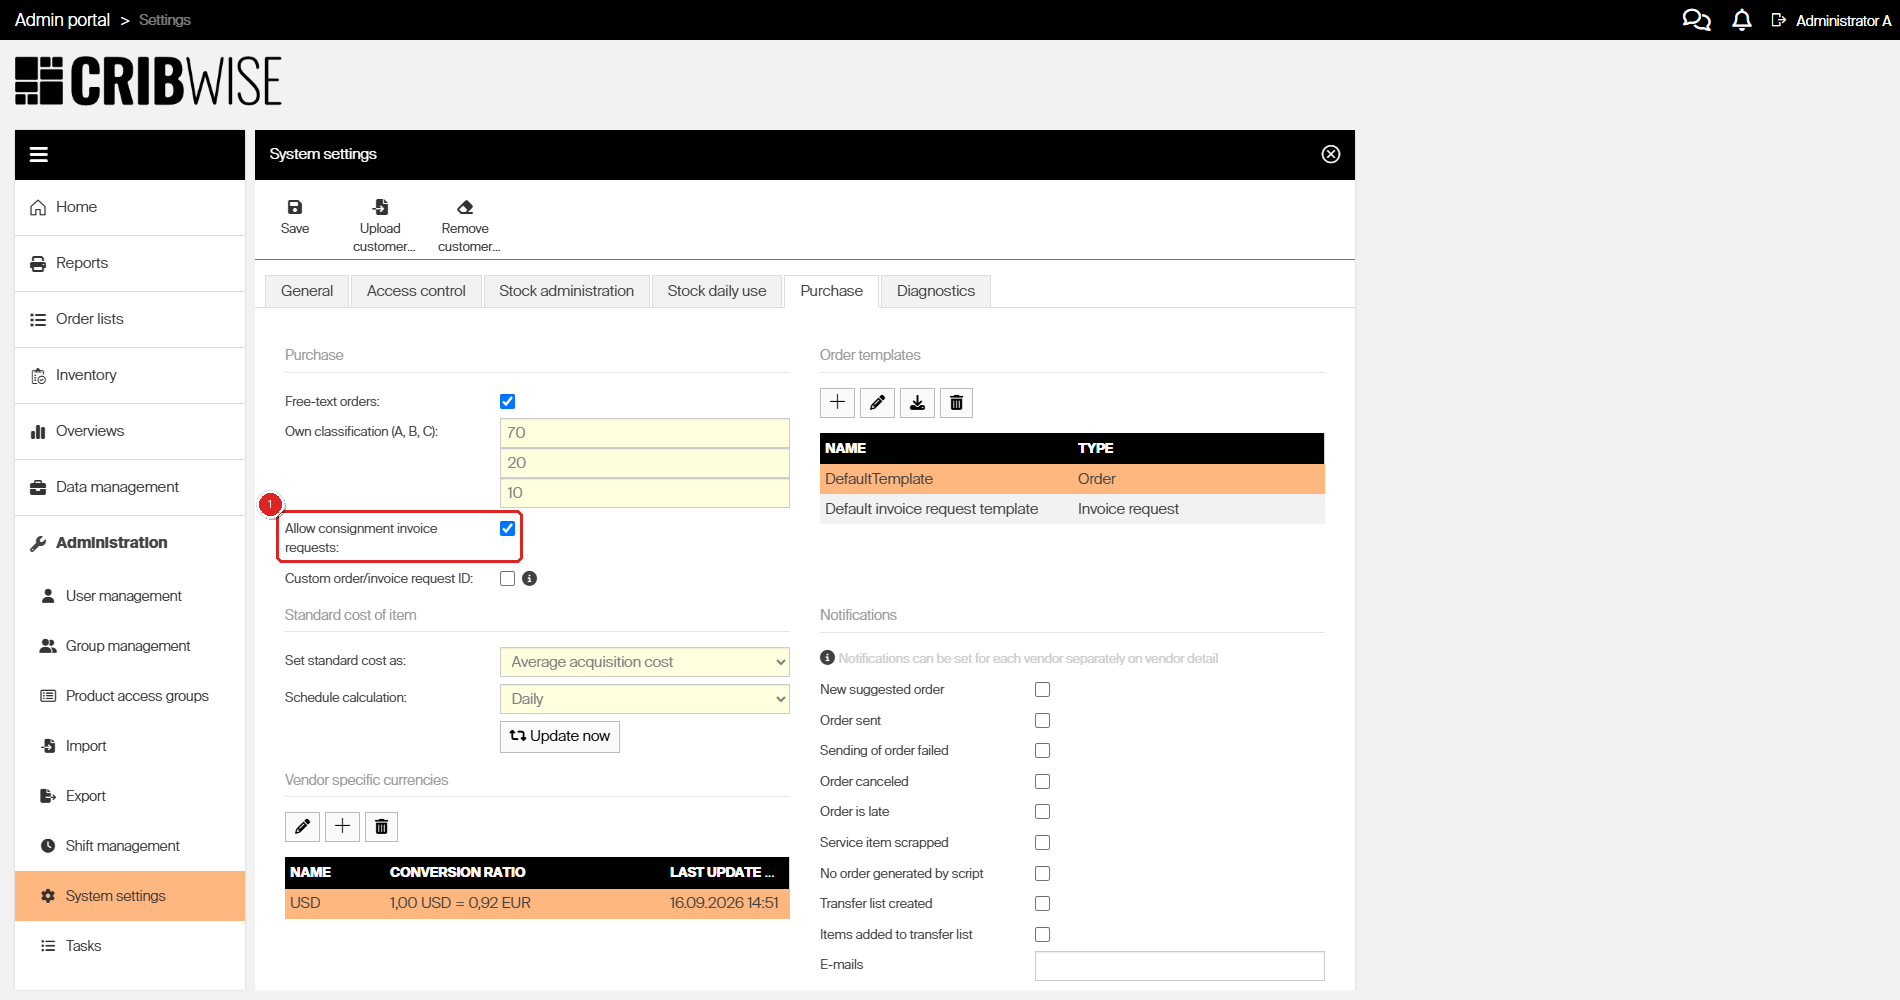
Step 1: Allow consignment invoice requests on the Purchase tab. The Order templates list on the right is where the invoice request template comes from.
Note: The templates used to send an invoice request are managed in the same place, under Order templates. See How to customize consignment invoice templates.
Step 2 — Set the consignment order template on the vendor
- Go to Data management > Vendors.
- Select the vendor and click View detail.
- On the General information tab, choose a template in Consignment order template.
- Click Save vendor.
Consigned items go on their own purchase orders, so they can use their own layout. The two template fields work like this:
| Field | Used for |
| Order template | Normal purchase orders sent to this vendor. |
| Consignment order template | Purchase orders for consigned items. Set it to the same template as above unless the vendor wants a different document. |
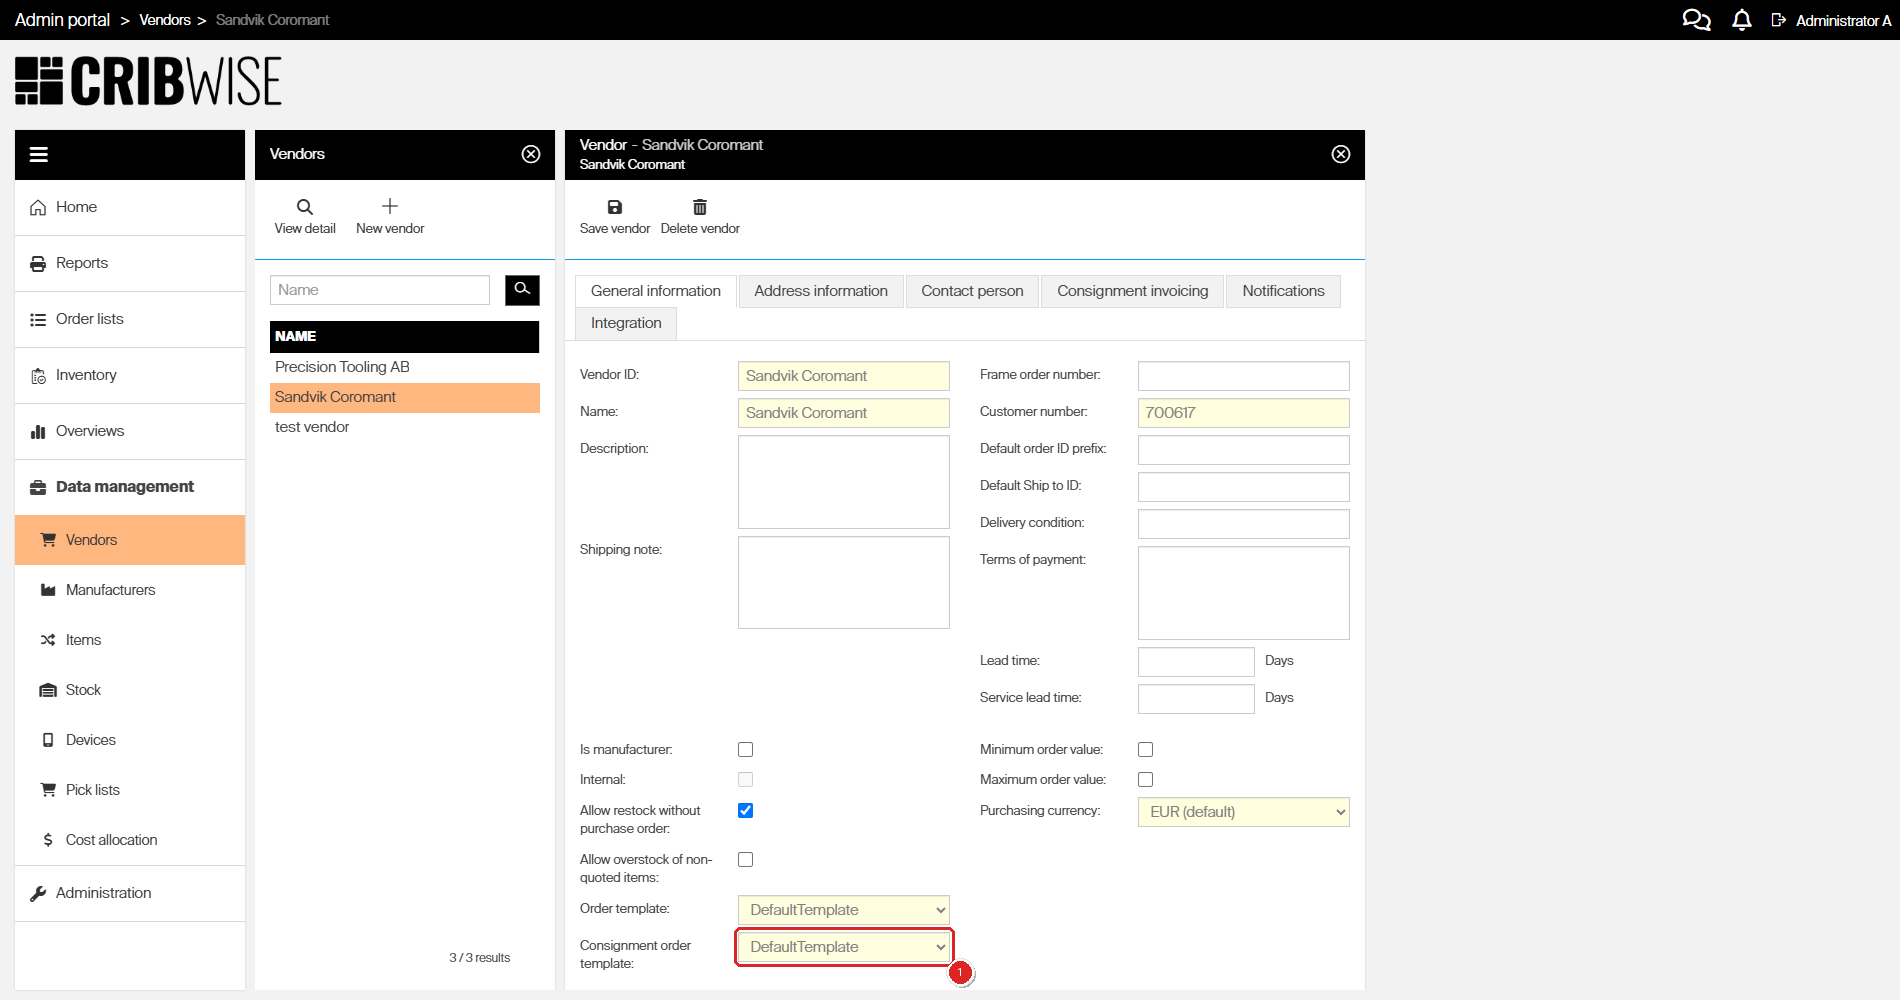
Step 2: the Consignment order template field, directly below Order template at the bottom of the General information tab.
Note: Both template fields are mandatory when you create a vendor, so an existing vendor already has one. The list offers only templates of type Order — invoice request templates are chosen later, per invoice request.
Step 3 — Flag the device assignment as consigned
- Go to Data management > Items.
- Select the item and click View detail.
- Open the Stock locations tab.
- In the Device assignments grid, select the row for the device you want to consign.
- Click Edit device assignment (the pencil above the grid).
The Assignment settings panel opens on the right.
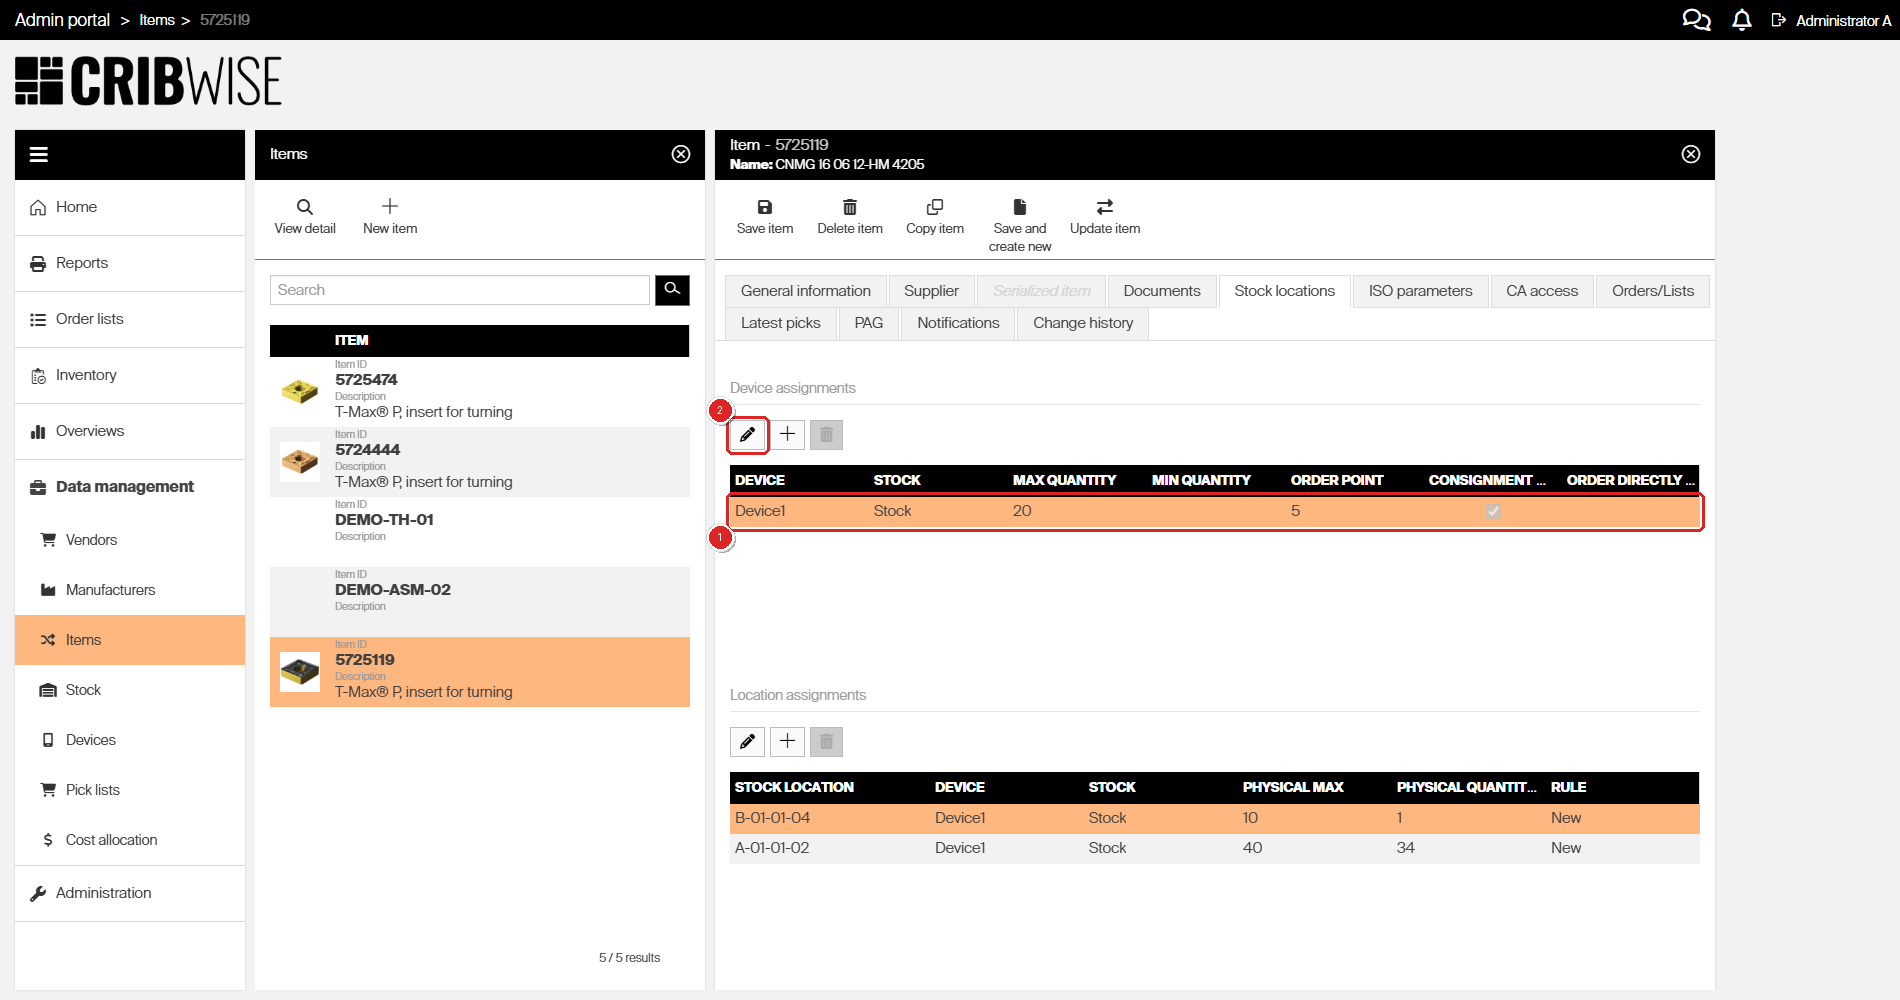
Step 3: select the device assignment row (1), then click Edit device assignment (2). The CONSIGNMENT column on the right of the grid shows the flag once it is saved.
Tick Consignment and save
- Tick Consignment.
- Click Save assignment.
The panel holds the settings that apply to this item in this device:
| Field | What it does |
| Max quantity | How many pieces the device should hold. Reorder calculations fill up to this number. |
| Order point | The level at which the item is reordered. |
| Consignment | Marks this item, in this device, as consigned. Changes both how it is ordered and how it is invoiced. |
| Service add on information | Free text passed on with service orders. Not used by consignment. |
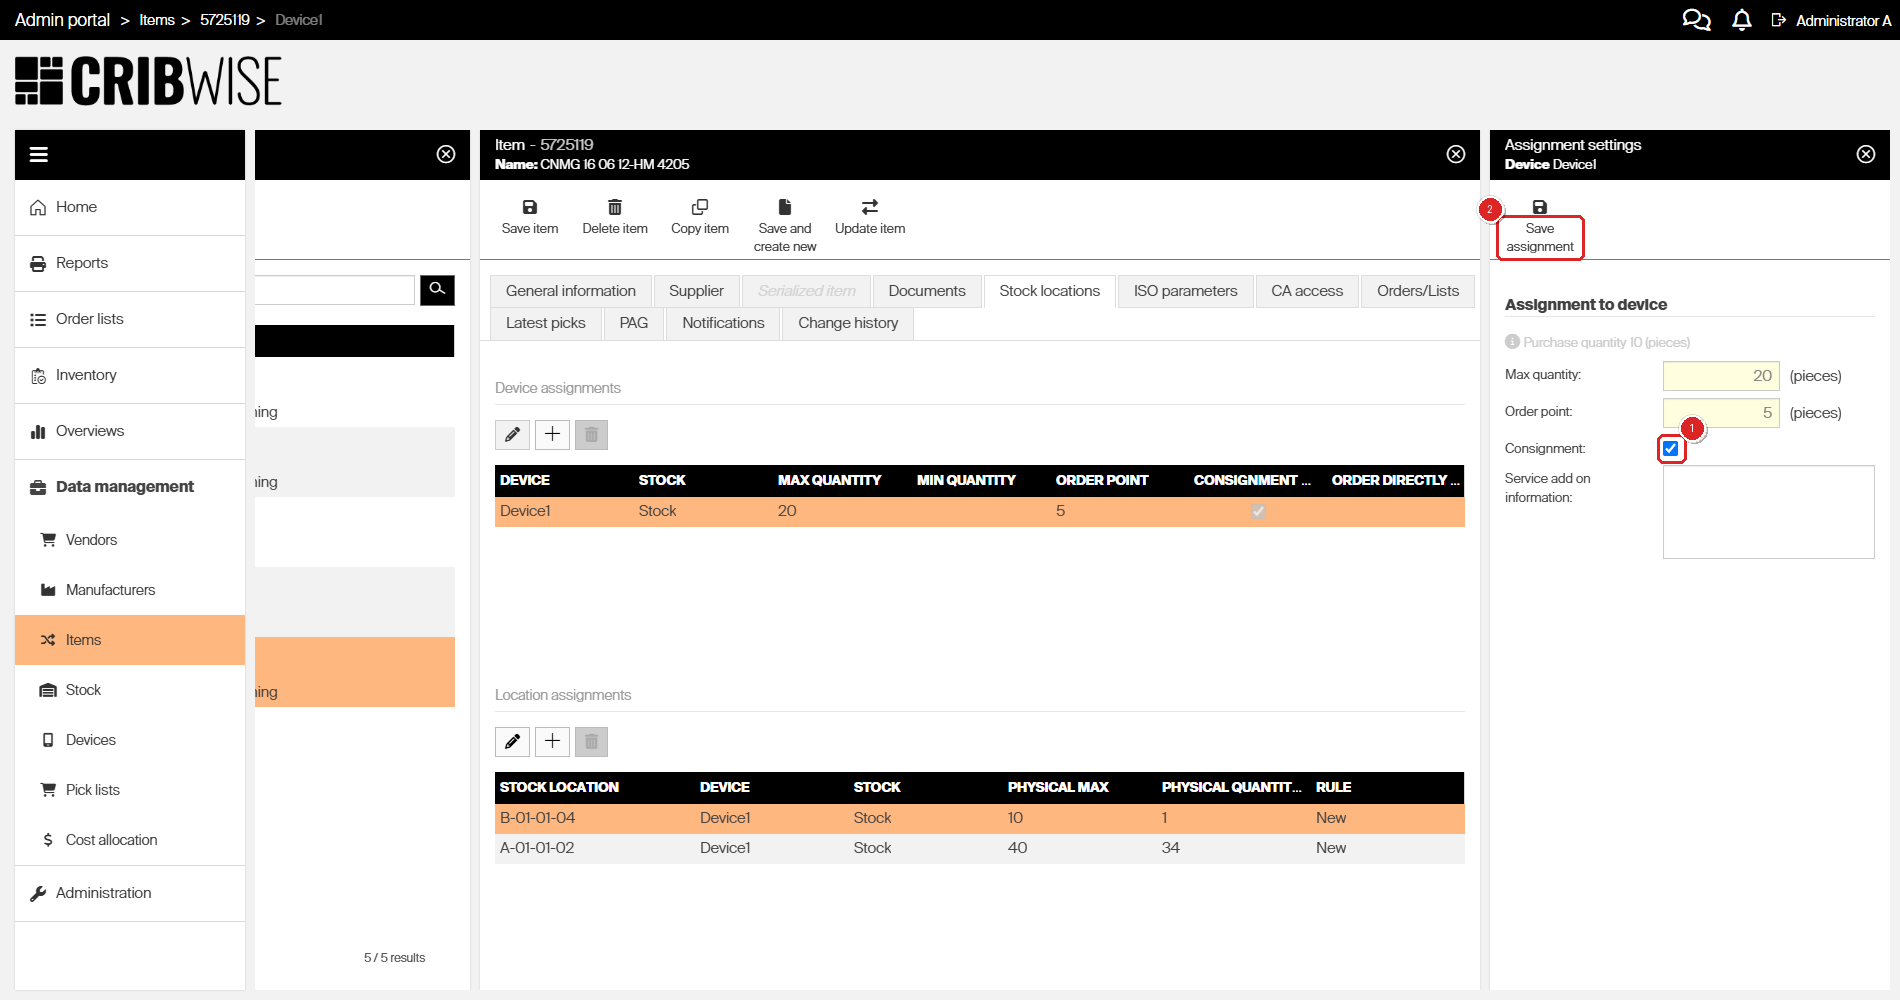
Step 3: tick Consignment (1), then click Save assignment (2). Note that Purchase quantity at the top of the panel is read-only.
Success: the CONSIGNMENT column in the Device assignments grid shows a tick for that row. The tick is read-only — change it from the Assignment settings panel.
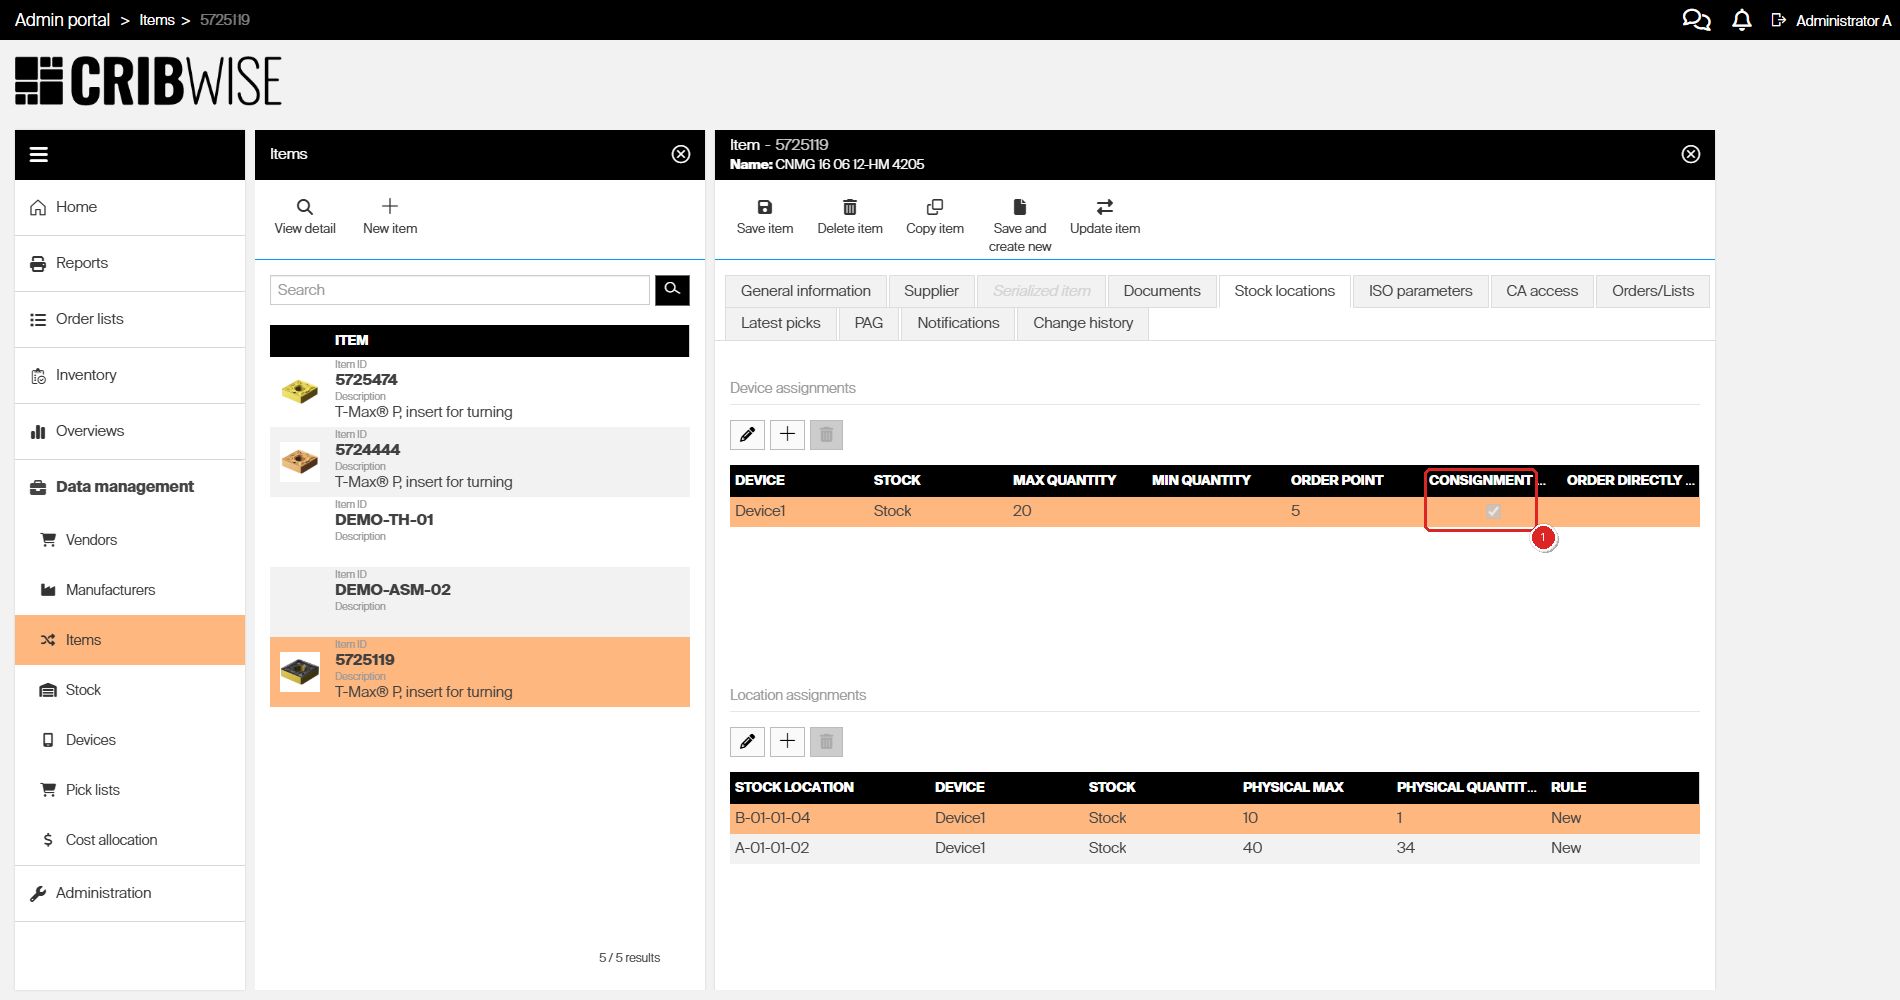
Success state: the CONSIGNMENT column carries a tick for the saved assignment.
Warning: From this moment the item can no longer be added to a normal purchase order for that device. If a reorder is already in progress, finish it before you set the flag.
Step 4 — Turn on consignment invoicing for the vendor
- Go to Data management > Vendors and open the vendor.
- Open the Consignment invoicing tab.
- Tick Generate consignment invoice requests.
- Choose a Period.
- Set the Starting day.
- Click Save vendor.
The tab stays empty until you tick the checkbox, which then reveals the period and the send options.
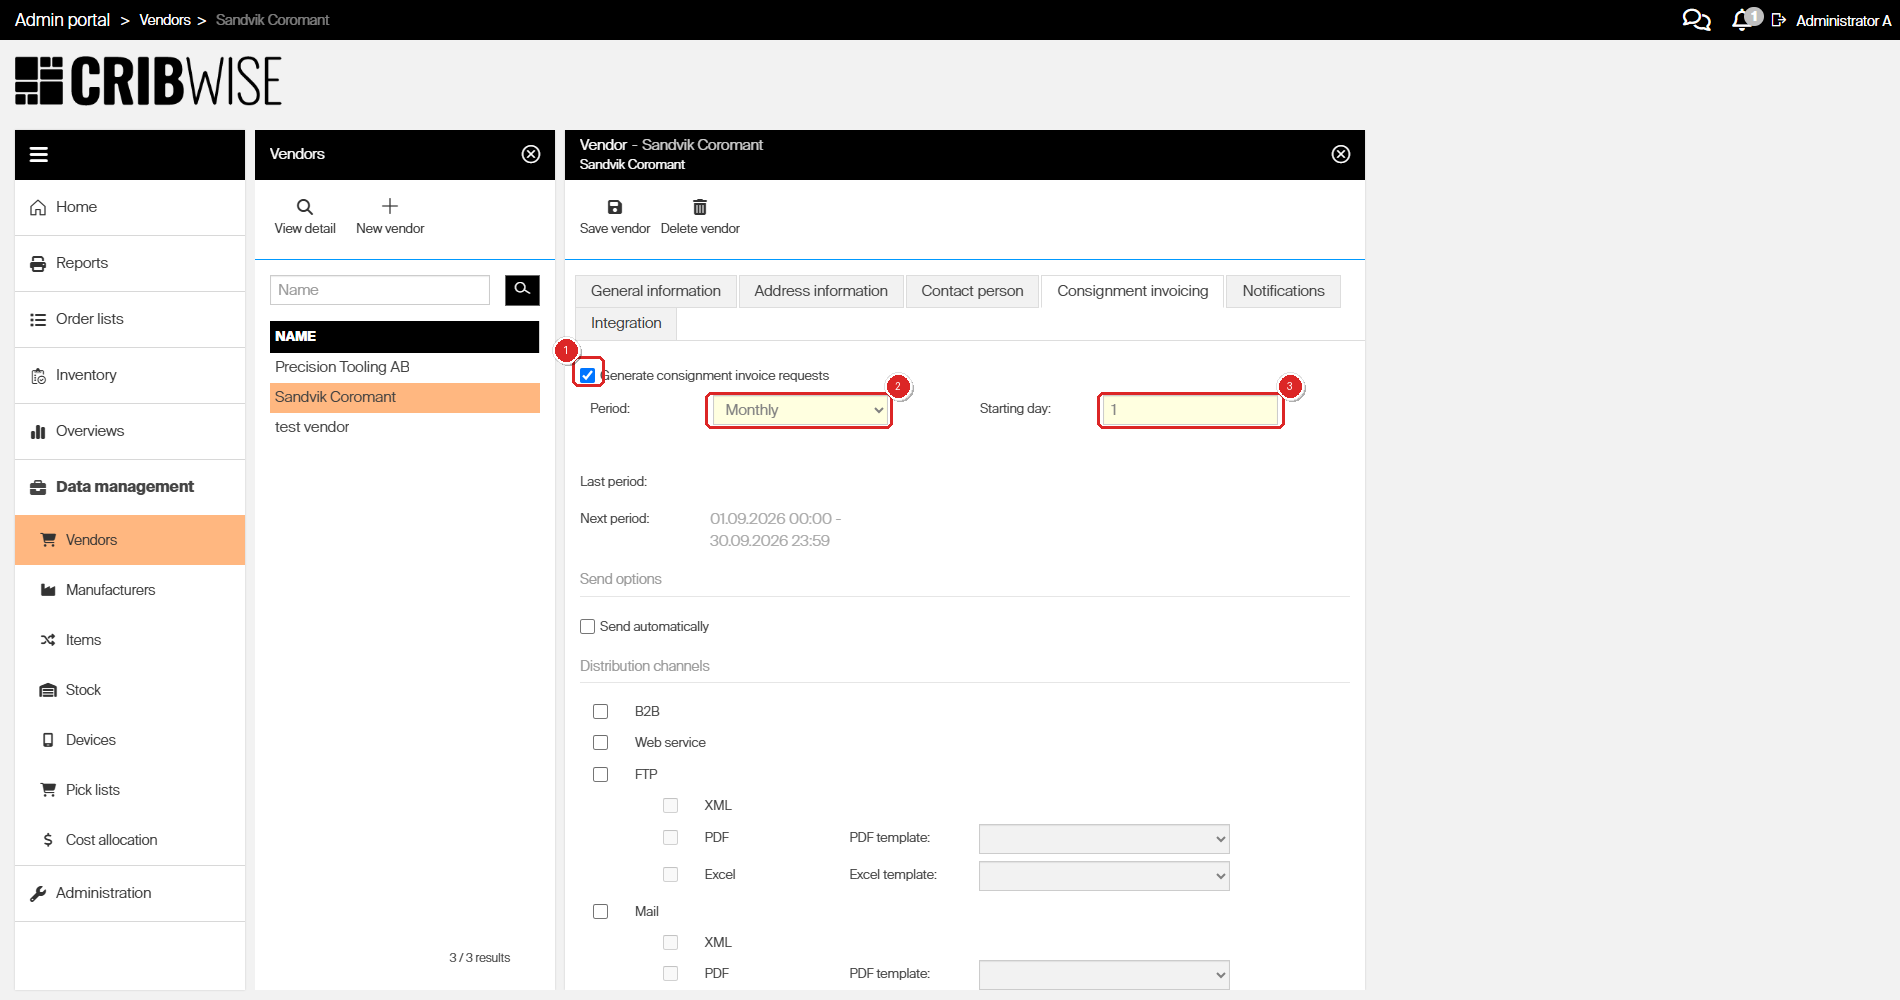
Step 4: tick Generate consignment invoice requests (1), choose a Period (2), and set the Starting day (3).
Choose the period
Starting day changes meaning with the period you pick:
| Period | Starting day | What a request covers |
| Weekly | A weekday, chosen from a list | That weekday until the day before the same weekday next week. |
| Biweekly | A weekday, chosen from a list | That weekday until the day before the same weekday two weeks later. |
| Monthly | A day of the month, typed as a number | That day until the day before the same day next month. |
Warning: A monthly period starting on day 29, 30 or 31 runs long in shorter months, because the period ends the day before that date in the following month. Use day 1 unless the vendor asks for something else.
Set the send options
Under Send options, tick Send automatically if the request should go out as soon as it is generated. It needs at least one distribution channel. Leave it clear and each request waits in Prepared status until you send it by hand.
The Distribution channels are B2B, Web service, FTP and Mail. Tick a channel first — its XML, PDF and Excel format checkboxes stay greyed out until you do, and the template lists stay greyed out until you tick the matching format. The channel’s own connection details (addresses, credentials) live on the vendor’s Integration tab.
Success: after saving, Next period shows the date range the first invoice request will cover, counted from today. Last period stays empty until the first request is generated.
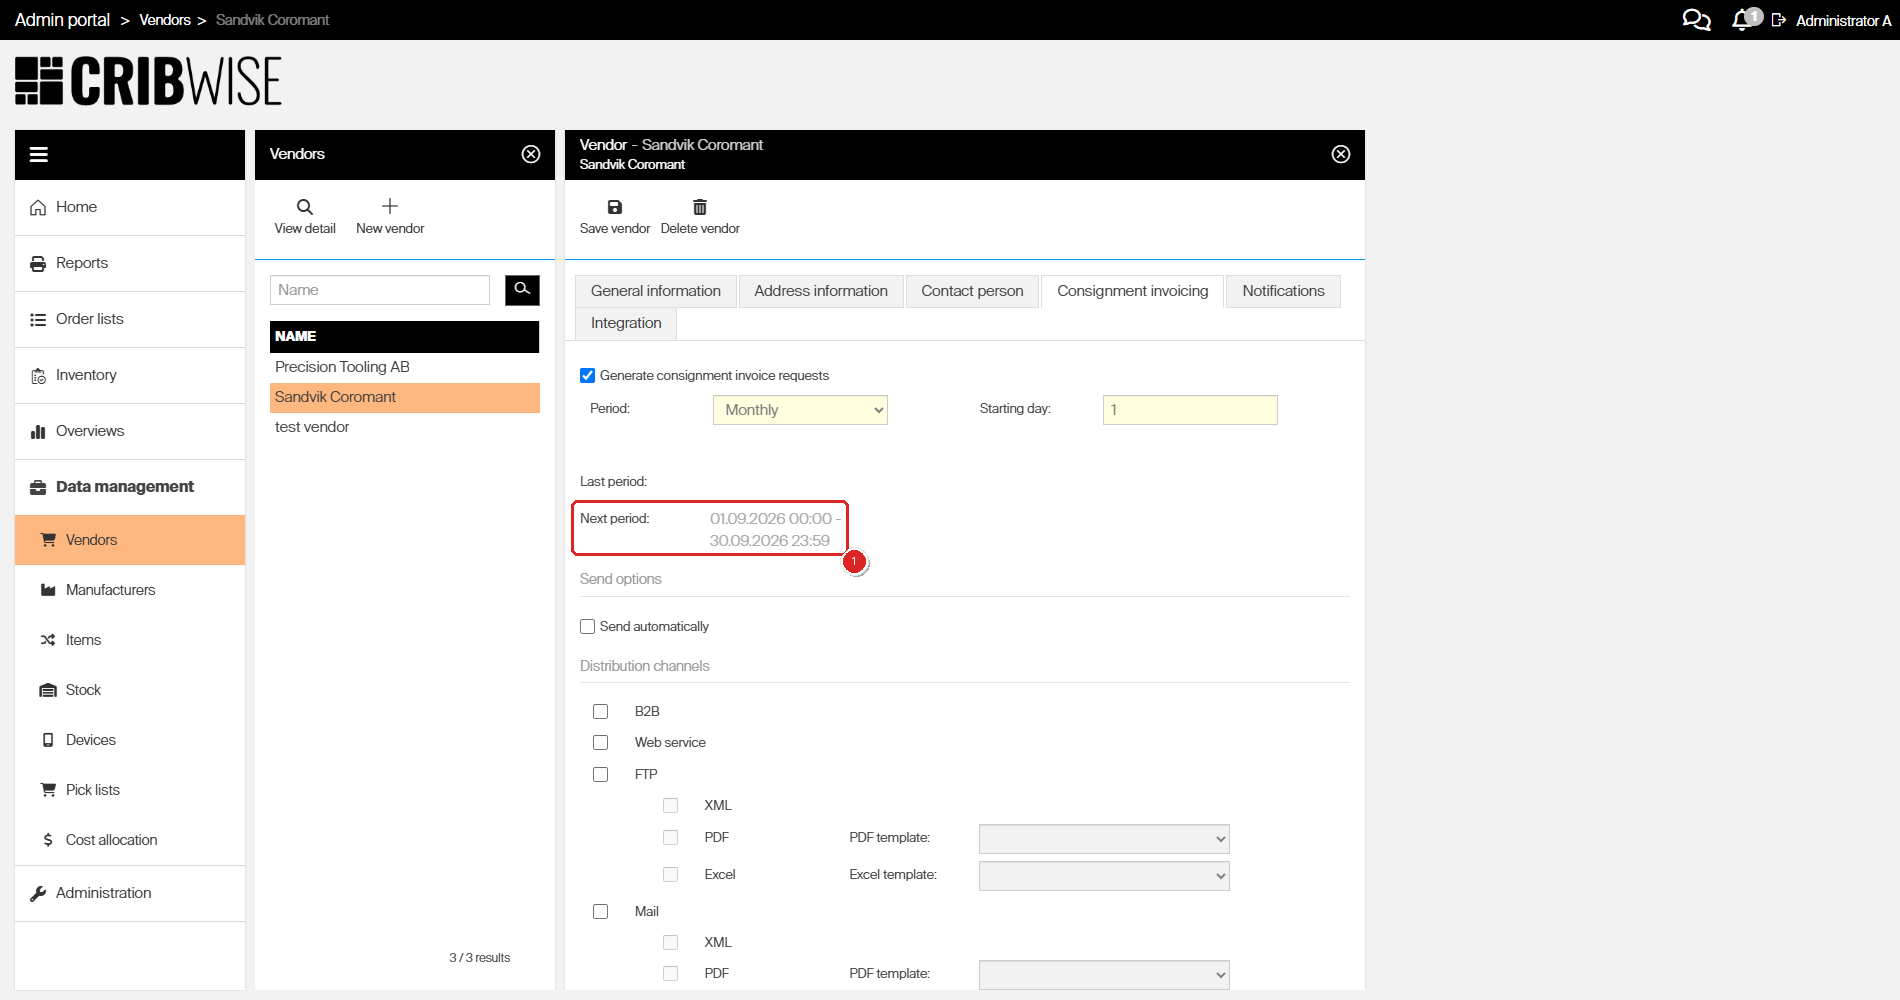
Success state: saving with Monthly and Starting day 1 generated a Next period of 01.09.2026 00:00 – 30.09.2026 23:59 — the current month.
Warning: Changing the period later can put quantities that were already invoiced on a new request as well. Agree the period with the vendor before you start, and change it as rarely as possible.
Step 5 — Order the consigned items
- Go to Order lists > Purchase orders.
- Click New order.
- Set Order type to Purchase.
- Choose the Vendor and the Stock.
- Tick Consignment.
- Click Save order, then add items on the Ordered items tab.
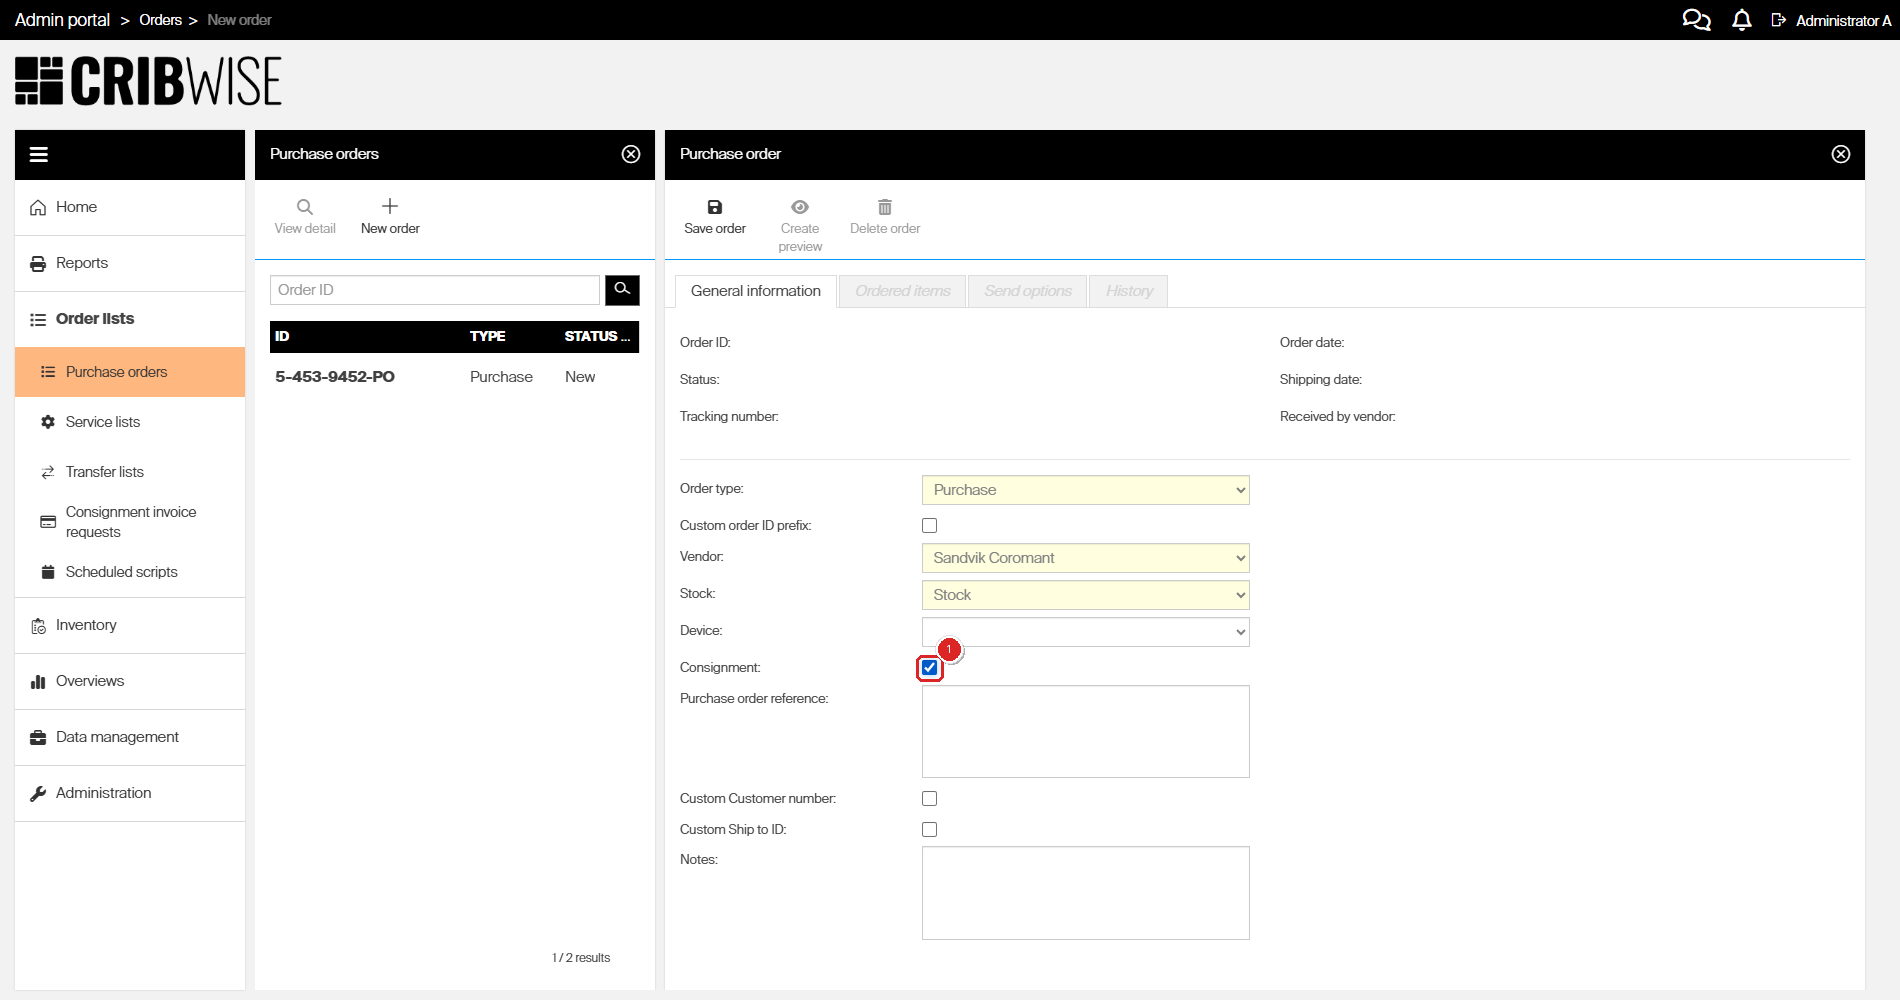
Step 5: Consignment on the new purchase order, below Device. Tick it before you add items.
A consignment order and a normal order hold different items, and the two sets never overlap. On an order with Consignment ticked, the item picker offers only the assignments you flagged in Step 3; on a normal order it offers everything else. That is the check to run if an item you expect is missing from the list.
Tip: You do not have to create these orders by hand. A scheduled script that generates purchase orders raises a separate order with Consignment set whenever a consigned item needs reordering. See Understanding purchase order scripts: automated reorder rules.
Step 6 — Find the generated invoice requests
- Go to Order lists > Consignment invoice requests.
- Filter by Vendor, or by a From and To date.
- Select a request and click View detail to see the invoiced items and the send options.
A request is generated the day after its period ends, so nothing appears here until the first period closes. Each row shows the vendor, the stock, the period it covers, and a status of either Prepared (created, not sent) or Sent.
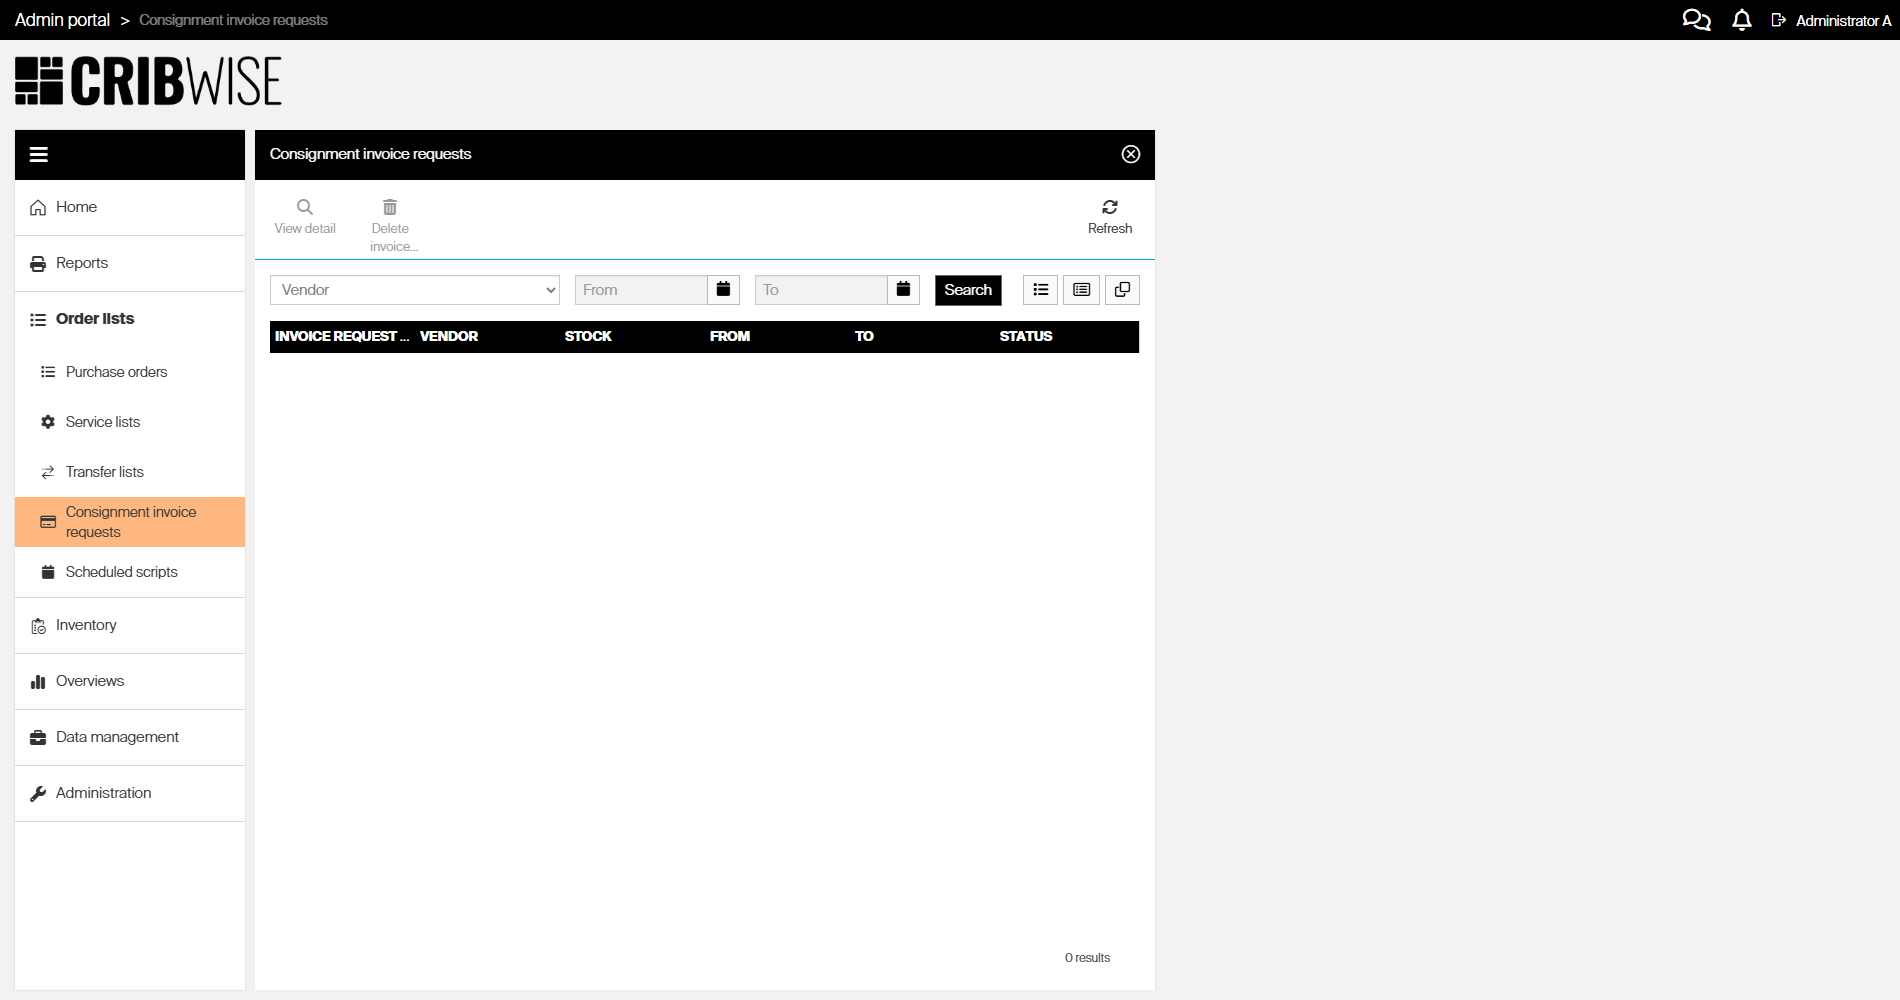
Step 6: Order lists > Consignment invoice requests, with its vendor and date filters. The list is empty here because no period has closed yet.
Success: consignment is set up when the assignment shows a tick in the CONSIGNMENT column, the vendor shows a Next period, and your consigned items appear on an order with Consignment ticked.
Next steps
- Check the invoice request template — the document the vendor receives is built from a template of type Invoice request. See How to customize consignment invoice templates.
- Automate the ordering — set up a scheduled script so consigned items are reordered without a manual order. See Understanding purchase order scripts: automated reorder rules.
- Read how invoicing is calculated — consumption less items returned as not used, and what happens to devices that synchronise late. See Consignment invoicing.
Troubleshooting
| Problem | Likely cause | Fix |
| The item is missing from the item picker on a consignment order. | Its device assignment is not flagged as consigned, or it is assigned to a different device. | Open the item’s Stock locations tab and check the CONSIGNMENT column for that device. Repeat Step 3 if it is clear. |
| A consigned item is missing from a normal purchase order. | Expected behaviour. Consigned and non-consigned items never share an order. | Create a second order with Consignment ticked and put the item there. |
| There is no Consignment checkbox in Assignment settings, or it is greyed out. | [HYPOTHESIS] Consignment is switched off for your installation, below the level of System settings. Not Allow consignment invoice requests — that setting was unticked on the test system and the Consignment checkbox stayed available on both the assignment and the order form. | Contact CRIBWISE support to have consignment enabled. |
| No invoice request appears after the period ends. | Allow consignment invoice requests is clear in System settings, or Generate consignment invoice requests is clear on the vendor. | Check both, starting with Step 1. The vendor setting alone is not enough. |
| Next period stays empty after saving the vendor. | The save did not go through, usually because another tab on the vendor holds an invalid value. | Work through the vendor tabs, fix the flagged field, and save again. Then reopen Consignment invoicing. |
| A request sits in Prepared and is never sent. | Send automatically is clear, or no distribution channel is selected. | Either send it by hand from the request detail, or tick Send automatically plus a channel on the vendor. |
| The PDF or Excel template list is greyed out. | The channel or the format above it is not ticked. | Tick the channel (FTP or Mail), then the format, then choose the template. |
| A monthly invoice period is longer than a month. | Starting day is 29, 30 or 31 and the following month is shorter. | Set Starting day to 1, after agreeing the change with the vendor. |
Related articles
- Consignment management: setup, ordering, and invoicing — how consignment works, how a period is calculated, and how to manage the requests it generates.
- How to manage vendors — all six vendor tabs, including Consignment invoicing and the integration channels.
- How to customize consignment invoice templates — build the PDF or Excel document the vendor receives.
- How to create manual purchase orders — the full order form, adding items, and sending the order.
- Understanding purchase order scripts: automated reorder rules — how consigned items get their own order automatically.
- Understanding stock structure: stocks, devices, and locations — what a device assignment is and where it sits.
- All system settings quick reference — every setting on the Purchase tab and the other five tabs.