
What you can do
Pick an assembly on the Shop Floor Interface as one tool, pick fresh spare parts for it, and hand it back when the job is done. Once an assembly is built and stocked, it behaves like any other durable item: you pick and return the assembly, never its components.
This article uses two assemblies from the earlier articles of the series: DEMO-ASM-02 Turning tool assembly, demo, which has no serial numbers, and ASM-END-MILL-12 End mill assembly Ø12 shrink-fit, which is serialized.
Before you start
- The assembly is built and in a stock location. An assembly with quantity 0 is built first, as shown in Assemblies: Building and stocking.
- Status Released. An assembly still in Defined status does not appear on the Shop Floor Interface.
- A Shop Floor Interface login that may pick and return. The return tiles follow your permissions. The operator in this example sees New, Used and Scrap. For service needs the permission to return for service.
- For spare parts: spare parts set up on the assembly or on its components, under Related items > Spare parts in the Admin Portal. See Item relations: alternatives, substitutes, and assemblies.
Quick start
Experienced users – pick an assembly in 4 steps:
- Select Pick and the assembly in the item list.
- Set the quantity and select Pick.
- Take the assembly, tick its row and, for a serialized assembly, its serial number.
- Select Picking finished.
Return it in 4 steps:
- Select Return and the condition: New, Used, For service or Scrap.
- Select your pick of the assembly.
- Select Return, put the assembly in the location shown and tick its row.
- Select Returning finished.
Need more detail? Follow the full steps below.
Pick an assembly
A stocked assembly sits in the normal item list. You pick the whole assembly; its components stay part of it.
Step 1 — Select the assembly
- On the main menu, select Pick.
- Find the assembly in the item list, or type part of its item ID in the search box.
- Select the assembly (1).
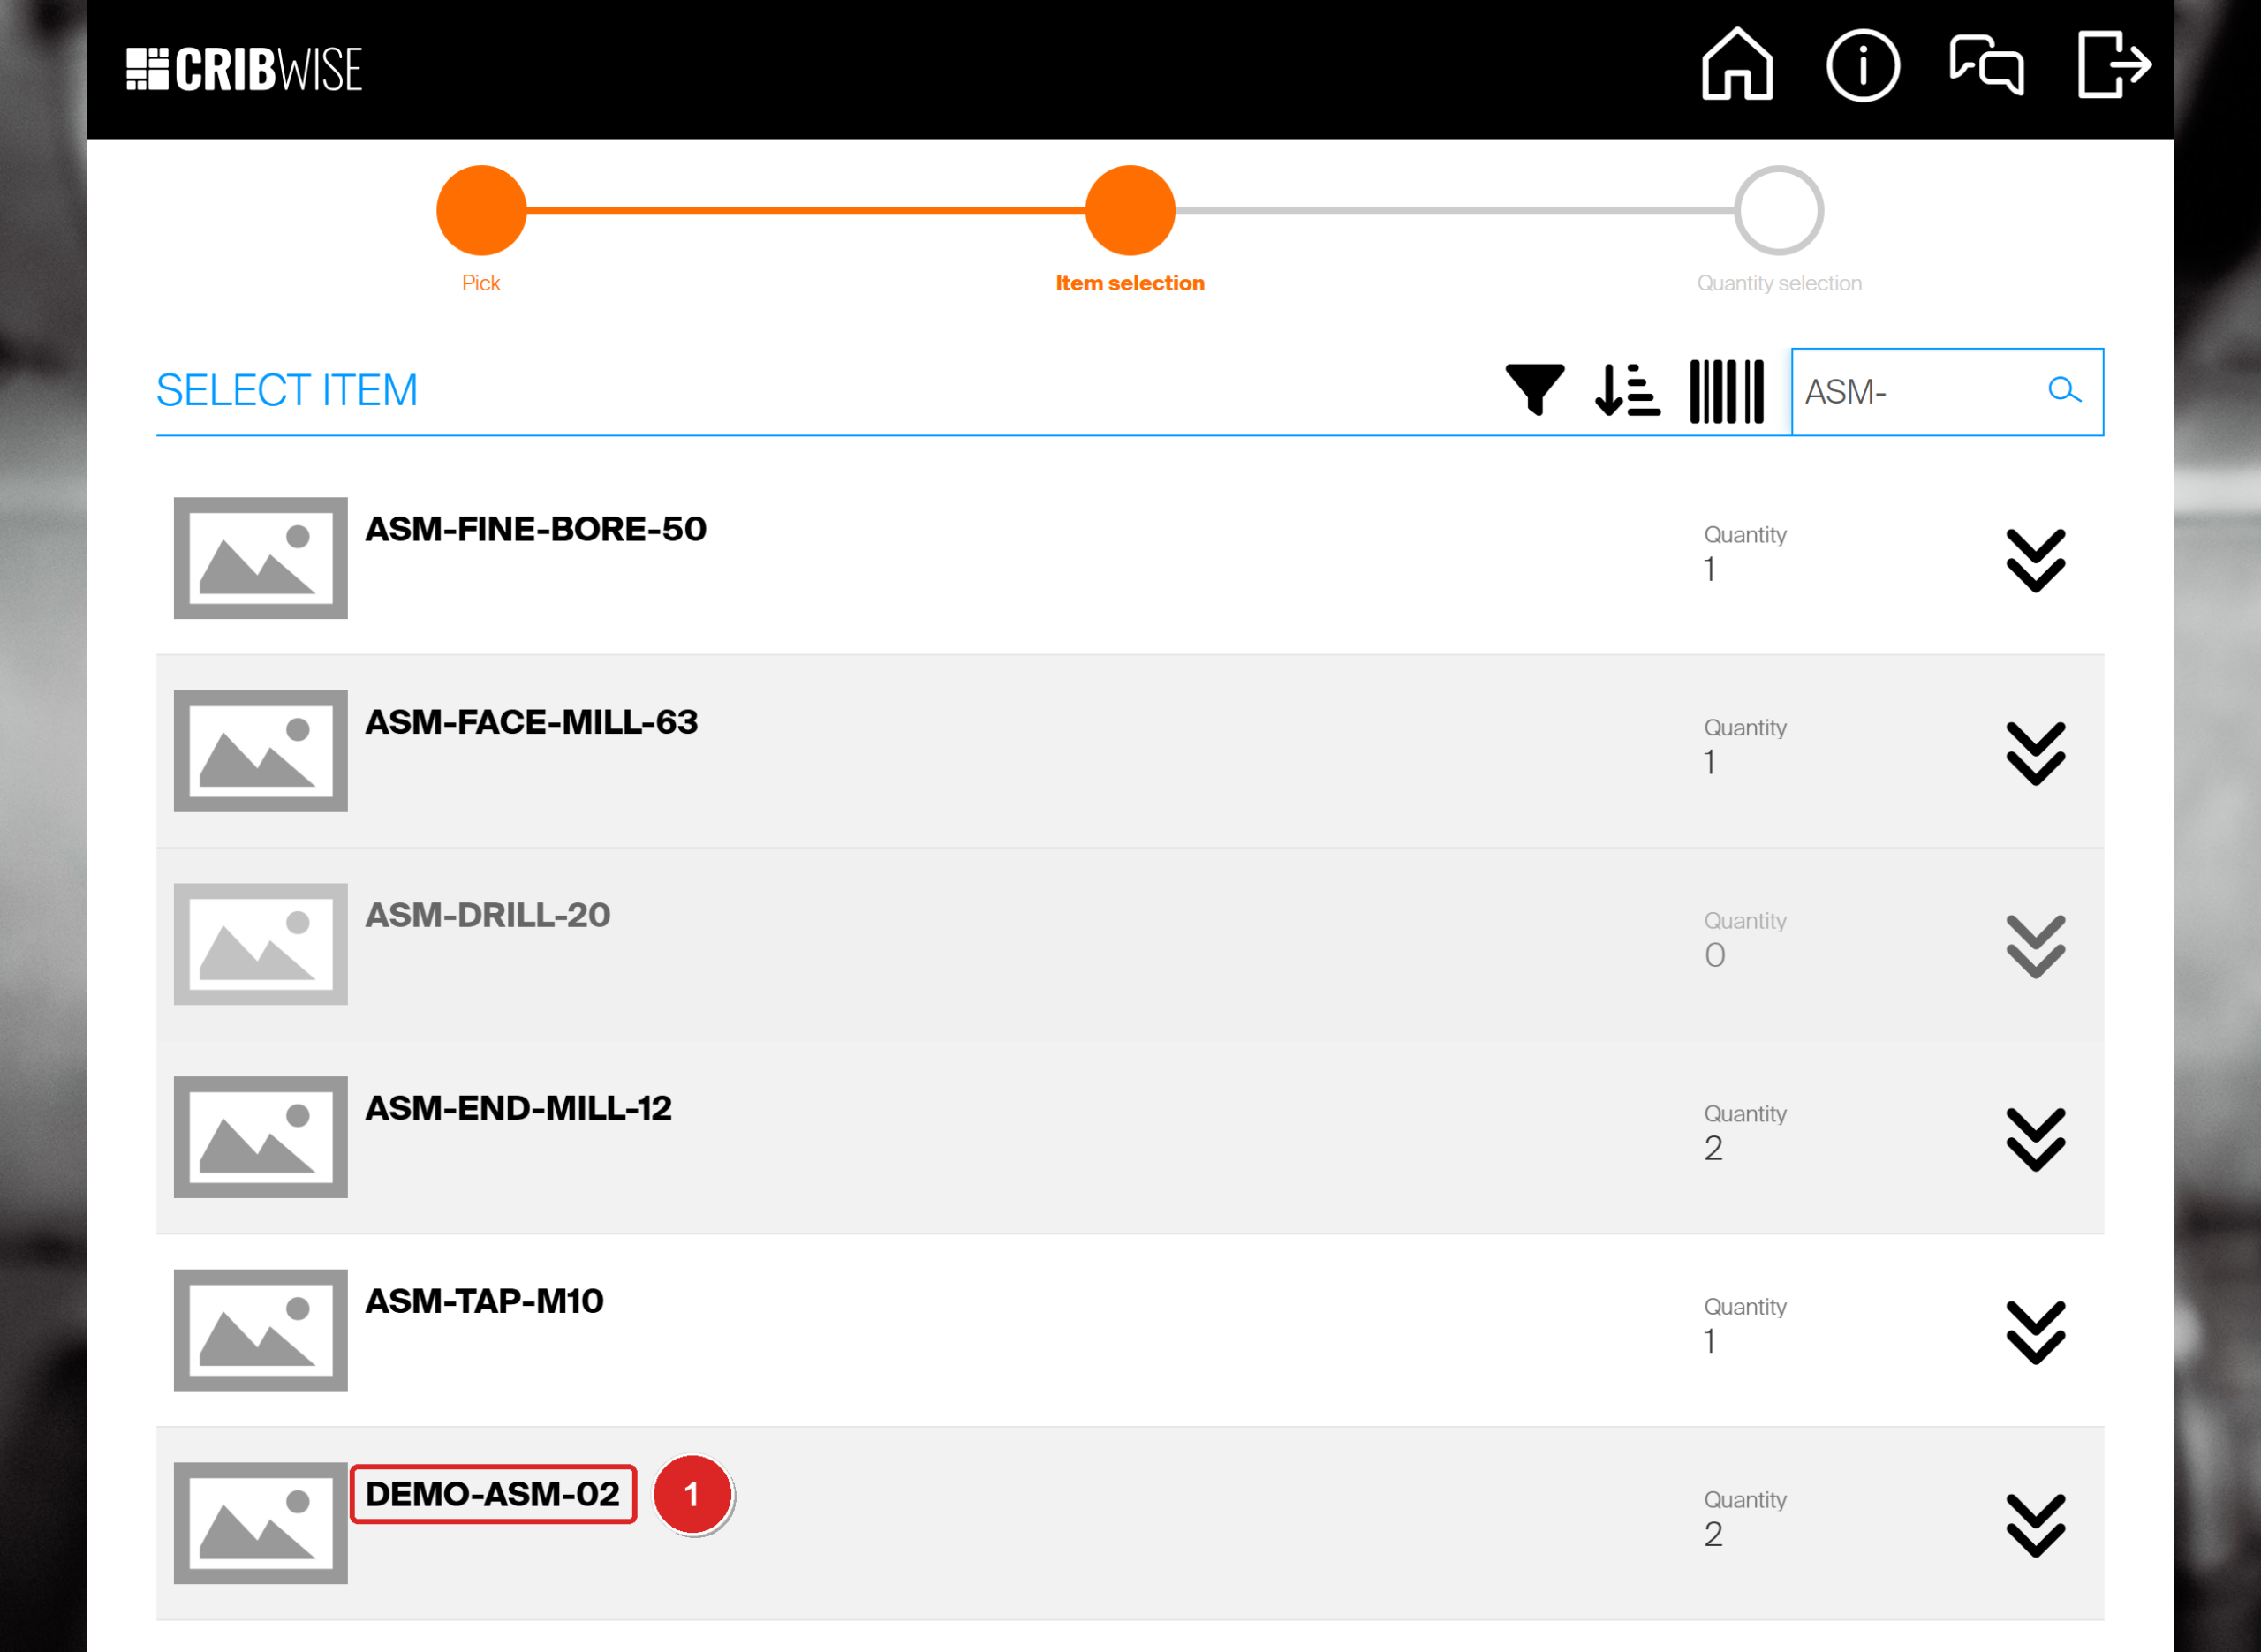
Assemblies are listed like any other item, with the quantity in stock.
Note: When you type the full item ID, CRIBWISE opens the quantity screen straight away.
Step 2 — Choose the quantity and pick
- Set the quantity (1). The screen shows how many are available in this device.
- To pick spare parts for the assembly at the same time, select Related items (2). See Pick spare parts for an assembly below.
- Select Pick (3).
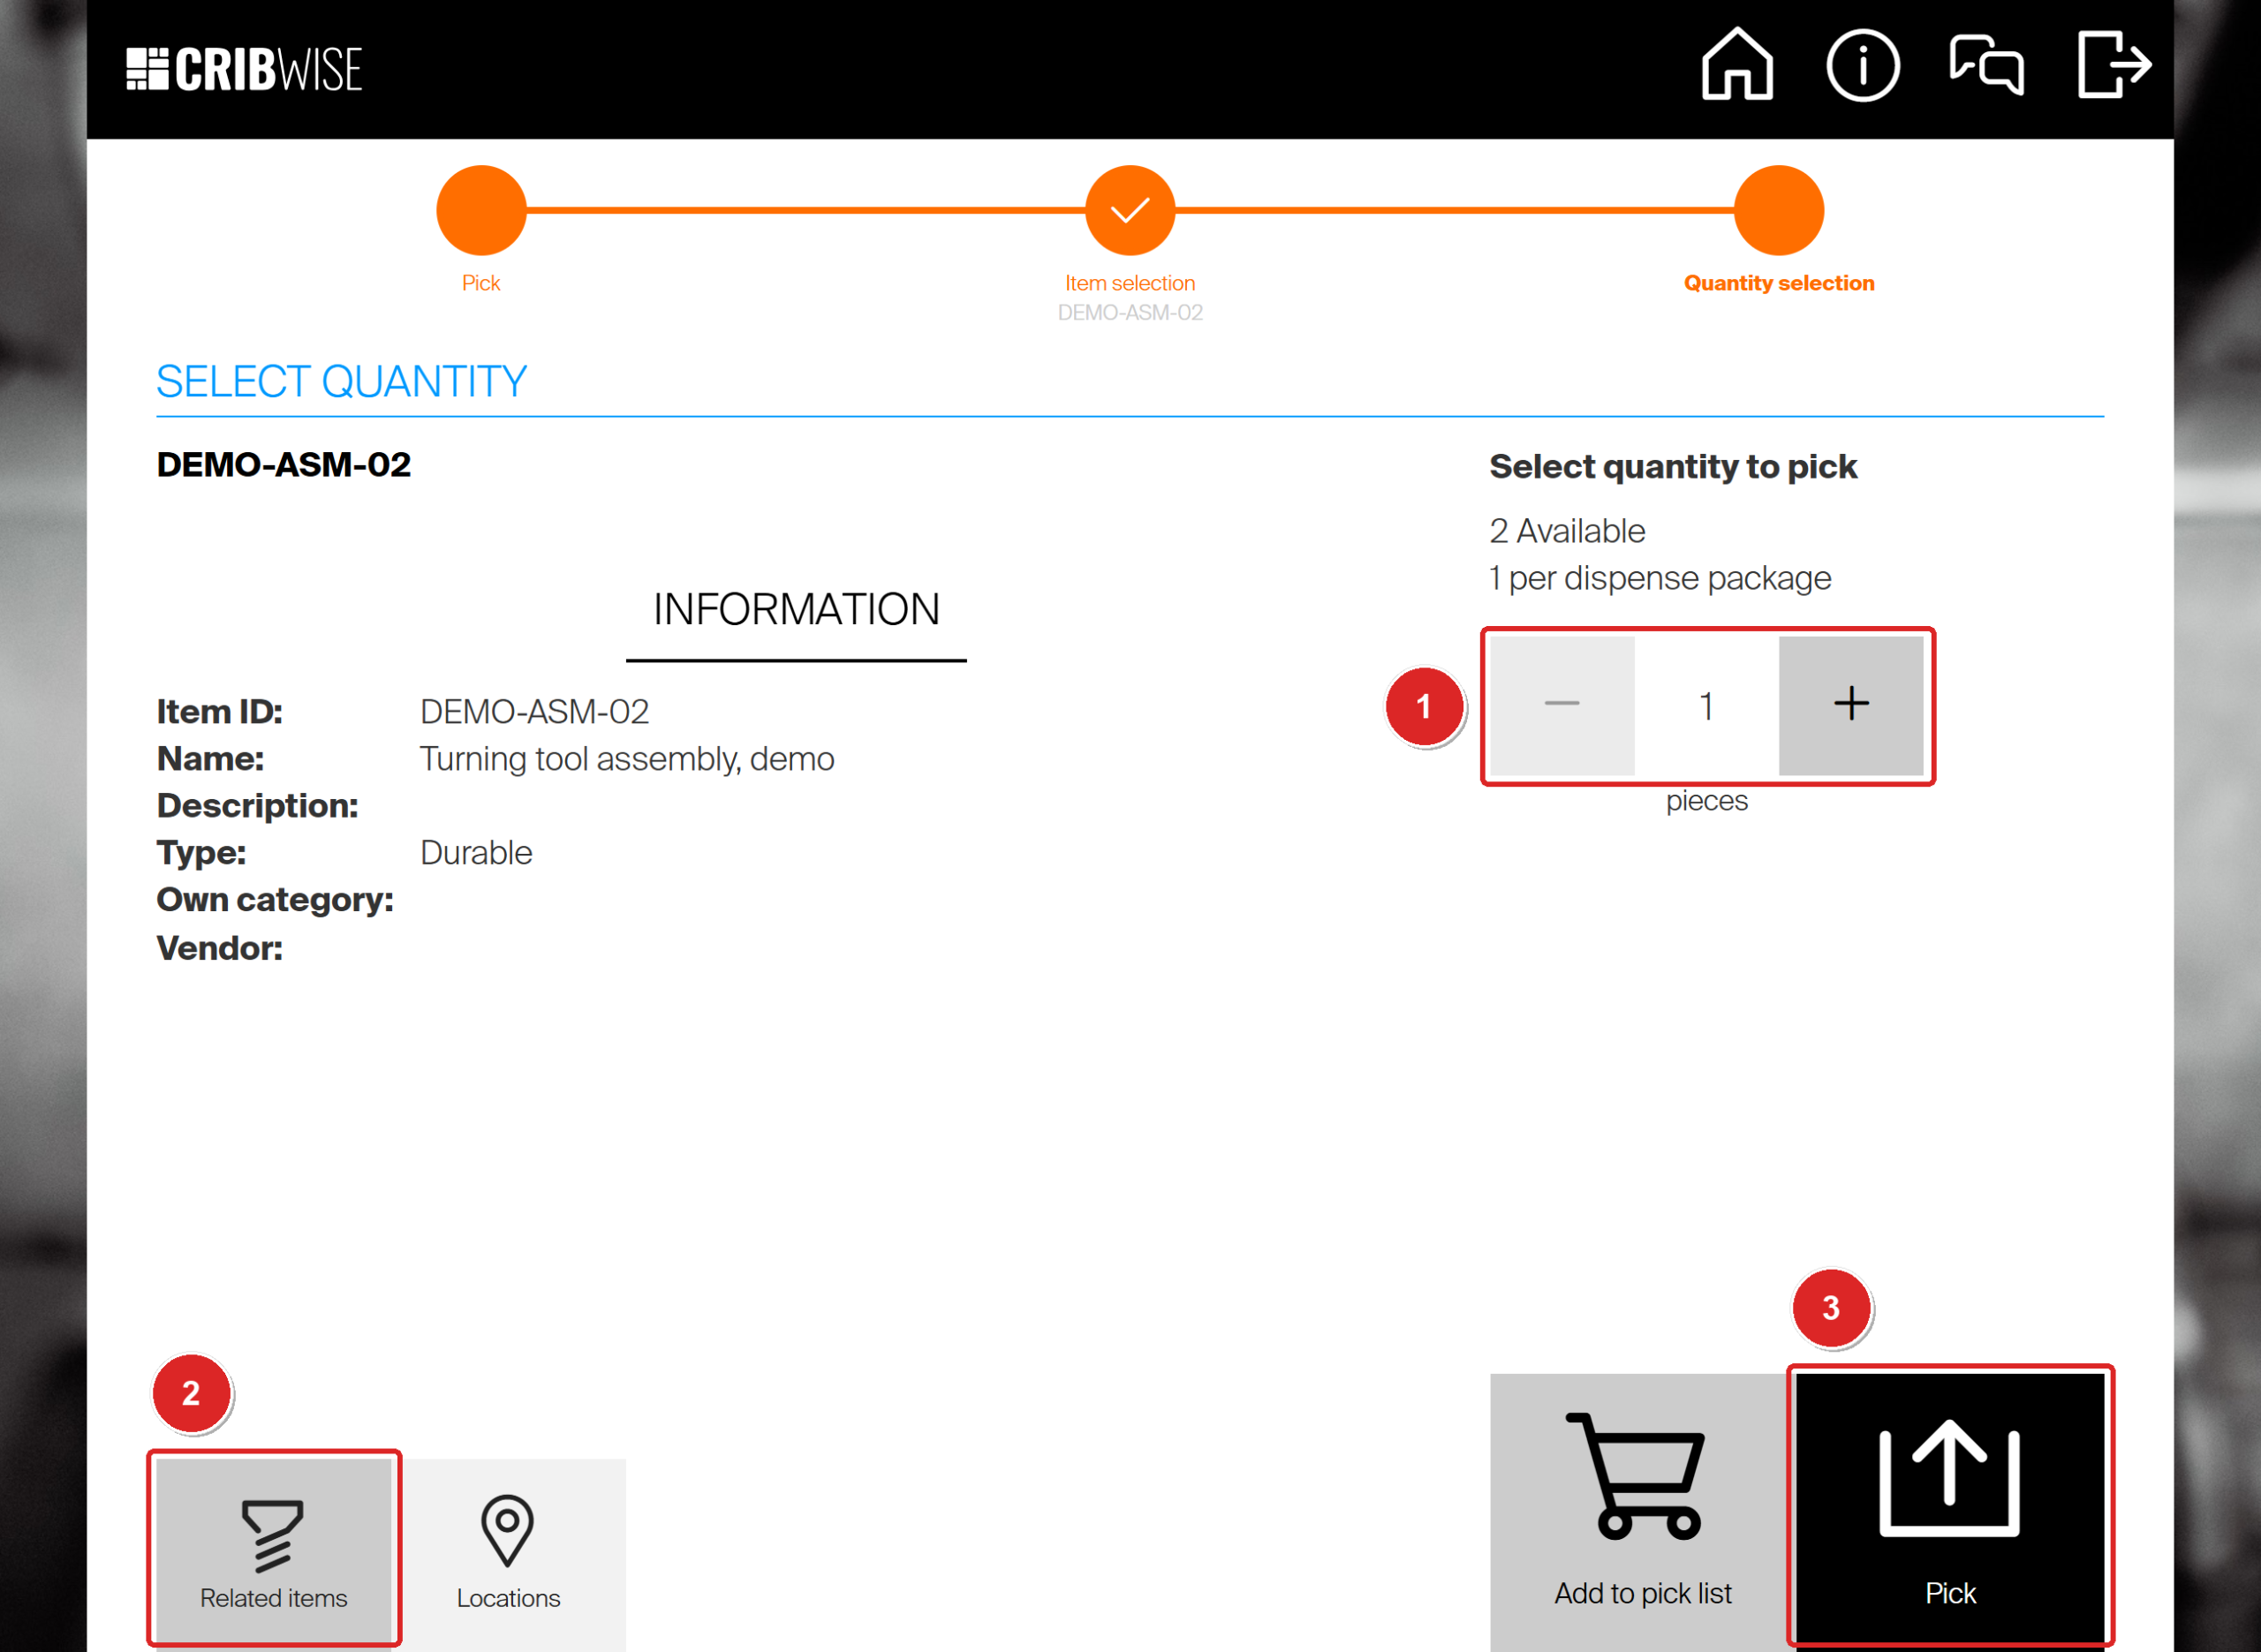
DEMO-ASM-02 has 2 available. Related items (2) opens its components and spare parts.
Step 3 — Take the assembly from its location
Items to pick shows the location and the condition of the assembly you are taking.
- Take the assembly from the location shown.
- Make sure the box on its row is ticked. It is ticked already for an assembly without serial numbers.
- Select Picking finished.
Important: The tick is what registers the pick. If nothing is ticked when you select Picking finished, CRIBWISE asks “No item is selected as picked. Do you want to finish operation anyway?” Answer No and tick the row.
For a serialized assembly, the row is not ticked, because CRIBWISE needs to know which unit you took.
- Tick the box on the row (1). The Select serial number(s) for item dialog opens.
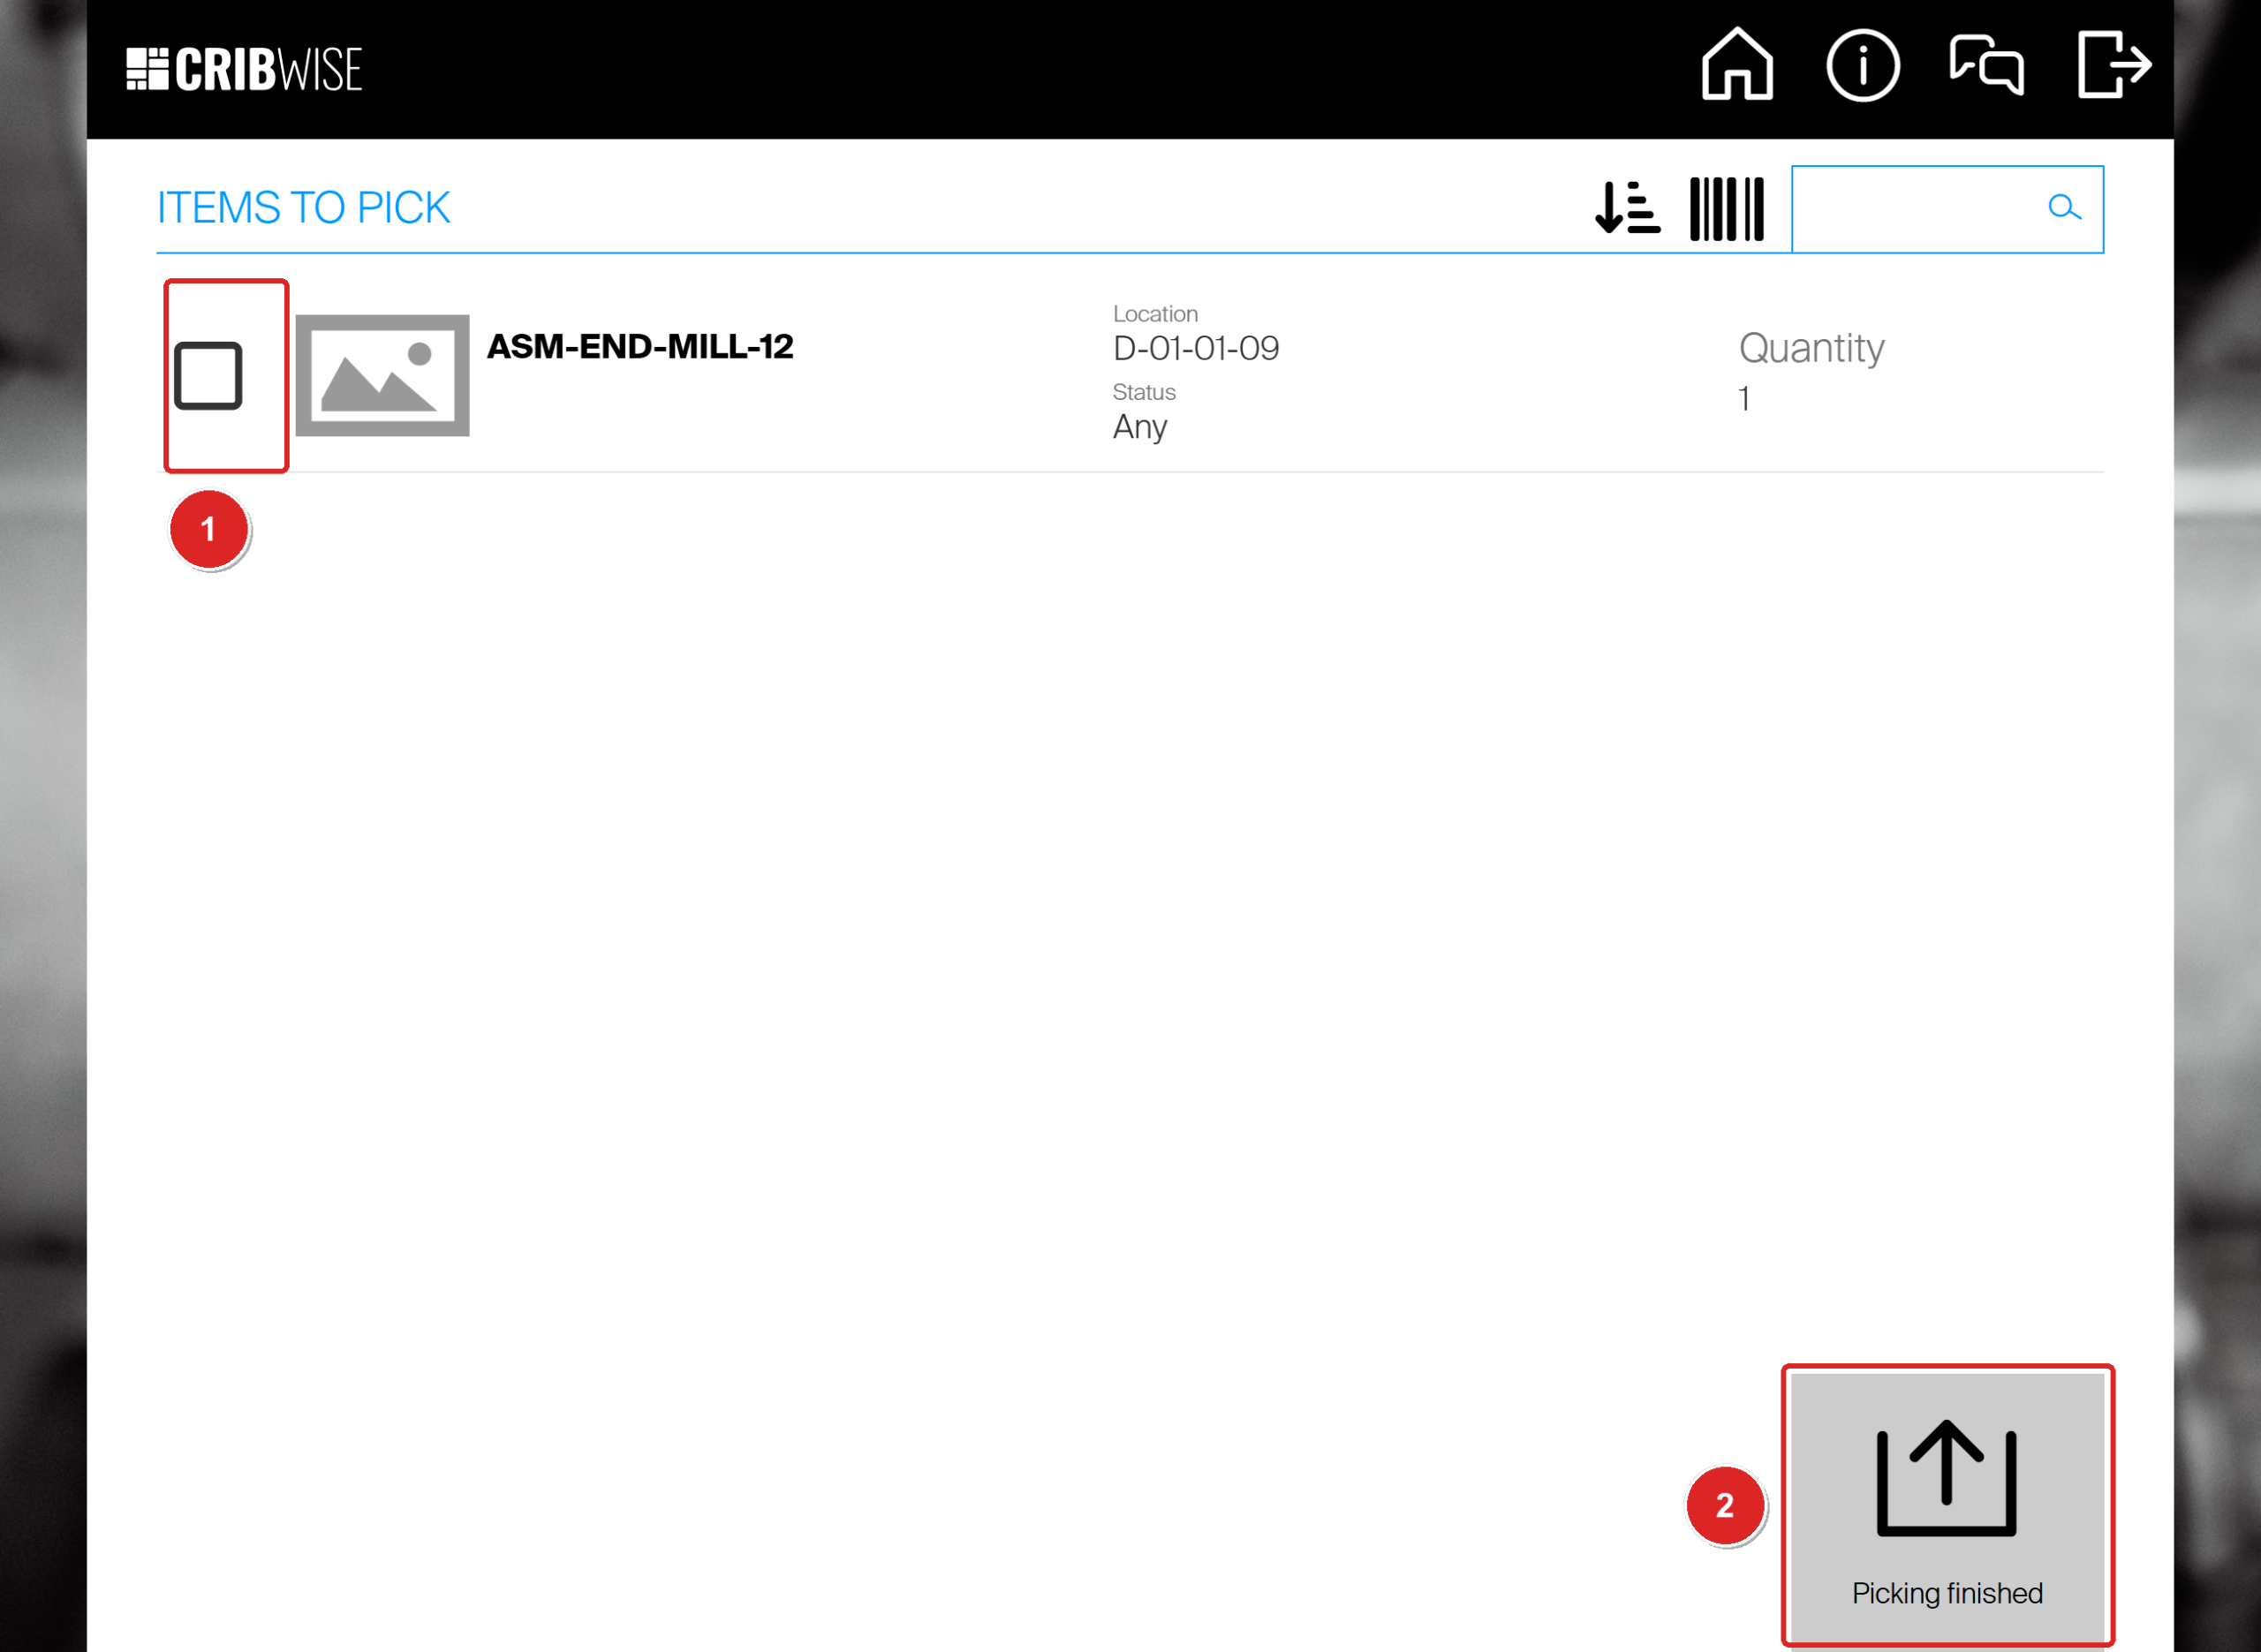
A serialized assembly: the tick box (1) opens the serial number dialog. Picking finished (2) comes last.
- Tick the serial number of the unit you took (1). Each row shows its Condition.
- Select Confirm (2), then Picking finished.
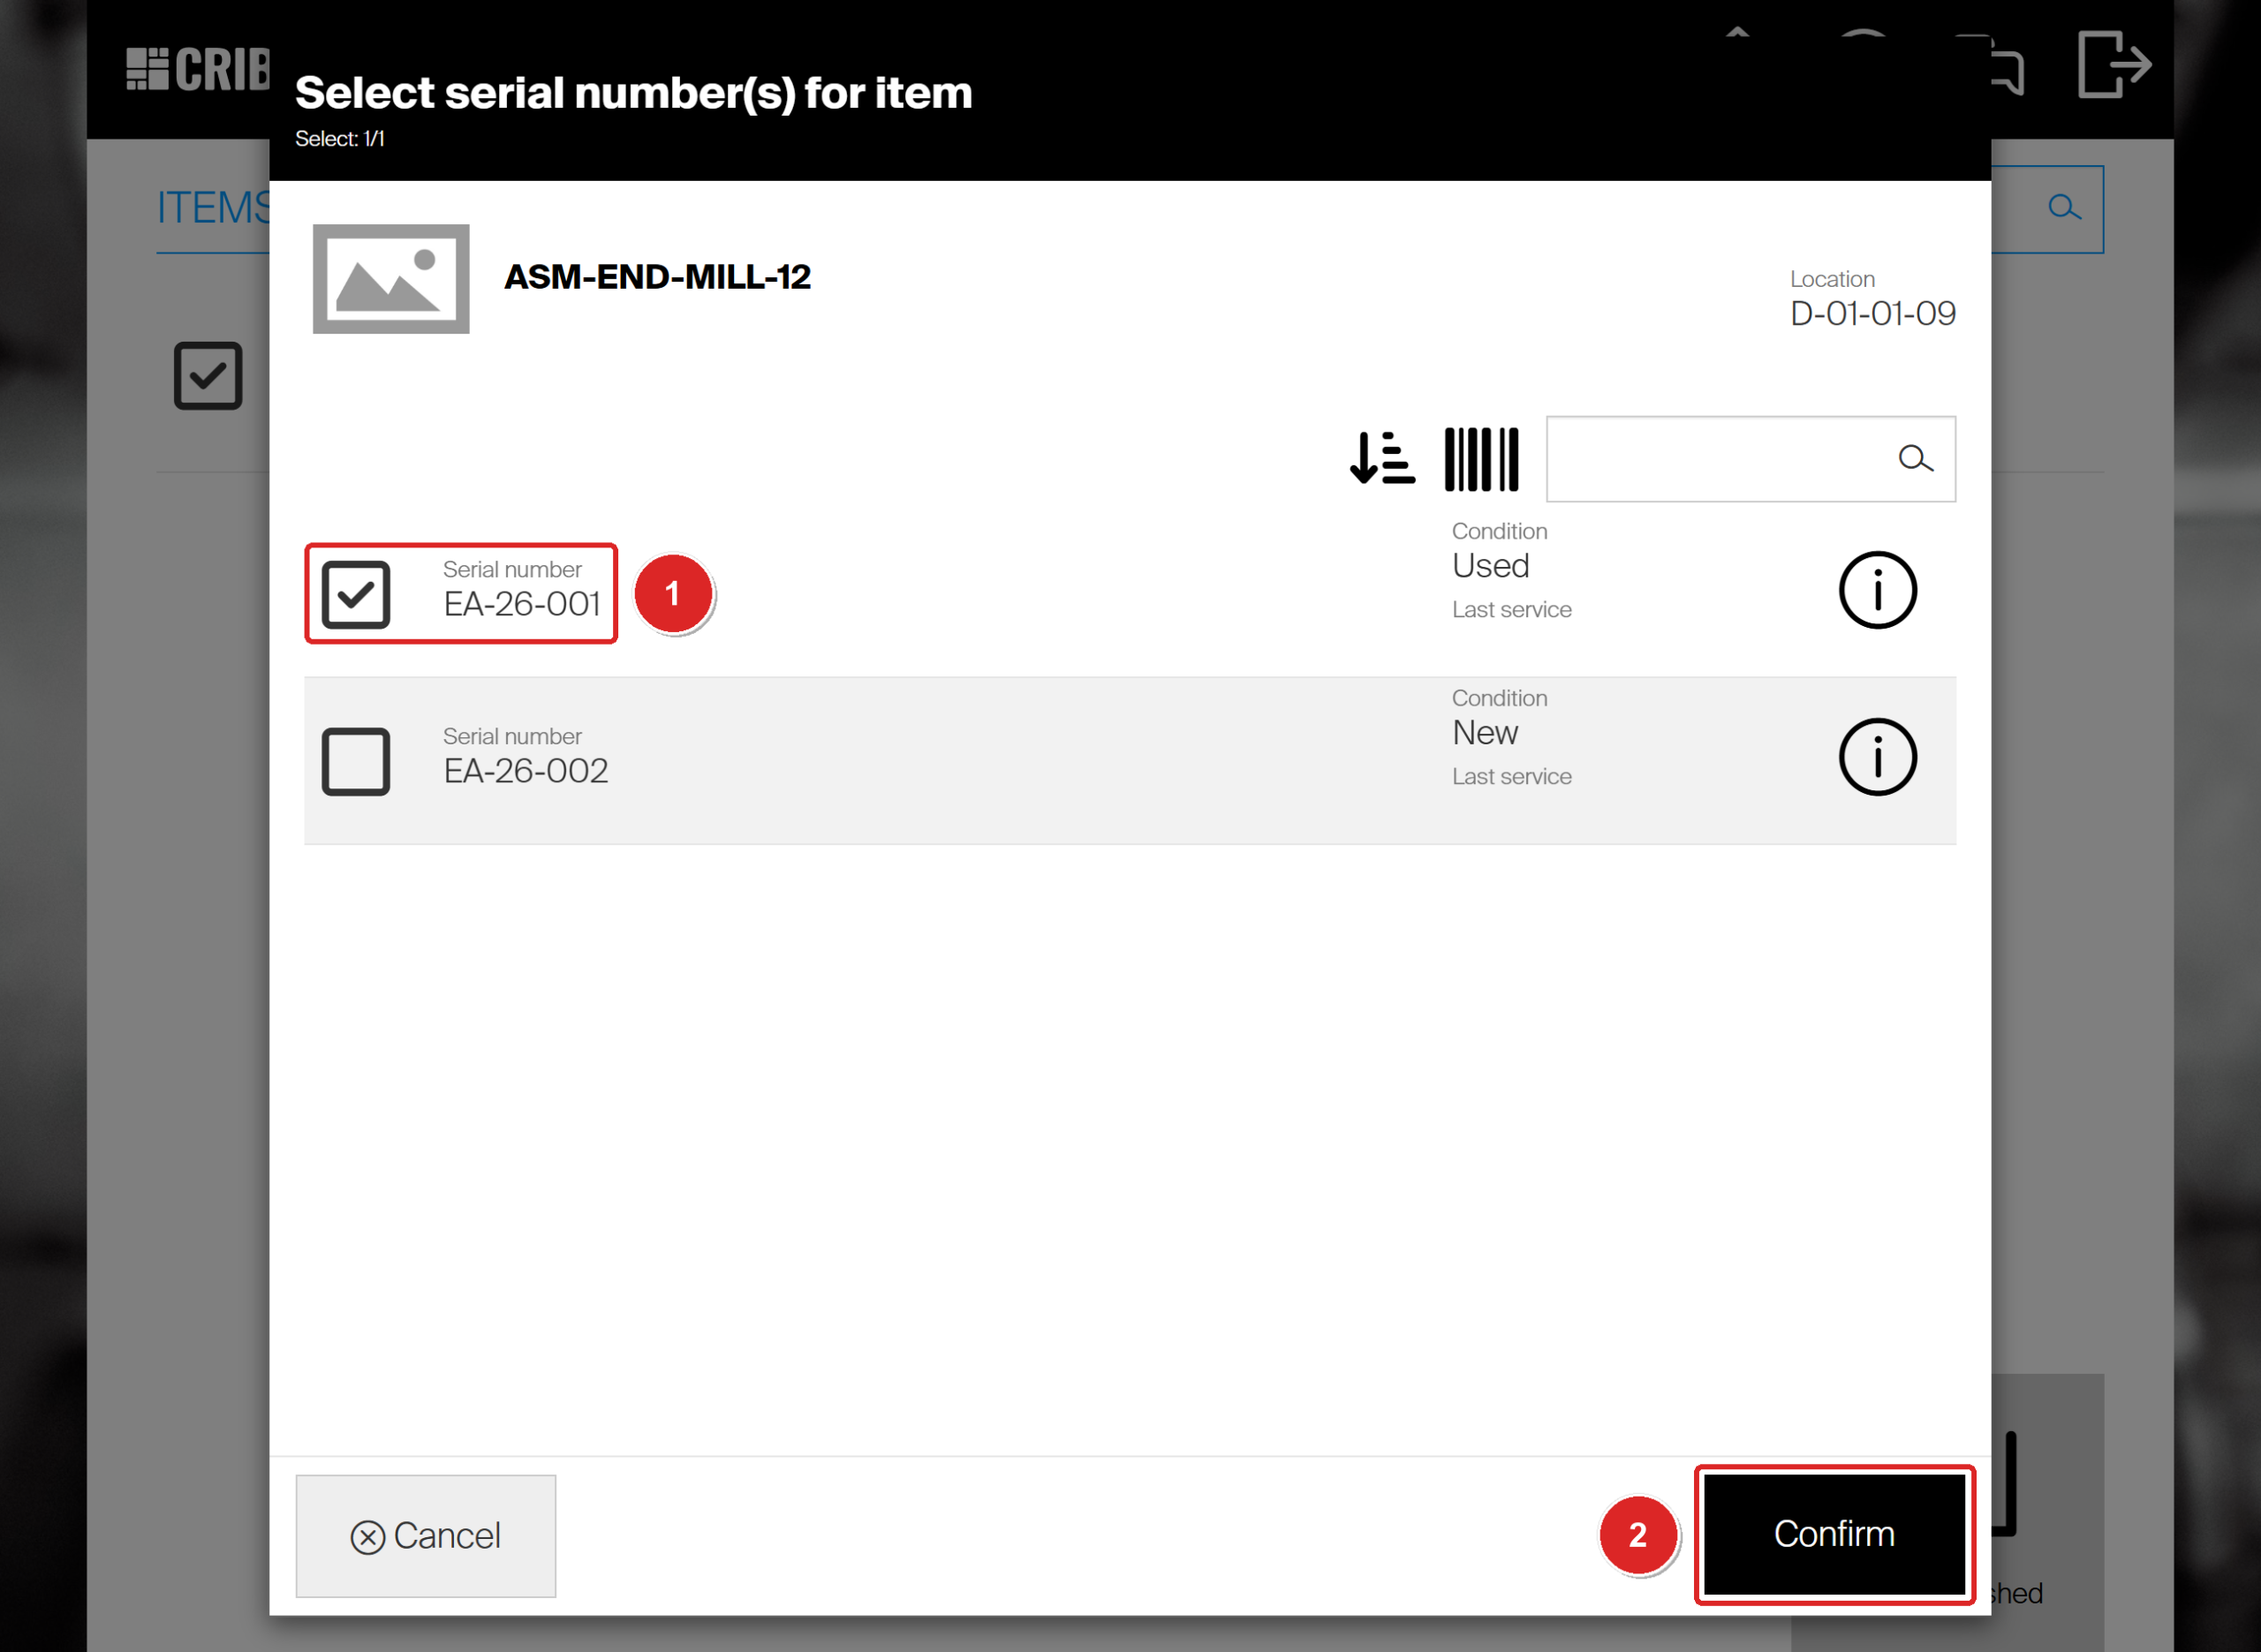
EA-26-001 (1) is the unit taken. The header counts how many serial numbers you have selected.
Step 4 — Check the pick summary
The Pick summary shows the assembly, the location it came from, its condition and the date it is due back.
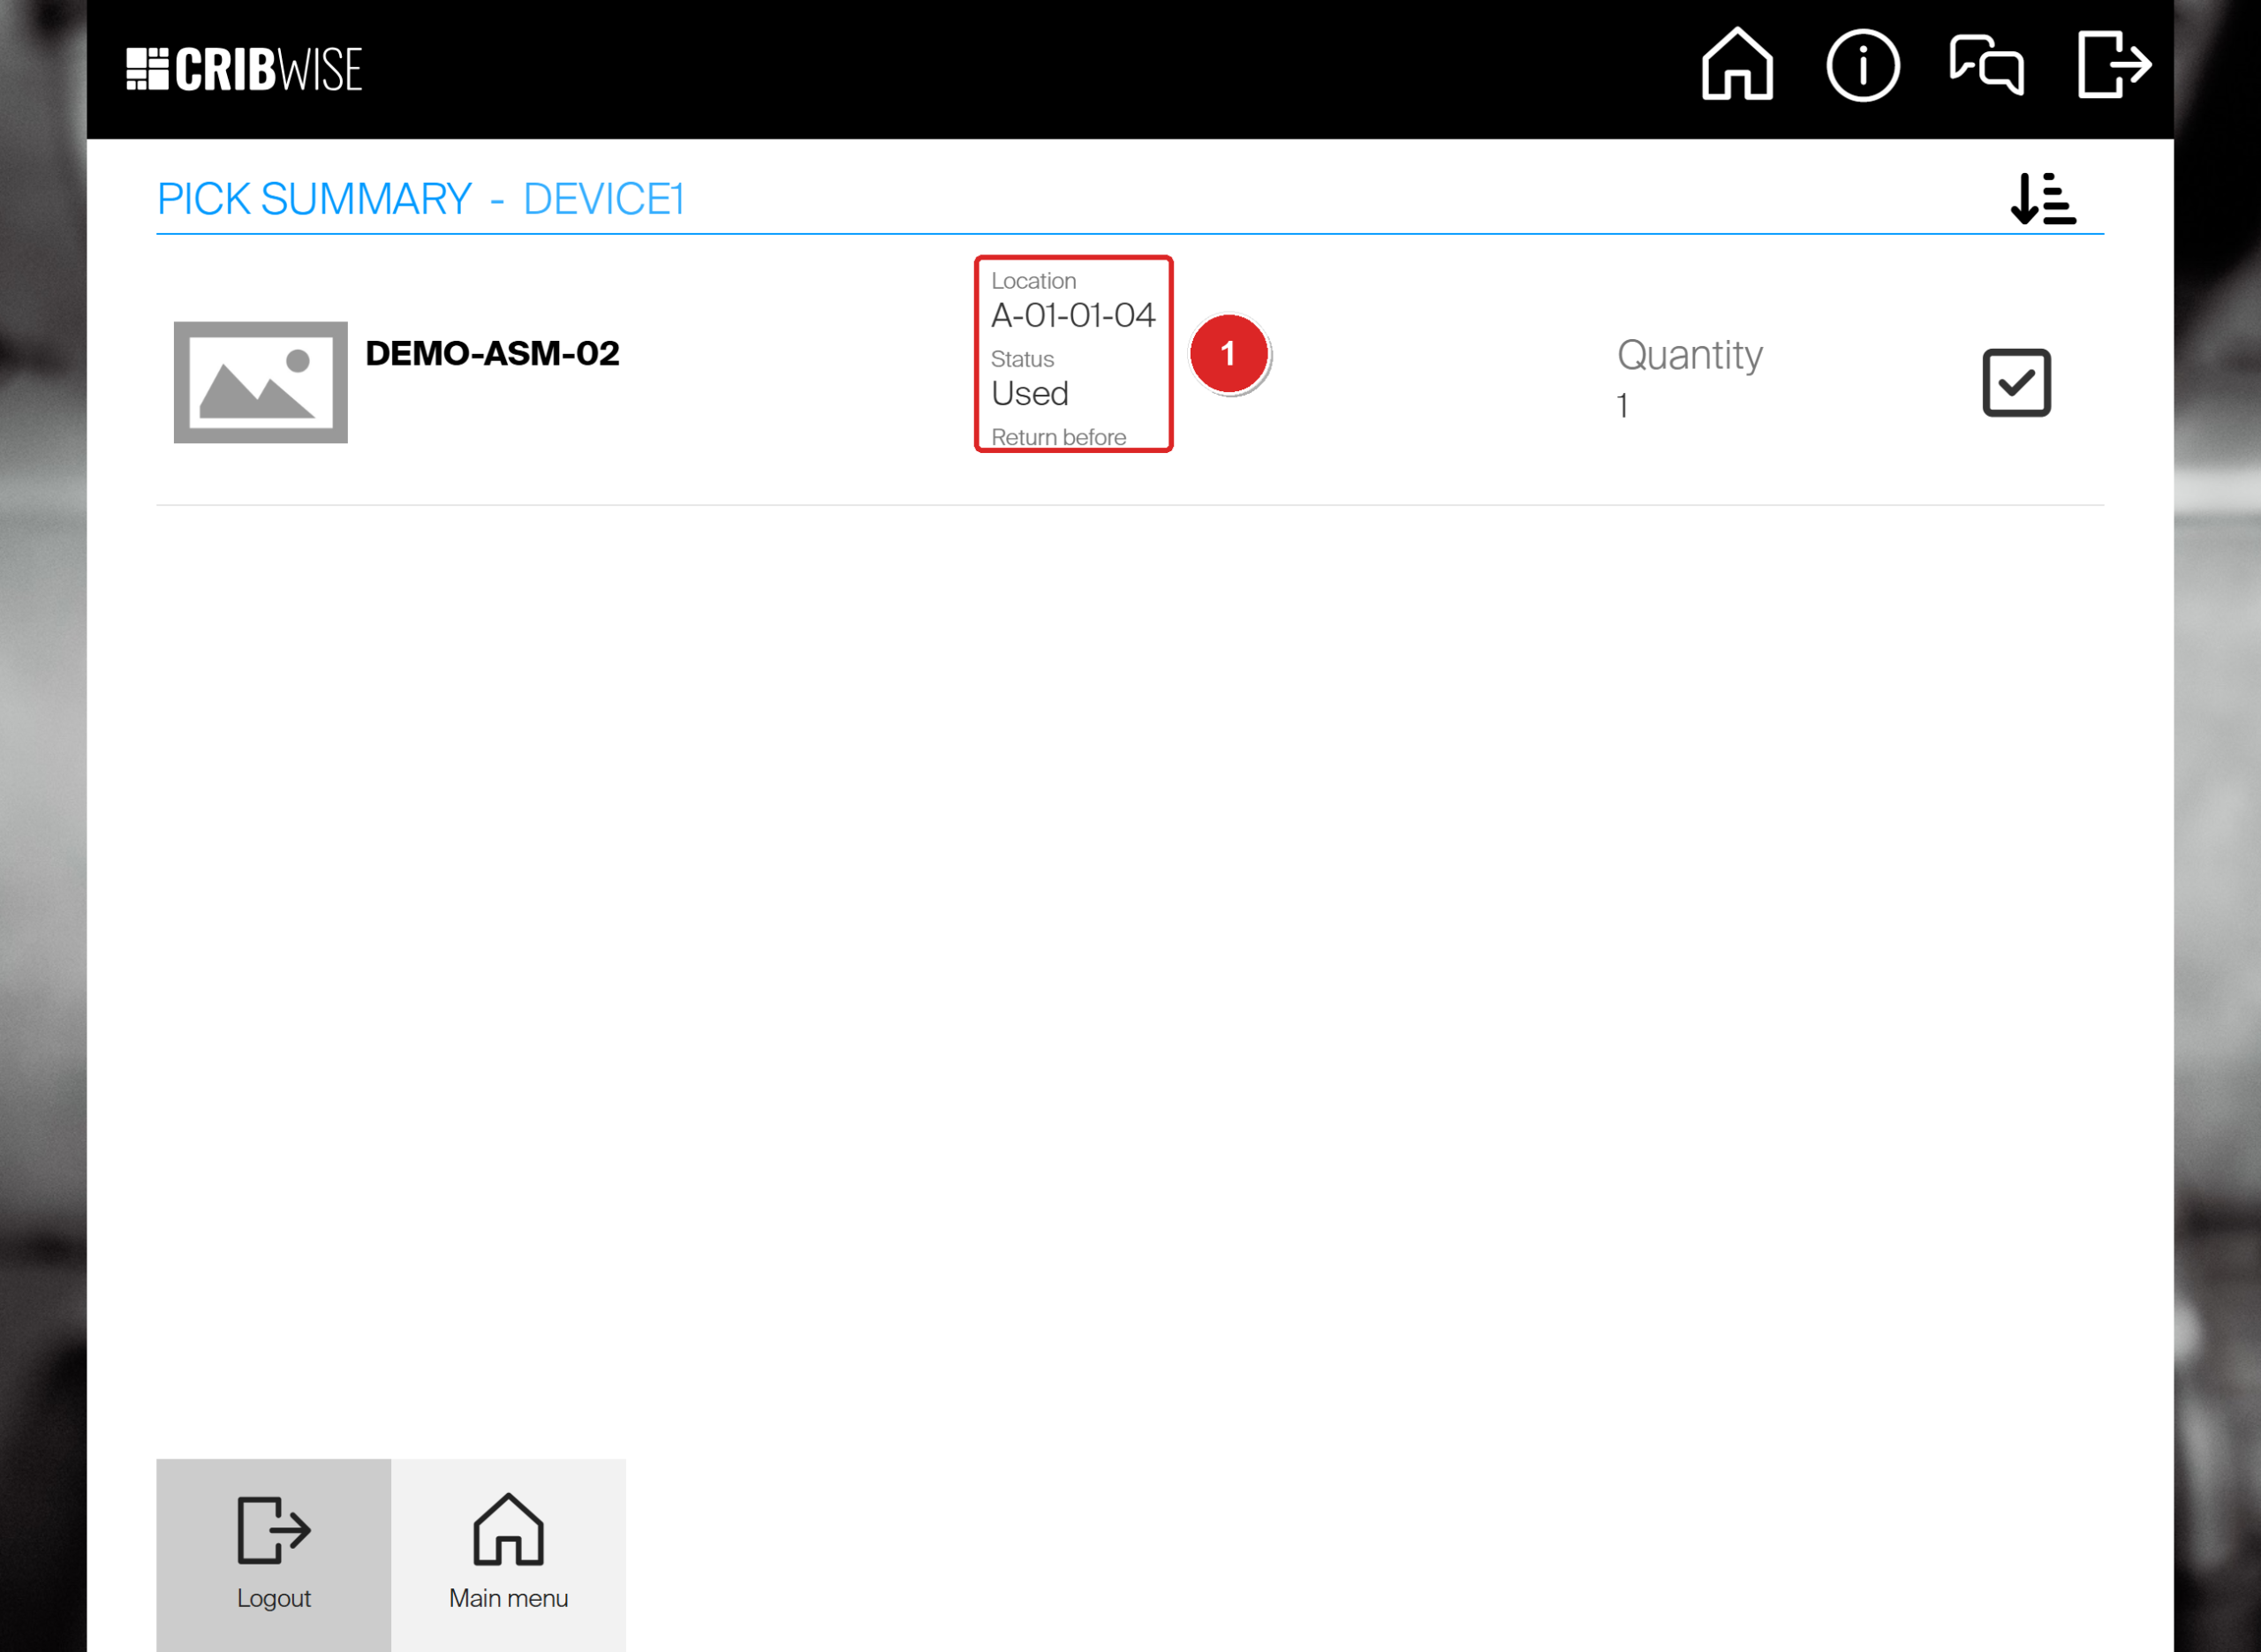
DEMO-ASM-02 was picked from A-01-01-04 in condition Used (1).
Success: The assembly is checked out to you as one item, not as its parts. It now counts in Picked durable items on the main menu until you return it.
Pick spare parts for an assembly
When an assembly in use needs a fresh spare part, such as a new insert for the holder, you do not rebuild it. Open Related items for the assembly and pick the spare part from there.
The Spare parts tab lists the assembly’s own spare parts and the spare parts it inherits from its components. In this example, the component DEMO-TH-01 has the insert 5724444 as a spare part, so DEMO-ASM-02 shows it too.
- On the quantity screen of the assembly, select Related items. The dialog opens on the Assembly items tab, which lists the components.
- Select the Spare parts tab (1).
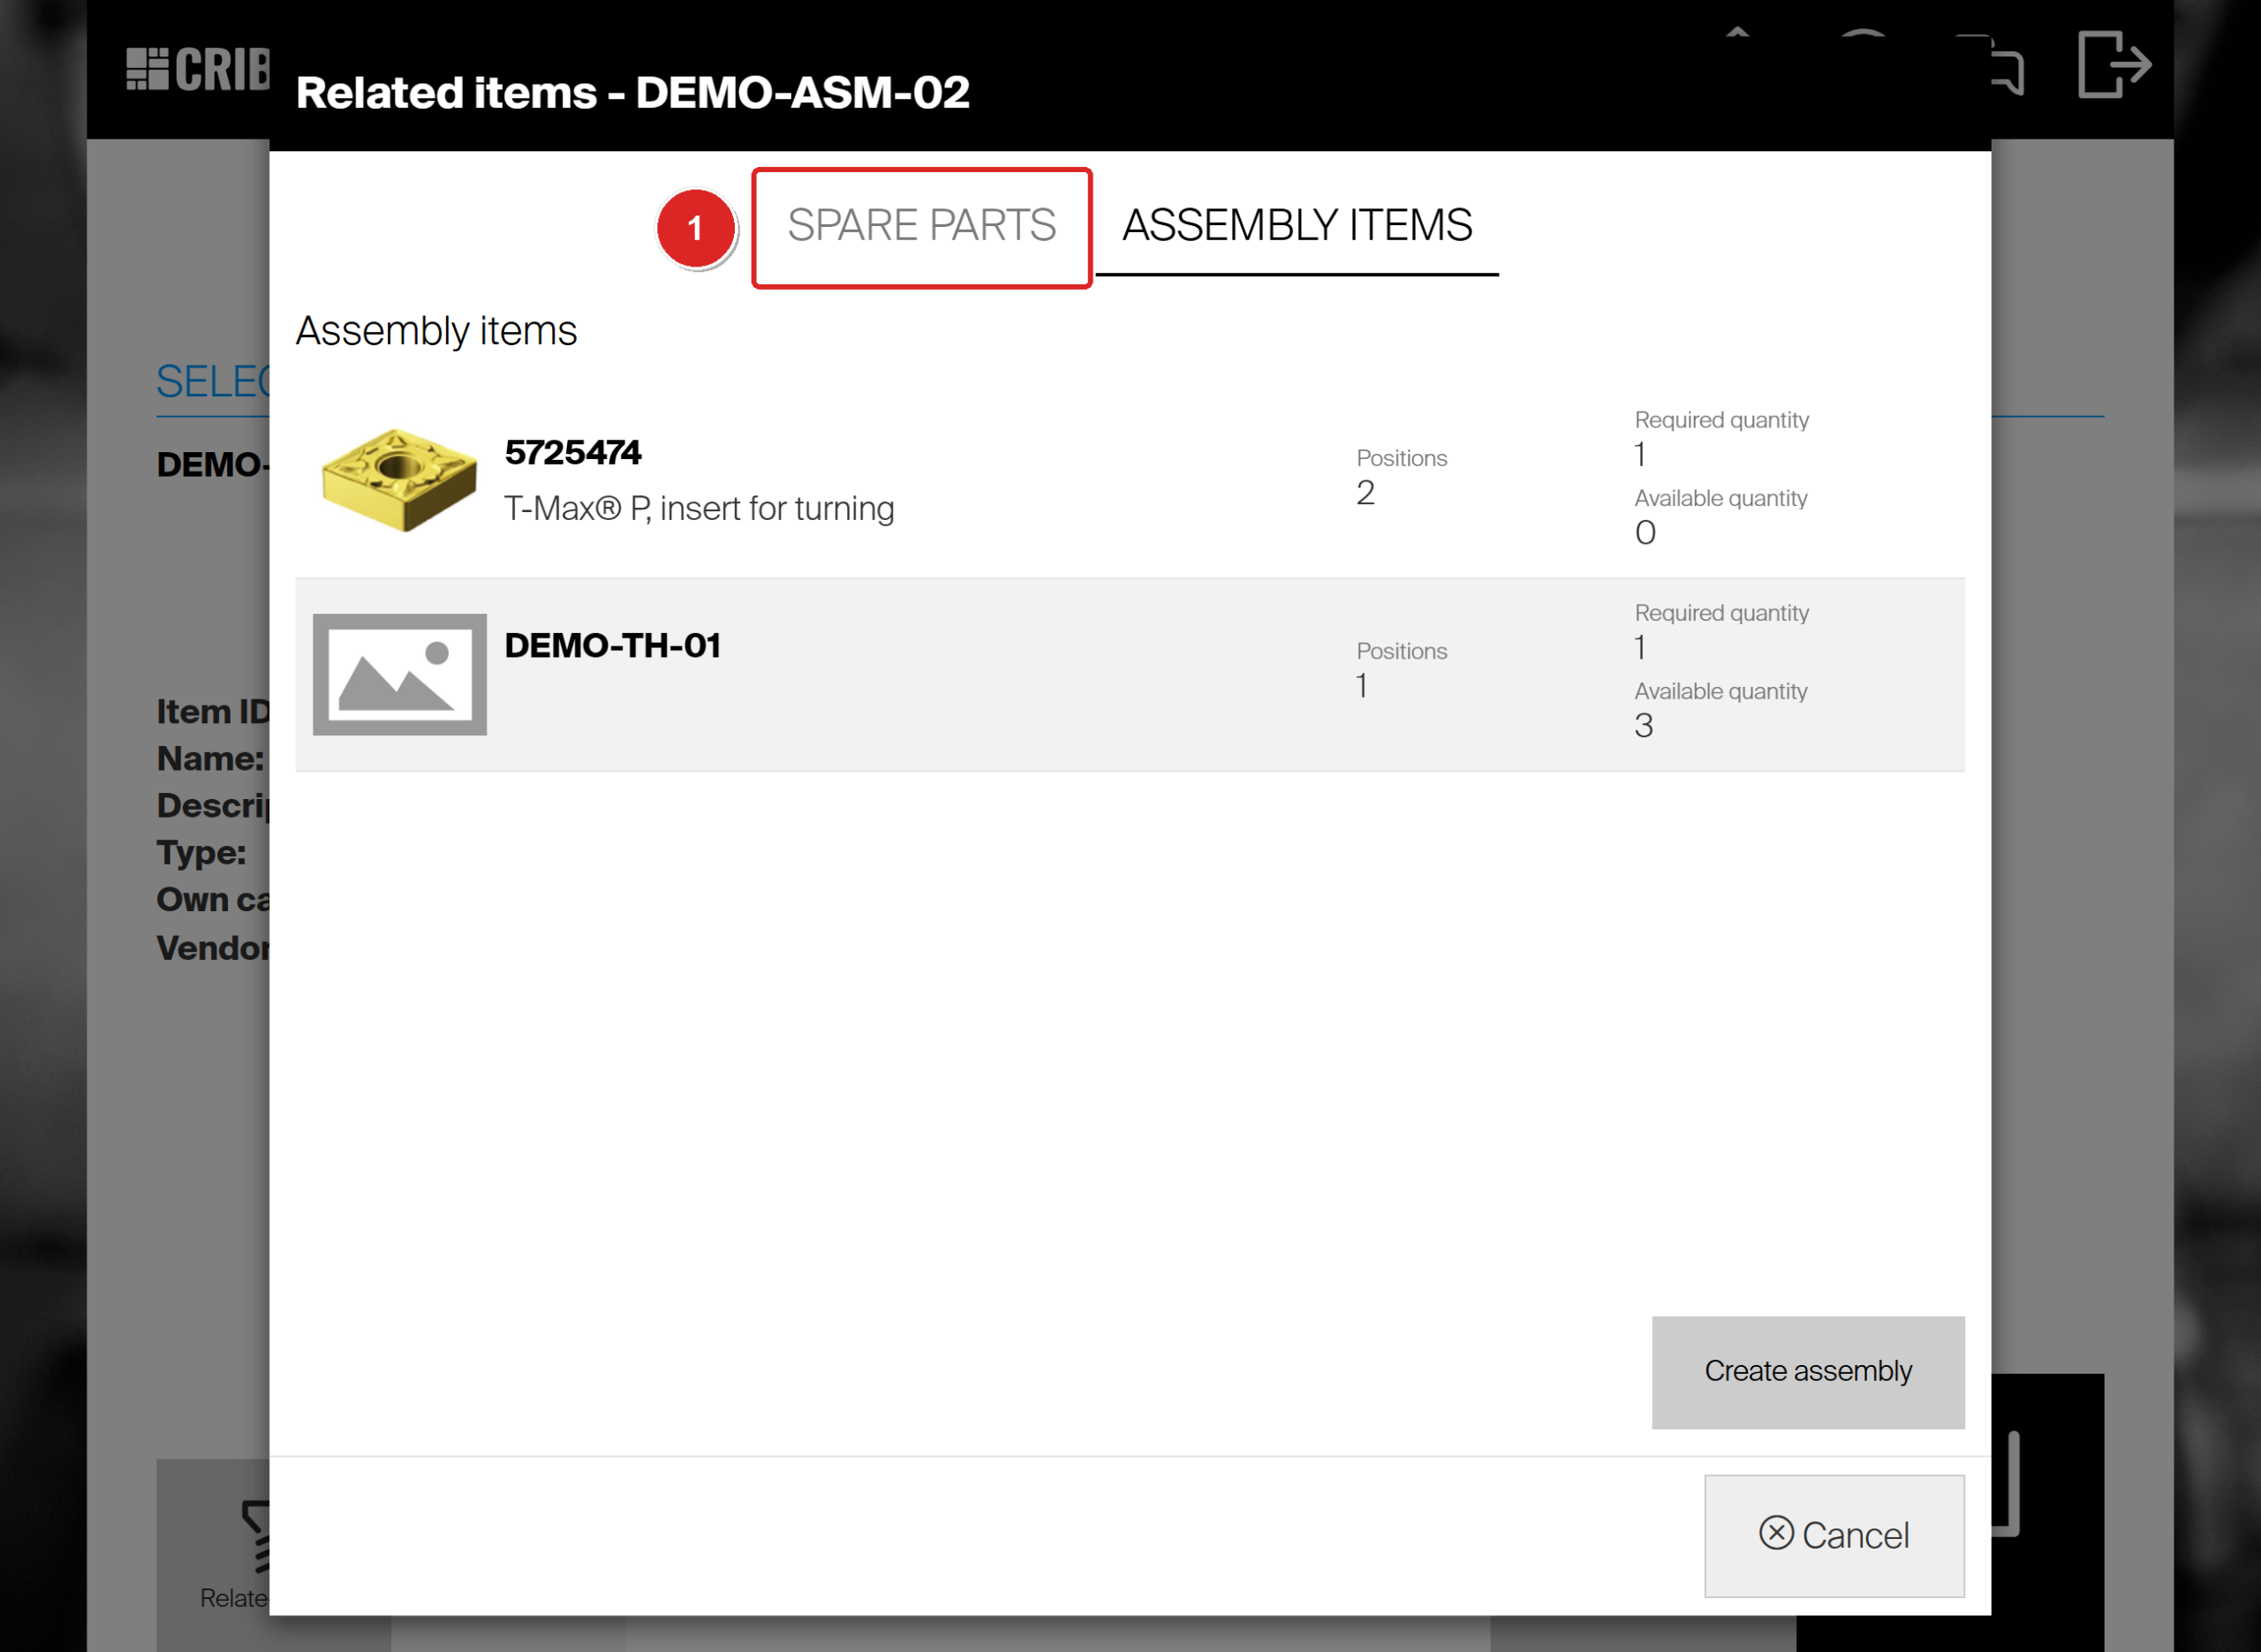
Related items opens on the assembly’s components. Spare parts (1) is the tab next to it.
Each spare part shows its Positions, the Required quantity and the Available quantity in this device. An inherited spare part (1) also shows the Assembly item (2) it belongs to.
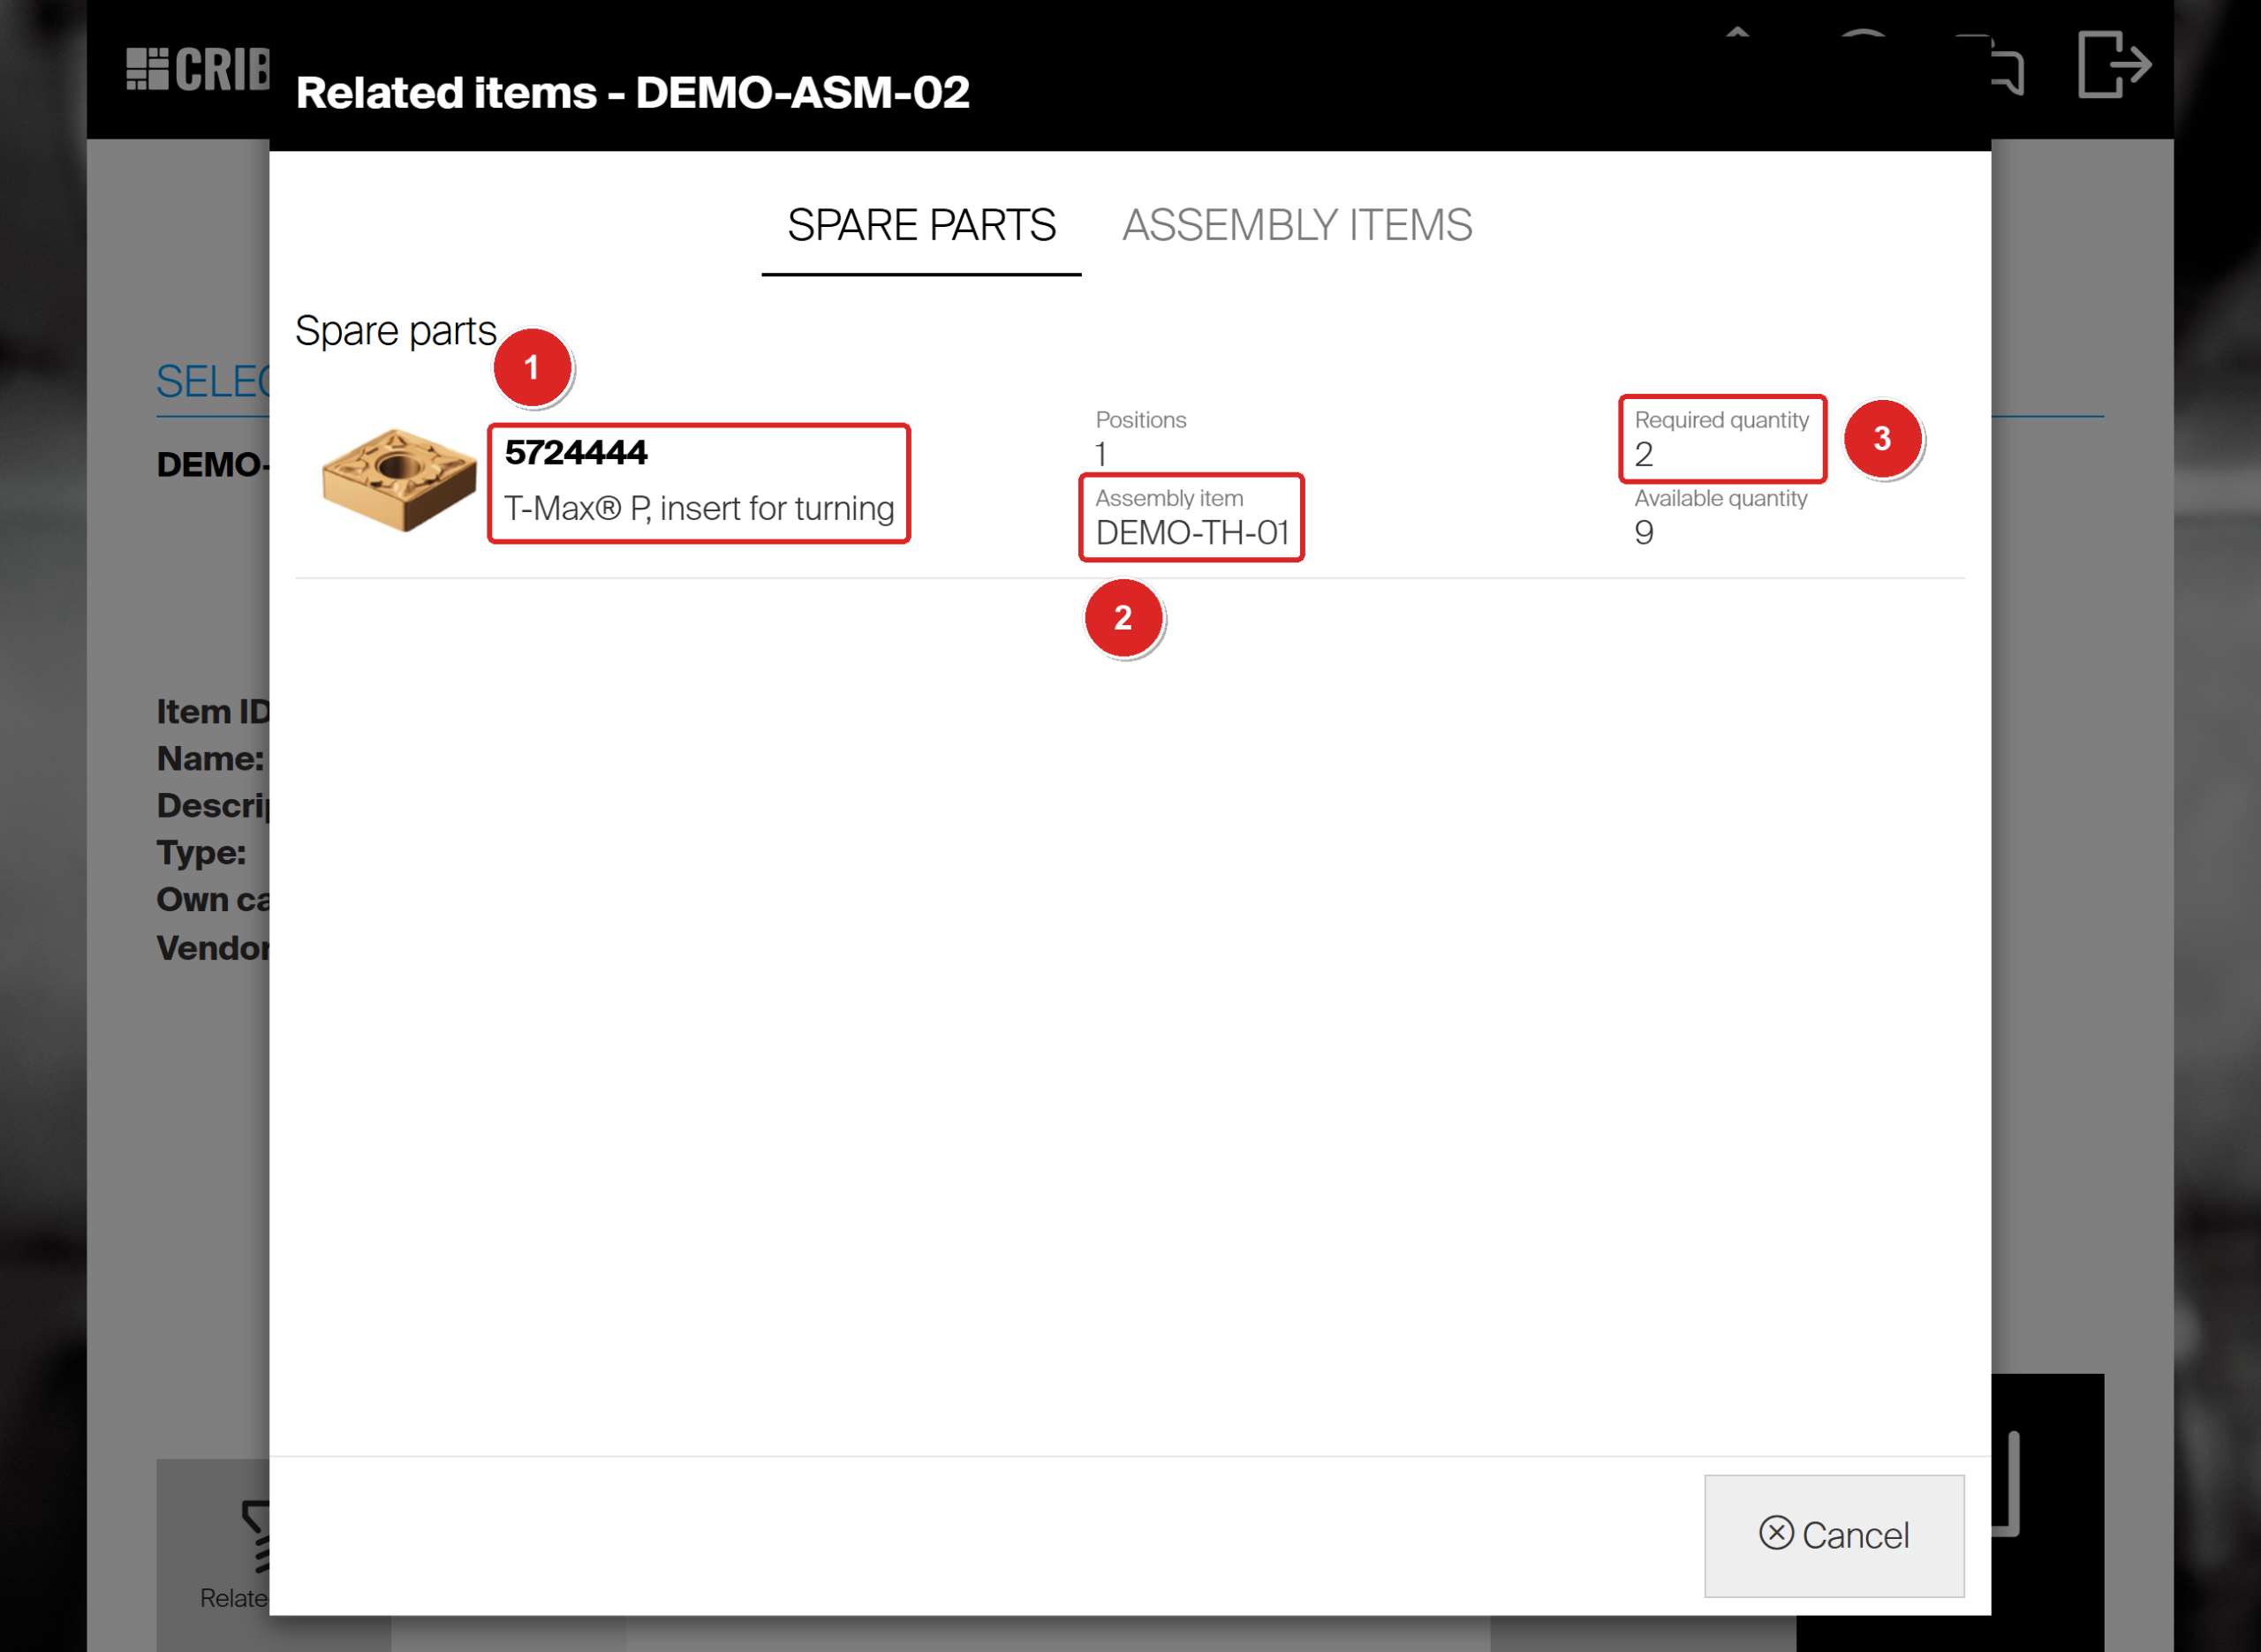
Insert 5724444 (1) is inherited from component DEMO-TH-01 (2). One holder needs 2 of them (3).
- Select the spare part. The Select quantity dialog opens with the required quantity already filled in (1).
- Change the quantity if you need fewer or more.
- Select Add to pick list to collect more items first, or Pick to pick it now (2).
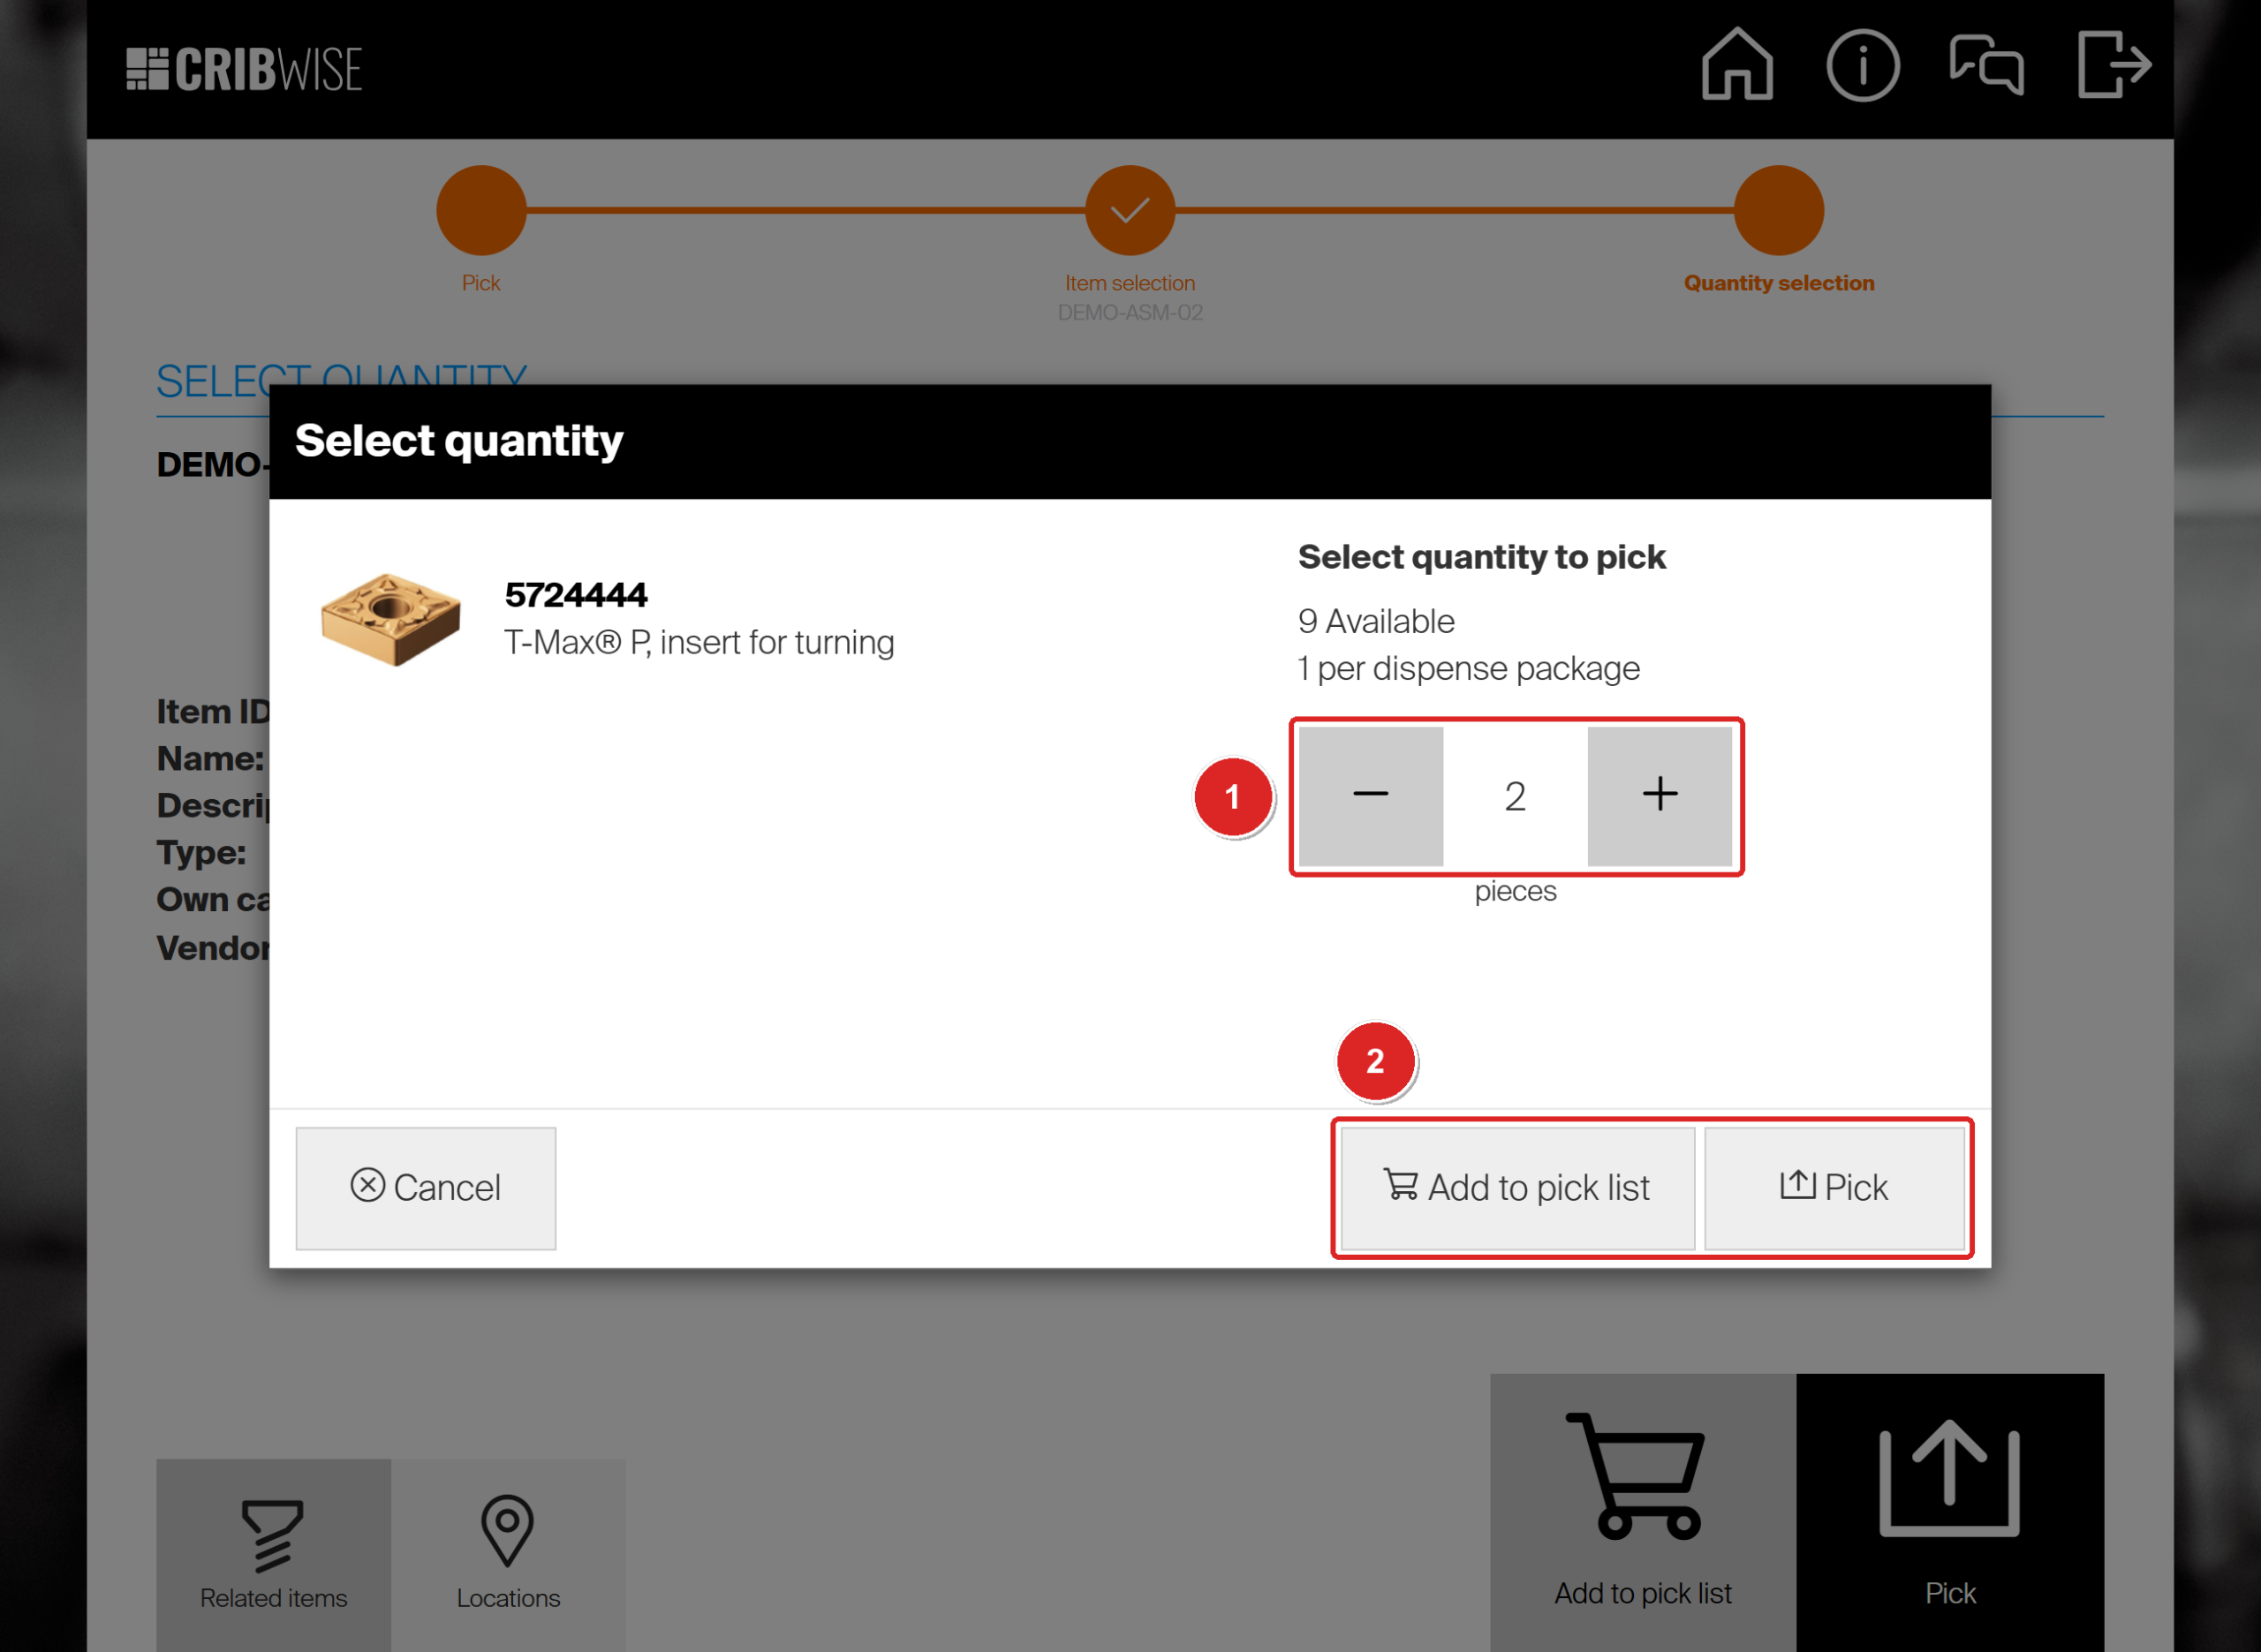
The quantity starts at the required quantity of 2 (1). Cancel closes both dialogs.
Note: The Assembly items tab of the same dialog also has Create assembly. That builds a new assembly, as described in Assemblies: Building and stocking. It is not needed to pick spare parts.
What each return condition does to an assembly
An assembly comes back as one item, just as it was picked. Its durable components cannot be returned on their own: they became part of the assembly when it was built.
| Condition | Use it when | What happens to the assembly |
|---|---|---|
| New | You never used it, or took the wrong one. | The assembly goes back to its location in the condition it had when you picked it: DEMO-ASM-02 was picked as Used and came back as Used. |
| Used | You used it and it is still fine. | Condition Used. It goes back to a location that takes used items and can be picked again. |
| For service | It needs regrinding, repair or calibration. | Condition For service. It goes to a location for items waiting for service and cannot be picked until it has been serviced. Only offered if you may return for service, and only for assemblies with service switched on. |
| Scrap | It is broken or worn out. | You choose a scrap reason, and nothing goes back to a location. Its parts are not freed, see Assemblies: Tracking. |
Note: Every return of a serialized assembly counts as one use towards its service rule, whatever the condition, including a return as New. See Assemblies: Service.
Return an assembly
Step 1 — Choose the condition
- On the main menu, select Return.
- Select the tile that matches the assembly. Here it is Used (1).
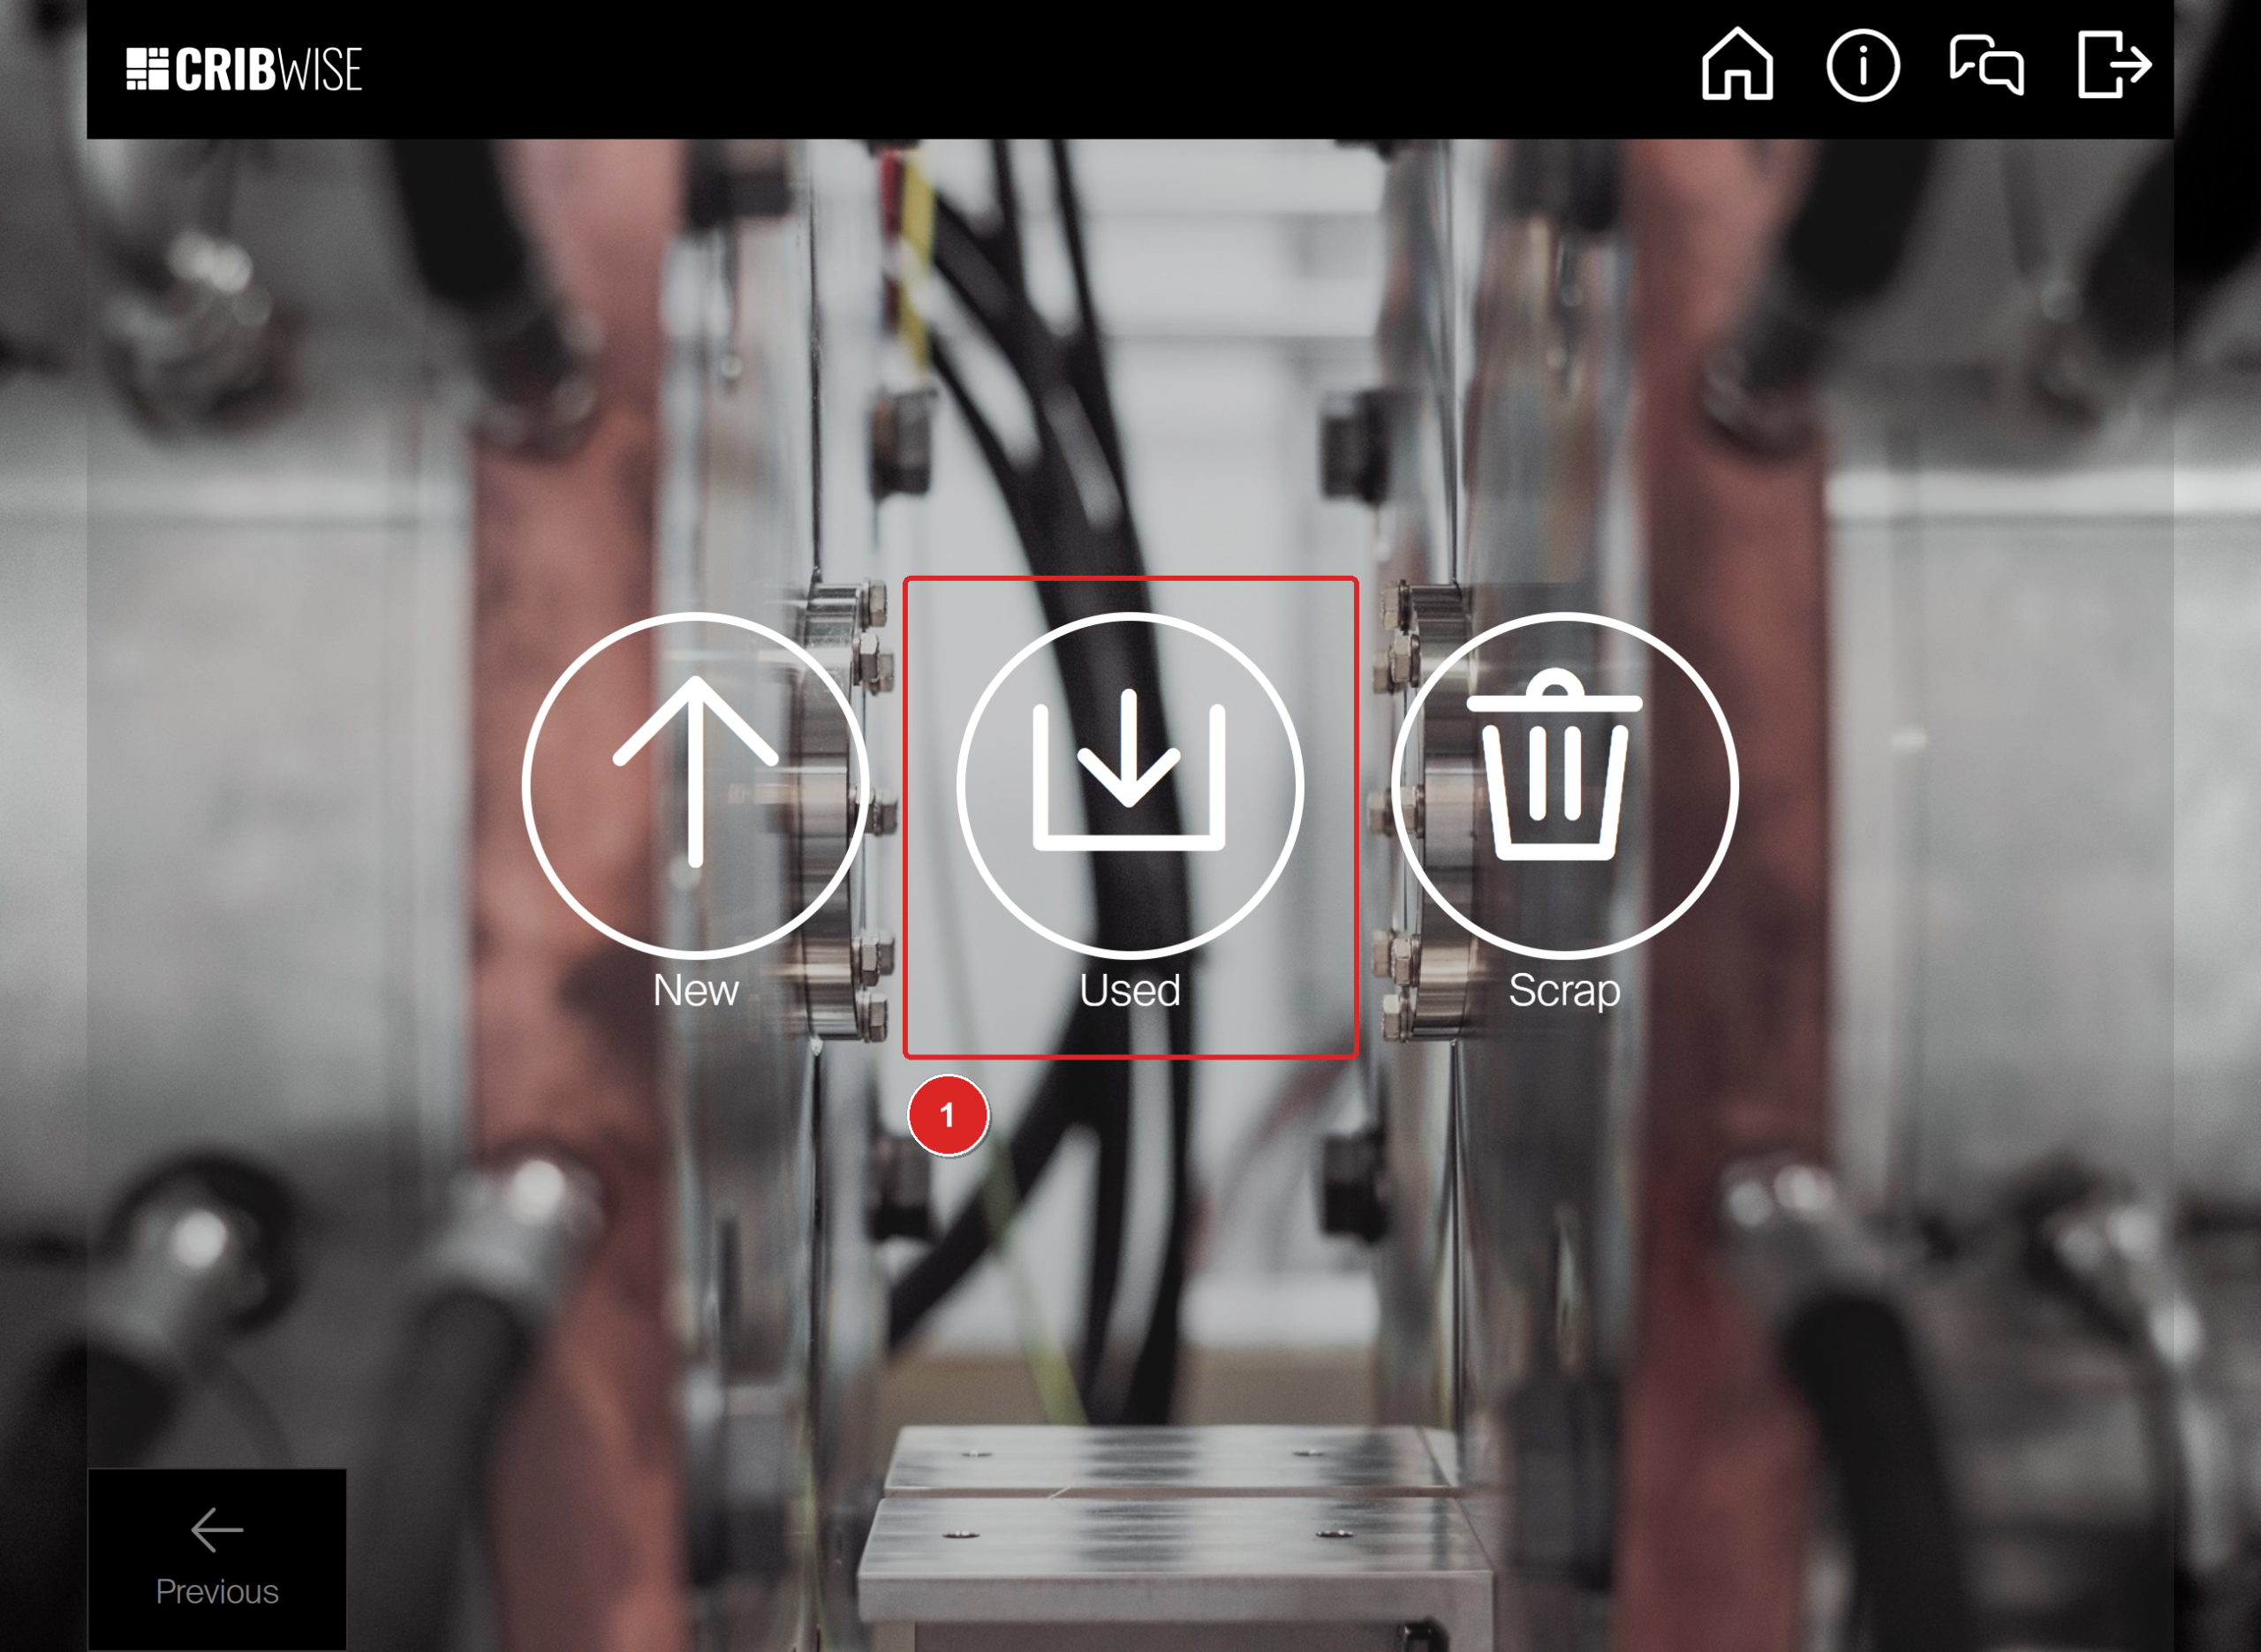
The operator in this example sees New, Used (1) and Scrap.
Step 2 — Select your pick
The list shows the open picks on this device, newest first, with the date they were picked.
- A serialized assembly shows its Serial number (1), so you return exactly the unit you took.
- An assembly without serial numbers shows the Quantity picked and its condition (2).
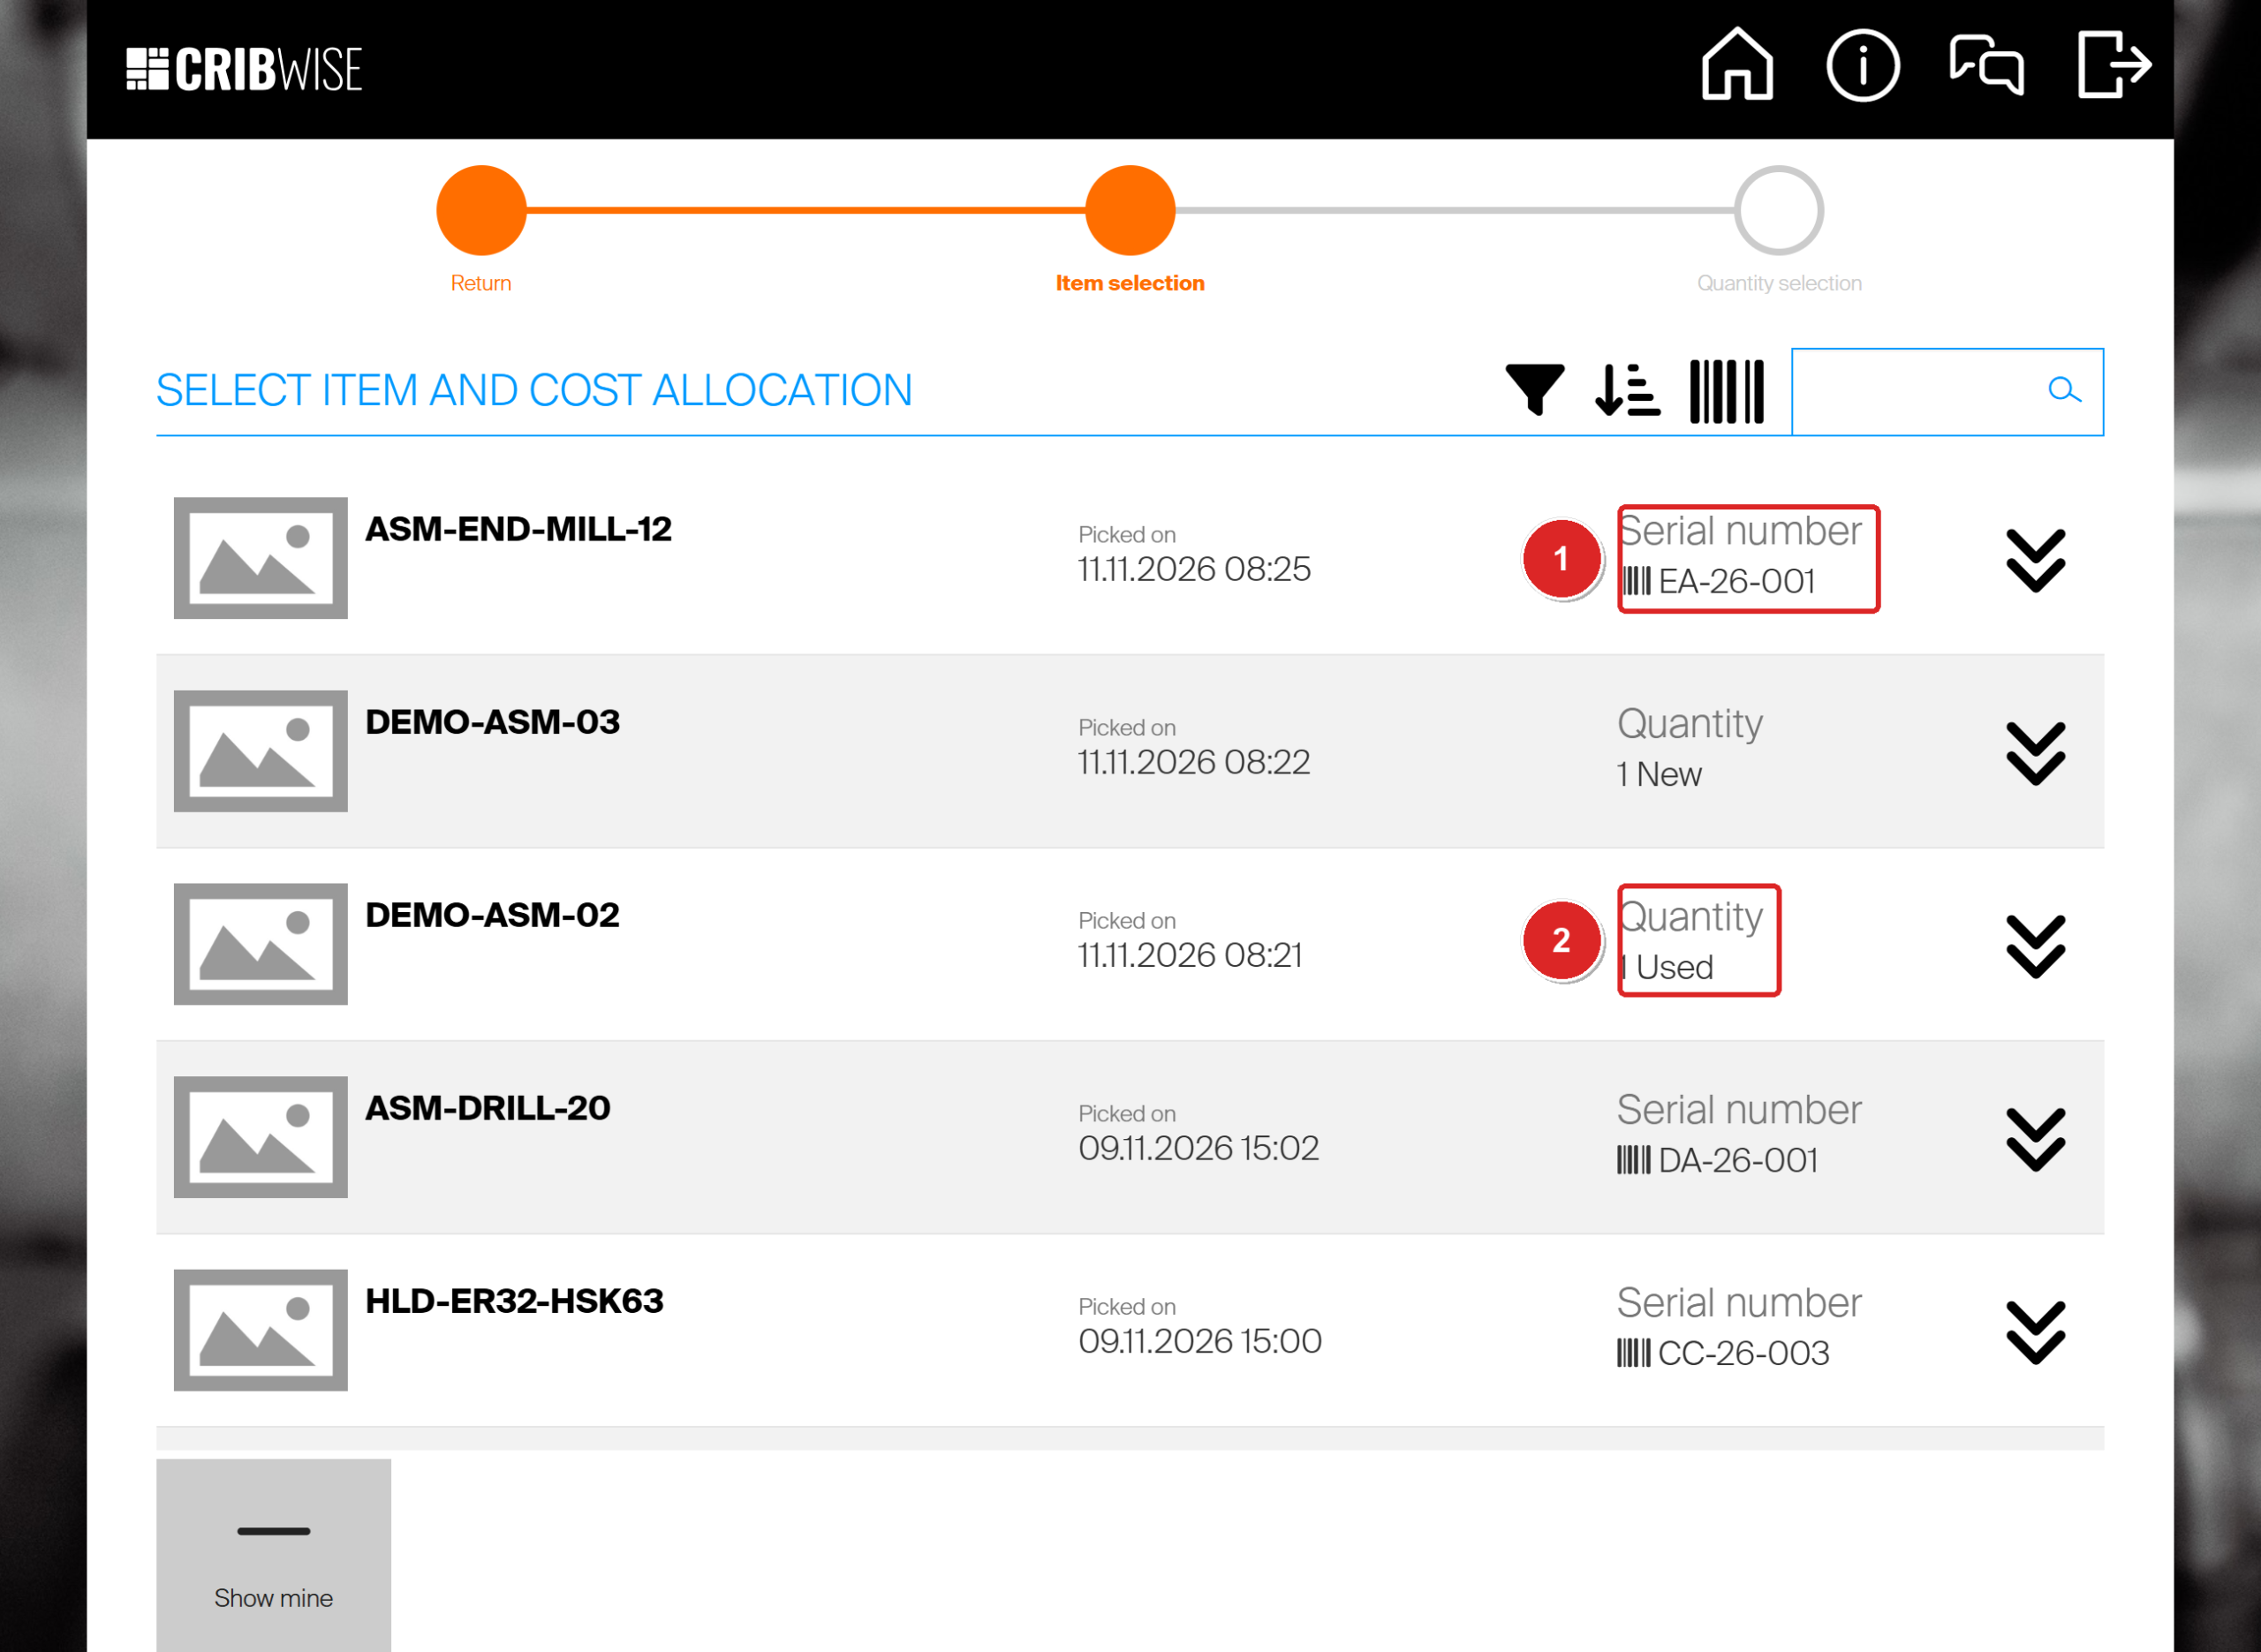
ASM-END-MILL-12 is listed with serial number EA-26-001 (1), DEMO-ASM-02 with 1 Used (2). Show mine hides picks of other users.
Select the row of the assembly you are returning.
Step 3 — Check the quantity
For an assembly without serial numbers, set the quantity you are returning. A serialized assembly shows 1 Picked and the serial number under the barcode: it is always returned one unit at a time.
- To check the unit first, select Serial number info (1).
- Select Return (2).
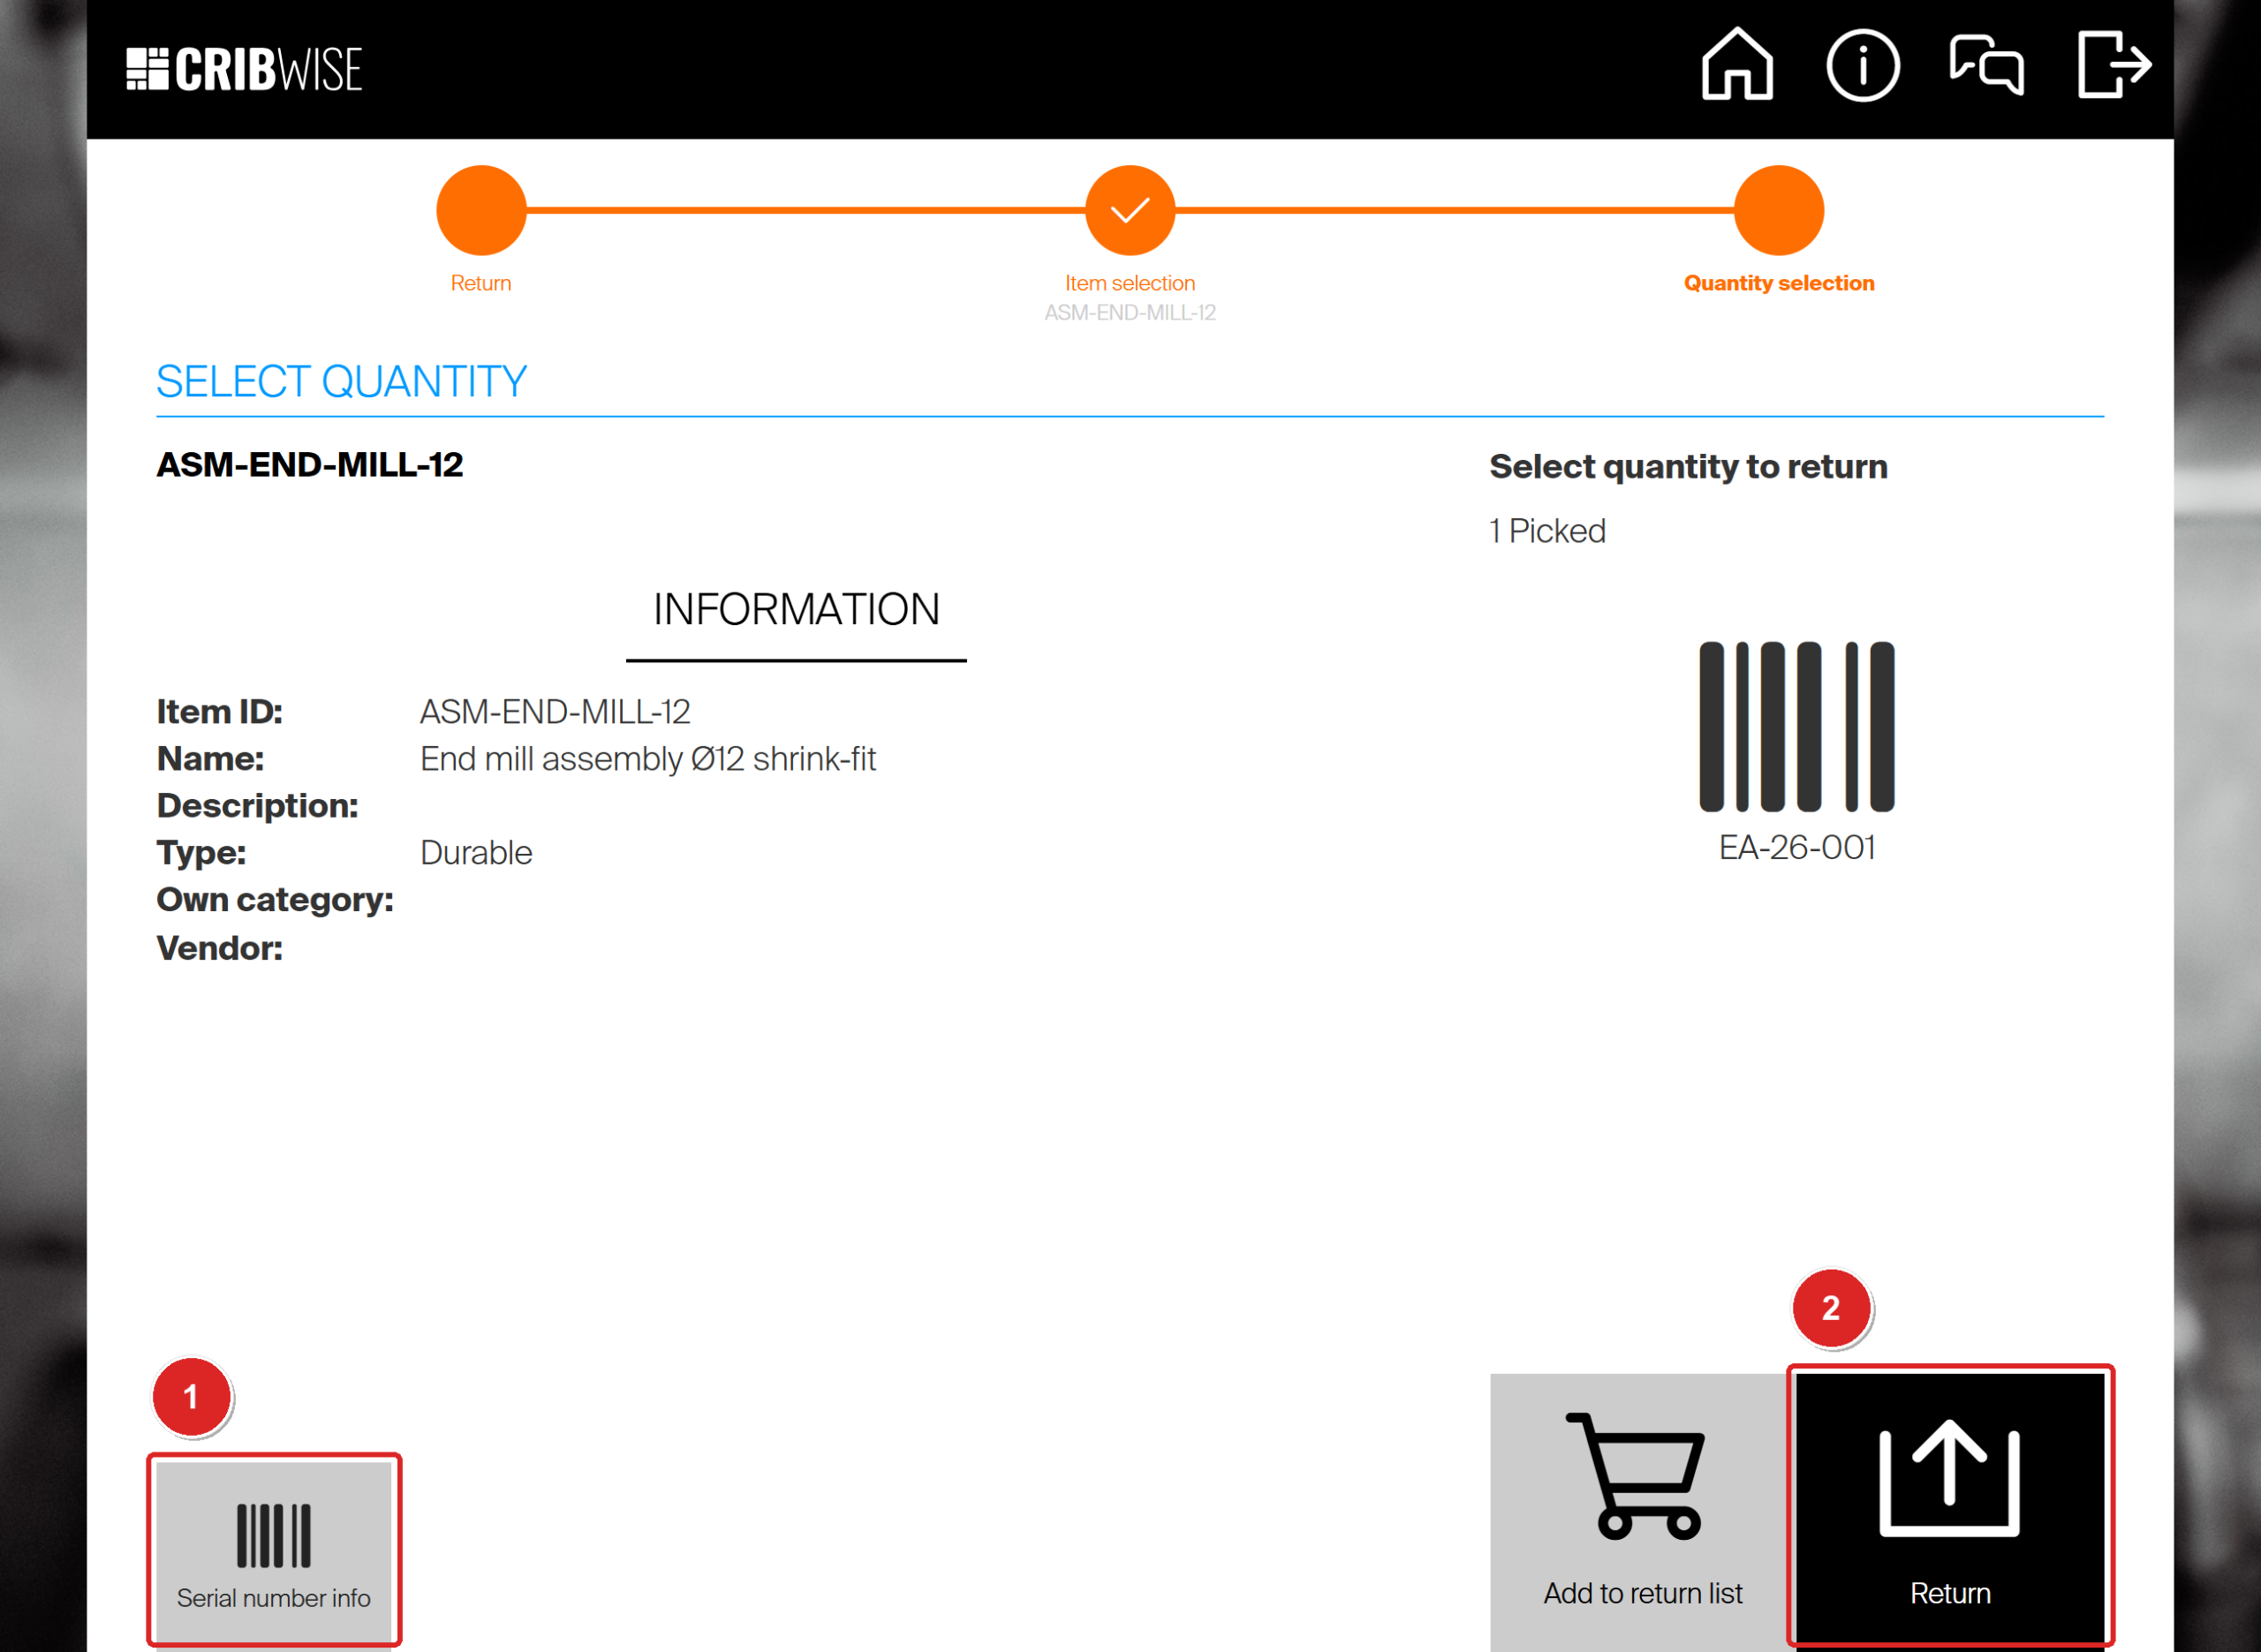
Serial number info (1) opens the details of EA-26-001. Return (2) hands the assembly back.
Serial number info shows the fields that apply to this assembly. ASM-END-MILL-12 has no service rule, so it shows only the Condition (1) and Loan time ends. An assembly with a service rule also shows its service counters, as described in Serialized items: Returning.
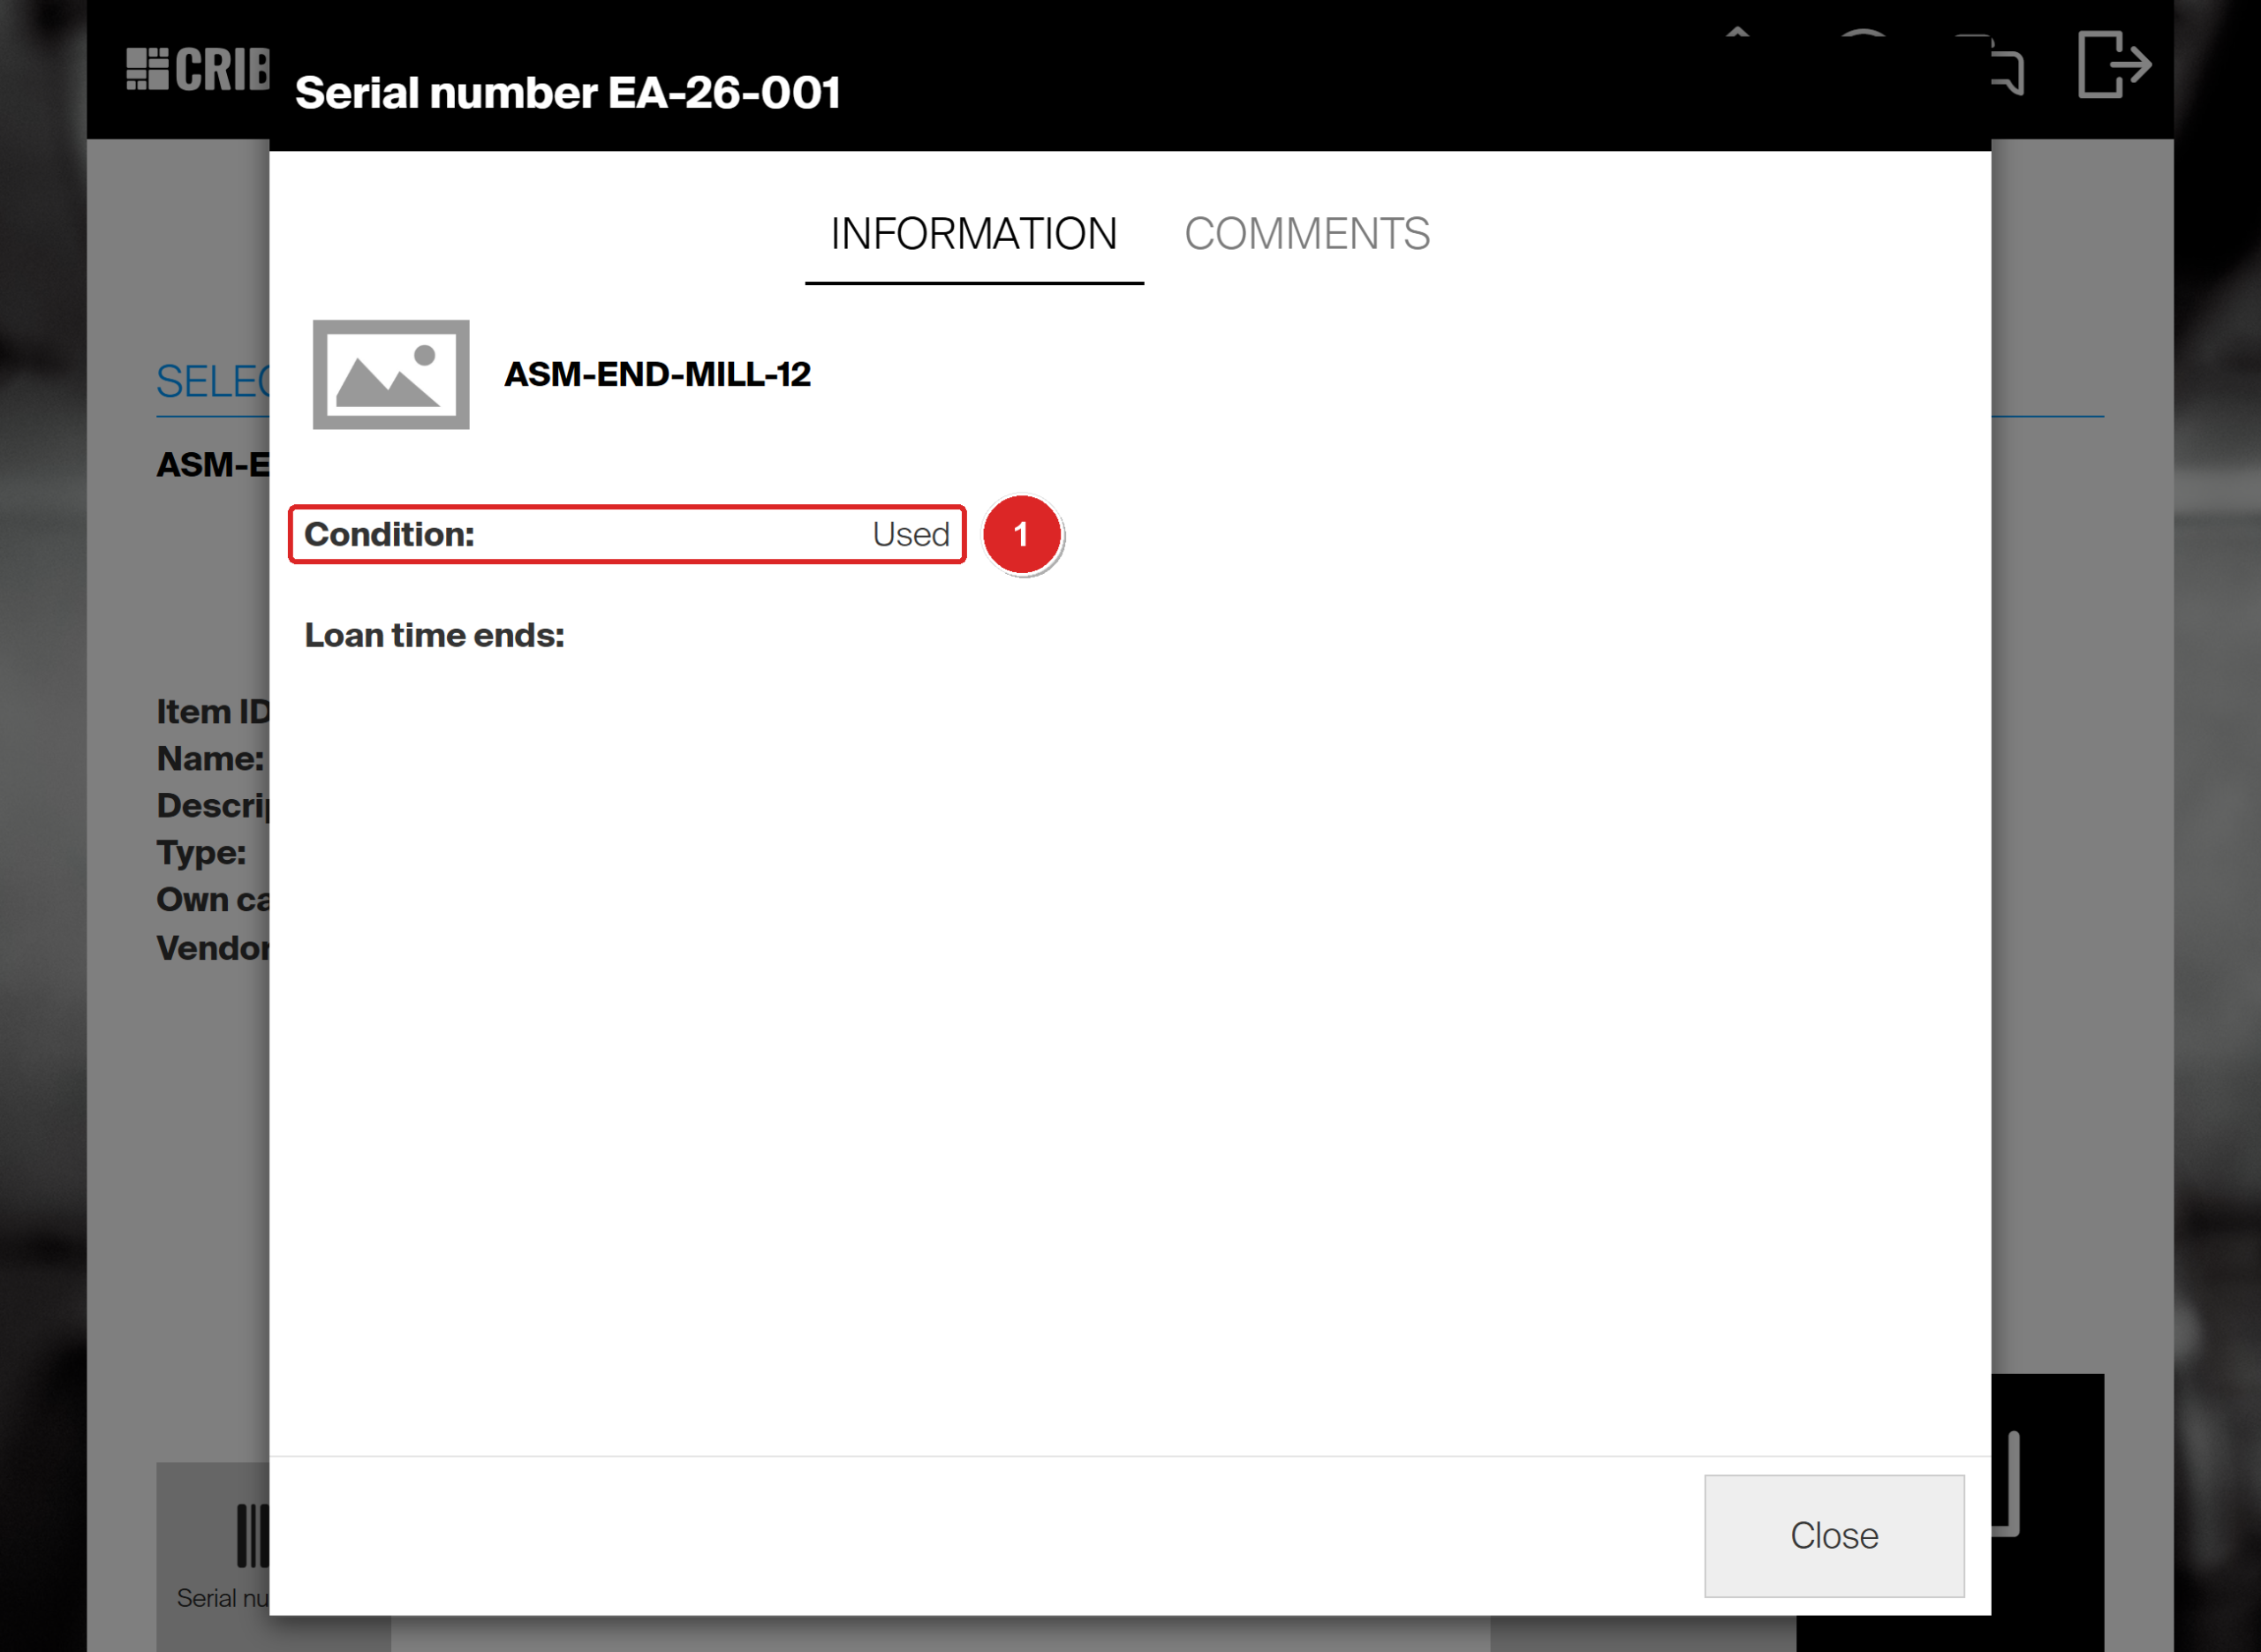
EA-26-001 is Used (1). Select Close to go back.
Step 4 — Put the assembly back
- On Items to return, put the assembly in the location shown.
- Tick its row (1).
- Select Returning finished (2).
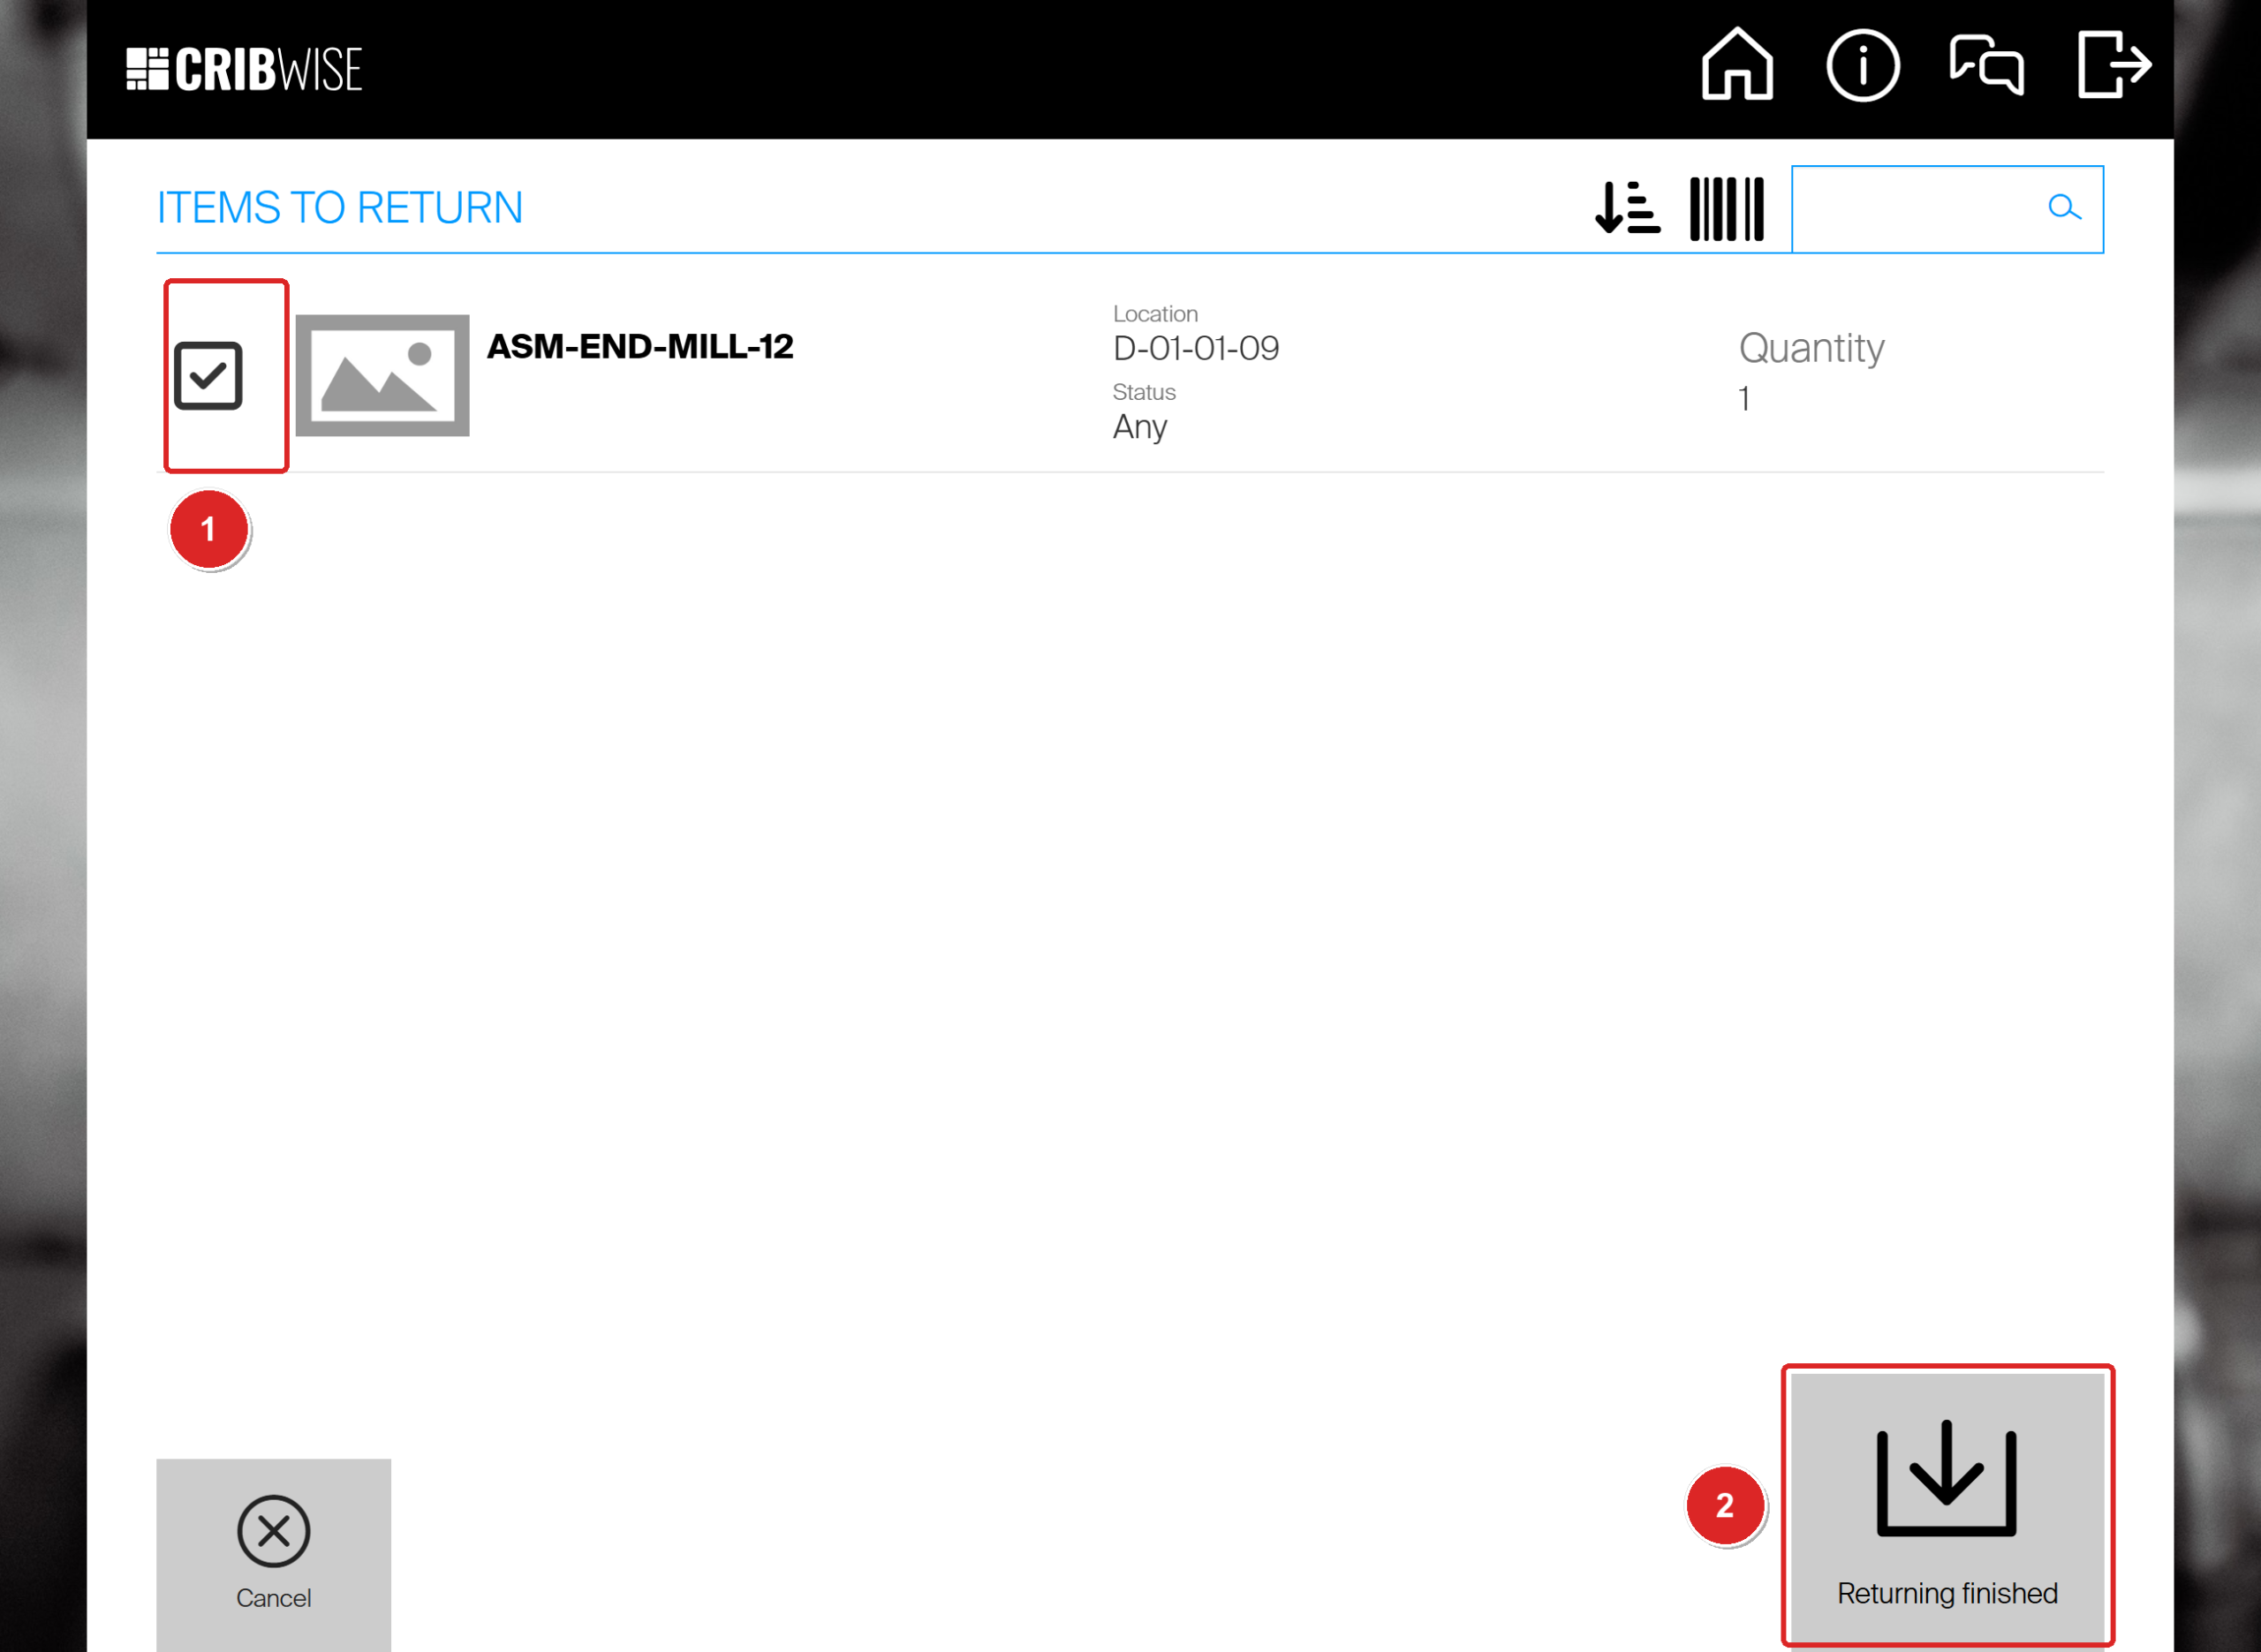
EA-26-001 goes back to D-01-01-09. The tick (1) registers the return.
The Return summary lists the assembly, its location, its status and the quantity.
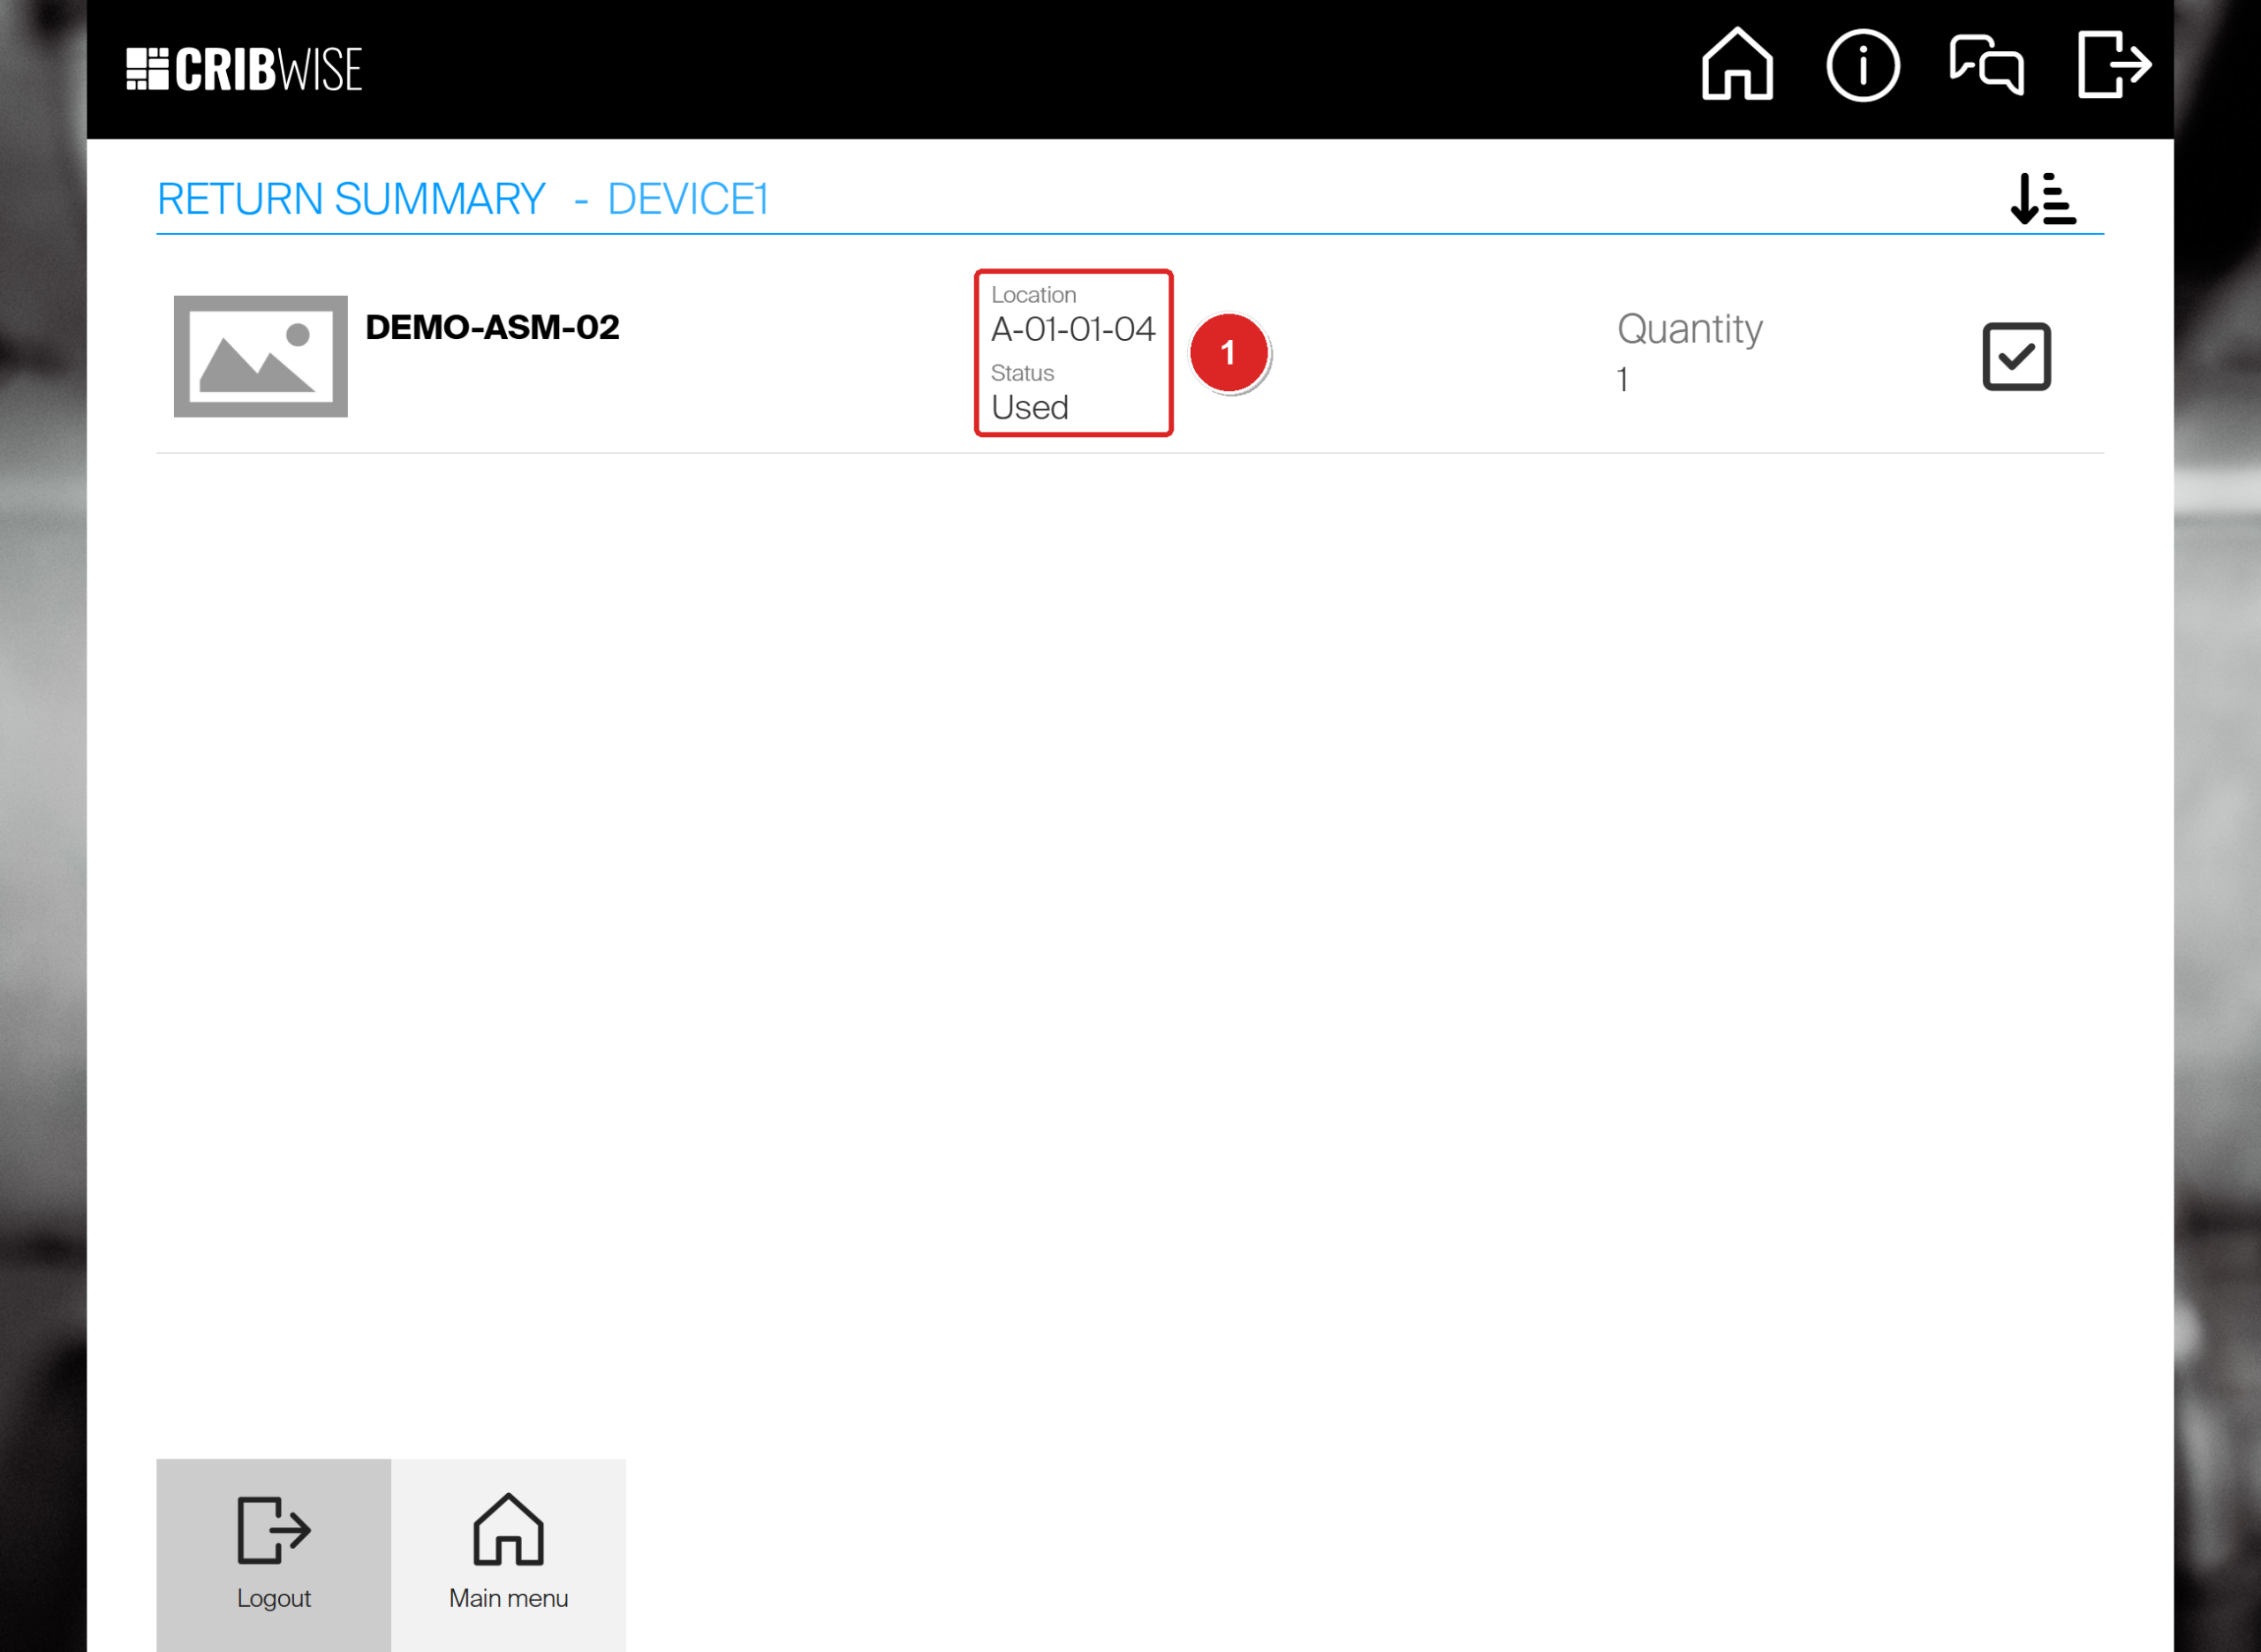
DEMO-ASM-02 returned as New: it is back in A-01-01-04 with the status it was picked with, Used (1).
Success: The assembly is back in stock and can be picked again. Picked durable items on the main menu goes down by one.
Return an assembly for service
Use For service when an assembly needs regrinding, repair or calibration before the next job. The tile appears only for a login that may return for service.
- On the main menu, select Return, then For service (1).
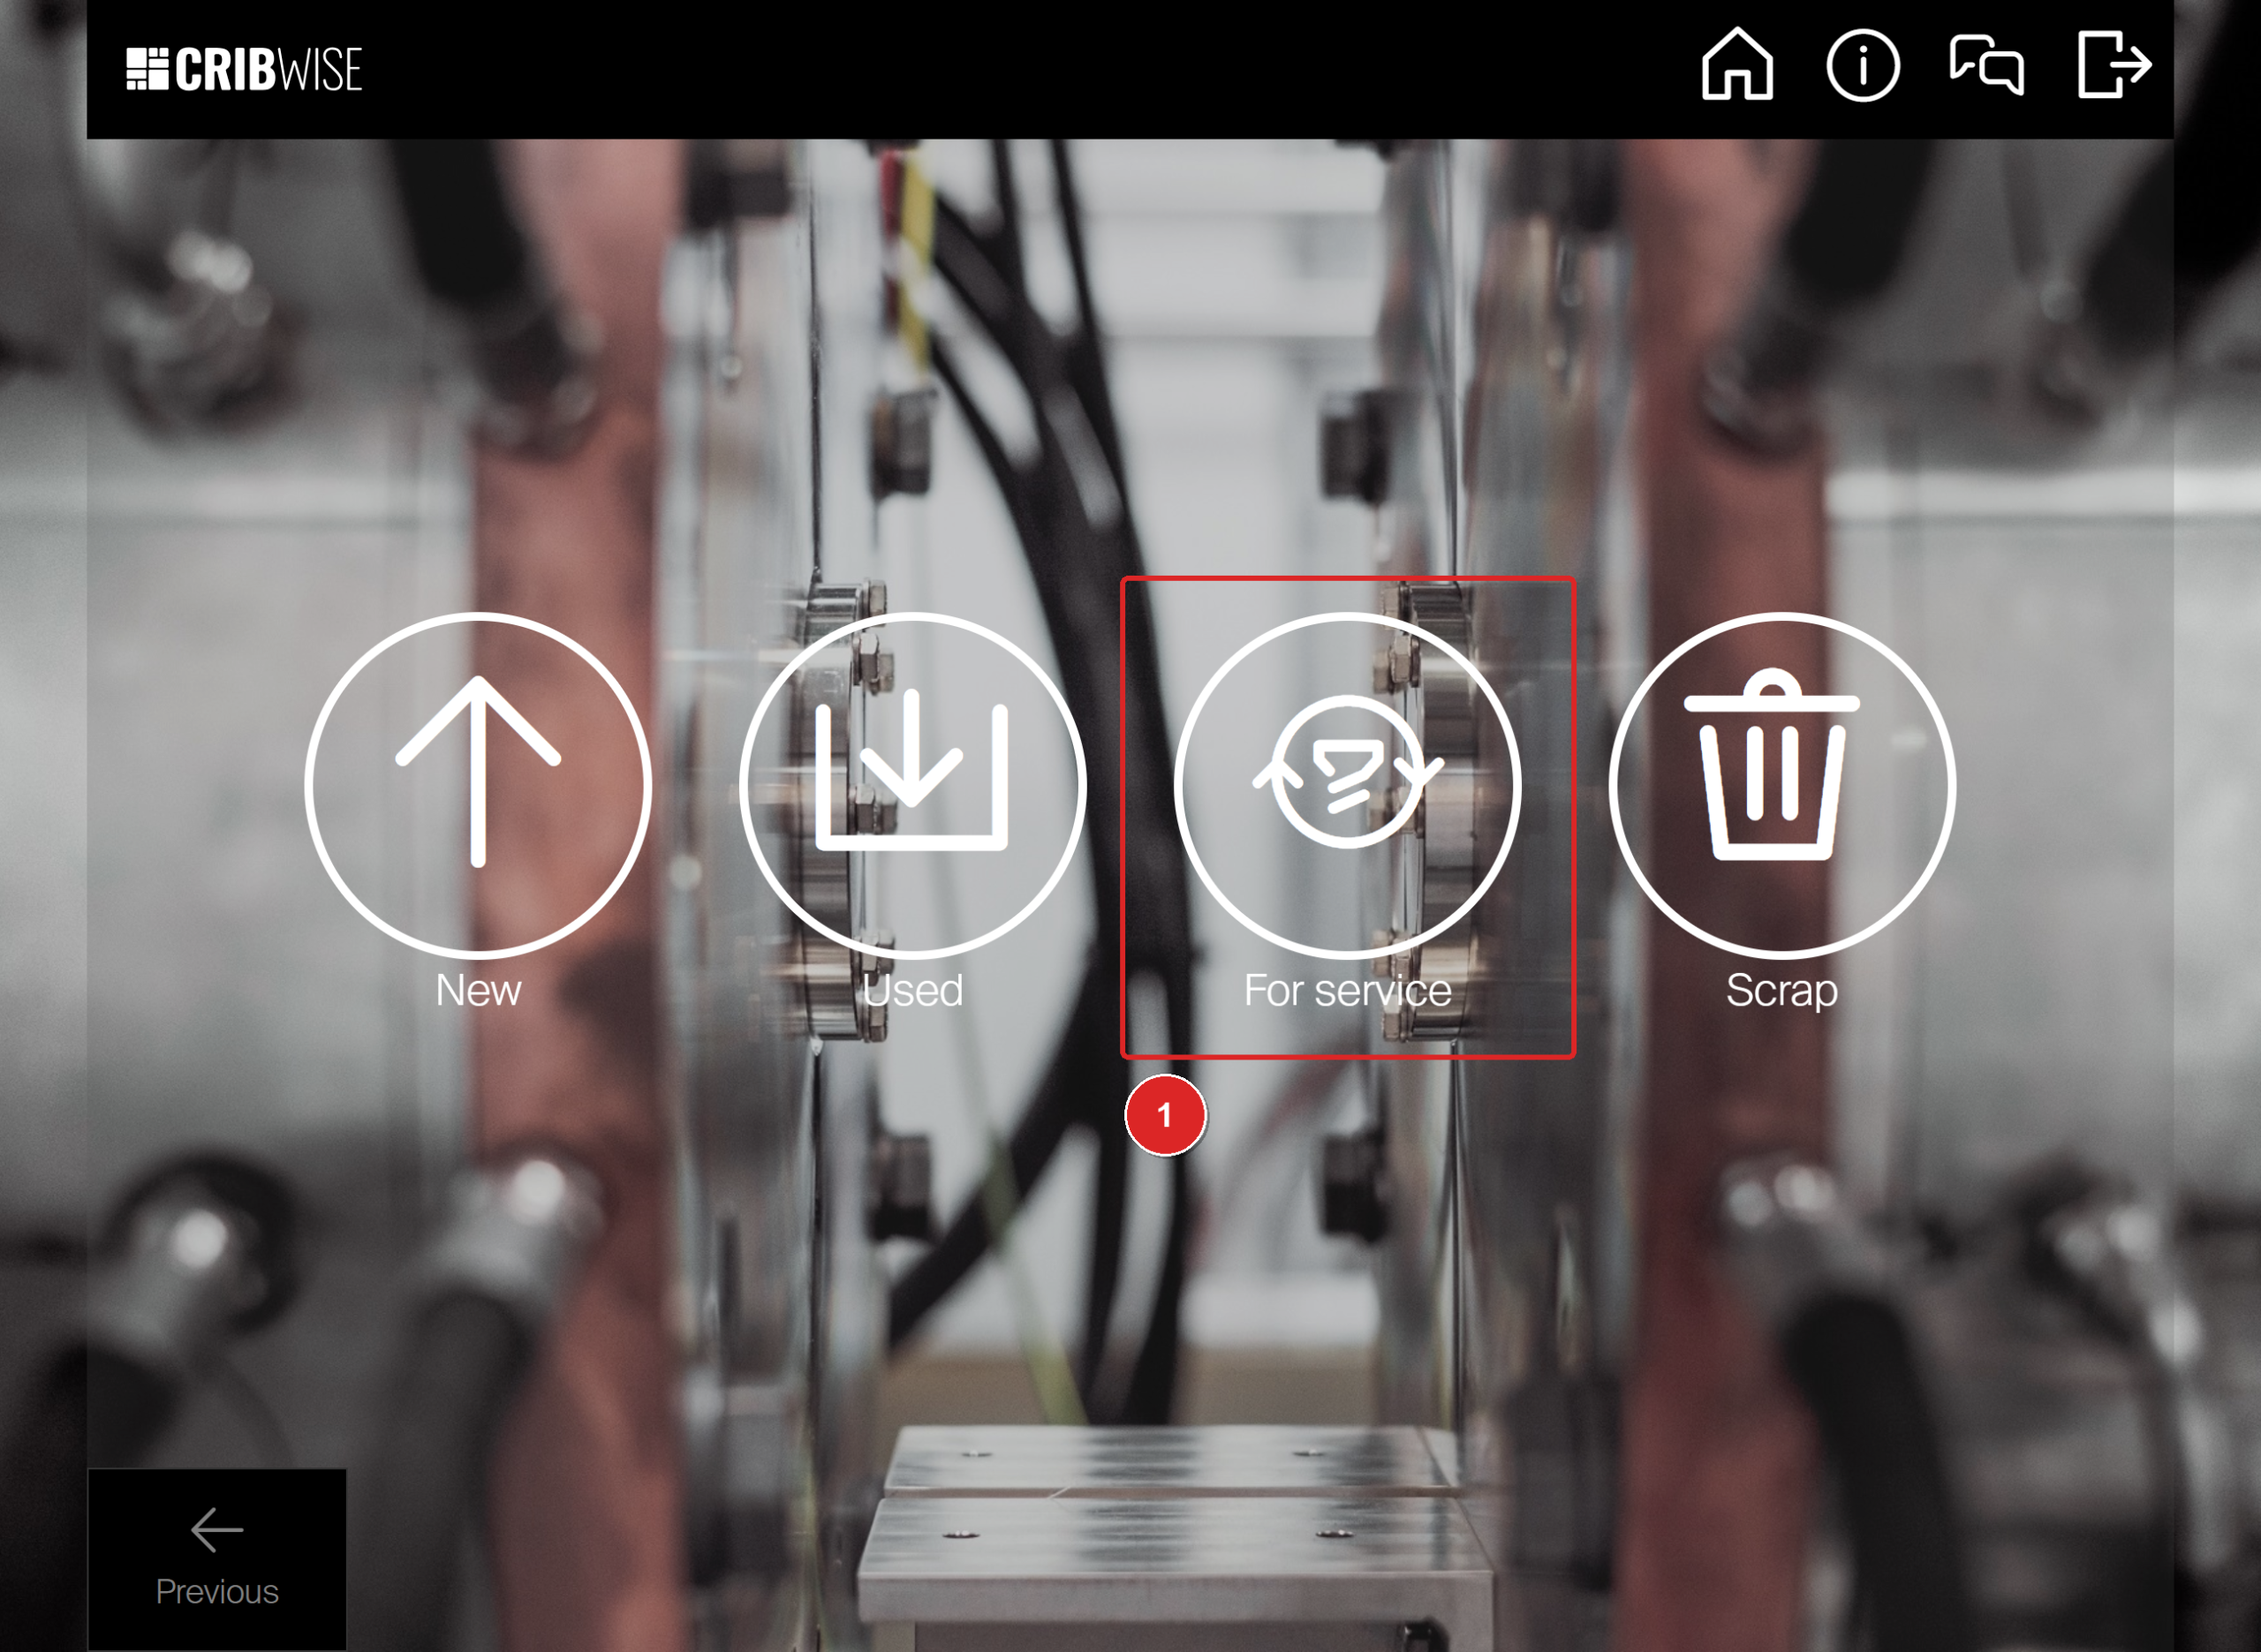
A user who may return for service sees a fourth tile, For service (1).
- Select the assembly (1). The list shows only picks of items with service switched on, so an assembly without service is not offered here.
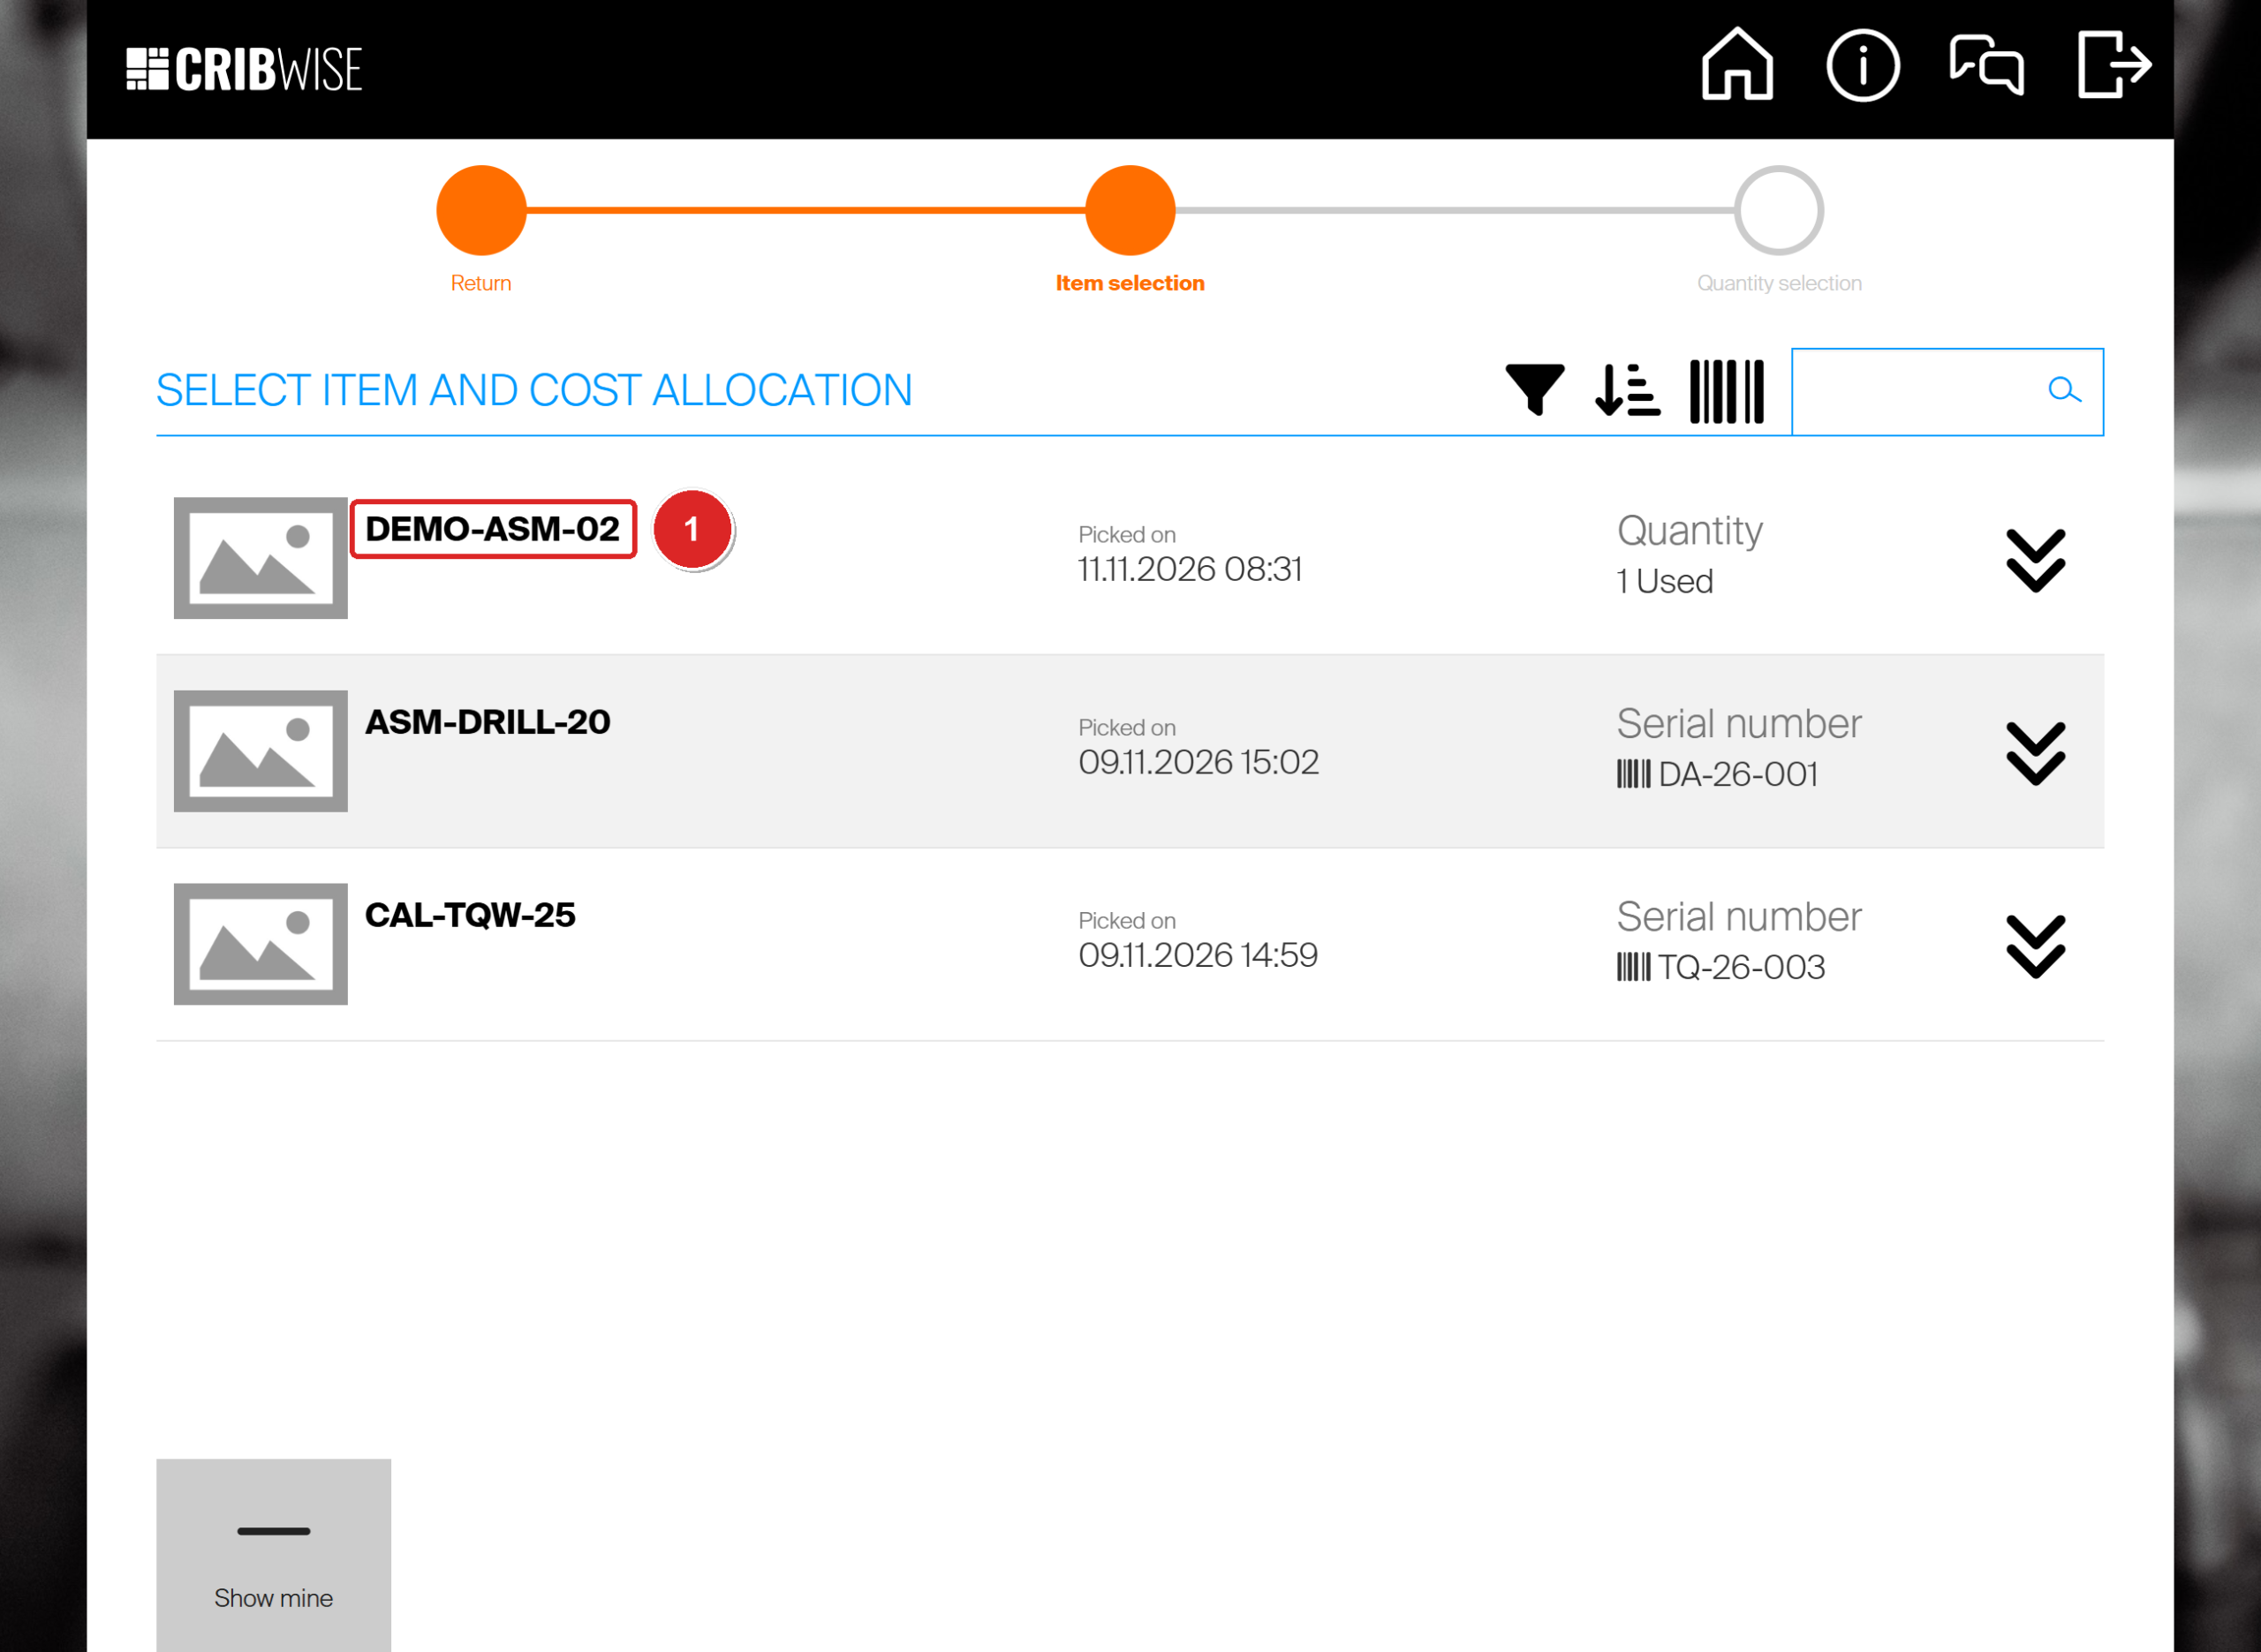
DEMO-ASM-02 (1) has service switched on. ASM-END-MILL-12 does not, and is not in this list.
- Select Return, put the assembly in the location shown, tick its row and select Returning finished.
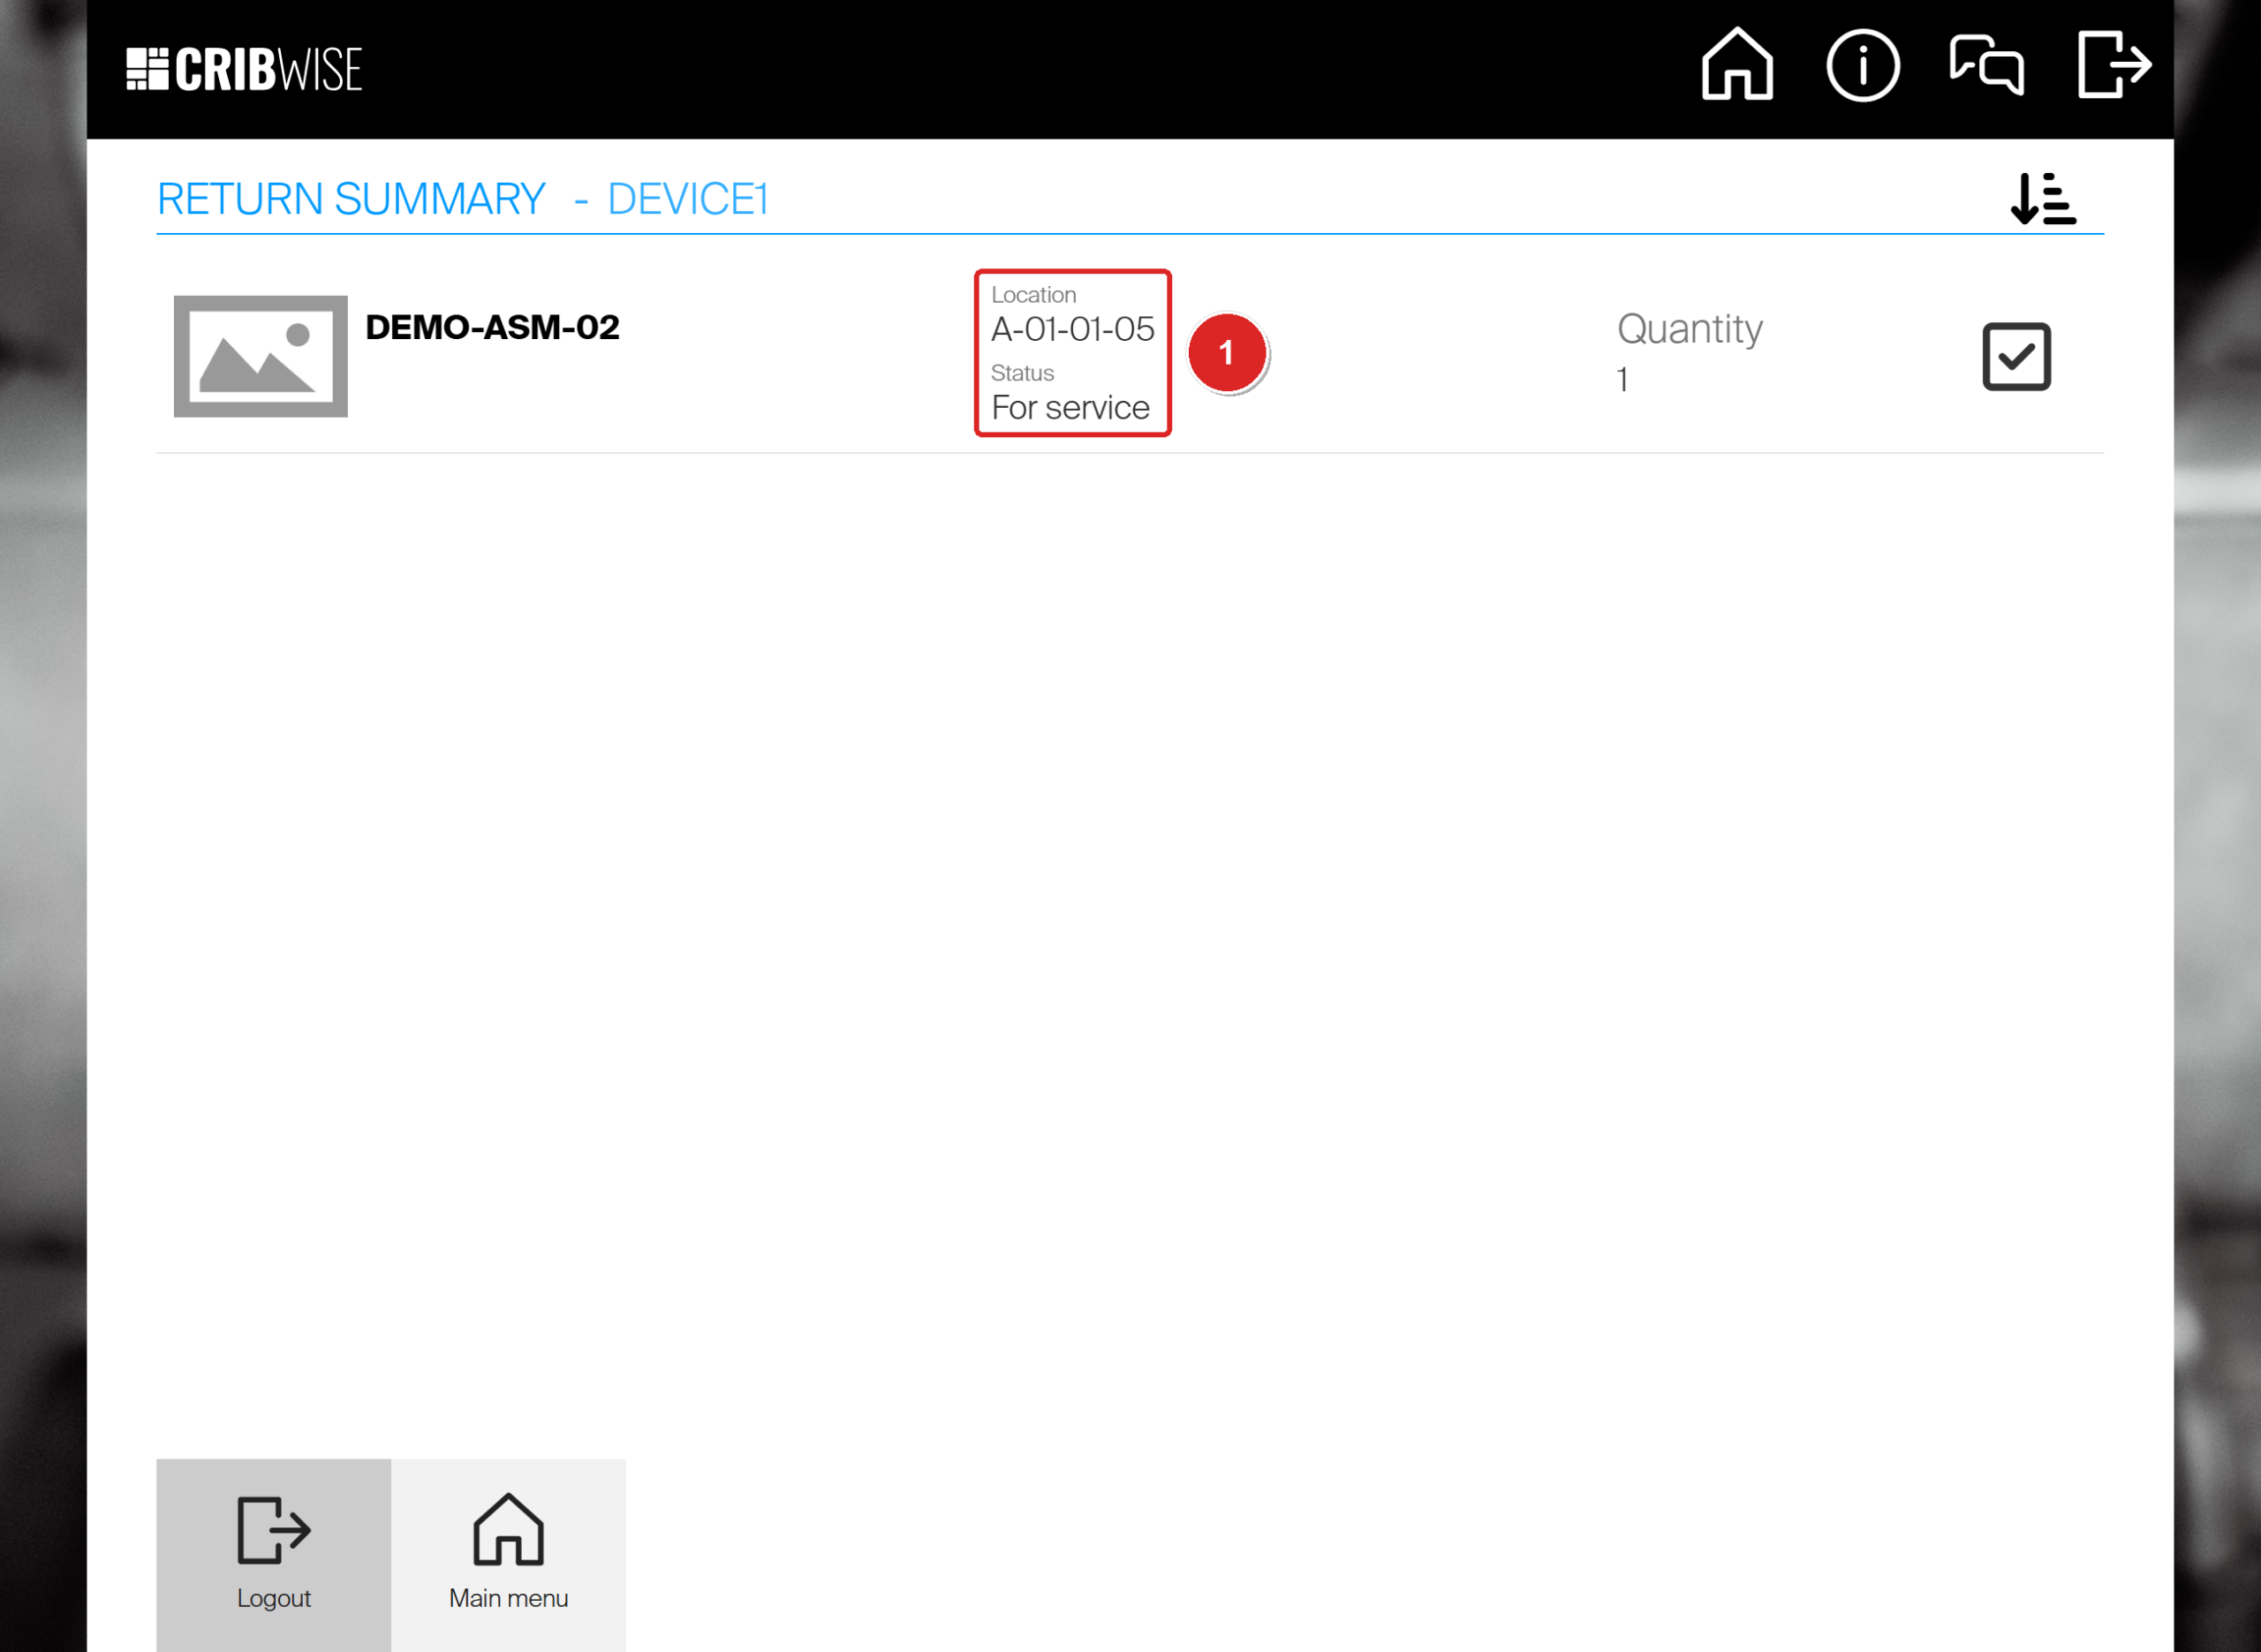
The assembly went to A-01-01-05 with status For service (1), not back to A-01-01-04.
Success: The assembly waits for service and is no longer available to pick: DEMO-ASM-02 went from 2 available to 1. What happens next is described in Assemblies: Service.
Next steps
- Send it for service – an assembly returned For service waits on a service list or service order. See Assemblies: Service.
- Follow it up – where your assemblies are and who has them is described in Assemblies: Tracking.
- Build another one – when the assembly runs out, build and stock a new one as shown in Assemblies: Building and stocking.
Troubleshooting
| Problem | Likely cause | Fix |
|---|---|---|
| The assembly is not in the item list. | None is in stock in this device, or the item is still in Defined status. | Switch on Show items not assigned in this device. If it shows quantity 0, build one first. If it does not show at all, ask an administrator to set the status to Released. |
| CRIBWISE says no item is selected as picked. | The box on the item row was not ticked. | Tick the row and, for a serialized assembly, its serial number. Then select Picking finished again. |
| A spare part is missing from the Spare parts tab. | It is not set up as a spare part of the assembly or of one of its components. | Ask an administrator to add it under Related items > Spare parts. See Item relations: alternatives, substitutes, and assemblies. |
| You want to return only one component. | Durable components become part of the assembly when it is built. | Return the whole assembly. Consumable spare parts you picked separately are returned on their own. |
| There is no For service tile. | Your login may not return for service. | Ask an administrator to check your user group, or return the assembly as Used and report it. |
| The assembly is not in the For service list. | Service is not switched on for this assembly. | Ask an administrator to check the assembly’s service setup in the Admin Portal. |
| Your pick is not in the return list. | It was picked on a different device. | Return it on that device, or ask an administrator to switch on Allow returns for other devices on this device. |
Related articles
- Assemblies: Building and stocking – build an assembly from its components and put it in a stock location.
- Assemblies: Service – what happens to an assembly returned for service.
- Assemblies: Serial numbers – the serial number dialogs when you pick and return a serialized assembly.
- Serialized items: Returning – return conditions and service counters of serial numbers.
- How to return, scrap, and recycle items in SFI – every return option, return lists and scrap reasons.
- How to pick an item – the standard pick flow an assembly follows.
- Item relations: alternatives, substitutes, and assemblies – spare parts, alternatives, matching items and assembly items.