
What you can do
Turn on lot and batch tracking for a CRIBWISE item so every pick, return and restock records which lot the piece came from. Stock already sitting in a location keeps an unknown lot until you count it, so this guide also covers recording lot numbers for what is already on the shelf.
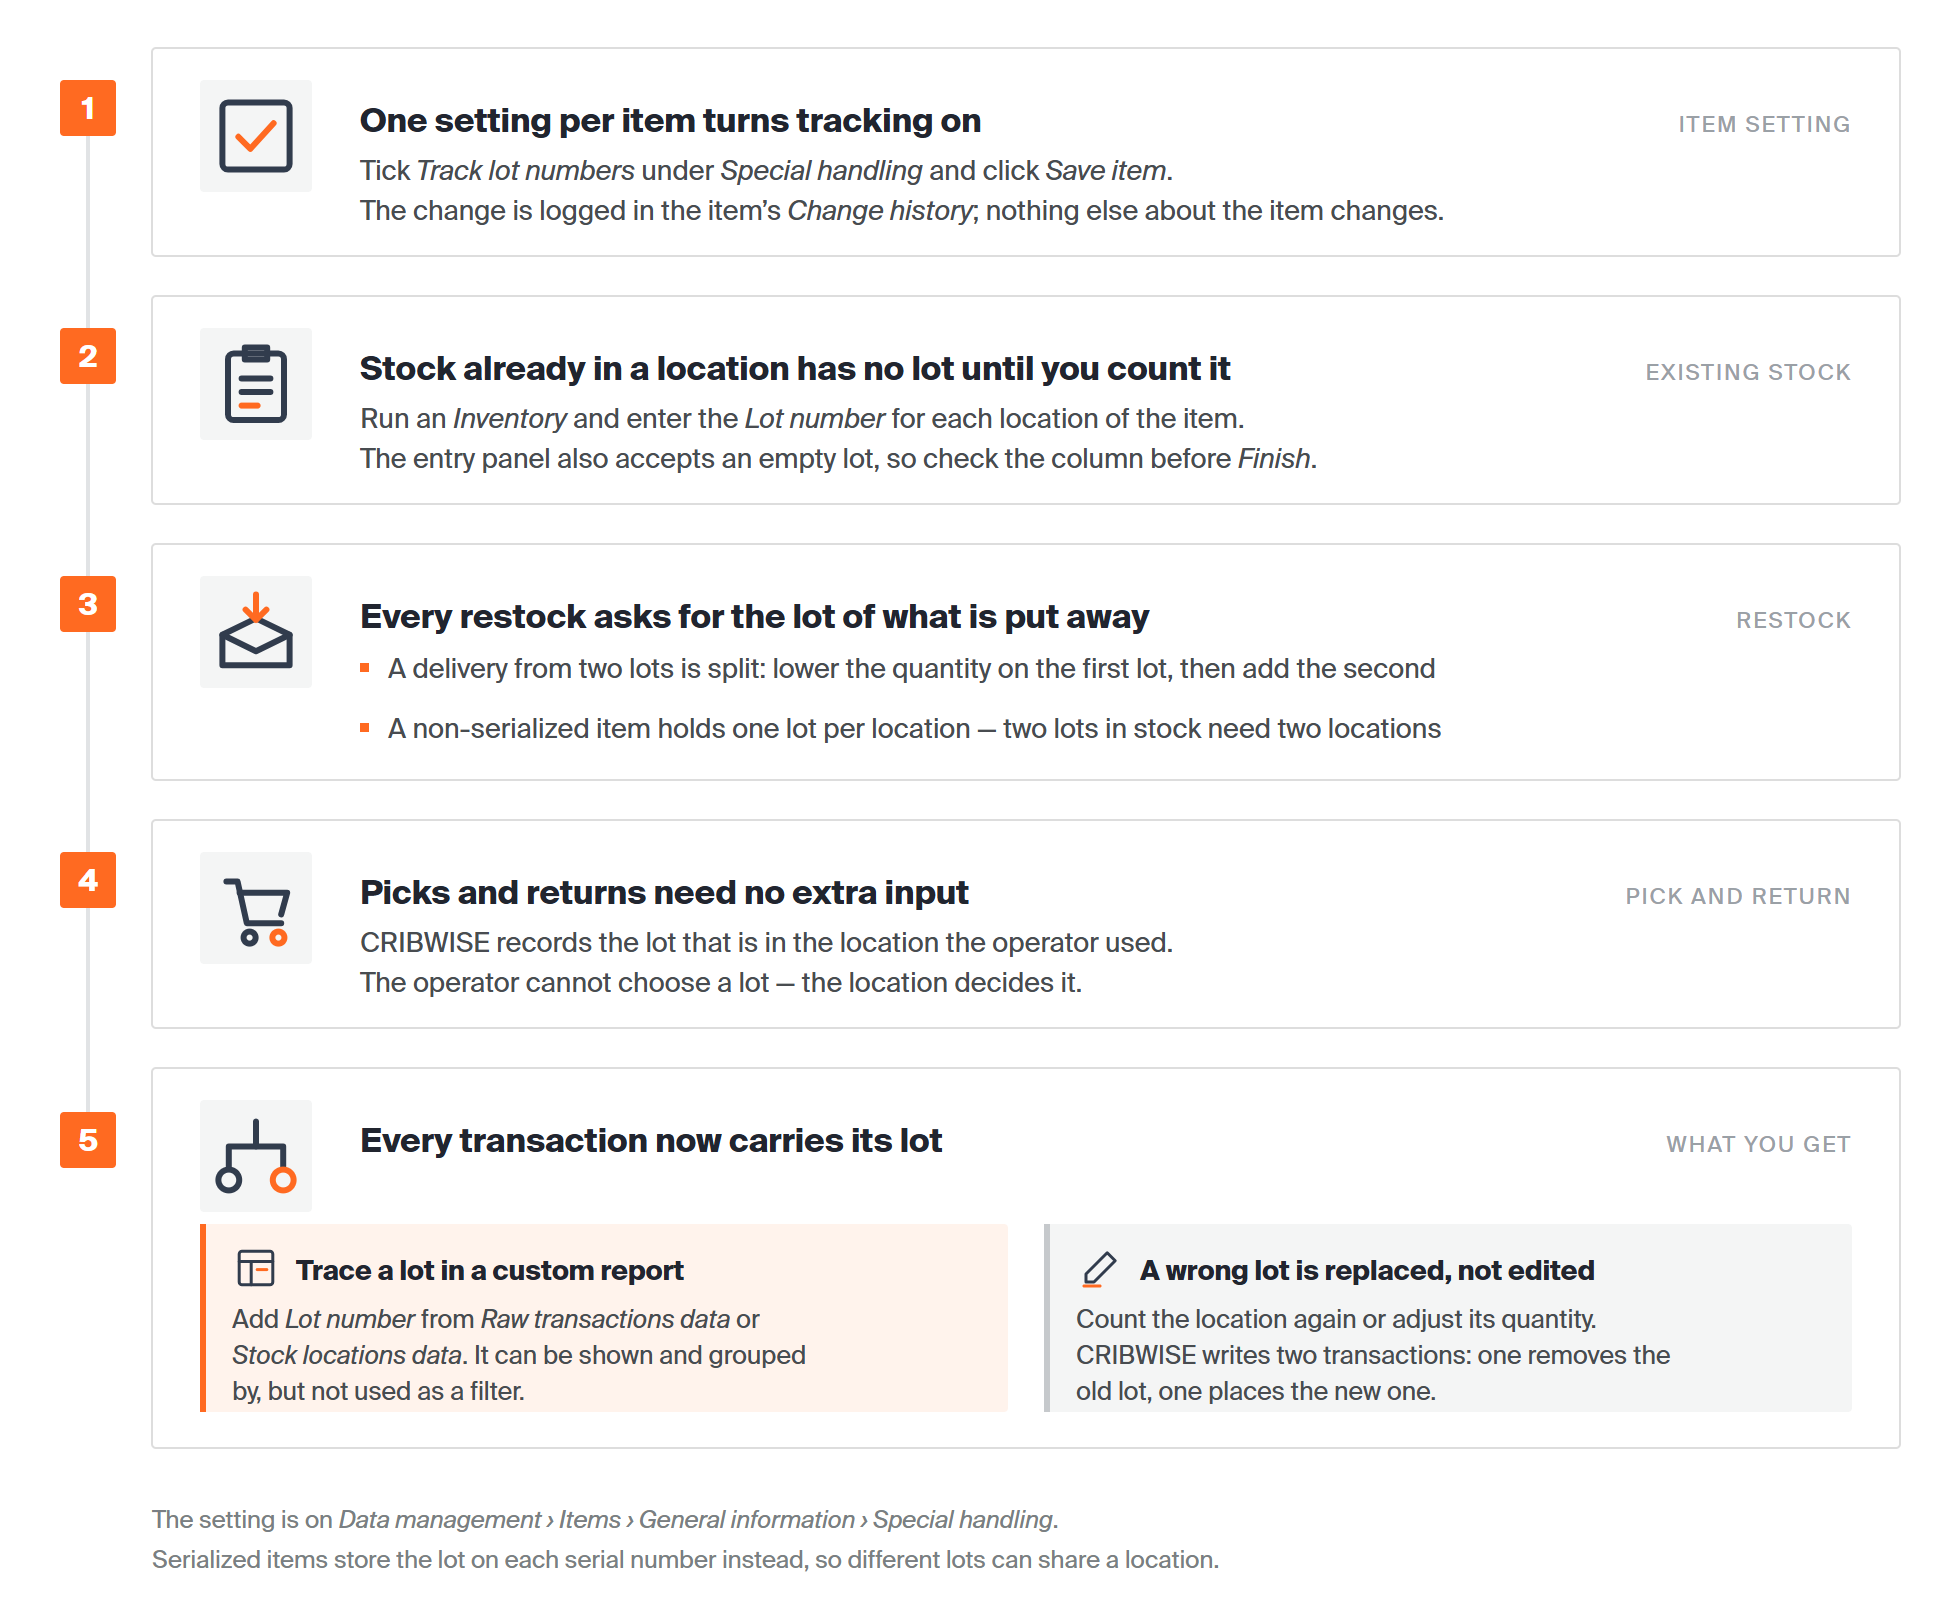
How lot tracking works on an item, from the setting to the report.
Before you start
- Admin Portal access with permission to update items. If Save item is greyed out on the item detail, your user group cannot make this change.
- The item ID of the item you want to track.
- A decision on which items need it. Tracking is set per item, not system-wide. Turn it on for the items whose lot you have to be able to prove – cutting inserts from a controlled batch, adhesives with a shelf life, parts under a customer quality agreement.
- A device you can lock, if the item already has stock in a location. Recording a lot number for existing stock means running an inventory count, and a count needs the device locked.
Important: Tracking changes daily use as soon as you save. Restock, location assignment and inventory all start asking for a lot number for this item, and each location can hold only one lot of a non-serialized item at a time. If two lots are in stock at once, the item needs two locations – so check you have the shelf space before you switch it on.
Quick start
Experienced users – turn tracking on in 5 steps:
- Go to Data management > Items and select the item.
- Click View detail.
- Tick Track lot numbers in the Special handling section of the General information tab.
- Click Save item.
- Run an inventory of every location that already holds the item and enter the lot number you find there.
Need more detail? Follow the full steps below.
Steps
Step 1 – Open the item
- In the left menu, click Data management.
- Click Items.
- Click the row of the item you want to track.
- Click View detail in the toolbar.
The item opens in a panel on the right, on the General information tab.
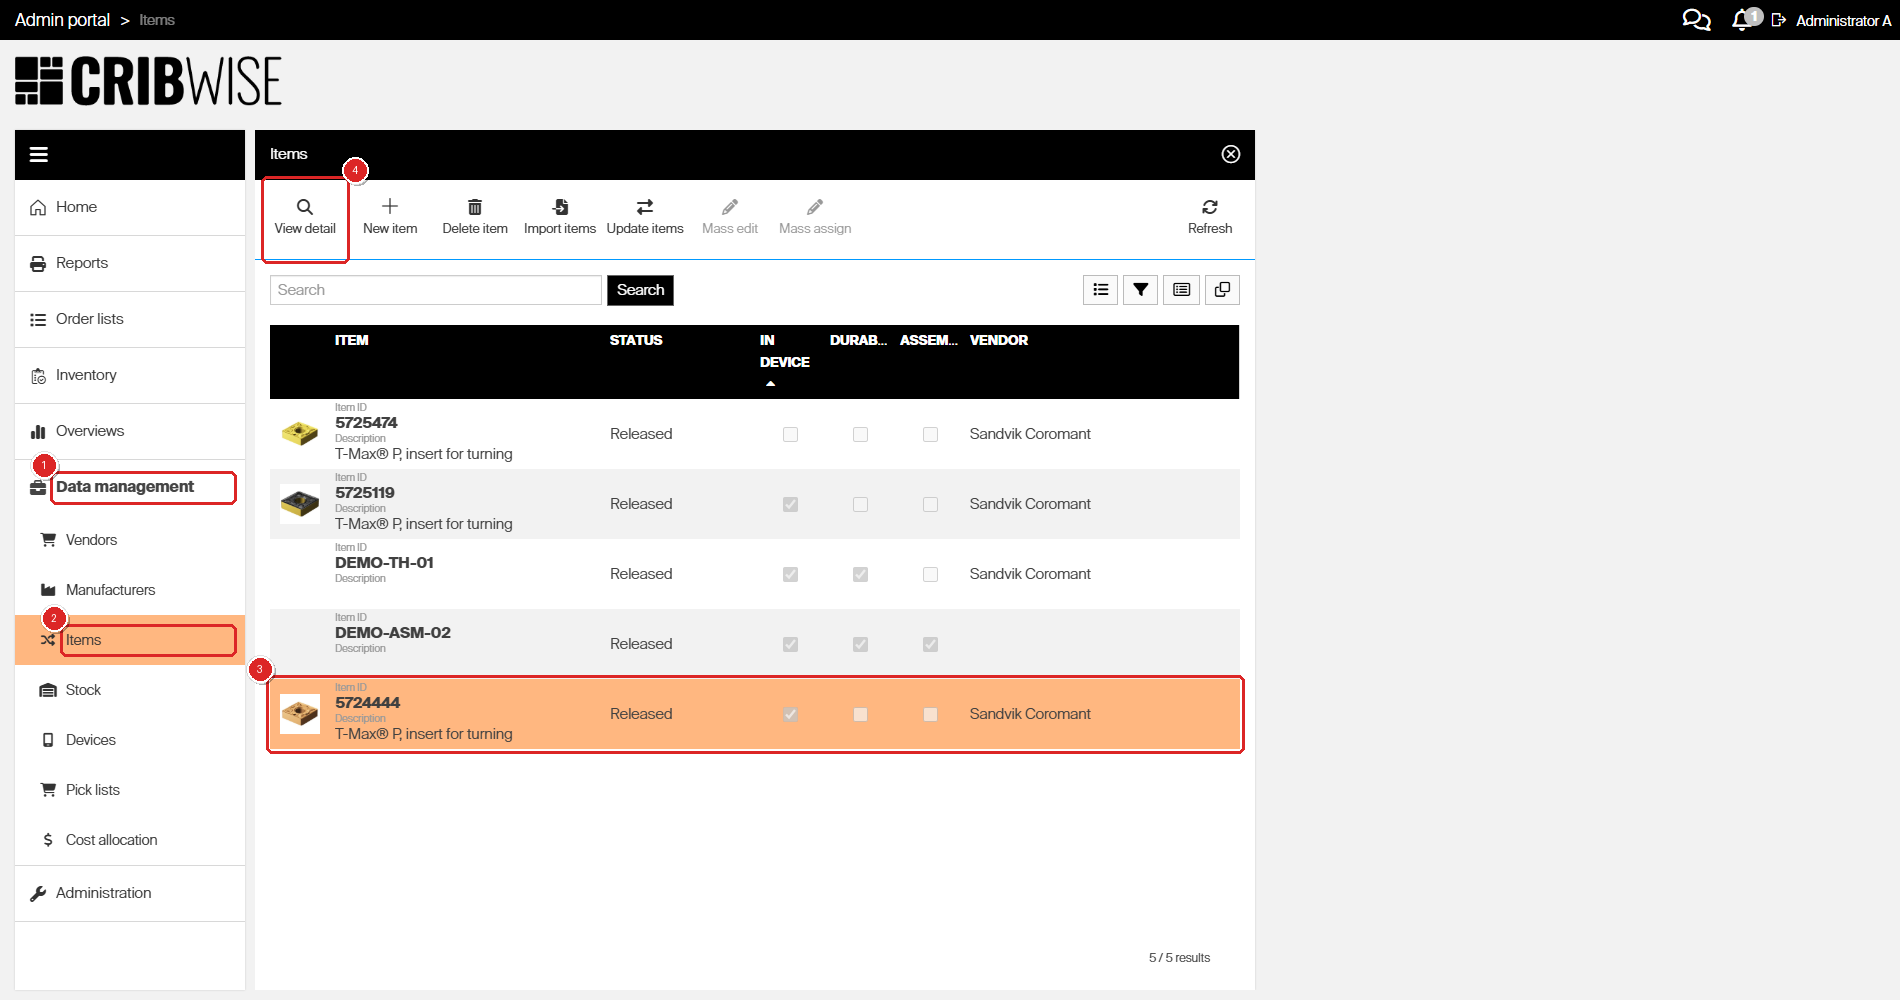
Opening an item: (1) Data management, (2) Items, (3) the item row, (4) View detail.
Step 2 – Tick Track lot numbers
- Stay on the General information tab.
- Scroll to the bottom of the tab, to the Special handling section.
- Tick Track lot numbers.
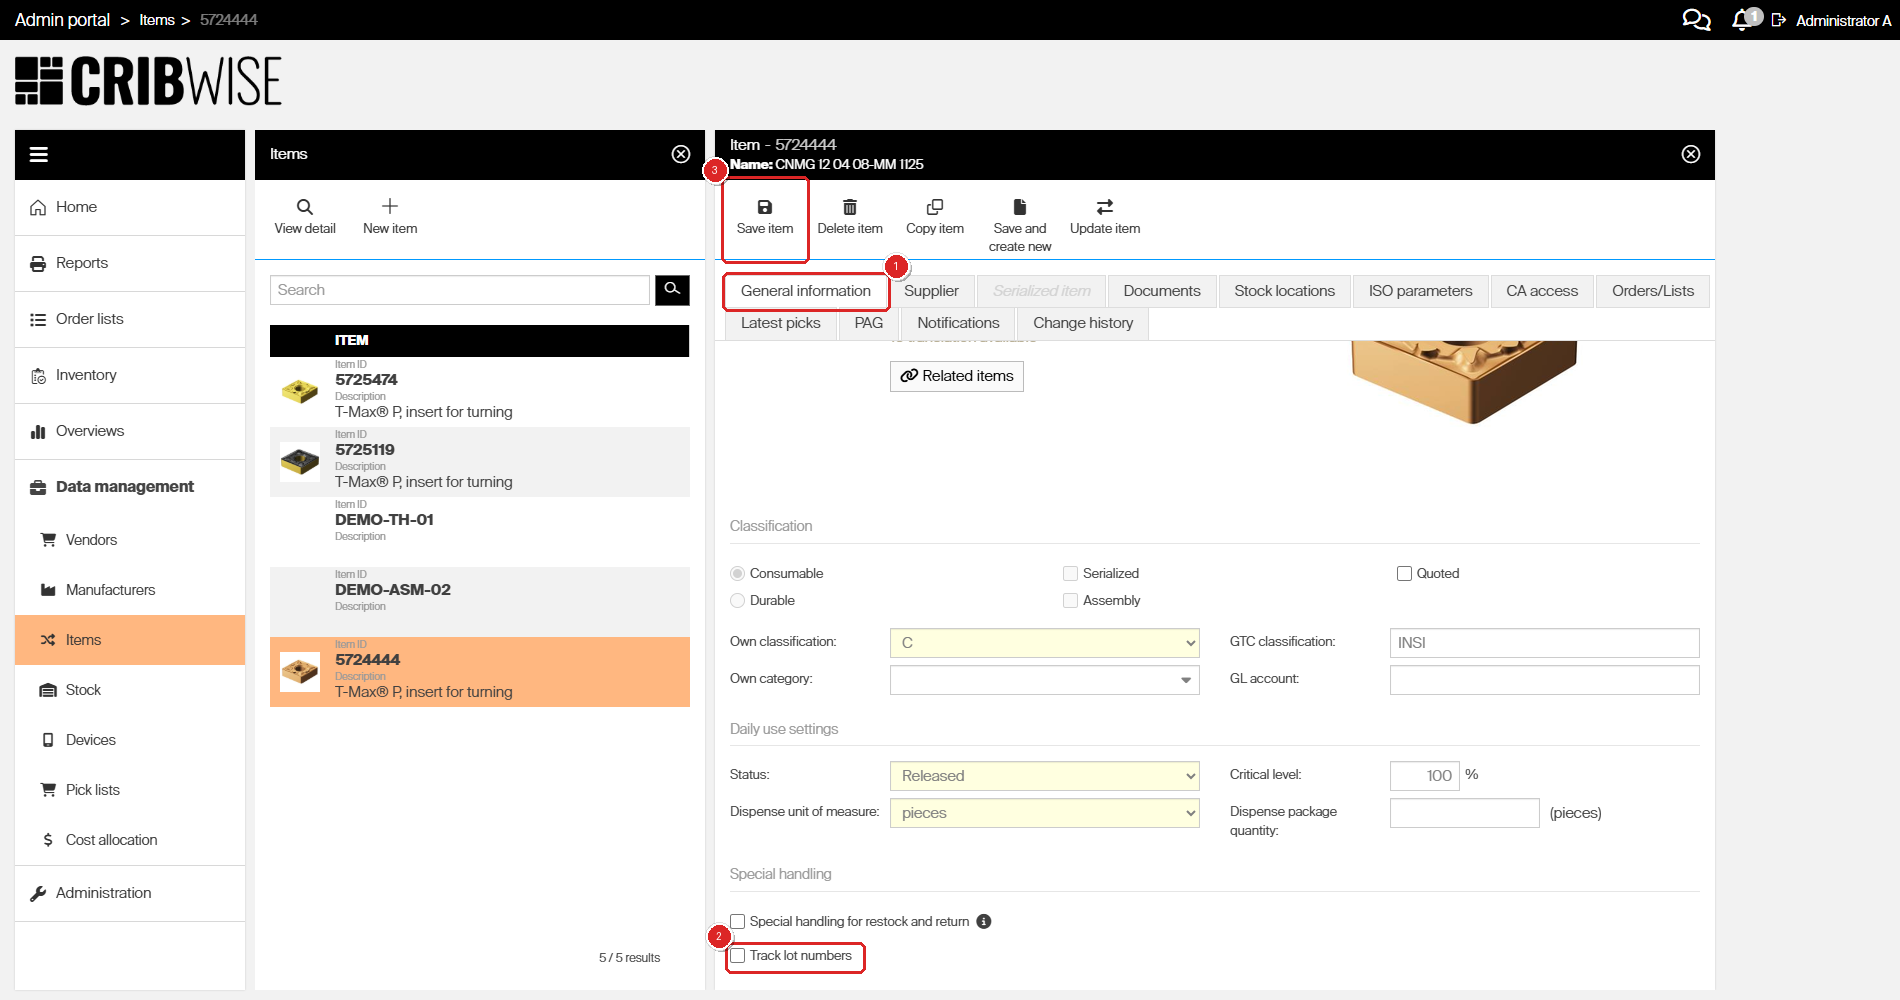
The setting: (1) the General information tab, (2) Track lot numbers under Special handling, (3) Save item.
Track lot numbers and Special handling for restock and return sit in the same section but are separate settings, and either works on its own. With both on, a restock asks for a lot number for each location the item goes into – see Understanding special handling for restock and return.
Step 3 – Save the item
- Click Save item in the toolbar.
The panel stays open and the checkbox stays ticked. The Change history tab now carries a Track lot numbers changed entry with your user name and a timestamp, which is the quickest way to confirm the save landed.
To see which items track lots across your whole catalogue, add the Track lot numbers column to the Items list from the Columns button. The column exists but is cleared by default.
Step 4 – Find the stock that has no lot number yet
Tracking applies from now on. Anything already in a location was put there without a lot number, so its lot is unknown until someone counts it.
- Open the Stock locations tab on the item.
- Read the Location assignments table and note every row with a Physical quantity above zero.
Those are the locations to count in the next steps. If every row shows zero, you are done – skip to Success.
The Stock locations tab does not show lot numbers. It tells you where the item is, not which lot is there. Lot numbers appear in the inventory count, described below.
Step 5 – Start an inventory of those locations
- Go to Data management > Devices and open the device that holds the item.
- Click Lock device and confirm. Only a locked device can be counted.
- Click Inventory in the left menu.
- Choose the stock from the dropdown, click the row of the locked device, then click Select devices.
- Click the rows for your item, then click Select items.
The count opens. Its Lot number column is empty for your item – that is the unknown lot you are about to fill in.
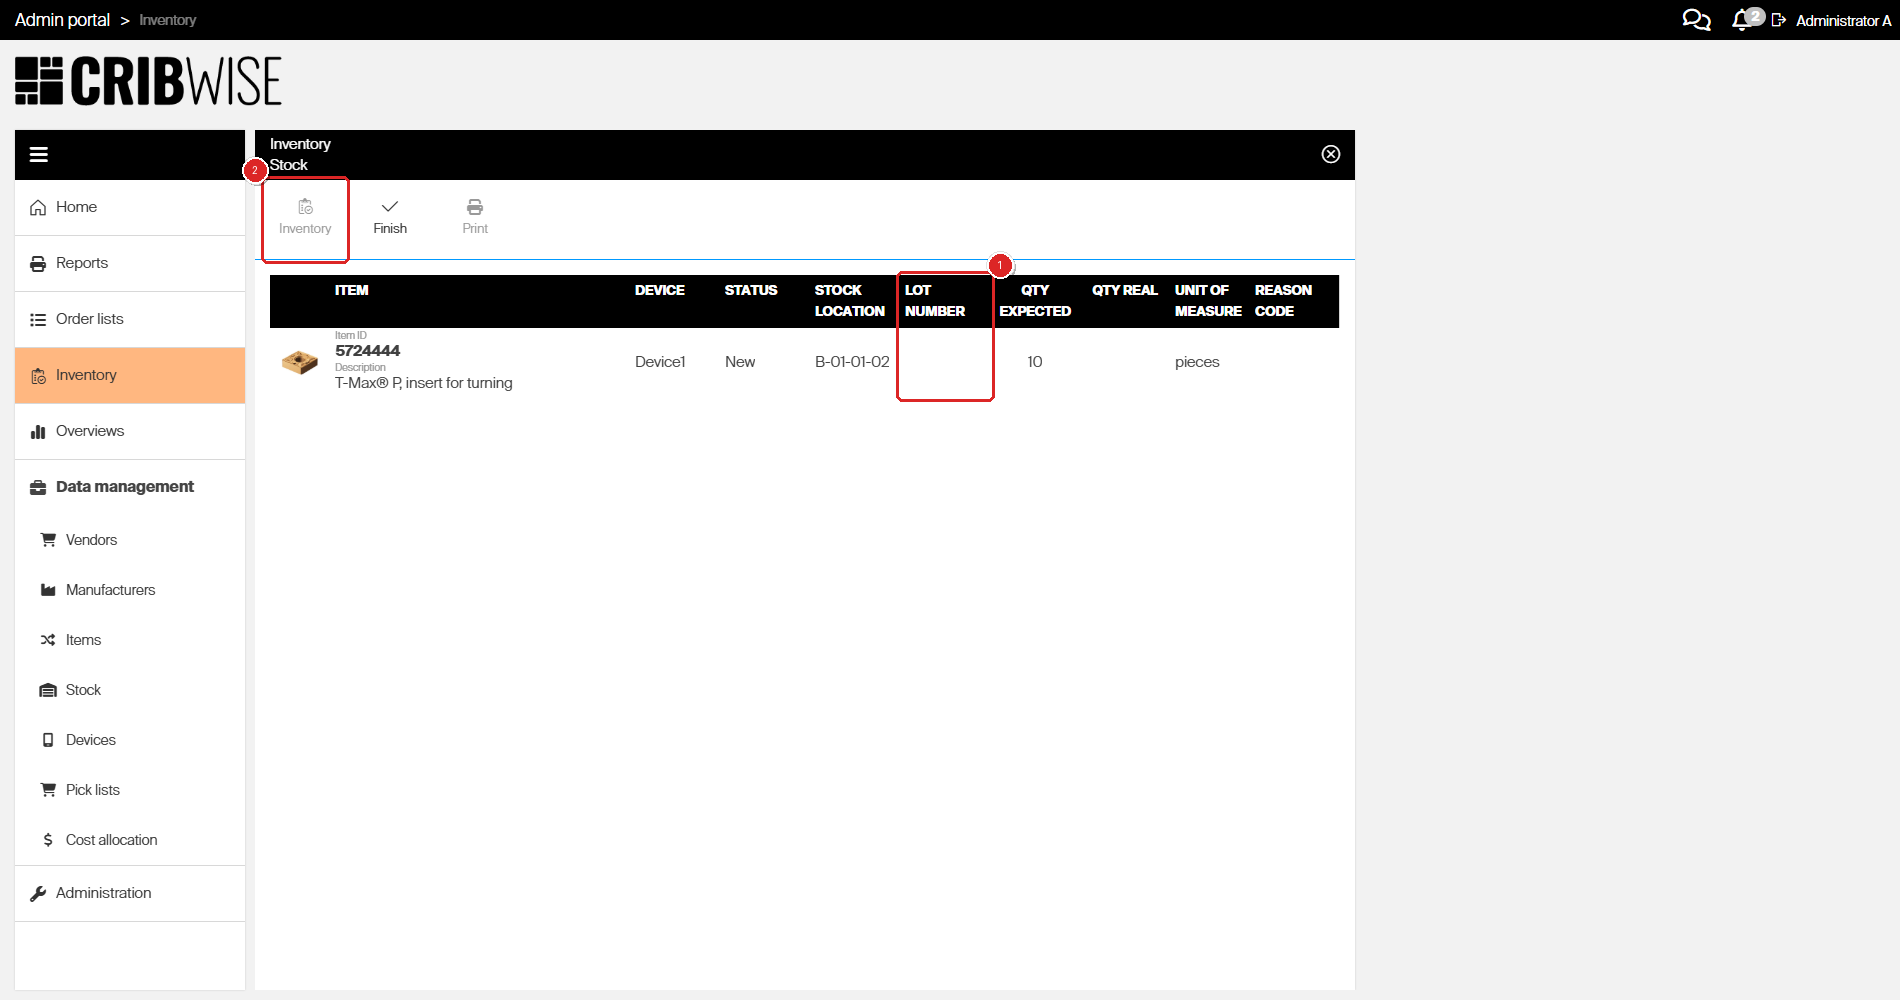
The running count: (1) the Lot number column, still empty, (2) Inventory, which opens the entry panel for the selected row.
Step 6 – Enter the lot number
- Click the row for the location you are counting.
- Click Inventory in the toolbar. The Enter quantity panel opens.
- In Lot number, type the lot or batch number printed on the box in that location.
- In Real quantity, enter the quantity you counted.
- Click Save.
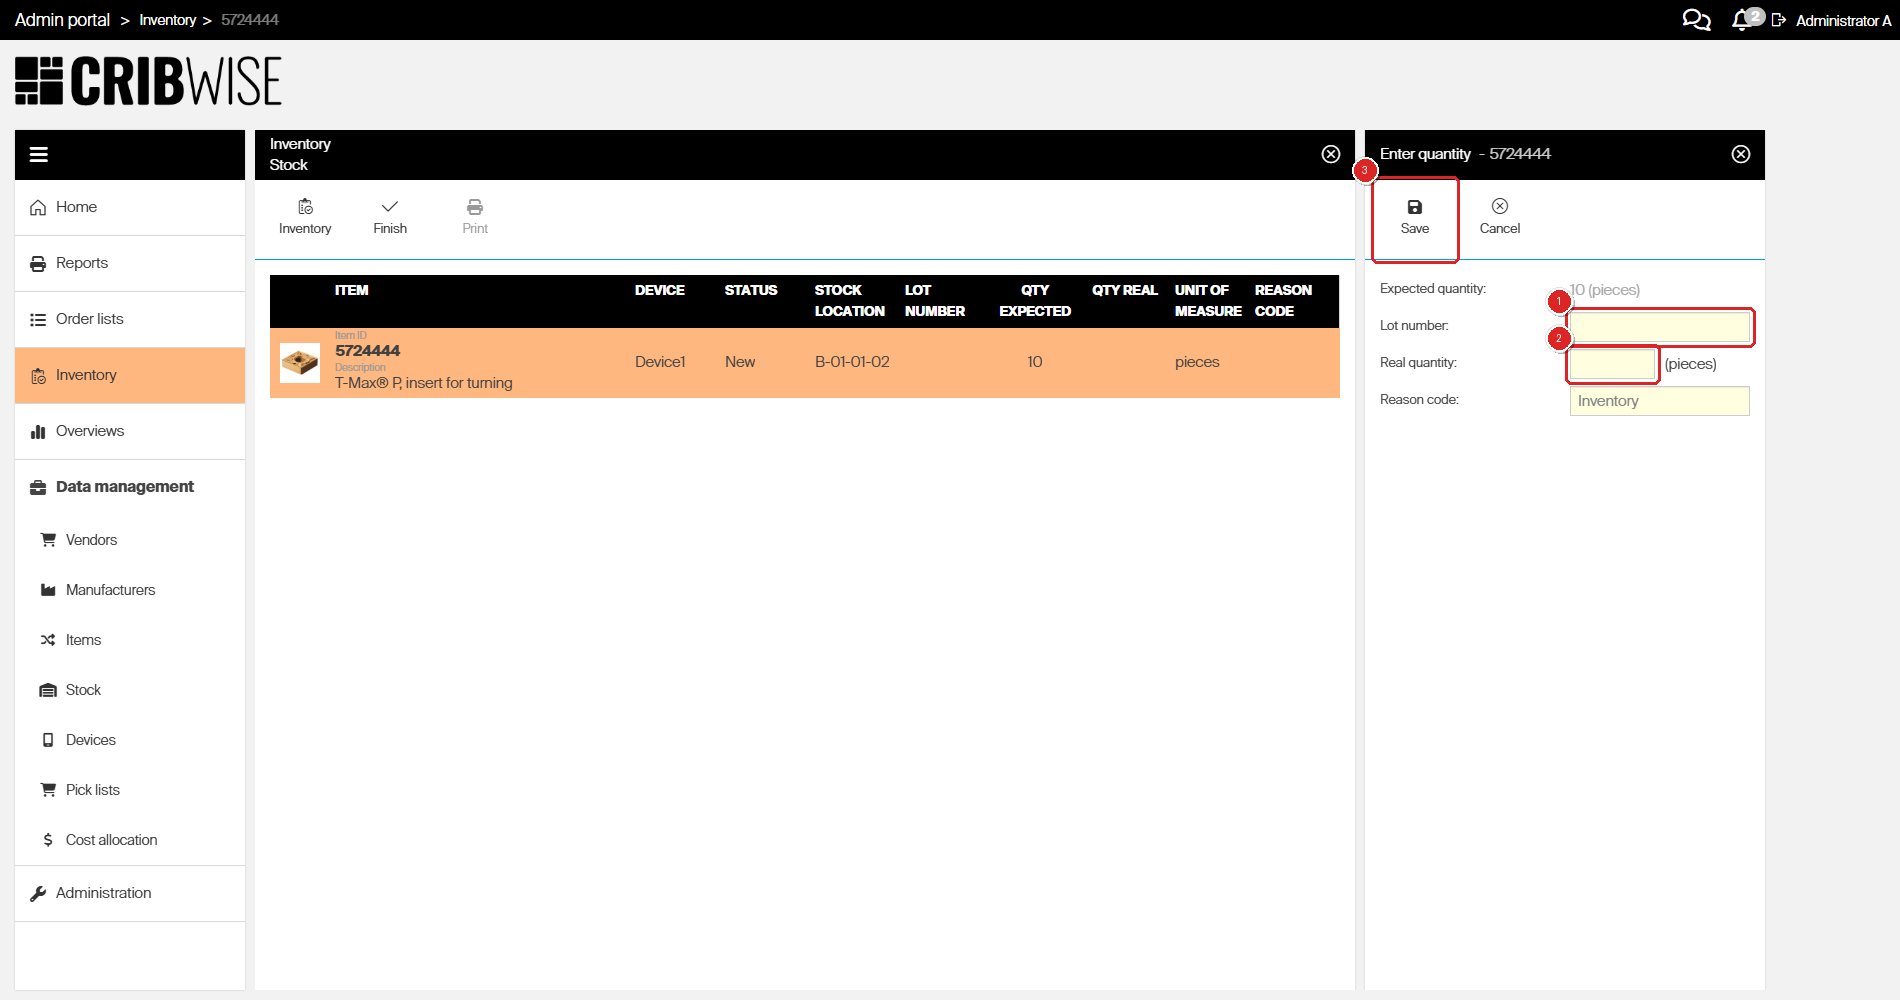
Recording the lot: (1) Lot number, (2) Real quantity, (3) Save.
| Field | Required | What to enter |
|---|---|---|
| Expected quantity | Read-only | What CRIBWISE believes is in the location. Shown for comparison; you cannot edit it. |
| Lot number | Not enforced | The lot or batch number of the pieces in this location. Use the number from the supplier’s packaging so it matches the certificate. See the warning below – the Admin Portal will let you save this field empty. |
| Real quantity | Yes | The quantity you actually counted. Enter the expected quantity if nothing is missing – the lot number is still recorded and the stock level does not move. |
| Reason code | Pre-filled | Comes in as Inventory. Leave it unless your site uses its own reason codes. |
Warning: The Admin Portal does not force you to fill in Lot number. Saving the panel with the field empty is accepted with no validation message, and the row goes back to the count with a blank lot. Check the Lot number column for every row before you click Finish.
Repeat step 6 for every location on the list. One location holds one lot, so a location with two lots physically mixed in it has to be separated first.
Step 7 – Finish the count and unlock the device
- Check that every row now shows a Lot number.
- Click Finish. The count closes immediately, with no confirmation prompt.
- Go back to Data management > Devices, open the device and click Unlock device.
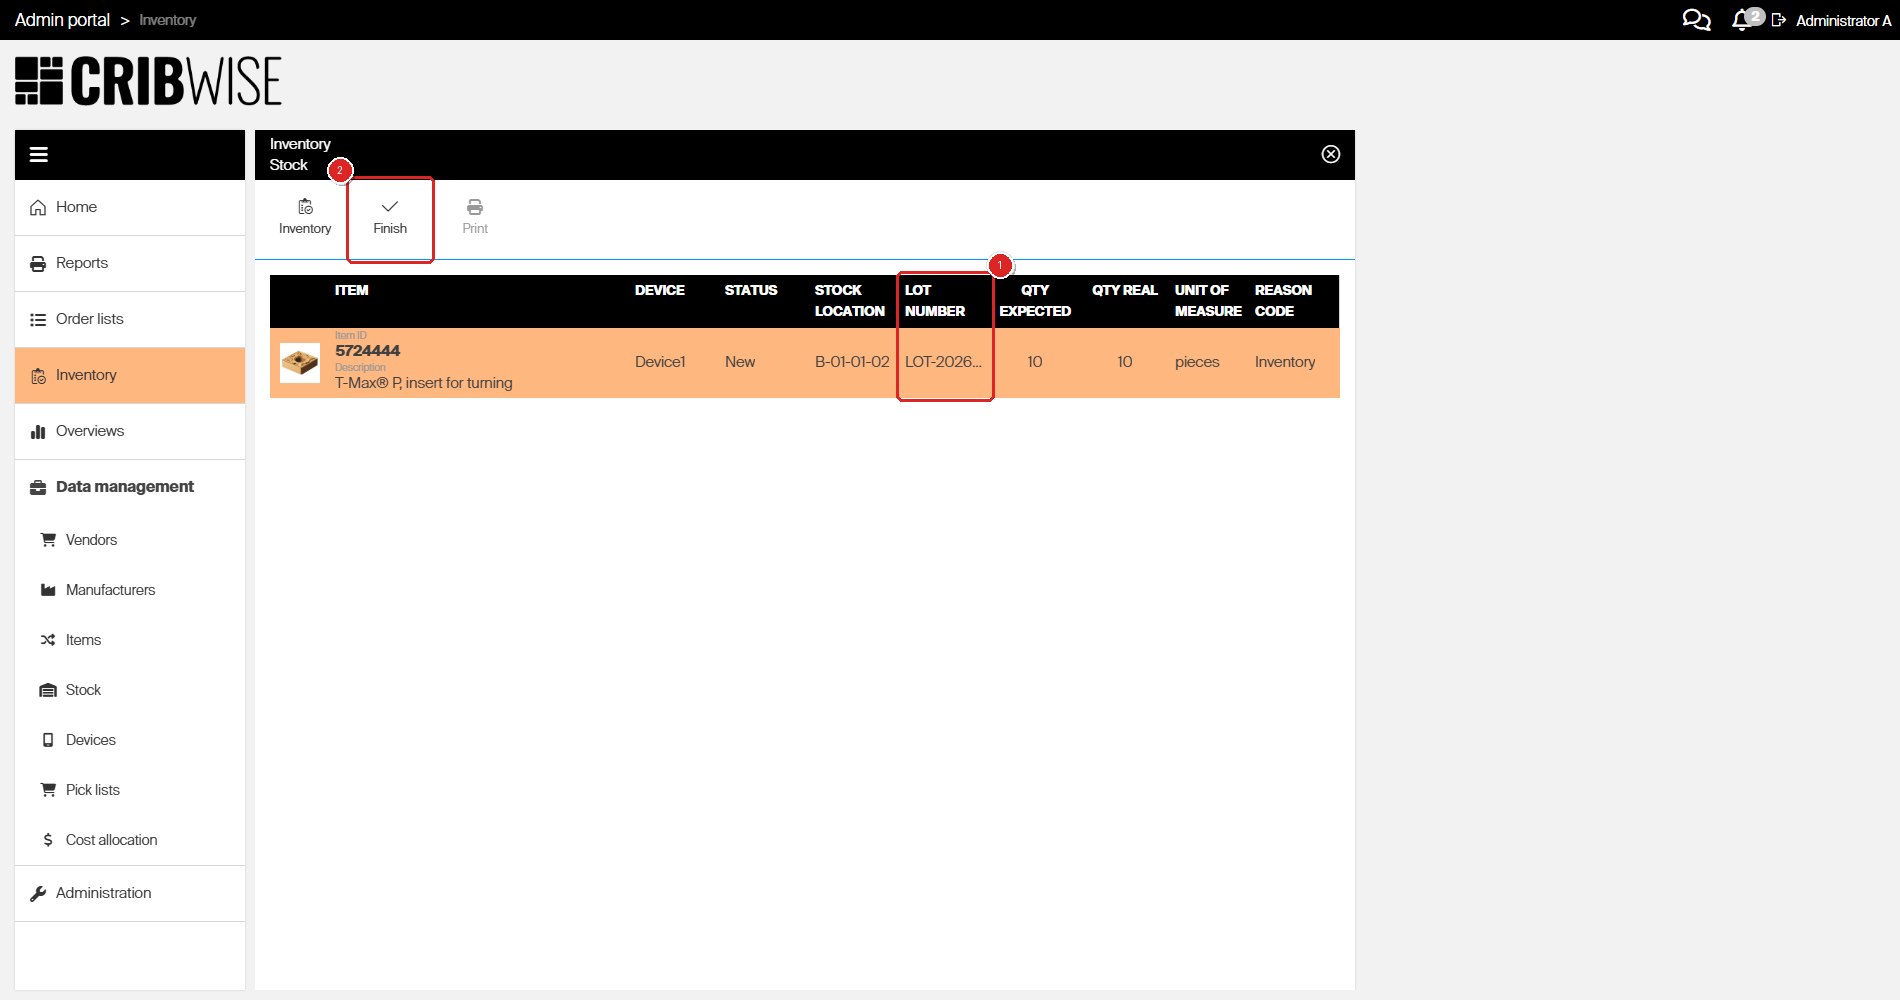
Lot recorded: (1) the Lot number column now holds the number, with Qty expected and Qty real matching, (2) Finish.
Warning: Leave the device locked and operators cannot pick from it. Unlocking is the last step of every count, not an optional one.
Success
You are done when all three of these are true:
- Track lot numbers is ticked on the item’s General information tab and Change history shows the Track lot numbers changed entry.
- Every location that holds the item shows a lot number in an inventory count instead of a blank.
- The device is unlocked and operators can pick again.
From here on, every transaction on this item stores the lot number involved, and the next restock will ask the operator for the lot before the stock can be put away.
What changes in daily use
Once tracking is on, these flows behave differently for this item:
| Flow | What changes |
|---|---|
| Restock | The operator is asked for a lot number for the quantity being restocked, before the item can be put into a location. Splitting one delivery across two lots is done by lowering the quantity on the first lot and adding a second. |
| Assign to a location | If the assignment places a physical quantity, a lot number is required for that quantity. With multiple conditions on one location, each condition carries its own lot number. |
| Inventory | The count gains a Lot number column, and the entry panel gains a Lot number field showing the lot the system expects in that location. |
| Pick and return | Nothing to enter. The operator cannot choose the lot – CRIBWISE records whichever lot is in the location they took from. |
| Excel import | Changing the quantity in a location through an import requires the lot number for that location. |
Note: A lot number cannot be edited directly once it is recorded. To correct it, run another inventory of the location or adjust the quantity. Either way CRIBWISE writes two transactions – one removing the old lot, one placing the new one.
Reporting on lot numbers
Recorded lot numbers can be shown in a custom report. The report designer offers a Lot number field in two data sources: Raw transactions data, for which lot each transaction used, and Stock locations data, for which lot is in each location now. The default Raw transaction report does not include it – add it to a report of your own.
| What you want to do with Lot number | Possible? |
|---|---|
| Show it in the report | Yes |
| Group by it (drop it on GROUP BY or COLUMNS) | Yes |
| Filter the report to one lot | No – it cannot be used as a filter |
| Count or sum it (drop it on VALUES) | No |
Tip: Because you cannot filter to one lot, group the report by Lot number and read the rows under the lot you are following.
If the item is serialized
Serialized items store the lot number against each serial number rather than against the location, so serial numbers from different lots can share a location. The lot is entered when the serial number is created, and it is shown whenever an existing serial number is selected for an operation.
A serialized lot number also cannot be corrected through an inventory – it is edited on the instance detail instead. See Managing serialized items and serial numbers and the serialized section of Lot and batch tracking.
Next steps
- Tell the operators. The next restock of this item will stop and ask for a lot number. Anyone restocking needs to know to have the supplier’s packaging to hand – see How to restock items on the Shop Floor Interface.
- Check the shelf space. Two lots in stock at the same time need two locations for a non-serialized item. Add a second location assignment before the next delivery rather than during it.
- Read the rules in full. Lot and batch tracking covers the one-lot-per-location rule, restock with special handling, and the serialized case in more depth.
Troubleshooting
| Problem | Likely cause | Fix |
|---|---|---|
| Track lot numbers is not in the Special handling section. | You are looking at the wrong tab, or the section is below the fold. | Open General information and scroll to the bottom of the tab. Special handling is the last section, under Daily use settings. |
| Save item is greyed out. | Your user group does not have permission to update items. | Ask an administrator to grant the item update privilege, or to make the change for you. |
| The Lot number column is empty for stock that is definitely on the shelf. | The stock was put there before tracking was switched on, so its lot was never recorded. | Expected. Run the inventory in steps 5 to 7 and enter the lot number you find in the location. |
| The device row is greyed out on the Inventory screen and Select devices does nothing. | The device is not locked. The screen gives no message about it. | Open the device in Data management > Devices, click Lock device, then return to Inventory. |
| Opening Inventory jumps straight into a count, with no stock or device to choose. | An earlier count was never finished. CRIBWISE resumes it instead of starting a new one. | Finish the open count, or unlock the device from Data management > Devices. A count left open keeps the device locked and operators cannot pick from it. |
| A restock stops with a message about not enough space. | The lot being restocked is different from the lot already in the location, and no empty location is available. | Create another location assignment for the item, or lower the quantity being restocked to what the matching lot’s location can take. |
| The wrong lot number was recorded. | Lot numbers are bound to the item in the location and cannot be edited directly. | Run another inventory of that location and enter the correct number. For a serialized item, edit the lot on the instance detail instead. |
| A counted row shows a blank Lot number. | The Enter quantity panel was saved with the field empty. The portal accepts that without warning. | Select the row, click Inventory again and enter the number. Make checking the Lot number column part of the routine before anyone clicks Finish. |
| You need to stop tracking this item. | Clearing the checkbox stops future lot numbers being collected. | Untick Track lot numbers and click Save item. Lot numbers already written to past transactions stay in the history. |
Related articles
- Lot and batch tracking – the rules behind the setting: one lot per location, restock with special handling, and how serialized items differ.
- Item fields and settings reference – every other field on the General information tab.
- Understanding special handling for restock and return – the neighbouring setting, and what happens with both switched on.
- How to restock items on the Shop Floor Interface – the flow that will now ask operators for a lot number.
- How to do an inventory on the Shop Floor Interface – counting from the cabinet instead of the Admin Portal.
- Managing serialized items and serial numbers – where a serialized item’s lot number is entered and corrected.
- Report data sources reference – the data behind the reports you would build to follow a lot through the shop, including the Lot number field.