
What you can do
Create and manage cost allocation sets to control what information shop floor users must specify when they pick or return items. Each set defines its own steps, value types, values, and hierarchy, so spending can be tracked per machine, operation, work order, or any other cost carrier.
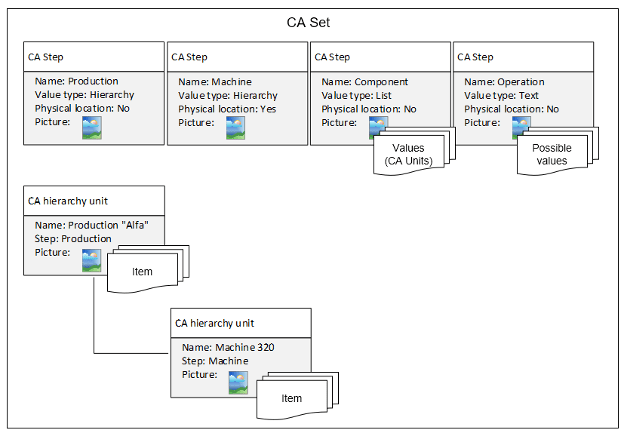
A cost allocation set with its steps, values, and hierarchy defined in the Admin Portal.
Before you start
- Cost allocation must be turned on in System settings. When it is, a default set with default steps and values is created automatically and used by all stocks and devices.
- You need the Cost allocation Admin Portal permission to create, edit, or delete sets. See user group privileges.
- If you are new to the concept, read Understanding cost allocation: structure, setup, and examples first.
Important: When cost allocation is turned on, at least one set must exist. The system will not allow you to remove the last set.
Quick start
Experienced users build a set in 6 steps:
- Create the set in Data management > Cost allocation.
- Define the steps and their value types in the General information tab.
- Add the values for each List and Hierarchy step in the Values tab.
- Build the hierarchy by dragging values into the tree.
- Restrict items and users on hierarchy values where needed.
- Assign the set to stocks or devices.
Need more detail? Follow the full steps below.
Steps
Step 1 – Create a cost allocation set
- Navigate to Data management > Cost allocation.
- Create a new set and give it a unique ID and name. Both must be unique.
The set ID is used as the reference in Excel import/export and in the API. Once created, a set can be selected as a stock’s default CA set (Manage stocks) or assigned directly on a device (Manage devices).
Step 2 – Define the structure and steps
The structure defines what additional information the user must specify during each pick – one step is one question. Set up the structure in the General information tab of the set detail.
- Add up to 8 steps (levels).
- For each step, select a Type (the purpose of the step, for example Machine or Operation) and a Value type (how the user selects the information).
- Mark one step as the physical location: select it in the list and click Set step as physical in the action menu.
Each value type offers different options.
Hierarchy step
| Option | Function |
|---|---|
| Upload picture | Uploads a default picture for the step, shown on SFI during CA selection. Save the step before uploading. |
| Remove picture | Erases the uploaded default picture from the step. |
Hierarchy steps are always marked as required.
List step
| Option | Function |
|---|---|
| Upload picture | Uploads a default picture for the step, shown on SFI during CA selection. Save the step before uploading. |
| Remove picture | Erases the uploaded default picture from the step. |
| Required | Specifies whether the step can be skipped during CA selection on SFI. |
Text step
| Option | Function |
|---|---|
| Required | Specifies whether the step can be skipped during CA selection on SFI. |
| Validated | If checked, only allowed values are accepted. The flow cannot proceed until the user enters a valid value on SFI. |
| Min length | Minimum length of the value entered on SFI. |
| Max length | Maximum length of the value entered on SFI. |
Note: You can reorder steps after creating them, but hierarchy step order is locked once any hierarchy is defined, and steps cannot be deleted while a hierarchy exists. A step-level default picture is shown for all values of List and Hierarchy steps unless a value has its own picture.
Step 3 – Add cost allocation values
To manage values, open the Values tab in the set detail and select a CA step from the dropdown to show its units. Only List and Hierarchy steps appear. The toolbar options are:
 Opens the detail of the selected value.
 Creates a new value for the selected step.
 Deletes the selected unit. A unit defined in the hierarchy cannot be deleted.
 Switches between single and multi-select to work with several values at once.
When a unit detail is open, set its General information:
| Option | Function |
|---|---|
| Type | Sets the step this unit belongs to. The step must already exist. |
| Value | The value shown to the user during CA selection and stored for pick and return transactions. |
| Active | Sets whether the unit can be selected during CA selection. |
| Cost carrier | Complementary information stored with the value for pick and return transactions. |
You can also set a per-value icon (PNG or JPEGs), which overrides the step-level picture, or remove it to fall back to the step picture.
Step 4 – Build the hierarchy
Hierarchy management appears on the Values tab when at least one Hierarchy step exists. The left side lists all List and Hierarchy values; the right side shows the relation tree, starting from the Root node.
- Prepare the hierarchy steps and create their values.
- Drag a value from the list into the tree. The system highlights valid drop positions. Start with the lowest step-level values and drop them on Root.
- Continue with higher-level values, assigning each to its parent.
- Dragging a value within the tree copies it – along with its child relations and restrictions – to the drop location.
Warning: Values can only be dropped into positions allowed by the step order. Values from two steps selected in multi-select mode cannot be dropped into the hierarchy.
Tools for working inside the hierarchy:
 Expands the full hierarchy.
 Collapses the hierarchy to the first level.
 Opens a tab to restrict the items and users available when this value is selected.
Removes the value (and its child relations and restrictions) from the hierarchy. The value definition itself is not deleted.
You can search the whole tree (case-insensitive, white space acts as a wildcard). Matches are selected and expanded, and navigation buttons step between multiple hits and show the total count.
Step 5 – Restrict items and users
Select a place in the hierarchy and click Restrict.
Item restrictions
The opened tab lists items that can be picked when this value is selected. If no items are specified, all items can be picked. If restrictions also exist on parent levels, the intersection of all of them applies. An  icon in the tree marks where item restrictions are defined. Use the toolbar to assign a new item or remove a selected one.
Note: Changes to item restrictions can take several minutes before they apply.
User and user group restrictions
The opened tab lists the users and user groups allowed to select this value. If none are specified, no restriction applies. If restrictions exist on parent levels, the intersection applies. A  or
or  icon in the tree marks where user restrictions are defined. Use the toolbar to assign or remove a user or user group.
Note: Changes to user restrictions can take several minutes before they apply.
Step 6 – Assign the set to stocks or devices
Select the set as the default CA set on a stock (Manage stocks), or assign it directly on a device (Manage devices). Each device always uses a single set.
Success: The set appears in Data management > Cost allocation with its steps, values, and hierarchy defined, and the devices that use it prompt for those steps during picking and returning on the Shop Floor Interface.
Troubleshooting
| Problem | Likely cause | Fix |
|---|---|---|
| The last set cannot be deleted | Cost allocation is turned on, which requires at least one set | Turn off cost allocation in System settings first, or keep at least one set |
| A step cannot be reordered or deleted | A hierarchy is already defined | Remove the hierarchy relations first, then change the step order or delete the step |
| A value cannot be deleted | The unit is used in the hierarchy | Remove the value from the hierarchy first, then delete the value definition |
| Restricted items or users still appear | Restriction changes are not applied instantly | Wait a few minutes – item and user restriction changes take time to apply |
| A value cannot be dropped into the hierarchy | The drop position breaks the step order, or two steps are multi-selected | Drop values only into highlighted positions, and avoid multi-selecting values from two different steps |
Related articles
- Understanding cost allocation: structure, setup, and examples – learn the concept before building a set.
- How to configure custom cost allocation lists and hierarchies – add custom list and hierarchy values.
- How to create and manage stocks – set the default CA set for a stock.
- How to create and manage devices – assign a CA set directly to a device.
- How to pick an item – see how cost allocation is selected during picking.