
What you’ll learn
The picked items locations overview shows every durable item that is picked and not yet returned, grouped by where it is now.
Use it to find tools that are out in production, see who took them and when a loan runs out, and scrap picks that will never come back.
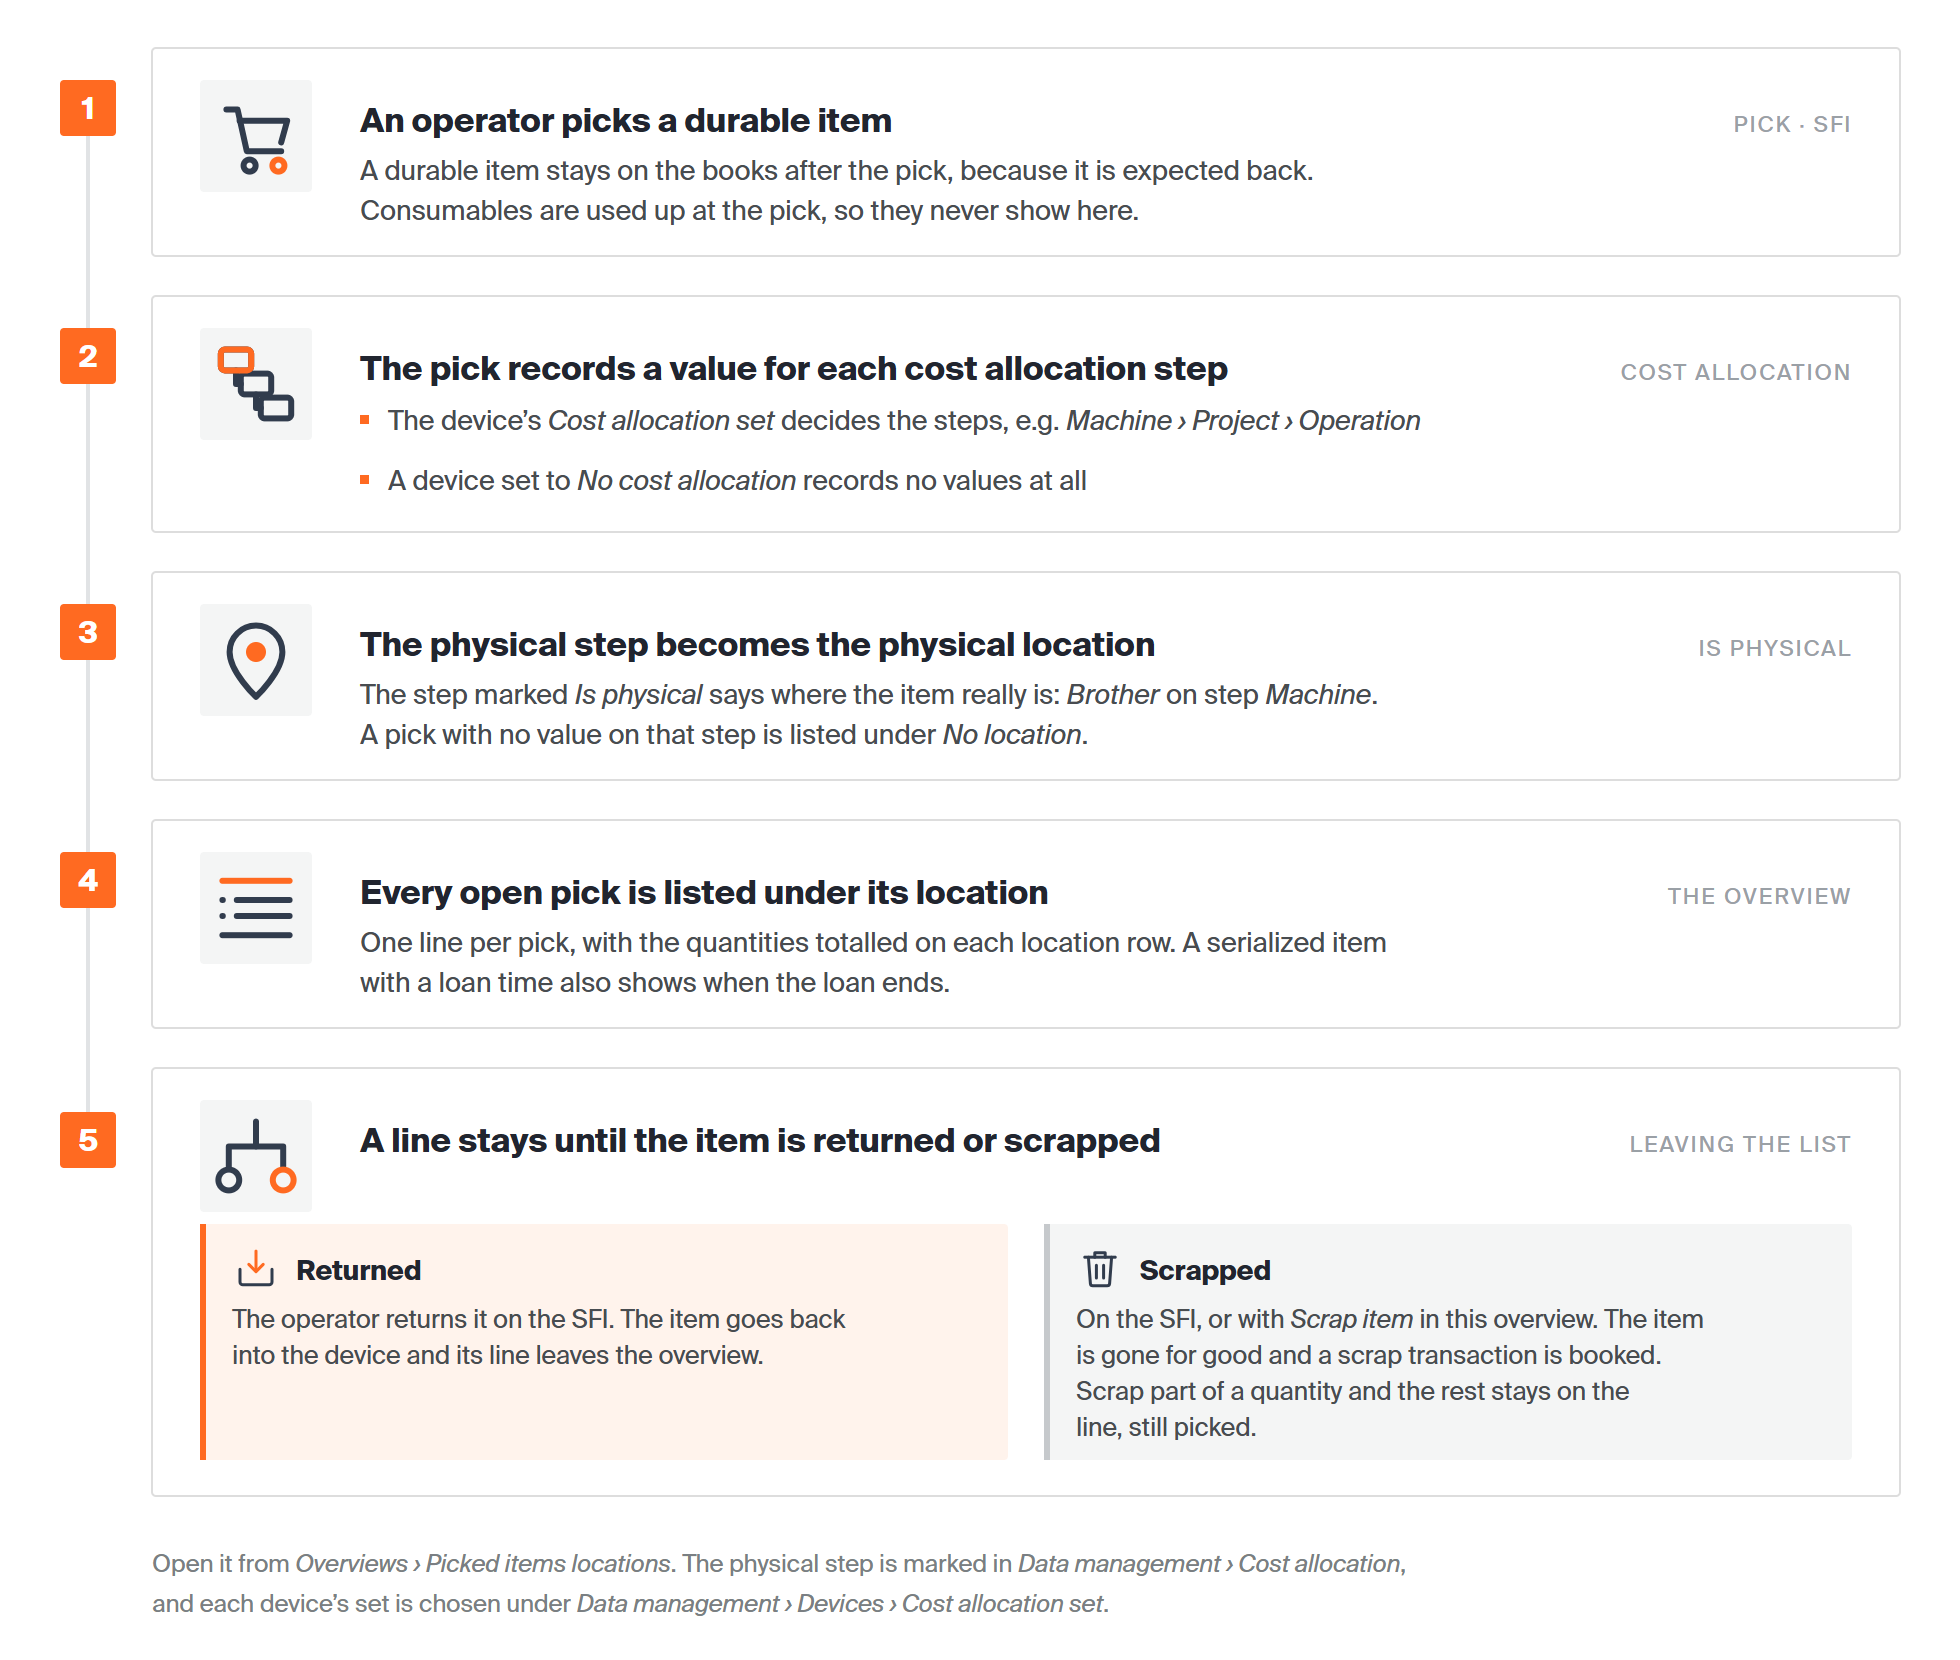
How a pick gets into the overview, and the two ways it leaves.
The overview at a glance
| Question | Answer |
|---|---|
| What does it list? | Every open pick of a durable item: picked on the Shop Floor Interface (SFI) and not yet returned or scrapped. Consumable items never appear. |
| How is it grouped? | By physical location: the value chosen at the pick on the cost allocation step marked Is physical, for example the machine Brother. |
| What is one line? | One pick, not one item. An item picked twice shows on two lines. |
| Where is it? | Overviews › Picked items locations. The panel is titled Locations of picked durable items. |
| What can you do here? | Filter and sort the list, choose the columns, export it to Excel, open an item, and scrap picks. |
| Where else is this data? | The BI interface publishes the same list as the PickedItemsLocations feed. |
How picks are grouped
When an operator picks a durable item on a device that uses a cost allocation set, they choose a value for each step of the set, for example Machine, then Project, then Operation. The step marked Is physical says where the item physically goes, so its value becomes the pick’s physical location.
Each location row shows the value in bold with the step name under it, plus the total quantity picked to that location. Picks with no value on the physical step are collected under No location. That is what happens on a device set to No cost allocation.
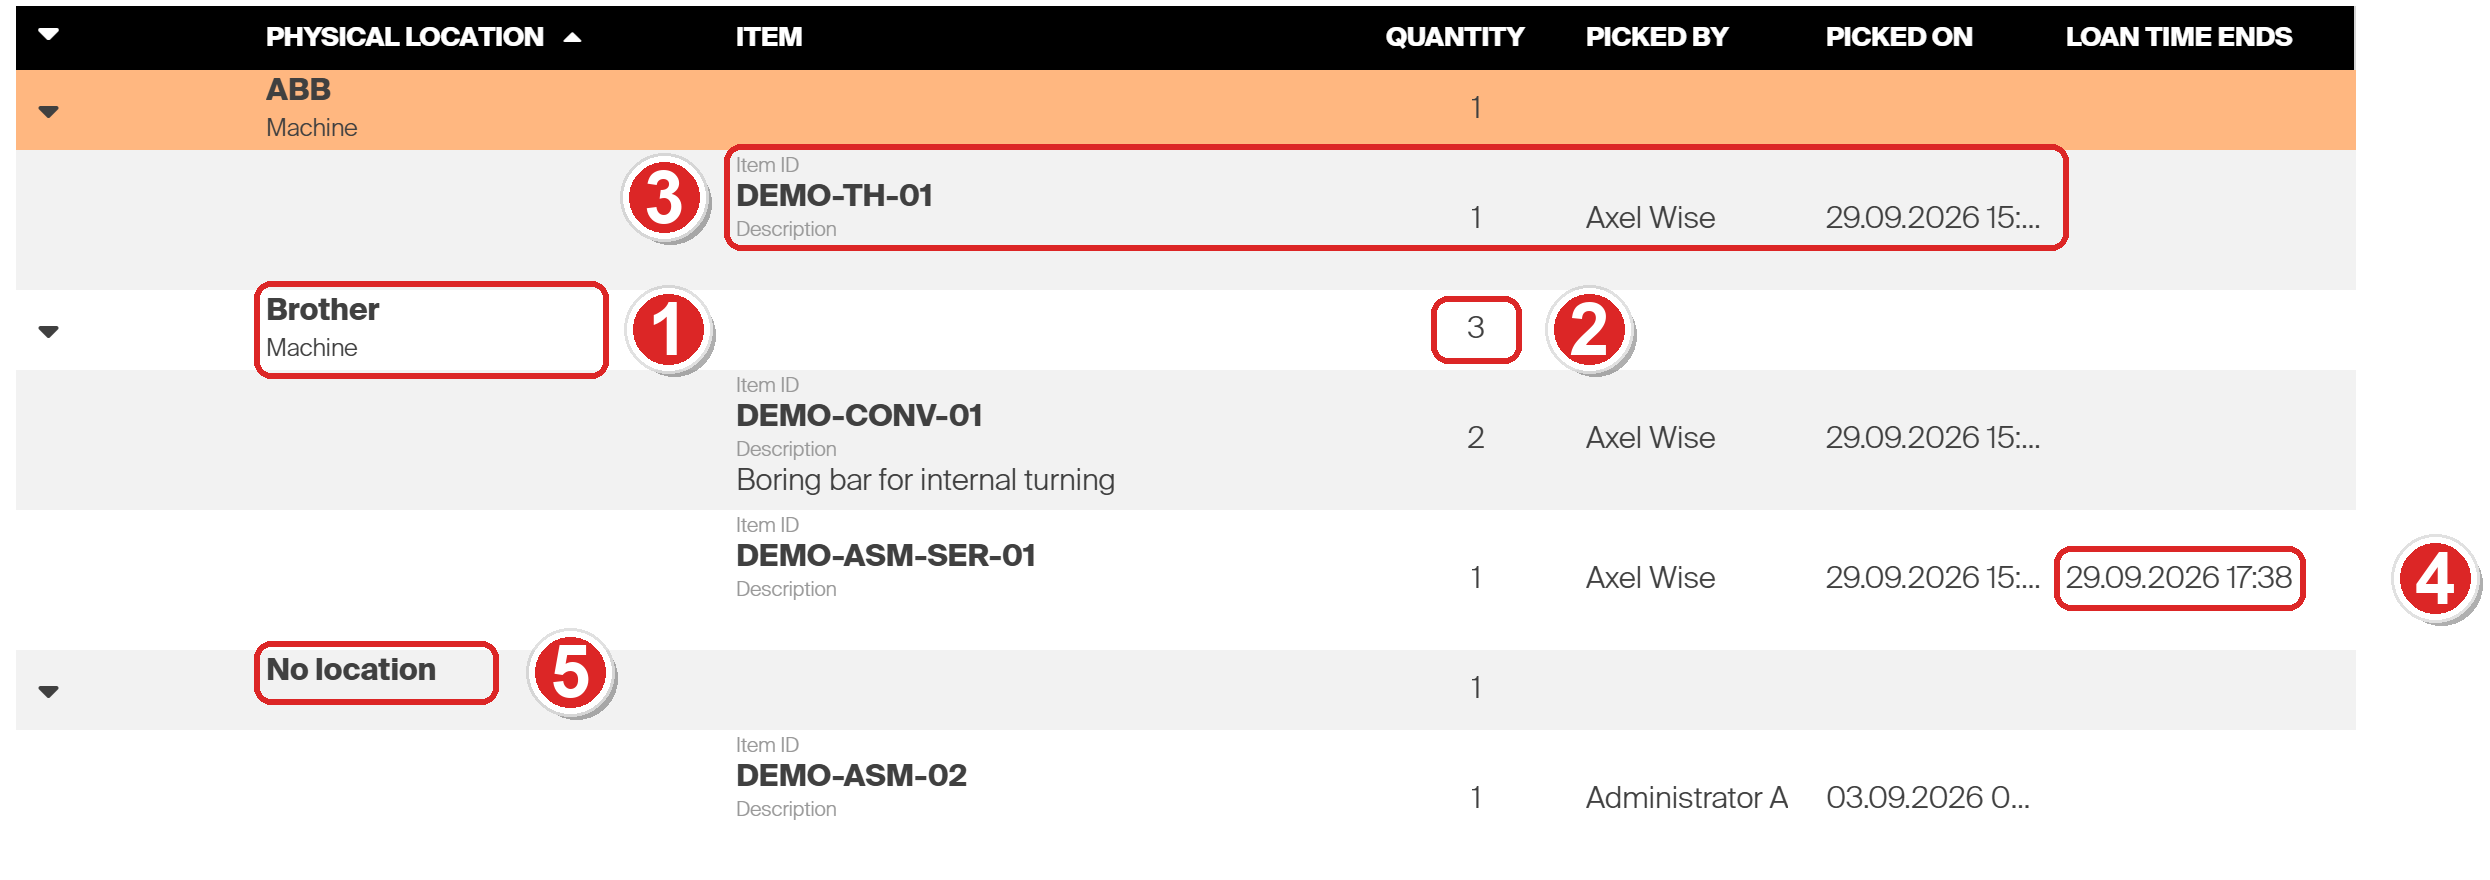
The list with every location expanded. 1 A physical location: the value Brother on the step Machine. 2 The total quantity picked to it. 3 One pick: a DEMO-TH-01 picked to machine ABB. 4 Loan time ends, filled in for a serialized item with a loan time. 5 Picks made without cost allocation.
Tip: If most picks land in No location, check the device. Its Cost allocation set (Data management › Devices, General information tab) decides which steps operators fill in, and the step marked Is physical in that set decides the location.
The physical location on the shop floor
The SFI uses the same physical location. If Check if durable item is already picked is on (system settings, Stock daily use tab), an operator who picks an item that is already picked to the chosen location has to say why first.
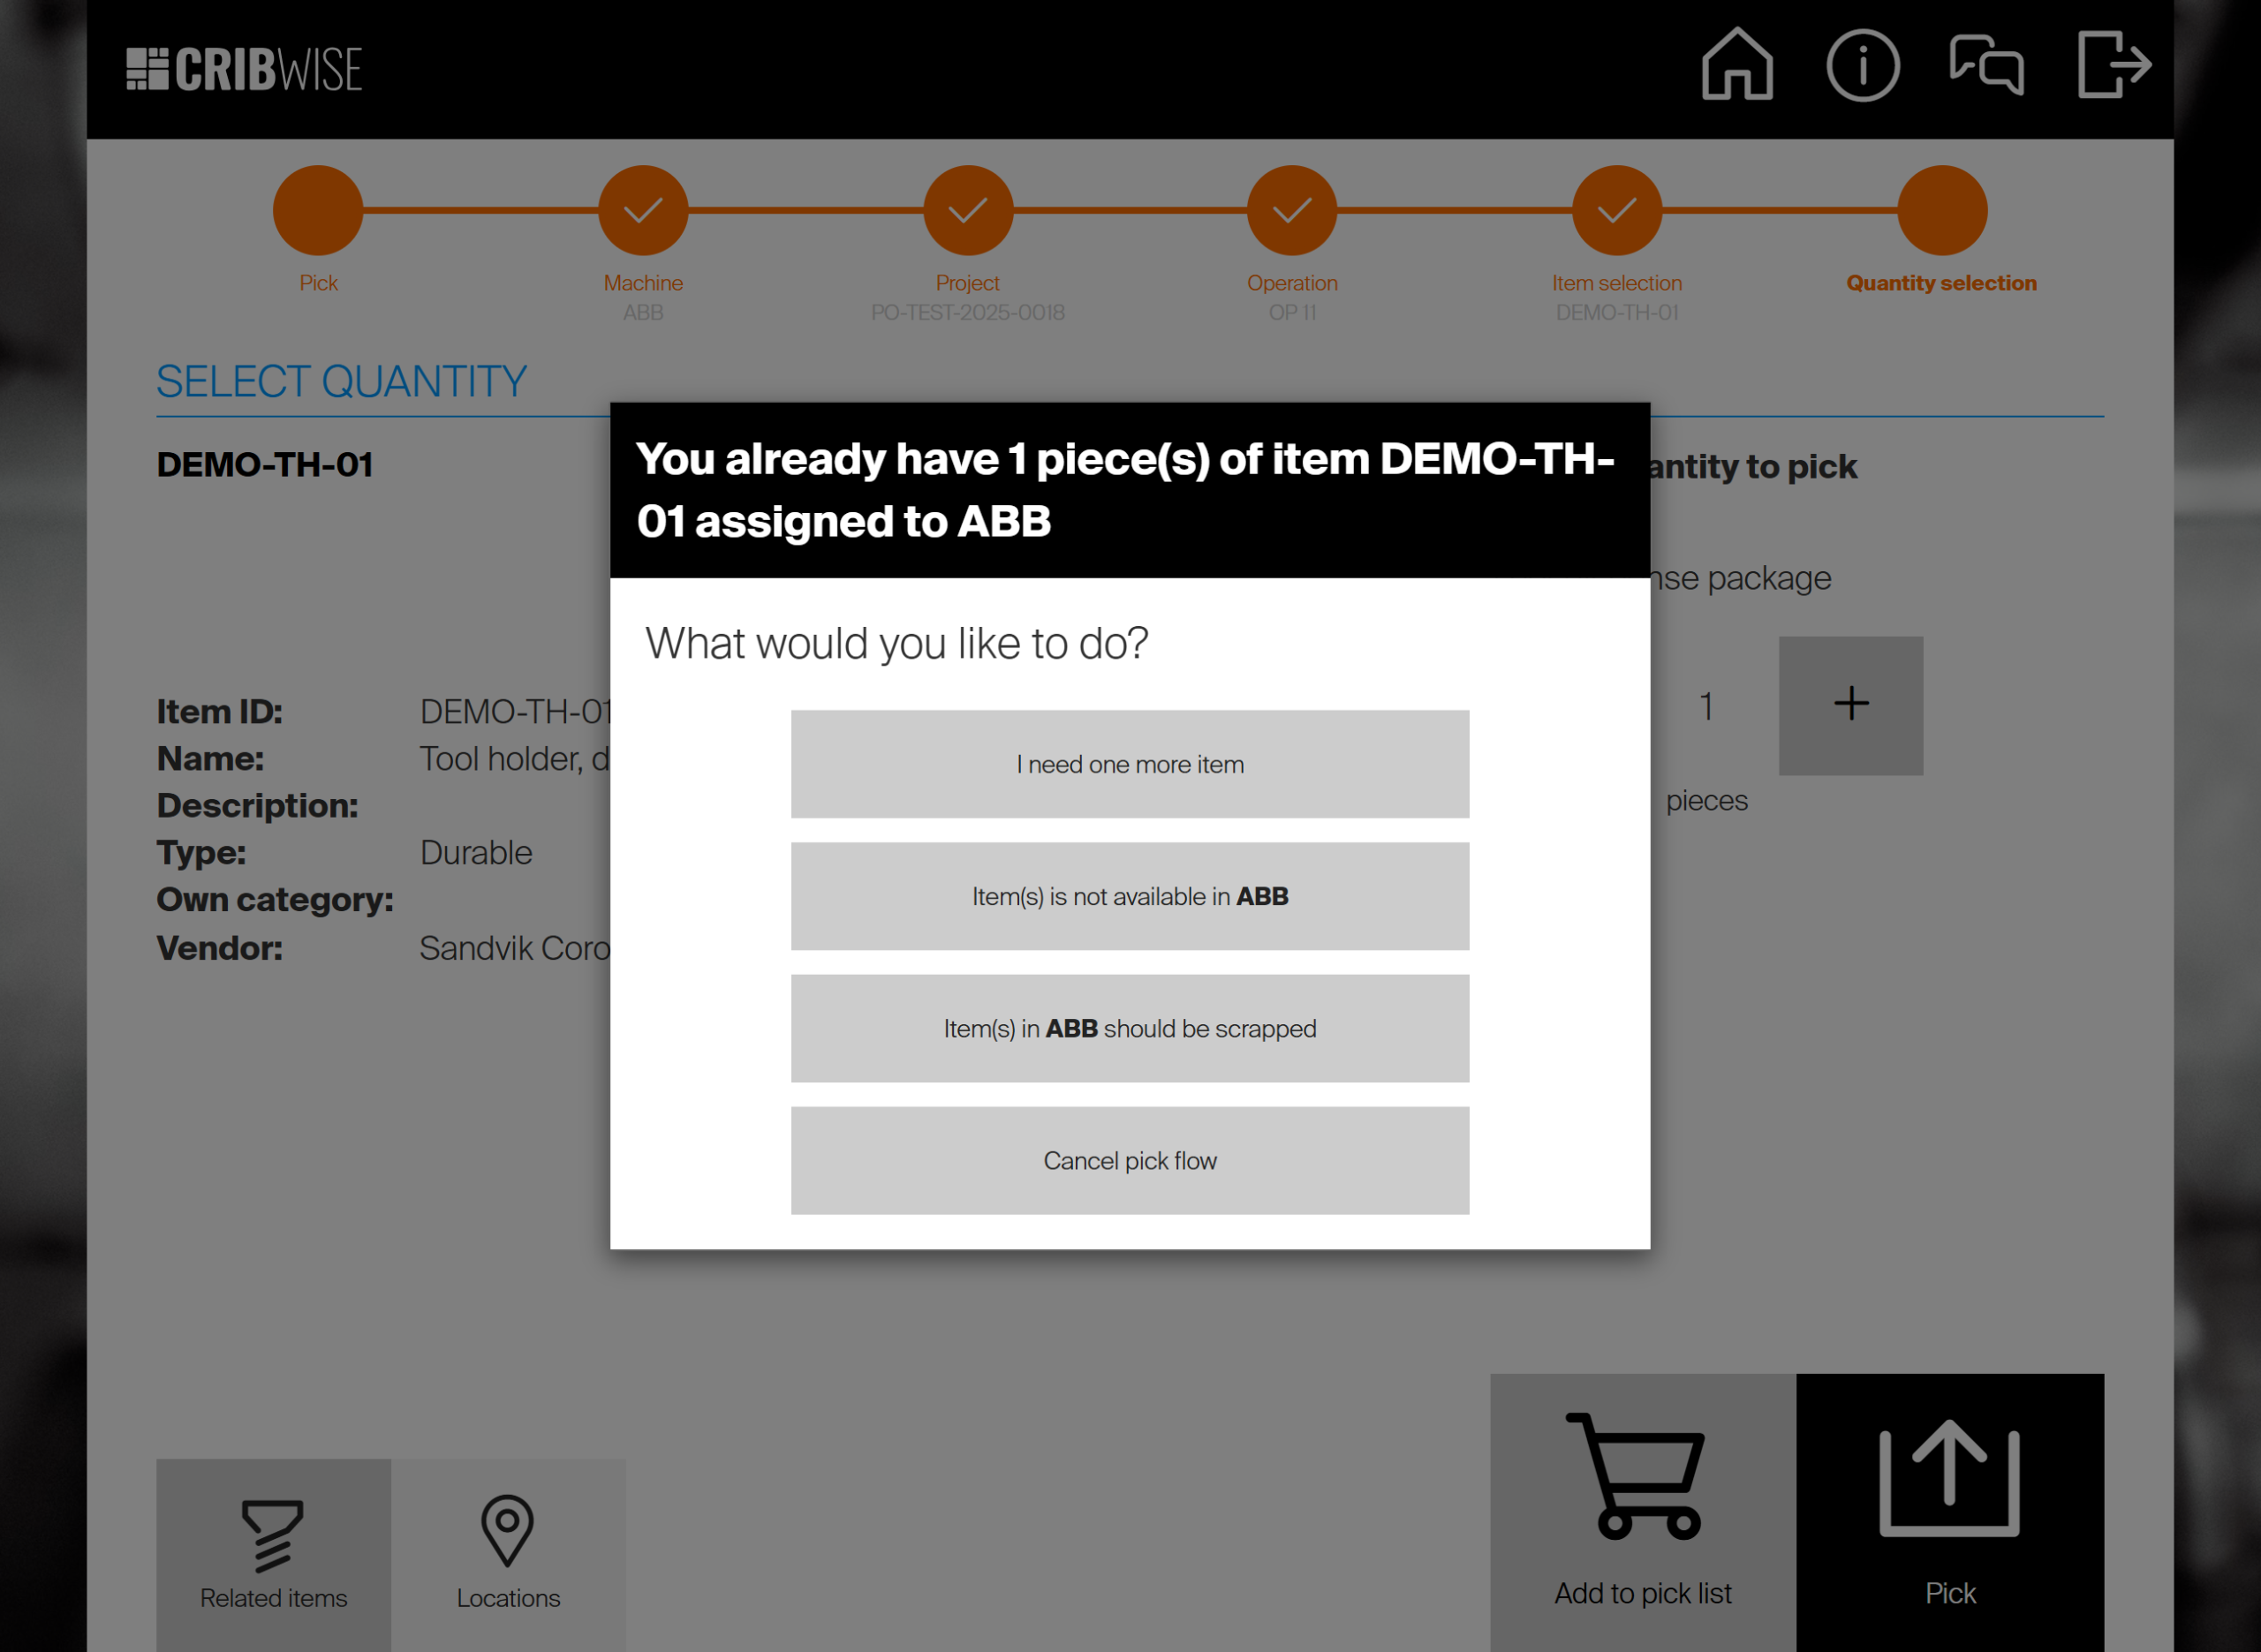
On the SFI: DEMO-TH-01 is already picked to machine ABB, so the operator chooses before the pick goes ahead.
The answers are I need one more item, Item(s) is not available in ABB, Item(s) in ABB should be scrapped and Cancel pick flow, with your own location name in place of ABB. After I need one more item the pick goes ahead, and the overview shows the item on two lines under that location.
Working with the list
The list opens collapsed, with only the location rows showing. Select the arrow on a row, or Expand all, to see the picks under it.

1 The toolbar. 2 The Locations and Items filters. 3 Refresh. 4 Selection mode, advanced filter, columns and saved views.
| Control | What it does |
|---|---|
| Open item | Opens the detail page of the selected item. Available when an item line is selected. |
| Collapse all / Expand all | Shows only the location rows, or every pick under them. |
| Export | Exports the list to an Excel file, with the rows and columns currently shown. See Exporting the list. |
| Scrap item | Scraps the selected picks. Available when only item lines are selected. In selection mode it reads Scrap items. See Scrap picked items. |
| Refresh | Reloads the list. |
| Locations | Keeps the locations whose value or step name matches, for example Brother or Machine. |
| Items | Keeps the picks whose item matches on ID, name, description, GTC classification, category, barcode, order code or a custom field. |
| Search | Applies both filters. Pressing Enter in a filter does the same. |
| Selection mode | Lets you tick several item lines, for example to scrap them together. |
| Advanced filter | Filters on item properties: Device, Vendor, Manufacturer, Assembly, Own classification, Status, Category, GTC classification, Serialized items, Quoted item, Serviced item and Critical level. |
| Columns | Chooses the columns and their order. See Available columns. |
| Saved views | Saves the columns and the advanced filter as a view you can open again, or restores the default layout. |
Exporting the list
The export runs in the background. A first message confirms “Picked items locations overview export has been scheduled.” A few seconds later a second message says the .xlsx file has been prepared for download. Select that message to download the file.
Available columns
Select Columns to choose what the list shows. Tick or clear a column, drag it by its handle to change the order, then select Save. Physical location and Item are always shown and cannot be moved.
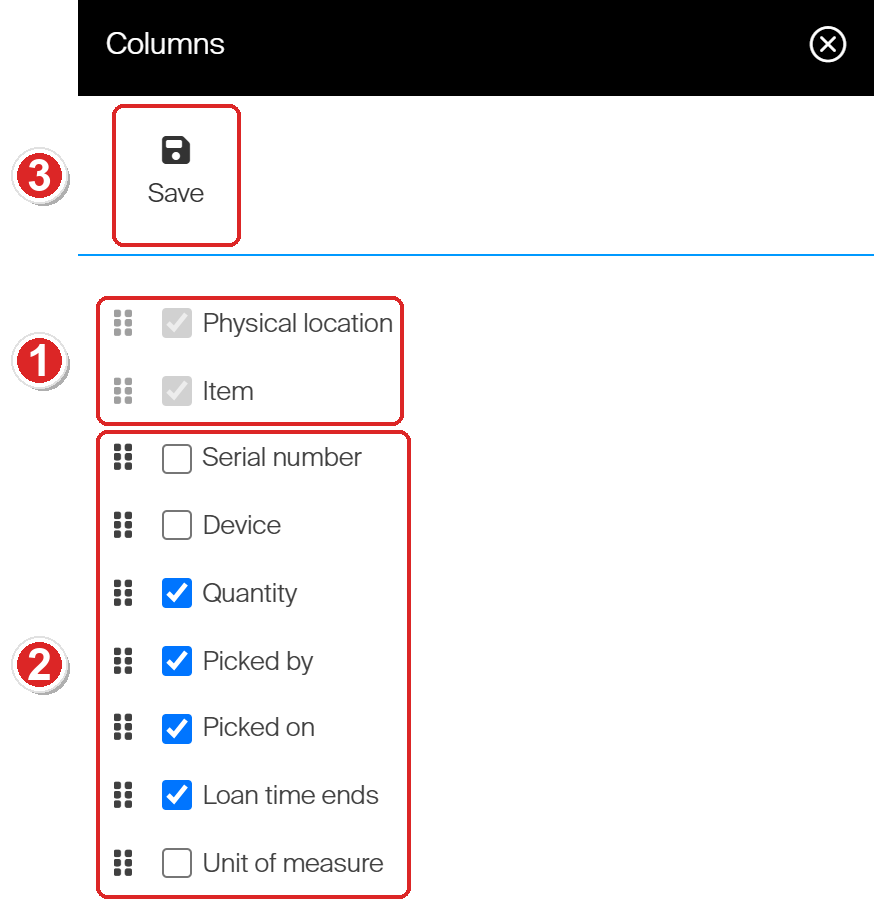
The Columns panel. 1 Always shown and locked in place. 2 Tick to show, drag the handle to reorder. 3 Save keeps the layout.
| Column | Shown by default | What it shows |
|---|---|---|
| Physical location | Always | The value and step of the physical location, or No location. |
| Item | Always | The item ID, name and description. |
| Serial number | No | The serial number of a serialized pick. Empty for other items. |
| Device | No | Name and ID of the device the item was picked from. |
| Quantity | Yes | The quantity of the pick. On a location row, the total for that location. |
| Picked by | Yes | Full name of the user who picked the item. |
| Picked on | Yes | Date and time of the pick. |
| Loan time ends | Yes | When the loan ends, for a serialized item with a loan time. Empty otherwise. |
| Unit of measure | No | The unit of the quantity, for example pieces. |
Where the loan time comes from
Only serialized items can have a loan time. Set it on the item’s General information tab: tick Specify loan time, then enter a Max allowed time in months, weeks, days or hours. Loan time ends is the pick time plus that period, so a pick at 15:38 with a 2-hour loan ends at 17:38.
The same section has an Automatic scrap period. How it scraps an overdue instance is described in Managing serialized items and serial numbers.
Scrap picked items
Scrap a pick from here when the item will never come back to the device, for example because it broke in the machine. Scrapping books a scrap transaction and removes the pick from the list. It is the same operation as returning an item as scrap on the SFI.
Warning: Scrapping cannot be undone. A scrapped item is no longer picked and can never be returned.
Before you scrap
- Select item lines only. Scrap item stays greyed out while a location row is selected.
- The device the item was picked from must run version 1.51 or later. Otherwise you get “Scrap from Admin Portal is not available for devices prior to version 1.51”.
- If Mandatory reason code for scrapping is on in system settings, you choose a reason code at the end.
Scrap one or more picks
- Select the line of the pick to scrap. To scrap several picks, select Selection mode first, then tick each line.
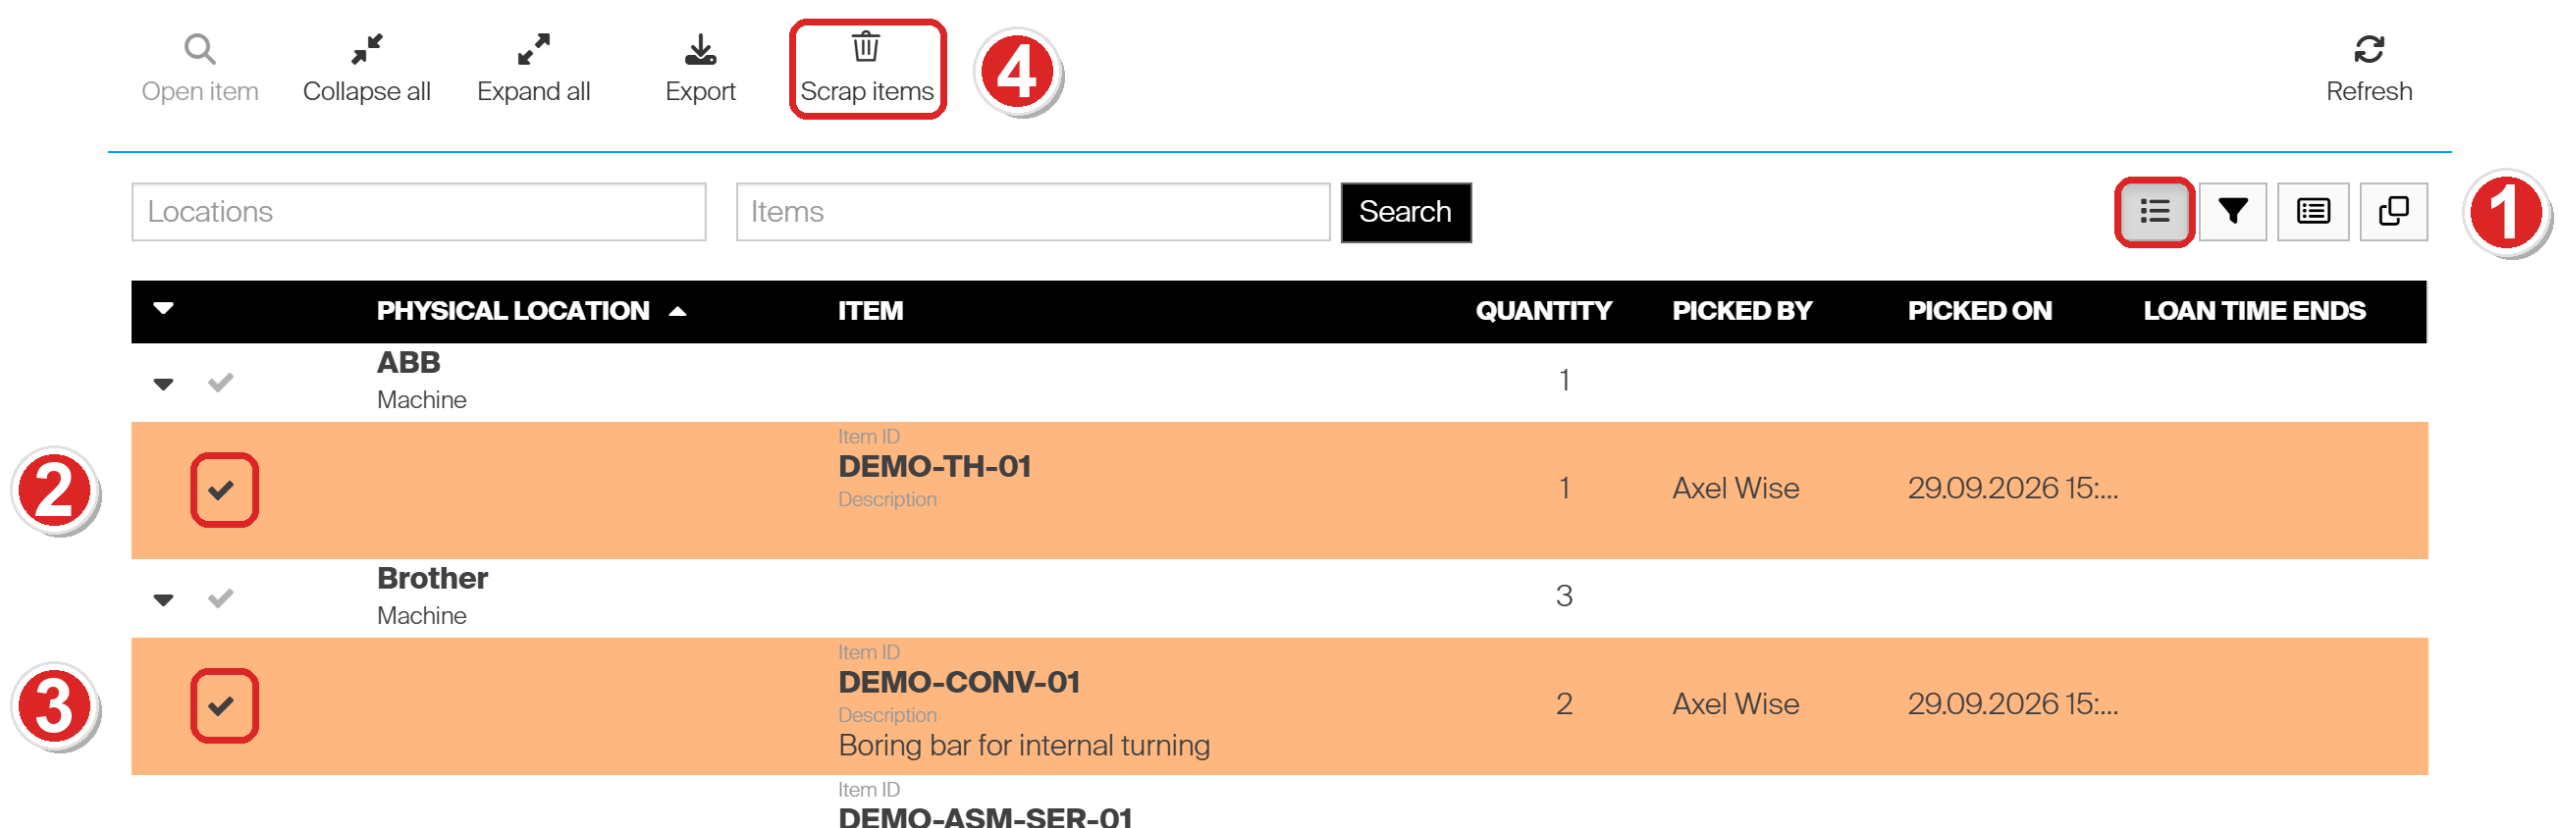
Selection mode is on (1), with two picks ticked (2 and 3). The toolbar button now reads Scrap items (4).
- Select Scrap item in the toolbar (Scrap items in selection mode). The Scrap picked items panel lists the picks, each with its full picked quantity.
- To scrap less than the picked quantity, select the line, then select Change scrap quantity. This is only available for picks of more than one.
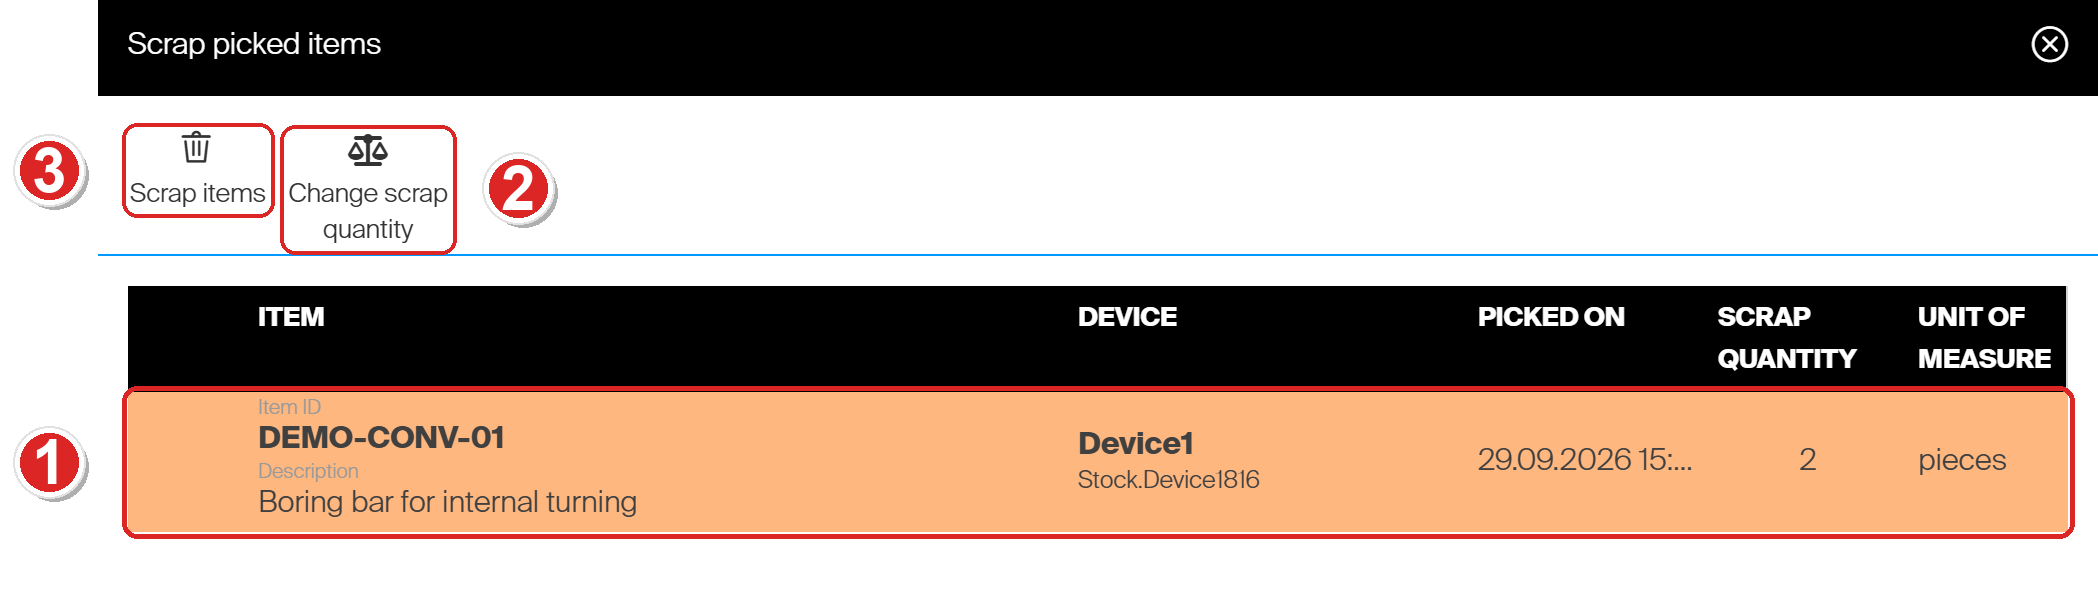
The Scrap picked items panel. 1 The selected pick, 2 pieces. 2 Change scrap quantity. 3 Scrap items starts the scrap.
- Enter the Quantity for scrap and select Apply.
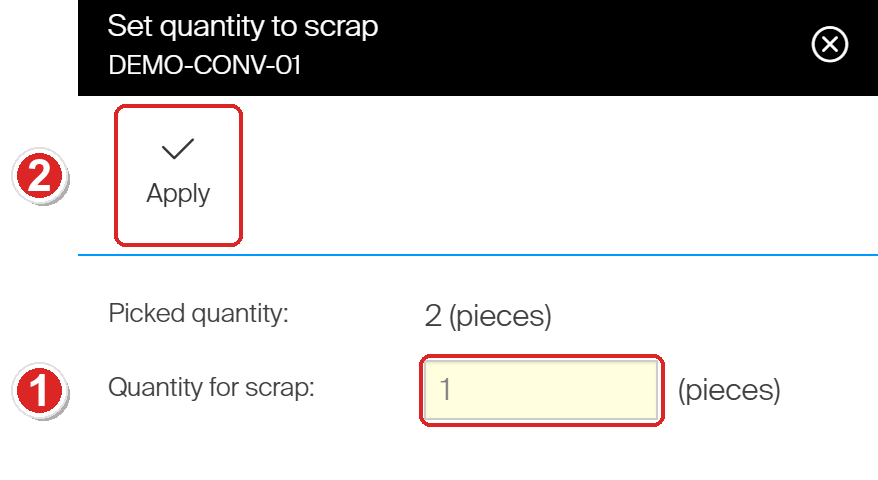
Set quantity to scrap. 1 The quantity, from 1 up to the picked quantity. 2 Apply returns to the panel.
- Select Scrap items.
- Select Yes to confirm.
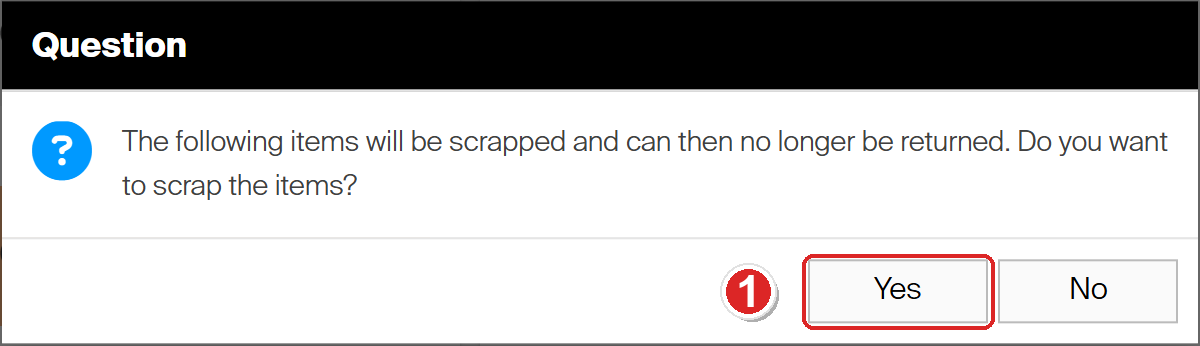
The last chance to stop. No keeps everything picked.
- If a reason code is required, choose it in Scrap reason code. The same reason applies to every pick in the list.
Success: The message “Selected picks were scrapped.” appears and the list reloads. A fully scrapped pick is gone. A partly scrapped pick stays, with the rest of its quantity still picked.

After scrapping 1 of 2 DEMO-CONV-01: 1 the location total drops from 3 to 2, and 2 the pick stays with 1 piece.
Common confusion
| People often think… | But actually… |
|---|---|
| The overview shows everything in stock. | It shows durable items that are picked and not yet returned: what is out in production. Stock in your devices is in the item overview. |
| No location means the item is lost. | It means the pick has no value on the physical step, usually because the device was set to No cost allocation. |
| A line is one item. | A line is one pick. An item picked twice shows on two lines. |
| The Locations filter finds items. | It matches location values and step names. Use the Items filter for item IDs, names and barcodes. |
| Export downloads the file straight away. | The file is prepared in the background. Select the second message to download it. |
| Scrapping here differs from scrapping on the SFI. | It is the same operation as returning an item as scrap, and it books the same scrap transaction. |
| Any durable item can have a loan time. | Only serialized items have one, so Loan time ends stays empty for the rest. |
Take action
Want the physical location to mean something? Mark the right step as physical in your cost allocation set, and give your devices that set. Go to How to create and manage cost allocation sets for the steps.
Related articles
- Understanding cost allocation: structure, setup, and examples – sets, steps, values and the physical step.
- How to create and manage cost allocation sets – mark a step as physical and give a device its set.
- How to pick an item – the SFI operation behind every line.
- How to return, scrap, and recycle items in SFI – the ways a pick leaves this list on the shop floor.
- Understanding the serialized item overview – every instance of a serialized item, in or out of the device.
- Item overview dashboard reference – the stock that is still in your devices.
- BI interface: connect a BI tool to CRIBWISE reporting data – the same list as a feed for BI tools.