
What you can do
Count the stock on an open storage device from the CRIBWISE Admin Portal and correct the recorded quantities, without standing at the device. Use it for shelves and open bins, and choose exactly which stock locations you count.
To count at the device itself instead, see How to do an inventory on the Shop Floor Interface.
Before you start
- The right permission. Your user group needs Perform inventory from admin portal. You find it under Administration > Group management, on the AP Privileges tab. See Admin Portal permissions reference.
- A device with open storage. Only devices you can count from the Admin Portal are listed. On our test portal the TX750 cabinet is not listed.
- A time when nobody needs the device. You must lock the device before you count. CRIBWISE does not lock it for you.
- Know the reason code rule. If Mandatory reason code for discrepancy is on, every counted quantity that differs from the expected one needs a reason code. See All system settings quick reference.
Important: Locking takes the whole device out of use on the shop floor, not only the locations you count. Count when the device is quiet, and unlock it as soon as you finish.
Quick start
Experienced users – count in 5 steps:
- Lock the device under Data management > Devices.
- Open Inventory, choose the stock and the device, and select Select devices.
- Tick the locations to count and select Select items.
- Enter the real quantity for each row (and tick the serial numbers), then select Finish.
- Unlock the device.
Need more detail? Follow the full steps below.
Steps
Step 1 – Lock the device
- Go to Data management > Devices.
- Select the device and select View detail.
- Select Lock device (1).
The device locks at once. There is no confirmation. To warn the operators first, use Notify users about device lock next to it.
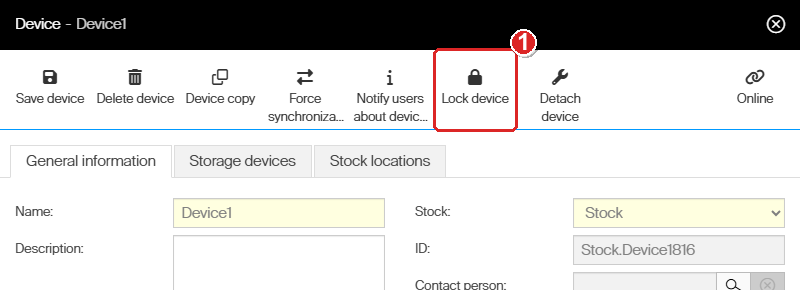
Lock device is in the toolbar of the device detail.
Step 2 – Choose the stock and the device
- Select Inventory in the menu. The Select devices for inventory page opens.
- Choose the stock in Select stock (1).
- Click the device row (2). Its Status now reads Locked.
- Select Select devices (3).
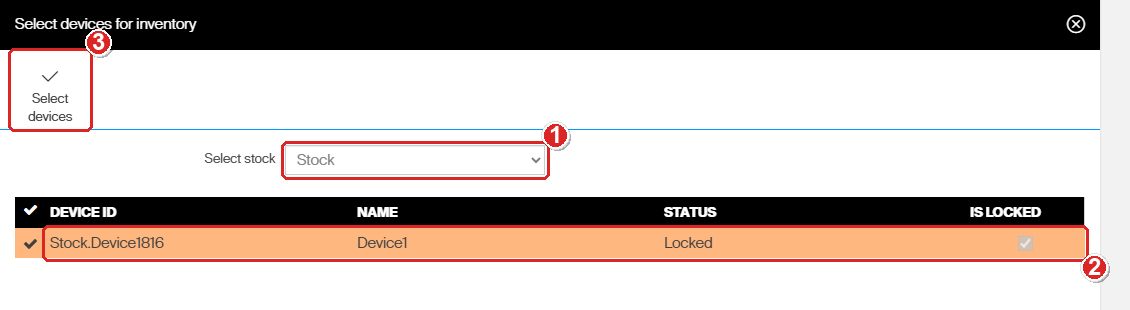
Only a locked device can be selected. If the device is not locked, the row does not select and Select devices stays grey.
Step 3 – Choose the locations to count
The item list shows one row per stock location on the device: Item, Status (the location rule, for example New or Any), Stock location, Expected quantity, Unit of measure and the date of the Last inventory.
- Tick the rows you want to count (1). The list is sorted by stock location, so the locations of one storage device sit together.
- Select Select items (2). This starts the count.
There is no search box or filter on this page. To count part of a device, tick only those rows.
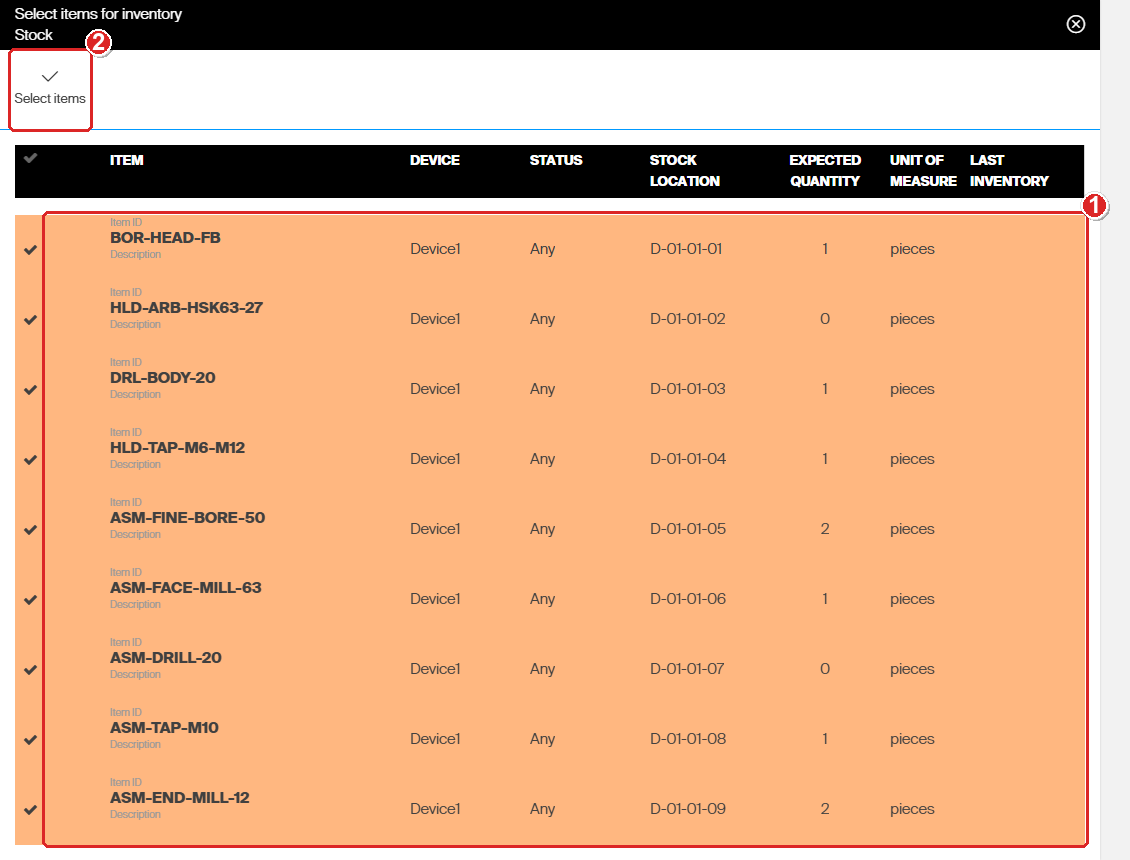
Here only the nine locations of storage device D are ticked, D-01-01-01 to D-01-01-09.
Step 4 – Enter what you counted
The count page lists the rows you ticked, with Qty expected, an empty Qty real and an empty Reason code. For each row:
- Click the row (1).
- Select Inventory (2). The Enter quantity panel opens on the right.
- Type the quantity you counted in Real quantity (3).
- Check the Reason code (4). It starts as Inventory; type a more exact reason if you have one.
- Select OK (5).
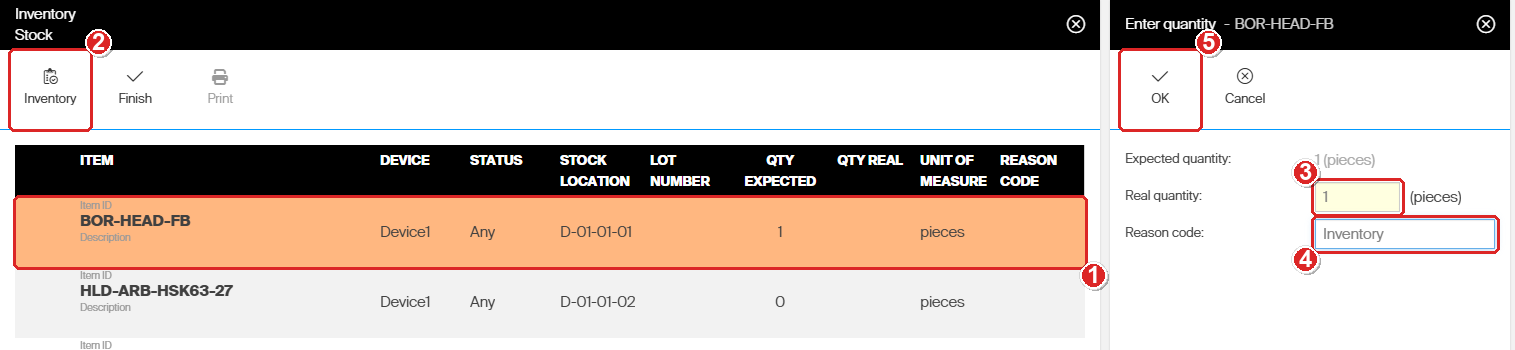
Expected quantity is read-only. Only Real quantity and Reason code can be changed.
If the real quantity differs from the expected one and Reason code is empty, the field turns red and OK does nothing. Type a reason code, then select OK again.
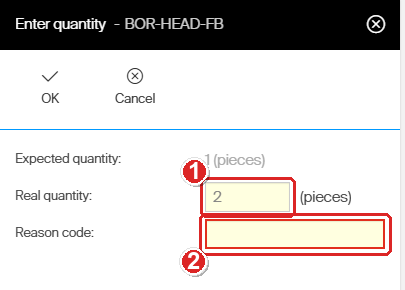
A discrepancy with an empty reason code. This happens when Mandatory reason code for discrepancy is on.
Step 5 – Tick the serial numbers (serialized items only)
For a serialized item, a Serialized items panel opens after OK. It lists the serial numbers that should be in the location.
- Click each serial number you found (1).
- Check the counter (2). It shows how many you ticked against the real quantity, for example 1/1.
- Select OK (3). It stays grey until the counter is complete.
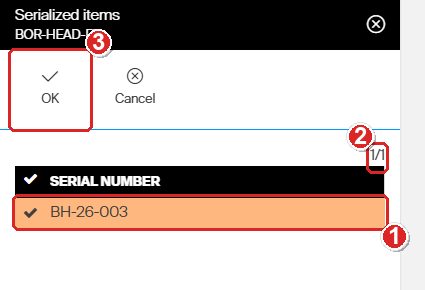
One serial number expected, one ticked.
Step 6 – Finish the count
- Check that every row shows a Qty real (1) and a Reason code (2).
- Select Finish (3). There is no confirmation.
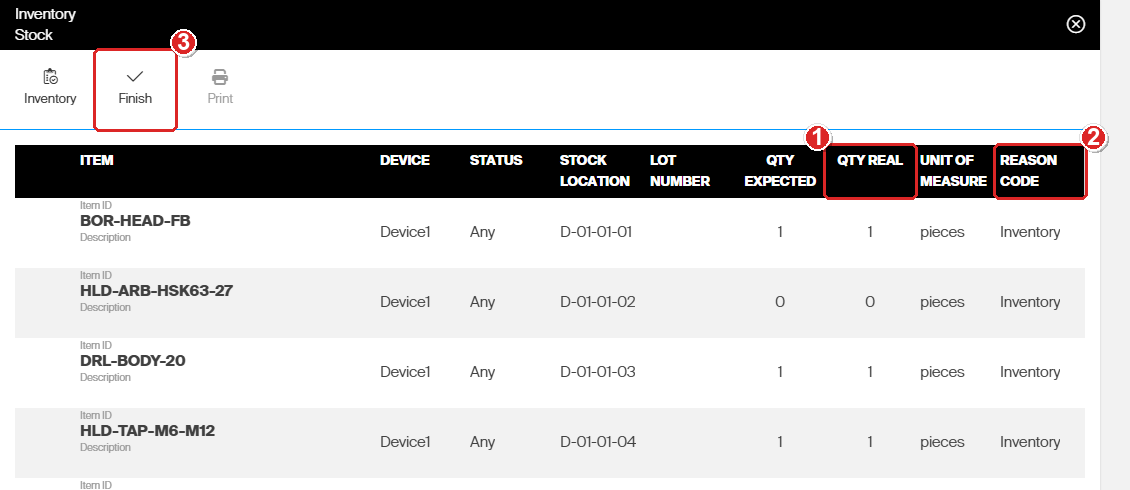
Every row is counted, so the count is ready to finish.
Success: the Inventory summary opens. For each location it shows Expected quantity, Real quantity, Deviation (the difference in pieces), Discrepancy (the difference as a value) and the new Last inventory date. Select Close when you have read it.
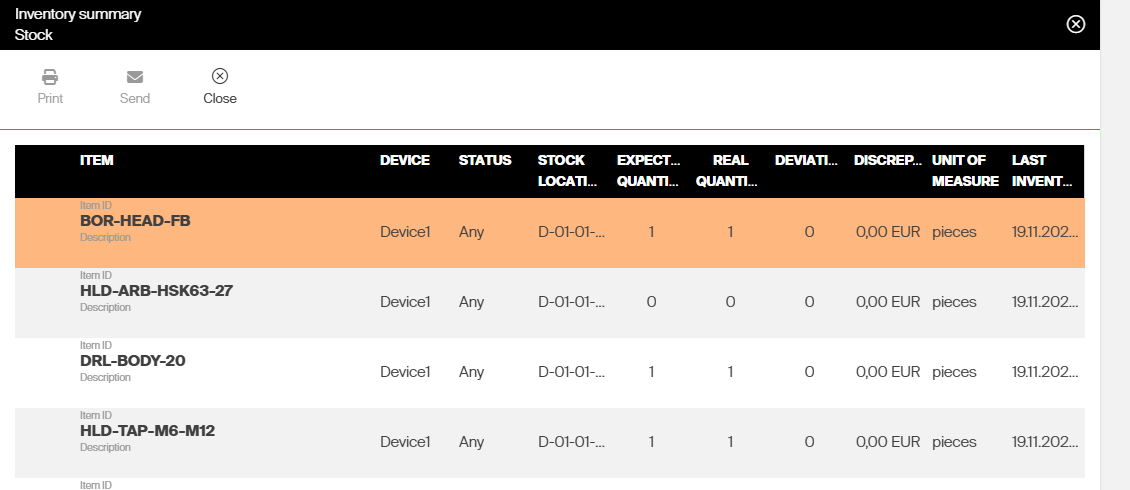
The summary of the count on storage device D. Nothing was missing, so every deviation is 0.
Note: If no row has a Qty real when you select Finish, the count closes and you return to the Home page. No quantity or Last inventory date changes.
Step 7 – Unlock the device
Finishing the count does not unlock the device.
- Go to Data management > Devices.
- Select the device and select View detail.
- Select Unlock device.
Success: after a page reload, the button reads Lock device again and the device Status is no longer Locked. Operators can use the device again.
If a count is already running
A count that was started but not finished stays open, and the device stays locked. The next time anyone selects Inventory, the stock and device selection is skipped and the open count comes back.
In our test, quantities typed in an earlier session were empty again when the count came back. Check the Qty real column and enter any missing rows before you select Finish.
Where the results appear
- Stock levels – the real quantity you entered becomes the quantity of the location.
- Last inventory – the date and time of the count, in the summary and in the item list when you start the next count.
- Raw transaction report – one row per location with Transaction type Inventory. For serialized items there is one row per serial number. See How to use the raw transaction report.
- Event log – one Inventory entry per counted location, with your user name. See How to use the event log for auditing.
- Item Change history – a Location assignment updated row at the time of the count.
Admin Portal or Shop Floor Interface?
| Admin Portal inventory | Shop Floor Interface inventory | |
|---|---|---|
| Where | Any computer with the Admin Portal | At the device |
| Devices | Devices with open storage | The device the SFI runs on |
| Permission | Perform inventory from admin portal (AP Privileges) | Perform inventory (SFI Privileges) |
| Choosing what to count | Tick stock locations in a list | Tap items on the device screen |
For the SFI steps, see How to do an inventory on the Shop Floor Interface.
Troubleshooting
| Problem | Likely cause | Fix |
|---|---|---|
| The device row does not select and Select devices is grey | The device is not locked. | Lock it on the device detail (Step 1), then open Inventory again. |
| A device is missing from the list | It has no open storage, or it is a cabinet or vending machine. | Count it on the Shop Floor Interface instead. |
| Inventory opens straight into a list of items | A count was started and never finished. | Enter the missing quantities and select Finish. See If a count is already running. |
| OK does nothing and Reason code is red | The real quantity differs from the expected one and no reason code is given. | Type a reason code, then select OK. |
| OK in the Serialized items panel stays grey | Fewer serial numbers are ticked than the real quantity. | Tick a serial number for every piece, or go back and correct the real quantity. |
| Operators cannot use the device after the count | The device is still locked. Finish does not unlock it. | Open the device detail and select Unlock device. |
Related articles
- How to do an inventory on the Shop Floor Interface – count at the device.
- How to create and manage devices – lock, unlock and notify users.
- Admin Portal permissions reference – the Perform inventory from admin portal permission.
- All system settings quick reference – Mandatory reason code for discrepancy and Send automatically when finished.
- How to use the raw transaction report – see the inventory transactions.
- How to turn on lot and batch tracking for an item – record lot numbers during a count.