
What you can do
Preview a purchase order as a file, send it to the vendor again, or cancel it in the CRIBWISE Admin Portal. You do all three from the order’s detail view, and the History tab shows each status change.
The buttons you see depend on the order’s status. See What each status allows.
Before you start
- An Admin Portal login that may change purchase orders. See Admin Portal permissions reference.
- An existing purchase order. See How to create manual purchase orders.
- A send option with a file format, for Create preview. On the Send options tab, Mail or FTP must be ticked with at least one format (XML, PDF or Excel), and the order must be saved.
Important: Cancel order and Send order act at once. There is no “Are you sure?” question, and a cancelled order cannot be made active again.
Quick start
Experienced users – preview, resend or cancel an order in 5 steps:
- Open Order lists > Purchase orders, select the order and select View detail.
- Tick Mail or FTP and a file format on Send options, then select Save order.
- Select Create preview, then download the file from the bell in the header.
- Select Resend order to send an active order again, or Cancel order to stop it.
- Check the History tab for the status change.
Need more detail? Follow the full steps below.
What each status allows
| Status | Buttons in the order toolbar | What it means |
|---|---|---|
| New | Save order, Send order, Create preview, Delete order | Saved but not sent. You can still add and change items. |
| Active | Save order, Create preview, Cancel order, Resend order, Delete order | Sent to the vendor and waiting for goods. It shows on the Shop Floor Interface restock screen. |
| Closed | Save order, Delete order (Create preview is greyed out) | Everything was restocked or cancelled. CRIBWISE closes the order by itself. |
| Cancelled | Save order, Delete order (Create preview is greyed out) | Stopped with Cancel order. It is gone from the restock screen. |
Create preview and Resend order also stay greyed out until the order has a saved send option. Create preview needs Mail or FTP with a file format.
Steps
Step 1 – Open the order
- Go to Order lists > Purchase orders.
- Select the order in the list.
- Select View detail.
The order opens on the right, with its toolbar and the tabs General information, Ordered items, Send options and History. For more about the list, see How to view and filter purchase orders.
Step 2 – Preview the order file
A preview is the same file the vendor gets, for example a PDF. Nothing is sent when you create it.
- Select the Send options tab.
- Tick Mail (1). If your vendor gets orders by FTP, tick FTP instead.
- Tick a format, for example PDF, and choose a template (2). Vendor default uses the template set on the vendor.
- Select Save order (3).
- Select Create preview (4).
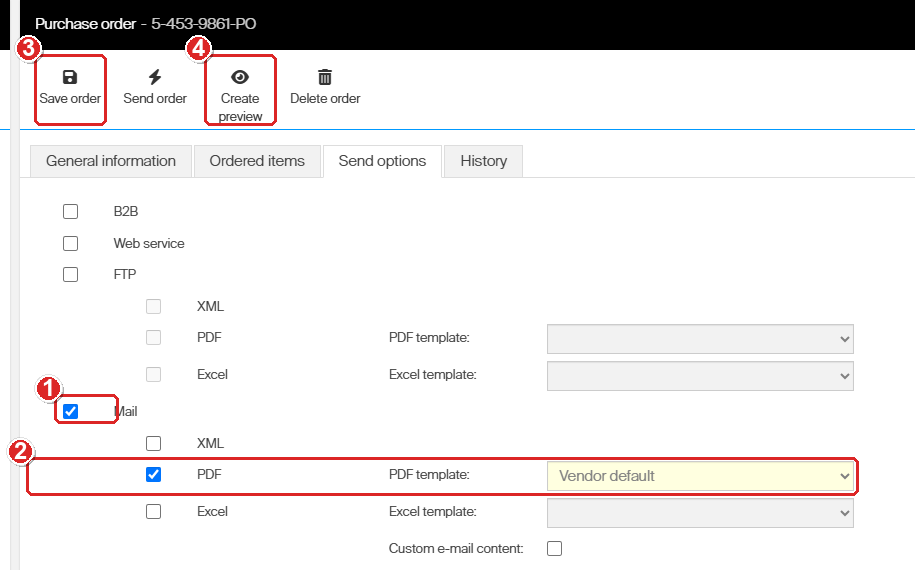
Create preview turns on only after Mail or FTP and a format are saved.
A message says Creation of the preview for [order] has been scheduled. The file is made in the background. In our test it was ready within 20 seconds.
- Select the bell in the Admin Portal header.
- Select the message The preview file [order]-[date]_[time].pdf for the order [order] is prepared and ready for download (1) to download the file.
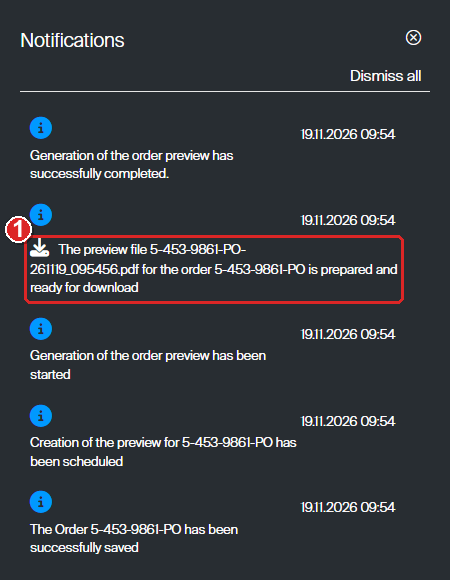
The file name is the order ID plus the date and time of the preview.
Tip: To change what the PDF or e-mail looks like, see How to customize purchase order email templates.
Step 3 – Resend an active order
Resend an order when the vendor did not get it, for example after a failed send. A failed send shows a warning icon in the Alert column (1), and the hover text says Failed to send order to target(s). The order’s General information tab names the channel and format that failed.
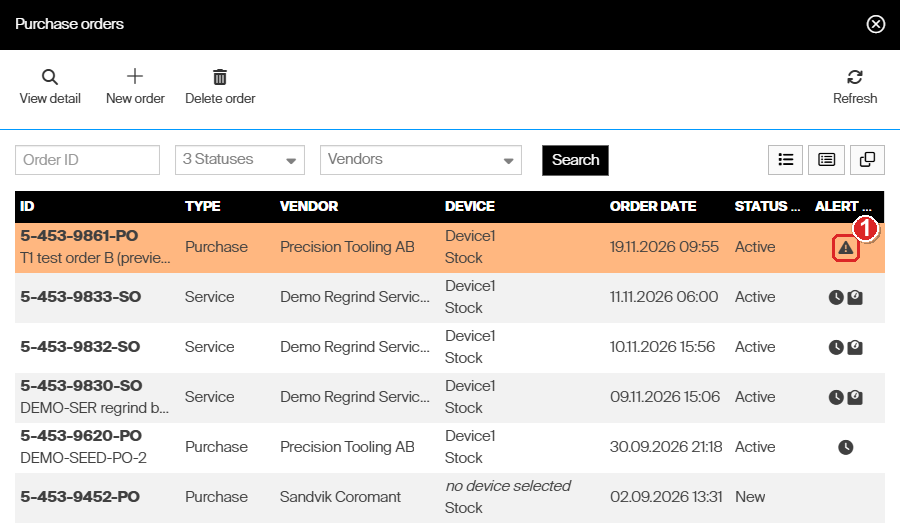
The warning icon marks an active order whose last send failed.
- Fix the cause first, for example the vendor’s e-mail address or FTP details. See How to manage vendors.
- Open the order (Step 1).
- Select Resend order (1).
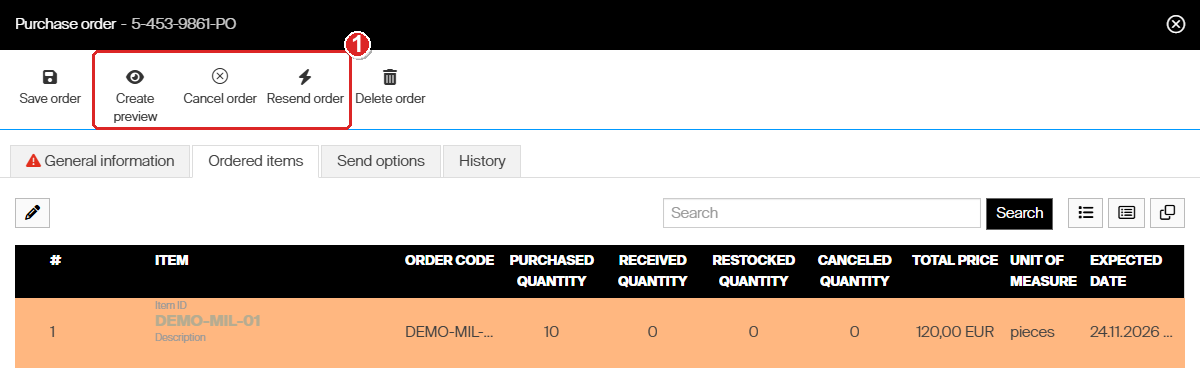
Cancel order and Resend order appear only while the order is Active.
The detail view closes and a message says Resend of order [order] has been scheduled. The bell then shows Sending of order [order] to vendor started, followed by the result for each channel and format.
Step 4 – Cancel an order
Cancel an order the vendor should not deliver. You can cancel only an Active order. A New order has no Cancel order button: delete it with Delete order instead.
- Open the order (Step 1).
- Select Cancel order (in the image above, the middle button).
The order is cancelled at once and the detail view closes. The status changes to Cancelled.
- The order leaves the Shop Floor Interface restock screen, including any goods that were received but not yet placed.
- Stock that was already restocked stays in the device. The order lines keep their received, restocked and canceled quantities.
- Cancel order only changes the status. It does not send anything through the order’s send options, so tell the vendor yourself.
Note: To cancel only part of an order, for example one line or the quantity that will not come, do it on the Shop Floor Interface. See How to receive goods, cancel or scrap order lines on the Shop Floor Interface.
Cancelled and closed orders are hidden by default. To see them again:
- Open the status filter above the list (1). It says 3 Statuses by default.
- Tick Cancelled, Closed or both (2).
- Select Search (3).
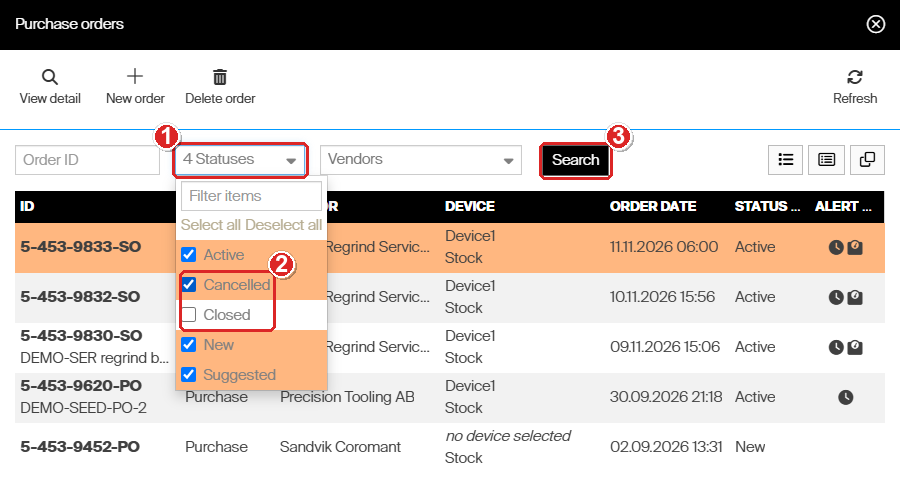
The default filter shows New, Active and Suggested orders only.
Step 5 – Check the History tab
- Open the order (Step 1).
- Select the History tab (1).
Each row is a status change (2): when it happened (Raised), Old status, New status and the message Status changed.
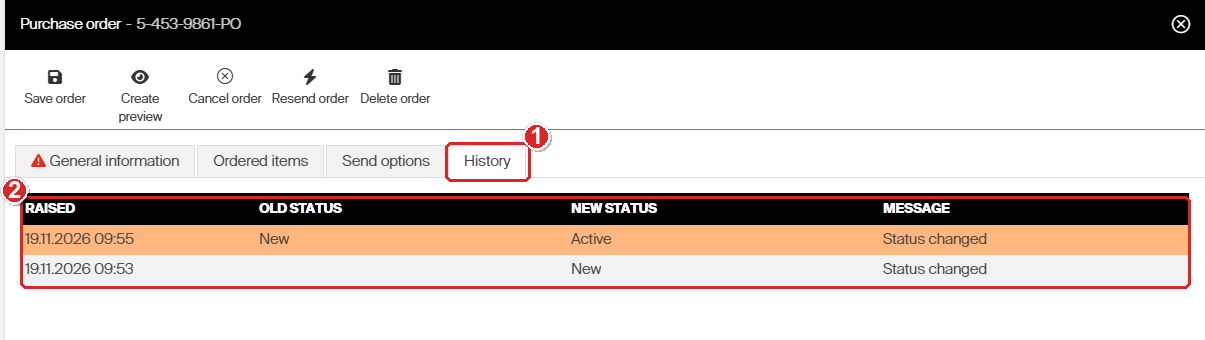
History lists status changes only.
History does not list previews, resends or failed sends. Those show in the bell and in Administration > Event log. Received, restocked and canceled quantities show per line on the Ordered items tab.
Success: the order shows the status you expect in the list (Active after a resend, Cancelled after a cancel), and the History tab has a row for the change.
Next steps
- Receive or cancel single lines when goods arrive – see How to receive goods, cancel or scrap order lines on the Shop Floor Interface.
- Put the goods into the device – see How to restock items on the Shop Floor Interface.
Troubleshooting
| Problem | Likely cause | Fix |
|---|---|---|
| Create preview is greyed out | No Mail or FTP send option with a format is saved, the order has no items, or the order is Closed or Cancelled. | Tick Mail or FTP and a format on Send options, choose a template and select Save order. |
| Save order does nothing after you tick a format | The template field next to the format is empty. | Choose a template, for example Vendor default, then save again. |
| Resend order is greyed out | The order has no saved send option, or it has no items. | Set a send option on Send options, select Save order, then Resend order. |
| There is no Cancel order or Resend order button | The order is not Active. New orders have Send order. Closed and Cancelled orders cannot be cancelled or sent. | Delete a New order you do not need. For a closed order, create a new order. |
| The bell says Order [order] failed to be sent by FTP in PDF format. See event log for details. | The vendor’s FTP or e-mail details are missing or wrong. | Check the vendor, then select Resend order. Details are in Administration > Event log. |
| A cancelled order is missing from the list | The status filter hides Cancelled and Closed orders by default. | Tick Cancelled in the status filter and select Search. |
Related articles
- How to view and filter purchase orders – the list, its filters and the order tabs.
- How to create manual purchase orders – create an order and send it for the first time.
- How to customize purchase order email templates – change the file and e-mail the vendor gets.
- How to manage vendors – the vendor’s e-mail and FTP details that sending uses.
- Understanding purchasing and service workflows – how an order moves from suggestion to restock.
- How to receive goods, cancel or scrap order lines on the Shop Floor Interface – cancel part of an order at the device.