
What you can do
Record goods that arrived, cancel what will not come, or cancel the rest of an order line on the CRIBWISE Shop Floor Interface (SFI). It all happens on the Restock screen, next to restocking.
- Receive goods books what arrived without putting it into a location yet.
- Cancel or scrap items cancels part of a purchase order line. On a service list, the same button scraps items that will not come back.
- Cancel remaining quantity on the restock summary cancels what is still open after a restock.
Note: When an order is completed it automatically creates a Receive goods transaction.
To put goods into the device, see How to restock items on the Shop Floor Interface.
Before you start
- An SFI login with the Restock privilege. Without it, Stock management is missing from the main menu. The privilege is set per user group under SFI Privileges. See How to create and configure a user group.
- An active purchase order for this device. New (unsent), closed and cancelled orders are not on the restock screen. See How to create manual purchase orders.
Important: Cancelled and received quantities are booked on the order as soon as you tap Confirm. There is no extra question, so check the quantity first.
Quick start
Experienced users – receive or cancel order lines in 5 steps:
- Tap Stock management > Restock.
- Select the purchase order on the left.
- Tap Receive goods or Cancel or scrap items.
- Tick the line and set the quantity with − and +.
- Tap Confirm.
Need more detail? Follow the full steps below.
Steps
Step 1 – Select the order
- On the main menu, tap Stock management.
- Tap Restock. Select items to restock opens, with orders and service lists on the left.
- Select the purchase order (1). Its items show on the right.
The buttons under the list turn on: Restock all, Cancel or scrap items (3) and Receive goods (2).
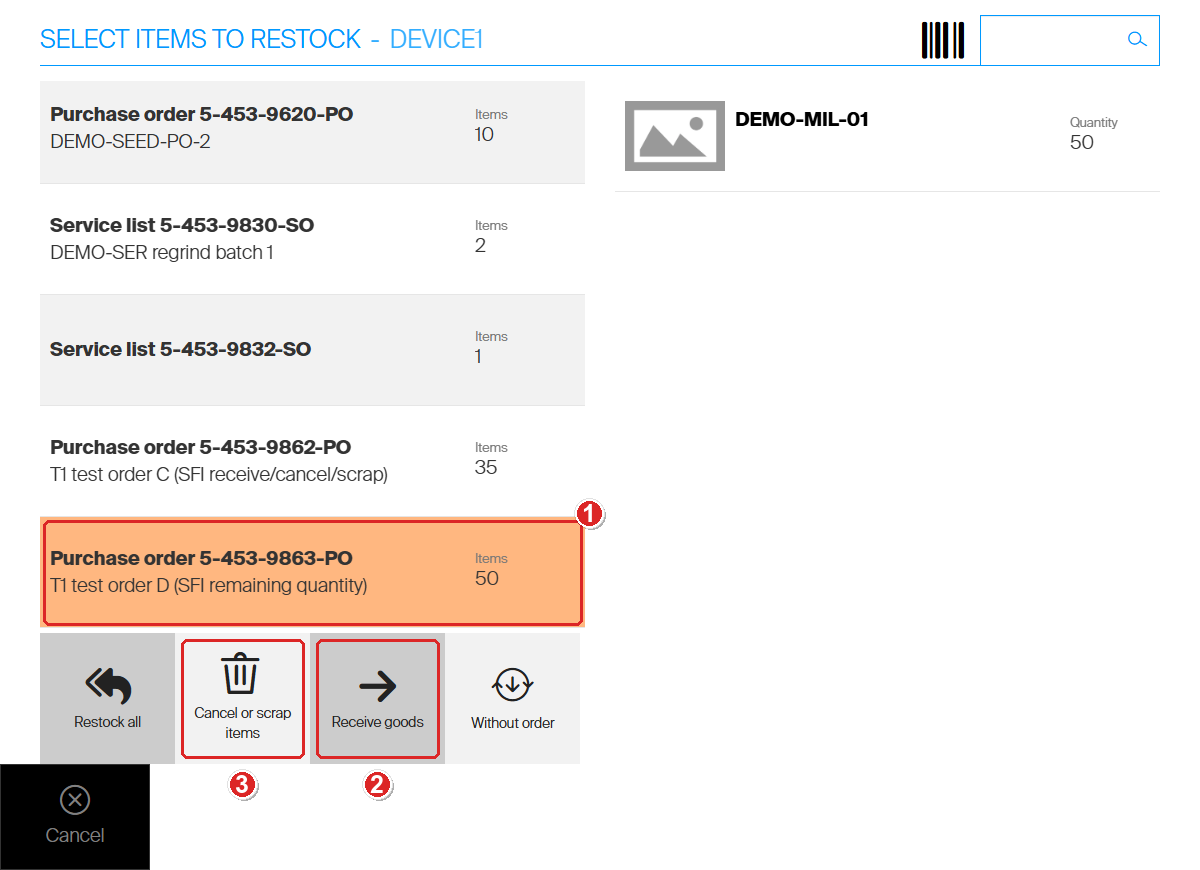
Receive goods and Cancel or scrap items work on the selected order only.
Step 2 – Receive goods without placing them
Use this when goods arrive but go into the device later, for example when goods-in and the crib are different people.
- Tap Receive goods. Receive items for order opens.
- Tick the line that arrived (1). Received quantity fills in the whole open quantity.
- If less arrived, lower Received quantity with − (2).
- Tap Confirm (3).
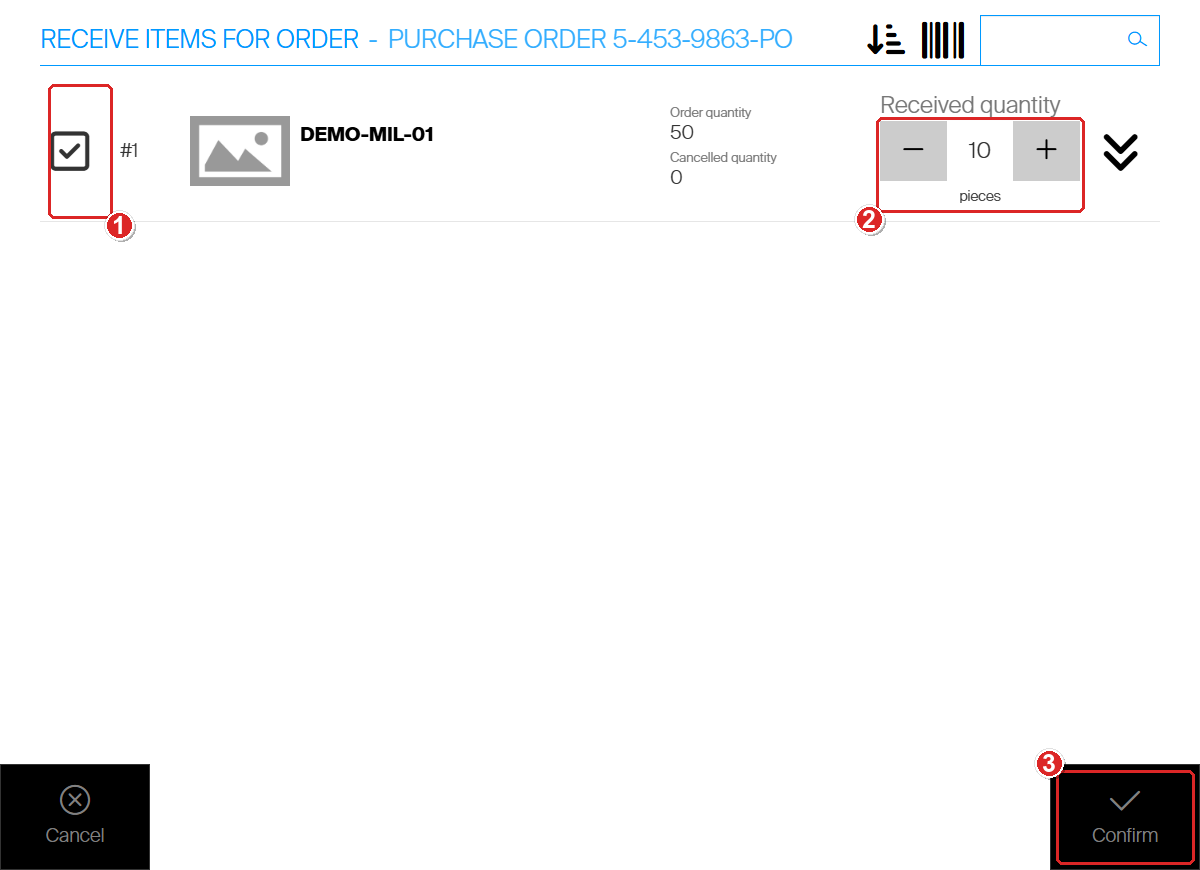
Order quantity 50, received 10. The rest stays open.
The SFI goes back to Select items to restock. There is no summary. In the Admin Portal, the order line’s Received quantity goes up, and Restocked quantity stays the same.
Received goods are not in stock yet. The order keeps them open until you restock them, and they can no longer be cancelled. Restock them later as usual, see How to restock items on the Shop Floor Interface.
Step 3 – Cancel part of an order line
Use this when the vendor will not deliver part of a line.
- Select the order (Step 1).
- Tap Cancel or scrap items. Cancel items for order opens.
- Tick the line (1).
- Set Cancelled quantity with + (2).
- Tap Confirm (3).
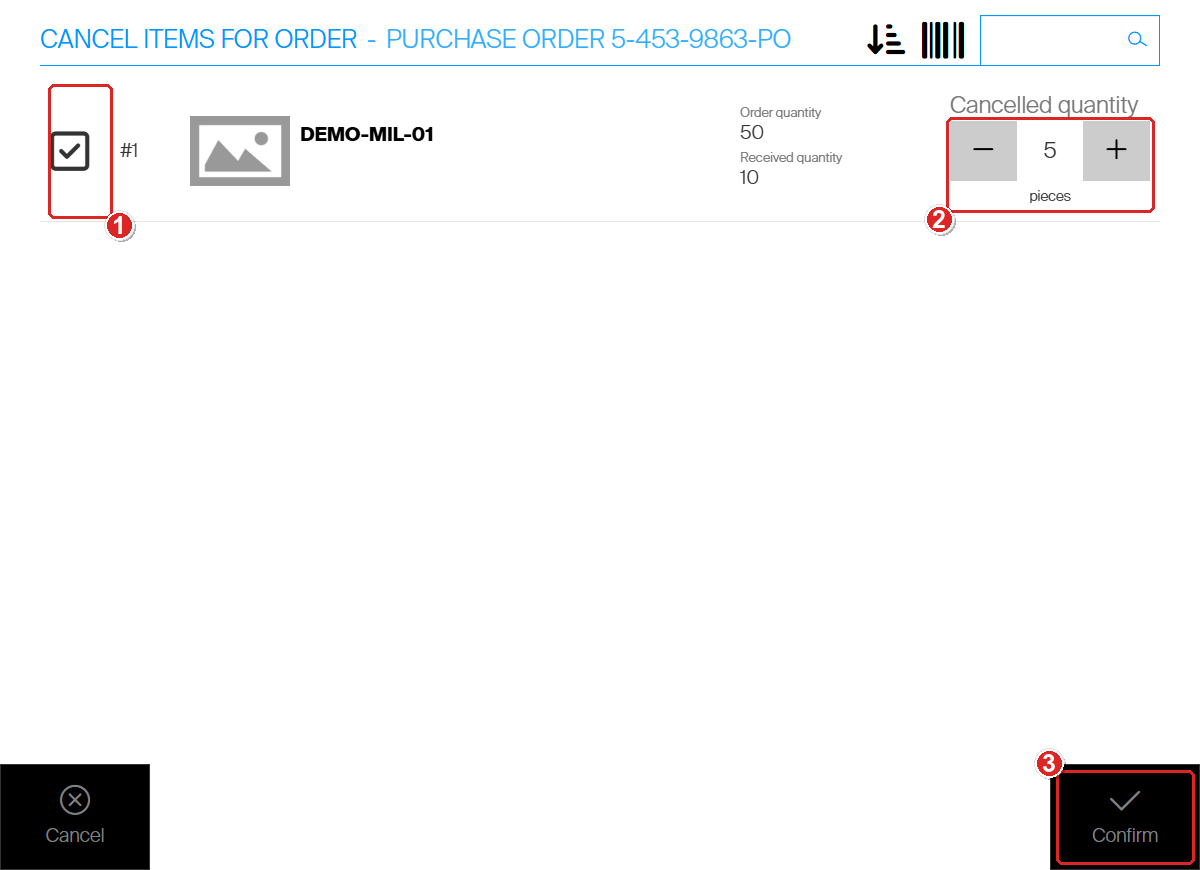
Cancelled quantity is the line’s total. It starts at what was already cancelled.
Cancelled quantity is a running total for the line, not an amount to add. If 5 were cancelled before and 5 more will not come, set it to 10. The highest value is the order quantity minus the received quantity.
The order’s item count on the restock screen drops by the cancelled quantity.
Note: On a service list, the same button opens Scrap items for order, with Picked quantity, Received quantity and Scrapped quantity. Use it for items that will not come back from service. See Understanding the service flow: from pick to restock.
Step 4 – Cancel the remaining quantity after a restock
When a delivery is short and the vendor will not send the rest, cancel the rest right after you restock.
- Restock what arrived. See How to restock items on the Shop Floor Interface.
- On the Restock summary, tap Cancel remaining quantity (1).
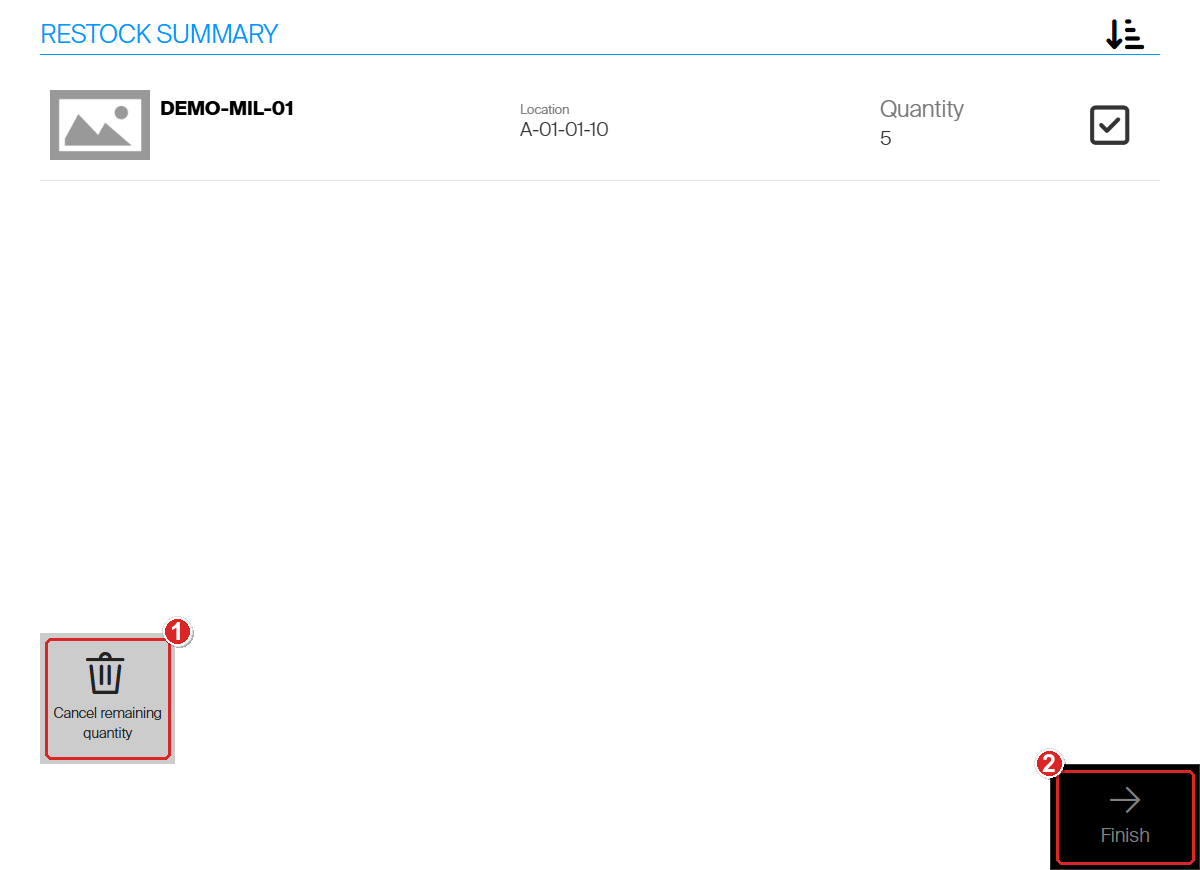
Cancel remaining quantity shows only while the order still has open quantity.
Cancel items for order opens with the line already ticked and Cancelled quantity set to the most you can cancel.
- Check Cancelled quantity (1). Lower it if part of the rest will still come.
- Tap Confirm (2). You are back on the Restock summary, and the button is gone.
- Tap Finish.
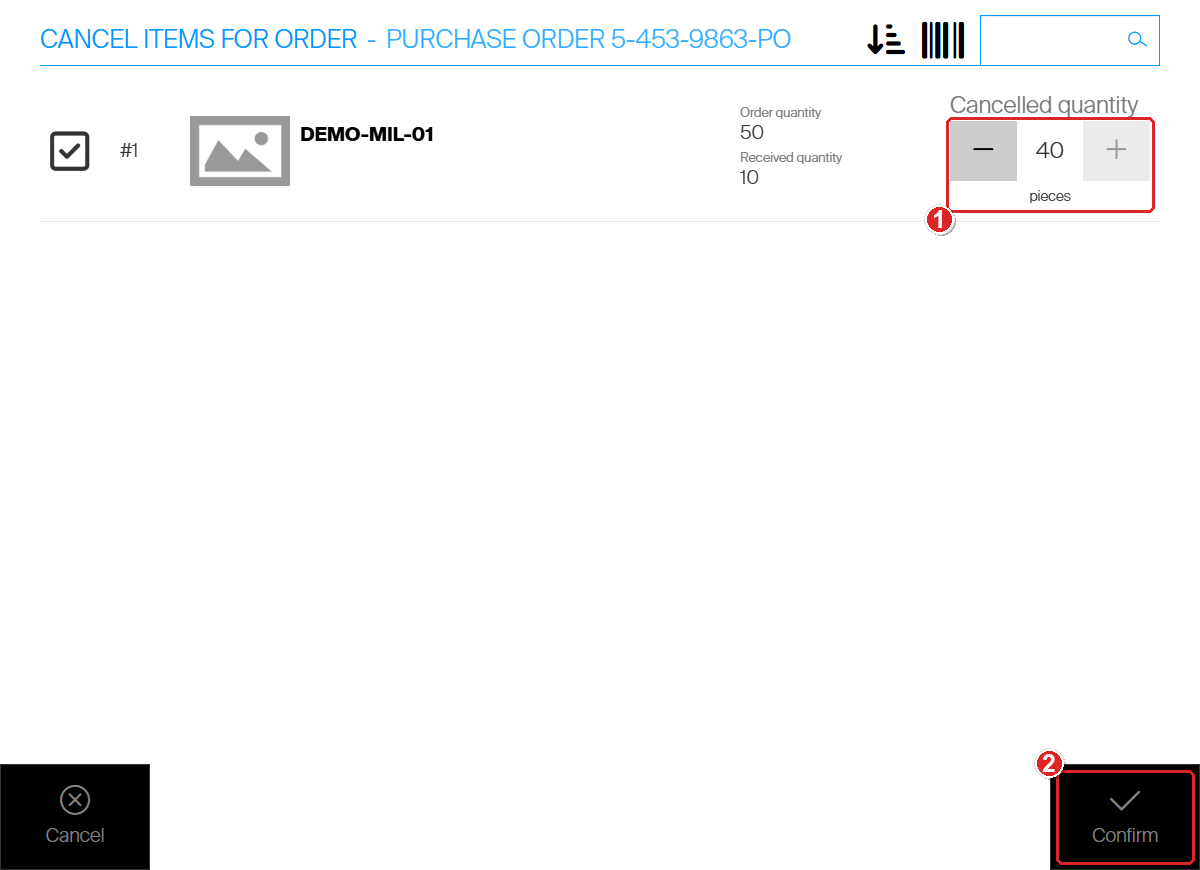
Here 5 were restocked and 5 received earlier, so 40 of 50 is the most that can be cancelled.
Goods that were received but not restocked are not cancelled. They stay on the order for restocking.
Tip: On a service list the summary shows Scrap remaining quantity instead. See How to restock items on the Shop Floor Interface.
Success: in the Admin Portal, the order line on the Ordered items tab shows the new Received quantity, Restocked quantity and Canceled quantity. When every piece is restocked or cancelled, the order closes by itself (status Closed) and leaves the restock screen.
How the quantities fit together
Each order line keeps four numbers. You see them on the Admin Portal Ordered items tab.
| Column | Set by | Example (one line of 50) |
|---|---|---|
| Purchased quantity | The order | 50 |
| Received quantity | Receive goods | 10 |
| Restocked quantity | Restock | 10 |
| Canceled quantity | Cancel or scrap items and Cancel remaining quantity | 40 |
This line is complete: 10 restocked plus 40 cancelled is 50, so the order is Closed.
Next steps
- Restock received goods – see How to restock items on the Shop Floor Interface.
- Cancel or resend a whole order – see How to cancel, resend or preview a purchase order.
Troubleshooting
| Problem | Likely cause | Fix |
|---|---|---|
| Stock management is missing from the main menu | Your user group does not have the Restock privilege. | Ask an administrator to turn on Restock under SFI Privileges for your group. |
| Receive goods and Cancel or scrap items are greyed out | No order or service list is selected. | Select the order on the left first. |
| The order is not on the restock screen | The order is New (not sent), Closed or Cancelled, or it is for another device. | Check the order status in Order lists > Purchase orders. Send a New order first. |
| You cannot raise Cancelled quantity to the whole open quantity | Part of the line was received with Receive goods. Received goods cannot be cancelled. | Restock the received goods, or cancel only the part that was not received. |
| Confirm stays greyed out | No line is ticked. | Tick the line first, then set the quantity. |
| The order stays open after you cancelled the rest | Received goods are still waiting to be restocked. | Restock them. The order closes when every piece is restocked or cancelled. |
Related articles
- How to restock items on the Shop Floor Interface – put goods from an order or service list into the device.
- How to cancel, resend or preview a purchase order – act on the whole order in the Admin Portal.
- How to view and filter purchase orders – find the order and read its quantities.
- Understanding the service flow: from pick to restock – where scrapping a service item fits.
- How to create and configure a user group – give a group the Restock privilege.