
Create a new item directly in the Admin Portal when the item is not available in a catalog. You enter the item details, choose its type, and save it — ready for stock assignment and picking.
Before you start
- You need Administrator access to the Admin Portal.
- Have the item details ready: ID, name, description, and category.
- Decide whether the item is consumable (used once) or durable (returned after use). See Understanding item statuses if you are unsure.
Important: The consumable/durable choice can only be changed while the item is Defined. Once it is released, see How to change an item from consumable to durable.
Quick start
Experienced users — create an item in 5 steps:
- Open Data management > Items > New item
- Enter Item ID, Name, and Description
- Choose Consumable or Durable and fill in mandatory fields (yellow)
- Set Status to Released (or leave as Defined to finish setup first)
- Click Save item
Need more detail? Follow the full steps below.
Steps
Step 1 — Navigate to items
- In the left menu, click Data management.
- Click Items.
- Click New item in the toolbar.
The item detail form opens with the General information tab active.
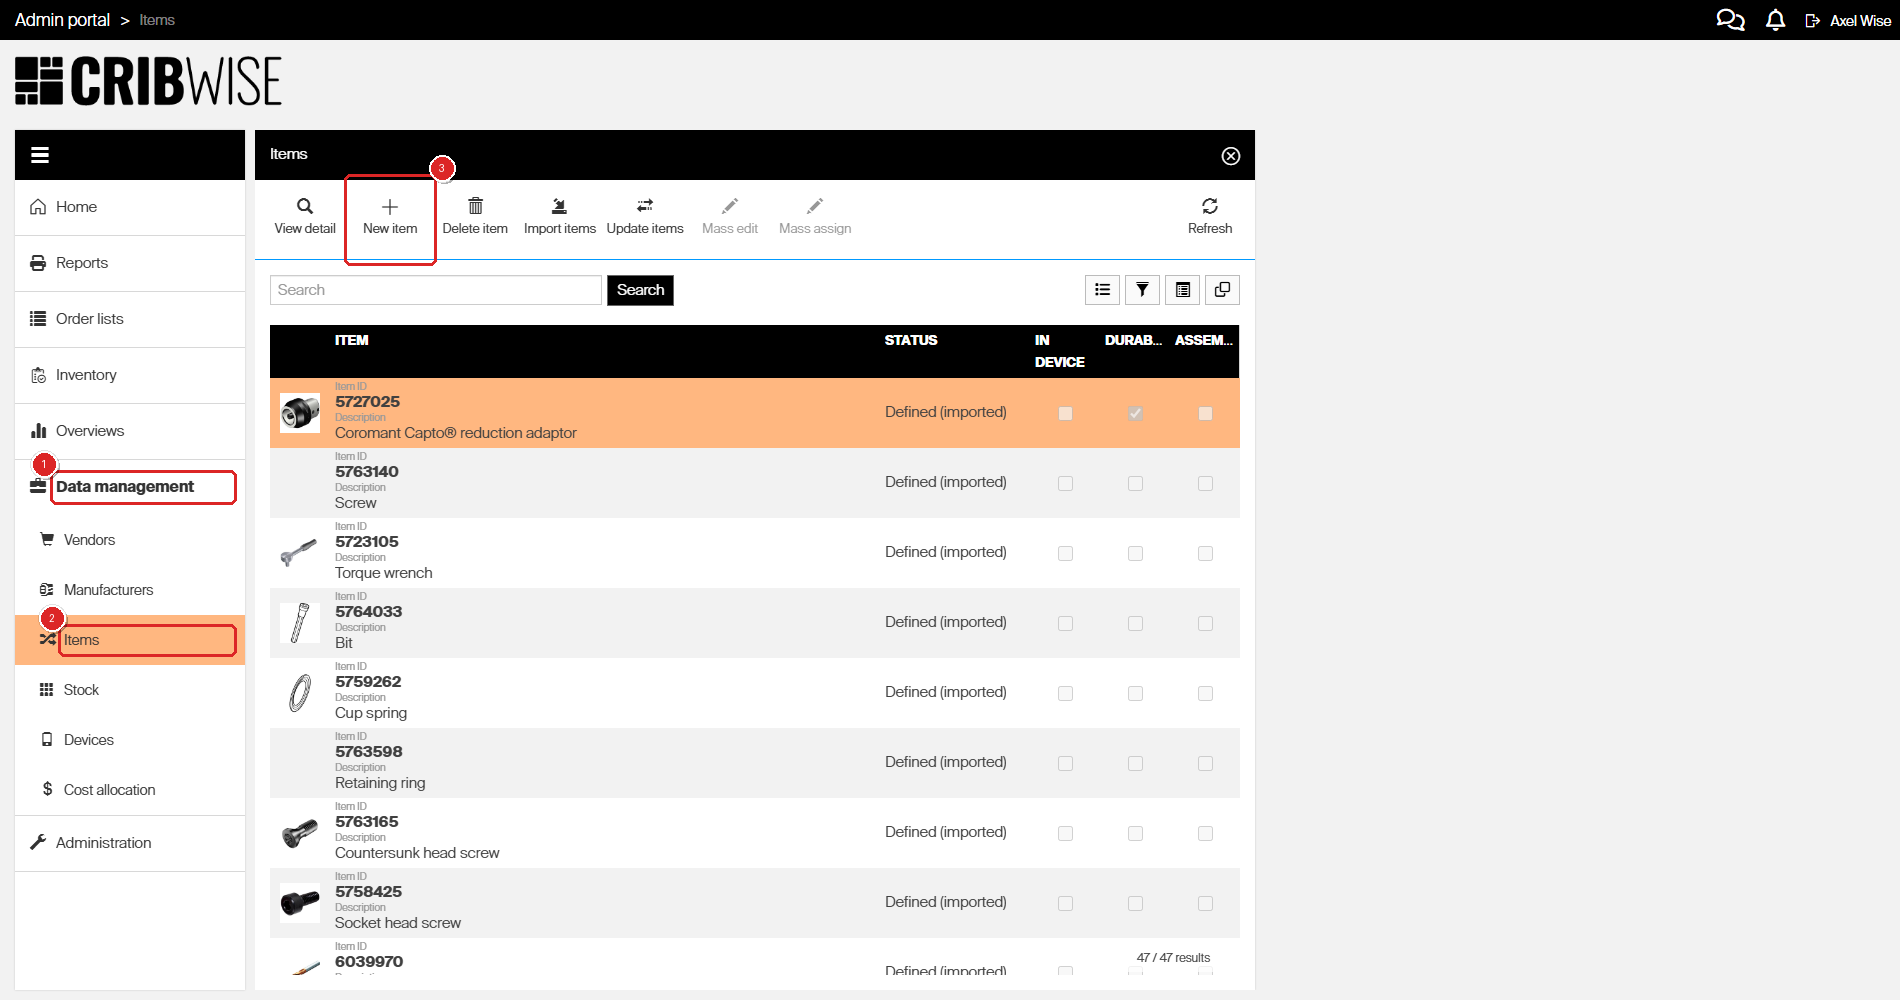
Click Data management (1), then Items (2), then New item (3) in the toolbar.
Step 2 — Enter basic information
Fill in the top section of the form.
| Field | Required | What to enter |
|---|---|---|
| Item ID | Yes | A unique identifier. Use your part number or internal code. |
| Name | Yes | The display name. This appears in lists and on vending machines. |
| Description | No | A short description. The “(Default)” label indicates the default language. |
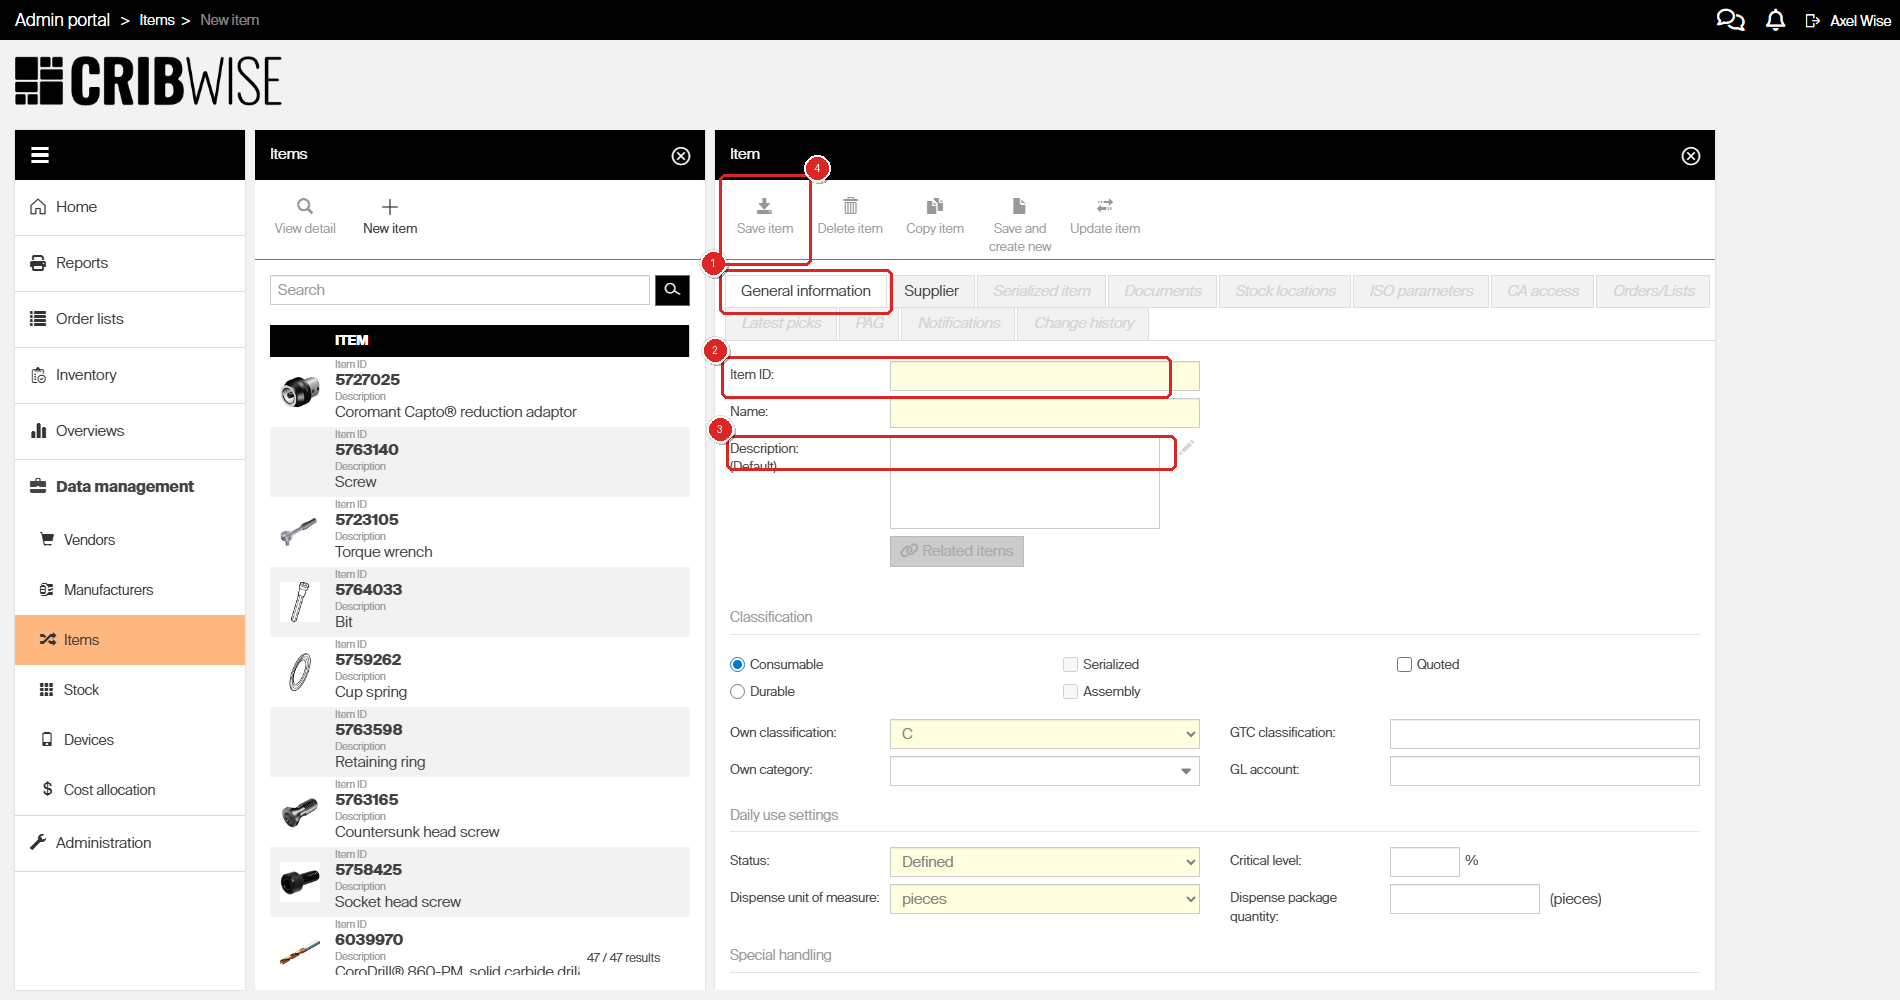
The new item form showing (1) General information tab, (2) Item ID and Name fields, (3) Description field, and (4) Save item button.
Step 3 — Set the classification
Under Classification, choose the item type.
- Select Consumable or Durable. New items default to Consumable.
- If you select Durable, the Serialized and Assembly checkboxes become available.
- Optionally enable Quoted for special pricing workflows.

Consumable selected (1). Switch to Durable (2) to unlock Serialized and Assembly. Set classification and category (3).

When Durable is selected (1), the Serialized (2) and Assembly (3) checkboxes become available.
| Field | Description |
|---|---|
| Own classification | ABC classification (A, B, or C). Defaults to C. |
| Own category | The item category (e.g., “Inserts”, “Drilling tools”). Type to search. |
| GTC classification | Classification code from the Generic Tool Catalog standard. Optional. |
| GL account | General ledger account for financial integration. Optional. |
Step 4 — Configure daily use settings

Set the Status (1), Dispense unit of measure (2), and Critical level (3).
| Field | Description |
|---|---|
| Status | Start with Defined while setting up. Change to Released when ready for picking. |
| Dispense unit of measure | How the item is counted: pieces, meters, kilograms, etc. |
| Critical level (%) | The stock percentage at which a low-stock alert triggers. |
| Dispense package quantity | How many units are dispensed per pick. |
Step 5 — Configure durable-only fields (if applicable)
If you selected Durable in Step 3, two additional fields appear:
| Field | Description |
|---|---|
| Usage cost structure | How the cost of using this item is calculated. |
| Cost | The cost value used with the selected cost structure. |
Step 6 — Set special handling (optional)

Enable optional behaviors under Special handling.
| Option | What it does |
|---|---|
| Special handling for restock and return | Adds extra steps when restocking or returning this item. |
| Prompt user to return picked item during picking | Reminds users to return the old item when picking a new one. |
| Track lot numbers | Enables lot/batch number tracking for each transaction. |
Step 7 — Fill in custom information (optional)
Under Custom fields, fill in any custom fields your organization has configured (Custom description, Internal ID, End date, ERP information).
Note: These fields vary depending on your organization’s configuration.
Step 8 — Save the item
- Click Save item in the toolbar.
Tip: After the first save, the Save and create new button becomes available. Use it to create multiple items in a row.
Success: The item is saved. You see the item ID in the breadcrumb, the name in the header, and all tabs become active (Supplier, Documents, Stock locations, etc.).
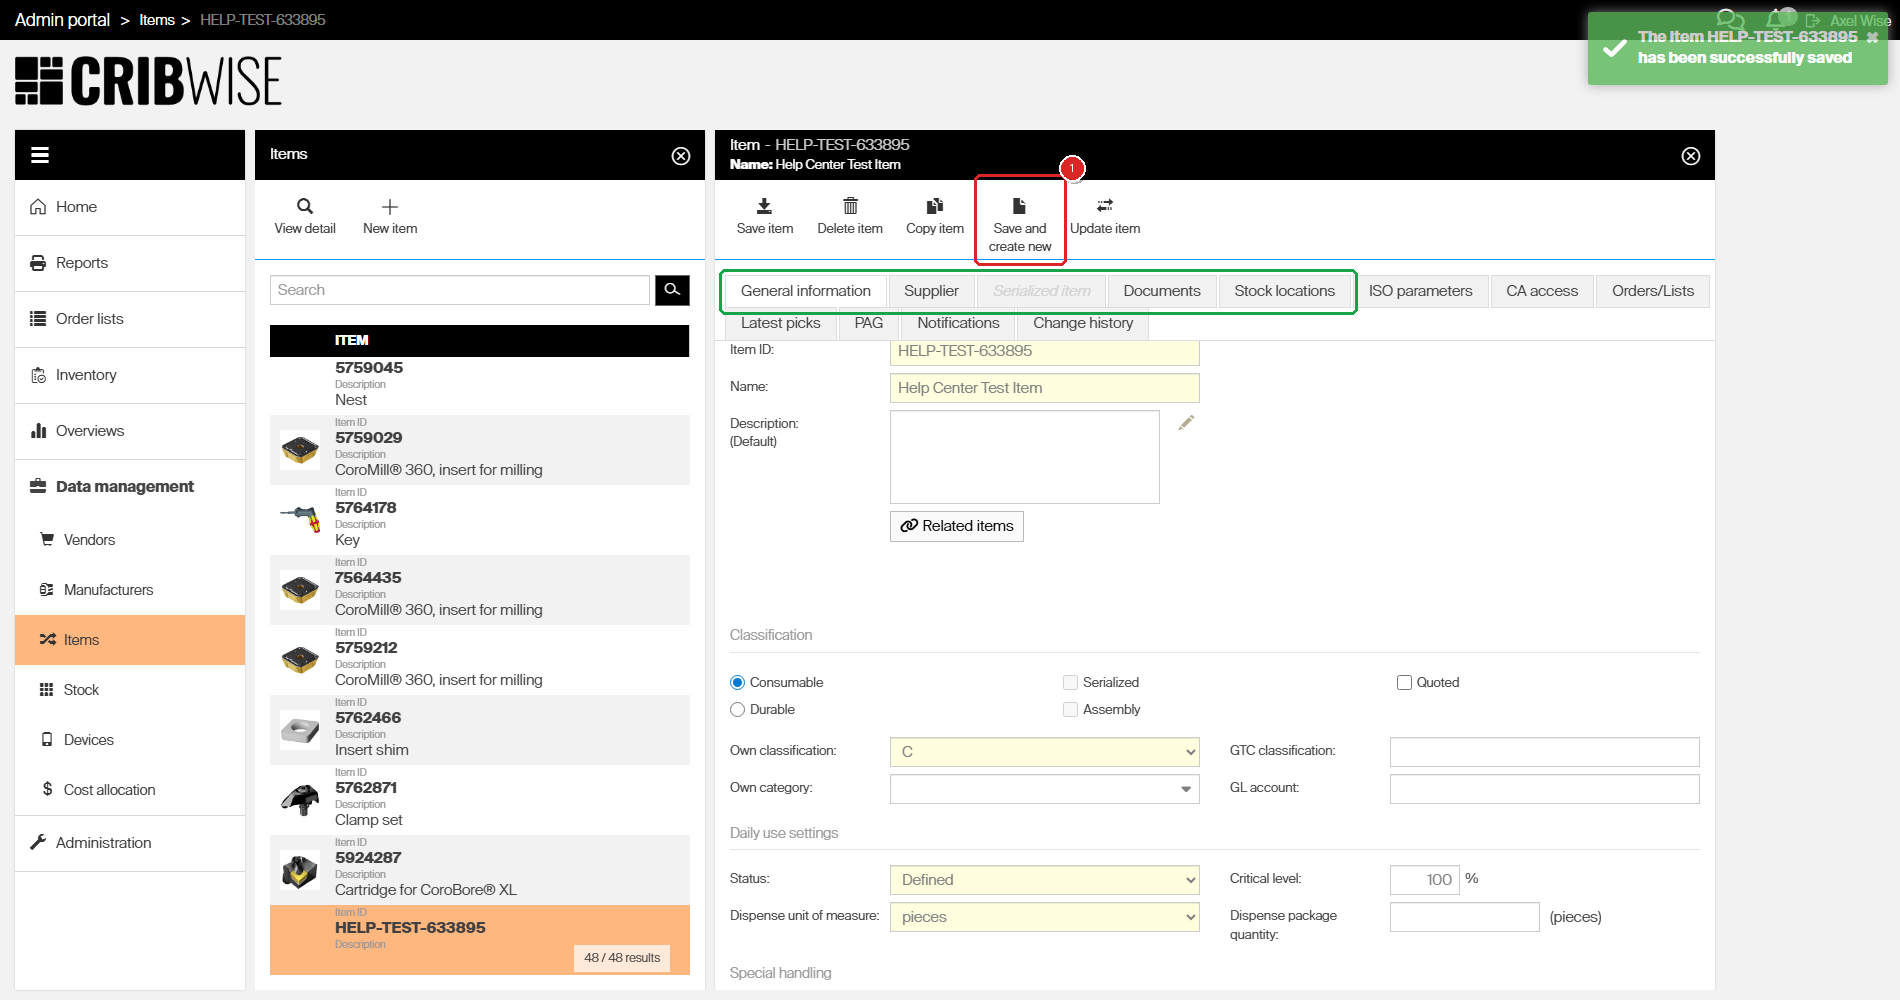
After saving, all tabs are active (green) and the “Save and create new” button (1) is available for batch creation.
Next steps
After creating the item, complete its setup using the other tabs:
| Tab | What to configure | Priority |
|---|---|---|
| Supplier | Standard cost, barcode, package dimensions, and service settings. | High |
| Stock locations | Assign the item to devices and storage locations. Required before the item can be stocked or picked. | High |
| Documents | Attach product datasheets, safety sheets, or technical drawings. | Medium |
| ISO parameters | Technical cutting parameters (ISO standard). | Medium |
| CA access | Control which cost allocations can pick this item. | Medium |
| Notifications | Set up alerts for low stock, picks, or purchase orders. | Low |
Troubleshooting
| Problem | Likely cause | Fix |
|---|---|---|
| Cannot change Consumable to Durable | The item’s status is no longer Defined, so the type is locked | Create a durable copy with Copy item and move the stock over. See How to change an item from consumable to durable. |
| Serialized checkbox is grayed out | Item is set to Consumable | Only Durable items can be serialized. Switch to Durable first. |
| Item does not appear on the vending machine | Status is still Defined, or no stock location assigned | Change status to Released and assign the item to a stock location. |
| Save item button is grayed out | Required fields are empty | Fill in Item ID and Name — both are required. |
| Cannot pick the item on SFI | Item is Defined or Obsolete | Change the status to Phase in or Released. |
Related articles
- How to add an item — Overview of all methods to add items
- How to import items from a catalog — Import from Sandvik, SECO, or Walter catalogs
- Understanding item statuses — Item types, flags, and lifecycle explained
- Manage items — General information — Detailed field documentation
- Assign item to location — Stock location assignment after creating an item
- Restock items — Adding physical stock to a location