
What you can do
Find an item fast on the CRIBWISE Shop Floor Interface: search, scan a barcode, filter by category, sort the list and open the item details before you pick or return.
Typing or scanning the exact item ID or barcode skips the list and takes you straight to the quantity step.
Before you start
- A Shop Floor Interface login that may pick or return. The tools below are the same for every user, but which items you see depends on your access rights and on the device.
- The item is assigned to this device. The pick list shows the items that are assigned to the device you are logged in to. See When the item is not in the list.
- Optional: categories and barcodes. The category filter only has something to show when your administrator has given items an Own category in the Admin Portal. Scanning only finds items that have a barcode.
New to the Shop Floor Interface? Read Getting started with Shop Floor Interface: layout and menus first.
Quick start
Experienced users – find an item in 4 steps:
- Tap Pick on the main menu.
- Type part of the item ID, name, description or barcode in the search box.
- Type or scan the full item ID or barcode to jump straight to the quantity step.
- Tap the item in the list.
Need more detail? Follow the full steps below.
Steps
Step 1 – Open the item list
- Tap Pick on the main menu.
- If your system asks for a cost allocation first, choose it. The item list opens next.
The list shows the items assigned to this device, with the quantity you can take. The items picked most often are at the top. An item with quantity 0 is greyed out and cannot be picked.
Four tools sit above the list:
- Filter categories (1) – show only one item category.
- Sort by (2) – change the order of the list.
- Scan (3) – read a barcode with the device camera.
- Search box (4) – type to narrow the list.
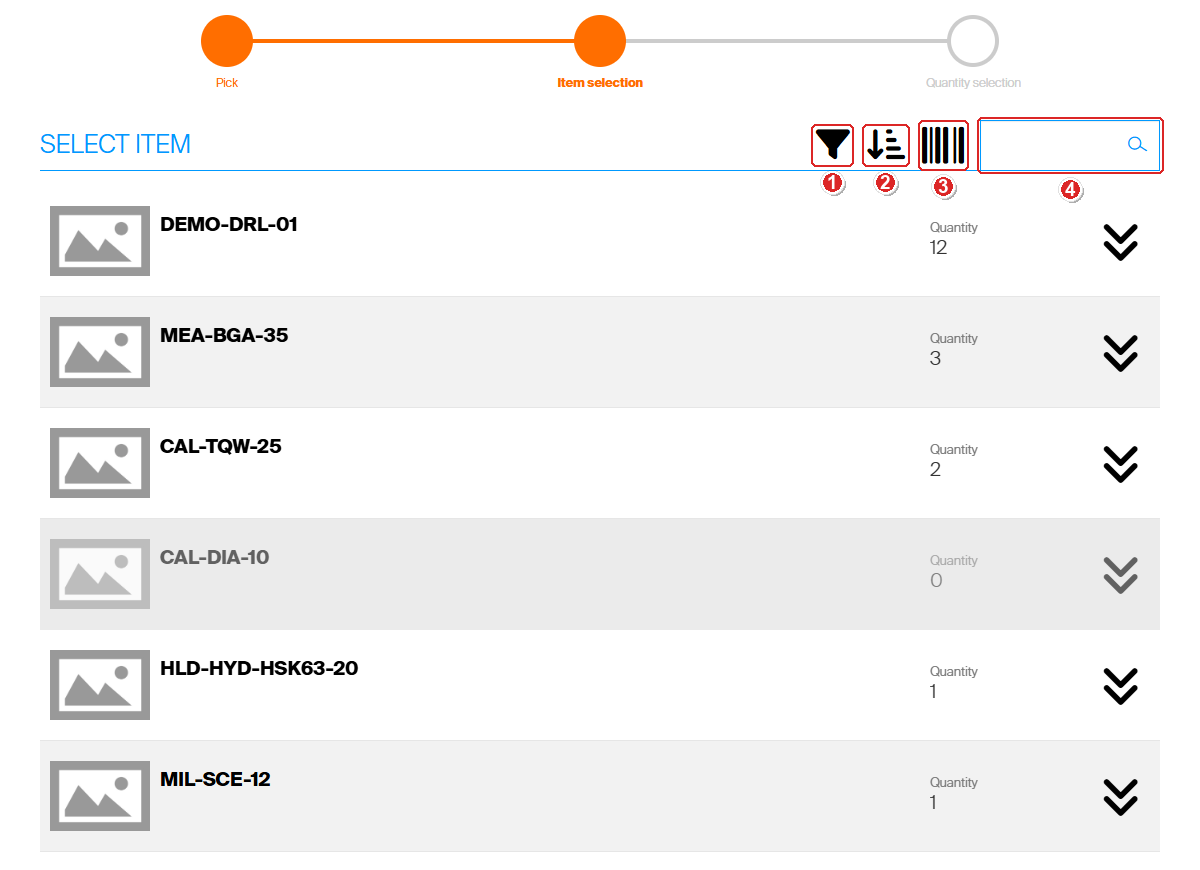
The Select item list on the Pick screen. The greyed row has no stock left in this device.
Step 2 – Search for the item
- Tap the search box (1).
- Type part of what you know about the item.
The list narrows as you type. Upper and lower case do not matter. The search looks in these fields:
- Item ID
- Item name
- Description
- Barcode (part of the code is enough)
- Order code
- Service code
- Own category
The search does not look at the vendor, the serial number or the unit.
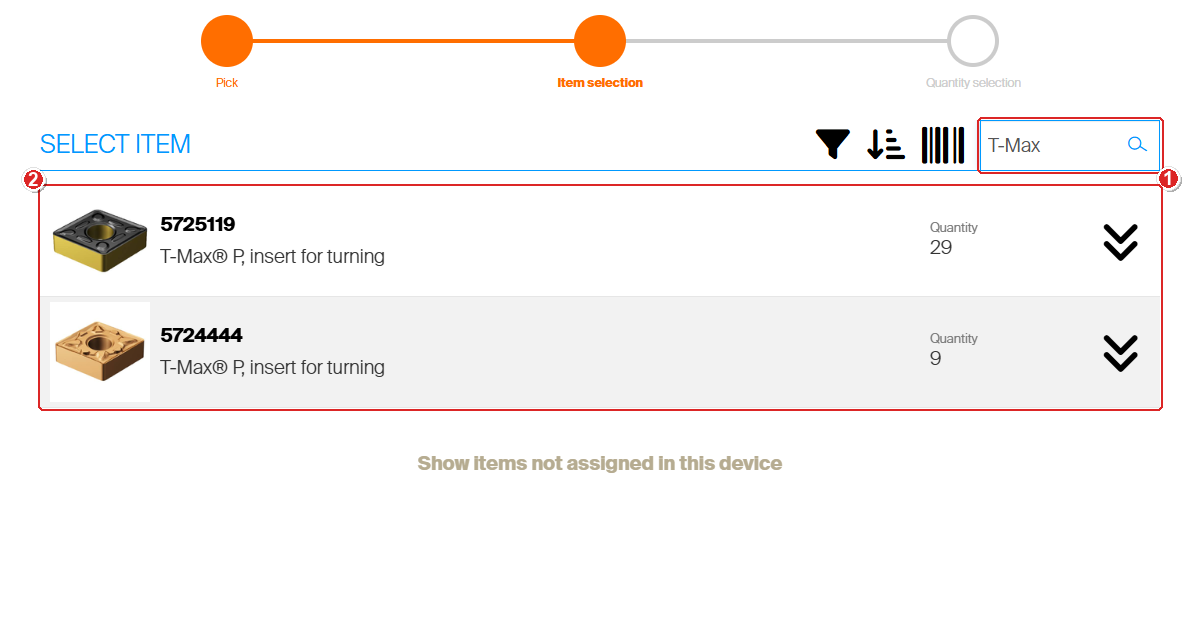
Typing T-Max finds both inserts, because the word is in their description.
Step 3 – Jump straight to the quantity
- Type or scan the full item ID, item name, barcode or order code.
If exactly one item matches the whole text, CRIBWISE selects it for you and opens the quantity step. You do not need to tap the item.
This shortcut only works when:
- the text is complete and spelled exactly, including upper and lower case. DEMO-MIL-01 jumps; demo-mil-01 or DEMO-MIL only narrows the list.
- the item has stock you can take in this device.
Success: the quantity step opens. The item ID shows under Item selection at the top (1), and the screen asks you to Select quantity to pick (2).
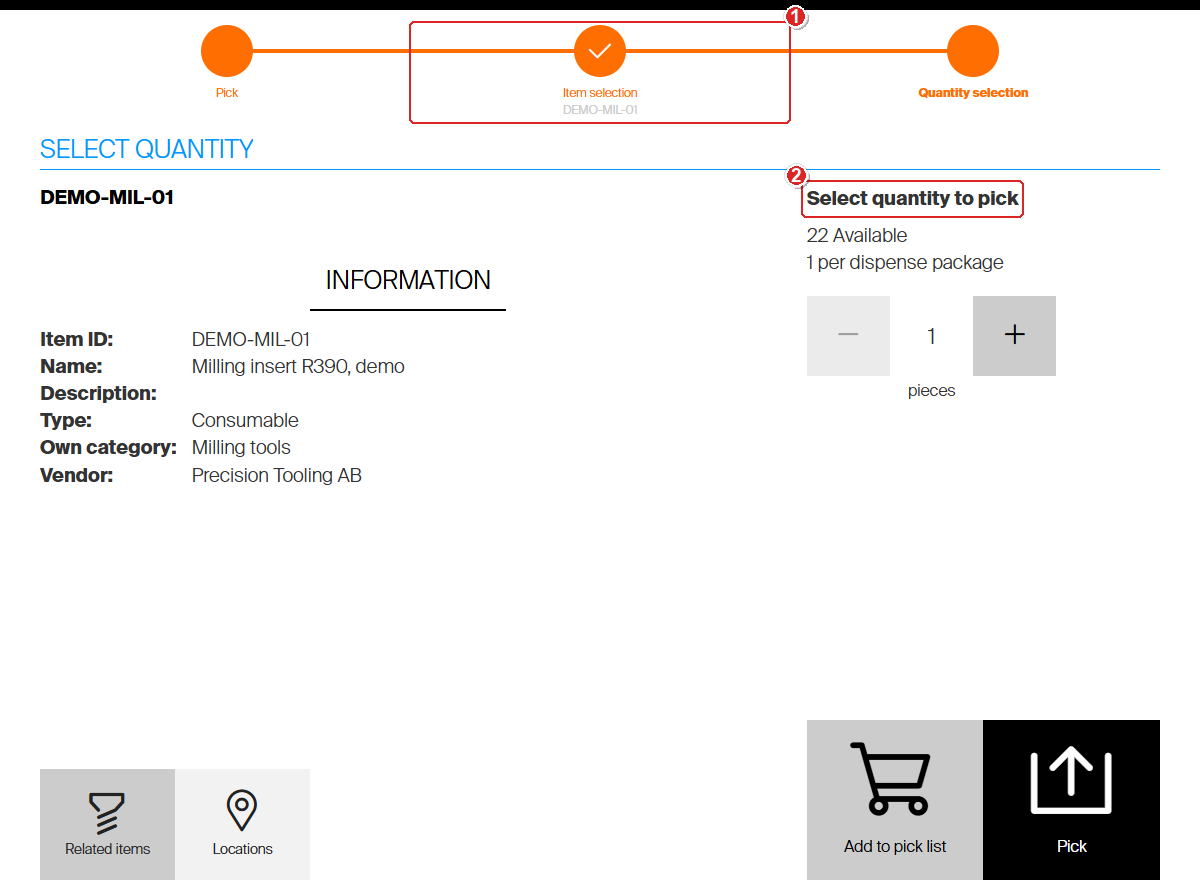
Typing the full item ID skipped the list. Nothing is booked until you tap Pick.
To pick the item, follow How to pick an item from the quantity step.
Step 4 – Scan a barcode (optional)
- Tap Scan (the barcode icon).
- Hold the barcode in front of the device camera.
The Scan barcode: window shows the camera picture. The scanned code is used like text typed in the search box, so a full barcode jumps straight to the quantity step (see Step 3). Tap Cancel (1) to close the window without scanning.
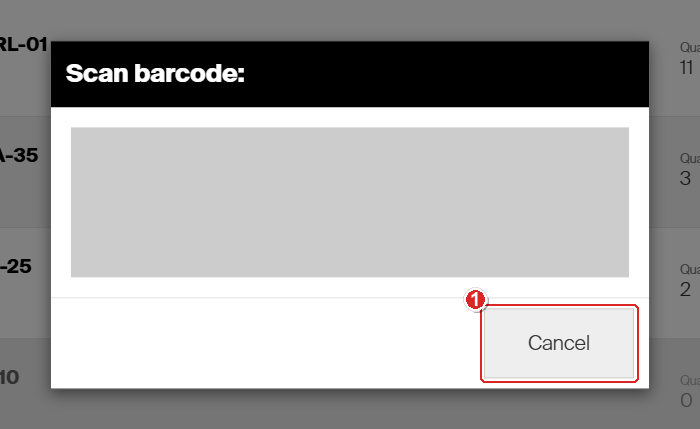
The Scan barcode window. On a device without a camera, the area stays grey and the message Initialization of video device failed! appears.
Step 5 – Filter by category (optional)
- Tap Filter categories. A tile appears for each main category. The number on a tile is how many items in the current list belong to it.
- Tap a category tile, for example Milling.
- If the category has sub-categories, tap one of them (2).
The list shows only the items in that category. The path you chose shows next to Category: (1). Tap All in the path to go back to the full list.
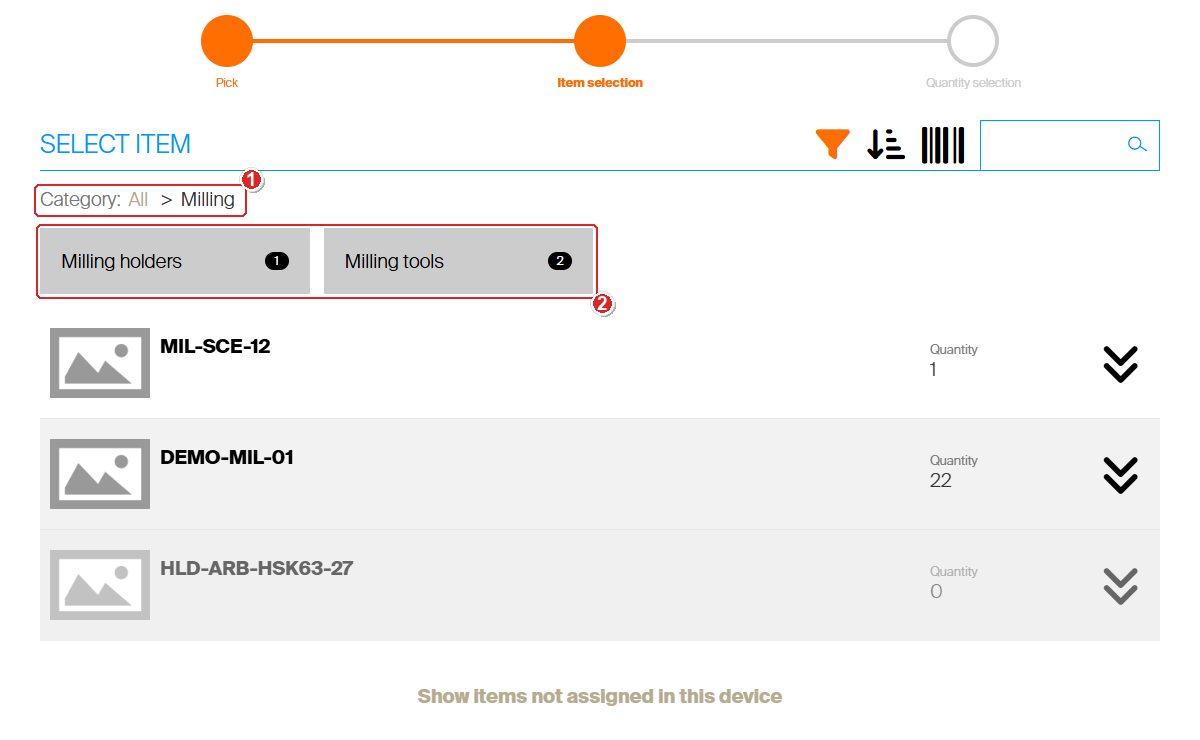
After tapping Milling, its two sub-categories show with their item counts.
The category filter works together with the search box. Type in the search box to narrow the category further.
Step 6 – Sort the list (optional)
- Tap Sort by.
- Tap the field to sort on (1). Tap it once for A to Z, again for Z to A, and a third time to remove the sort.
- Tap Confirm (2).
On the pick list you can sort by Barcode, Frequently picked, Item description, Item ID, Item name, Order code, Quantity or Service code. Scroll the window to see all eight. You can sort by one field at a time.
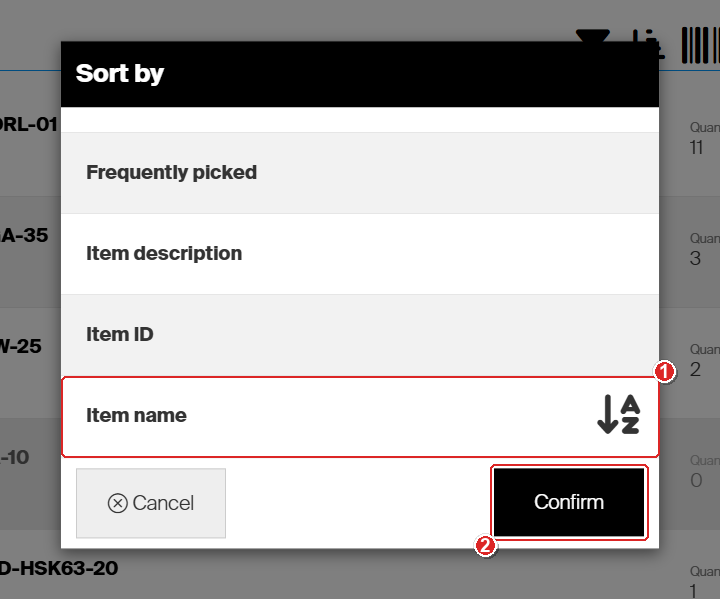
The arrow icon next to the field shows the direction: A–Z or Z–A.
Step 7 – Check the details and select the item
- Tap Show detail (the double arrow) at the end of the row (1).
- Check the details (2).
- Tap Select (3), or tap the row itself.
The details show Item ID, Name, Description, Type, Own category and Vendor, plus the unit and how many pieces come in one dispense package. Related items and Locations open more information about the item. Tap the double arrow again to close the details.
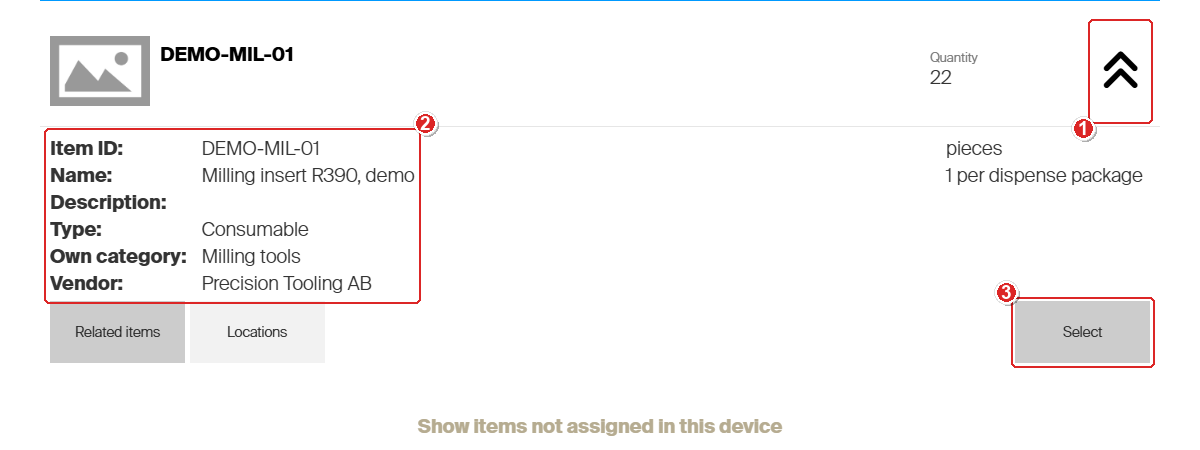
Show detail opens the item information inside the list, without leaving the screen.
When the item is not in the list
The list only shows items that are assigned to this device. Show items not assigned in this device sits below the last row of every list, also when your search finds nothing.
- Tap Show items not assigned in this device.
- Look for the item in the longer list (1).
These extra items have quantity 0 here and are greyed out, so you cannot pick them in this device. Tap a greyed item to open All item locations. Depending on the item, it shows Stock locations (device, location and quantity) and Picked items (who has the item out, when they picked it and how many). Tap Cancel to close it.
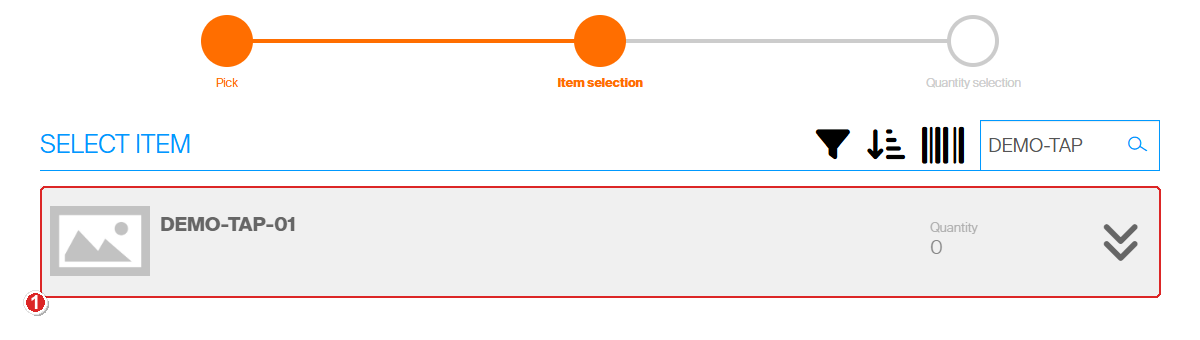
DEMO-TAP-01 is not assigned to this device, so it shows with quantity 0 and cannot be picked here.
Tip: An item that is assigned but has run out also shows greyed with quantity 0. Ask your administrator to restock it, or pick an alternative item if one is set up. See Understanding item relations.
Find a picked item on the Return list
The Return list has the same search box, Sort by and Scan tools. It shows picks, not items, so a few things work differently:
- Newest pick first. Each row shows when the item was picked, and the cost allocation if one was used. Sort by also offers Picked on, Serial number and Physical cost allocation; there is no Frequently picked.
- Search finds more. On top of the pick list fields, the search also matches the serial number and the cost allocation values, for example a machine name.
- No jump. Typing an exact ID only narrows the list. Tap the row to select it.
- Filter cost allocations (1) replaces the category filter. Tap a level, for example Machine, then a value tile (2). Each tile shows how many picks it holds. The No … tile shows the picks without a value on that level.
- Show mine (3) limits the list to the items you picked yourself. The button then changes to Show all, which brings back the picks of other users too.
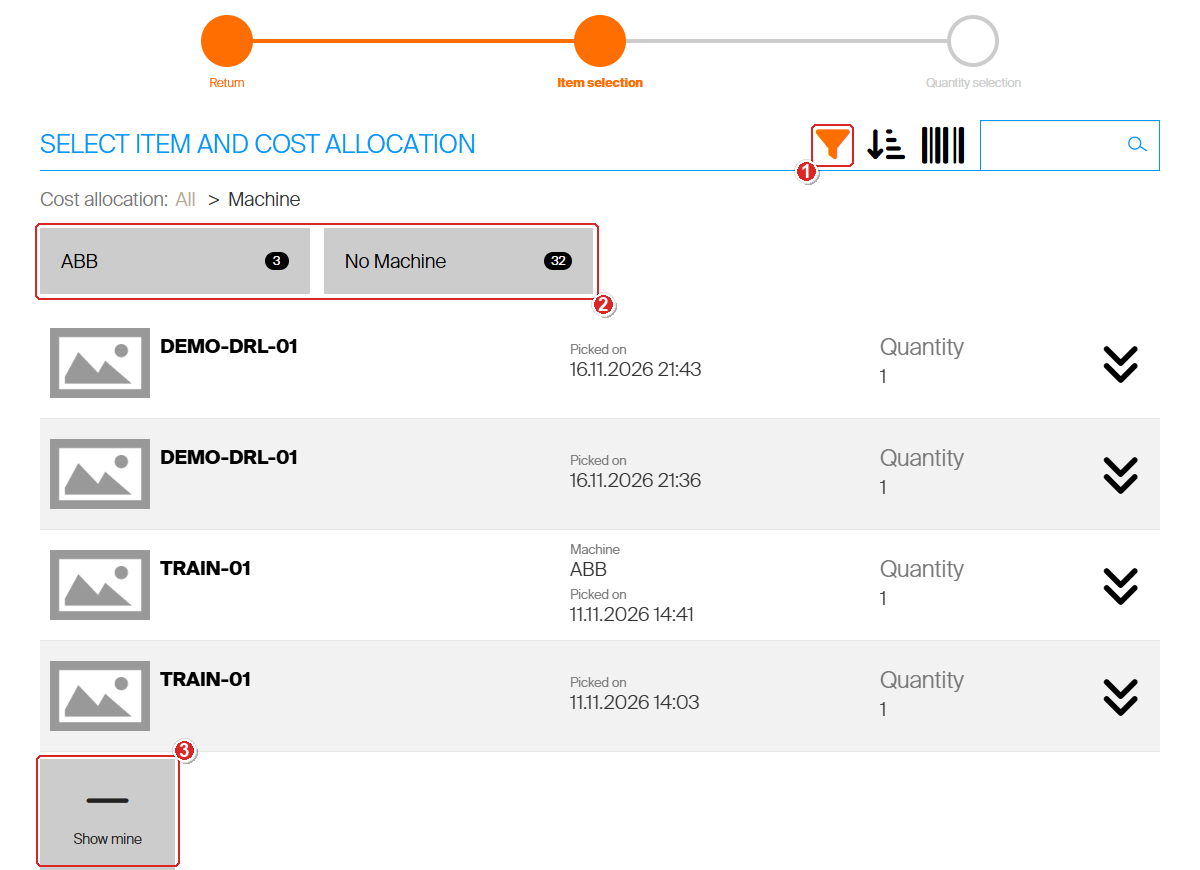
Filtering the Return list by machine. ABB holds three picks.
Show detail on a Return row shows the cost allocation and Picked by. To finish the return, see How to return an item as new.
The same tools on other screens
Users with stock management rights find the search box and Scan on the item lists under Stock management too:
- Assign item, Manage items and Inventory – search box, Scan and Sort by.
- Restock – search box and Scan, without Sort by.
The category filter is only on the Pick list.
Next steps
- Pick the item – set the quantity and tap Pick. See How to pick an item.
- Pick a serialized item – the serial number is chosen after the item. See Serialized items: Picking.
- Make the category filter useful – give your items an Own category with Mass edit.
Troubleshooting
| Problem | Likely cause | Fix |
|---|---|---|
| Typing the full item ID only narrows the list | The text does not match exactly. Upper and lower case count for the jump, and a partial ID is not enough. | Type the ID exactly as on the label, or tap the item in the list. |
| The exact ID still does not jump | The item has quantity 0 in this device. | Tap the greyed row to see All item locations. Ask your administrator to restock it. |
| The search finds nothing | The item is not assigned to this device, or you searched for a field the search does not use, such as the vendor or a serial number. | Tap Show items not assigned in this device, or search by ID, name, description or barcode. |
| Every category tile shows 0 | No item in the list has an Own category yet. | Ask your administrator to set Own category on the items. |
| The Scan window shows Initialization of video device failed! | The device has no camera, or the browser may not use it. | Type the code in the search box instead. |
| Your pick is missing from the Return list | Show mine is on, or a cost allocation filter or search text hides it. | Tap Show all, tap All in the cost allocation path and clear the search box. |
Related articles
- Getting started with Shop Floor Interface: layout and menus – the screens and menus of the Shop Floor Interface.
- How to pick an item – the full pick, from the item to the pick summary.
- Serialized items: Picking – choose the serial number after the item.
- How to return an item as new – return an unused item.
- Understanding item relations – alternative items for an item that has run out.
- Understanding cost allocation – the levels and values you can filter the Return list by.