
What you can do
Change the same field on many items at once with Mass edit in the CRIBWISE Admin Portal. Use it after a catalog import or a vendor change, instead of opening every item.
Mass edit on Data management > Items changes item fields: vendor, status, category, classification, price and more.
To give many items a device assignment instead, see How to assign many items to a device at once (Mass assign).
Before you start
- An Admin Portal login that may edit items. See Admin Portal permissions reference.
- Know which items you want to change. Use the search box or the Advanced filter to narrow the list first, so only the right items are shown.
Quick start
Experienced users – change many items in 5 steps:
- Open Data management > Items and filter the list.
- Select the Selection mode icon and click each item you want to change.
- Select Mass edit.
- Tick each field you want to write and enter its value.
- Save and answer Yes to Do you really want to update selected items?
Need more detail? Follow the full steps below.
Steps
Step 1 – Select the items
- Go to Data management > Items.
- Search or filter the list so it shows the items you want to change.
- Select the Selection mode icon next to the search box (1).
- Click each item you want to change (2). Selected rows turn orange.
Mass edit in the toolbar becomes available (3), and Delete item changes to Delete items.
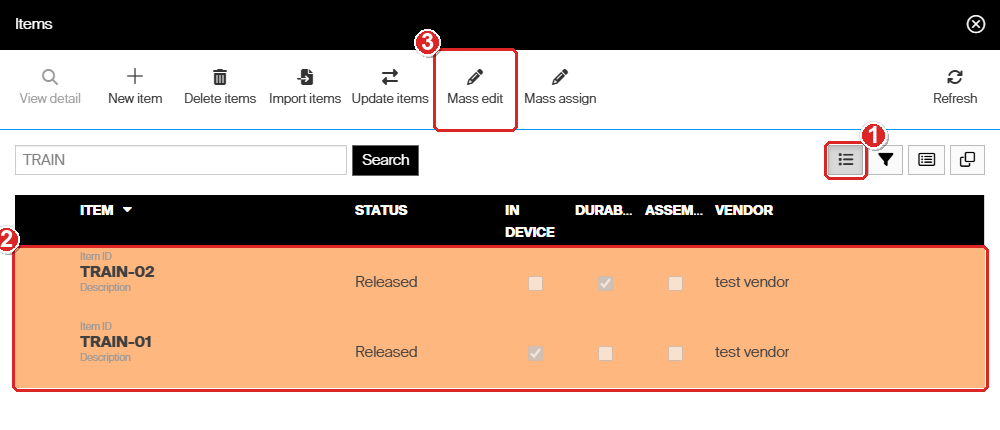
Selection mode lets you pick several rows. Mass edit and Mass assign stay greyed out until items are selected.
Step 2 – Change item fields with Mass edit
- Select Mass edit. The Mass edit panel opens on the right.
- Tick the checkbox in front of each field you want to change, then enter or choose the new value (1). The field becomes editable when its checkbox is ticked.
- Select Mass edit at the top of the panel (2).
Only the ticked fields are written. Every field you leave unticked keeps its own value on each item.
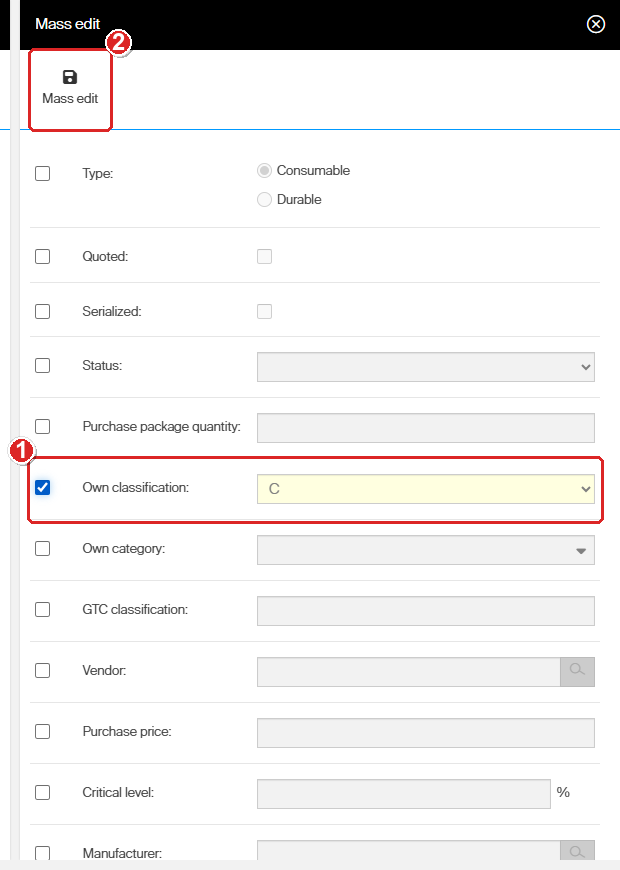
Every field has its own checkbox. Here only Own classification is ticked, so nothing else changes.
These fields can be mass edited:
| Field | What it sets |
|---|---|
| Type | Consumable or Durable. Only works on items in status Defined (see Troubleshooting). |
| Quoted, Serialized | The item flags of the same name. |
| Status | Phase in, Released, Phase out or Obsolete. See Understanding item statuses. |
| Purchase package quantity, Purchase price, Vendor, Manufacturer | The purchasing values from the item’s Supplier tab. |
| Own classification, Own category, GTC classification | How the item is grouped in reports, scripts and the shop floor category filter. |
| Critical level | The critical level in percent of the order point. |
| Service, Usage cost structure and Cost | Service on or off, and the usage cost settings for durables. |
| Prompt user to return picked item during picking, Track lot numbers | The item options of the same name. |
For what each field means, see Item fields and settings reference.
Note: Some changes can not be made if there is something prohibiting it, like an item being released can not be mass edit to change type from Consumable to Durable.
Step 3 – Confirm the change
CRIBWISE asks Do you really want to update selected items?
- Check that the right items are selected in the list behind the dialog.
- Select Yes (1).
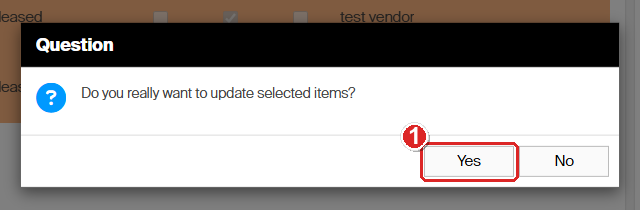
Select No to go back to the panel without changing anything.
Success: a green message says The selected record has been successfully saved! The new values show on every selected item.
Next steps
After a mass change:
- Check the result in the Item overview – see Item overview dashboard reference for what each column means.
- Release imported items – set Status to Released and a Vendor in one Mass edit, so they reach the shop floor.
Troubleshooting
| Problem | Likely cause | Fix |
|---|---|---|
| Mass edit is greyed out | The list is not in Selection mode, or no item is selected. | Select the Selection mode icon, then click the items. |
| The Mass edit button in the panel is greyed out | No field is ticked. | Tick the checkbox in front of at least one field. |
| A field you set did not change | Its checkbox was not ticked, so the value was not sent. | Tick the checkbox next to the field and save again. |
| The message says Following item(s) edit failed: followed by item IDs | Those items could not take the change. The other selected items were saved. A typical cause is changing Type on an item that is no longer in status Defined. | Open the named items and change them one by one. See How to change an item from consumable to durable. |
| You cannot see what a mass edit changed | Mass edit is not written to the items’ Change history. | Keep a note or an export of the old values before you mass edit. |
Related articles
- Item fields and settings reference – what every item field means.
- Item overview dashboard reference – the columns you can edit with Mass edit.
- How to import items from a catalog – bring in many items, then finish them with Mass edit.
- Understanding item statuses – what each status allows.
- How to assign many items to a device at once (Mass assign) – give many items a device assignment at once.