
What you can do
Assign a batch of items to a device in one go with Mass assign in the CRIBWISE Admin Portal. Use it after a catalog import or a new cabinet, instead of opening every item.
Mass assign creates or updates the device assignment of the selected items: the Max quantity, Order point and Min quantity that purchasing and the reorder scripts work with. It does not give the items a stock location in the device.
Before you start
- An Admin Portal login that may edit items. See Admin Portal permissions reference.
- Know which items you want to change. Use the search box or the Advanced filter to narrow the list first, so only the right items are shown.
- For Mass assign: the device must already exist under Data management > Devices. See How to create and manage devices.
Quick start
Experienced users – change many items in 5 steps:
- Open Data management > Items and filter the list.
- Select the Selection mode icon and click each item you want to change.
- Select Mass assign.
- Choose the device and enter the quantities.
- Save and answer Yes to Do you really want to update selected items?
Need more detail? Follow the full steps below.
Steps
Step 1 – Select the items
- Go to Data management > Items.
- Search or filter the list so it shows the items you want to change.
- Select the Selection mode icon next to the search box (1).
- Click each item you want to change (2). Selected rows turn orange.
Mass assign in the toolbar becomes available (3), and Delete item changes to Delete items.
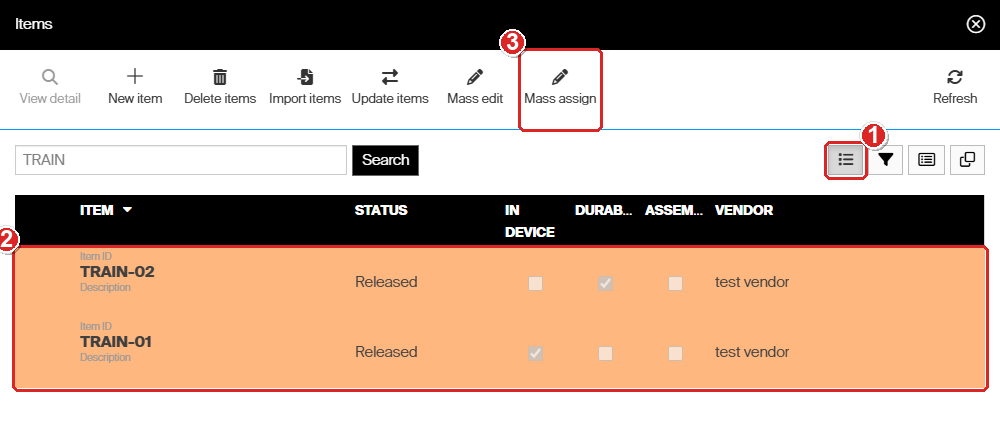
Selection mode lets you pick several rows. Mass edit and Mass assign stay greyed out until items are selected.
Step 2 – Choose the device
- Select Mass assign. The Devices panel opens.
- Click the device (1).
- Select OK (2).
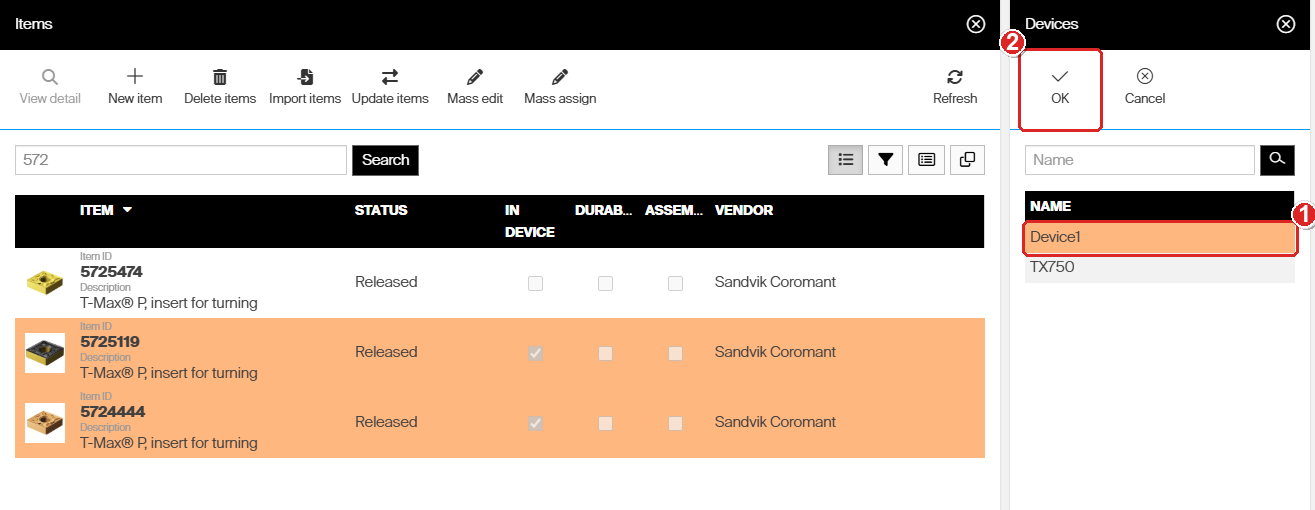
Use the Name box to find a device when you have many.
Step 3 – Enter the quantities and save
The Assignment settings panel shows the device name at the top.
- Enter Max quantity and Order point (1). The yellow fields are required.
- If at least one selected item is durable, also enter Min quantity. The field is hidden when all selected items are consumables.
- Tick Consignment if the items are consignment stock, and add Service add on information if you use it.
- Select Save assignment (2).
- Select Yes in the Do you really want to update selected items? dialog.
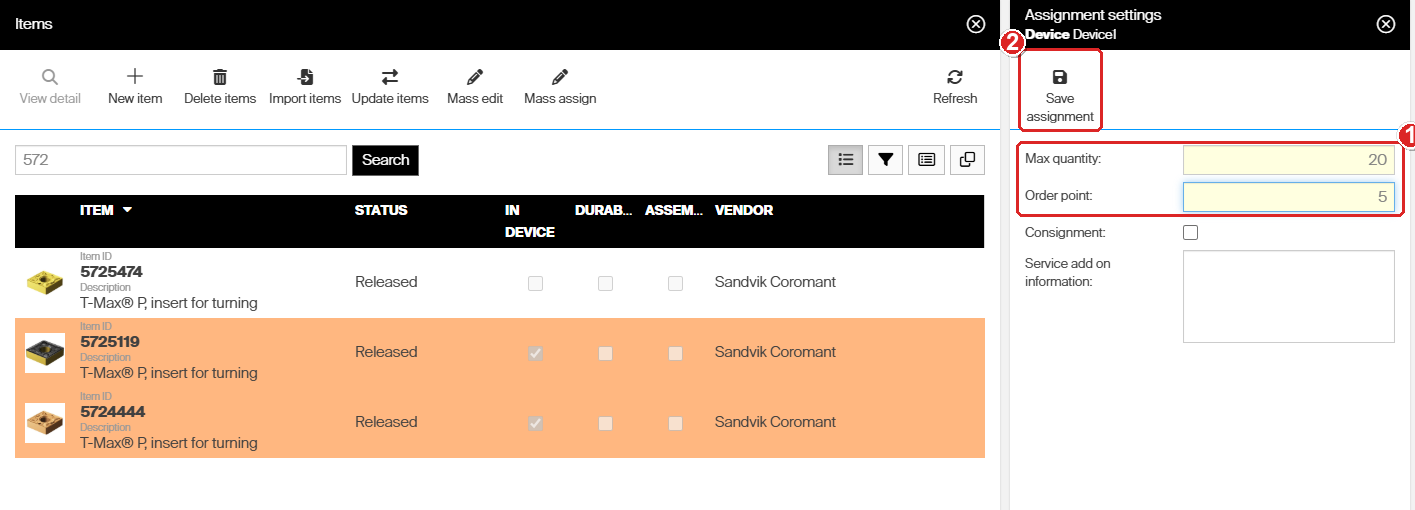
The same values are written to every selected item on this device.
Important: If an item is already assigned to that device, Mass assign replaces its Max quantity, Order point and Min quantity with the new values. To change only one value on existing assignments, use Mass edit on the Item overview instead. See How to edit many items at once (Mass edit).
Next, give each item a stock location in the device, so operators can pick it. Use Assign item on the Shop Floor Interface (see How to assign an item to a location (Shop Floor Interface)) or the item’s Stock locations tab.
Next steps
After a mass change:
- Check the result in the Item overview – see Item overview dashboard reference for what each column means.
- Give newly assigned items a location – see How to assign an item to a location (Shop Floor Interface).
Troubleshooting
| Problem | Likely cause | Fix |
|---|---|---|
| Mass assign is greyed out | The list is not in Selection mode, or no item is selected. | Select the Selection mode icon, then click the items. |
| Items were mass assigned but operators cannot pick them | Mass assign creates the device assignment only, not a stock location. | Assign each item to a location in the device. |
| Existing Max quantity or Order point values were overwritten | Mass assign replaces the assignment values of items that were already on the device. | Correct them with Mass edit on the Item overview. Next time, select only the items that are new to the device. |
| A wrong device assignment cannot be removed | Device assignments can only be deleted while the device is locked. | Lock the device under Data management > Devices, delete the assignment on the item’s Stock locations tab, then unlock the device. See How to create and manage devices. |
Related articles
- Item overview dashboard reference – the columns you can edit with Mass edit.
- How to import items from a catalog – bring in many items, then finish them with Mass edit.
- Understanding stock structure: stocks, devices, and locations – device assignment versus location assignment.
- How to edit item assignments (Shop Floor Interface) – change one item’s assignment at the device.
- How to create and manage devices – create the device, and lock it to remove an assignment.
- How to edit many items at once (Mass edit) – change item fields, or existing assignments in the Item overview.