
Unlock the full potential of your manufacturing operations with our seamless integration solution for CRIBWISE and WinTool TMS. This powerful addon is designed to bridge the gap between your tool management and tool library system, allowing for effortless synchronization of tool data and stock levels. Experience the convenience of having real-time inventory updates within WinTool, and streamline your shop floor efficiency with ease. Dive into the details on this page and discover how to configure this integration, transforming the way your tools and resources are managed. Elevate your production with the smart synchronization that our integration offers, ensuring that your operations are always running smoothly and efficiently.
Pre-requisites
Before you can proceed with configuring the integration between CRIBWISE and WinTool TMS you need to complete the below mandatory steps.
CRIBWISE
- CRIBWISE Professional Cloud offering (not available for on-premise installations yet)
- The “WINTOOL Tool Management System” addon enabled on your CRIBWISE subscription.
- User with access to CRIBWISE Admin Portal and that has role “Administrator”.
WinTool TMS
- Tool Dispenser interface v1.18 or newer enabled on your WinTool installation
- User in WinTool that has access to manage cost centers
- User that has access to the “WT-ToolDispenser-Interface.ini” interface configuration file
Configure cost centers in WinTool
CRIBWISE uses a simplified cost center structure in WinTool to be able to show the correct stock levels in your installed devices. You can decide to show stock levels per device (if you have many) or consolidate levels and show them as if it was a single device. If you want to display stock levels per device in WinTool certain steps below needs to be repeated per device. Important to note is that the stock transactions generated by CRIBWISE does not conflict with any existing purchasing or inventory tracking transactions in WinTool. Below is a list of cost centers that you need to create:
- Device cost center (create one per device)
- Quantity in use
- Quantity ordered
To create a new cost center follow these steps (in the table below we have listed the settings needed when creating each user transaction):
- Open the WinTool application.
- Go to “Settings” under “Logistics” in the left pane.
- Select “Cost centers” in the menu pane that opens.
- Add a new cost center to the list, enter name in “Description“
- Select option according to below table in “Type” drop-down menu.
- Make a note of the technical id assigned to the new cost center (shown in the bottom right corner of the “Edit cost centers” dialogue. In the example screenshot below the generated id was “32”.
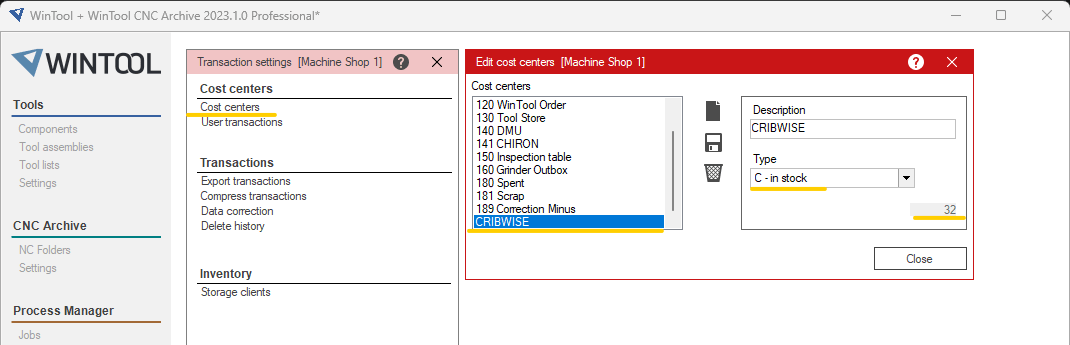
| Description | Type |
| Device Name e.g. Milling Room | C – in stock |
| In Use | D – in use |
| Ordered | D – in use |
Configure user transactions
For CRIBWISE to be able to generate transactions between the cost centers you created “user transactions” needs to be added to describe the possible source and target combination. Below is a list of the user transactions that needs to be created. Please note that if you plan to show stock levels for multiple devices the following steps needs to be repeated for each device (cost center). At the moment we are not able to show ordered/in-use quantities per device, only the sum for all devices.
- Decrease ordered
- Increase ordered
- Pick durable
- Return picked durable
To create a new user transaction follow these steps (in the table below we have listed the settings needed when creating each user transaction):
- Open the WinTool application.
- Go to “Settings” under “Logistics” in the left pane.
- Click on “User transactions” to open the “Transaction configuration” menu.
- Click on the “New” icon in the middle of the menu to add a new entry.
- Input the name in the “Description” field.
- Select “Action” in the drop down menu.
- Select cost center in the “Transfer from” drop down menu.
- Select cost center in the “Transfer to” drop down menu
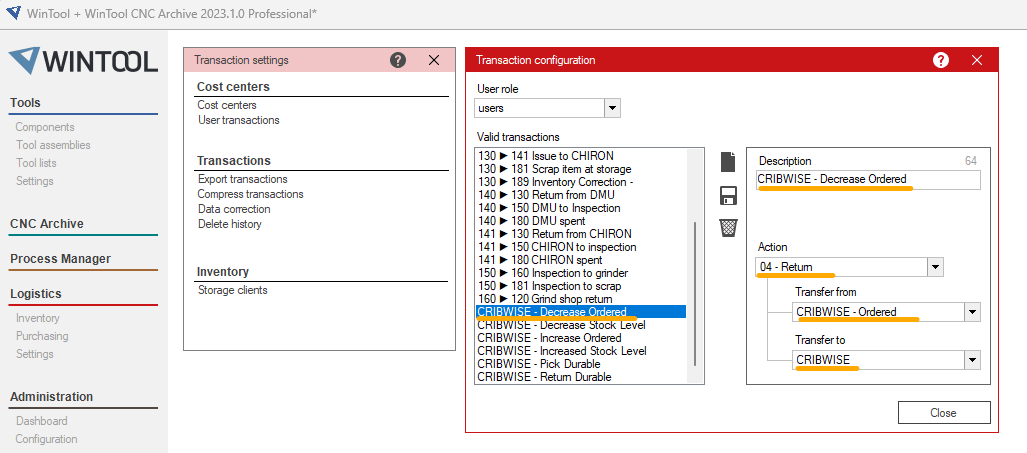
| Name | Action | Transfer from (cc) | Transfer to (cc) |
| Increase ordered | 04 – Return | CRIBWISE – Ordered | CRIBWISE |
| Decrease ordered | 03 – Issue | CRIBWISE | CRIBWISE – Ordered |
| Pick durable | 03 – Issue | CRIBWISE | CRIBWISE – In use |
| Return picked durable | 04 – Return | CRIBWISE – In use | CRIBWISE |
If you used different names during creation (then in our examples) of the cost centers the above table will have to be adjusted to you own settings for cost center name.
Update WT-ToolDispenser-Interface.ini
Before the interface can be turned on it needs to be configured with the details of the cost centers to use. This is done by editing the “WT-ToolDispenser-Interface.ini” file that is located with the executable for the interface. Most of the parameters in the file can be configured to match your requirements but a few needs to match what CRIBWISE will use in terms of file format and cost center identifiers.
- MachineCostCenterColumnNr: This needs to be set to “10” to match the format of the stock transaction CSV file produced by CRIBWISE.
- ArchiveFlag: We recommend that you set this to “TRUE“. This will keep a local copy of any imported stock transaction file and make it easier to troubleshoot if you experience issues with the interface.
- ExportFlag: Set to “TRUE” to enable export of tool data
- StockAmountSync: Needs to be set to “Actions” to match the way quantity adjustment is calculated by CRIBWISE
Below is an excerpt of the configuration file that matches the cost centers created in this guide. Comments and unused properties have been removed for brevity.
[GLOBAL]
ToolDispenserName=CW
ExportFile=C:\WinTool\Export\WT-ToolDispenser-Components-Master-Data.csv
CostCenterFile=C:\WinTool\Export\WT-ToolDispenser-CostCenter-Master-Data.csv
BMPExportPath=C:\WinTool\Export\Images\
ImportFile=C:\WinTool\Import\
Archivepath=C:\WinTool\Archive
ARCHIVEFLAG=TRUE ExportFlag=TRUE
ExportModus=ALL
DirectRestock=TRUE
DirectRestockRemark="Direct restock on dispenser"
MachineCostCenterColumnNr = 10
ImportOrderMin=FALSE
LOGFLAG=TRUE
StockAmountSync=Actions [BitMap]
bmpwidth=600
bmpheight=450
pictype=png [COSTCENTER]
Stock.Device12047=32
INUSE=37
ORDERED=39
Cost center mapping
If you have multiple CRIBWISE devices that stock items imported from WinTool you need to add mapping for all in the configuration file. To do this you will need access to the unique device id in CRIBWISE (which can be found in Admin Portal) and also the technical identifier for the cost center created in WinTool for this device. In this section we also need to provide a mapping for the cost center used to shown item quantities in use and quantities ordered.
Mapping INUSE and ORDERED cost center
To complete this you need to have know the technical ids WinTool assigned when you created the cost center for quantities ordered and that are in use. In the above guide those id’s where 37 for in use and 39 for ordered. As you can see below we need to add two new lines under the COSTCENTER section. The first needs to be “INUSE” (upper case) followed by equal and the technical id (37 in this example). Repeat the same for “ORDERED”.
[COSTCENTER]
INUSE=37 ORDERED=39
Mapping multiple device to one cost center
Here each CRIBWISE device id will be added to a separate row in the configuration file and then mapped to a single cost center, 32 in this example.
[COSTCENTER] Stock.Device12047=32 Stock.Device14054=32 INUSE=37 ORDERED=39
Mapping multiple device to separate cost centers
Here each CRIBWISE device id will be added to a separate row in the configuration file and then mapped to a separate cost center per device, 32 and 33 in this example.
[COSTCENTER] Stock.Device12047=32 Stock.Device14054=33 INUSE=37 ORDERED=39
Configuration in Admin Portal
Before you can enable the integration CRIBWISE needs to have information on how your WinTool installation is configured. Once the integration addon for WinTool is enabled on your subscription you will find all the needed settings under “Administation”, “Integration” and then click on the WinTool logo. Below is a description of each parameter and where you can find the values.
- Tool Dispenser Name: Input the same value that you added in your “WT-ToolDispenser-Interface.ini” file. You can find it under property “ToolDispenserName”.
- Export folder name: Enter the name of the folder where all component master data files from WinTool will be uploaded in your configured synchronization target. CRIBWISE will look for new files in this “folder”.
- Import folder name: Enter the name of the folder where CRIBWISE will upload stock transaction files that you will relay to WinTool.
- Image folder name: Enter the name of the folder where the images references in the component master data files are stored. CRIBWISE will only try to download images from this “folder”.
- WTxL-Mode enabled: Choose if you have enabled WTxL mode in the WinTool interface or not.
- CRIBWISE device name field: If you are planning on assigning components in WinTool to a CRIBWISE device within the WinTool UI you need to specify which UserField will be used for this.
- WinTool ID field: When a new item is created in CRIBWISE using component data from WinTool a reference is stored in one of the custom field in the item. Here you can select which field to use. Please note that you will not be able to use this field for other purposes as data will be overwritten.

Configuring a synchronization target
For CRIBWISE to be able to send and receive data to/from your WinTool installation we need to configure a intermediary storage that can be used for that purpose. This offers a secure way for CRIBWISE to upload new files containing the quantity on hand adjustments later read by WinTool and also for CRIBWISE to download new component master data produced by WinTool. This setup allows the customer to be in full control of managing the files from the synchronization target to the needed directories used by WinTool and vice versa. CRIBWISE stores all sensitive configuration values, like account keys and password, using FIPS 140-2 Level 3 certified HSMs (Hardware Security Modules).
Azure Storage Account (account key)
This allows for connecting to a Azure Storage Account using a provided account key as authentication. CRIBWISE will use a designated container to upload and download the BLOBs. You will need access to configuration of the Storage Account in the Azure Portal to look-up the needed parameters for this configuration. Below is a list of the parameters you need to complete the setup and where to find the values:
- Storage Account Name: Goto “Endpoints” menu option and look for the BLOB service URL. If the URL is e.g. https://mystorageaccount.blob.core.windows.net/ you would input “mystorageaccount” in the configuration field.
- Container Name: Goto “Storage browser” and then “Blob containers” and select and create a new container. Input the name of the created container in this configuration field.
- Account Key: Goto “Access keys” menu option and copy the value under either key1 or key2 and paste it in this configuration field.
Google Cloud Storage Bucket (service account)
This allows for connecting to a Storage Bucket in Google Cloud using a provided service account as authentication. CRIBWISE will use a designated bucket to upload and download the files. You will need access to configuration of the Bucket in the Google Cloud Platform Console to look-up the needed parameters for this configuration and also some of the details for the service account to use for authentication. Below is a list of the parameters you need to complete the setup and where to find the values:
- Bucket Name: Find Cloud Storage option in the navigation menu and select “Buckets”. Copy the name of an existing bucket or create a new for this specific purpose (recommended). The service account used for authentication needs to be assigned role “Storage Object User” on the bucket.
- Private Key Id: Copy the value from the ‘private_key_id’ field in the JSON file that you downloaded from the Google Cloud Console when generating the key for the service account.
- Private Key: Copy the value from the ‘private_key’ field in the JSON. Including the ‘—–BEGIN PRIVATE and END PRIVATE—– parts’.
- Client Email: Copy the value from the ‘client_email’ field in the JSON file.
- Client Id: Copy the value from the ‘client_id’ field in the JSON file.