
What you can do
Build a pick list in the Admin Portal – name the job, list its items, set the quantities – so operators pick the right tools for that job on the Shop Floor Interface. One list at a time, no spreadsheet and no integration needed.
Before you start
- Administrator or Manager access to the Admin Portal. If you can’t see the pick list menu, make sure the setting is enabled for that usergroup under the AP privileges.
- Pick lists switched on. Enable Enable predefined pick lists in System settings > Stock daily use. Until it is on, pick lists do not appear on the Shop Floor Interface.
- The items already in CRIBWISE. You add items to the list by picking them from the list of available item, so every item must exist first.
- A decision on quantities. Three checkboxes decide whether operators can change quantities and whether the list survives being fully picked. See Choosing the quantity settings below.
Note: The Admin Portal form builds one list at a time. To create many lists at once, use the export/import function or the pick list REST API.
Quick start
Experienced users – create a pick list in 5 steps:
- Go to Data management > Pick lists.
- Click New pick list.
- Enter an ID and a Name, then tick the quantity settings the job needs.
- Click Save pick list.
- Open the Items tab and add each item with its quantity to pick.
Need more detail? Follow the full steps below.
Steps
Step 1 – Open the pick list overview
- In the left menu, click Data management.
- Click Pick lists.
The overview lists every pick list in the system with its status and active till date.
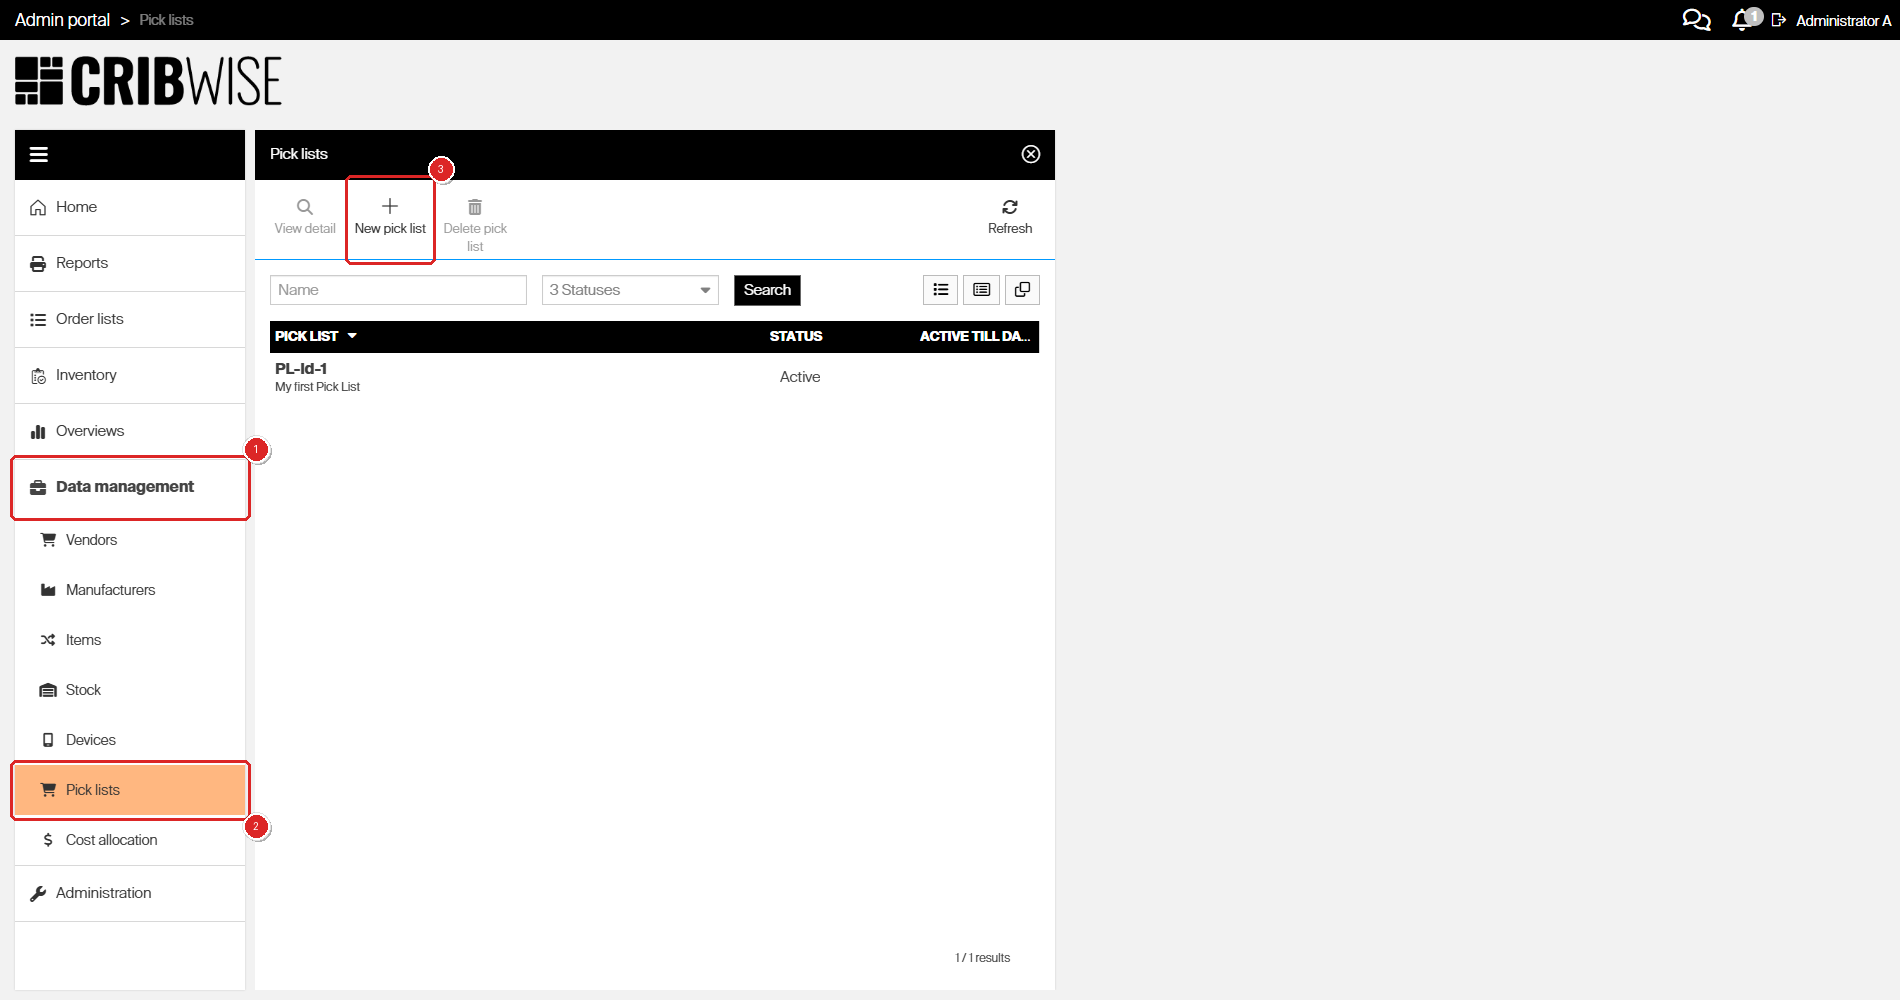
The pick list overview: (1) Data management, (2) Pick lists, (3) New pick list.
Step 2 – Name the list
Click New pick list. The Pick list panel opens on the General information tab.
- In ID, enter a unique identifier for the list, such as a work order number.
- In Name, enter the name operators will see on the shop floor, such as Engine block 123.
| Field | Required | What to enter |
|---|---|---|
| ID | Yes | A unique ID for the list. Use the identifier the job already has in your planning system so the two line up. |
| Name | Yes | The name shown on the Shop Floor Interface. Make it something an operator recognises at the cabinet. |
| Target date | No | An informational date shown to the operator. It does not close the list. |
| Active till date | No | The date the list stops being offered. Leave it empty for no expiry. |
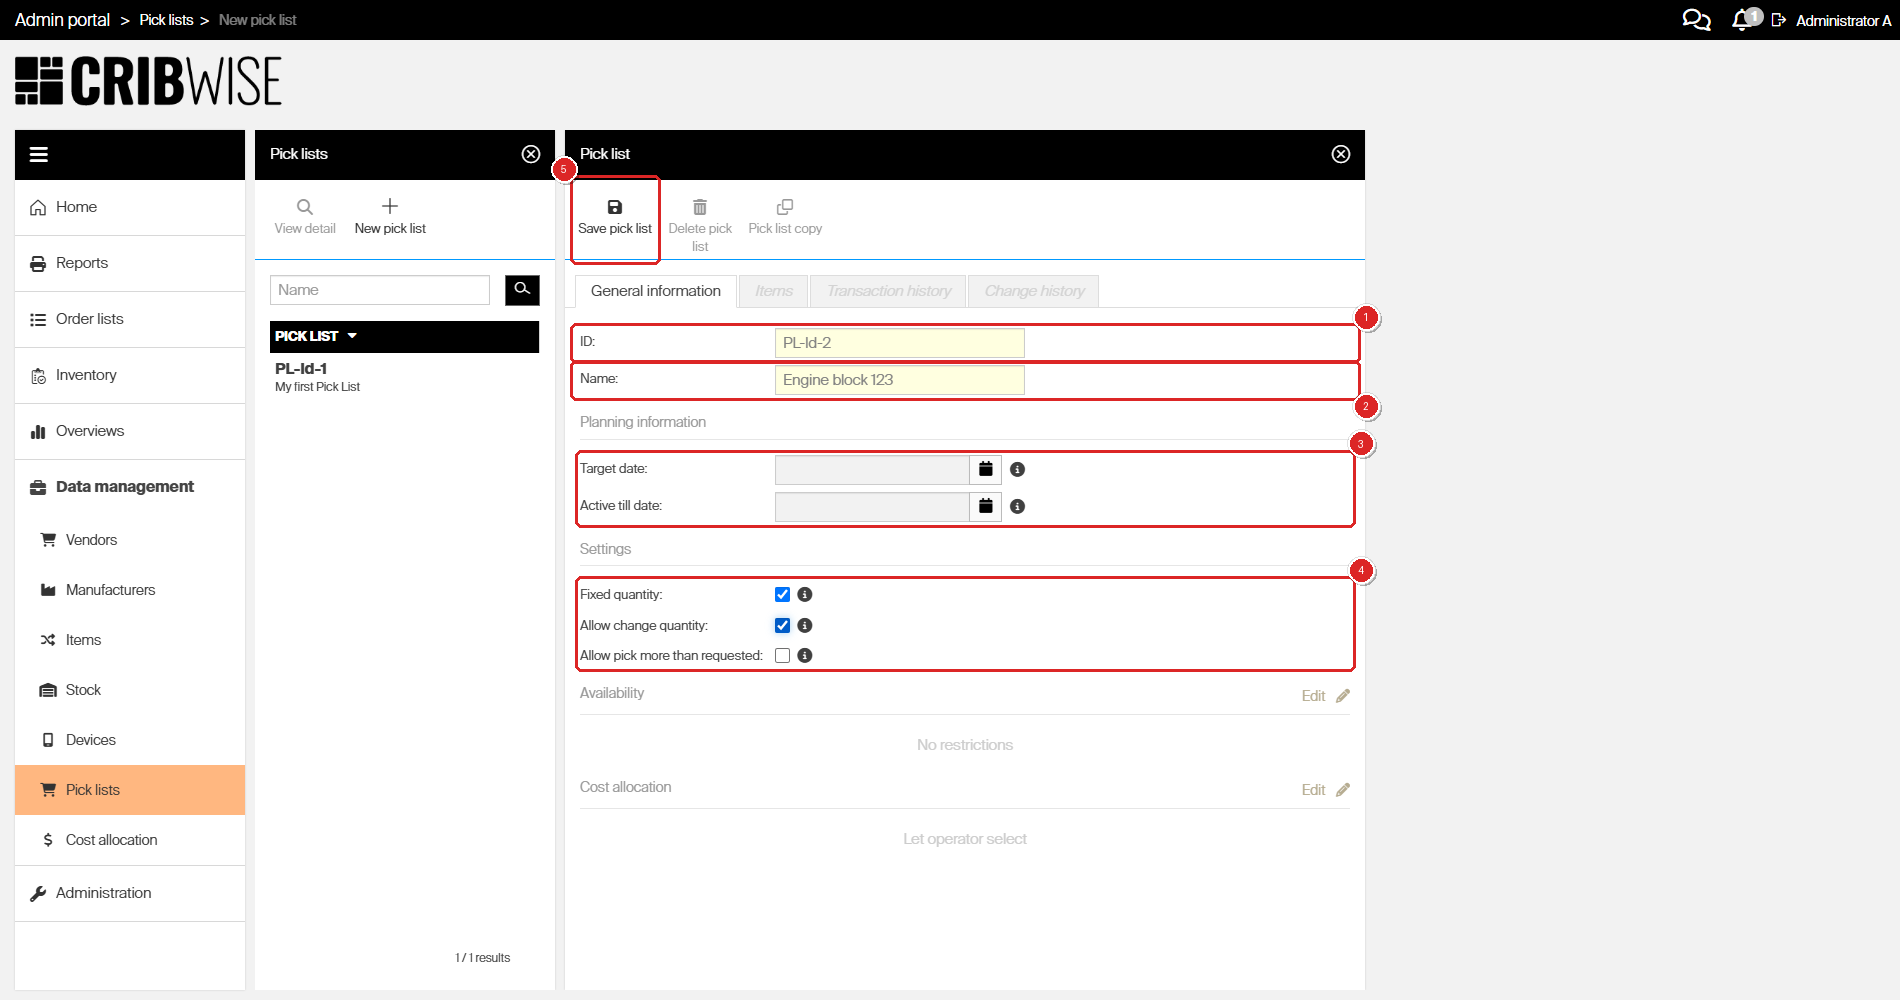
The General information tab: (1) ID, (2) Name, (3) the optional planning dates, (4) the quantity settings, (5) Save pick list. The two yellow fields are the required ones.
Step 3 – Set the quantity behaviour
Under Settings, tick the boxes that match how the job should be picked.
| Setting | What it does |
|---|---|
| Fixed quantity | Keeps the list available after everything on it has been picked, so it can be used again. Clear it and the list closes once it is fully picked. |
| Allow change quantity | Lets the operator adjust the quantity while picking. Clear it and the quantities are locked. |
| Allow pick more than requested | Lets the operator exceed the listed quantity. It only takes effect when Allow change quantity is also ticked. |
Important: Fixed quantity does not lock the quantity. It controls whether the list survives being fully picked. The setting that stops an operator changing a quantity is Allow change quantity.
Step 4 – Limit who sees the list (optional)
By default the list is offered to every user on every device – the Availability section reads No restrictions. To narrow it down:
- Next to Availability, click Edit.
- Select a Device, a User, or a User group.
- Click Apply.
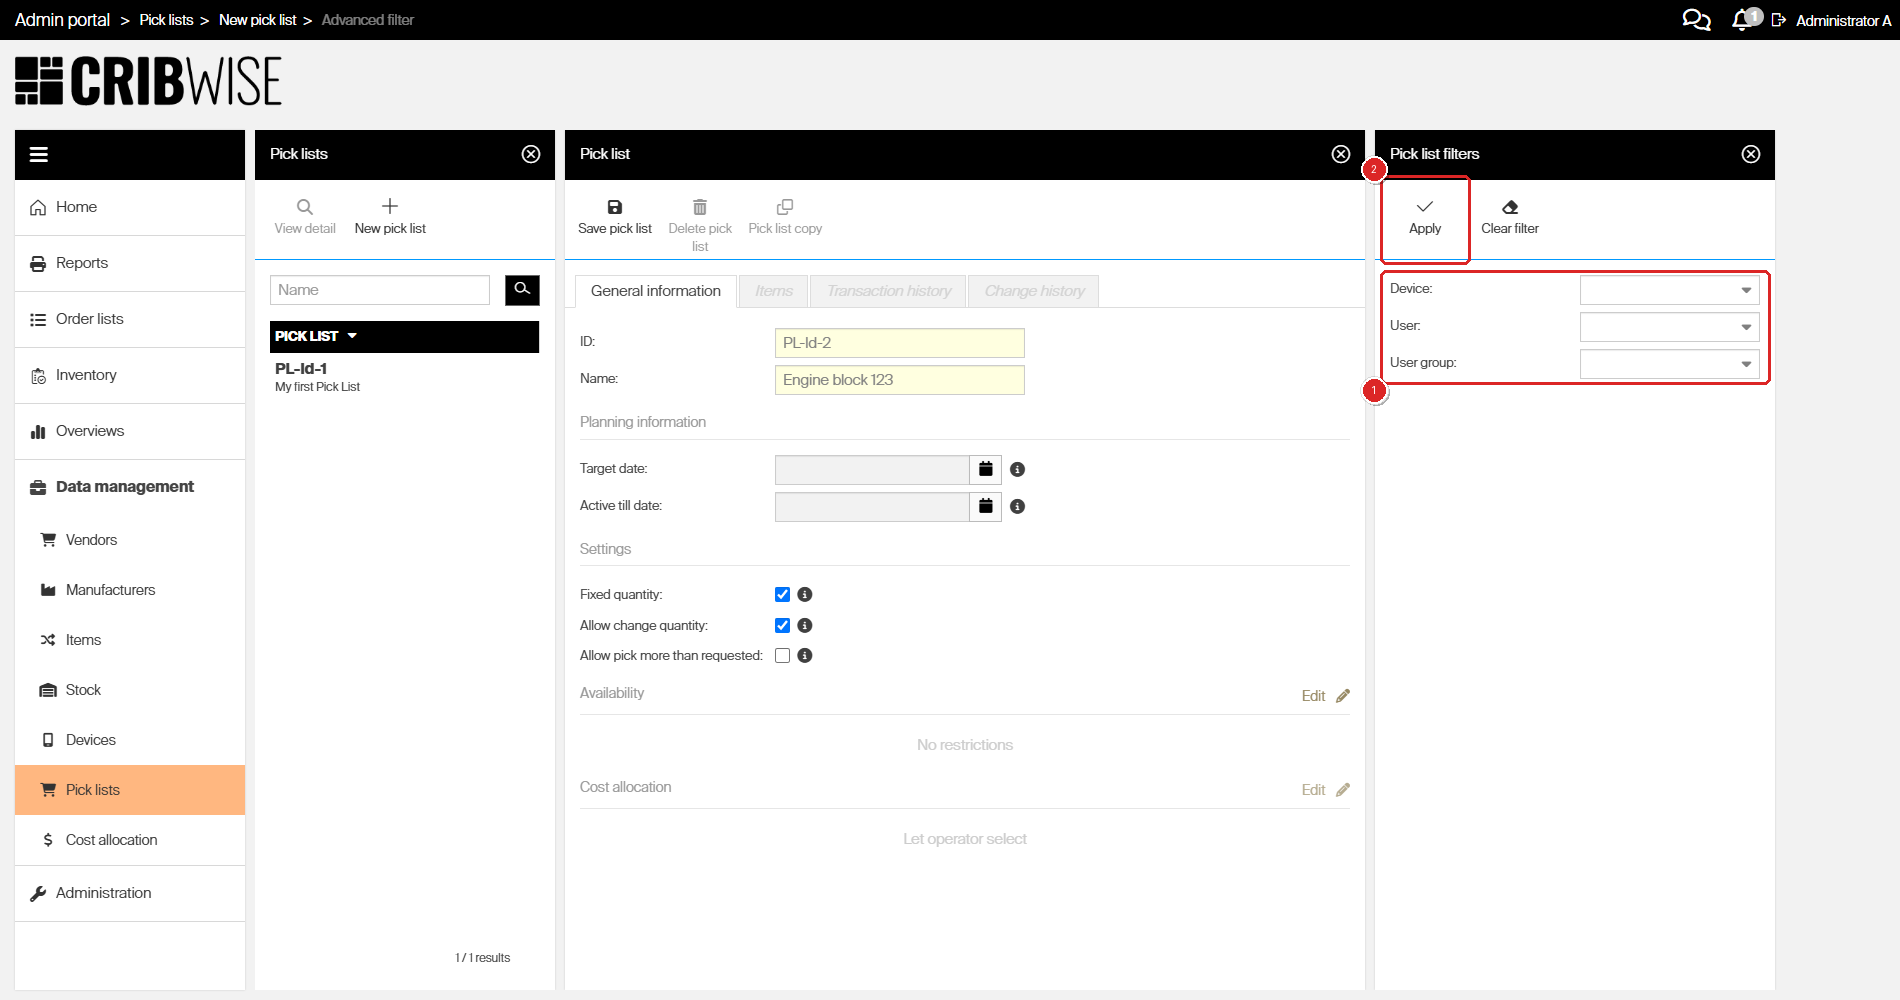
The availability filters: (1) Device, User and User group, (2) Apply. Leave all three empty to offer the list everywhere.
Tip: Tie a list to one device when the job belongs to one machine. Operators at other cabinets then never see it, which keeps the Select pick list screen short.
Step 5 – Pre-fill cost allocation (optional)
A pick list can carry its own cost allocation values. When it does, CRIBWISE skips those steps during picking and books every pick against the same machine, project, or operation.
- Next to Cost allocation, click Edit.
- Choose Predefined values to set the values now, or Let operator select to leave the choice to the shop floor.
- If you chose Predefined values, pick the CA set, then click Select values and choose a value for each step.
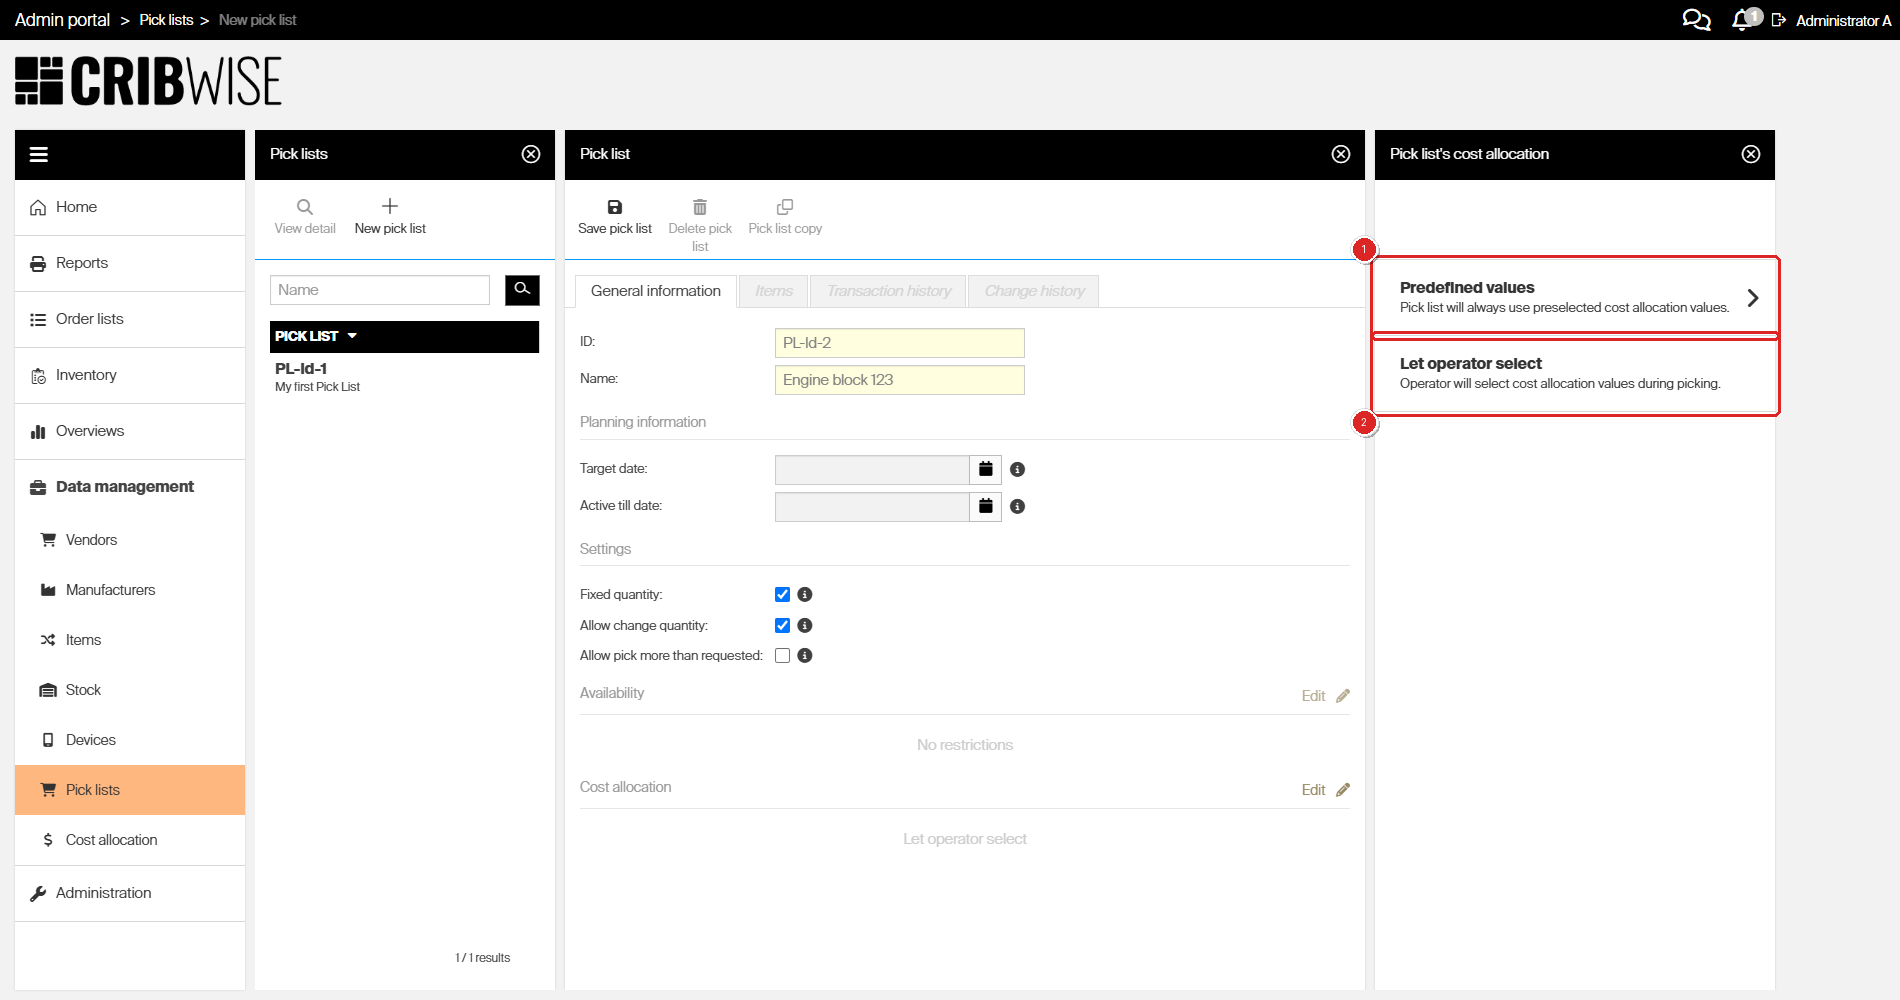
The two cost allocation modes: (1) Predefined values, (2) Let operator select – the default.
Step 6 – Save the list
Click Save pick list. A Status field appears showing Active, and the Items tab becomes available.
Important: The Items, Transaction history and Change history tabs stay greyed out until the list has been saved once. You cannot add items to an unsaved list.
Step 7 – Add the items
Items are added in batches, and every item in a batch gets the same quantity. Add one batch per quantity you need.
- Open the Items tab.
- Click + on the grid toolbar. The Items picker opens.
- Click each item that needs the same quantity. Use the search field if the item list is long.
- Click OK.
- In Quantity to pick, enter how many units of each selected item the job needs.
- Click Save.
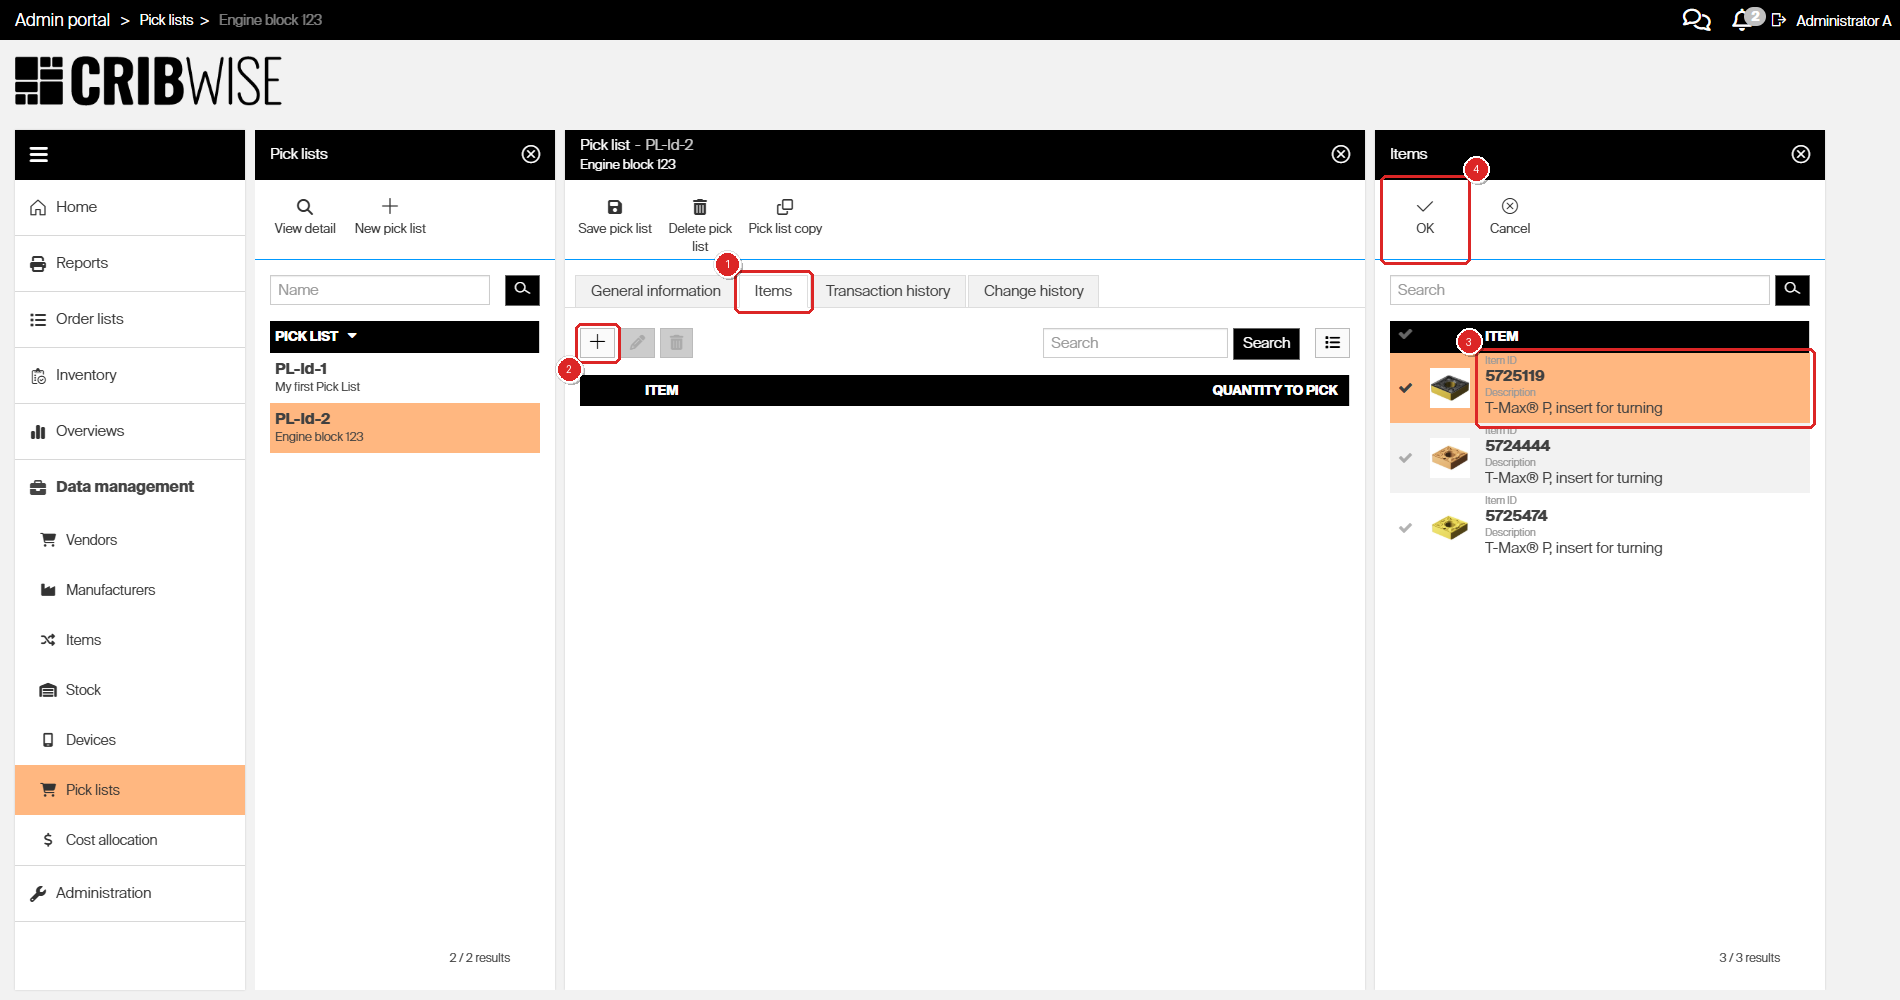
Adding items: (1) the Items tab, (2) +, (3) a selected item, (4) OK. The quantity is asked for after you confirm the selection.
Repeat steps 2 to 6 for each different quantity. Items are saved as you go – you do not need to press Save pick list again.
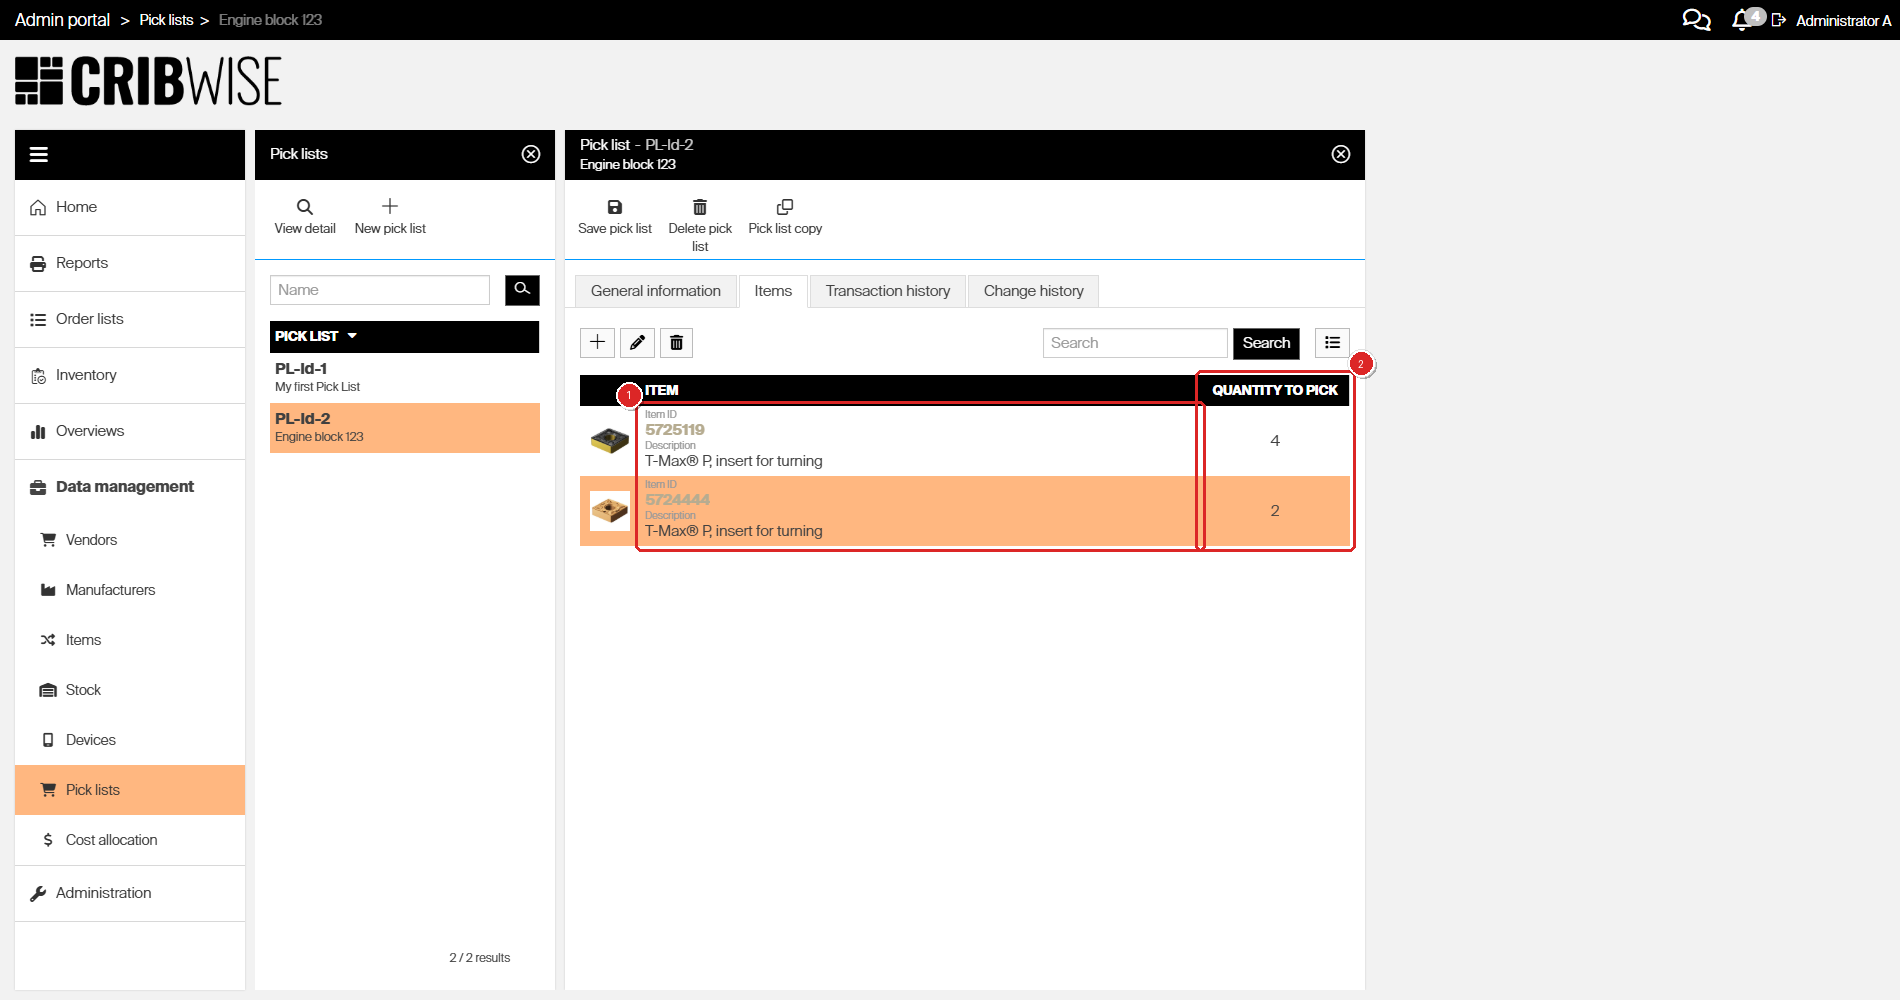
The finished list: (1) the items on the list, (2) the Quantity to pick column. Select a row and click the pencil to change its quantity.
Success: The General information tab shows Status: Active, and the Items tab shows every item with its quantity to pick. The list is now offered on the Shop Floor Interface.
Note: To take a list out of service later, set an Active till date so it stops being offered, or open it and click Delete pick list to remove it altogether.
How the list looks on the Shop Floor Interface
Nothing else is needed to publish the list. The next operator to open the Shop Floor Interface sees it straight away.
The main menu
The operator taps Pick list.
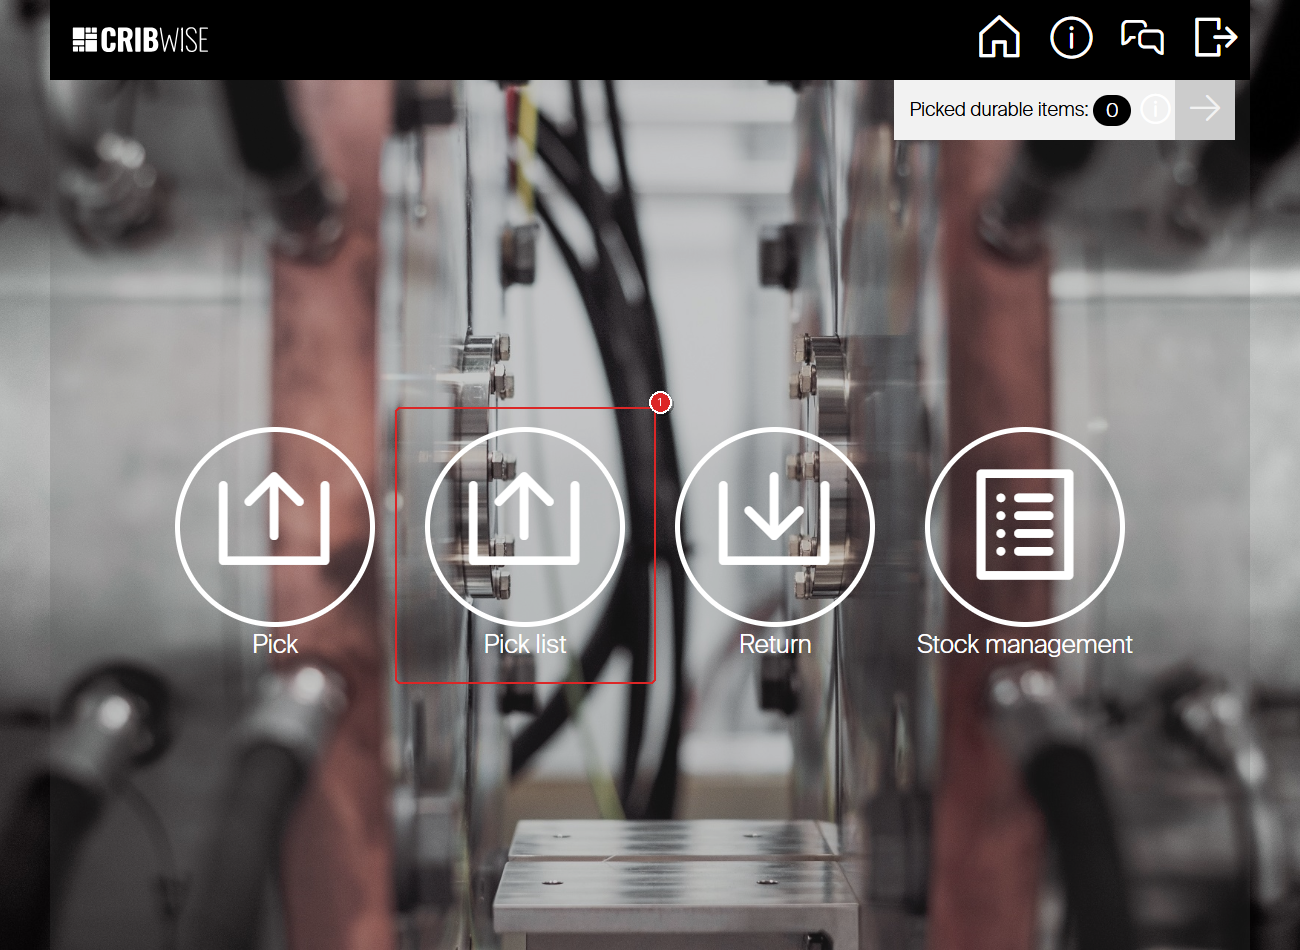
The Pick list tile appears only when pick lists are enabled and the user group has the pick list permission.
Select pick list
Each row shows the Name and ID you entered, how much of the list is Available in device, the Target date, and the total Quantity for pick still outstanding.
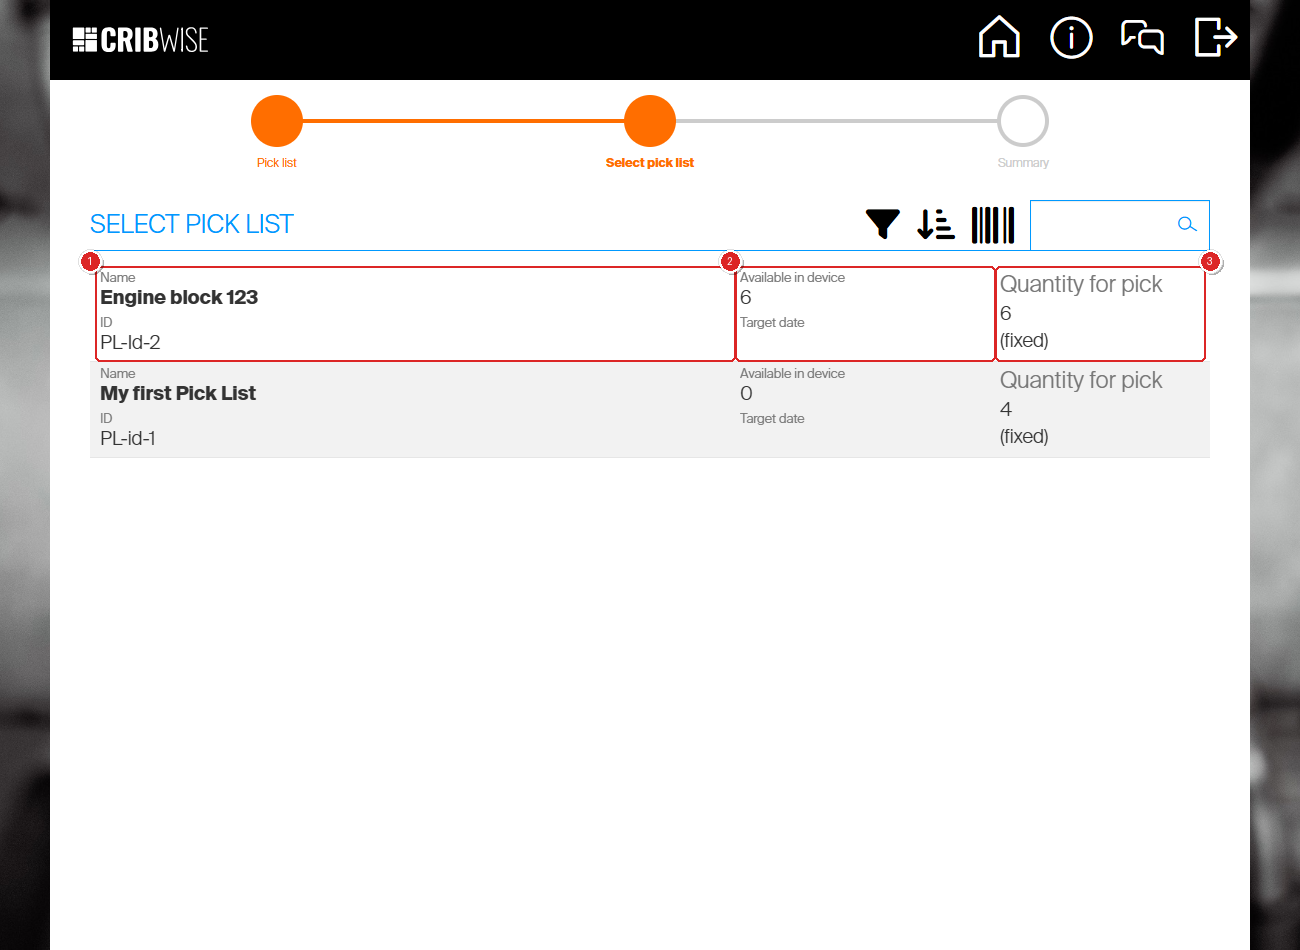
The list from the Admin Portal, seen by the operator: (1) the Name and ID, (2) how many of its items this cabinet holds, (3) the total quantity to pick.
Pick list summary
Tapping the list opens the summary. Every item you added appears with its quantity, how much is Available for pick on this device, and an Availability marker. The + and − buttons are shown only when Allow change quantity is ticked on the list.
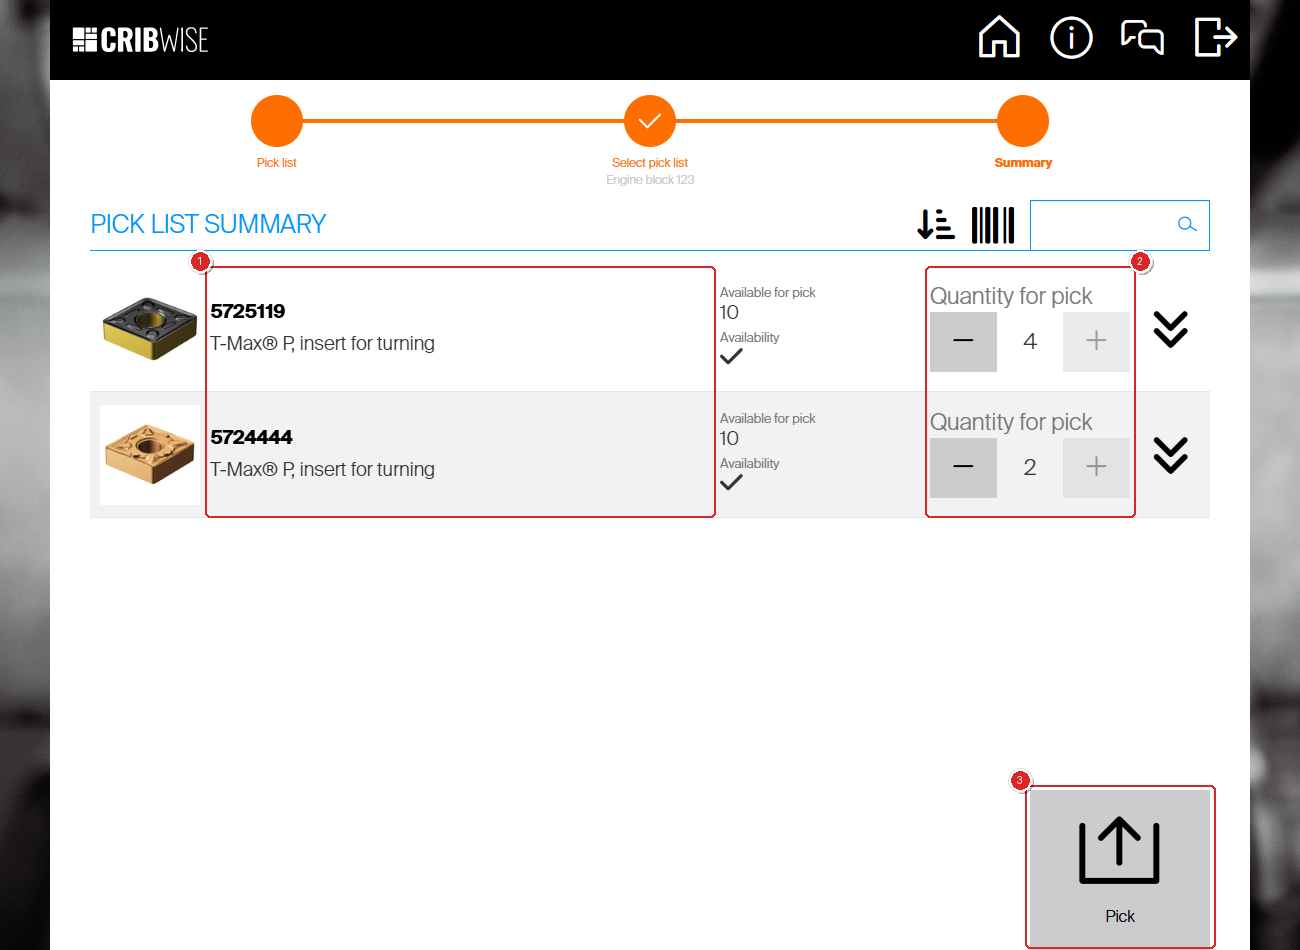
The summary: (1) the items from the Items tab, (2) the quantities you entered as Quantity to pick, (3) Pick. If the list carries predefined cost allocation, those wizard steps are skipped.
From here the operator collects the items and finishes the pick. The whole operator flow is covered in How to pick items from a pick list on the Shop Floor Interface.
Choosing the quantity settings
Allow change quantity and Fixed quantity combine into four patterns. Pick the row that matches the job.
| Pattern | Allow change quantity | Fixed quantity | Best for |
|---|---|---|---|
| Reusable job template | On | On | A part you produce regularly. The list is a standing recommendation operators can adjust, and it never runs out. |
| Work order with a target | On | Off | A production run with a planned material budget. Each pick reduces what is left, and the list closes when nothing remains. |
| Fixed kit | Off | On | A kit that must always be picked complete – a maintenance or setup kit. Quantities are locked and the list stays available. |
| Net demand list | Off | Off | A one-off list of exactly what is still needed. Quantities are locked and the list closes once it is picked. |
Tip: Group the items by quantity before you start adding them. Every item in one batch gets the same Quantity to pick, so four items at quantity 1 are one batch, not four.
Troubleshooting
| Problem | Likely cause | Fix |
|---|---|---|
| The Items tab is greyed out. | The list has not been saved yet. | Fill in ID and Name, click Save pick list, then open the tab. |
| Pick lists is missing from the Data management menu. | Pick lists are switched off, or your account does not have the permission. | Enable Enable predefined pick lists in System settings > Stock daily use and check your user group. |
| The list does not appear on the Shop Floor Interface. | It has no items, its Active till date has passed, it is restricted to another device or user, or it was fully picked without Fixed quantity. | Check the Items tab, the dates, and Availability. Confirm the operator’s user group has the pick list permission. |
| An item shows as unavailable when the operator opens the list. | The item is not assigned to a location on that device, or its stock is zero. | Assign the item to the device and restock it, or point the list at a device that holds it. |
| Operators cannot change a quantity. | Allow change quantity is not ticked. | Tick it on the General information tab and save. Add Allow pick more than requested if they also need to exceed the listed amount. |
| Saving fails with a duplicate ID. | Another pick list already uses that ID. | Check the overview for the existing list. Update that one instead, or choose a different ID. |
Related articles
- How to pick items from a pick list on the Shop Floor Interface – the operator side of the list you just built.
- How to create pick lists with the export/import function – the spreadsheet route, for many lists at once.
- How to manage pick lists with the REST API – let an ERP or MES create and update the lists instead.
- Customer use case: pick lists for job-based picking – why a machine shop chose pick lists, and which pattern they used where.
- Understanding cost allocation: structure, setup, and examples – the sets and values a pick list can pre-fill.
- Understanding purchase order scripts: automated reorder rules – where Consider pick list demands lets planned picks pull in stock.
- System settings reference – all Stock daily use settings, including the pick list toggle.