
Read time: ~5 minutes
Applies to: Installer · On-premise only
What you can do
Update an on-premise CRIBWISE installation to the latest version by running the Admin Portal installer through the Application Manager. The update itself usually takes about 2 minutes.
Note: It is recommended but not required, to create a backup of the databases before performing an update. See How to back up on-premise data for detailed instructions on how to back up the databases.
Before you start
- You need the latest installation package. Request the Admin Portal installer directly from your reseller, or download it (Step 1).
- You need administrator rights on the server hosting the Admin Portal — the installer must run as an administrator.
- You need a valid license file. If the license file is not valid, request a new one from your reseller.
- Plan a maintenance window. The Admin Portal restarts as part of the update.
Quick start
Experienced administrators complete the update in 5 steps:
- Download and unzip the latest installation package.
- Run installer.exe as an administrator and accept the license agreement.
- Click Update next to Admin Portal Application.
- Confirm the prefilled license information and click Next, then Proceed.
- Wait about 2 minutes, then click Finish.
Need more detail? Follow the full steps below.
Steps
Step 1 – Download the installation package
To update an on-premise installation, the first step is to download the latest version of the installation package. You can either request the Admin Portal installer directly from your reseller or download the latest installer from:
https://[BaseURL]/public/installers/latest/[Reseller]/AP/[Reseller]_AP_Installer.zip
Replace [BaseURL] and [Reseller] with the values for your installation.
Step 2 – Run the installer as an administrator
- Unzip the package.
- Run installer.exe as an administrator (1).
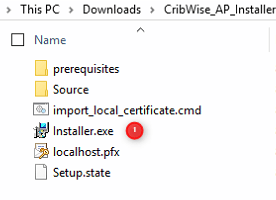
Callout 1: Installer.exe in the unzipped package folder. Right-click it and run it as an administrator.
Step 3 – Accept the license agreement
The CRIBWISE Application Manager opens on the End User License Agreement.
- Select I agree with disclaimer and terms of use.
- Click Upgrade.
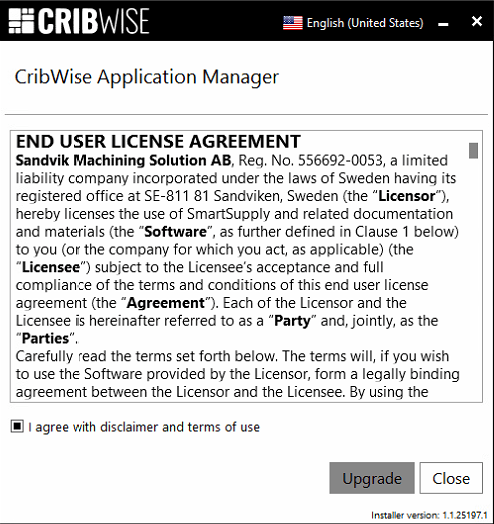
Accept the agreement to enable Upgrade.
Step 4 – Start the update
The Application Manager lists your installed apps and the updates available for them.
- Click Update (2) next to Admin Portal Application.
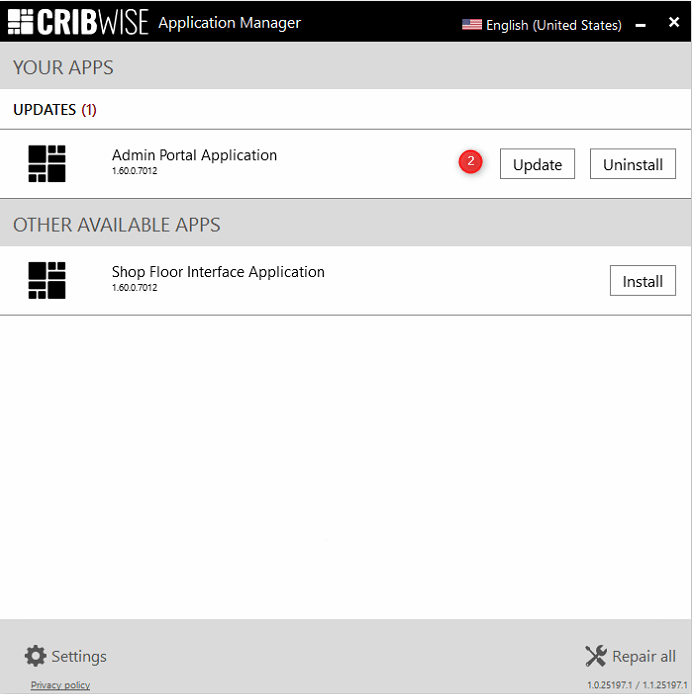
Callout 2: Update next to Admin Portal Application. The Shop Floor Interface Application is listed separately under other available apps.
Step 5 – Check the license information
If the license file is valid, all information will be prefilled, and you can continue by clicking Next (3).
Important: If the license file is not valid, request a new one from your reseller.
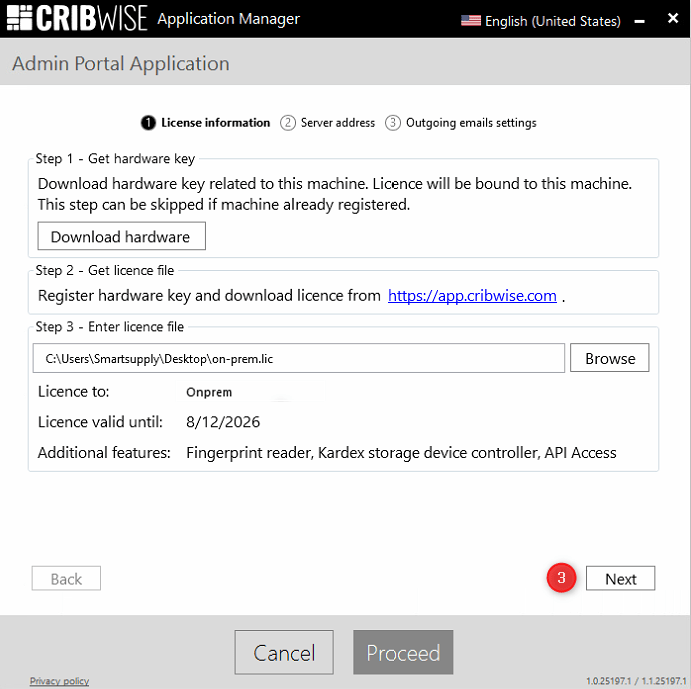
Callout 3: Next. The licence holder, expiry date, and additional features are read from the licence file.
Step 6 – Proceed with the update
The window will display a message indicating that you are about to update the Admin Portal application (4).
- Click Proceed (5).
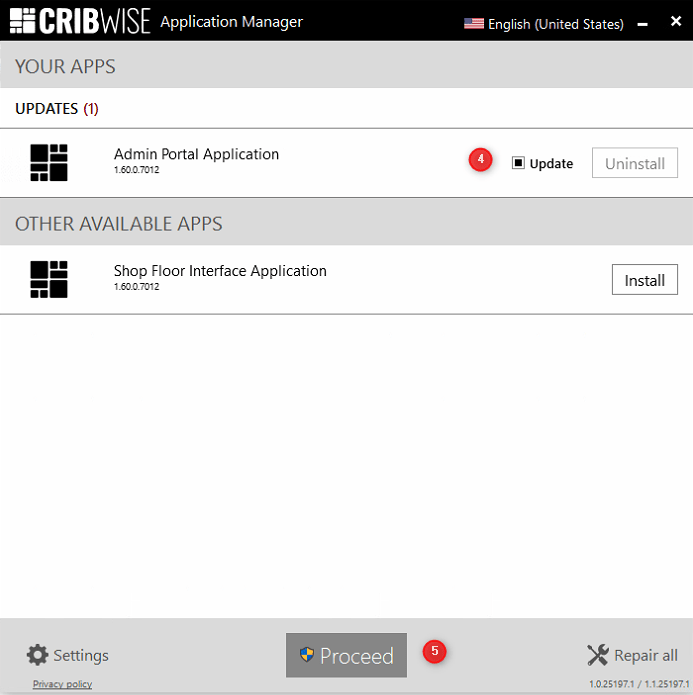
Callouts 4 and 5: the Admin Portal Application is marked for update, and Proceed starts it.
Step 7 – Wait for the update to complete
Wait for the update to complete. This process usually takes about 2 minutes.
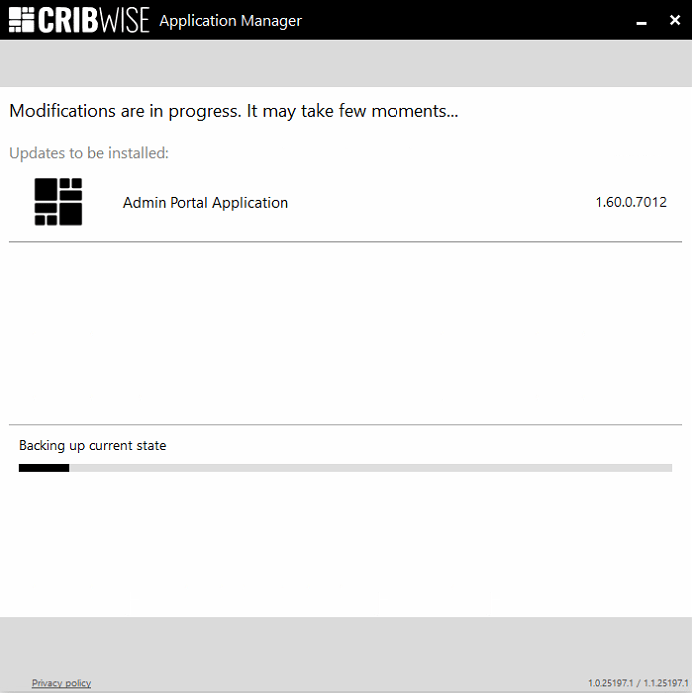
The Application Manager reports its progress while the update runs.
Step 8 – Finish
The final window will indicate whether the installation was successful.
- Click Finish to complete the process.
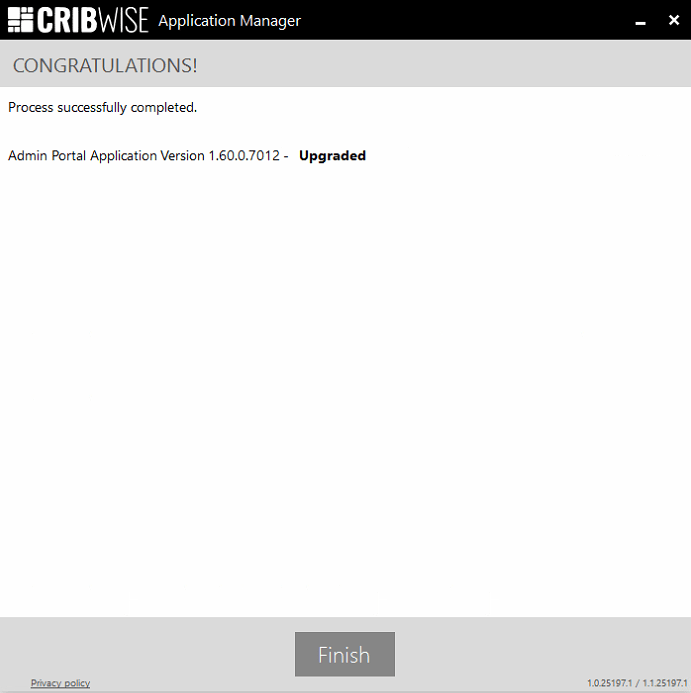
The confirmation screen names the version and marks it Upgraded.
Success: The final window reports that the process completed successfully and shows the Admin Portal Application version as Upgraded.
Next steps
- Reboot the server (optional) — a server reboot after the update is recommended but not required.
- Let the devices update themselves — all devices will update automatically at the scheduled time, provided the device setting for automatic updates is enabled.
- Take a fresh backup — once the updated system is verified, follow How to back up on-premise data so you have a current recovery point.
Troubleshooting
| Problem | Likely cause | Fix |
|---|---|---|
| The download URL does not work | [BaseURL] and [Reseller] are placeholders and were not replaced | Substitute the values for your installation, or request the installer directly from your reseller |
| The installer will not start, or fails partway through | installer.exe was not run as an administrator | Close it and run installer.exe as an administrator (Step 2) |
| The license information is not prefilled, or the licence is rejected | The license file is not valid | Request a new license file from your reseller |
| Upgrade stays unavailable on the license agreement screen | The agreement has not been accepted | Select I agree with disclaimer and terms of use first (Step 3) |
| The update runs much longer than 2 minutes | The Application Manager is still backing up the current state | Let it finish — the progress bar names the stage it is on |
| The devices still run the old version after the update | The scheduled update time has not passed, or automatic updates are disabled on the device | Wait for the scheduled time, and check that the device setting for automatic updates is enabled |
Related articles
- How to back up on-premise data — back up the databases before you update.
- How to restore on-premise data — roll back to the backup if the update goes wrong.
- How to install on-premise — the full first-time installation guide.
- How to clean up on-premise data — remove leftover data when you want a fresh installation instead.
- How to migrate the Admin Portal database from LocalDB to SQL Server — required to upgrade past version 1.60 on LocalDB.