What you can do
Move your on-premise Admin Portal database from the bundled LocalDB service to your own managed SQL Server (or SQL Server Express). This lets you upgrade past version 1.60 while keeping your data on a database service you control instead of the LocalDB instance provisioned by CRIBWISE.
Note: Up to version 1.60, the on-premise Admin Portal stored its relational data in a LocalDB 2014 service on the same machine as the application. From version 1.61, you can point the Admin Portal at your own SQL Server instead.
Before you start
- You need a Windows user with administrator privileges on the Admin Portal server.
- You need access to the target SQL Server with the CREATE DATABASE permission.
- SQL Server 2014 or newer must be installed, including Express editions.
- The target SQL Server must be reachable from the PC where the Admin Portal is installed.
Important: Back up the LocalDB database files before you start (Step 2). The migration moves live data, so a verified backup lets you recover if anything goes wrong.
Quick start
Experienced administrators complete the migration in 6 steps:
- Stop the CD Platform Host service.
- Back up the LocalDB database files.
- Copy the database files to the target SQL Server’s data folder.
- Attach the database in SQL Server Management Studio (or via sqlcmd).
- Modify the Admin Portal to use the existing SQL Server.
- Verify that the Admin Portal starts and shows all your data.
Need more detail? Follow the full steps below.
Steps
Step 1 – Stop the Admin Portal services
- Open Task Manager and go to the Services tab.
- Locate the CD Platform Host service.
- Right-click the service and select Stop.
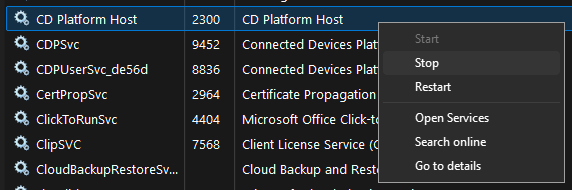
Warning: Do not skip this step. The database files are locked while the service runs, and copying them in use can corrupt your data.
Step 2 – Back up the LocalDB database files
- Navigate to the LocalDB data folder: C:\Windows\System32\config\systemprofile
- Create a backup copy of both database files:
- SmartSupplyAdministration.mdf
- SmartSupplyAdministration_log.ldf
Step 3 – Copy the database files to the target SQL Server
Copy the two files from Step 2 to the SQL Server data folder so the database service can access them:
C:\Program Files\Microsoft SQL Server\MSSQLxx.SQLSERVEREXPRESS\MSSQL\DATA
Note: Replace MSSQLxx with your installed SQL Server version. You can place the files in a custom location instead, but you must then grant the database service access to that location. That procedure is outside the scope of this guide.
Step 4 – Attach the database in SQL Server Management Studio
This guide uses Microsoft SQL Server Management Studio (SSMS). Any tool that can connect and send SQL commands to SQL Server works too – see Step 5 for the sqlcmd alternative.
- Open SSMS and connect to the target SQL Server.
- Right-click the Databases folder of the server and select Attach…
- Click Add in the Databases to attach section and locate the SmartSupplyAdministration.mdf file from Step 3. The related SmartSupplyAdministration_log.ldf file is selected automatically.
- To rename the database, enter a new name in the Attach as column.
- Confirm the operation. The database is now attached to the SQL Server.
Step 5 – [Alternative] Attach the database with sqlcmd
Use this approach if SSMS is not available. You can use sqlcmd or any similar tool that sends T-SQL commands.
- Connect to the target SQL Server. Additional authentication may be required depending on the server’s settings:
sqlcmd -S <target server>
- Create a new database from the existing files. Provide the new database name and replace the paths to match where you placed the files in Step 3:
CREATE DATABASE <database new name>
ON (FILENAME='C:\Program Files\Microsoft SQL Server\MSSQLxx.SQLSERVEREXPRESS\MSSQL\DATA\SmartSupplyAdministration.mdf'),
   (FILENAME='C:\Program Files\Microsoft SQL Server\MSSQLxx.SQLSERVEREXPRESS\MSSQL\DATA\SmartSupplyAdministration_log.ldf')
FOR ATTACH;
- Execute the command:
GO
The database is now attached to the SQL Server.
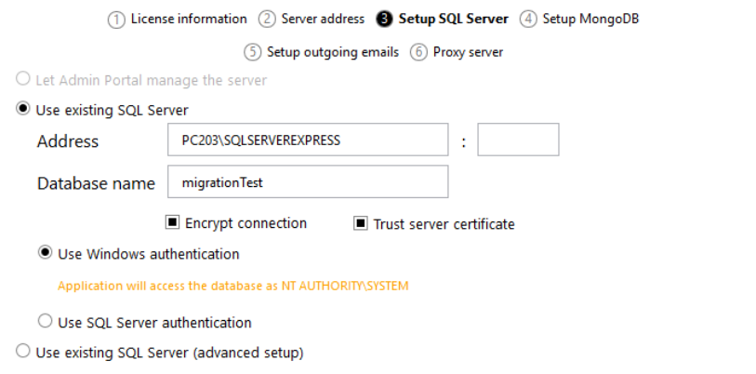
Step 6 – Point the Admin Portal at the new database
- Open the Application Manager from the Start menu.
- Select Modify for the existing Admin Portal installation.
- Navigate to the Setup SQL Server step.
- Select Use existing SQL Server and enter the connection information for the server and the name of the database you attached in Step 4 or Step 5.
- Click Proceed to apply the change.
The Application Manager validates that it can connect to the database. If the connection succeeds, the change is applied and the Admin Portal service restarts using the database served by your SQL Server.
Step 7 – Finish and verify
Once the update finishes, the Admin Portal services start automatically. Open the Admin Portal and confirm that it loads without errors and contains all the data you expect.
Success: The Admin Portal runs against your managed SQL Server, the service has restarted automatically, and all your data is present.
Troubleshooting
| Problem | Likely cause | Fix |
|---|---|---|
| The database files cannot be copied or are locked | The Admin Portal service is still running | Stop the CD Platform Host service in Task Manager before copying the files (Step 1) |
| Attaching the database fails with an access or permission error | The SQL Server service cannot read the files in their current location | Place the files in the SQL Server DATA folder, or grant the database service access to the custom location |
| CREATE DATABASE fails in sqlcmd | The user lacks CREATE DATABASE permission, or the file paths are wrong | Connect with an account that has CREATE DATABASE permission and correct the FILENAME paths to match Step 3 |
| The Application Manager cannot connect to the SQL Server | Wrong connection details, or the server is not reachable from the AP machine | Verify the server name, database name, and credentials, and confirm the SQL Server is accessible from the Admin Portal PC |
| The Admin Portal starts but shows no or partial data | It is pointing at the wrong database, or the wrong files were attached | Re-check the database name in Setup SQL Server and confirm the attached files are the backups from Step 2 |
Related articles
- How to install CRIBWISE on-premise – set up the Admin Portal and configure SQL Server during a fresh installation.
- Getting started with Admin Portal: layout, navigation, and lists – find your way around the Admin Portal after the migration.
- Getting started with Shop Floor Interface: layout and menus – the SFI that connects to your on-premise Admin Portal.