
What you can do
Configure custom cost allocation values so shop floor operators can type a free-text value for a list or hierarchy step instead of only picking from a predefined list. Use this when a step — such as a work order — has values you cannot know in advance.
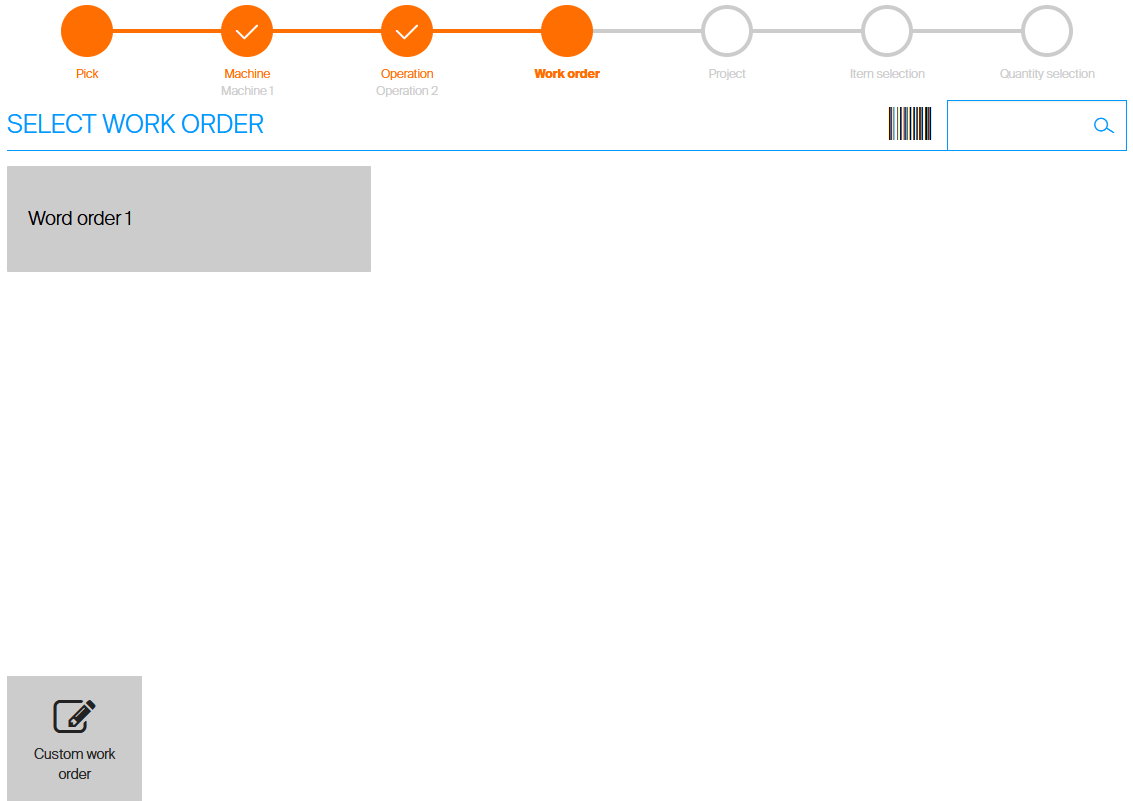
On the Shop Floor Interface, an operator can pick a predefined value or enter a custom one.
Before you start
- You need a cost allocation set with at least one List or Hierarchy step. See How to create and manage cost allocation sets.
- You need the Cost allocation Admin Portal permission to create and edit values.
- If you are new to cost allocation, read Understanding cost allocation: structure, setup, and examples first.
Important: Each step can have only one custom value. If a custom value already exists for the step, the option is disabled.
Quick start
Experienced users enable a custom value in 3 steps:
- Create a value for the List or Hierarchy step and check the Custom value option.
- Add the value to the hierarchy (hierarchy steps only) and set any restrictions.
- Test the pick flow on the Shop Floor Interface.
Need more detail? Follow the full steps below.
Steps
Step 1 – Enable the custom value on a step
- Create a new value for the List or Hierarchy step (see How to create and manage cost allocation sets for creating CA values).
- In the value settings, enter a Value name. This label identifies the custom value to operators.
- Check the Custom value option.

Name the value and check Custom value in the value settings.
The custom value is marked with the  icon in the list of values.
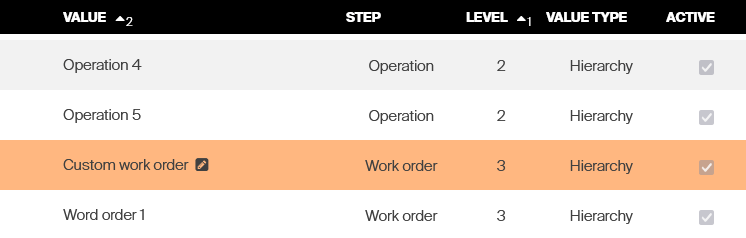
The custom value appears in the value list marked with the custom value icon.
Step 2 – Add the value to the hierarchy (hierarchy steps only)
For hierarchy steps, the custom value must be added to the hierarchy before operators can use it. Add it the same way as a standard value.
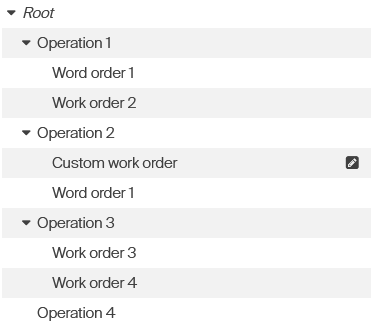
Place the custom value in the hierarchy to control when it is available.
Placement controls when the value appears. In this example, the custom value for the second hierarchy step (Work order) is available only when Operation 2 is selected for the first step (Operation).
Note: You can set item, user, and user group restrictions on the custom value just like on standard values – for example to limit which items can be picked or which users may enter it.
Step 3 – Check the pick flow on the Shop Floor Interface
When the operator reaches the step, an option to enter the custom value appears, labelled with the value name you set (for example Custom work order). The operator can pick a predefined value or enter the custom one.
- Select the custom value option to show a text input.
- Enter a value by keyboard or scanner, similar to a text step.
- Confirm to proceed, or go back to the list of predefined values.
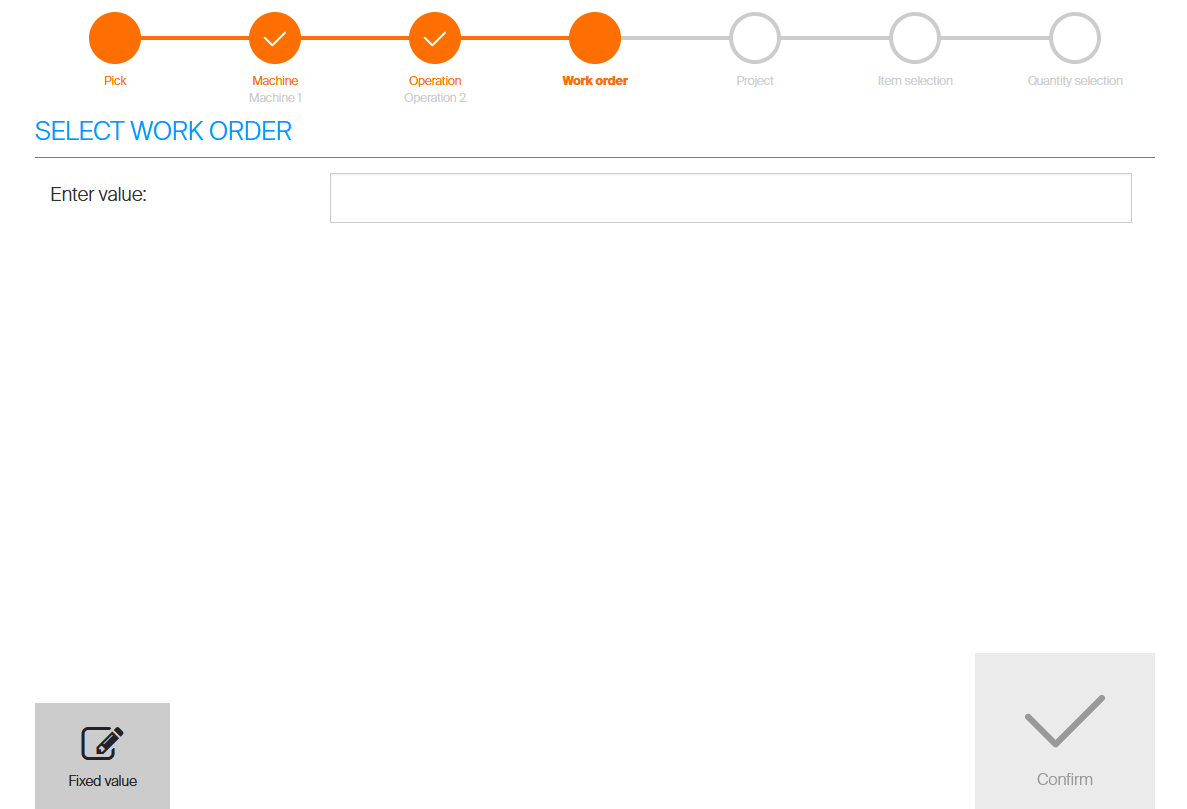
Selecting the custom value shows a text input for the operator to type or scan a value.
Note: If the step has no predefined values, or the operator is not allowed to select any predefined value, the text input is shown automatically.
Success: The step offers the custom value option on the Shop Floor Interface, and operators can enter free-text values that are stored with the pick.
How custom values appear elsewhere
In reporting
A custom value entered during picking is treated like any other selected value. In reporting, the value the operator typed is shown as the value selected for the step.

The transaction shows the operator-entered text as the value for the step.
If the step is physical, the value also appears as the physical location of the picked item in the Picked items overview and the Item locations dialog on the Shop Floor Interface.
In predefined pick lists
When working with predefined pick lists, you can define a pick list with a custom CA value. During import or update, a pick list can be set with any value for a step that allows a custom value.
In Excel import and export
When working with CA hierarchy and values via Excel, references to a custom value always use the value name defined in the value detail (for example Custom work order).

In Excel, the custom value is referenced by its name from the value detail.
Troubleshooting
| Problem | Likely cause | Fix |
|---|---|---|
| The Custom value option is disabled | The step already has a custom value | Each step allows only one custom value; edit the existing one instead of adding another |
| The custom value does not appear on SFI | For a hierarchy step, the value is not added to the hierarchy | Add the custom value to the hierarchy under the correct parent, the same way as standard values |
| The text input opens immediately, skipping the list | The step has no predefined values the operator can select | Add predefined values, or accept that the custom value is the only option for this step |
| Excel import does not match the custom value | The reference uses the wrong text | Reference the custom value by its exact name from the value detail (for example Custom work order) |
Related articles
- How to create and manage cost allocation sets – create the steps and values this feature builds on.
- Understanding cost allocation: structure, setup, and examples – the concept behind steps, values, and hierarchy.
- How to create pick lists with the export/import function – set custom CA values on pick lists.
- How to pick an item – see how cost allocation is selected during picking.