Picking is performed to obtain one or more physical items from device. To start picking operation, select Pick option from the main menu Pick is available only if it is allowed by system administrator
Item selection
Based on system settings picking operation starts with selection of item to pick, or selection of cost allocation.
Following pictures are showing case, when item is selected first.
Flow cost allocation is selected at first is very similar to the one described here.
Only difference is that cost allocation is always selected before the item.
Based on system settings some items cannot be picked in some cost allocations, in that case these items are not shown in the item list.
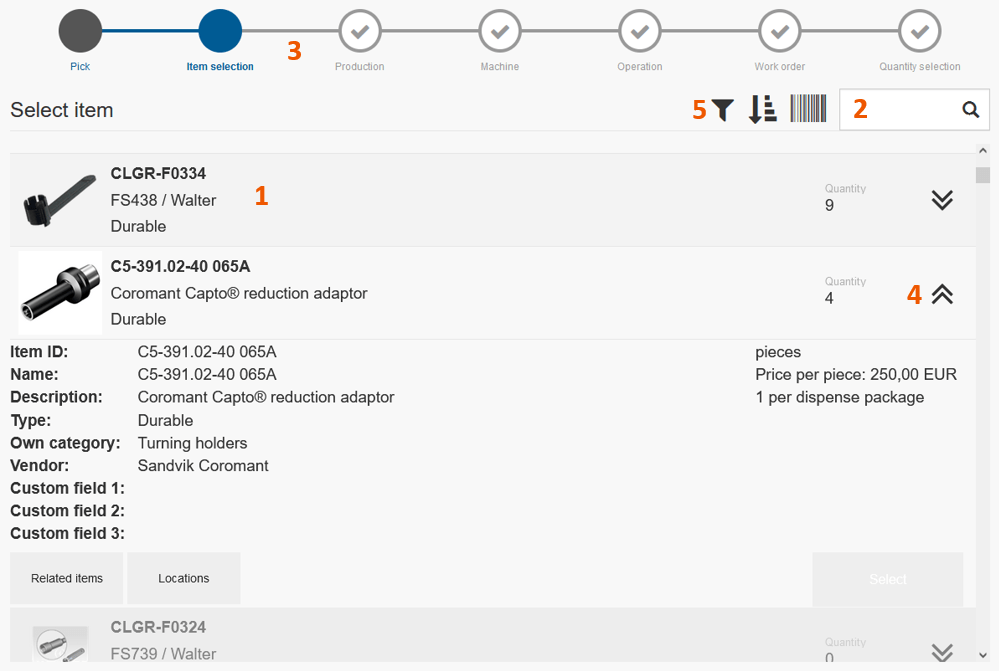
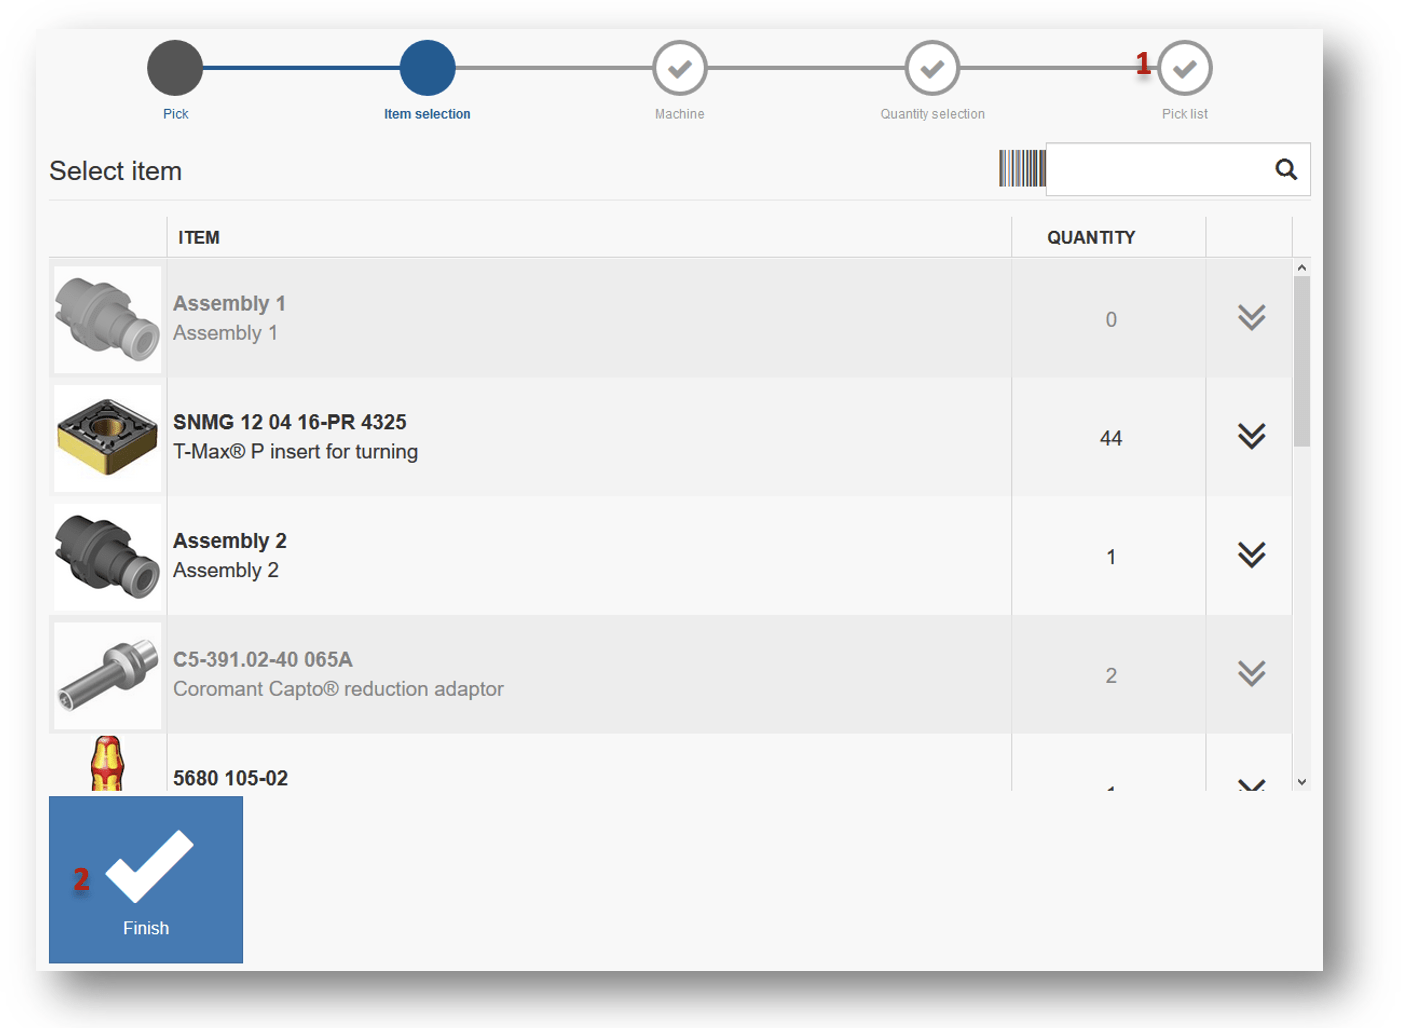
Item for pick can be selected from the list of all items located in current device
(1). To search for an item, click to search field
(2) and start typing item information (item id, name, description, barcode) or use barcode scanner. Graphical flow shows steps to be performed for pick
(3). To navigate to previous steps, select desired step in graphical flow. To display more information about item, expand item detail
(4). From item detail all item’s spare parts, matching items can be displayed and selected for pick. Also, information about all locations, where item is currently available, can be shown. Items can be filtered according to categories. To filter items, press Filter button
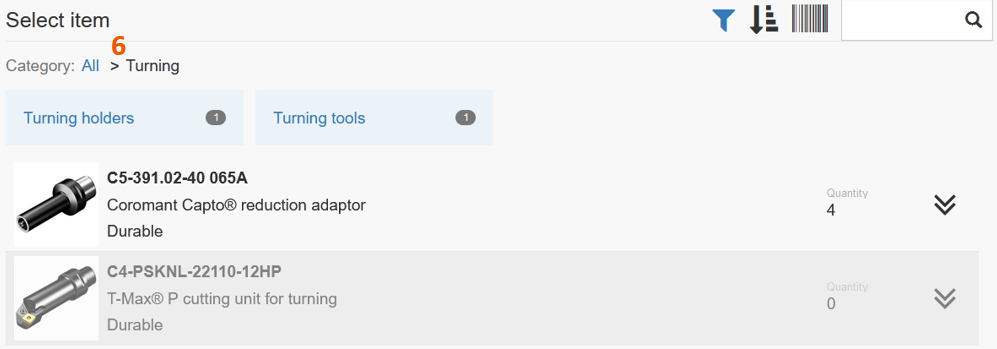
(5) on application header. List of categories will be shown, each category indicating how many items belongs to a category. Select category to navigate to its subcategories. Once a category is selected, list of items is updated to show only items belonging to selected category. To navigate back in selected categories or to display all items, select parent category or option All in breadcrumb
(6).
It is possible have item category filter active automatically. Turn on option Show category filter by default in device detail. By default, list contains only items assigned to this device. To show all items, click to the option at the bottom of the list
(7):

When there is only one item available for pick, this item is automatically selected and flow proceeds to the next step.
When item is selected in the item list, operation will proceed to selection of cost allocation. If selected item has no available quantity in current device, information about all assignments is shown to help find device with available quantity.
Cost allocation selection
If cost allocation is setup in Admin portal, selection of cost allocation must be performed based on cost allocation structure.
All steps of cost allocation selection are shown in graphical flow. In example bellow, four cost allocation steps are defined and must be selected – Production, Machine, Operation and Workorder.
Some cost allocations cannot be selected for specific items. In that case they are not shown in this list. If there is only one option available, this option is automatically selected and next step is shown.
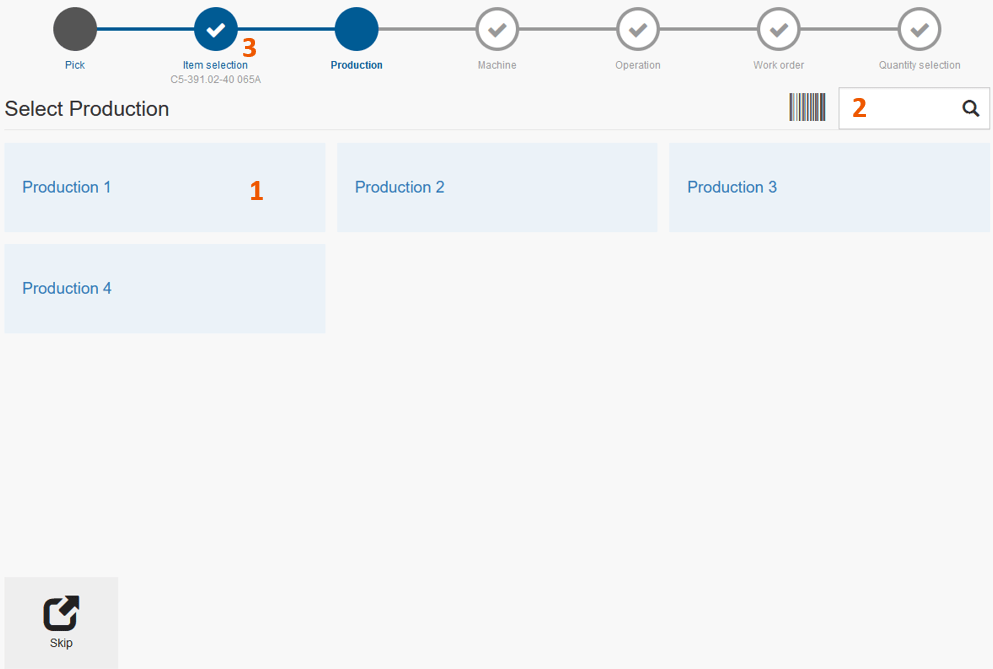
To select cost allocation and proceed to the next step, select one option from the list of all available cost allocations
(1). To search by cost allocation name, click search field
(2) and enter cost allocation name or use barcode scanner. If cost allocation must be selected as a text, click text field and enter value by keyboard or scanner. Then confirm selection by clicking Confirm button.
If Confirm button is disabled, entered value is not corresponding with set of predefined values or value rules. Contact your administrator for more information
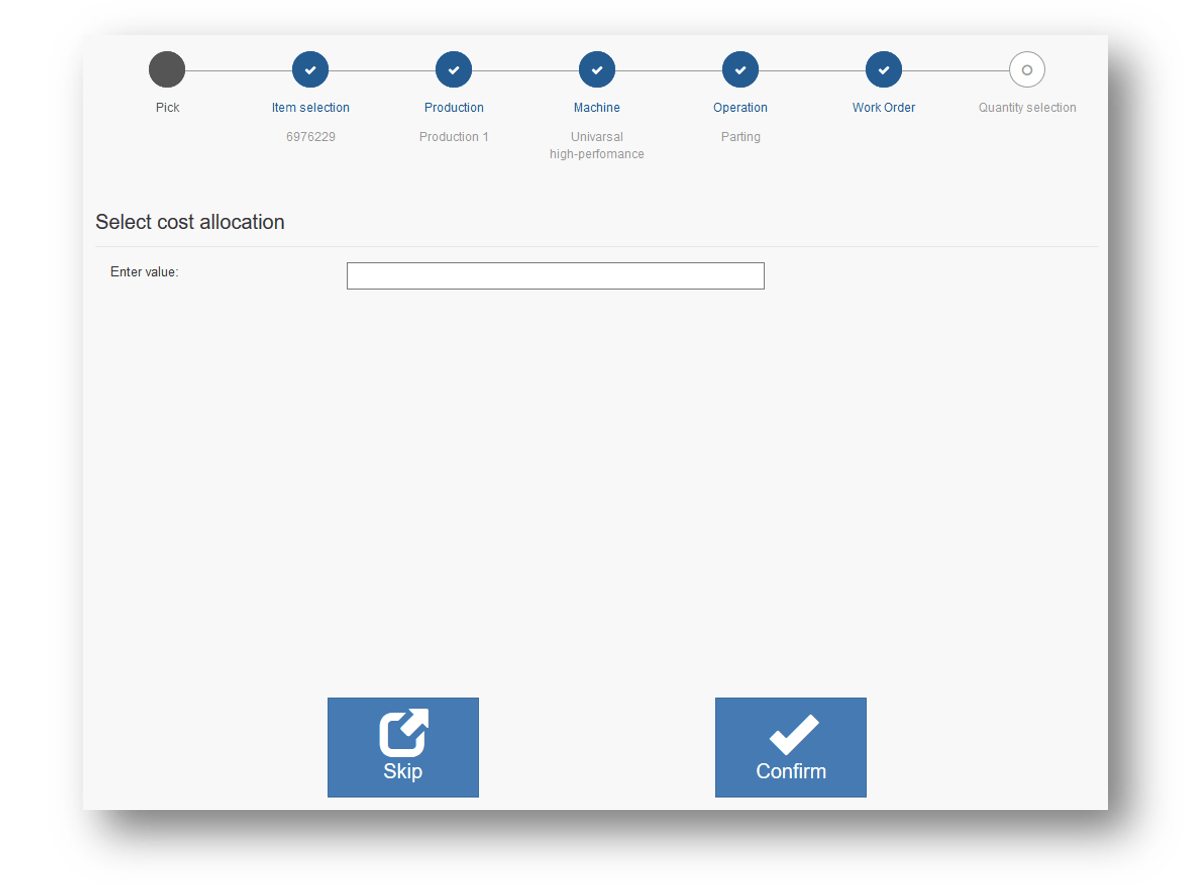
Some steps can be set to optional. To skip these steps, press Skip button to proceed next (as shown on previous screen). When all cost allocation steps are selected, quantity selection of desired item is shown.
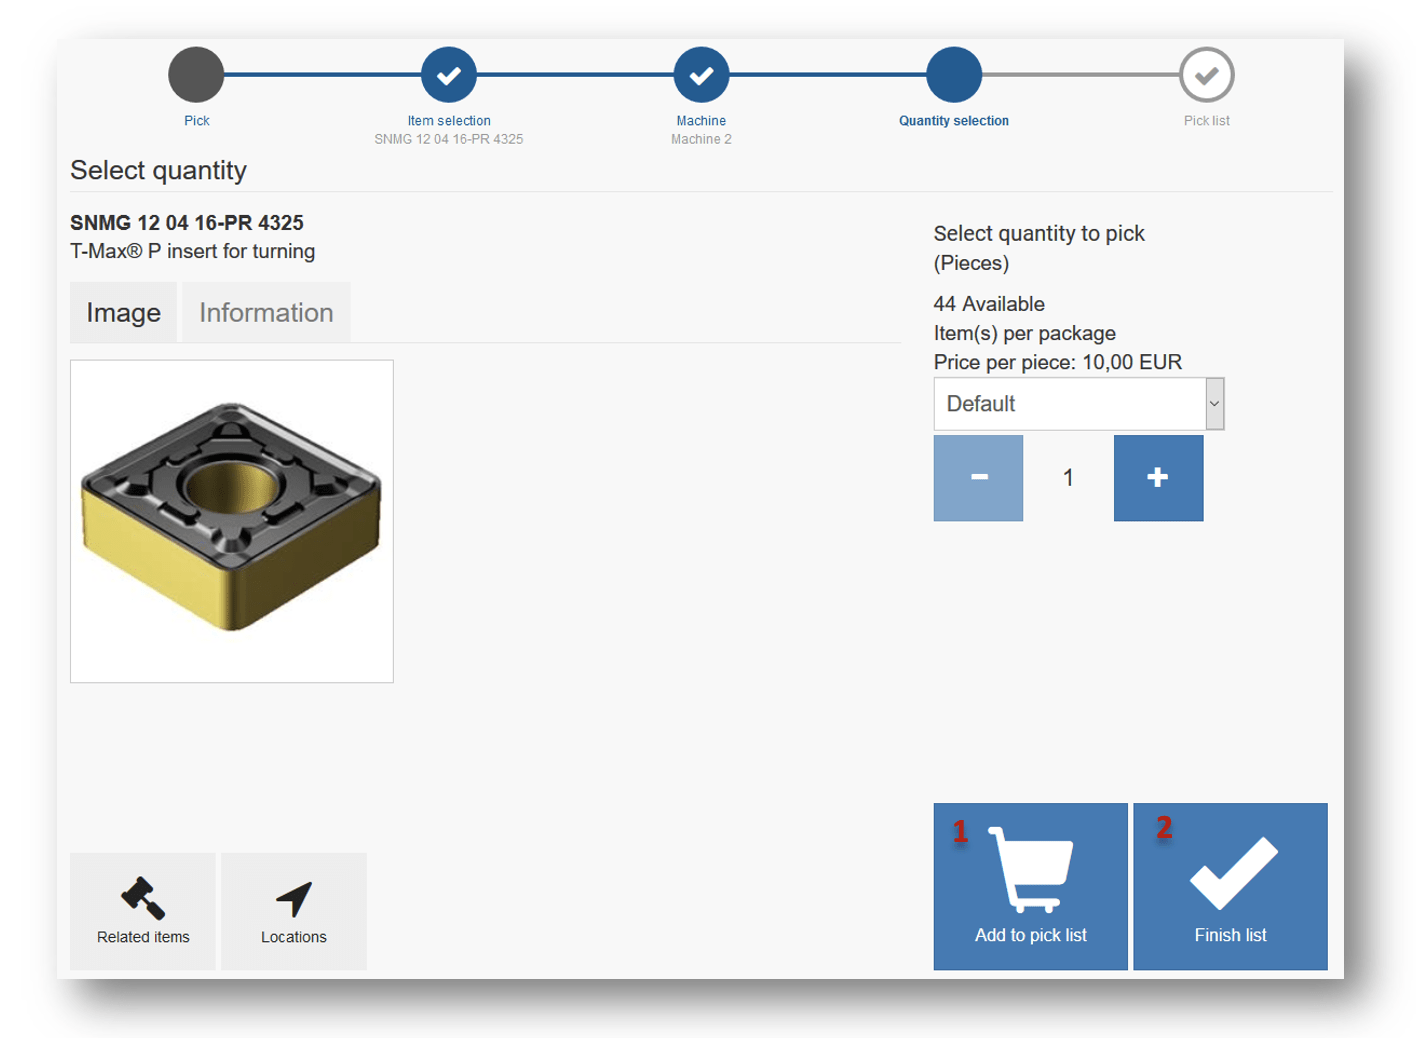
Quantity selection
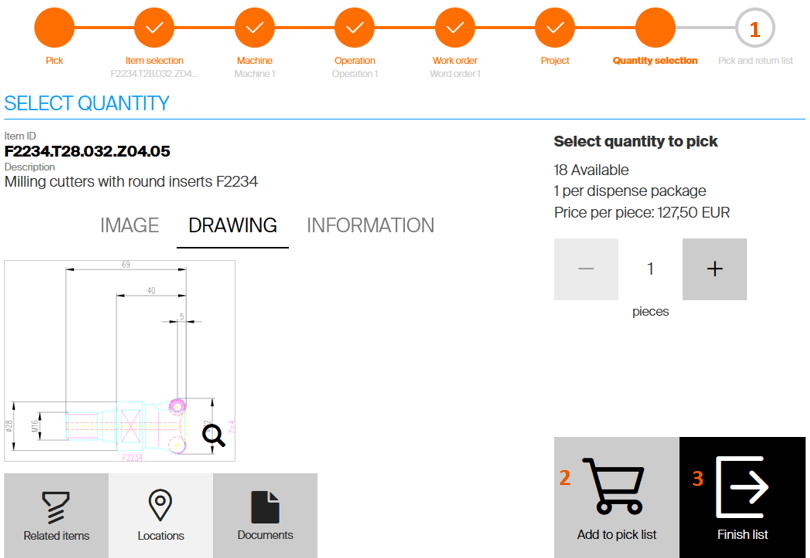
Quantity selection is the last step what must be selected before item can be physically picked from a location.
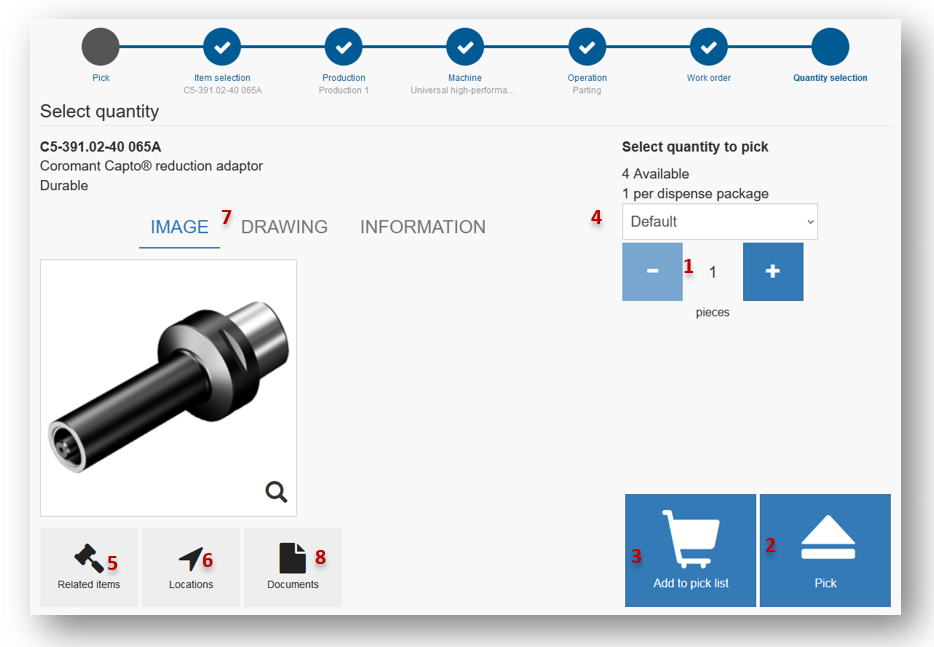
On quantity selection screen, enter desired quantity
(1) and select Pick button
(2) to perform the pick. To add current item into pick list and continue with selection of another item, press Add to pick list button
(3). This flow is described below (Working with pick lists). If this option is granted by system administrator, preferred condition of picked item can be selected in drop down menu
(4). If item has some related items (alternatives, spare parts, matching items, assemblies), they can be shown and picked or added to pick list by clicking on Related items button
(5). Button is not shown if there are no related items. To show all locations where this item is assigned within the stock with information about picked items and expected new items, press Locations button
(6). If item has any documents showing item’s image or drawing, these documents are listed beside the item information
(7). To list all documents available for item, press Documents button
(8). This button is not shown if there is no document available. Supported document types can be opened (opening of document will not affect current pick flow) from list of documents or by ![]() icon shown for image and drawing.
icon shown for image and drawing.
All documents are downloaded from Admin Portal. If Admin Portal is not available documents cannot be opened.
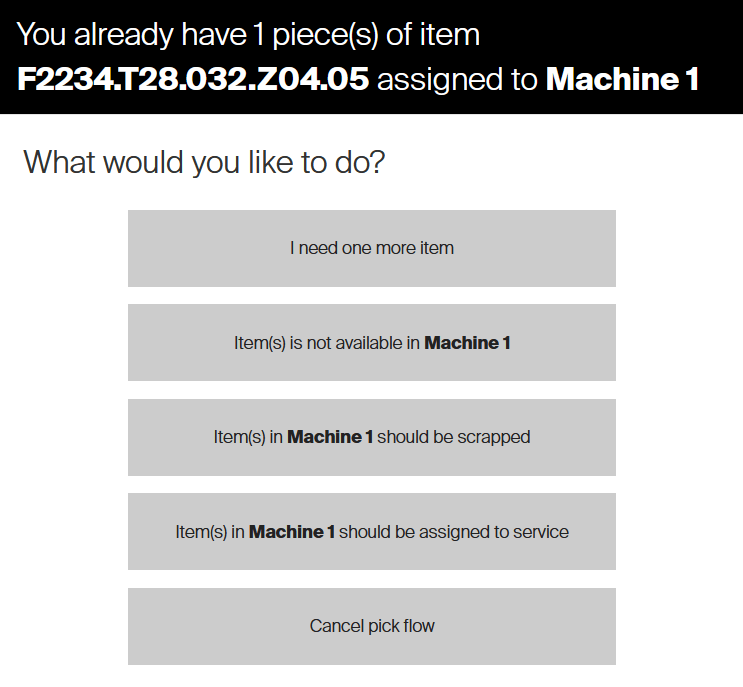
System can check if this item has been already picked (by any user). If yes, system will inform about this by a dialog window, allowing to perform additional actions.
For more details, see scrap/return during pick.
Pick item from location
When item or pick list is confirmed, system shows information about location, where to physically pick the item. If storage device, where item is about to be picked, is vending cabinet, following screen informing about opened location is shown:
To pick item, take it out from location unlocked or opened by the system
(1) in the vending machine and close the location. If there was not enough quantity in one location or there is another item in a pick list, system automatically opens next location right after previous location is closed. When picking durable items, information about item condition (based on rule of location where this item is assigned) is shown
(2). This information is not shown for consumable items. To cancel current location, press Cancel button
(3). Currently processed operation will be interrupted. If there will be more operations pending to be processed, system will offer options to cancel current operation or cancel all remaining:

Cancel can behave differently on various devices. F.e. Lista cabinet locks unlocked location, but if location is opened on AC200 when Cancel is pressed, location must be closed manually
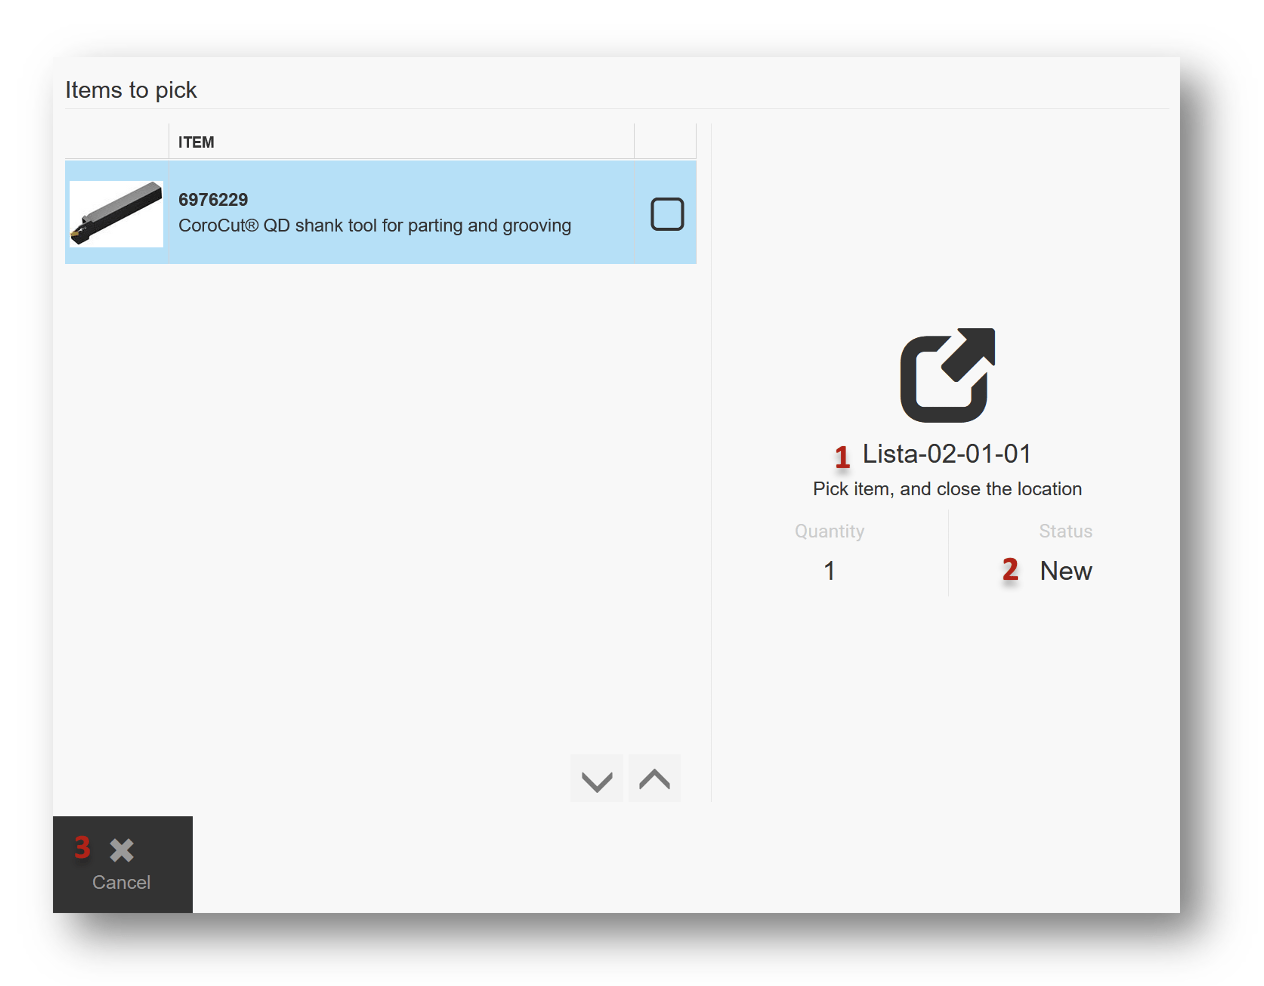
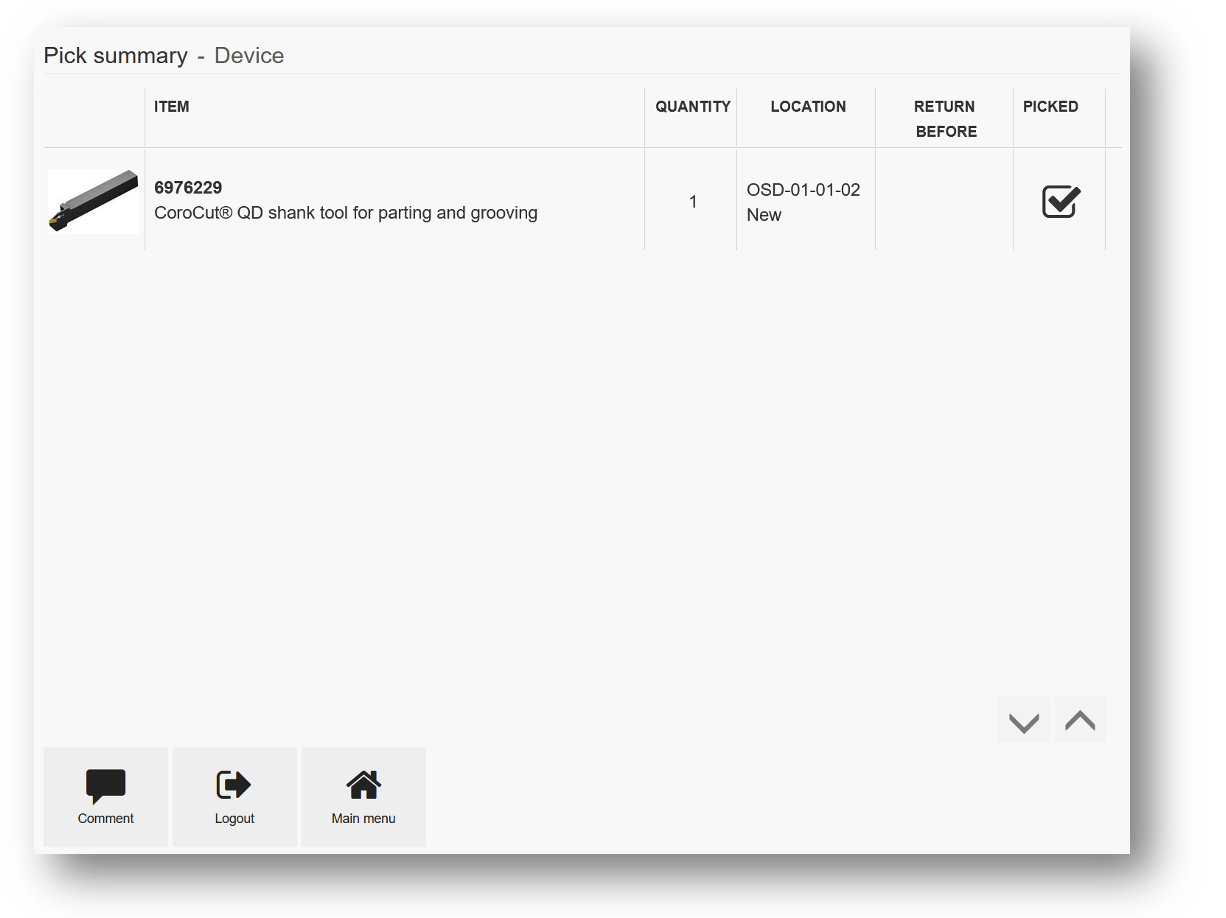
If storage device, where item is about to be picked, is non-automated shelf, following screen displaying locations where to pick item is shown:

To pick the item go to location shown in the list and pick item from this location. Then confirm the pick by selecting Picked checkbox
(1) and finish picking by pressing Picking finished button
(2). It is also possible to scan barcode of item to select the Picked checkbox. If there are more locations to pick item or another items are in the pick list, all items to pick will be shown in this list. Condition of durable item is shown together with location name
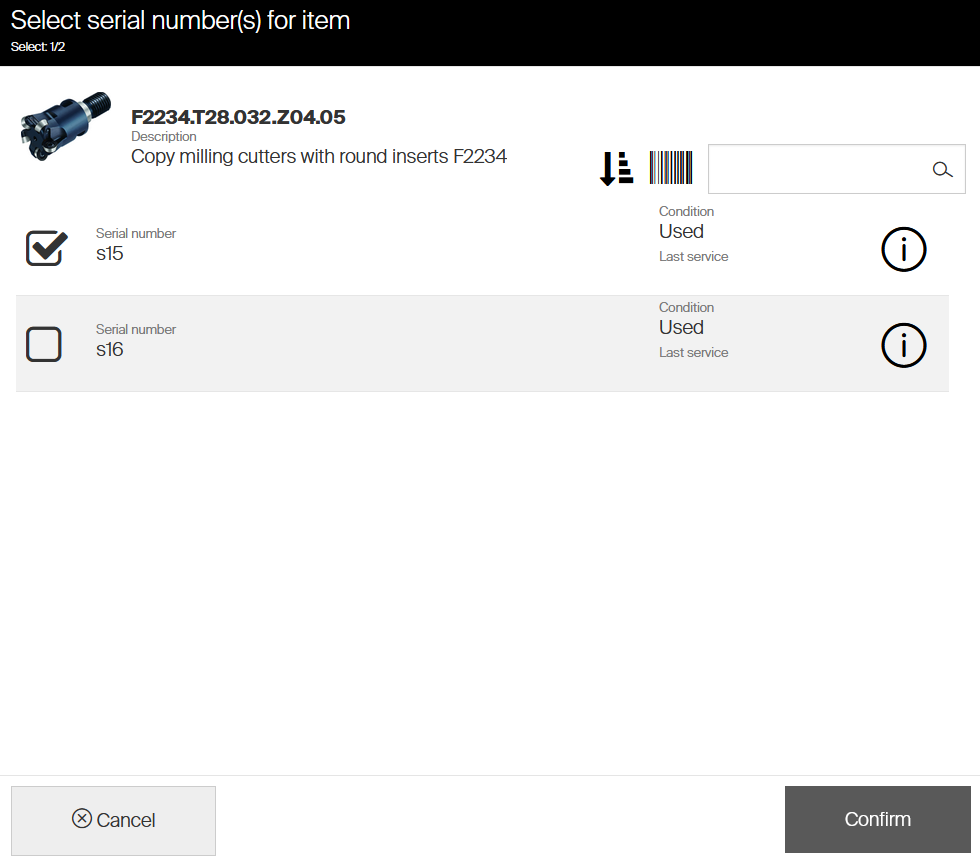
(3). If item is serialized, select serial number(s) of item(s) picked (serial number is selected automatically if there is only single one available). It is required to select exact number of serial numbers what is requested to be picked from a location. To show additional information about each serial number (service related information and comments), press ![]() button.
button.
If permission to change quantity during pick is granted, it is possible to change quantity picked from each location
(4). If quantity is changed for serialized items, it is required to enter serial numbers for the new quantity. Picking from storage devices allowing access to multiple locations at once (like Lista LDC drawers or Autocrib Locker FX) or picking of multiple items from single location will allow to pick all items from such locations. System will unlock this location or drawer or locker and shows all items for pick in the same manner as for non-automated shelves:

Once items are marked as picked, close location or drawer or locker to continue the picking flow. If no item is selected as picked when it is closed, system will allow to unlock it again in case it was closed without items marked as picked by accident. When all items are picked from all locations, summary screen is shown:
In that state user can logout or start another operation. If pick failed due to any problems with hardware communication, error is marked in this list. In that case contact system administrator.
Working with pick lists
Items can be added to pick lists to pick more items during one operation. To add item to pick list, click Add to pick list button on quantity selection screen. As a result, one step is added to graphical flow and application navigates back to item selection screen.
Pick list step
(1) on graphical flow signalizes that you are currently in the pick list. Select item and all cost allocation steps (if any) as during basic pick to proceed to quantity selection. The Pick list step could be removed by system settings. In such case, the step is not shown and will be automatically skipped when working with pick lists. To go directly to pick list content without selecting additional item, press Finish list button
(2).
On quantity selection screen select Add to pick list button
(1) to add current item to pick list and go back to item selection to select another one, or select Finish list button
(2) to add current item to pick list and proceed to pick list summary.
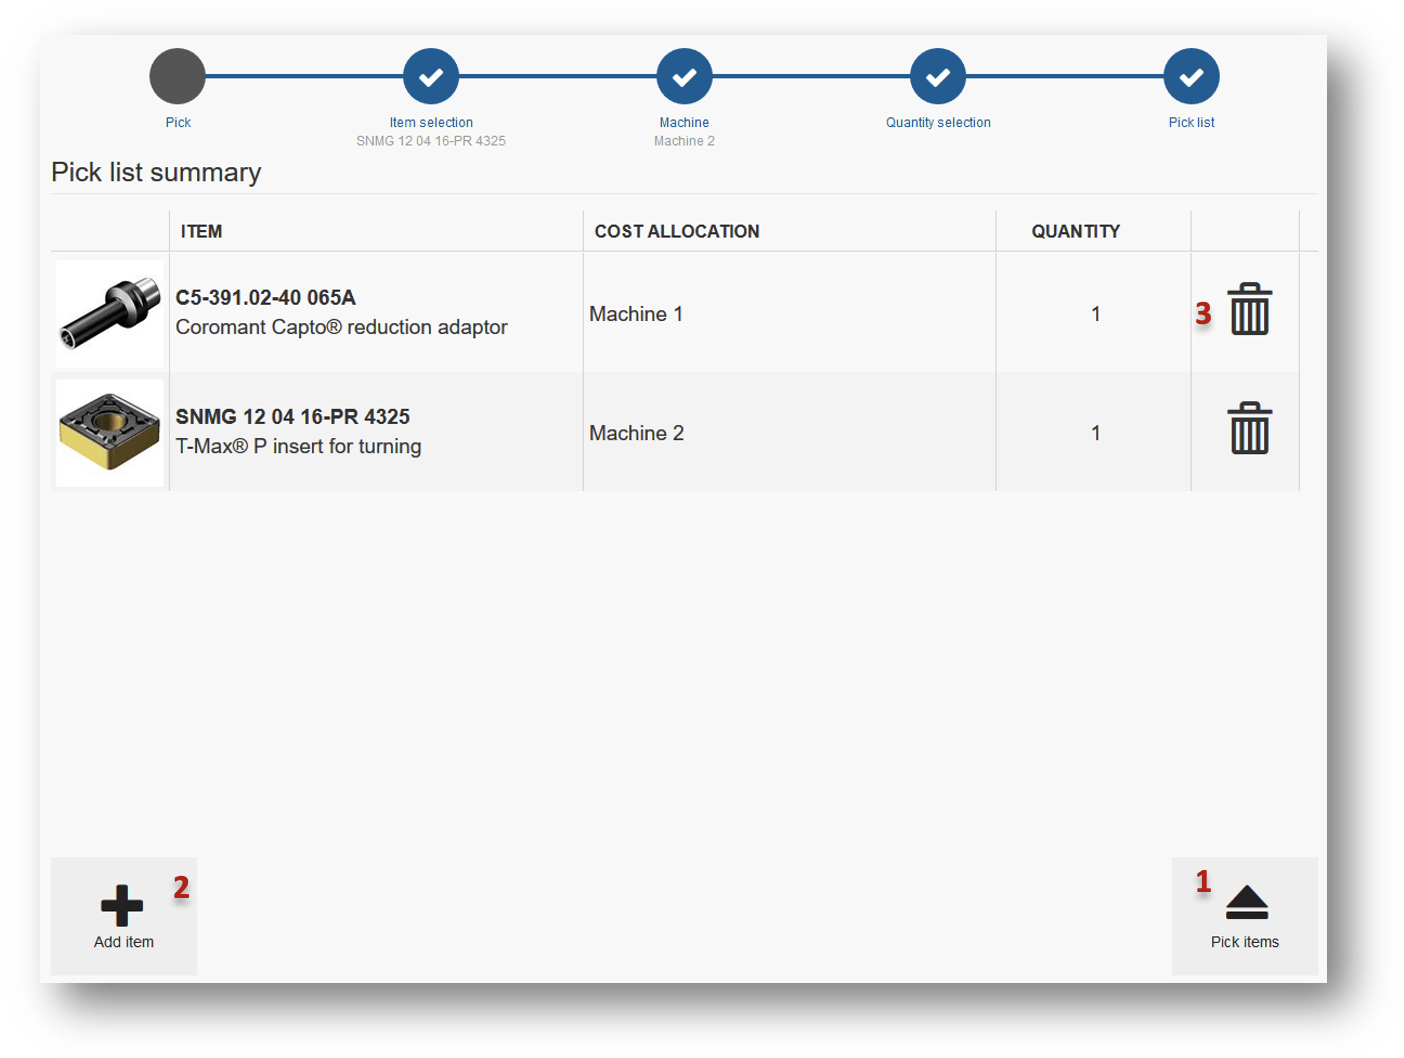
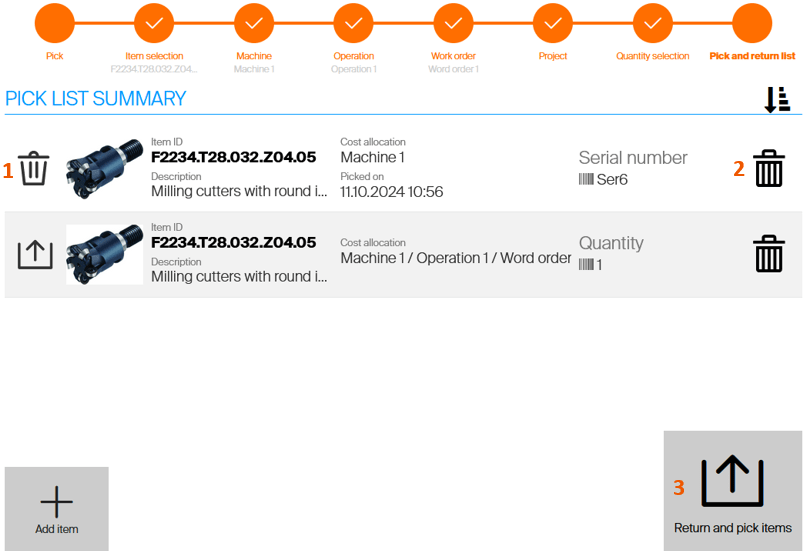
On pick list summary all items currently in the pick list are shown. To physically pick all items, select Pick items button
(1). To add additional items select Add item button
(2) or select Item selection in graphical flow. To remove item from pick list, select Remove button
(3).
Related items
When related items (alternatives, spare parts, matching items or assemblies) are defined for an item, these related items can be added to pick list and picked together with the main item. If related item is not available in current device, system can show where this device can be found within all stocks. All related items for selected item can be selected for pick directly from list of items by expanding item detail or from quantity selection screen during picking flow on an item. Button to show related items is not visible if there are no related items defined for the item.
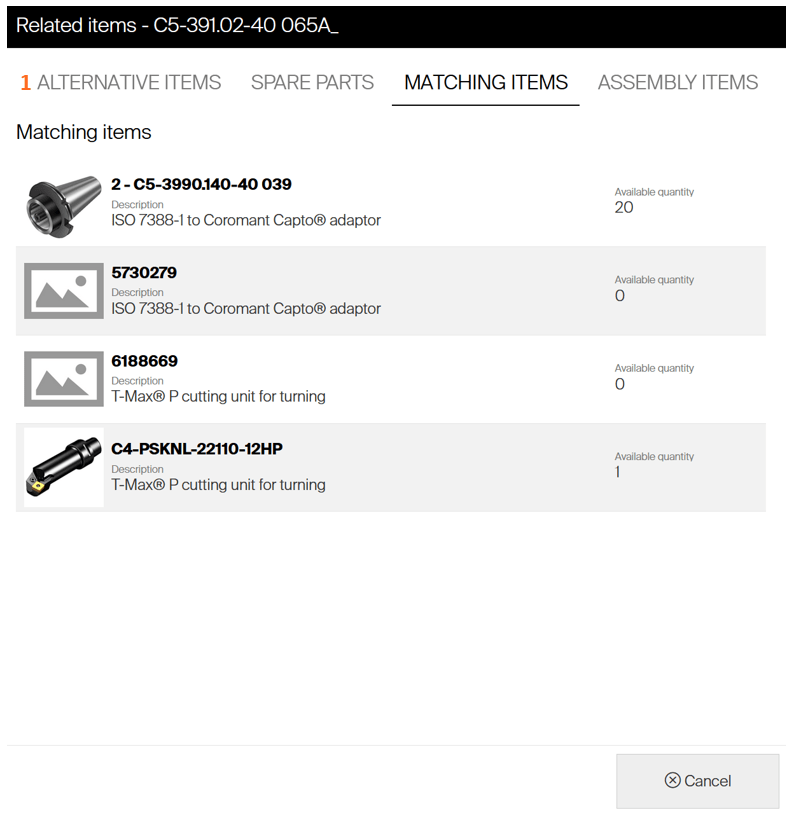
Upper section of dialog shown all relations that this item has. To switch between relations, click to tab in upper section
(1). List bellow will display all items within this relation, regardless if related item is assigned in current device. Click to related item to select it for the flow. If there is enough quantity available in current device, this item can be picked or added to pick list. If there is zero quantity on this device or item is not assigned at all, system will list all locations of this item within all stocks with information about upcoming purchase orders and picked items.
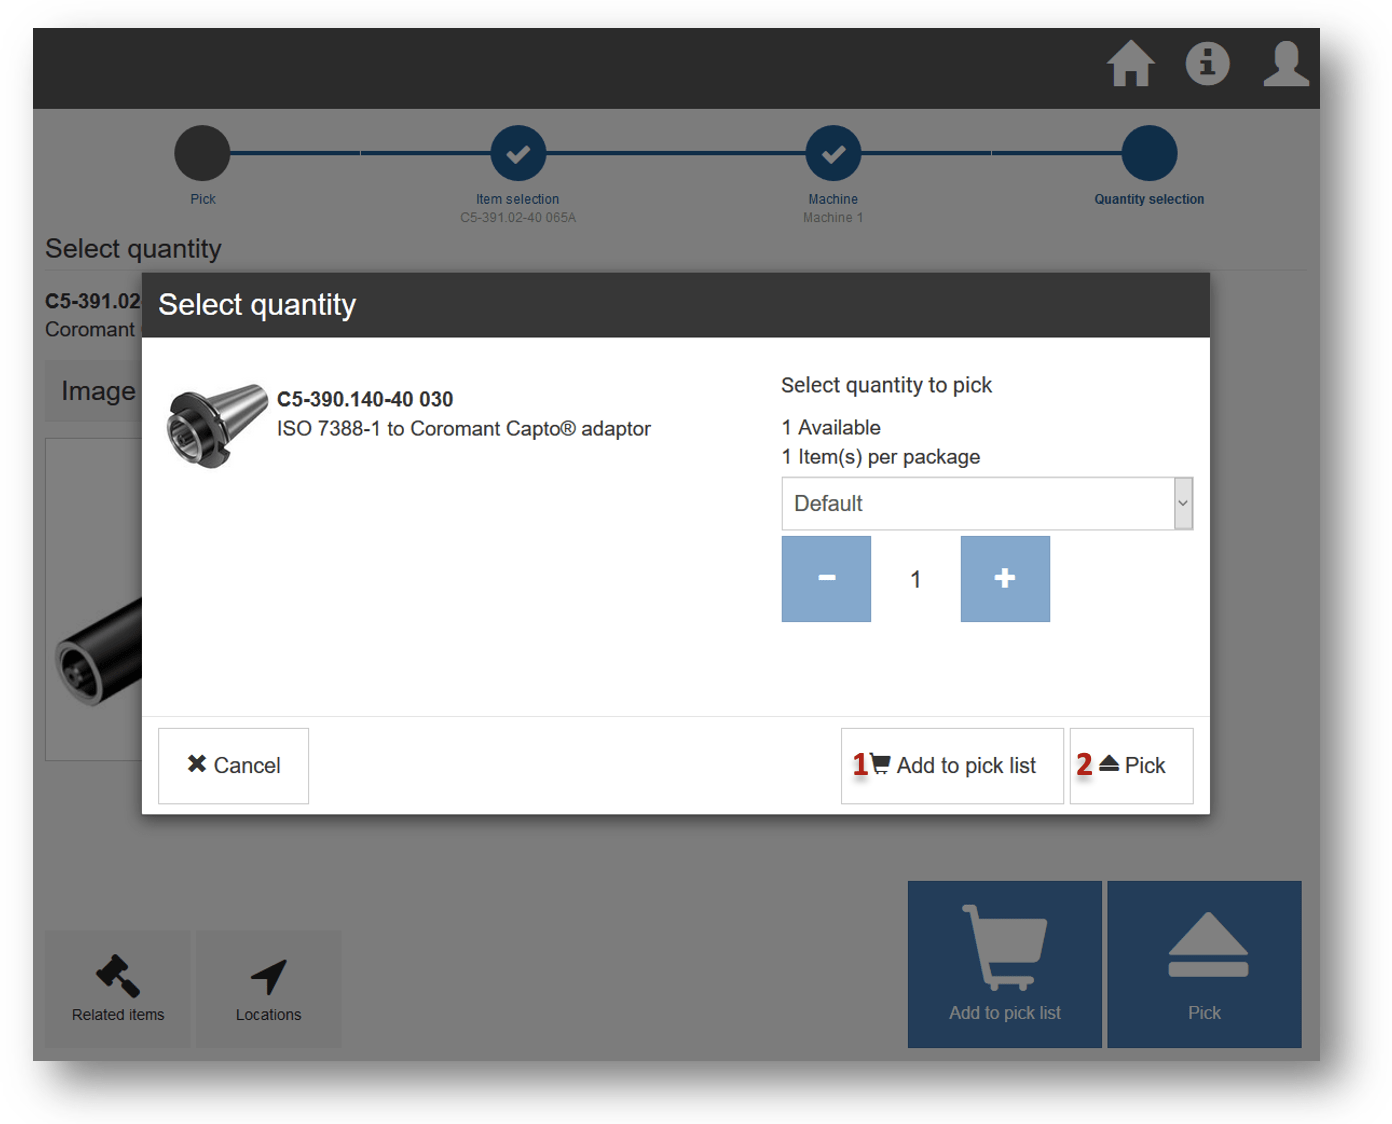
Select desired quantity (default quantity is set to required quantity for the main item). Related item can be added to pick list
(1) or picked directly without main item separately
Return/scrap item during pick
System may be set to check if item, currently being picked, is already picked in production by any user. This may be set either on:
- system level, to check if durable item is already picked in selected cost allocation by any user (see system settings), or
- item level, to check if the item is already picked by any user (see manage items).
When this happens, information about picked item is displayed once entering Quantity selection step during picking, allowing to perform additional action:
- Ignore and pick another item
- Scrap picked items (for durable items only)
- Return picked items to service (for durable and serviceable items only)
- Recycle picked items (for consumable items only)
- Cancel picking
Option to scrap item may not be shown if user does not have permission to scrap items. Return item to service may not be shown if user does not have permission to return item for service and if item is not serviceable. Recycle item may not be shown if user does not have permission to recycle and if there is no location dedicated for recycled items.
Scrap picked items
Once option Picked item(s) should be scrapped or Item(s) is not available in CA or Item(s) in CA should be scrapped is selected, Scrap flow is started.
Pick flow is not interrupted by the scrapping. All items in pick list remain unchanged.
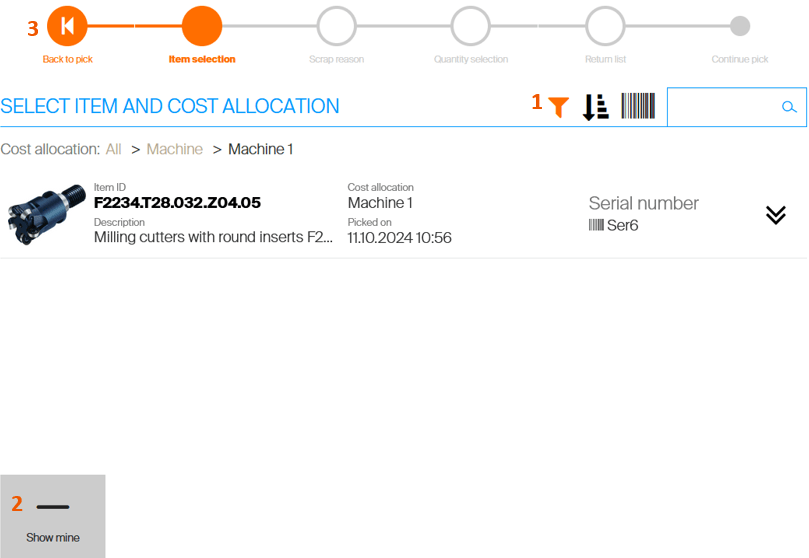
Select item which should be scrapped. If scrap is started due to item was already picked in selected CA, list of picked items will be filtered by this CA
(1). This filter can be changed to show picks from other CA. List is showing items picked by any user. To show only picks made by current user, press Show mine
(2). To return back to pick and cancel the scrap flow, select Back to pick (3).
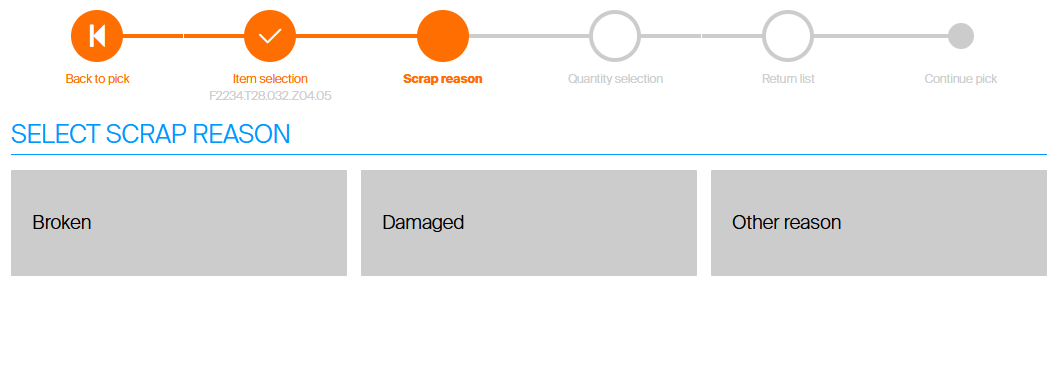
Select reason code for the scrap. If reason codes for scrapping are not mandatory or there is only single code available, this step is skipped.
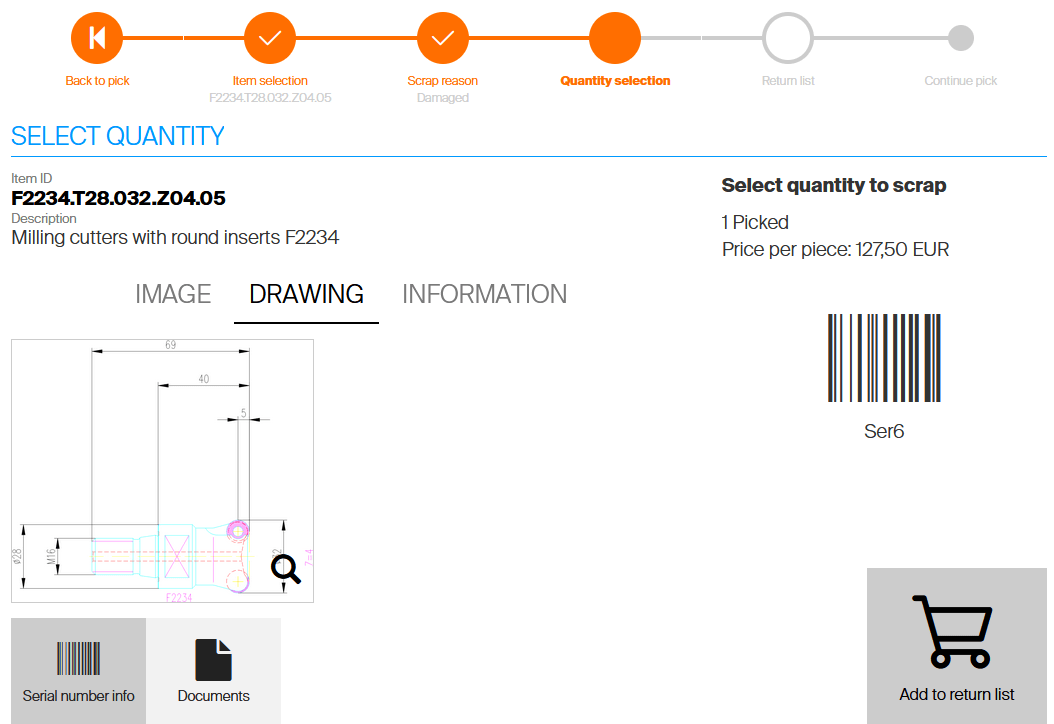
Confirm quantity to be scrapped. Item will be then added to return list.
Summary shows all items to be scrapped. Press Continue pick
(1) to return back to the pick flow or press Add item
(2) to add additional picked item to the scrap list.
 Once back in pick wizard, additional step Pick and return list will be shown
(1), indicating there are items to be returned (scrapped, recycled). Continue by adding additional items to pick list
(2) if more items should be picked or continue with pick of the current item
(3).
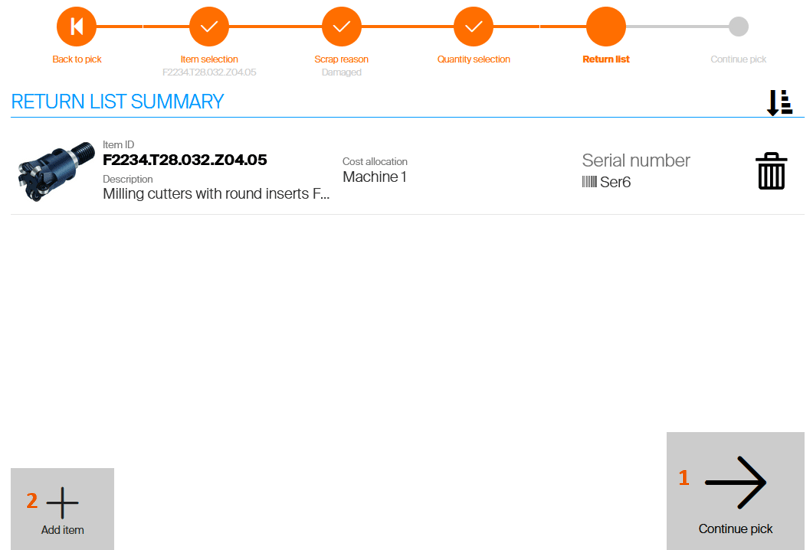
On the final step of the wizard, all items to be returned and picked are listed
(1). To remove item from the list, press trash bin icon
(2). Confirm the list to proceed with the flow
(3). After the confirmation, all items in the list marked to be scrapped will be scrapped and all items marked to be picked will be made available in their locations.
Return picked item for service
Once option Picked item(s) should be assigned to service or Item(s) in CA should be assigned to service is selected, return to service flow is started. The flow proceeds similarly to the scrap during pick flow described before, except no scrap reason code will be needed. Location designated for the serviceable item will be made accessible before locations where items will be picked.
Pick flow is not interrupted by the return for service. All items in pick list remain unchanged.
Recycle picked item
Once option Picked item(s) should be recycled is selected, recycle flow is started. The flow proceeds similarly to the scrap during pick flow described before, except no scrap reason code will be needed as recycle reason code may be needed to be entered instead. Location designated for the recycle will be made accessible before locations where items will be picked.
Pick flow is not interrupted by the recycle flow. All items in pick list remain unchanged.