
What you can do
Change a CRIBWISE item from consumable to durable — directly while it is still Defined, or through a durable copy once it has been released. Your stock and the original Item ID move over to the durable item.
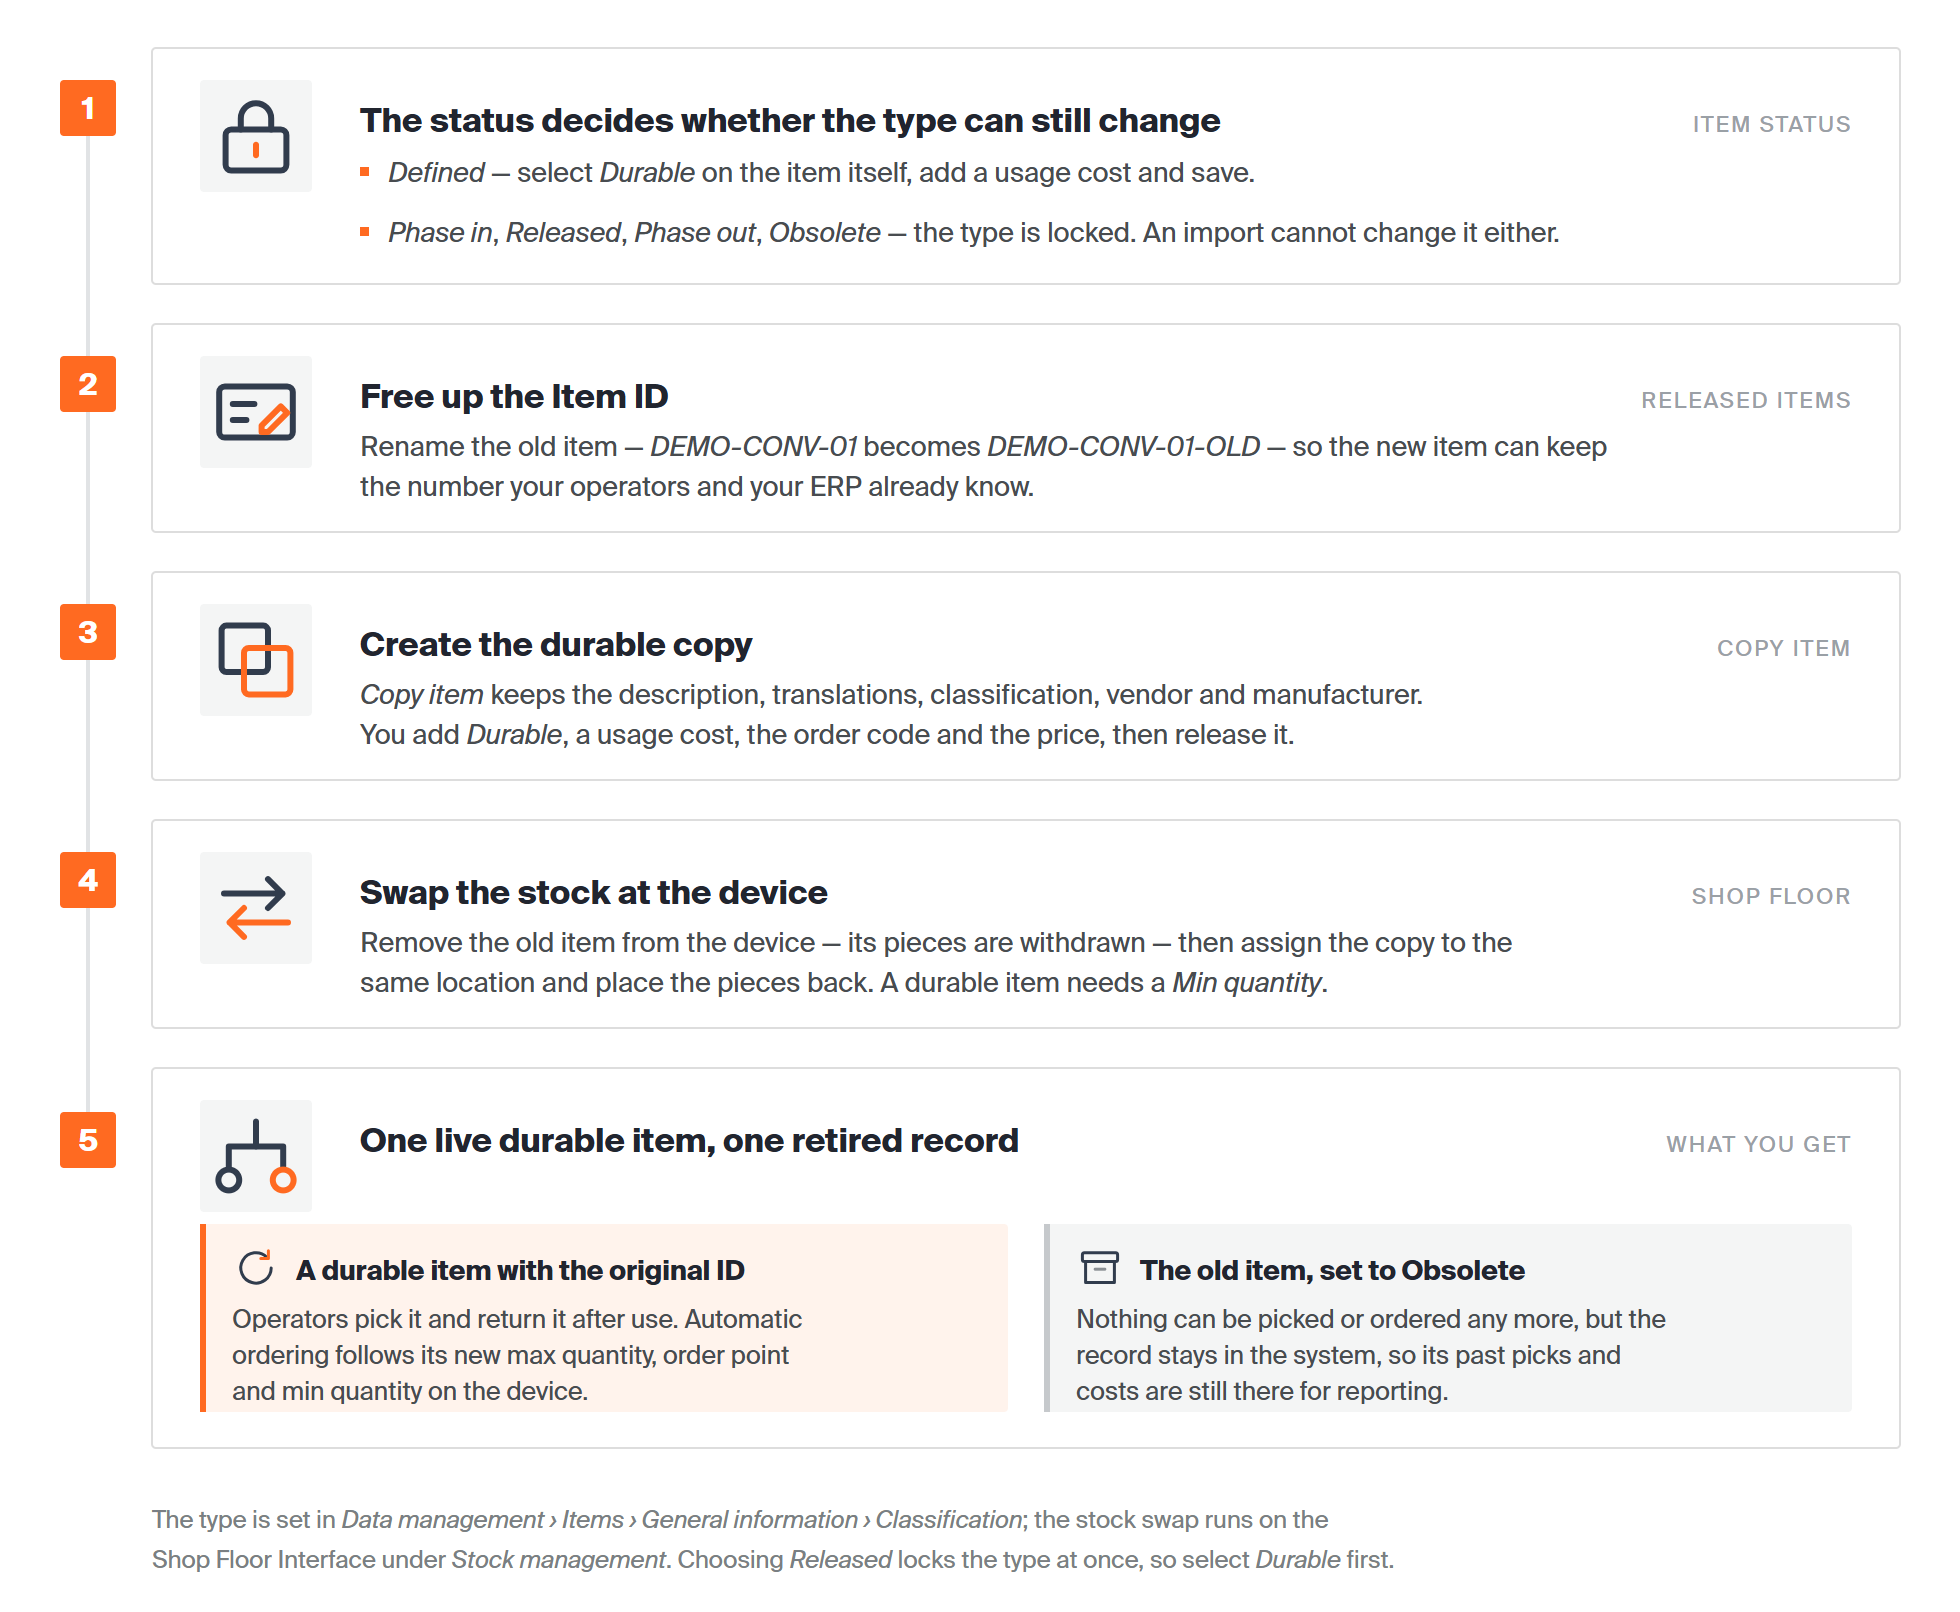
The whole route at a glance. Step 1 decides which way you go: a Defined item is changed in place; a released item takes steps 2–5.
Tip: The rule works the same the other way round. An item can go from durable to consumable only while it is Defined; after that, use the same copy route and select Consumable instead.
Before you start
- You need an Admin Portal user who can edit items under Data management > Items.
- For a released item you also need a Shop Floor Interface user whose user group includes Stock management. An operator group with only Pick and Return does not show it.
- Check that durable items are enabled for your company: the item’s Classification section must show a Durable option. If it only shows Consumable, contact CRIBWISE support.
- Note every device and location that holds the item, and how many pieces are in each. The item’s Stock locations tab in the Admin Portal lists them.
- Complete or cancel any open order for the item. The Shop Floor Interface will not remove an item from a device while an order for it is still open.
- Pick a quiet moment. Between removing the old item and placing the new one, operators cannot pick it.
Important: The item type locks as soon as the status leaves Defined, and a released item can never go back to Defined. An import cannot change the type either — it skips the row with “Cannot change item type during item update”.
Quick start
Experienced users — convert a released item in 5 steps:
- Rename the old item’s Item ID, for example add -OLD, and click Save item.
- Click Copy item, enter the original Item ID, select Durable, fill in the usage cost, order code and price, set Status to Released and click Save item.
- On the Shop Floor Interface, open Stock management > Manage items, open the old item and tap Remove from device.
- Tap Stock management > Assign item, choose the new item and the same location, set Min quantity and place the pieces back.
- Set the old item to Obsolete.
Need more detail? Follow the full steps below.
Steps
Step 1 — Check the item’s status
- In the Admin Portal, go to Data management > Items.
- Select the item and click View detail.
- Look at Status under Daily use settings.
| Status | Can you change the type? | Go to |
|---|---|---|
| Defined | Yes, on the item itself | Step 2 |
| Phase in, Released, Phase out or Obsolete | No — Consumable and Durable are greyed out | Step 3 |
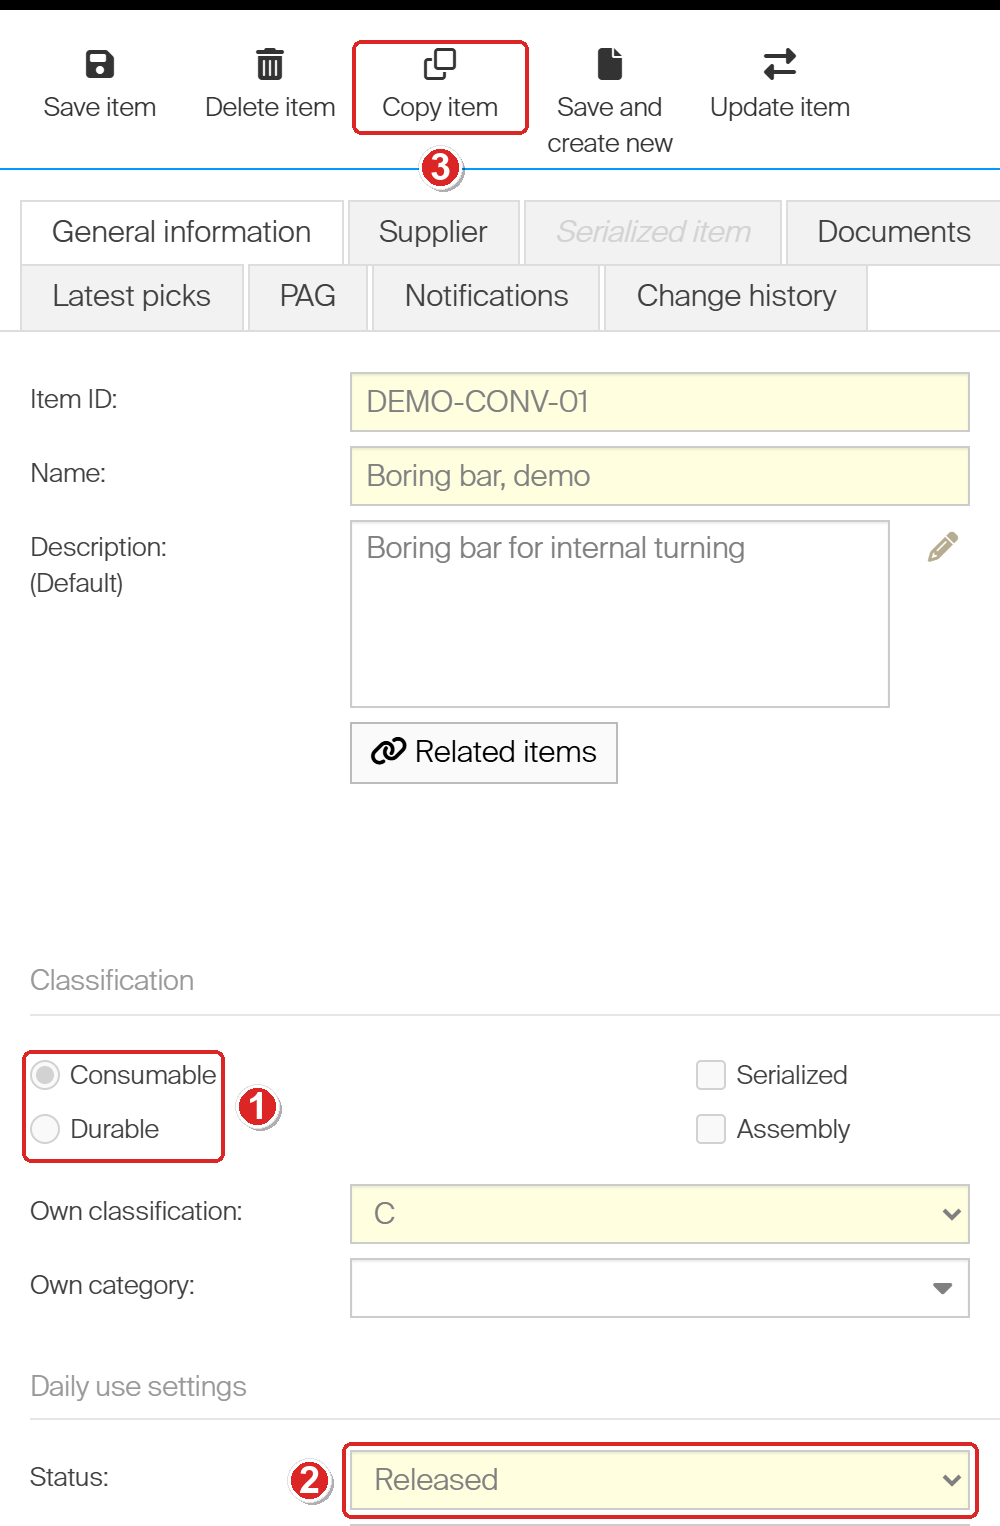
A released item. The type options are greyed out (1) because Status is Released (2). Copy item (3) starts the route for released items.
Step 2 — Change the type of a Defined item
- Under Classification, select Durable. Serialized and Assembly become available.
- Set Usage cost structure, for example Fixed per pick. See Understanding item costs for the options.
- Enter the Cost.
- Click Save item.
The fields are the same as in Step 4, shown in the screenshot there.
Success: Reopen the item. Durable is still selected, and you can still change it while the status is Defined. You are done — skip the remaining steps.
Note: Select the type before you touch Status. As soon as you choose any status other than Defined, the type options lock — even before you save.
Step 3 — Rename the old item
The durable copy takes over the original Item ID, so the number on your labels, in your pick routines and in your ERP stays the same. Free it up first. If the new item may have a new Item ID, skip this step.
- On the old item, change Item ID — for example from DEMO-CONV-01 to DEMO-CONV-01-OLD.
- Click Save item.
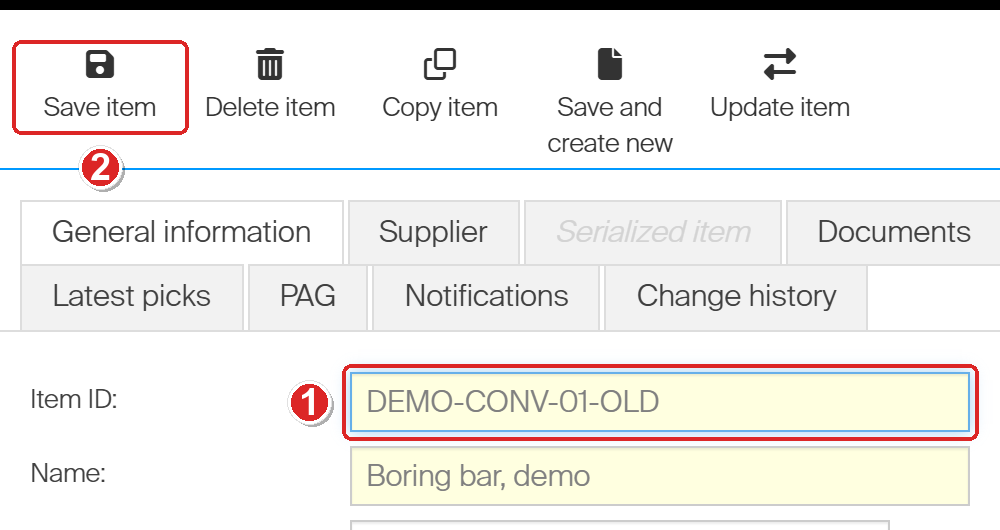
The old item with its new Item ID (1), ready to save (2). The Item ID stays editable after release.
If an ERP integration keeps your item data in sync, check with its owner how it identifies items before you rename one.
Step 4 — Create a durable copy
- With the old item still open, click Copy item. A new item opens in status Defined, so the type options are available again.
- Enter the Item ID — the original one, for example DEMO-CONV-01.
- Enter the Name.
- Under Classification, select Durable.
- Set Usage cost structure.
- Enter the Cost.
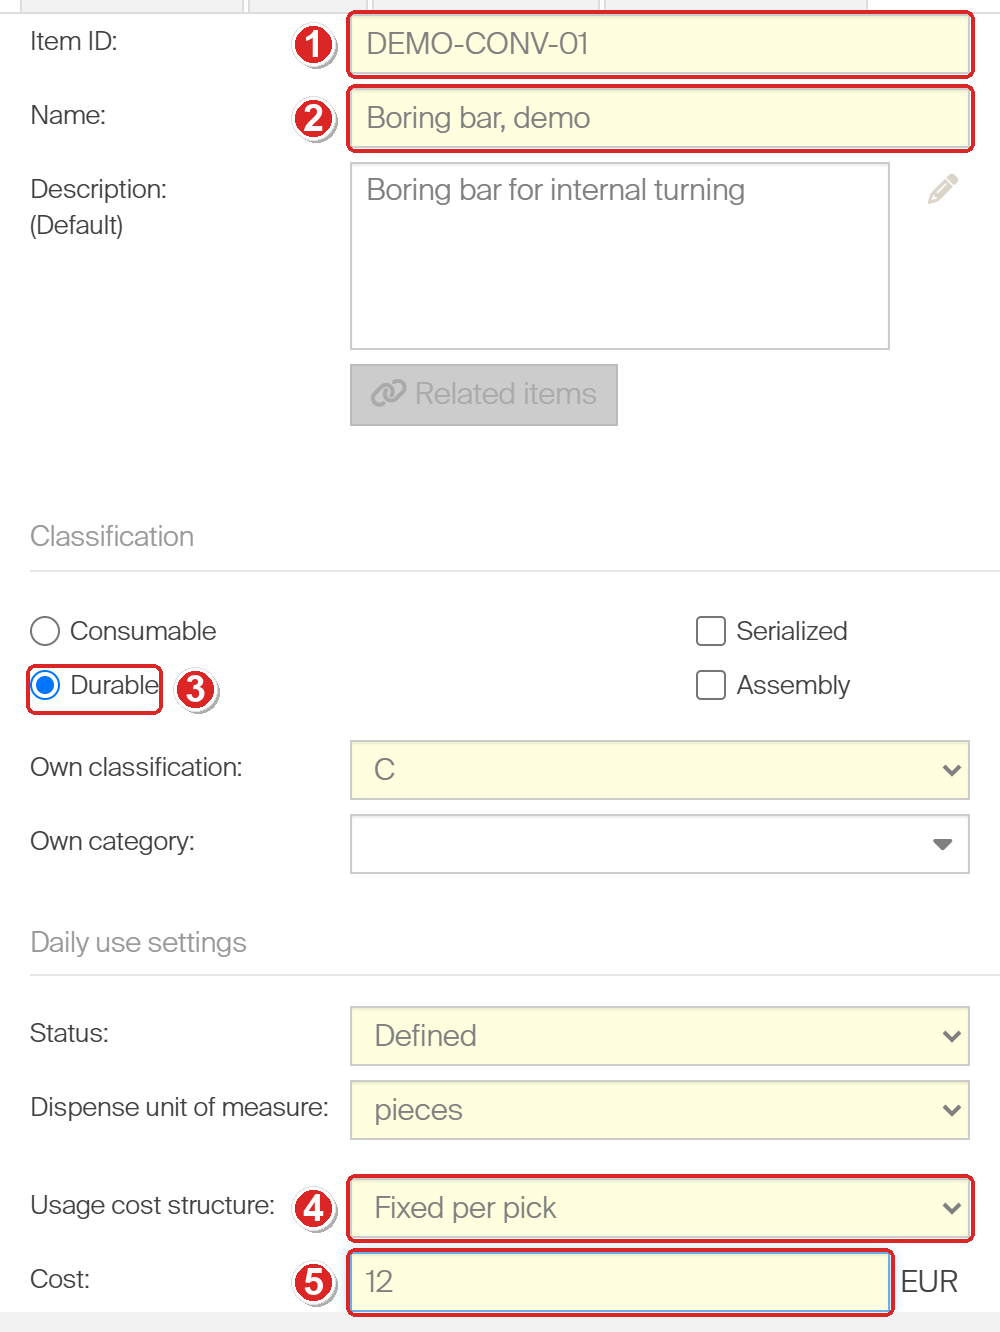
The copy on General information: Item ID (1), Name (2), Durable (3), Usage cost structure (4) and Cost (5). The description came across from the old item.
- Open the Supplier tab.
- Enter the Order code.
- Enter the Purchase price.
- Check Purchase package quantity.
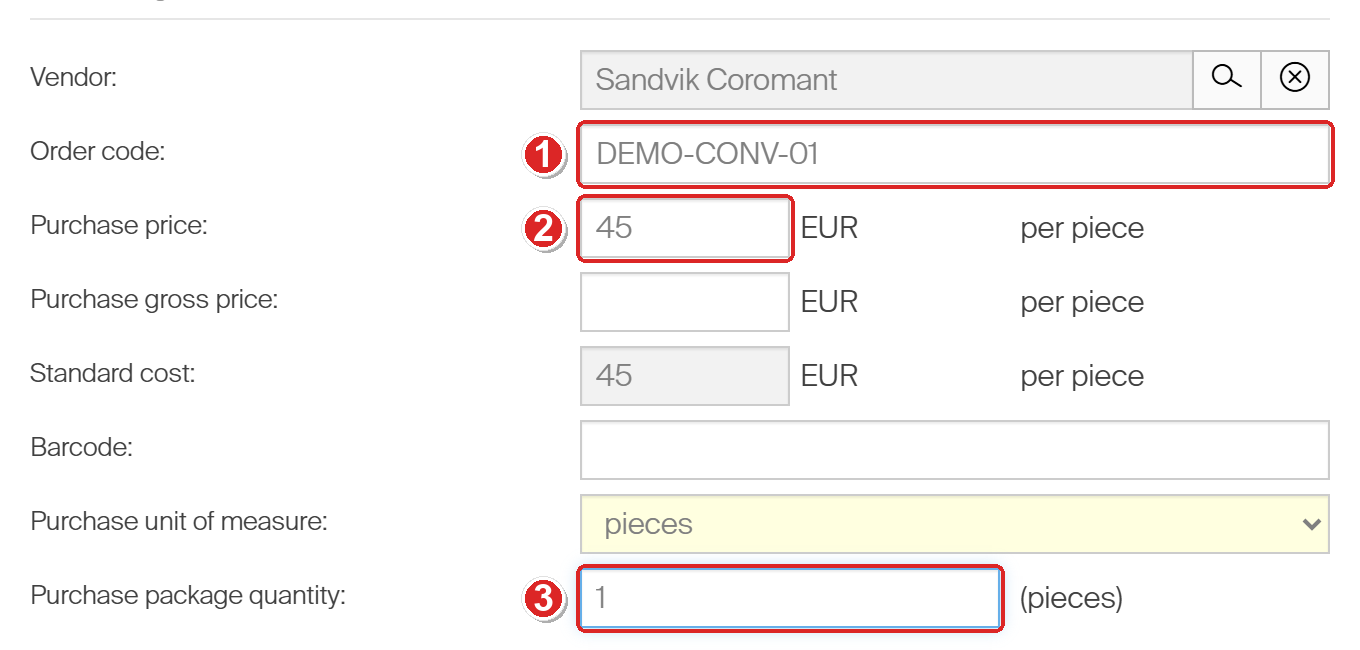
The Supplier tab. The vendor is copied; Order code (1) and Purchase price (2) are not. Purchase package quantity (3) is copied — check it.
| Copy item copies | You fill in again | Check after the first save |
|---|---|---|
| Description and its translations, GTC classification, vendor, purchase package quantity, manufacturer and manufacturer item ID | Item ID, name, type, usage cost, order code, purchase price | Documents, ISO parameters, CA access, PAG, Notifications and Related items. They unlock once the copy is saved — compare them with the old item. |
Step 5 — Release and save the copy
- Go back to General information.
- Set Status to Released.
- Click Save item.
Success: Reopen the item. Durable is selected and greyed out, and Status reads Released.
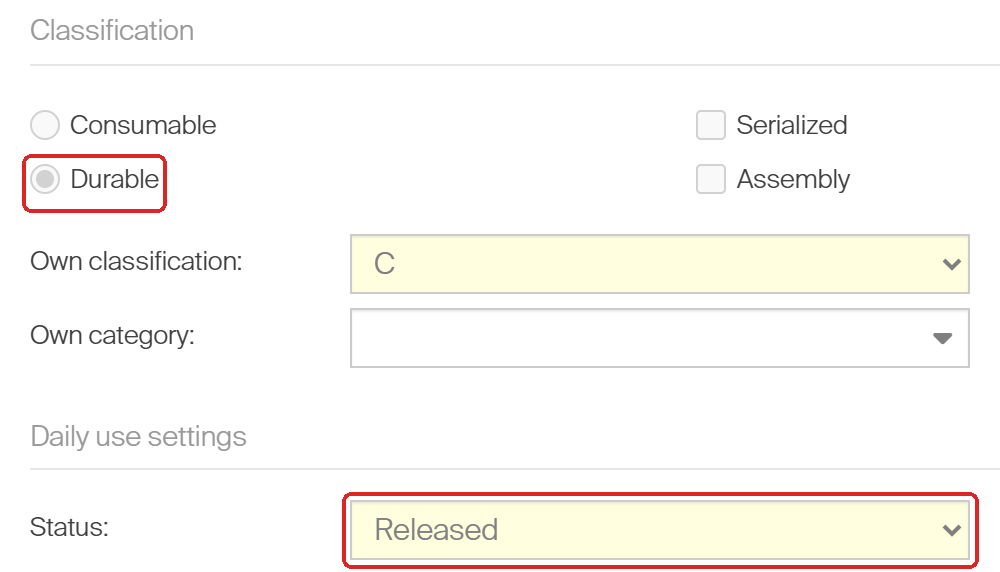
The saved copy: a released durable item under the original Item ID.
Step 6 — Take the old item out of the device
Do this on the Shop Floor Interface of each device that holds the old item. An import cannot do it: it rejects location changes on a released storage device.
- Sign in to the Shop Floor Interface on the device.
- Tap Stock management, then Manage items.
- Tap the pencil on the old item’s row.
- Tap Remove from device.
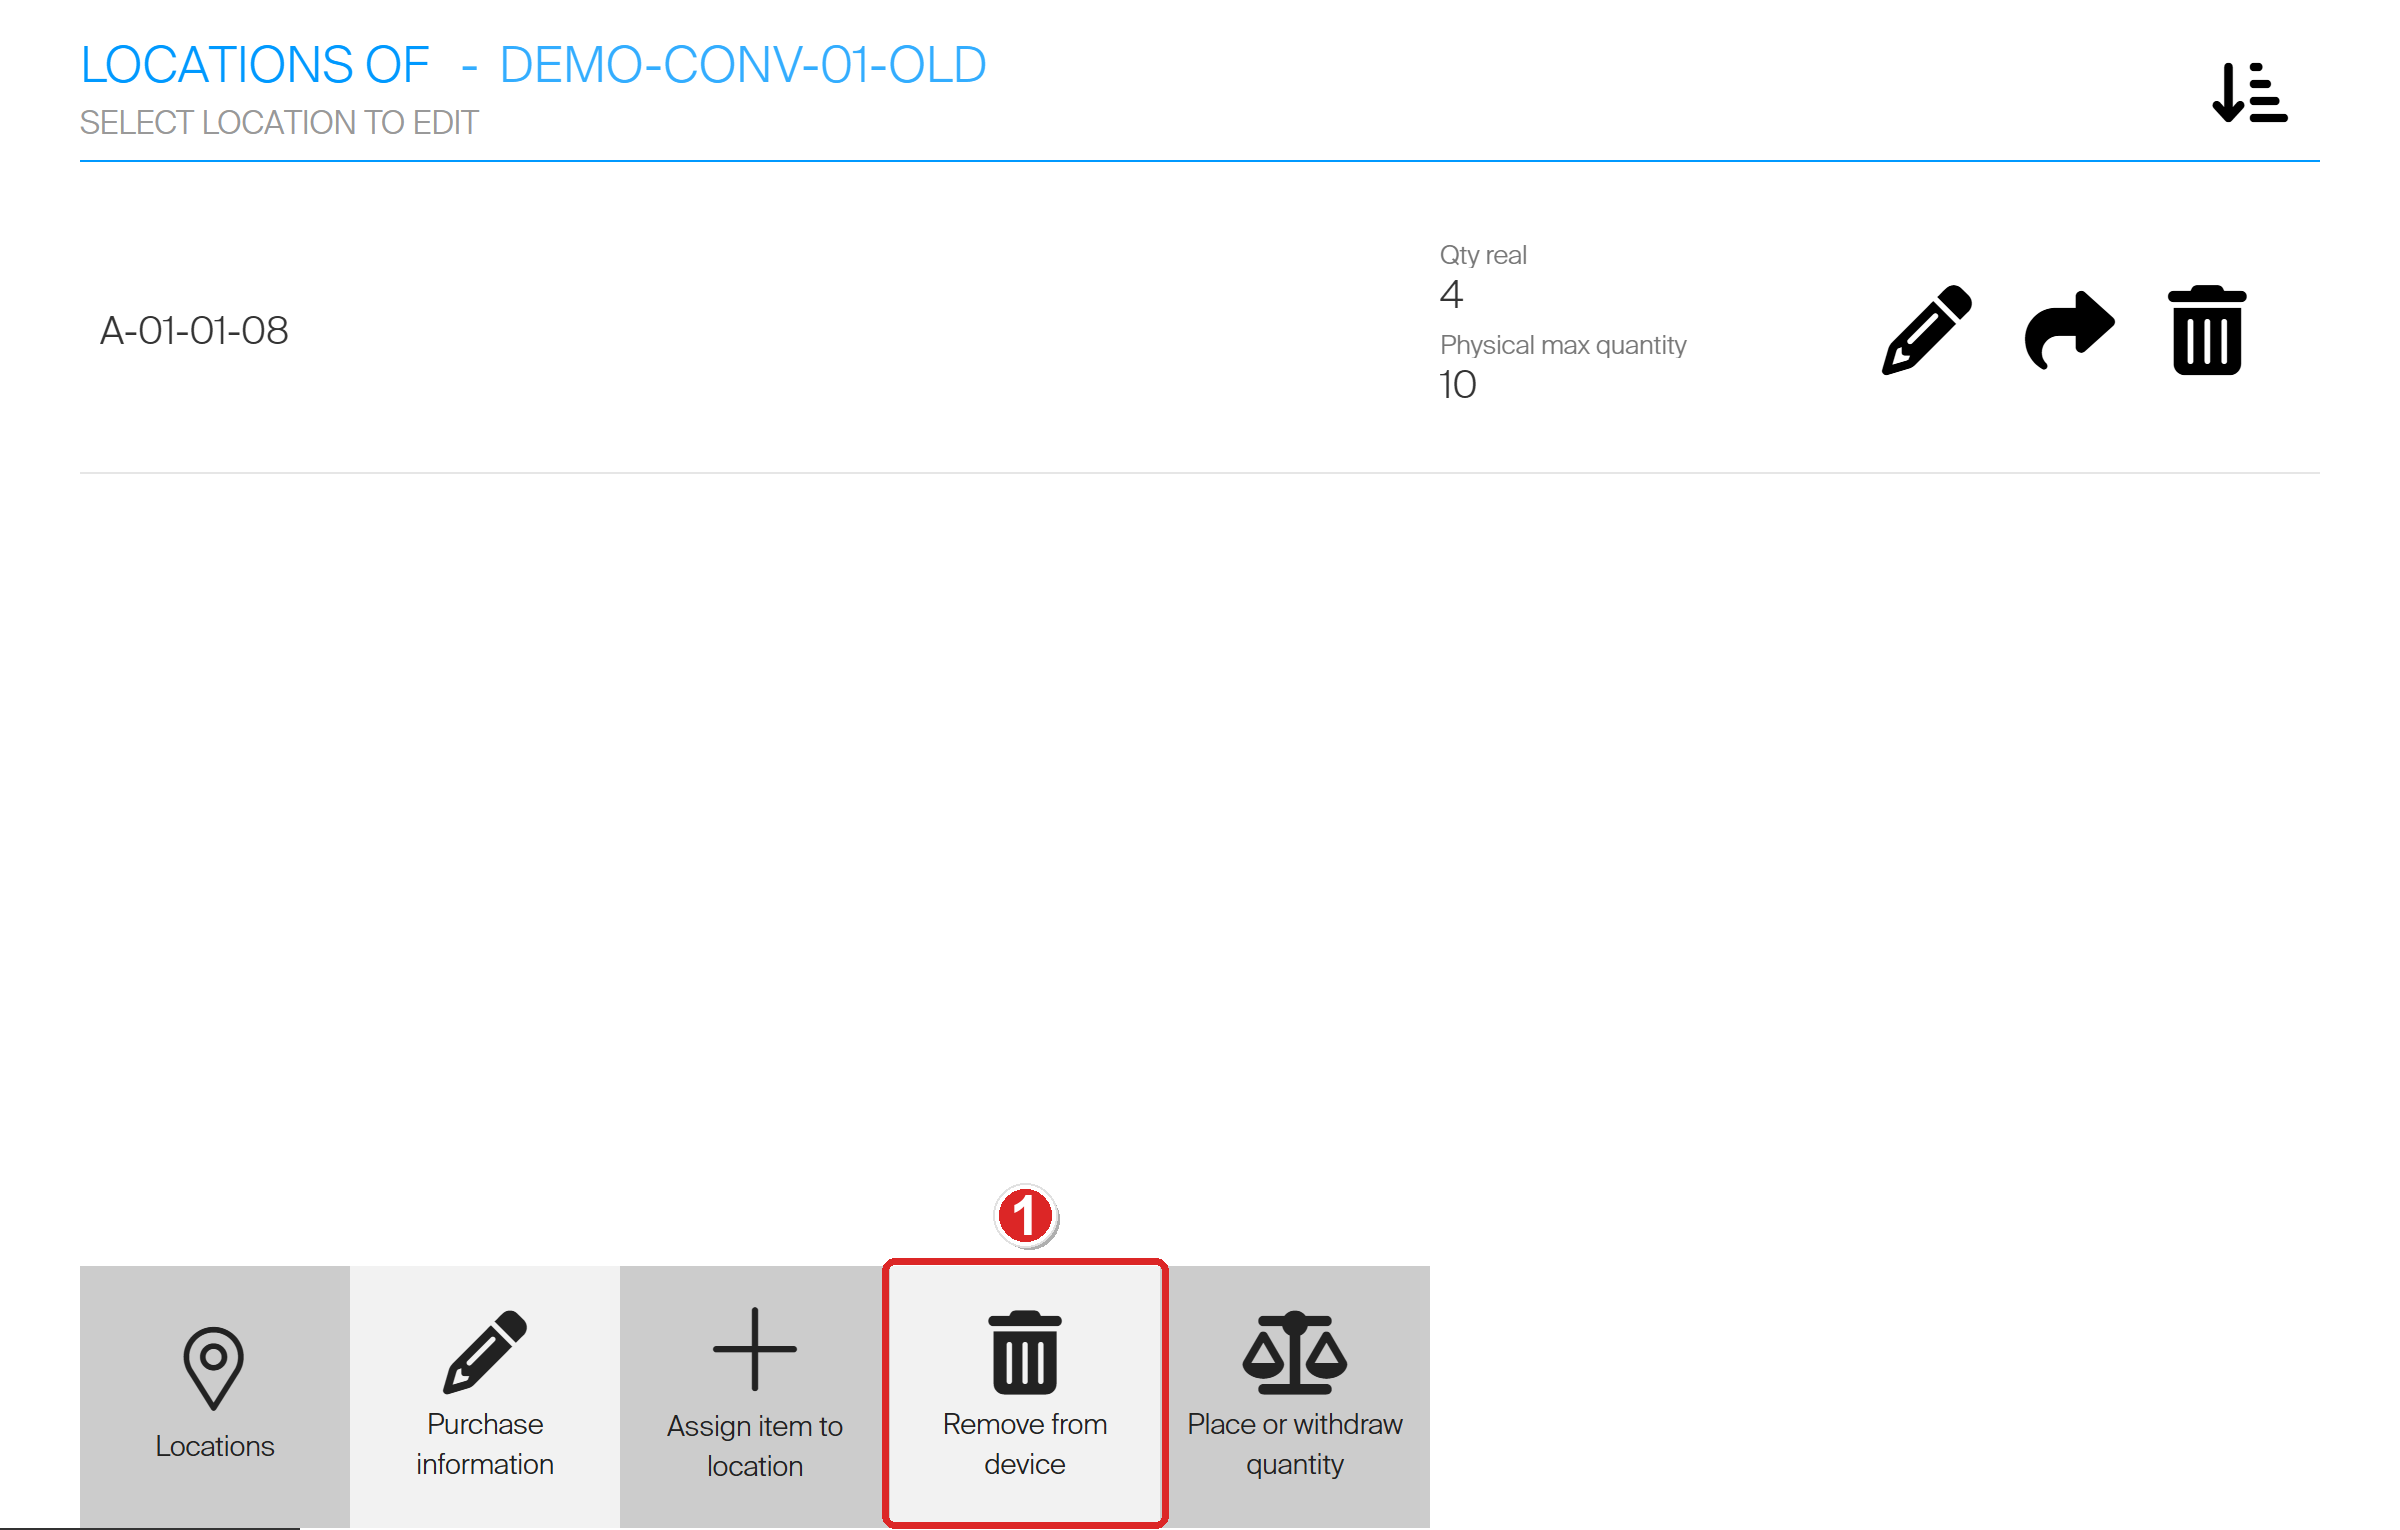
The locations of the old item, with the pieces it still holds. Tap Remove from device (1).
- Tap Yes to confirm.
- Take the pieces out of the location and tap Finish.
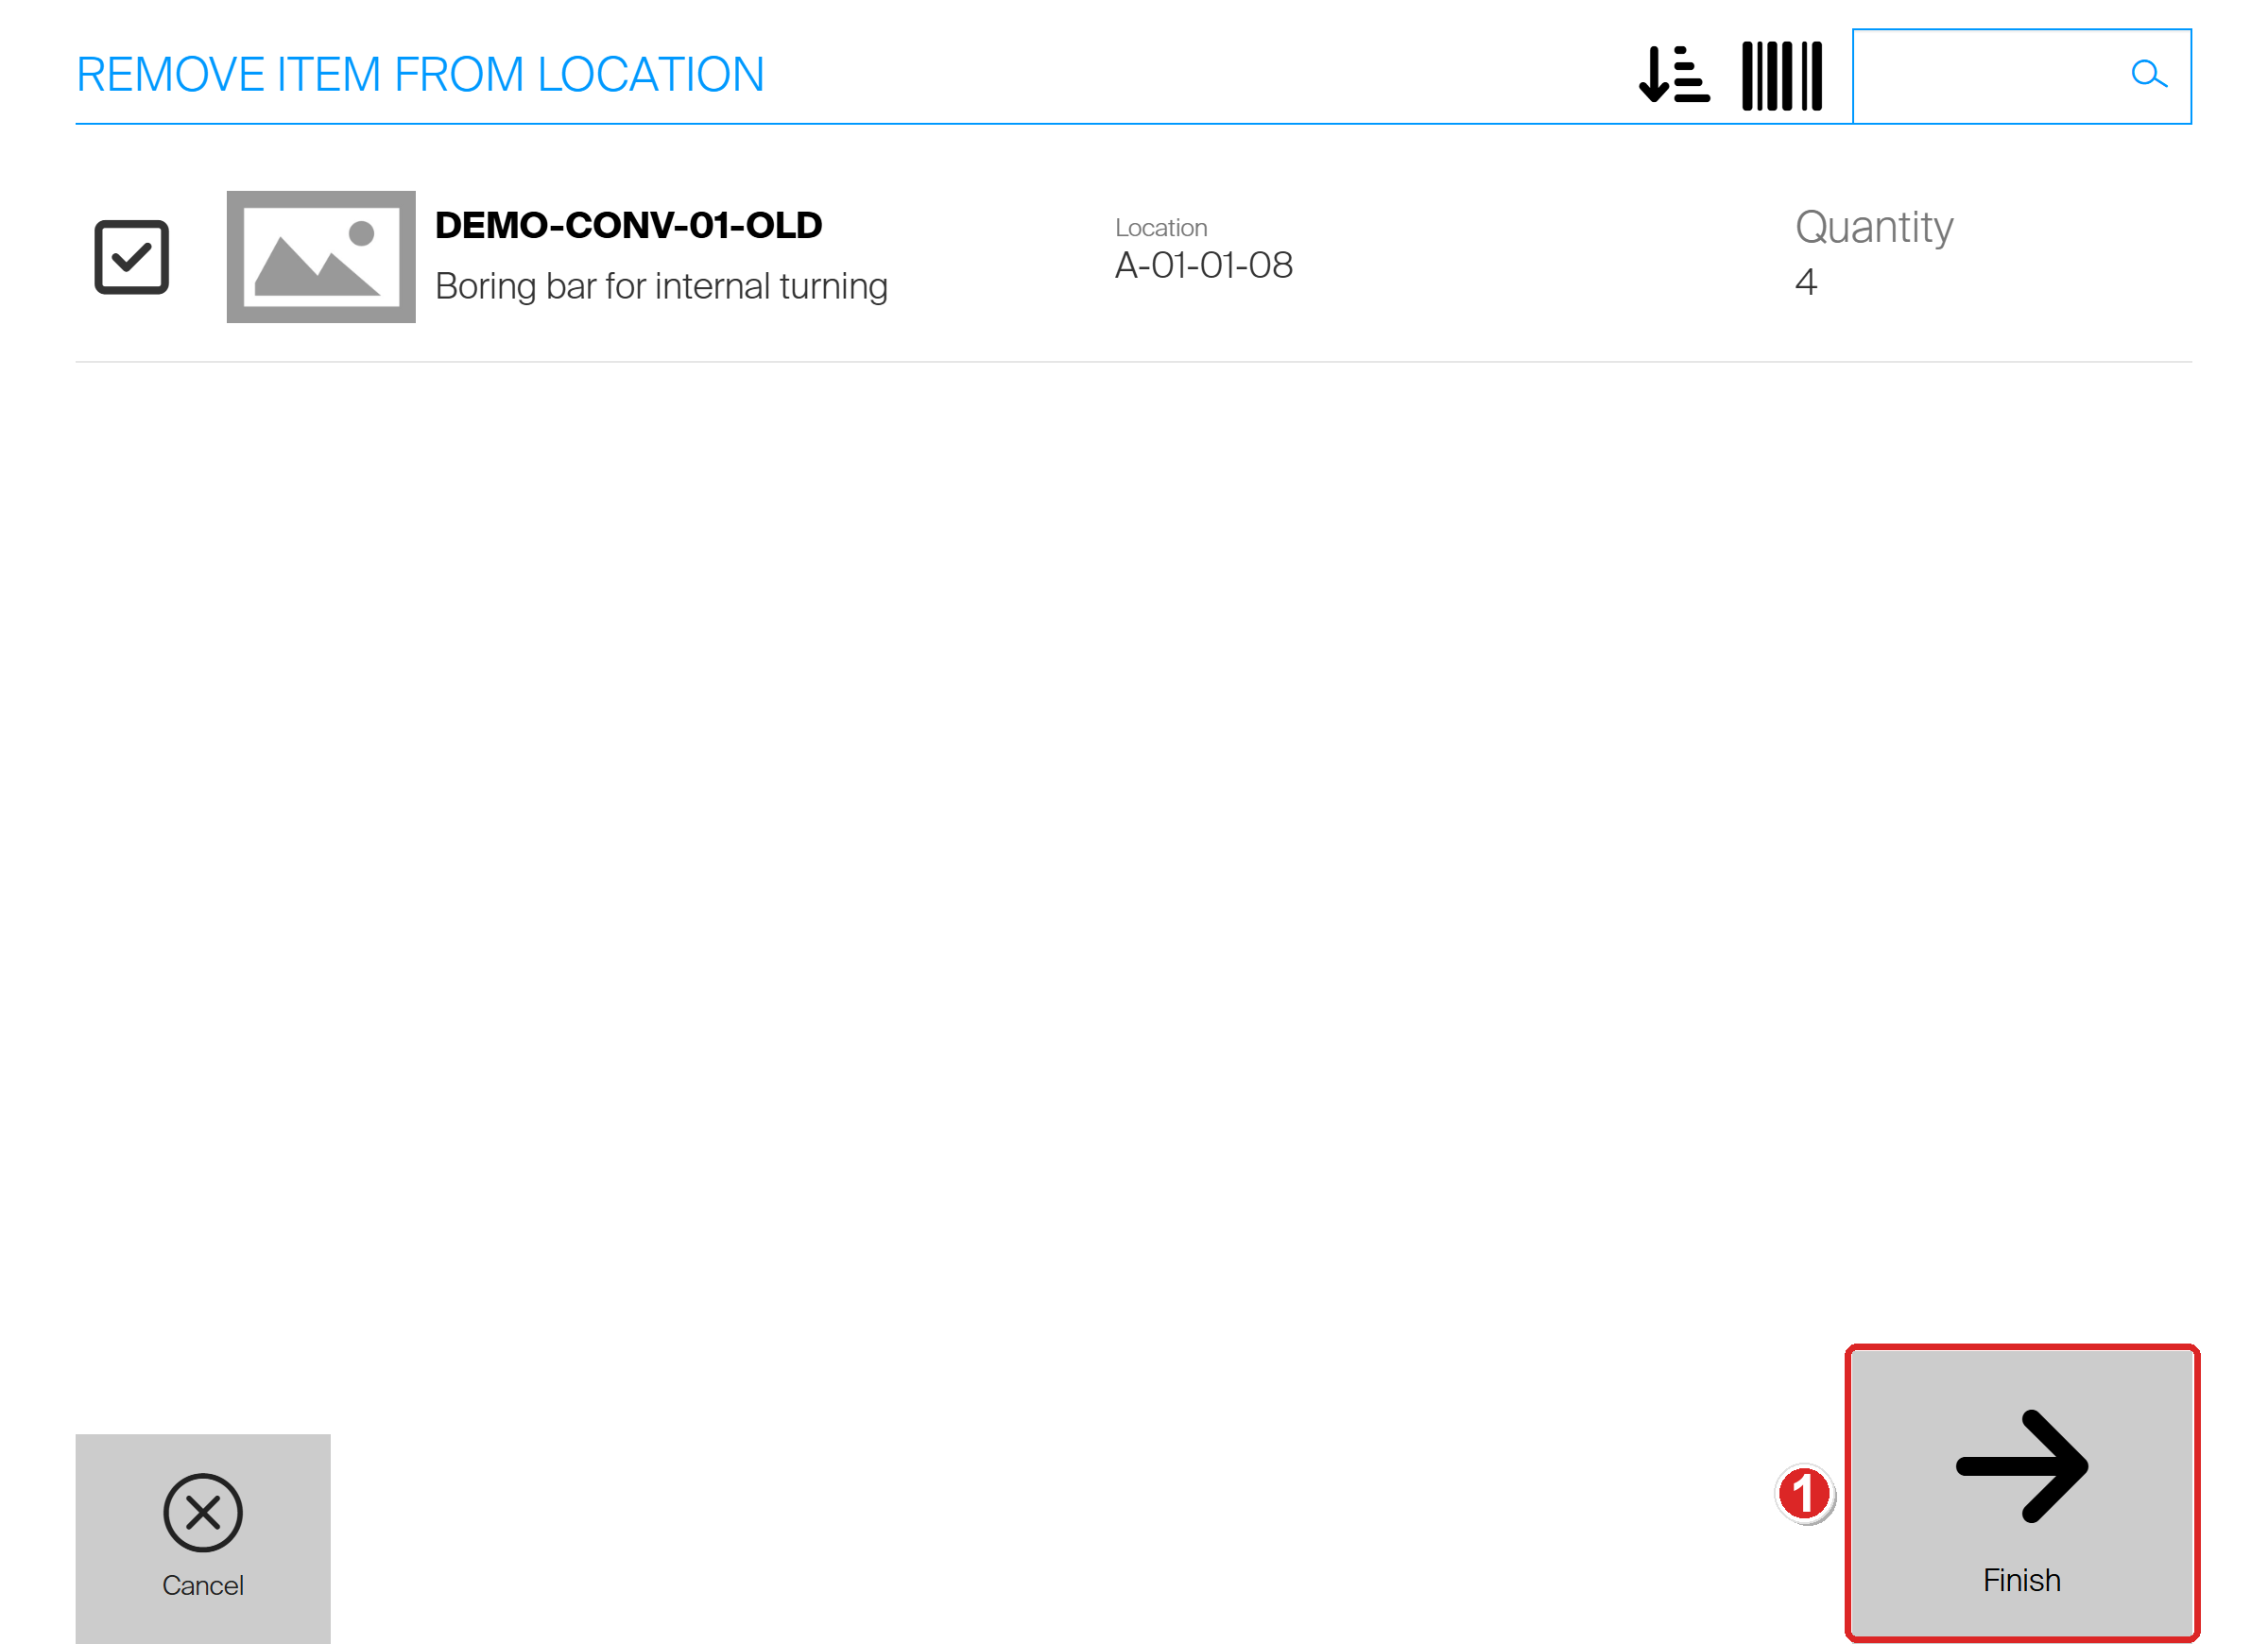
Remove item from location lists every location and quantity. Tap Finish (1). Keep the pieces at hand for the next step.
Item removed from locations confirms it. Each piece is booked out with a withdraw transaction, and the old item leaves the device’s Manage items list.
Step 7 — Assign the durable item and put the pieces back
- Tap Stock management, then Assign item.
- Search for the item and tap the new one — not the one ending in -OLD.
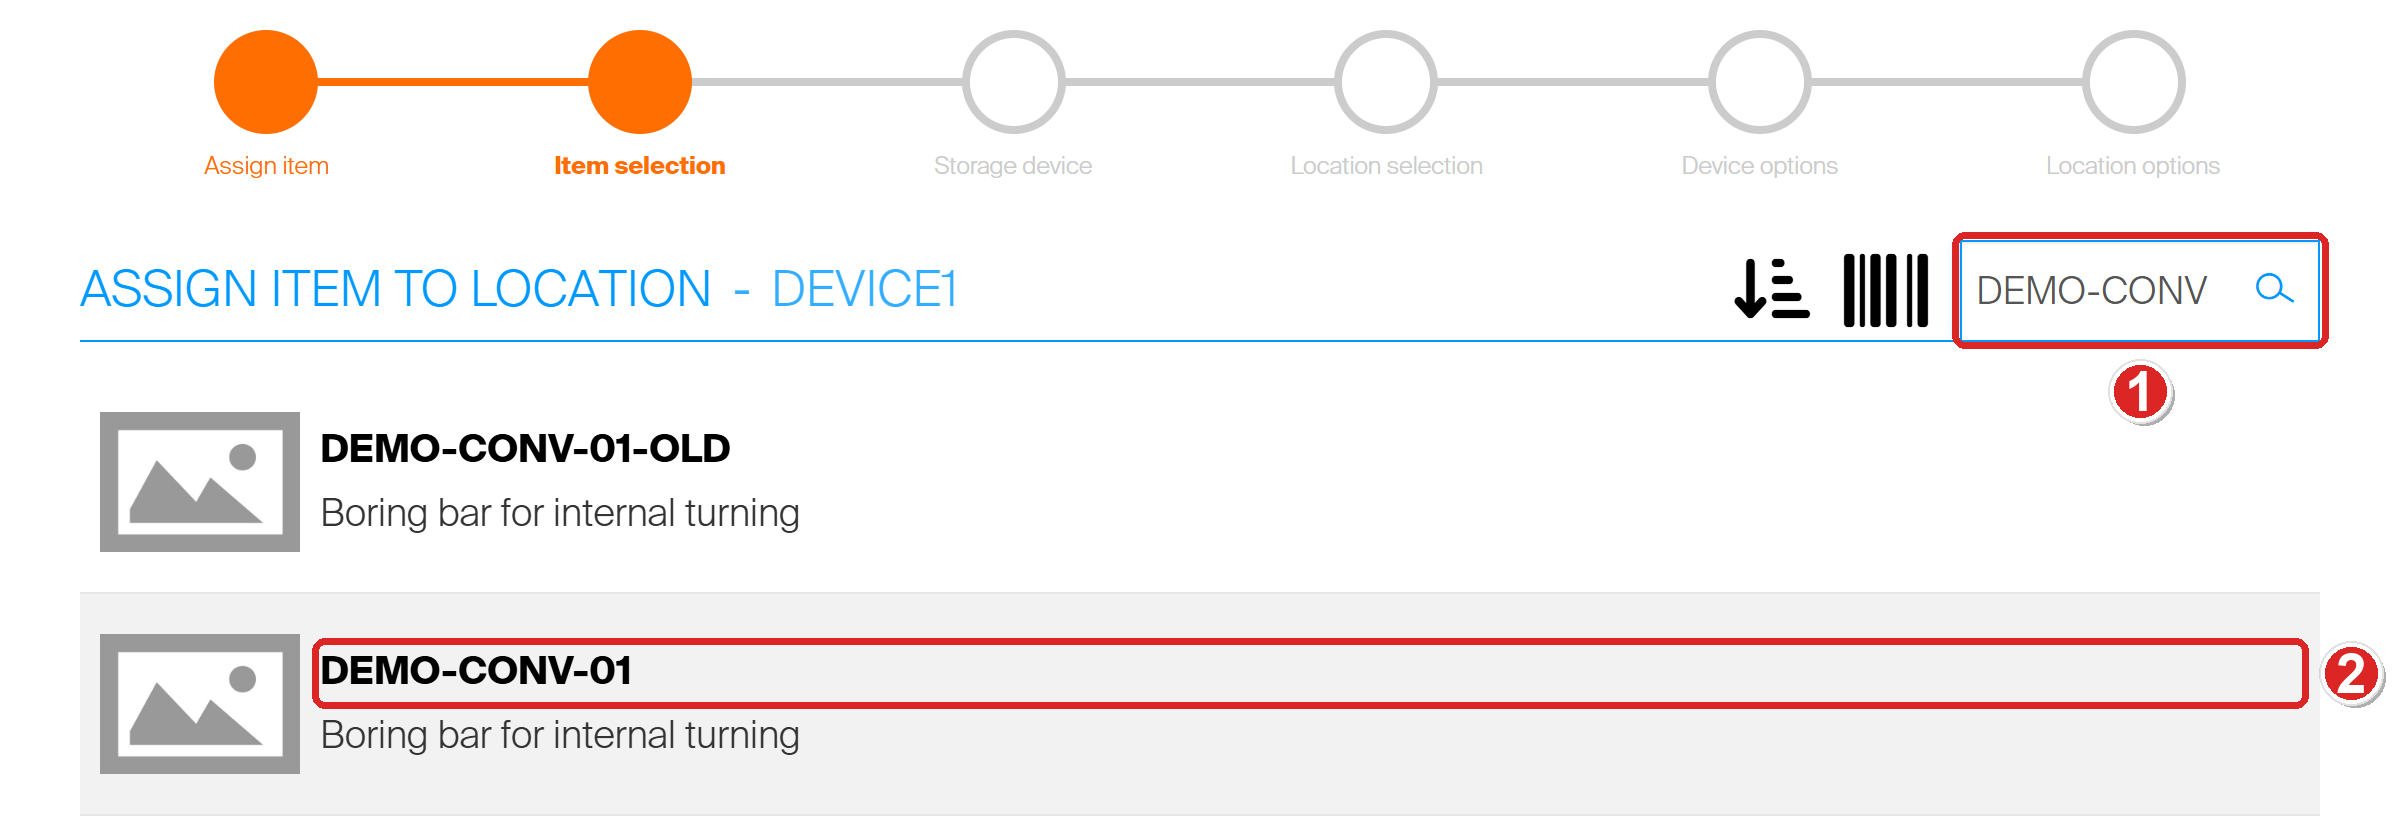
Search (1), then tap the durable item (2). The old item is still listed until you retire it in Step 8.
- Tap the storage device, for example A.
- Tap the location the old item used, for example A-01-01-08.
- Set Max quantity and Order point.
- Set Min quantity. Durable items require it — Confirm stays unavailable until it has a value.
- Tap Confirm.
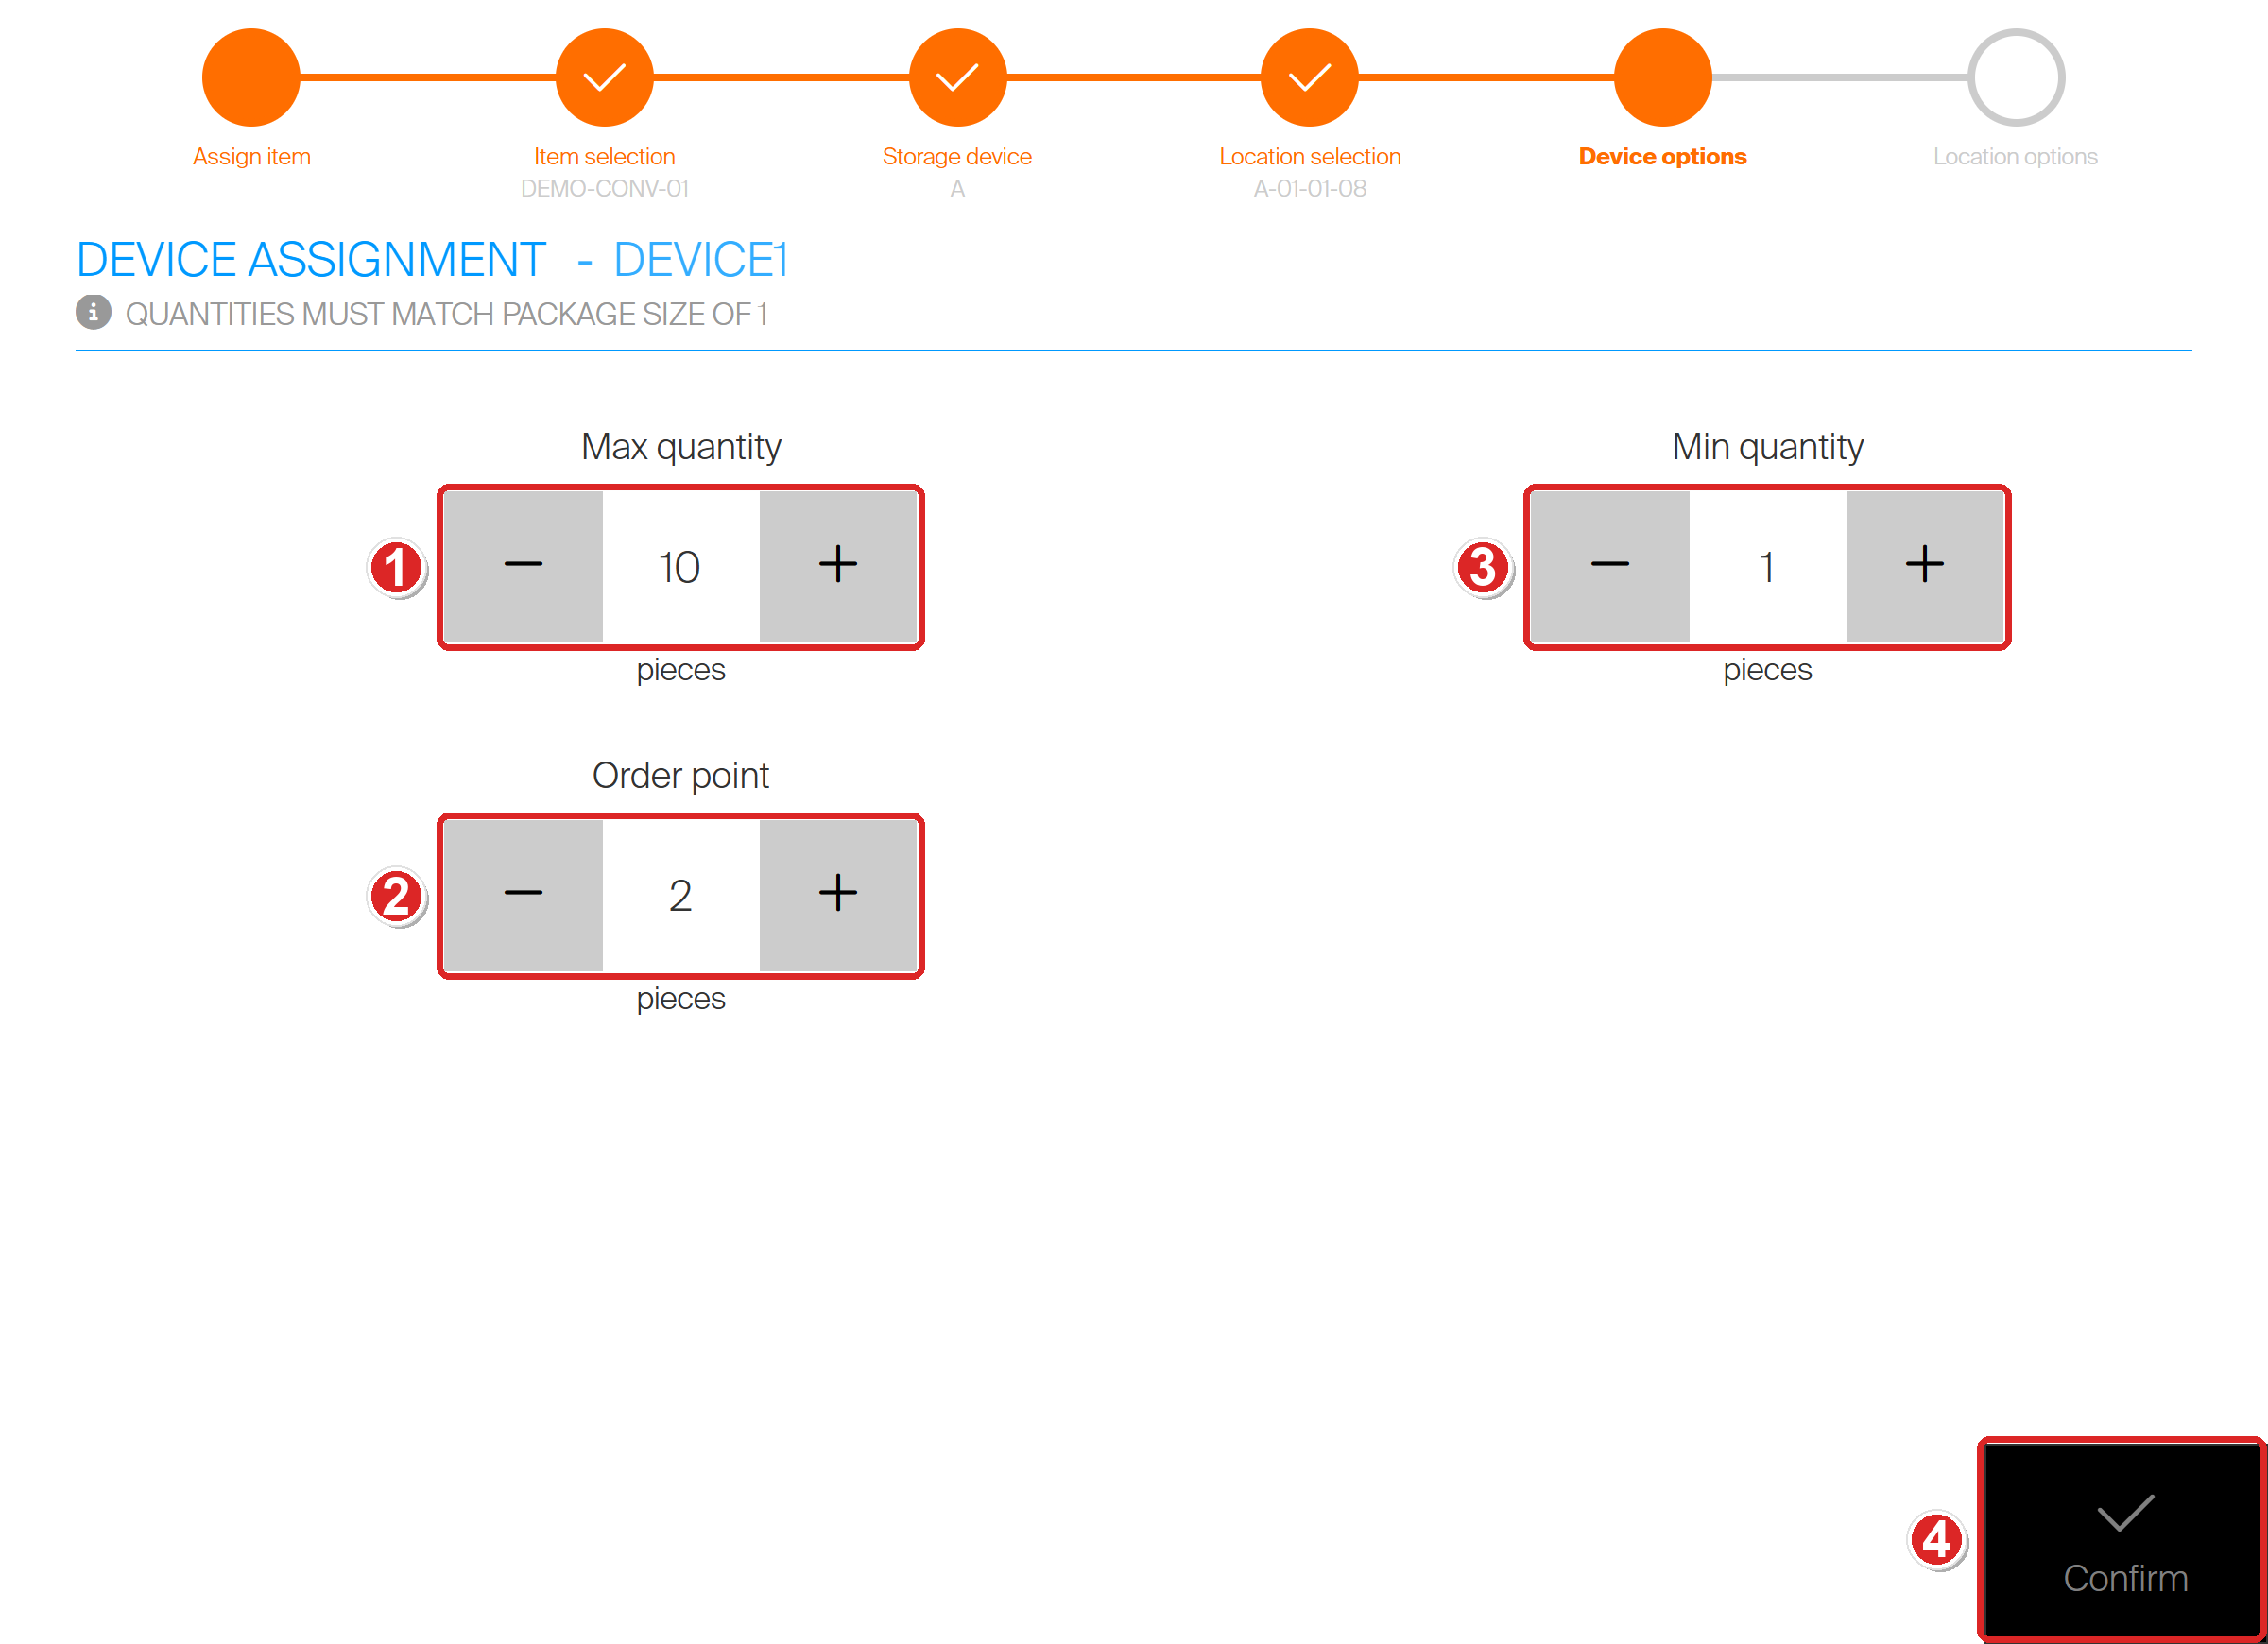
Device options for a durable item: Max quantity (1), Order point (2), the extra Min quantity (3), then Confirm (4).
- Set Physical max quantity.
- Leave Location rule on New. It is selected by default — tapping it again clears it.
- Set Quantity to the number of pieces you took out. The button changes to Place items.
- Tap Place items.
- Put the pieces in the location and tap Finish.
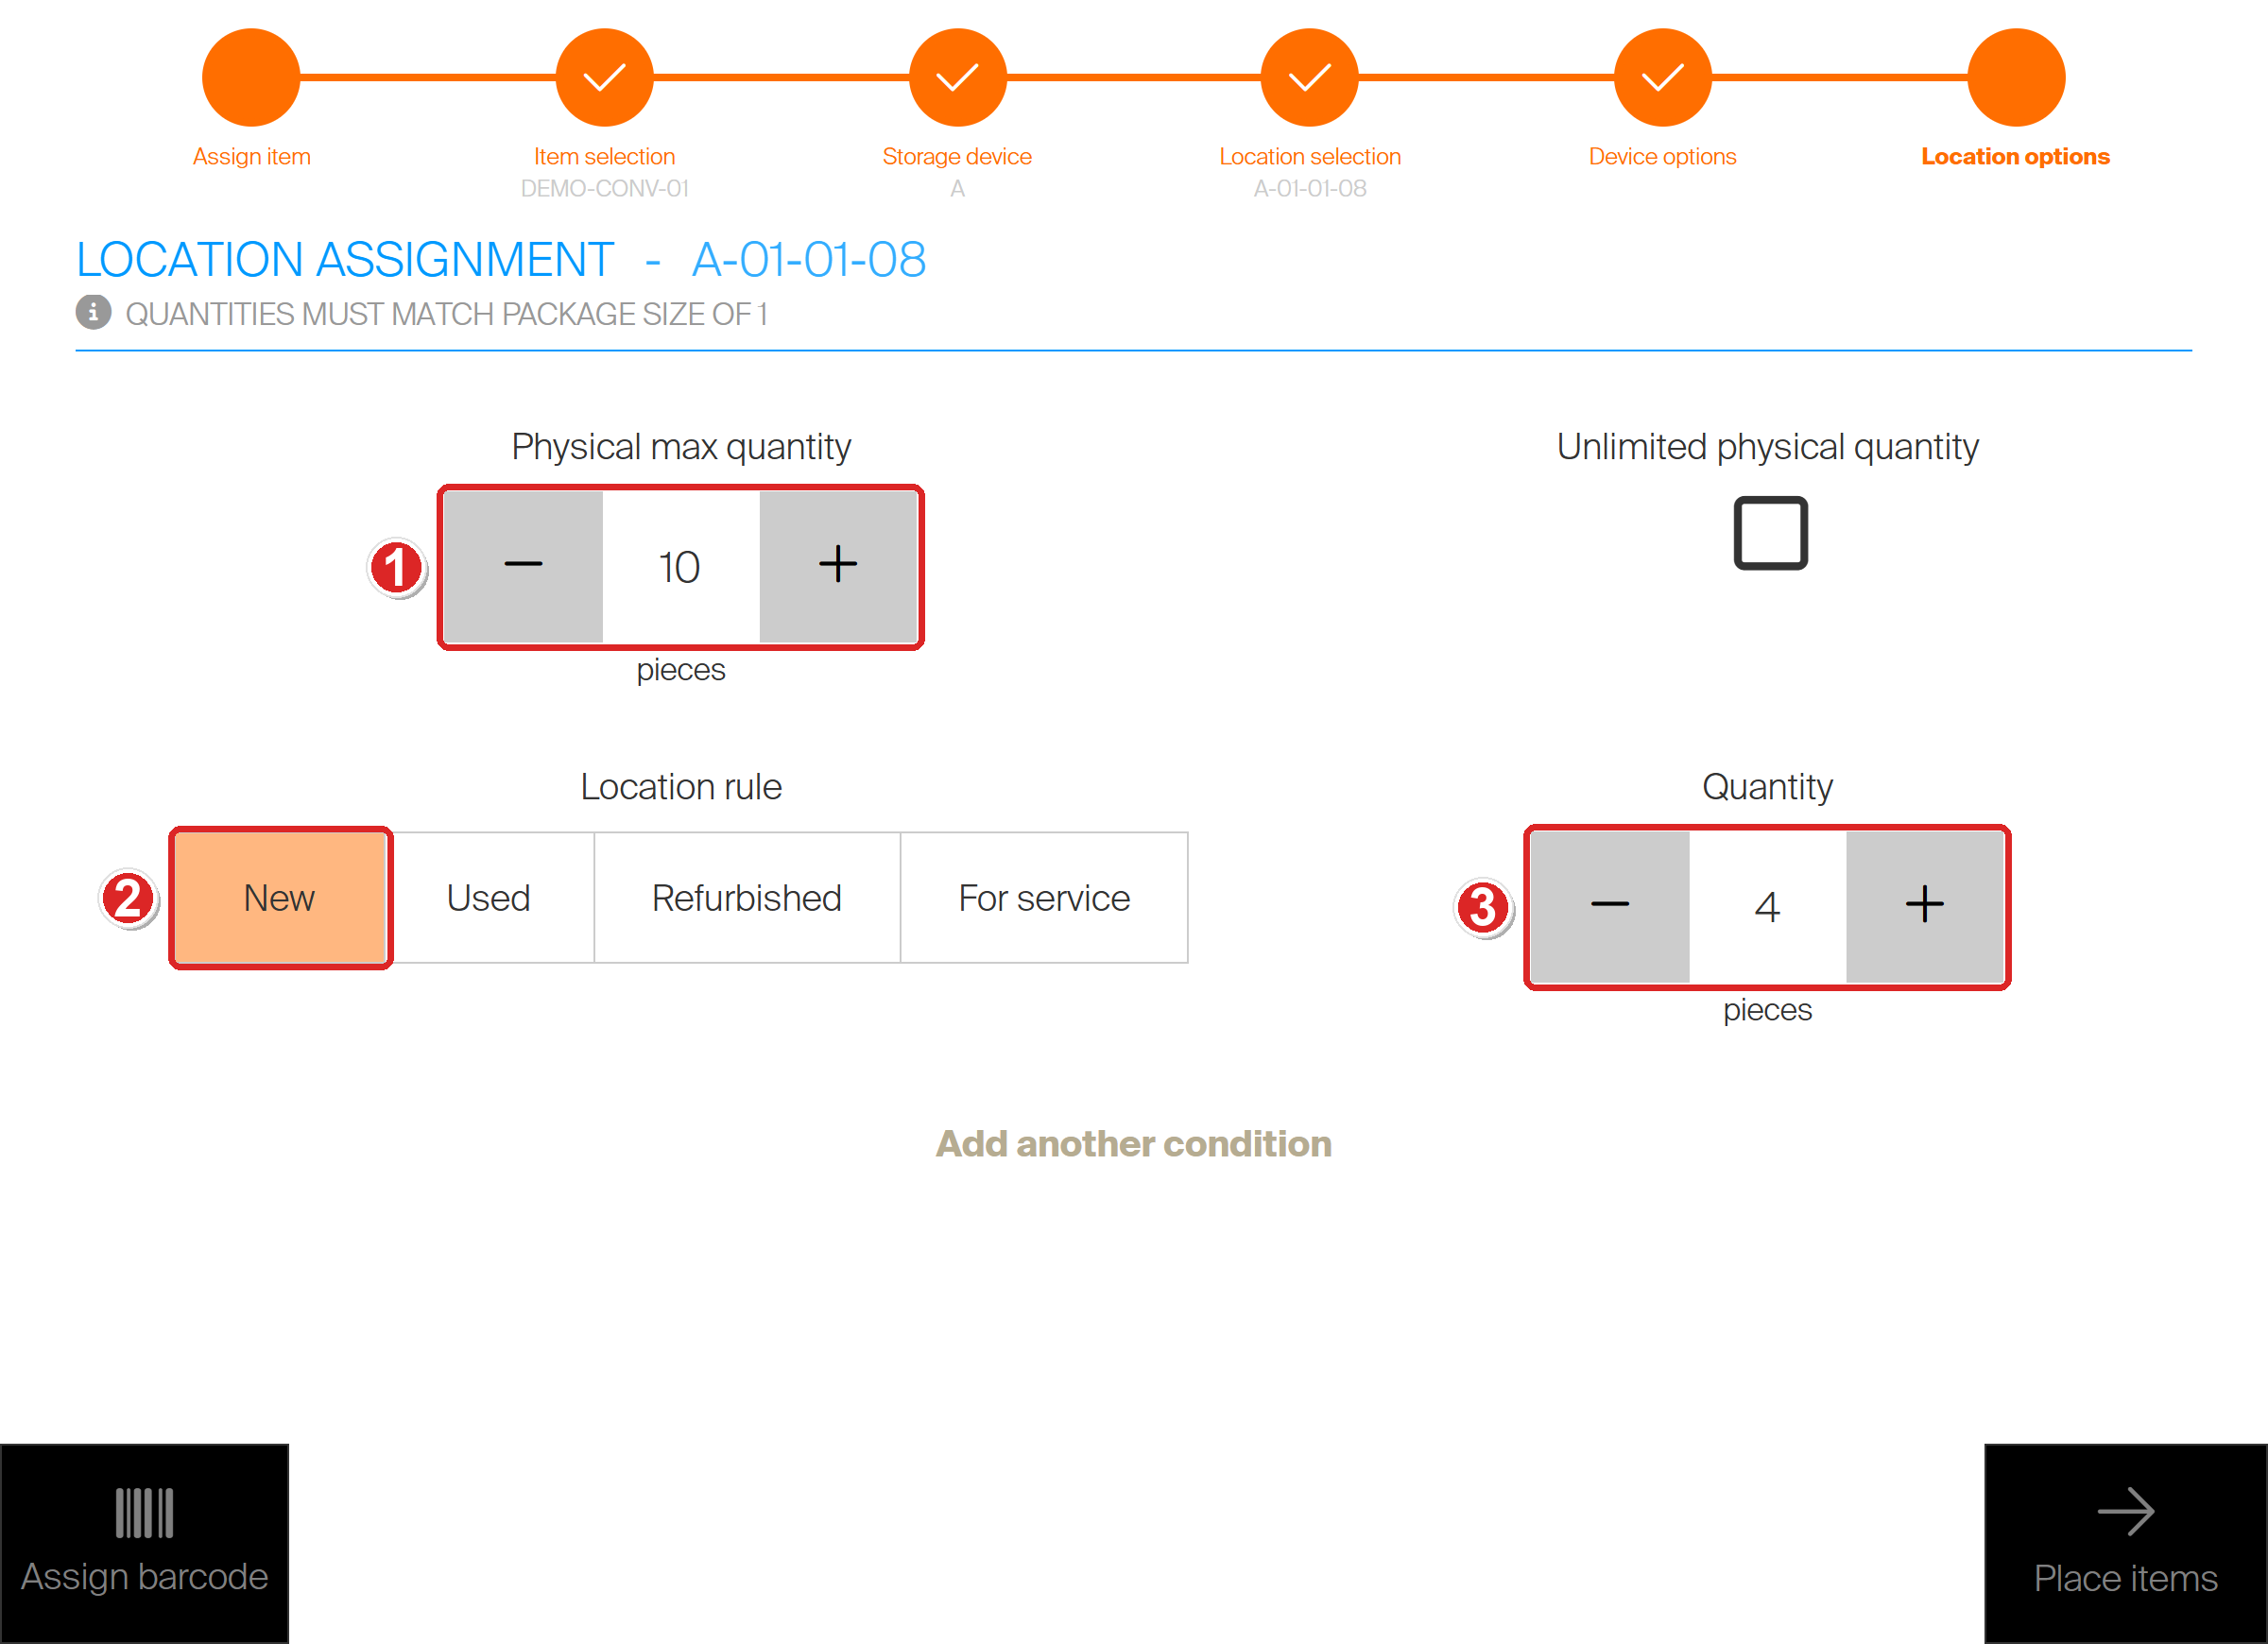
Location options: Physical max quantity (1), the location rule New (2) and the quantity to place back (3). Durable items get a location rule and Add another condition; consumables do not.
Success: Manage items lists the durable item with its Min Qty, and its location shows Qty real equal to the pieces you placed.
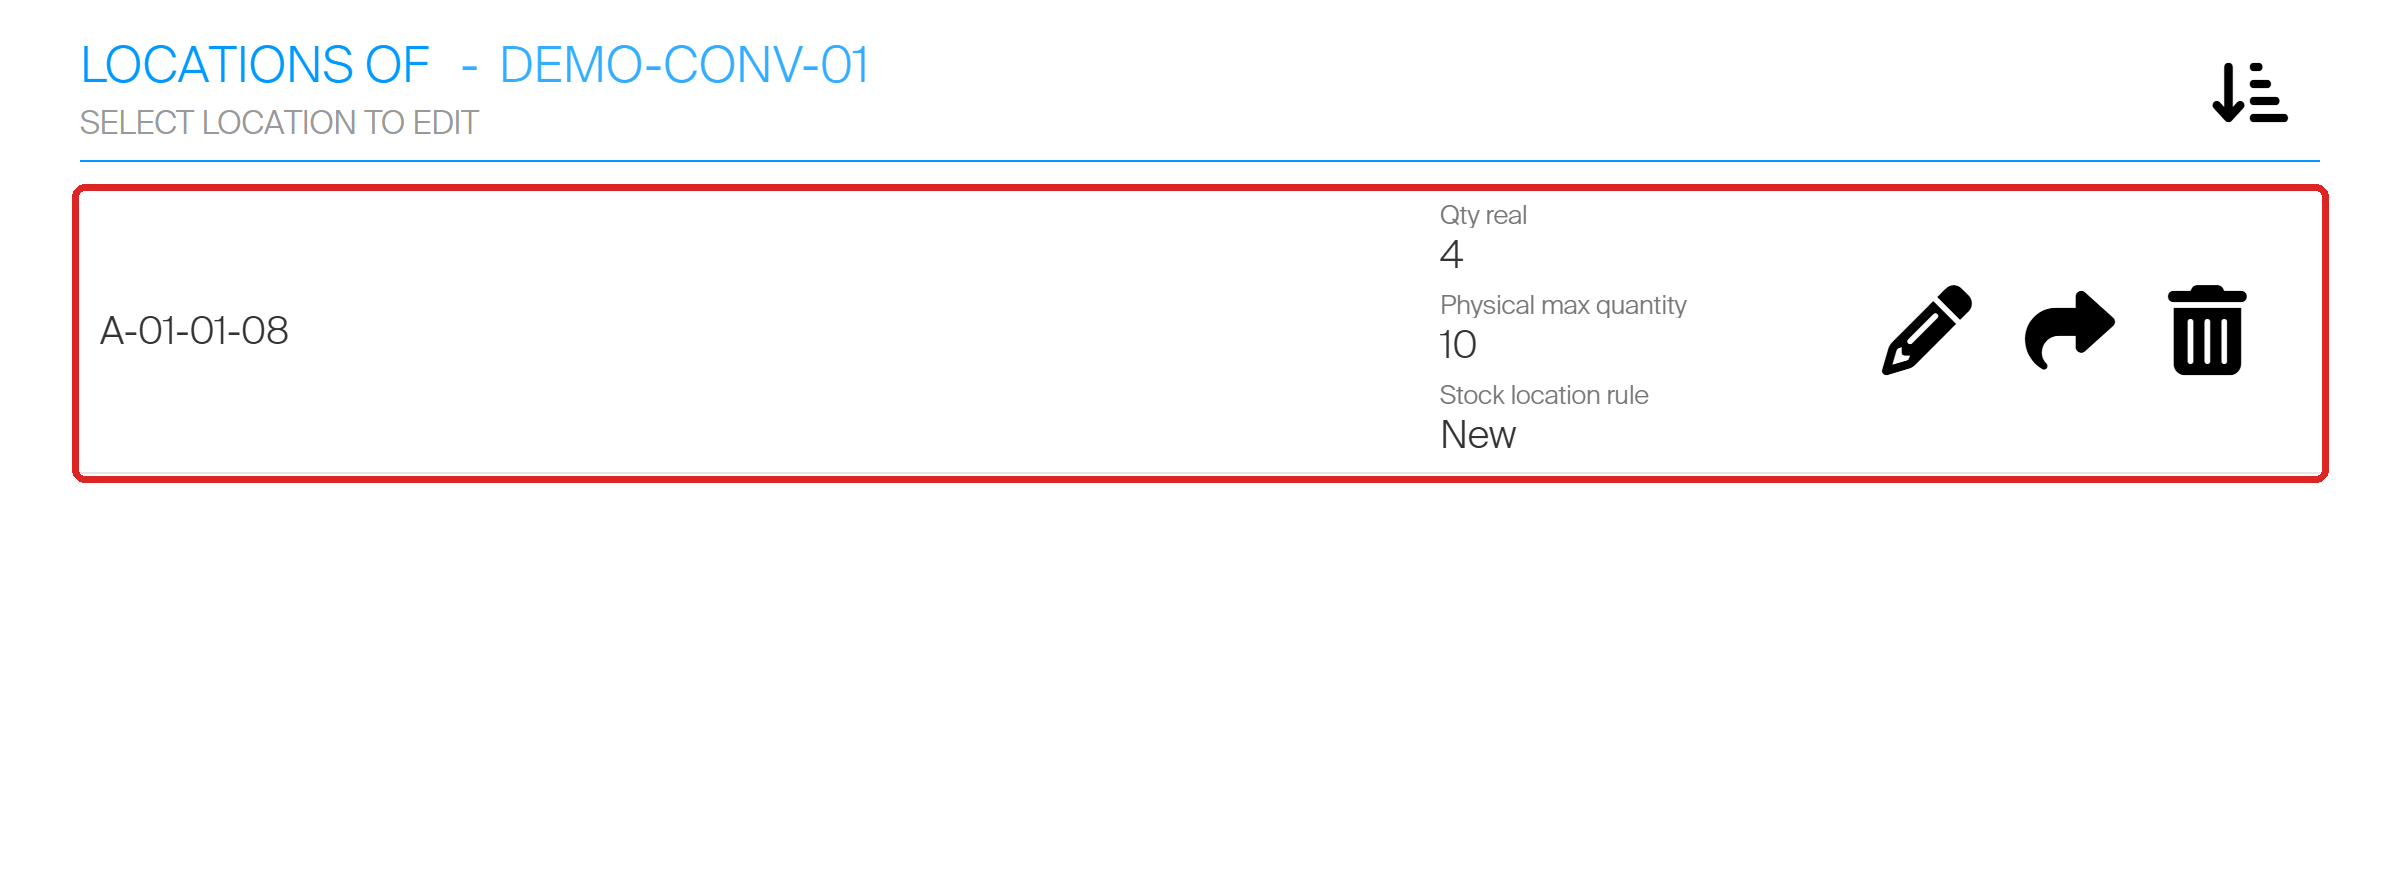
The durable item back in its old location with all four pieces, under the rule New.
Repeat Steps 6 and 7 on every device that held the old item.
Step 8 — Retire the old item
- In the Admin Portal, open the old item, for example DEMO-CONV-01-OLD.
- Set Status to Obsolete.
- Click Save item.

The old item set to Obsolete (1).
Success: The old item can no longer be picked or ordered, but it stays in the system with its history for reporting. See Understanding item statuses.
Converting many items at once
For a batch of items, an import can do the Admin Portal part. The device work in Steps 6 and 7 still happens on the Shop Floor Interface.
- Export Items under Administration > Export, with all attributes selected. See How to export data from the system.
- If the new items must keep the original Item IDs, rename the old items first, as in Step 3.
- In the file, copy the row of each item you want to convert.
- In the copied row, clear ID. A row with an empty ID creates a new item.
- Set Item ID and Item name for the new item.
- Set Type to Durable.
- Set Usage cost structure (for example FixedPerPick) and Cost.
- Import the file: open Administration > Import, tick Items and click Proceed. See How to import item data into the system.
| Change | By import? |
|---|---|
| Change Type on an existing item | No. The preview counts the row as updated, but the import skips it. Download invalid rows shows “Cannot change item type during item update”. |
| Create the new durable items | Yes — rows with an empty ID |
| Assign them to devices | Yes — Item device assignments. Give durable items a Min quantity. |
| Assign them to locations on a released storage device | No — “Changes on released storage device cannot be performed within non-locked device”. Use Step 7. |
What changes when an item becomes durable
| Consumable | Durable | |
|---|---|---|
| After a pick | Used up — it cannot be returned | Returned after use. See How to return, scrap, and recycle items. |
| Cost of a pick | Always 100% of standard cost | Follows Usage cost structure |
| Device assignment | Max quantity and order point | Max quantity, order point and a required Min quantity |
| Location | One quantity per location | A Location rule (New, Used, Refurbished, For service), with more conditions per location if needed |
| Extra options | — | Serialized and Assembly, set while the item is Defined |
Next steps
- Tell your operators — the item must now be returned after use. See How to return, scrap, and recycle items in SFI.
- Review lists that include the item — pick lists and scheduled scripts were set up with the old item record, now named -OLD. Add the durable item where it is needed.
- Fine-tune the device settings — order point, max and min quantity. See How to edit item assignments (Shop Floor Interface).
Troubleshooting
| Problem | Likely cause | Fix |
|---|---|---|
| Consumable and Durable are greyed out | The status is not Defined | Create a durable copy (Steps 3–8). The status cannot be set back to Defined. |
| There is no Durable option | Durable items are not enabled for your company | Contact CRIBWISE support. |
| Save item does nothing | A required field is empty. A durable item needs Usage cost structure and Cost; a released item also needs Vendor, Order code, Purchase price and Purchase package quantity on the Supplier tab. | Fill in the fields outlined in red, on both tabs, and click Save item again. Use Save item, not Update item. |
| The import finished, but the type did not change | An import cannot change the type of an existing item. The row is counted under Entries skipped. | Create new items with empty ID rows instead. See Converting many items at once. |
| The old item cannot be removed from the device | An order for it is still open | Complete or cancel the order, then try again. |
| Confirm stays unavailable in Device options | Min quantity is empty | Set a Min quantity. Durable items require one. |
| Place items stays unavailable | No location rule is selected — tapping the selected rule clears it | Tap New so it is highlighted again. |
Related articles
- Understanding item statuses — what Defined, Released, Phase out and Obsolete allow.
- How to create an item manually — choose the right type when you first set an item up.
- Understanding item costs: standard cost and usage cost — how the usage cost of a durable pick is worked out.
- How to assign an item to a location (Shop Floor Interface) — the Assign item flow in full.
- How to edit item assignments (Shop Floor Interface) — remove, move and correct assignments.
- How to import item data into the system — the import wizard, preview and invalid rows.
- How to return, scrap, and recycle items in SFI — what operators do with a durable item after use.