
Assign an item to a stock location at the device in front of you, so it can be picked, returned, and restocked there.
Where to do this
| You want to | Use | Guide |
|---|---|---|
| Set up assignments centrally, for many items or for a device you are not standing at | Admin Portal | How to assign an item to a location (Shop Floor Interface) |
| Assign an item to a location for the first time | Shop Floor Interface | This article |
| Change quantities, move an item, or remove an assignment | Shop Floor Interface | How to edit item assignments (Shop Floor Interface) |
Before you start
- You need a user account with the Assign item permission enabled in your user group.
- You need access to the Shop Floor Interface on a device connected to your storage.
- The item must already exist in CRIBWISE before you can assign it to a location.
Note: If you do not see Assign item in the Stock management menu, your administrator has not granted you the permission. See How to create and configure a user group.
Quick start
Experienced users — assign an item in 6 steps:
- Tap Stock management, then Assign item.
- Select the item.
- Select the storage device zone.
- Select the stock location.
- Set the device quantities and tap Confirm.
- Set the location quantities and tap Save.
Need more detail? Follow the full steps below.
Steps
Step 1 — Open the assign item wizard
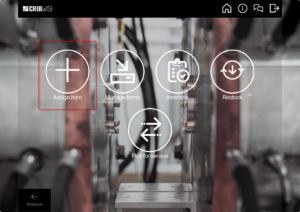
- On the SFI main menu, tap Stock management.
- Tap Assign item.
The wizard opens with a progress bar showing six steps: Assign item, Item selection, Storage device, Location selection, Device options, and Location options.

Step 2 — Select an item
- Browse the item list, or use the search bar to find the item by number or name.
- Tap the item you want to assign.
The wizard advances to the Storage device step.

Tip: Scan the item barcode instead of searching. With a barcode scanner or a physical keyboard, the search field does not need focus — the SFI recognizes the input automatically.
Step 3 — Select a storage device zone
- Find the zone where you want to put the item, for example A or B.
- Tap the zone.
The wizard advances to Location selection.

Step 4 — Select a stock location
The screen lists every location in the zone, with the number of items already assigned and whether the location handles recycling.
- Tap the location where you want the item, for example A-01-01-01.
- If no location suits you, tap Create new location.
The wizard advances to Device options.
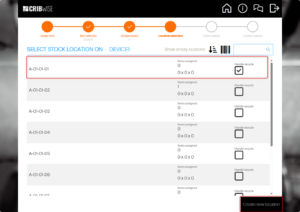
Tip: Tap Show empty locations to hide locations that already hold items.
Step 5 — Set the device options
These values control purchasing for the item at this device.
| Field | What to enter |
|---|---|
| Max quantity | The target stock level for the item at this device. |
| Order point | The level that triggers an automatic order. |
| Min quantity (durables only) | The safety stock to keep on hand. |
- Use the + and − buttons to set each value.
- Tap Confirm.

The wizard advances to Location options.
Important: Quantities must be multiples of the item’s package size. The screen shows the reminder “Quantities must match package size of Item.” If they do not match, Confirm stays greyed out.
Step 6 — Set the location options and save
These values control the location itself, not purchasing.
- Set the Physical max quantity — how many pieces fit in this location.
- Set the starting Quantity — how many pieces are in the location now.
- Tap Save.

Note: Unlimited physical quantity will remove the feature to move to next location when the first one is full when restocking.
Success: The item appears in the Manage items list for this device, and it can be picked, returned, and restocked at the location you chose.
Next steps
- Restock the item — add physical stock to the new location. See How to restock items on the Shop Floor Interface.
- Adjust the assignment later — change quantities, move the item, or remove it. See How to edit item assignments (Shop Floor Interface).
Troubleshooting
| Problem | Likely cause | Fix |
|---|---|---|
| Assign item is missing from the menu | Your user group does not have the Assign item permission | Ask your administrator to enable it in Admin Portal → User groups |
| Confirm is greyed out | The quantities do not match the item’s package size | Adjust the quantities to a multiple of the package size shown on screen |
| The item is not in the list | The item does not exist in CRIBWISE yet | Create the item in the Admin Portal first, then try again |
| No locations appear for the zone | Every location already holds the maximum number of items | Tap Show empty locations, or tap Create new location |
| The item is already assigned and you want to change it | This wizard creates new assignments only | Use Manage items to edit an existing assignment |
Related articles
- How to edit item assignments (Shop Floor Interface) — change quantities, move an item, or remove an assignment.
- How to assign an item to a location (Shop Floor Interface) — do the same job centrally, including bulk assignment.
- How to restock items on the Shop Floor Interface — add stock to assigned locations.
- How to do an inventory on the Shop Floor Interface — count and reconcile physical stock.
- Understanding stock structure: stocks, devices, and locations — how stocks, devices, and locations relate.