
Refresh items you already have with the latest data from a manufacturer catalog — names, descriptions, documents, spare parts, and ISO parameters. You choose which information the update overwrites, so your own purchasing data stays untouched.
Before you start
- You need Admin Portal access to Data management > Items.
- The catalog connections must already be set up in your CRIBWISE instance. If the Item update source panel is empty, contact your CRIBWISE administrator.
- The items you want to refresh must have come from a catalog originally, or carry the manufacturer ID the catalog can match on.
- Decide what should be overwritten. By default the update replaces item name, description, GTC classification, documents, spare parts, and ISO parameters.
Important: An update overwrites the item fields you select with the catalog’s values. If someone has hand-edited an item name or description, that edit is replaced. Check the update settings in Step 5 before you run the update.
Quick start
Experienced administrators update items in 5 steps:
- Select the items in Data management > Items.
- Click Update items in the toolbar.
- Choose the catalog in the Item update source panel.
- Select the matched row, then click Update items.
- Check the update settings, then click Update items to run it.
Need more detail? Follow the full steps below.
Steps
Step 1 – Select the items to update
- In the left menu, click Data management.
- Click Items.
- Click the row of the item you want to refresh. The selected row is highlighted.
- Click Update items in the toolbar.
To update several items in one run, click Selection mode (the icon above the list) first. Checkboxes appear on every row so you can tick more than one item before you click Update items.

Step 2 – Choose the catalog
The Item update source panel opens on the right. Click the catalog that supplies the item.
Each catalog only knows its own manufacturer’s products, so pick the manufacturer that matches the item you selected.
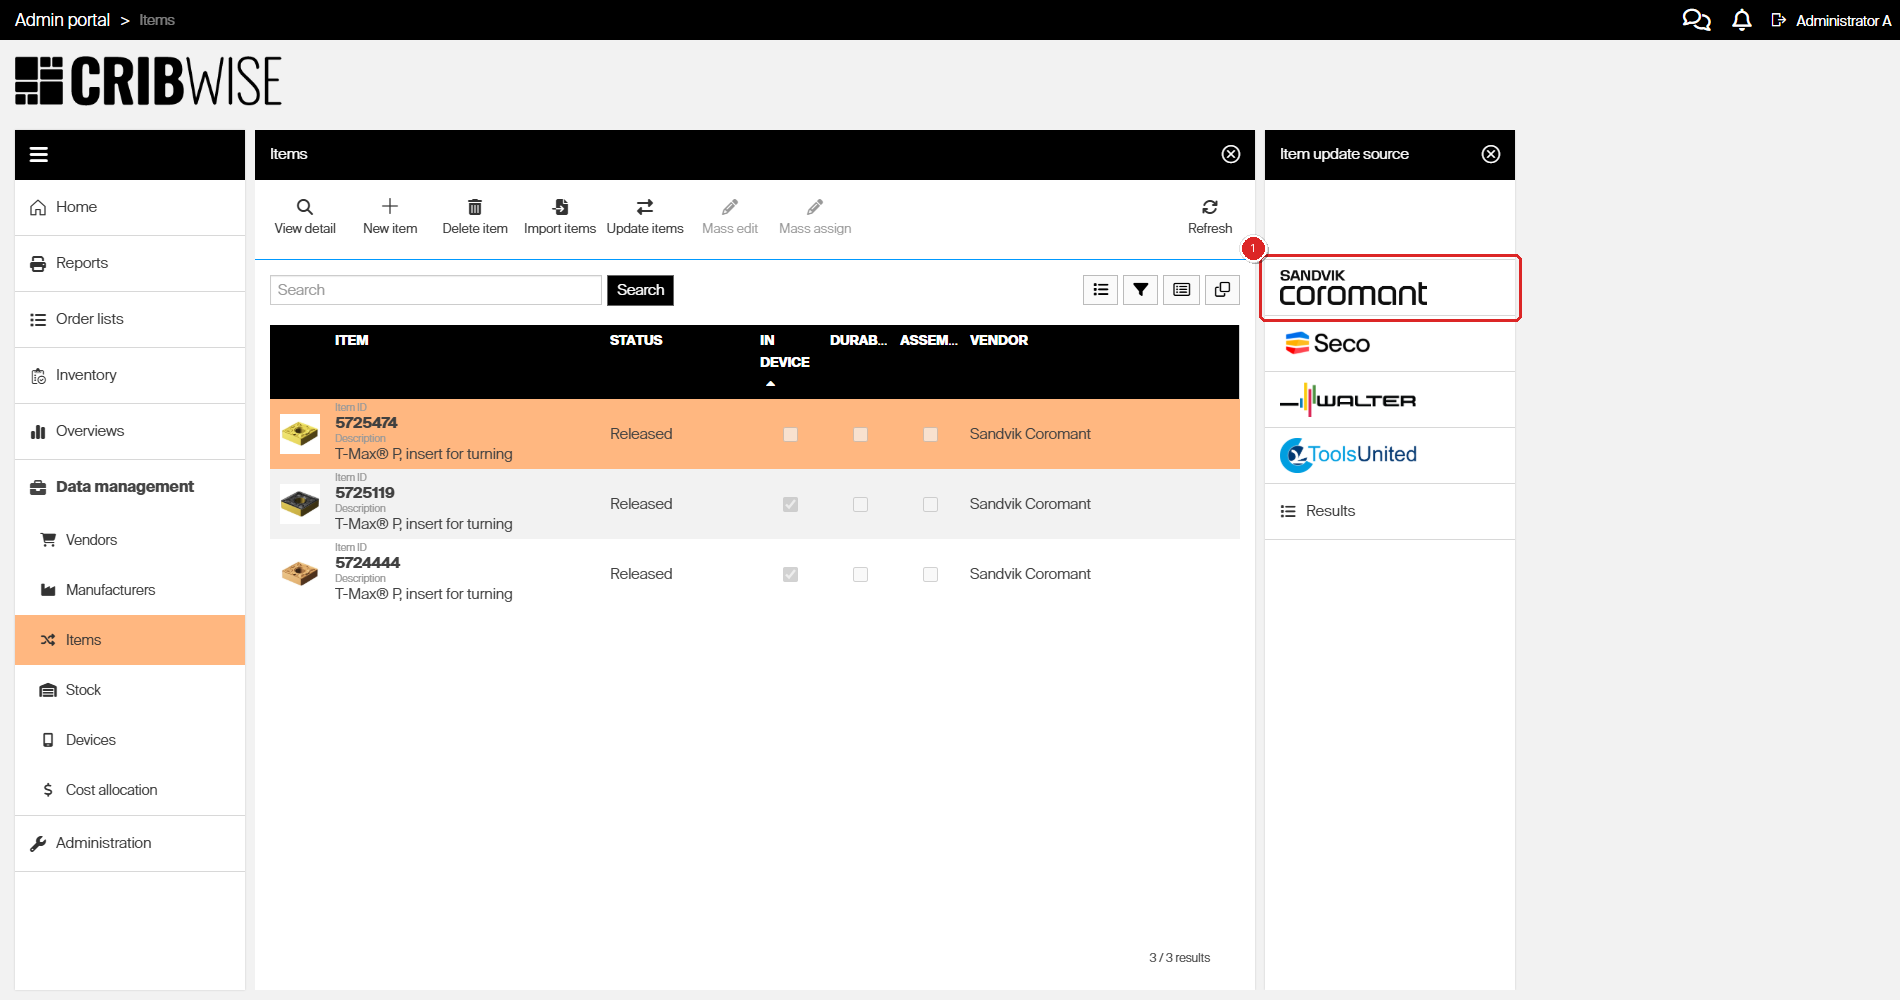
Note: The catalogs you see depend on what your CRIBWISE administrator has connected. Your list may be shorter or longer than this example.
Step 3 – Review the match results
CRIBWISE looks up each selected item in the catalog and reports what it found. Three counters summarise the outcome:
| Ready for import | Items matched to exactly one catalog record. These can be updated straight away. |
| Needs attention | Items the catalog could not resolve to a single record on its own. Open the row and choose the right catalog item yourself. |
| Not found | Items the catalog has no record for. These cannot be updated from this catalog. |
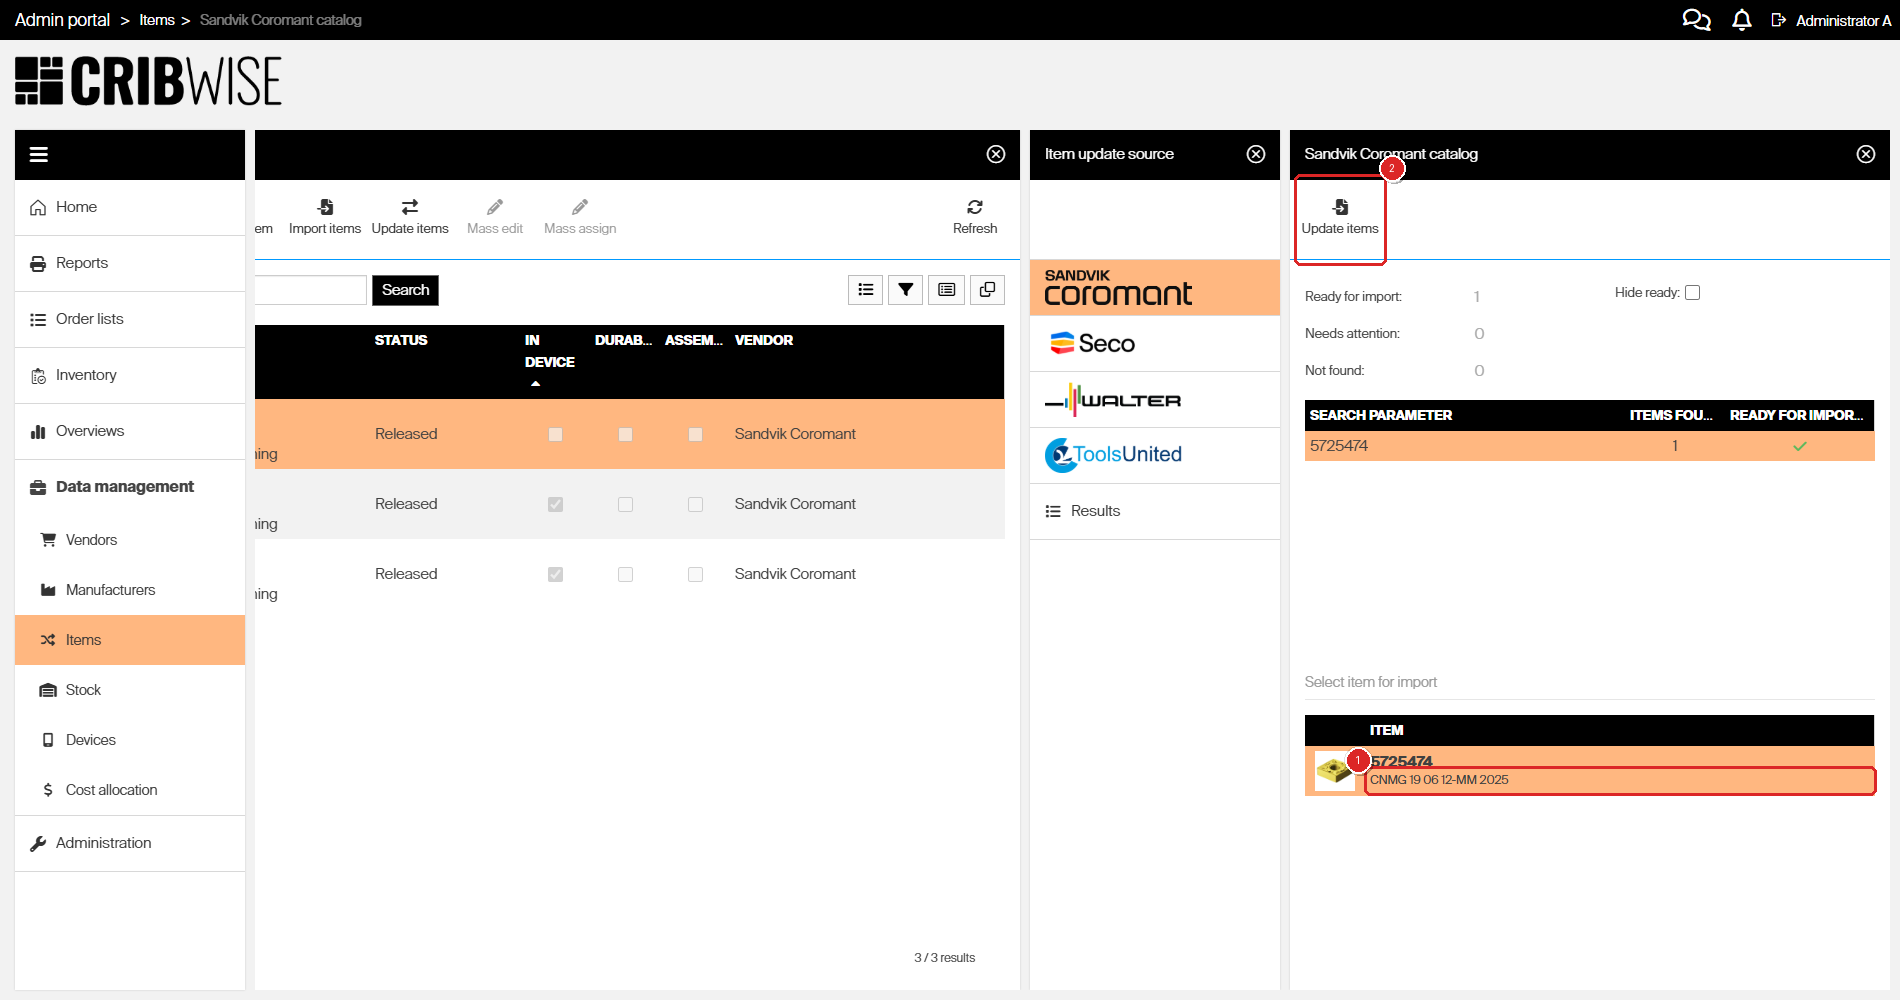
The table below the counters lists one row per item, showing the search parameter used for the lookup and how many catalog items it found.

Tip: Tick Hide ready to hide every item that already matched cleanly. Only the rows that need your attention stay on screen — useful when you update a long list at once.
Step 4 – Select the catalog item
- Click the row in the results table.
- Under Select item for import, click the catalog item you want to take data from.
- Click Update items at the top of the catalog panel.
The catalog item shows its catalog ID and product designation, so you can confirm you picked the right record before continuing.
Step 5 – Check what will be updated
The Update items panel lists the information the update will overwrite, and the items it will apply to.
By default the update covers Item information, Documents, Spare parts, and ISO parameters. Purchasing data is deliberately left out, so your vendor codes and prices survive the update.

To change the selection, click Change updated information. The Update items settings panel opens:
- Item information — item name, item description, GTC classification. Selected by default.
- Supplier information — vendor order code, purchase package quantity, barcode. Cleared by default.
- Documents, Spare parts, ISO parameters — selected by default.
Tick or clear the boxes you need, then click OK.

Warning: Selecting Supplier information replaces your vendor order code, purchase package quantity, and barcode with the catalog’s values. Only select it when you want the catalog to own that data.
Step 6 – Run the update
Click Update items in the Update items panel to start the update.
Success: The Item import results panel opens and lists each item ID with the result OK. A confirmation message also appears in the top-right corner, naming the item and its result.
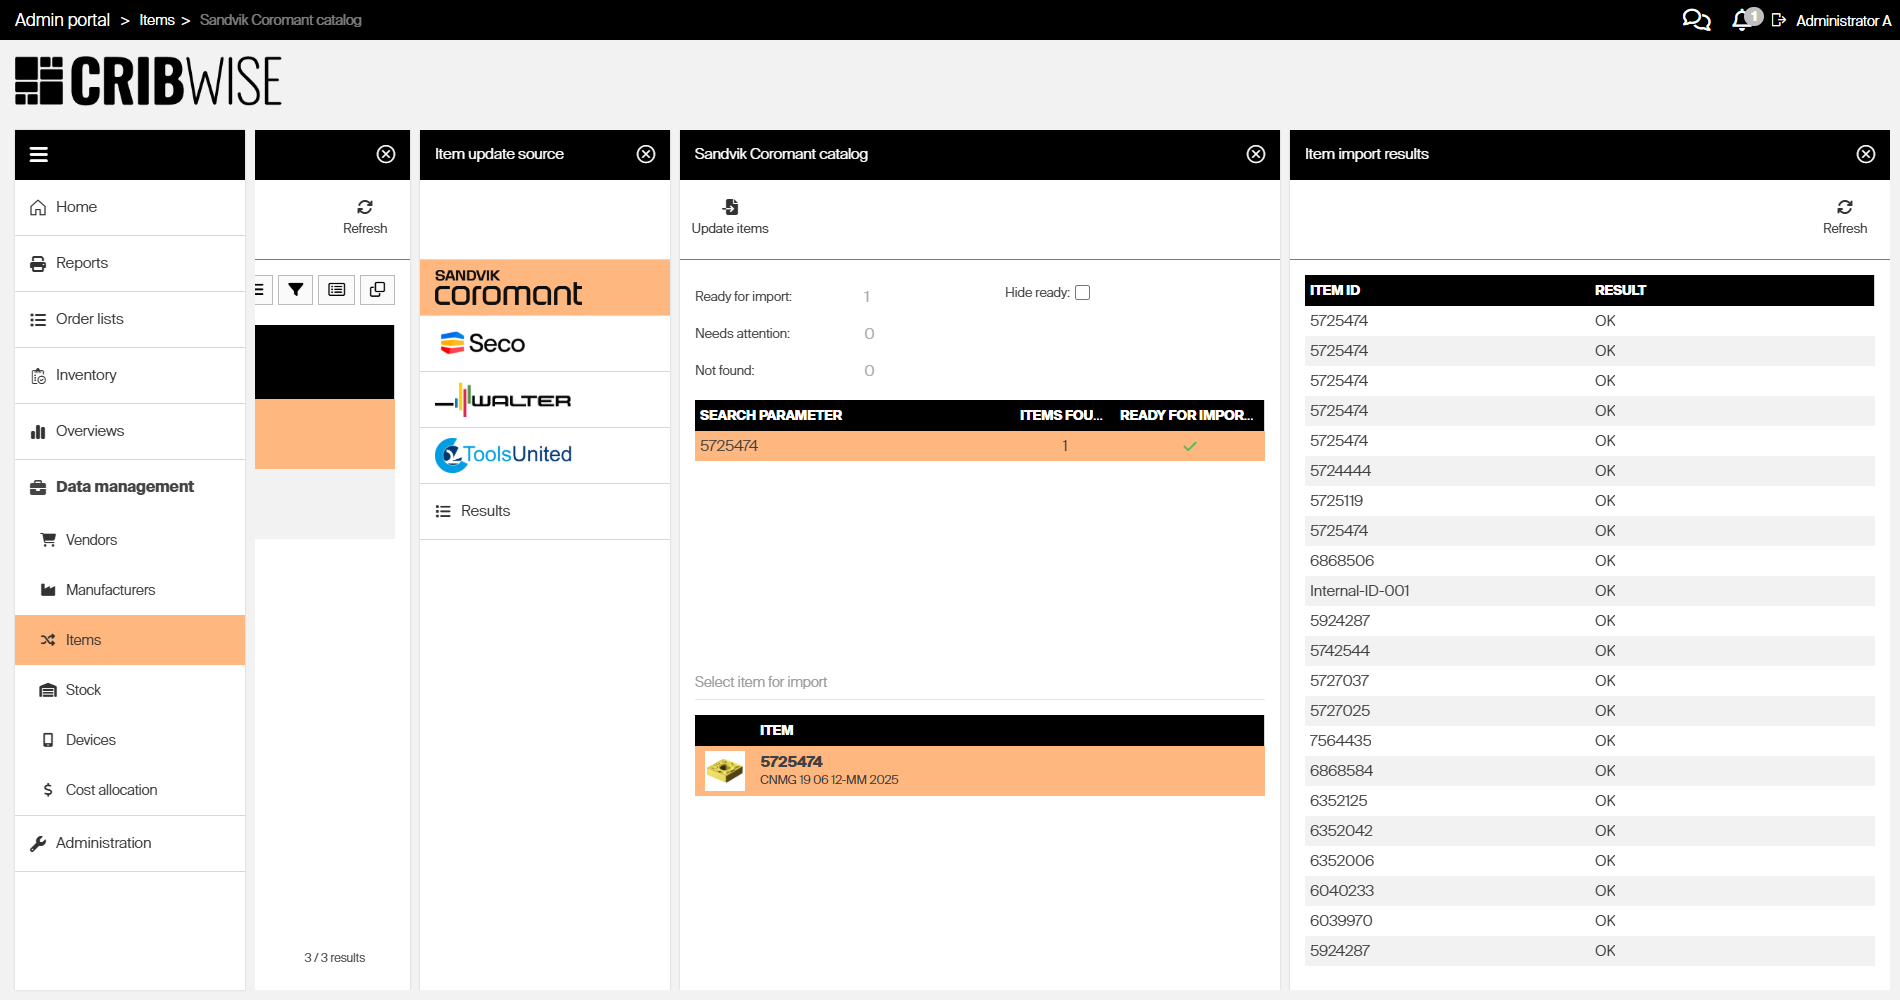
Tip: You can reopen this list at any time from Results in the Item update source panel. It keeps the history of earlier imports and updates, so you can check an older run without repeating it.
Next steps
- Open the item and check the result — confirm the new name, description, and documents look right before you rely on them.
- Review purchasing data — if you left Supplier information cleared, vendor codes and package quantities are unchanged and may need a separate review. See Item supplier settings reference.
Troubleshooting
| Problem | Likely cause | Fix |
|---|---|---|
| The Item update source panel is empty | No catalog connections are configured for your instance | Contact your CRIBWISE administrator to set up the catalog connections. |
| The item lands under Not found | The catalog has no record matching the search parameter shown in the results table | Check that you chose the manufacturer’s own catalog. If it is correct, the product may have been withdrawn from the catalog. |
| The item lands under Needs attention | The lookup did not resolve to a single catalog record | Click the row and pick the correct record under Select item for import before running the update. |
| Vendor order code or barcode did not change | Supplier information is cleared by default | Click Change updated information, select Supplier information, click OK, then run the update again. |
| An item name you edited by hand was overwritten | Item information is selected by default and replaces the name with the catalog’s value | Clear Item name under Change updated information before future updates, then restore the name on the item. |
| The wrong item is listed in the Update items panel | An unwanted item was selected in the items list | Click the remove icon at the end of that row in the Update items panel to drop it from the run. |
Related articles
- How to import items from a catalog — add brand new items from a manufacturer catalog
- Manage items – Import items from GTC package — import items from a GTC file instead of a live catalog
- Tools United import details — specifics of the ToolsUnited catalog connection
- Item fields and settings reference — what each item field means
- Item supplier settings reference — vendor, cost, and purchasing fields
- Understanding item statuses — Defined, Released, and the rest of the item lifecycle